Adobe Creative Suite 6 Design and Web Premium All-in-One For Dummies (2012)
Book VIII
Fireworks CS6
Chapter 9: Building a Wireframe Using Fireworks
In This Chapter
![]() Introduction to wireframing
Introduction to wireframing
![]() Creating a master page in Fireworks
Creating a master page in Fireworks
![]() Adding navigational items
Adding navigational items
![]() Exporting your wireframe
Exporting your wireframe
Many people don’t understand the concept of wireframing much less how to create a good wireframe. Essentially, a wireframe introduces others on your team, or perhaps clients, to functionality that you might want to use on a website or an application. Wireframes are sometimes referred to as simplified prototypes, which you make so that you and others can test a website before investing lots of time in it.
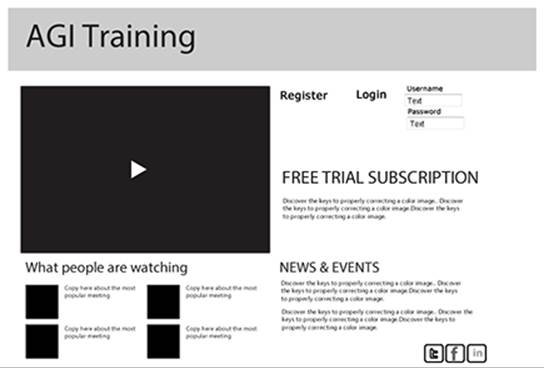
The intent behind a wireframe is to create a simplified model of your finished website or application. Typically they follow these rules (see Figure 9-1):
![]() No color! Use only black and white.
No color! Use only black and white.
![]() No shading, rounded corners, drop shadows, or any other kinds of decorative formatting that might take away attention from the basic structure.
No shading, rounded corners, drop shadows, or any other kinds of decorative formatting that might take away attention from the basic structure.
![]() Use basic fonts. Selecting a typeface is a design concern best dealt with later in the process.
Use basic fonts. Selecting a typeface is a design concern best dealt with later in the process.
Starting a Wireframe
Sketching out your ideas on paper is fine, but when you’re ready to show others those ideas you’ll want to produce a wireframe. Wireframes offer the best way to show how all your ideas will work and fit together. Wireframes can be made using many CS6 applications, but Fireworks has the unique ability to allow you to create navigational elements within your wireframe.
Figure 9-1: A typical wireframe doesn’t include any details that might distract from testing navigation.
Creating a Master Page
The first step anyone should take before diving into the wireframing process in Fireworks is to create a site map. Put some thought into the pages that you want to have in your site. ID each page on sticky notes and stick them to a wall or whiteboard. By planning ahead, you can save yourself lots of aggravation later in the process.
When you have a rough idea of what your site will look like you can use Fireworks to build simple navigational elements on a page, like the ones in Figure 9-2, and then define that page as a master for all additional pages. Master pages make it very easy for you to replicate your site in an interactive clickable document that can be used to demonstrate your site’s functionality.
Figure 9-2:Create a sample page with a few navigational elements that can be used as buttons.
If you’re interested in using the master page technique, create your site map and then follow these steps:
1. In Fireworks, choose File⇒New and set up a new document to define the size of your default website or application.
For this example, shown in Figure 9-3, we used 960 x 600.
Figure 9-3:Create a new blank document in Fireworks CS6.

2. Build your navigational elements (buttons). (Refer to Figure 9-2.) If you like, add logos or additional text to your page by using the Fireworks tools.
If you have already created assets in Photoshop or Illustrator you can open, place, or paste these graphics right in Fireworks. In this example, we created three text boxes. (See Figure 9-4.)
3. Choose Windows⇒Pages and then double-click to rename the initial page.
If it is to be your start page, change the name to Index or Home to make it easy to identify.
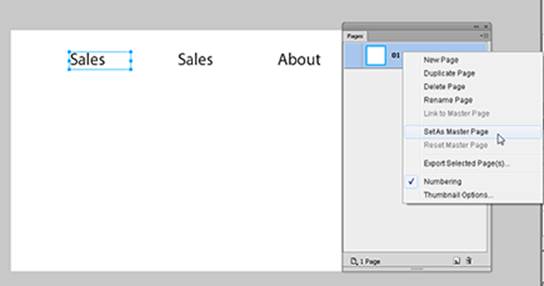
4. When you’ve renamed the page, right-click (Windows) or Control-click (Mac OS) on the page in the Pages panel and choose Set As Master Page from the contextual menu, as you see in Figure 9-4.
You can edit this page by accessing it in the Pages panel at any time.
5. Click the New Page icon, located in the lower-right area of the Pages panel.
6. Using your site map (sticky notes, sketches, and so on), create each of the pages in your site.
Note that each new page you create comes preloaded with the master page elements you defined.
Figure 9-4:Turn 01 Page 1 into a master page.
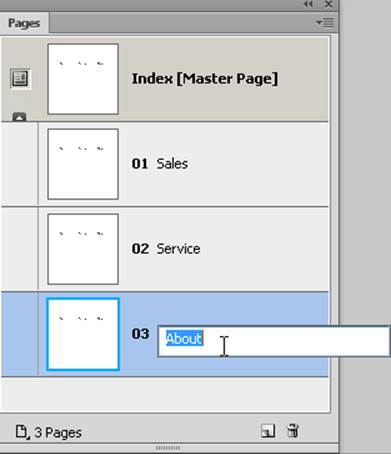
7. Double-click each page name to rename the page appropriately.
As you can see in Figure 9-5, the pages in this example were simply named Sales, Service, and About. Not a super creative website, maybe, but it gets us where we’re going.
In the next section, you make the navigational elements clickable.
Figure 9-5:Create new pages and name them. Each page contains the master page elements.
Creating Clickable Regions
To turn the navigational elements you defined in the previous section into clickable regions (buttons) and link them to the appropriate pages, follow these steps.
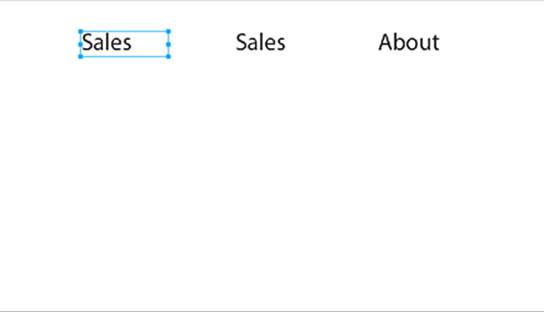
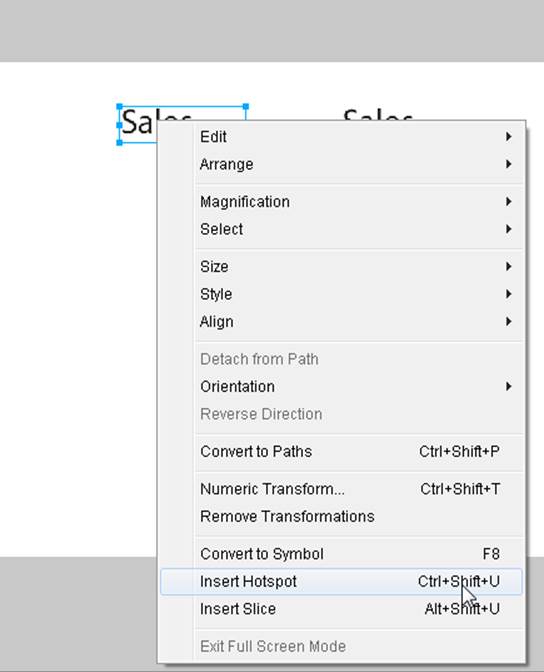
1. Select the Master Page in the Pages panel and then right-click one of your navigational elements.
In this example, we chose the word Sales.
 A right-click on a Mac can be performed without the mouse by pressing Control-click.
2. Select Insert Hotspot. (See Figure 9-6.)
A blue rectangle appears on top of the navigational element, as you see in Figure 9-7.
Figure 9-6:Add a hotspot to the page by selecting Insert Hotspot from the contextual menu.
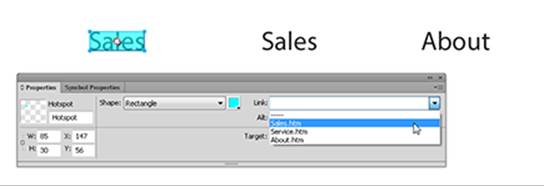
3. In the Properties panel, open the Link drop-down list and select the page that you want your navigational element to link to, as shown in Figure 9-7.
In this example we selected the Sales.htm link.
4. Continue to do this with all other links.
5. To test your site, choose File⇒Preview in Browser⇒Preview All Pages. When you click your links, you should be directed to the appropriate page.
Figure 9-7:Add a hotspot, and then add a link using the Properties panel for each of the navigational elements.
 If it helps, go back to Fireworks and add to each of your secondary pages a single word describing the future contents of the page. Place this word right in the middle of the page so that you can easily identify it. That way, you can see that you are navigating to the right page when you test your links.
For further testing, you can send your wireframe to others, as described in the next section. From here you can take your wireframe further into the prototyping stage by adding colors, art, and images to create a more visual design.
Sending Your Wireframe to Others
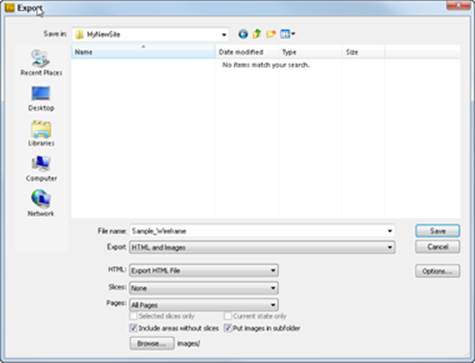
If you want to send your completed wireframe to someone else, choose File⇒Export. In the Export dialog box, open the Export drop-down list and select HTML and Images. Then open the Pages drop-down list and select All Pages. (See Figure 9-8.) Keep your images separate by selecting the Put Images in Subfolder option.
You can now send the folder with all pages to others to test your site. To start testing, your recipient needs only to click the main page (the home page). Your hotspots will work as hyperlinks in the browser, allowing users to navigate through the site.
Figure 9-8:Export your document to create a site and to send to someone else.