Take Control of Apple TV (1.0) (2014)
Do More with Apple TV
Over the course of this book, you’ve learned about what Apple designed the Apple TV to do: show videos, play music, and take full advantage of AirPlay’s power.
What’s left to try are advanced hacks like super-charging your Apple TV with Plex, working around regional restrictions that prevent people in one part of the world from watching video aimed at another, and even turning your Apple TV into a digital video recorder for broadcast video. I talk about Unix commands, DNS configuration, and things Apple never intended you to do with the Apple TV.
Put on your hard hat and follow me…if you dare. And if you don’t, because some of this stuff gets pretty geeky, that’s fine—I won’t hold it against you.
In the Plex
Frustrated by the limitations of the Apple TV’s apps and iTunes? Perhaps Plex can help. Plex is a freemium media player and management system that serves content to your Apple TV. It offers capabilities far beyond what Apple provides, such as:
· Playing video in multiple formats
· More versatile storage management than iTunes
· Automatic metadata management
· Showing free Web-based content from sources currently not supported by the Apple TV, including CNN, South Park Studios, NFL Network, Comedy Central, and more
Plex has a client/server architecture: You run the Plex Media Server on a computer or a supported NAS (network-attached storage) device. Clients connect to the server. Just about any device can be a client, but I talk about two: an iOS client and a clever hack, PlexConnect, that connects your Apple TV directly to your Plex server.
Note: If you like the idea of Plex but want a simpler tool, see Skip iTunes with Silver Screen.
Decide Where to Install Plex Media Server
Plex Media Server can run on a computer or on a supported NAS (network-attached storage) device. It works fine on my MacBook Pro laptop, but sometimes when Plex is streaming, the MacBook spins up its fans to cool the laboring CPU, which gets noisy. I’d prefer to run it on a different Mac, like a local server, or on a NAS device.
Here are the pros to dedicating a computer to Plex:
· Availability: You don’t have to worry about your Plex machine being asleep or turned off. This is particularly important if you use the PlexConnect hack (see Go Native with PlexConnect, but I also have a great workaround), as your Plex machine manages all your Apple TV’s Internet traffic. If the Plex machine were to go to sleep, the Apple TV wouldn’t have an Internet connection.
· Performance and noise: While Plex streams content, it can be CPU-intensive and thus cause a Mac’s fans to kick in, increasing the noise level. Also, other tasks running on that Mac could slow down Plex or vice versa. Finally, heat will be an issue if you’re streaming from a laptop that’s being used on a lap.
It’s not all good, though. Here are the cons:
· Cost and power usage: You’ll need to buy a server machine, if you don’t have one sitting around already; although it doesn’t need to be an expensive Mac, since Plex is multi-platform. Also, the server may consume more power overall than if you ran Plex on a non-dedicated computer.
· Complexity: You’ll have to maintain another computer.
Try Plex on a non-dedicated computer first. Then decide if you would prefer a dedicated computer or NAS. If you install Plex Media Server on a Mac, it will require Mac OS X 10.6 Snow Leopard or later, and an Intel Core 2 Duo processor or better plus at least 1 GB of RAM.
Using a Network Attached Storage Device
Many network-attached storage units from Synology, Drobo, and Netgear can run a Plex server. Before making a decision, read the Plex NAS Guide. The Plex community maintains a spreadsheet of compatible NAS units.
I don’t discuss installation on a NAS, but you may be able to find instructions online. For example, Drobo has a page describing how Plex works with the Drobo 5N, complete with a link to a detailed PDF about how to configure Plex on the Drobo 5N NAS.
Set Up Plex Media Server on a Mac
Start by downloading the latest version for OS X from the Plex Web site. The free download is about 70 MB. Expand the ZIP archive (if it doesn’t unzip automatically), move the resulting Plex Media Server app to your Applications folder, and launch it.
Tip: To make Plex Media Server run automatically whenever you restart your Mac, add it to the Login Items view for your account in the Users & Groups System Preferences pane.
Plex Media Server begins running in the menu bar and opens a configuration page in your Web browser (if it doesn’t, choose Media Manager from the Plex icon ![]() in the menu bar). Plex may change the exact procedure, but generally, you’ll be creating an account (if you haven’t already) and signing in.
in the menu bar). Plex may change the exact procedure, but generally, you’ll be creating an account (if you haven’t already) and signing in.
Next, you’re presented with a page where you handle a few administrative details, including naming your Plex server and signing up for, or in to, the myPlex cloud service, which lets you access your Plex library remotely and share media with friends.
About myPlex & PlexPass
myPlex is a free cloud-based service that lets you share media with friends and bookmark online videos to watch on Plex. PlexPass is a premium service—costing $3.99 per month, $29.99 per year, or $74.99 for life—that enables cloud sync, offline playback, multiuser support, and early access to new features.
After working through the basic setup questions, you reach the page where you set up your media library.
Add Sections
Click the Add Section button (outlined in red in Figure 109), and select a media type from the box: Movies, TV Shows, Music, Photos, or Home Movies. Then, click Add Folder, select the folder where you store that type of media, and click Add. It may take a few minutes for Plex to scan the folder for media.
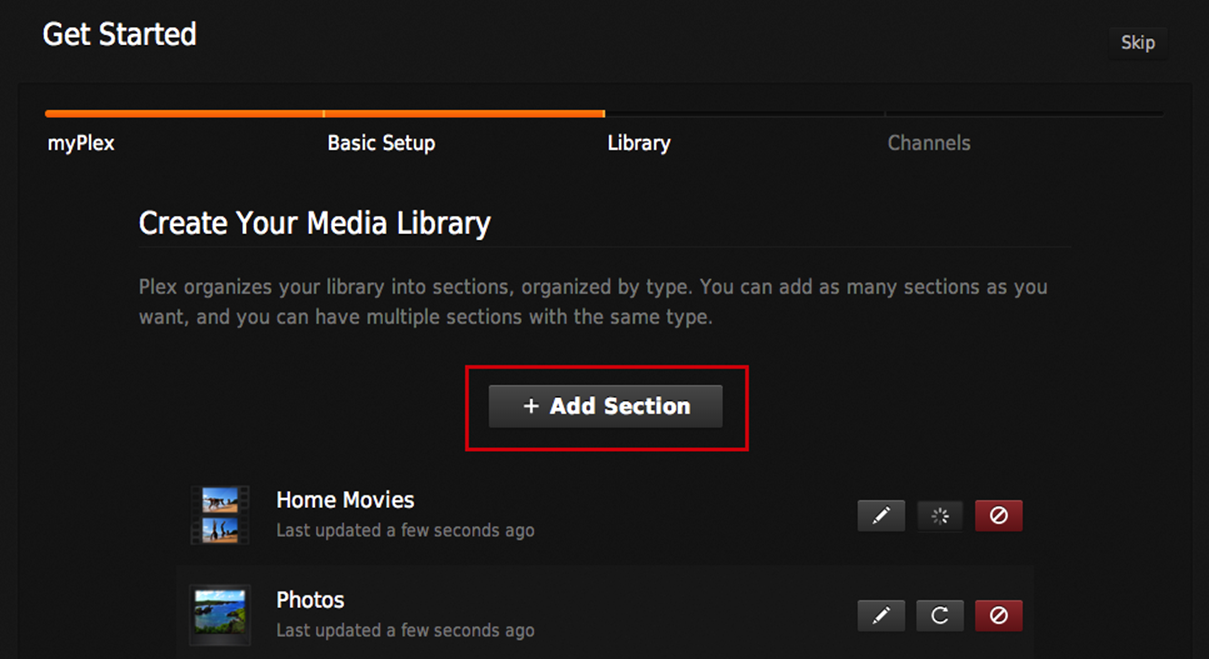
Figure 109: During the Plex Media Server setup, click the Add Section button (outlined in red) to add a new section of media. Sections you’ve already added are listed beneath the button.
When Plex finishes, you see that section listed below the Add Section button, as shown in Figure 109, above.
When you’re done adding sections, click Next.
Install Channels
Now, you get to install Channels, which are Plex apps used to access online content. As you can see in Figure 110, you’re shown only a handful of featured channels, like Apple Movie Trailers, Revision3, TED, TWiT, and Vimeo. To install one, click its icon, then click Install. If you don’t see any you like, don’t worry, you can install a much wider selection later. Note that you may be prompted to install additional plug-ins to handle the media.
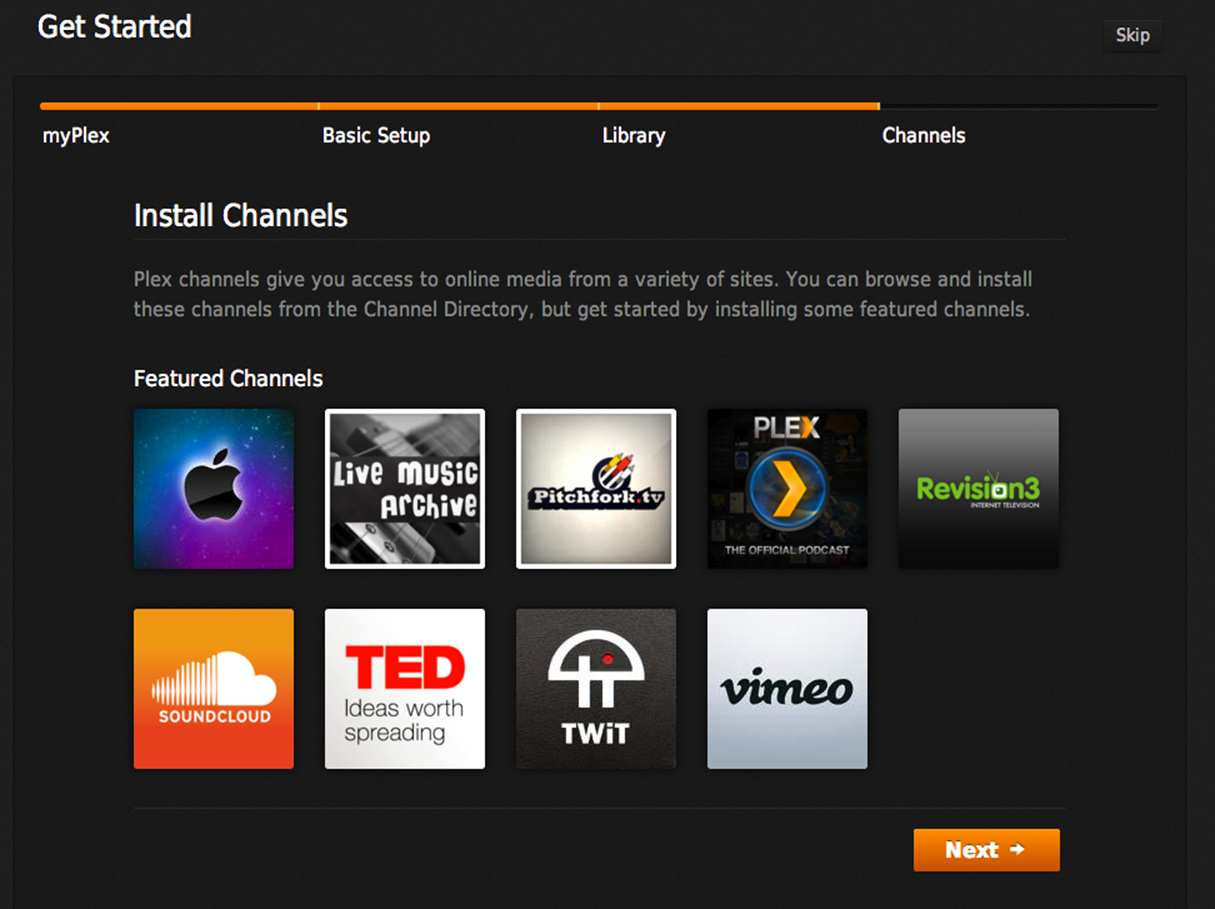
Figure 110: Plex offers a limited number of online channels during setup. There will be more to choose from after you complete setup.
When you’re finished installing channels, click Next.
Finish Up
Finally, you reach the Congratulations page. Click Done to finish setup.
Plex shows your Media Manager home page, which now lists the sections and channels that you’ve installed, as I describe next.
Manage Plex Media
If your Media Manager home page isn’t already open (Figure 111), while the Plex Media Server is running, click its icon ![]() in the menu bar and choose Media Manager to open it in your Web browser.
in the menu bar and choose Media Manager to open it in your Web browser.
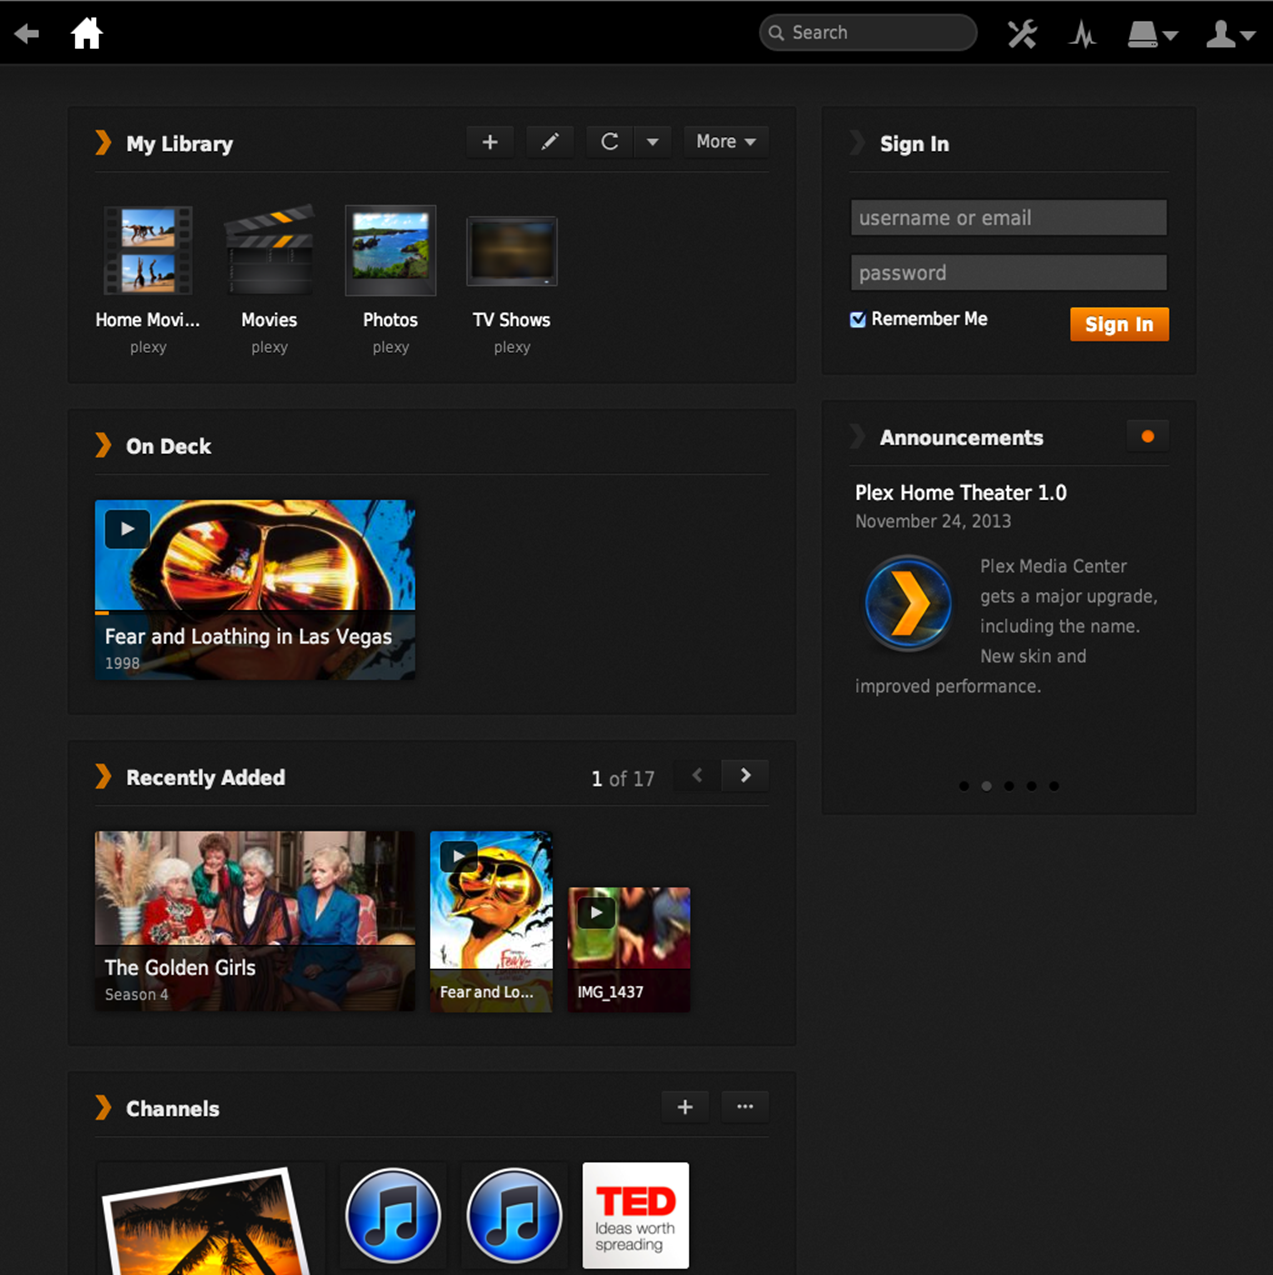
Figure 111: Plex’s browser-based Media Manager displays your media, what’s playing, recently added titles, and online channels. You can view and manage media in the browser.
Let’s take a quick tour of the Media Manager:
· My Library: Look here to see a thumbnail for each “section” you added during setup. To see media in a section, click that section’s thumbnail. To add a section, click Add Section ![]() in the My Library header. To rename or edit a section, click the Edit Sections
in the My Library header. To rename or edit a section, click the Edit Sections ![]() button.
button.
· On Deck: If you started playing media, but haven’t finished it, then it appears here. If you click the Play ![]() button on a video, the video plays directly in the browser, with the option of resuming or starting from the beginning.
button on a video, the video plays directly in the browser, with the option of resuming or starting from the beginning.
· Recently Added: This lists your most recently added media. Again, you can click the Play ![]() button to view videos right in the browser.
button to view videos right in the browser.
· Channels: This area displays the channels you are subscribed to. To add more channels, click the Add Channel ![]() button in the Channels header. There are tons of channels to choose from. Most popular sites with Web videos have a channel, so don’t be afraid to explore!
button in the Channels header. There are tons of channels to choose from. Most popular sites with Web videos have a channel, so don’t be afraid to explore!
Tip: If you don’t live in the United States, you can get a number of region-restricted channels. After clicking the Add Channel button, click More, then click Foreign (Region-Restricted) Plug-ins. There, you’ll find channels like FX, HGTV, Discovery Channel, Food Network, and more, all specific to different parts of the world. Unfortunately, not all of them may be available in your region.
Tip: The Mac version of Plex automatically adds channels for iPhoto and iTunes (music and video) libraries. If you wish to disable these, click Settings ![]() near the far upper right, select Channels from the sidebar, uncheck Enable iPhoto Sharing and Enable iTunes Sharing, and click Save.
near the far upper right, select Channels from the sidebar, uncheck Enable iPhoto Sharing and Enable iTunes Sharing, and click Save.
Bear in mind that Plex is folder based, so to add more media to Plex, add the file to the folder that you’ve assigned to that section. Then, update your library. The easiest way to do this is by clicking the Plex icon ![]() in the menu bar and choosing Update Library. Likewise, to remove an individual item, remove it from the folder and update your library. In either case, you may need to refresh your browser to reflect changes.
in the menu bar and choosing Update Library. Likewise, to remove an individual item, remove it from the folder and update your library. In either case, you may need to refresh your browser to reflect changes.
To add another folder to a section, open your Media Manager home page, click Edit Sections ![]() in the My Library heading, click Edit
in the My Library heading, click Edit ![]() for the Section you want to add a folder to, then click Add Folder.
for the Section you want to add a folder to, then click Add Folder.
To remove a folder, click the Delete ![]() button associated with that folder and then refresh your browser.
button associated with that folder and then refresh your browser.
Access Plex from iOS
You can access your entire Plex library from any iOS device with the $4.99 Plex app. Start the app while your iOS device is connected to your local network, and it should connect to your Plex server immediately. The interface is similar to the Web interface, so you shouldn’t get lost (Figure 112).
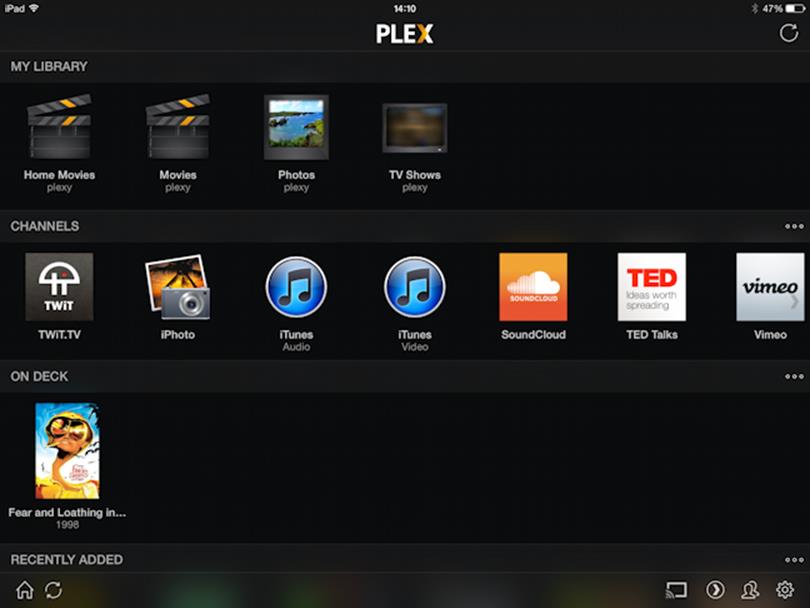
Figure 112: The Plex interface in iOS is similar to the Web client.
Most importantly, you can AirPlay media from the app to your Apple TV. To do so, near the lower right, tap the Cast ![]() button and select your Apple TV from the list. Yes, that’s right, you tap the Cast button—the Plex app recently added support for Google’s streaming dongle, and the developers combined AirPlay and Chromecast functions into a single button. You can also tap the same button to see what’s currently being AirPlayed.
button and select your Apple TV from the list. Yes, that’s right, you tap the Cast button—the Plex app recently added support for Google’s streaming dongle, and the developers combined AirPlay and Chromecast functions into a single button. You can also tap the same button to see what’s currently being AirPlayed.
When you’re AirPlaying media to the Apple TV, the app turns into a remote control, with controls that vary depending on what sort of media you’re playing (Figure 113).
Figure 113: When AirPlaying media, the Plex app becomes a remote control. In this example, there are buttons to skip backward 30 seconds, play or pause, stop, and skip forward 30 seconds.
The best part of the Plex app is that, unlike most third-party AirPlay apps, it continues to work even after the device is asleep. You can start a movie on your iPhone, AirPlay it to the Apple TV, and then put your iPhone to sleep and back into your pocket!
But there are a couple of things to be aware of. First, the Plex app doesn’t AirPlay photos, which is disappointing. Second, a bug in the app causes a conflict between videos and music. If you’re playing a movie and start playing a song, the song will play over the movie, leading to a huge mess. Be sure to stop playback on videos before playing audio.
Go Native with PlexConnect
The Plex app for iOS is great, but a clever hack called PlexConnect brings Plex natively to your Apple TV by hijacking the Trailers app. It’s easy to set up if you’re not afraid of the command line:
1. Download the PlexConnect archive.
2. Extract the archive, and move the resulting PlexConnect-master folder to the Applications folder.
3. Open Terminal. It’s in the Applications folder, nested in the Utilities folder.
4. At the command line, enter (I recommend copy and paste, making sure it’s all one line) the following and press Return:
openssl req -new -nodes -newkey rsa:2048 -out ~/Desktop/trailers.pem -keyout ~/Desktop/trailers.key -x509 -days 7300 -subj "/C=US/CN=trailers.apple.com"
You should see something like the following, and two files named trailers.pem and trailers.key appear on your Desktop:
Generating a 2048 bit RSA private key
..........................................+++
................+++
writing new private key to '/Users/josh/Desktop/trailers.key'
-----
5. Now enter (again, using copy and paste, and make sure it’s all on one line) the following and press Return:
openssl x509 -in ~/Desktop/trailers.pem -outform der -out ~/Desktop/trailers.cer && cat ~/Desktop/trailers.key >> ~/Desktop/trailers.pem
This creates another file on your Desktop, called trailers.cer.
6. Find the files trailers.cer and trailers.pem on your Desktop, and move them to /Applications/PlexConnnect-master/assets/certificates/
7. Now, back in Terminal, launch PlexConnect with:
sudo "/Applications/PlexConnect-master/PlexConnect.py"
Press Return and enter your administrator password when prompted.
8. In the Terminal window, note the line that says PlexConnect: IP_self: ###.###.###.###, where numbers should stand in for the hashtags. That’s the IP address of your computer, and you’ll need that to connect the Apple TV. Now:
§ If your Apple TV is connected via Ethernet: Open Settings on the Apple TV, and navigate to General > Network > Ethernet. Select Configure DNS and choose Manual; then enter your computer’s IP address.
§ If your Apple TV is connected via Wi-Fi: Open Settings on the Apple TV, and navigate to General > Network > Wi-Fi and choose the name of your Wi-Fi network. Select Configure DNS and choose Manual; then enter your computer’s IP address.
9. In Settings, go to General and then scroll down to Send Data to Apple and choose No Thanks. With Send Data to Apple highlighted, press Play/Pause (if this doesn’t work using the Apple Remote, try the Remote app on an iOS device). Choose Add Profile, then OK, and then enter the following, replacing the uppercased letters with your computer’s IP address (again, this is much easier from the Remote app):
http://YOUR_COMPUTER_IP_ADDRESS/trailers.cer
You should now see a trailers.apple.com profile listed.
Note: For more info, see the official PlexConnect documentation and Paul Kehrer’s guide to generating SSL certificates for the Apple TV.
Open the Trailers app from the main menu. If everything went according to plan, you should see the PlexConnect interface instead of movie trailers (Figure 114).
Figure 114: The Trailers app has been hijacked, replaced by the PlexConnect instance running on your server.
OK, stop the maniacal laughter, because there’s a slight problem: as long as the DNS server on your Apple TV is set to your PlexConnect server, your Apple TV must be able to connect to the PlexConnect server to access the Internet and function in any meaningful way. That’s both a hardware (because if you close the lid or turn the computer off, your Apple TV can’t connect to the Internet) and a software problem.
The software problem is easy to fix: set up PlexConnect as a daemon, a process that runs in the background and relaunches automatically when you restart the Mac. Here’s how to do that:
1. Stop the current PlexConnect process by switching back to the Terminal window and pressing Control-C.
2. Enter cd "/Applications/PlexConnect-master/support/OSX"
3. Enter sudo ./install.bash and provide your administrator password when prompted.
Note: If you need to restart, stop, or uninstall the PlexConnect daemon, check out PlexConnect Install Guide Mac for the necessary commands.
That solves the software side of the problem. As for the hardware side, the obvious answer is to dedicate a machine, like a Mac mini, to Plex and PlexConnect.
Unfortunately, not everyone has a spare Mac laying around. In that case, my advice is to set up PlexConnect only on Ethernet. When you want to use PlexConnect, plug in the Ethernet cable. If your server isn’t online, just unplug the cable and the Apple TV will switch back to an unblemished Wi-Fi connection.
Work Around Regional Restrictions
An annoyance of the Internet is the artificial borders erected by content providers. For instance, if you’re an American traveling abroad with an Apple TV, you may not be able to access the streaming services you’ve paid for. And even if you can access those services, your content options will almost certainly be different than they are at home.
There are a few ways to get around this. One is to manually change your DNS server to one that sits inside the desired country. To do this, open Settings on the Apple TV, and navigate to General > Network > Wi-Fi and choose the name of your Wi-Fi network. Select Configure DNS and choose Manual; then enter the IP address of the desired DNS server. Unfortunately, public DNS servers come and go all the time, so you may have to do this regularly; search Google for public dns server list by country to find sites listing them.
If that sounds fussy, consider a service that lets you switch your DNS nationality on the fly. The one I tested is Unblockus, which costs $4.99 per month with a 1-week free trial (no credit card required).
Once you’re signed up, choose a region from the Unblockus home page and click Update. It’s called Netflix Region Picker, and works best with Netflix, but can be used with other services (Figure 115).

Figure 115: The Netflix Region Picker on the Unblockus home page lets your Apple TV appear as though it’s coming from another country.
On the Apple TV, change the DNS on your connection (Wi-Fi or Ethernet) to 208.122.23.23 (note the IP address of the original DNS server if it isn’t set to Automatic). Then in the Settings app, go to iTunes Store > Location and select your desired location. Press menu to return to the main Settings page, then scroll down and select Sleep Now. Unplug the Apple TV, wait 10 seconds, then plug it back in. Your Apple TV should now appear to be from a foreign land!
This works particularly well with Netflix, since the viewing region isn’t tied to the region of your credit card or iTunes account. However, those of you who are not initially in the United States should note that for some other services, such as Hulu Plus, you must sign up with a U.S. iTunes account using a U.S. payment method. I’ll leave how to do that to your imagination.
Tip: Foreign Netflix libraries often have different selections than those of your home country. It’s worth exploring to see what you can find!
Another method to try is subscribing to a VPN service in your country of choice, then configuring your router to direct traffic through that VPN. Check your router’s documentation for instructions.
Record Live TV for Apple TV
The Apple TV doesn’t record live TV. But you can use an Elgato EyeTV HD (about $170) with your Mac to record TV shows and automatically add them to your iTunes library, where they’re accessible by your Apple TV. The EyeTV HD uses an IR blaster (a cable with an infrared LED at the end) to emulate a remote control. In theory, the EyeTV HD can change channels on any set-top box (such as a cable box, satellite receiver, or a digital converter box).
Why would you do this? I can think of a few reasons—the best one being that you’re a cord cutter who relies on free over-the-air broadcast channels (which often provide better picture quality than cable and satellite) for live TV. You can connect an over-the-air antenna, like the Mohu Leaf (about $40) to a digital converter box (like this one from IVIEW, which features component video outputs that should work nicely with the EyeTV HD), then connect the converter box to the EyeTV HD to capture free broadcast TV to supplement native Apple TV content.
In my case, I have the cheapest cable package that my provider offers. The included cable box is terrible, and with the EyeTV HD, I can skip its interface entirely.
Hook Up the EyeTV HD
The EyeTV HD requires a few connections. I won’t repeat its setup guide, but I’d like to offer a few pointers:
· Where to put the EyeTV HD: The EyeTV HD must connect to both your Mac (via USB) and your set-top box (via composite, component, or S-video). If those aren’t near each other, making the connection can be a real headache. The specified limit of USB is 16 feet (about 5 meters), but the cable that comes with the EyeTV HD is only about 2 feet long (less than 1 meter). There is no specified maximum for the A/V cables, but since they’re all analog, the signal tends to degrade with length.
Another option, and the one I chose, was to place my cable box in my office, connecting it to the living room set-top box with 25 feet of coaxial cable.
· Picking the output port: The EyeTV HD has both a component video output port and an A/V breakout port with an included adapter for composite and S-video.
The idea is that you connect a high-definition set-top box to the TV via HDMI and also connect it to the EyeTV HD with component video, which is the only analog output that can do HD. (Composite and S-video are only standard definition.)
But, how you connect the set-top box to the EyeTV HD depends on your setup. I have a bare-bones cable box with only composite (yellow for video, white and red for audio) outputs, so I connected it to the EyeTV via the aforementioned breakout cable, forgoing connecting the cable box to a TV. (I can watch live TV on my Mac through the EyeTV software.)
· Where to put the IR blaster: The EyeTV HD uses the IR blaster to send commands to your set-top box, so the IR blaster needs to be placed in front of your set-top box’s infrared sensor. If it’s not obvious (look for a little glass or plastic plate in the front of the box), or your set-top box’s documentation doesn’t show where the infrared sensor is, placement can require aggravating trial and error. I recommend setting the blaster an inch or two away from the front of the set-top box to maximize the width of the signal. You can fine tune placement later.
Tip: To locate the IR sensor in your set-top box, put the front end of the standard remote control right up to the front of the box. Start at one end, press a button, and keep inching over and pressing the button until the box responds.
Configure the EyeTV Software
With the hardware in place, you need to install the software and configure the EyeTV HD for your set-top box. I’ll warn you in advance: this process can be finicky and frustrating.
Start by installing the software from the included disc. If you don’t have a disc drive, then you can download the software here.
Warning! The EyeTV HD comes with a slip of paper that has an activation code on it. Whatever you do, DO NOT lose this code, as it’s required every time you install the EyeTV software.
When you first launch the EyeTV app, it opens three windows: the Live TV window in the upper left, the Setup Assistant in the center, and the On Screen Controller in the upper right (Figure 116).
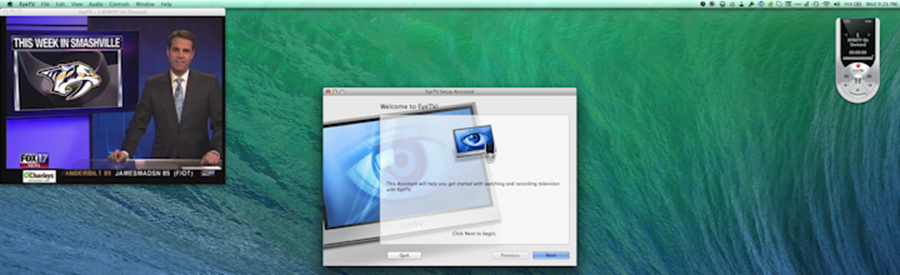
Figure 116: This is what you see when you launch the EyeTV Setup Assistant. The left-hand window is Live TV, which you can’t interact with during setup; the middle window is the Setup Assistant; and the right-hand window is the On Screen Controller, which you should ignore during setup.
You can’t interact with the Live TV window while the Setup Assistant is running, so leave the On Screen Controller alone. If you accidentally pull up a menu in the Live TV window, you won’t be able to dismiss it until you’ve completed setup.
Here’s how to work through the Setup Assistant:
1. Click through the welcome screen and the various screens about the license agreement and your country.
2. You’re prompted to choose your hardware. The Setup Assistant should detect it automatically. Click Next.
3. When Setup Assistant asks if you’re going to use the EyeTV with a cable or satellite receiver, keep the box checked and click Next.
4. You’re prompted to create an EyeTV account, which is used for program listings. If you don’t have one, click Create Account, enter your information, and click Create Account. Once your account is set up, click Next.
5. Now things get interesting. The Setup Assistant prompts you to connect the video inputs to your EyeTV (Figure 117), which you should have already done. Select your video connection type from the three options.
If the Live TV window hasn’t already displayed a picture, it should now. If you see No Signal in the Live TV window, check your connections and make sure you’ve selected the right input. Once you have a picture, click Next.
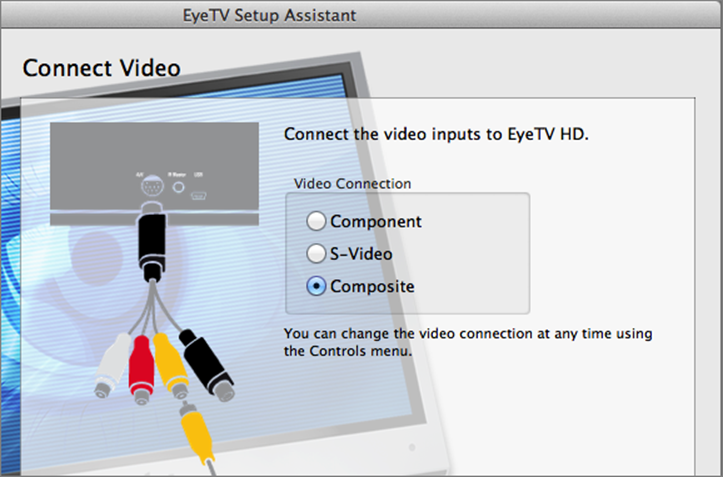
Figure 117: Be sure to choose the correct video input, or your Eye TV HD won’t receive a signal!
6. You’re prompted to connect the audio inputs, which you should have already done. If you’re not hearing your TV’s sound through your Mac’s speakers, double check your connection—and your Mac’s volume. Click Next.
7. You’re prompted to connect the EyeTV via USB, which you should have already done. Choose whether to launch the EyeTV software automatically when your Mac boots. If you’re unsure, keep the box checked, because if the software’s not running, your scheduled programs won’t record. Click Next.
8. Click Set Top Box Configuration and enter your ZIP code. Keep answering questions and clicking through. You’ll be asked to connect the IR blaster, which should already be connected and in place.
9. At the next screen, choose your set-top box’s manufacturer. If you’re not sure, look on the box for the manufacturer logo. If your manufacturer is not listed, check “My manufacturer is not listed.” Click Next.
10.Now comes the part that may have you ripping out hair: configuring the IR blaster to control your set-top box. Turn off your set-top box, and click the Begin Test button.
The EyeTV tries to turn your set-top box on. If it powers up, click, Yes, It Turned On (Figure 118) and skip to Step 11 (a page or so ahead). If not, click No, Try Next Remote.
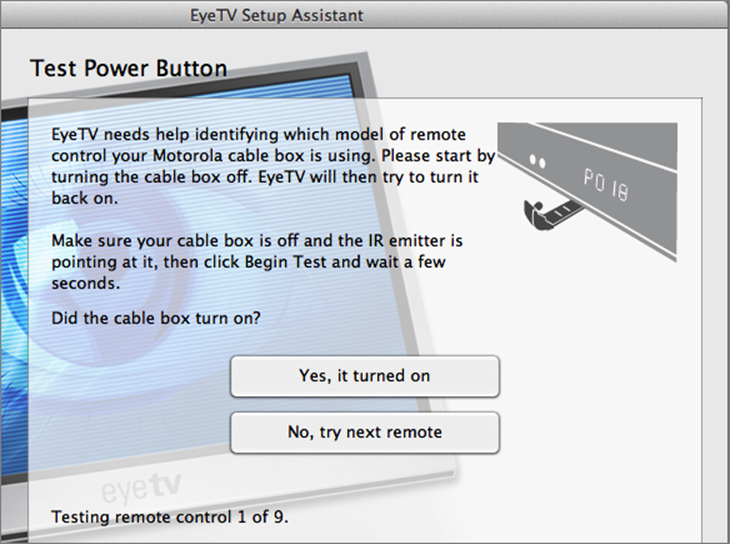
Figure 118: To set up the IR blaster, the EyeTV cycles through pre-programmed codes until it finds one that will turn your set-top box on. If it can’t, you have to program it manually.
If your set-top box isn’t turning on, it can be quite frustrating because you have no idea if the EyeTV software has the wrong code, or if the IR blaster isn’t hitting the right spot. Be sure to give it a few seconds between each test, since some set-top boxes turn on slowly. Once the Setup Assistant has cycled through all the codes, you can either click Previous to go through them again or teach it your remote’s codes manually.
To teach the codes manually, click No, It Remained Off, select Learn Codes, and click the Next button. Get out your set-top box’s remote control, because you need it to teach the EyeTV HD its signals using the onscreen number pad (Figure 119).
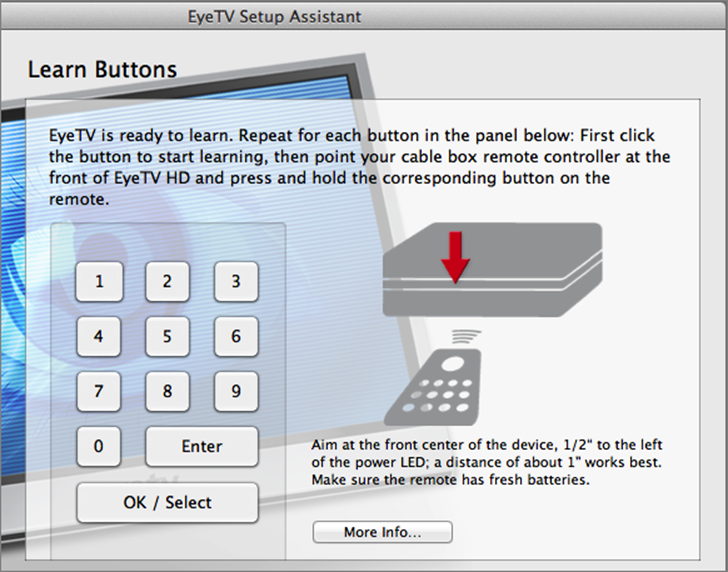
Figure 119: To program the IR blaster manually, click an onscreen button, then press the corresponding button on the physical remote. It helps if you put your remote’s sensor close to the sensor on the EyeTV and press the button repeatedly.
Aim the set-top box remote at the front of the EyeTV. Click an onscreen button (start with the 1, for example), and press the corresponding button on your remote. This process is finicky, and you have only a few seconds to train each button. I recommend clicking the onscreen button, then repeatedly pressing the remote button while waving the front of the remote about an inch in front of the Eye TV HD. When a button is learned, a green checkbox appears on it in the Setup Assistant. Be patient, it may take several attempts for each button. When all the onscreen numbers have green checkboxes, pour yourself a drink and click Next.
On the next screen, you’re given the opportunity to test each of the buttons you set up in the previous screen. Turn on your set-top box and try each button to see if it works. Move your IR blaster around if you need to.
11. The next screen lets you fine-tune the codes that the IR blaster puts out. Choose whether you need to put zeroes in front of channel numbers, press a button before entering a channel number, or press a confirmation button to change channels. If you’re not sure, play with your set-top box’s remote to see what works. Click Next to continue.
12. Now you can test whether or not the IR blaster can change channels properly, which is one of its major tasks. Choose a channel from the pop-up menu and click Test (Figure 120). Below that is a slider to adjust the time between key presses. Set it to the fastest setting, click Test, and if that’s too fast, dial it back a bit and test again.
Try this on single-digit, double-digit, and triple digit channels to make sure it works consistently. (And test on any quadruple-digit channels you might have too!)
When you’re happy with how the EyeTV changes channels, click Next.
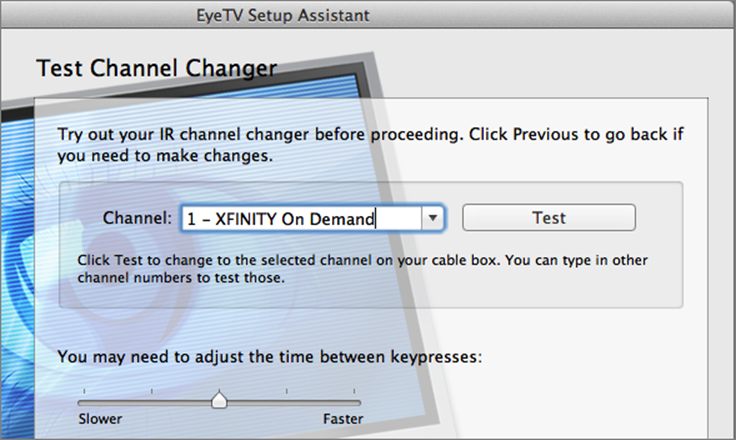
Figure 120: Test your IR blaster settings on multiple channels with different numbers of digits, like channel 1, channel 23, and channel 600. Also, try adjusting the time between key presses for faster response times.
13. Click through the registration and finishing screens. You are prompted to enter your administrator password to complete setup.
If you ever need to run setup again, fortify yourself with a stiff drink and choose EyeTV > EyeTV Setup Assistant.
Record for Apple TV
There are many things you can do with the EyeTV software, but let’s cut to the chase and talk about how to record TV, add it to iTunes, and then view it on your Apple TV.
Change a Few Settings
First, you need to change a few settings:
1. Choose EyeTV > Preferences (Command-,) and click the General button.
2. In the General pane, under the Export header, from the iPad/Apple TV Button pop-up menu:
§ If you have a second-generation Apple TV, choose Apple TV HD.
§ If you have a third-generation Apple TV (or if you’re not sure what you have), choose Apple TV HD 1080p.
3. (Optional) In the toolbar, click the Recording button.
On the Recording pane, you can change where your EyeTV archive is stored, which is your Documents folder by default. Recordings can be quite large, so you might want to move your archive to an external disk. Note that this folder doesn’t store the videos you’ll actually view from the Apple TV, but the raw recordings stored in Elgato’s proprietary format.
Close the preferences window. It’s time to record!
Record Manually
If you’re not there already, switch to the EyeTV Programs window by choosing Window > EyeTV Programs (Control-P). In this window, you access recordings, set recording schedules, and view your program guide. In the sidebar, select Program Guide.
You see a grid of what’s showing on each channel (Figure 121). To find a show, scroll around, or use the search box in the upper right. You can choose different dates using the selectors at the top of the window; the diamond ![]() button takes you to the present.
button takes you to the present.
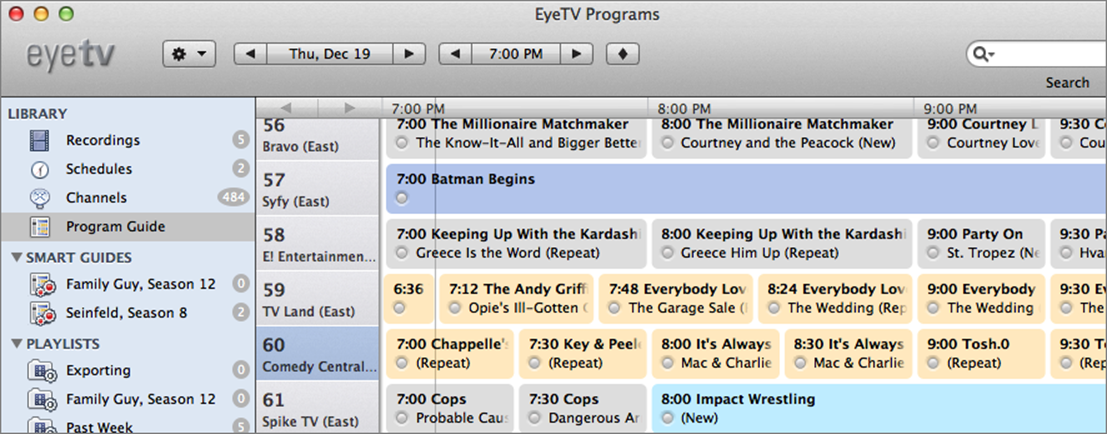
Figure 121: The EyeTV Program Guide shows you everything that’s on TV.
To set a single show to record when it comes on, click the little circle ![]() in the lower left of the episode listing. The circle turns red. To cancel a recording, click the circle again.
in the lower left of the episode listing. The circle turns red. To cancel a recording, click the circle again.
To export your manual recording to iTunes so you can play it on the Apple TV, click Recordings in the sidebar, select your recording, and click the Apple TV button in the toolbar (Figure 122).
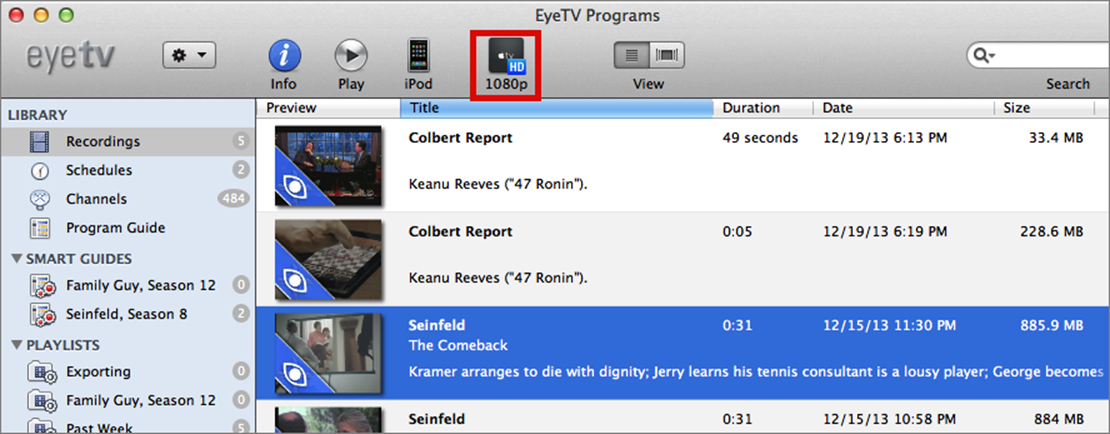
Figure 122: To export a show, select it, and click the Apple TV button (outlined in red here).
Record a Season or Show Automatically
To automate the recording of an entire show season, click its listing in the Program Guide, then click the Record All button (Figure 123).
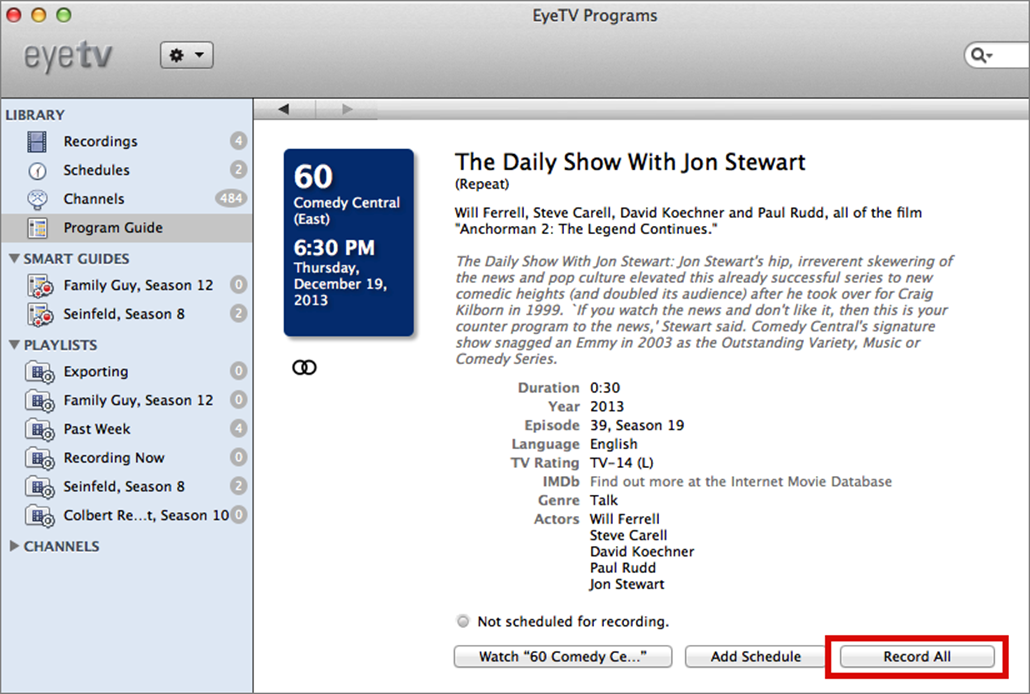
Figure 123: To record all episodes in a season of a show, double click it in the Program Guide and click the Record All button.
This creates a Smart Guide in the sidebar. To delete a Smart Guide and cancel future recordings, select it in the sidebar and press Delete.
To automate the export of Smart Guide recordings, select a Smart Guide in the sidebar and click the Options button in the upper right of the right-hand pane. From the Export To pop-up menu, choose Apple TV HD or Apple TV HD 1080p, and then click Save in the lower right (Figure 124).
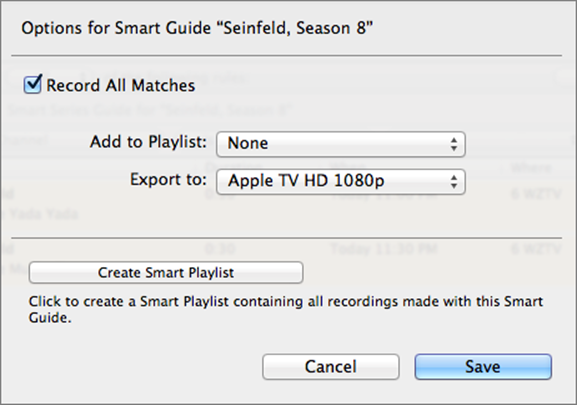
Figure 124: To export your Smart Guide recordings to iTunes automatically, choose Apple TV HD or Apple TV HD 1080p from the Export To pop-up menu.
Tip: After exporting recordings to iTunes, be sure to delete them from Recordings in the EyeTV sidebar, as the original files will still be taking up disk space.
Watch Recorded Shows
To view your TV recordings in iTunes, navigate to the TV Shows section of your library.
To view them on the Apple TV, open Computers > TV Shows. (For more about how to stream iTunes content to your Apple TV, see Content from Your iTunes Library, earlier.)
All materials on the site are licensed Creative Commons Attribution-Sharealike 3.0 Unported CC BY-SA 3.0 & GNU Free Documentation License (GFDL)
If you are the copyright holder of any material contained on our site and intend to remove it, please contact our site administrator for approval.
© 2016-2026 All site design rights belong to S.Y.A.