Take Control of Apple TV (1.0) (2014)
Control Your Apple TV
With only four buttons, the Apple Remote included with your Apple TV is quite possibly the most elegant remote control ever made. However, that simplicity hides some useful features. This chapter will teach you how to master the Apple Remote’s basic features and shortcuts.
But you’re not limited to the Apple Remote; the Apple TV can be commanded by a third-party remote, an iOS device with Apple’s Remote app, or a Bluetooth keyboard. Each option offers considerably more power than the Apple Remote, and each has its own particular strengths (and weaknesses).
Choose Your Weapon
You have several choices in how you control your Apple TV. Here are the pros and cons of each.
· Apple Remote: This is the default controller for the Apple TV, and it is included in the box. It’s delightfully simple, but it’s small, easy to lose, and offers fewer capabilities than the alternatives. You may also find it slow and tedious to type with. To master the Apple Remote, jump to Tame the Apple Remote.
· Third-party remotes: The Apple TV can learn to recognize signals from any infrared remote you choose. A third-party remote may offer a lot more shortcut buttons than the Apple Remote, and you can easily program each button for use with the Apple TV. Learn how in Pair a Third-party Remote.
· Remote for iOS: With Apple’s Remote app, you can control an Apple TV with an iPhone, iPad, or iPod touch. You can quickly play iTunes media from your computer and use the iOS onscreen keyboard to enter text. However, the app’s gesture-based controls can be slippery. I show you how to set up the app and walk you through its features in Run the Remote App.
· Keyboard: You can use any Bluetooth keyboard as a remote for the Apple TV, making text entry and menu browsing a breeze. Alternatively, a Mac app, Type2Phone, makes it easy to work from any Mac keyboard—if you have a MacBook Air, this may be an ideal solution. For more, read Become an Apple TV Keyboard Jockey.
Tame the Apple Remote
Let’s take a look at each button on the Apple Remote (Figure 8) to see what it does:

Figure 8: The Apple Remote has only four buttons: a directional ring, the Select button in the center of that, and the Menu and Play/Pause buttons under that.
· Directional ring: Located at the top of the Apple Remote, this “directional” ring, has dots to indicate up, down, left, and right. Press a dot to navigate the menus. Less obviously, you can press the Up or Down dot to reveal additional options while playing content. I’ll cover those throughout the book.
· Select: Press the silver button in the center of the directional ring to select menu options.
· Menu: The Menu button is a bit of a misnomer, as it doesn’t display a menu, but rather takes you back to the previous screen.
· Play/Pause: As you would expect, this button starts and suspends playback.
Note: The Apple Remote’s battery lasts a long time, but will eventually die. Replace it with an inexpensive CR2032 button battery. Amazon sells two Energizer CR2032 batteries for a little over $2.
Josh’s Favorite Apple Remote Tips
Use these shortcuts to zip around the Apple TV interface:
· Return to the main menu from anywhere: Hold down the Menu button for a few seconds.
· Put the Apple TV to sleep: If you don’t want to wait for the Apple TV to go into standby mode on its own (which happens after 1 hour by default), navigate to the main menu and then hold the Play/Pause button until the Apple TV falls asleep.
Restart the Apple TV: Hold down Menu and the Down dot until the status light on the Apple TV begins blinking rapidly, and then release both buttons.
These tips and more are on the Cheat Sheet, which you can keep on your iPad as a one-page PDF and print out and post prominently by your TV for others in your family.
The Frankenmote
Always losing that slippery little Apple Remote? Find some rubber bands and strap that sucker onto the back of your TV remote! Most remote controls have a lot of empty space at the bottom, giving plenty of room for the bands (Figure 9).

Figure 9: With just a few rubber bands and a big remote, you’ll never lose another Apple Remote!
The main downside, apart from it looking a little ugly, is that the TV remote might block some of the Apple Remote’s signals.
Pair a Third-party Remote
Is the Apple Remote not doing it for you? Too small? Too hard to hold? Forever lost in your couch? That’s cool; the Apple TV can work fine with any remote control.
Tip: The Apple TV can be programmed to use any infrared remote, not just a universal remote. In a pinch, you can use an old, unused remote, even one from a stereo, to control your Apple TV.
Tip: If you’ve lost your Apple Remote, you’ll need to use the Remote app on an iOS device, or a Bluetooth keyboard, to run through the steps below to teach the Apple TV about the replacement remote.
Follow these steps:
1. On the Apple TV, navigate to Settings > General > Remotes > Learn Remote. If you’re using a universal remote, choose an unused device on the remote, then select Start on the screen.
The Apple TV walks you through the process.
2. For each button shown on the Learn Remote screen, hold down the corresponding button on your remote until the bar at the bottom of the screen is full (Figure 10). If you make a mistake, press the Menu button on the Apple Remote to back out and start again from the beginning.
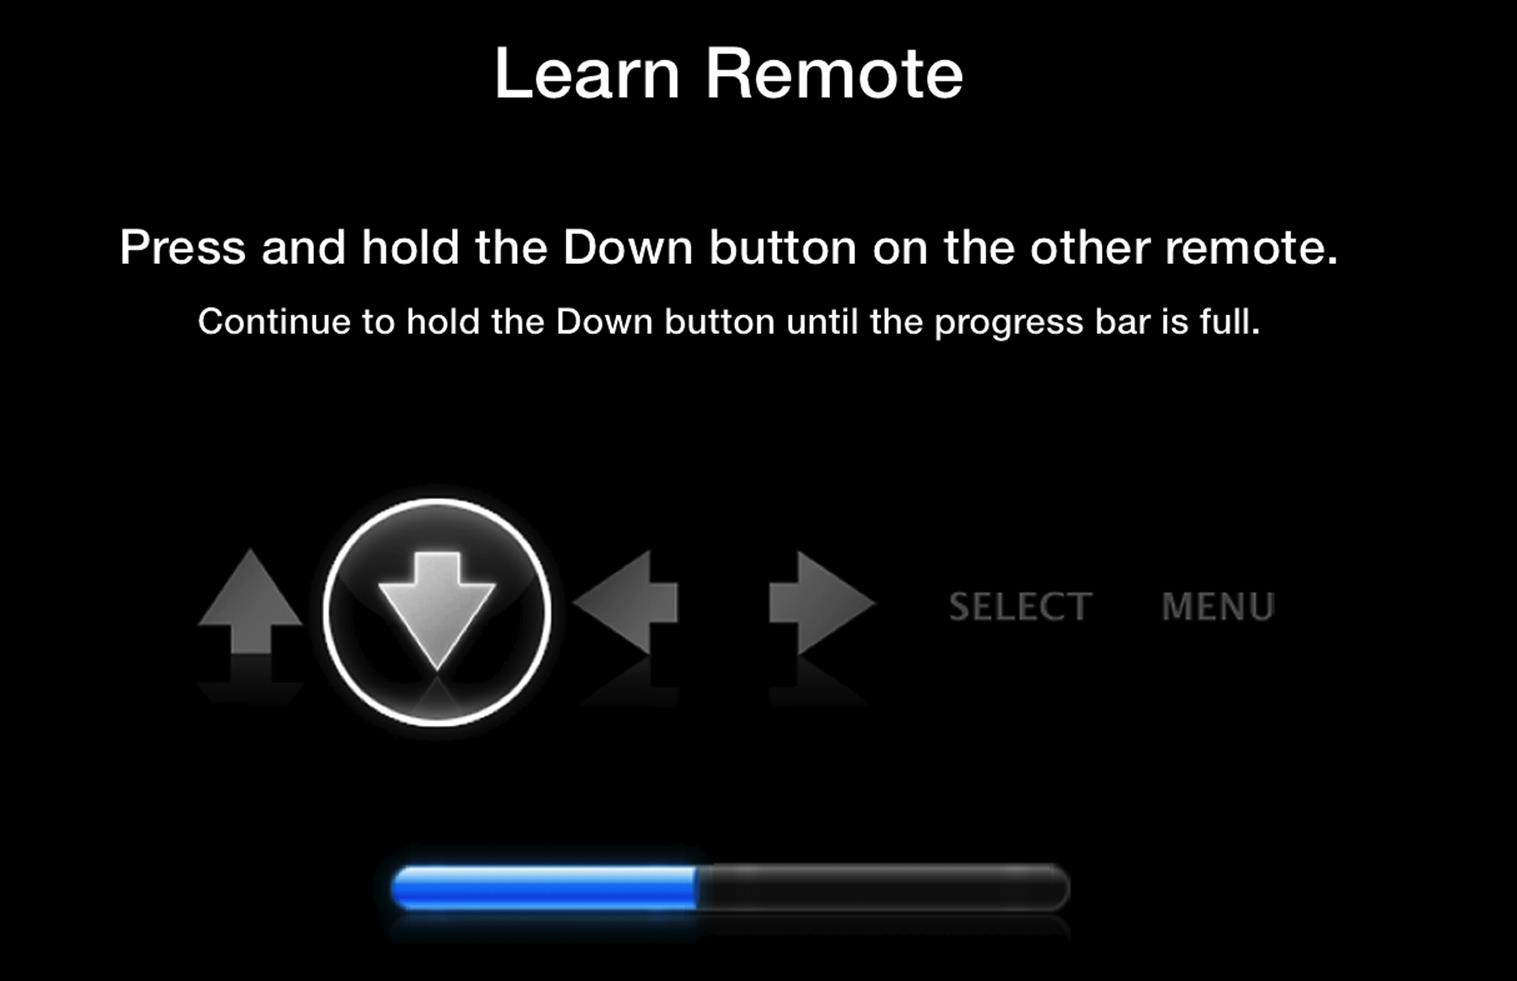
Figure 10: You can choose almost any button on your remote to stand in for various Apple TV commands, including some commands that you won’t find on the Apple Remote.
3. Enter a name for the remote. (As always with the Apple TV, typing goes faster with the Remote app or a keyboard).
After entering a name, you’re technically done, but you’ll notice one button missing in the guided setup: the Play/Pause button!
4. Unless you’ve run out of extra buttons on your remote, select Set Up Playback Buttons to see options for not only play and pause, but also rewind and fast forward, previous and next chapter, and even skip back and skip ahead (which rewind or fast-forward your media 30 seconds). Set these just as you set the basic buttons, except to skip a button, press the Right dot on your Apple Remote.
The Remotes screen now lists your remote, using the name you gave it, under Other Remotes.
Tip: If you can make buttons on your TV remote do double-duty for the Apple TV without causing confusion, you can get by with a single remote that can turn on the TV, adjust volume, and control the Apple TV.
If you later decide that the buttons you chose aren’t ideal, you can make changes by navigating to Settings > General > Remotes and selecting your remote from the list. You can rename the remote, delete it entirely, or redo the basic or playback buttons.
Run the Remote App
One of the best features of the Apple TV is that you can control it with your iPhone, iPad, or iPod touch. You can use the touch screen to navigate menus, and better yet, you can enter text directly with the onscreen keyboard instead of hunting and pecking with the Apple Remote. You can even access content from a Home Sharing-enabled iTunes library with the touch of a button!
Set Up the Remote App
To get started, download the free Remote app from the App Store.
Note: The Remote app works over Wi-Fi, so your iOS device and Apple TV must be on the same network.
Once the Remote app is installed, open it to its main screen. To use it with your Apple TV, tap Set Up Home Sharing (Figure 11, left), then enter the Apple ID credentials that you use for Home Sharing. If you don’t have Home Sharing enabled on your Mac, Remote instructs you to go turn it on.
Next, you see a grid of available devices you can control from the app (Figure 11, right).
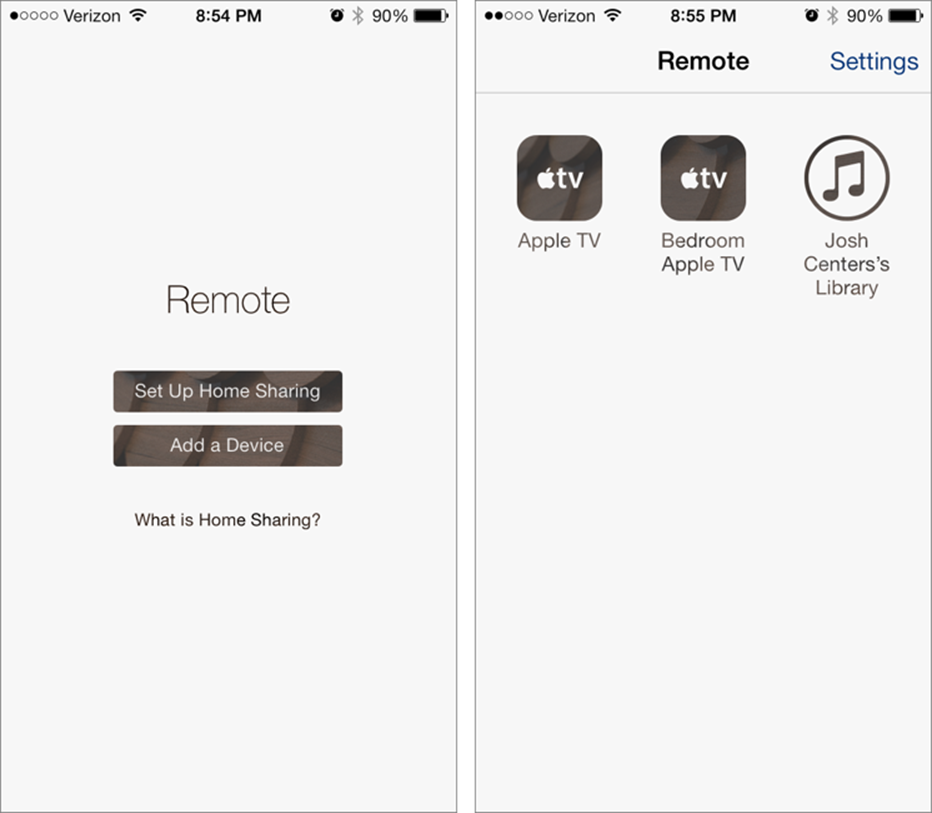
Figure 11: Apple’s Remote app works via iTunes Home Sharing and lets you control multiple Apple TVs and Mac-based iTunes libraries.
If your Apple TV isn’t shown in the grid, enable Home Sharing on the Apple TV: Open Settings > General > Remotes > Remote App. Select Turn On Home Sharing, and enter your Apple ID credentials. After you’re logged in, you’ll be asked if you’d like to use that Apple ID for the iTunes Store, if you haven’t already set that up. Select Yes to save yourself some typing later if you use the same account for Home Sharing and the iTunes Store.
A screen appears, telling you that Home Sharing is on. Select OK to finish.
Tip: Once you’ve enabled Home Sharing on the Apple TV, it can also access any Mac-based iTunes libraries on the local network that are signed into the same iTunes account; see Content from Your iTunes Library to learn more.
Set Up the Remote App without Home Sharing
Maybe you want to set up the Remote app on a device without giving that device Home Sharing access. For instance, you want your kids to be able to use the app without accessing your stash of R-rated movies.
Start up the Remote app and tap “Add a Device.” On the Apple TV, open Settings from the main menu and choose General > Remotes and select the name of your iOS device under the iOS Remotes heading (the Remote app will tell you the name of your device if you don’t know it).
You’re then prompted to enter the four-digit code from the Remote app. Use Up and Down to select the number, and Right to move to the next one. Select Done when finished.
To unpair the Remote app, select it again in General > Remotes, and select Remove when prompted.
Use the Remote App on the iPhone
Let’s take a tour of what you can do with the Remote app. Open it and choose your Apple TV from the list of options.
You should now see the Control screen, which lets you simulate pressing buttons on the Apple Remote (Figure 12). The large area in the middle of the screen is called the gestures area and acts like a trackpad, letting you swipe in different directions to control the Apple TV. Tapping the gestures area is the same as pressing the Select button on the Apple Remote. To navigate, swipe your finger over the gestures area. For example, swiping up would do the same thing as pressing Up on the Apple Remote.
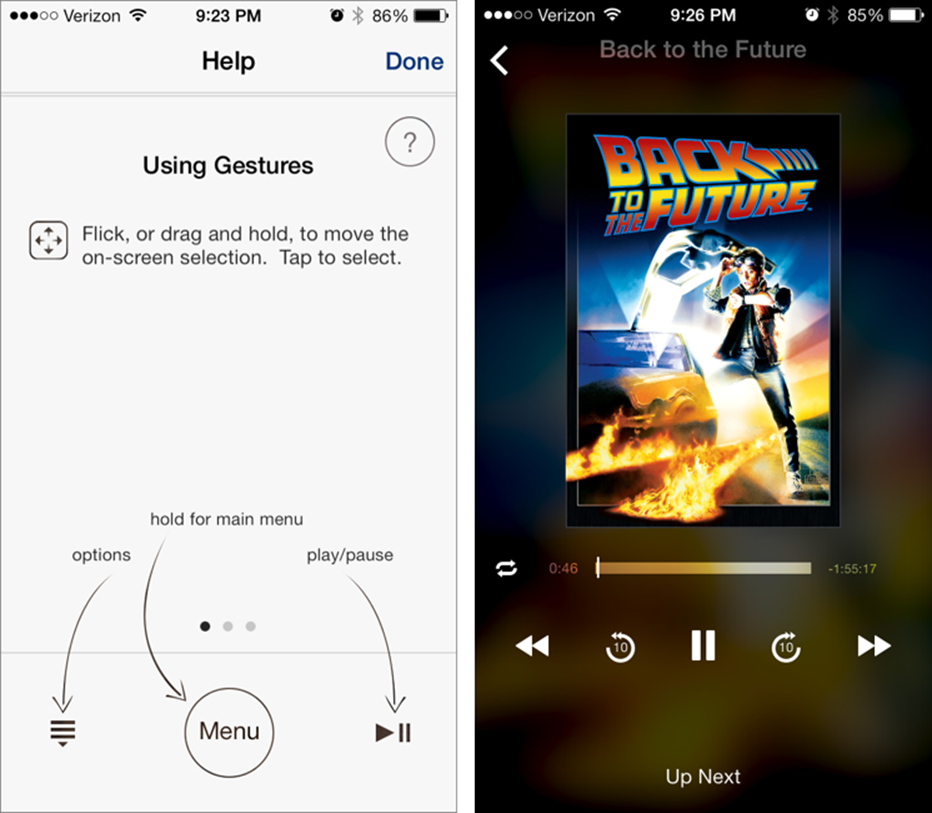
Figure 12: With Apple’s Remote app, you can either use interface control (left) or media control (right).
There are three buttons on the bottom of the Control screen. From left to right, they are Options ![]() , Menu, and Play/Pause <sub>
, Menu, and Play/Pause <sub>![]() </sub>. While watching an iTunes movie, pressing Options lets you quickly select chapters, subtitles, audio tracks, and AirPlay Speakers. The Menu and Play/Pause buttons behave just as they do on the Apple Remote.
</sub>. While watching an iTunes movie, pressing Options lets you quickly select chapters, subtitles, audio tracks, and AirPlay Speakers. The Menu and Play/Pause buttons behave just as they do on the Apple Remote.
The Remote app’s gesture controls can be slippery. It’s easy to overshoot your target without the tactile feedback of pressing a button on the Apple Remote. However, if you are playing content through Home Sharing, you can skip the Control screen in the Remote app and instead control the content playing on the Apple TV just as you would any local content on your iPhone by tapping Done in the upper right of the Control screen to switch to the Computers screen, then tapping the Now Playing button in the upper-right corner of the Computers screen.
On the Now Playing screen (Figure 13), you see the currently playing title featured prominently on the top. In the middle of the screen is a track position scrubber. Drag the knob to scroll through the title’s timeline. On the bottom is a button that skips 10 seconds back, a Play/Pause button, and Next and Previous buttons, which skip forward or backward 30 seconds, respectively. Press either Next or Previous to rewind or fast-forward. The longer you press the button, the faster the Apple TV rewinds or fast-forwards. Release the button to continue playing.

Figure 13: The Now Playing view gives you direct access to media control, including play, pause, and time.
To exit Now Playing and return to the Computers screen, tap the white Back button in the upper-left corner.
You can also access content directly from shared iTunes libraries to play back on the Apple TV—tap Done in the upper-left corner of the Control screen, then tap More in the lower right, then tap Computers to switch to the Computers screen. You should see any iTunes libraries available on your local network, where “available” requires the host computer to be turned on, iTunes to be open and signed into the same Apple ID as the Apple TV, and Home Sharing to be enabled. (To learn how to set up Home Sharing, seeContent from Your iTunes Library.)
Tap a shared iTunes library, and a screen gives you direct access to your content (Figure 14). The toolbar on the bottom of the screen lets you switch between content types. The defaults are Playlists, Artists, Control (which returns you to the Control screen for using the Apple TV interface), Search, and More. More offers other options, such as viewing Movies, TV Shows, Genres, Composers, and so on, plus lets you search the iTunes library.
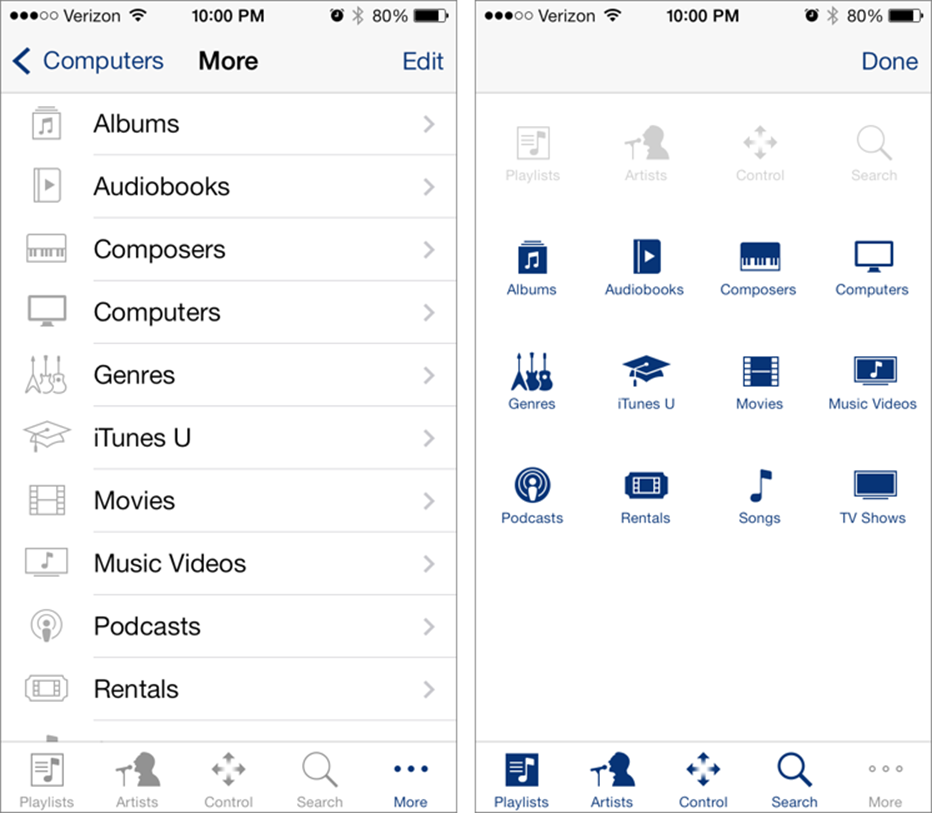
Figure 14: With the Remote app, you can access your entire iTunes library to play back on the Apple TV (left). You can rearrange the default buttons (right).
If you don’t like the default buttons in the toolbar, you can change them by tapping More, then tapping Edit in the upper right. That displays the Configure screen, with a grid of icons that you can place in the toolbar. Just drag the item you want in the toolbar on top of an existing button to replace it. Tap Done in the upper right when you’re happy with the layout (Figure 14, above).
Perhaps the best part of using the Remote app is that you can type into text fields with your iPhone’s virtual keyboard instead of hunting and pecking with the Apple Remote. Whenever you navigate into a text field, your iPhone vibrates and displays a text field you can type into. To dismiss the onscreen keyboard, tap Hide in the upper left. To bring it back up, tap the keyboard ![]() icon in the upper left.
icon in the upper left.
Tip: If you store your passwords in a password management app like 1Password, you can log in to services like Netflix more easily if you copy them from that app and paste them into the Remote app.
Use the Remote App on the iPad
The capabilities of the iPad version of Remote are identical to its little sibling, but the interface is rather different (Figure 15).
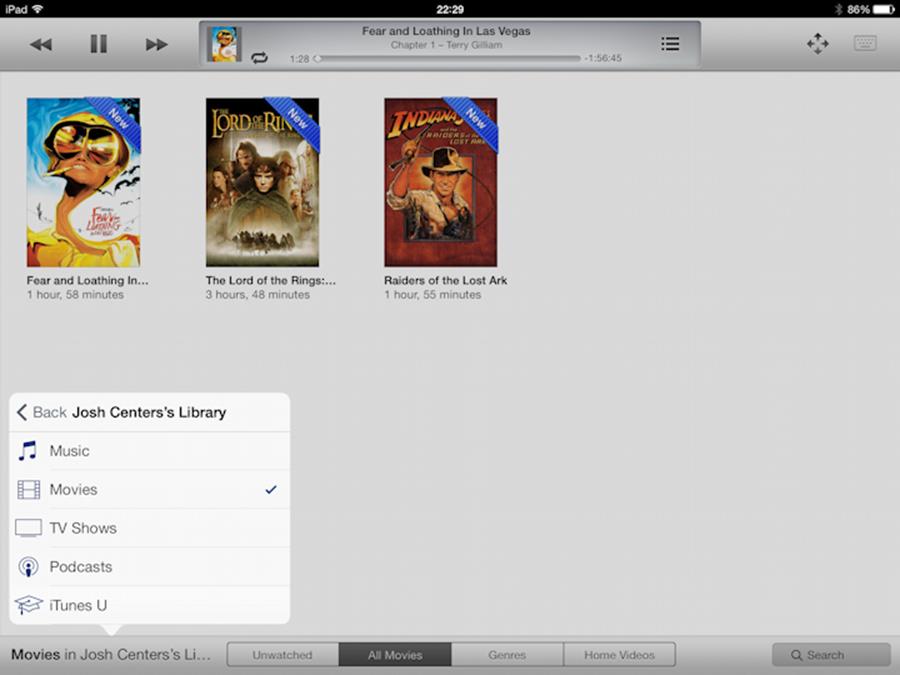
Figure 15: The iPad version of Remote offers the same capabilities as the iPhone version, but with a different layout.
After you select your Apple TV from the device list, you won’t be taken to interface controls, but rather to media controls. The controls should be familiar if you use the Music or Video app on the iPad. Tapping the media artwork near the top of the screen while something’s playing brings you the same Now Playing interface that appears on the iPhone.
To take direct control of the Apple TV’s interface, tap the cross ![]() in the upper right. To the right of that button is a button that enables or disables the onscreen keyboard—when available.
in the upper right. To the right of that button is a button that enables or disables the onscreen keyboard—when available.
Access iTunes libraries by tapping the action label in the lower-left corner. Select a library, and the relevant content appears in the Remote app’s interface. Unlike the iPhone’s interface, you cannot customize this list. You choices are Music, Movies, TV Shows, Podcasts, and iTunes U.
Become an Apple TV Keyboard Jockey
If you skipped Set Up Your Apple TV you might have missed the fact that you can control your Apple TV with a Bluetooth keyboard. Here’s how to set up and use a keyboard with the Apple TV.
I first explain how to set up an Apple Wireless Keyboard, but if you don’t have one of those handy you might like to work from the keyboard on a Mac laptop—or any Mac—and I explain how to do that in a sidebar, Control the Apple TV with Your Mac’s Keyboard.
Note: While any Bluetooth keyboard should work, Apple officially supports only its own Wireless Keyboard, so that’s what I use here. If you use another make of keyboard, refer to its instructions.
Pair Your Keyboard
Turn on your (unpaired) keyboard and, on the Apple TV, navigate to Settings > General > Bluetooth. On the Bluetooth screen, if Bluetooth is off, select it to turn it on. Under Devices, select your keyboard and press Select. You’ll then be prompted to enter a code on the keyboard and press Return. If pairing succeeds, you’ll be notified. Select OK to continue.
Control the Apple TV with Your Mac’s Keyboard
With the $4.99 Type2Phone Mac app from Houdah Software, you can control your Apple TV (or iOS device) with any keyboard connected to your Bluetooth-enabled Mac.
Once you have the app, you need to use it to pair your computer to the Apple TV. Follow these instructions to the letter or pairing may fail!
1. Open System Preferences and click Bluetooth. Be sure that Bluetooth is on and your computer is discoverable.
2. Keep the Bluetooth preference pane up, and launch Type2Phone.
3. In Type2Phone, click “Click here to connect” in the upper left and then choose Connect to New Device (Figure 16). A dialog appears. Ignore it for now.
4. On the Apple TV, open Settings > General >Bluetooth. If Bluetooth is off, select it. Wait a minute, and your computer should appear in the Device list as a keyboard. Select it. You might have to do this twice.
5. A pairing request appears on your computer, asking if you want to pair to the Apple TV. Click Pair. If pairing is successful, you should see the keyboard icon pop up on the left, and your computer’s keyboard will be marked as Connected.
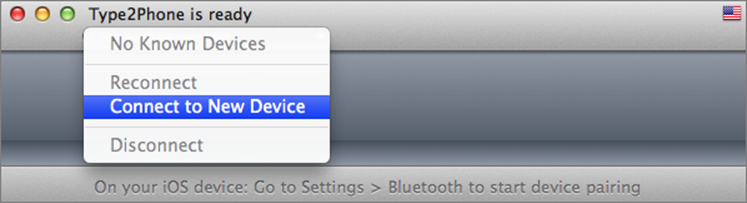
Figure 16: After opening the Bluetooth preference pane and ensuring that Bluetooth is on and your computer is discoverable, open Type2Phone, click “Click here to connect,” and then choose Connect to New Device.
You can now control your Apple TV with your computer’s keyboard. However, Type2Phone must be in the foreground. If you switch to another application, it disconnects. If that happens, switch back to Type2Phone, click “Click here to connect,” and choose your Apple TV from the device list.
Unpair Your Keyboard
If you later decide that you want to use your Bluetooth keyboard with another device, go to Settings > General >Bluetooth, and select your keyboard from the list. You’ll be presented with the same screen as when you first paired the keyboard. This time, select “Forget this Device” to free your keyboard from the grip of the Apple TV.
Tip: If you want a keyboard that can easily switch between controlling your Mac and your Apple TV, check out the Logitech Wireless Solar Keyboard K760, which can switch between three Bluetooth devices. It usually retails for $80, but has been seen for as little as $35.
Use Your Keyboard
While using a full keyboard to control your TV might seem like overkill, it’s actually pretty simple. Press the arrow keys to navigate, press Return to simulate the Apple Remote’s Select button, and hit Esc when you would press Menu on the Apple Remote.
The keyboard’s media keys are fairly limited. For instance, if you play music from the Apple TV Music app and jump back to the main menu, the Play/Pause key will pause the music, but pressing it again won’t resume it.
One distinct advantage of controlling your Apple TV with a keyboard is that you can cut through menus with ease. Whenever you’re at a long menu, start typing what you want. For instance, if you’re in the Artists view in Music, start typing an artist’s name in order to jump straight to that artist, saving yourself a lot of time and menu digging.