Take Control of Apple TV (1.0) (2014)
Apple TV at the Movies
The marquee feature of the Apple TV is watching movies and TV shows. In this chapter, I show you how to control video playback, purchase movies and TV shows from Apple’s iTunes Store, access your purchases from iCloud, and view videos stored on your computer in your iTunes library.
Of course, you’re not limited to iTunes content. In addition to streaming video from Netflix, Hulu, HBO GO, and more, you can rip your DVD and Blu-ray discs for playback on the Apple TV. I show you not only how to rip the discs, but also how to add cover art and metadata, and Offload Movies to Another Disk. I also point out a few great iOS AirPlay Apps for Video.
In most of this chapter, for videos stored on your computer, I assume you want them in your iTunes library. However, to go beyond iTunes, I explain how to Skip iTunes with Silver Screen. (Later in the book, I talk about Plex, a more complex solution; see In the Plex.)
Control Video Playback
To watch a movie, TV show, or other video content, navigate to a video app, such as Movies, TV Shows, or PBS, and select the video. No matter how you view a video, the playback controls are identical: to begin, press Play.
Video Navigation
Once a video is playing, you fast-forward or rewind it by pressing Right or Left, respectively (Figure 30).

Figure 30: The single white, right-facing triangle at left indicates slow fast-forwarding. Press Right again to switch to medium speed, and press Right again for fast.
A set of three triangles at the left of the timeline indicates the fast-forward or rewind speed, which can be slow, medium, or fast:
· One white triangle pointing right indicates a slow fast-forward speed. To speed it up, press the Right button once for medium speed, and once again for fast. Press Left to slow down.
· One white triangle pointing left means your show is rewinding slowly; press Left once or twice to speed up the rewind.
To return to normal playback, press Play/Pause.
For more efficient navigation, press Down to see the timeline split in sections (Figure 31). The sections correspond to chapter markers, or, if there are no markers, to 1/20th of the video or 30 seconds, whichever is longer. Press Left or Right to skip between sections. Notice that the Apple TV sets a marker where you left off, so it’s easy to skip around and then return to where you were.

Figure 31: Press Down and then Left or Right to skip chapters. If no chapters are available, the Apple TV splits the video into 20 sections or 30-second segments, whichever is longer.
While you watch a video, to quickly find out how much has played, press Up once to display the current chapter and the timeline (if your video doesn’t have chapters, you’ll see the entire timeline). It fades after 3 seconds, or you can press Down to remove it from the screen.
Tip: Worried that you’ll forget how to get around in videos on your Apple TV? Download the Cheat Sheet that comes with this book and keep it handy by your TV.
Other Video Controls
Press Up twice to see information about the currently playing video (Figure 32). Press Down to dismiss it.
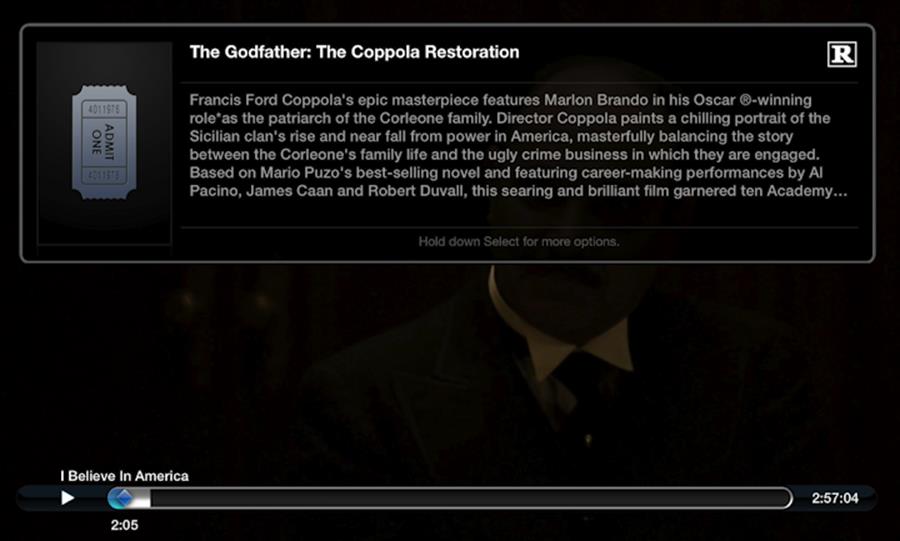
Figure 32: To see more information about the show you are watching, press Up twice.
To access many more options, hold Select to pause the video and bring up the Options menu (Figure 33), split into either three or four views:
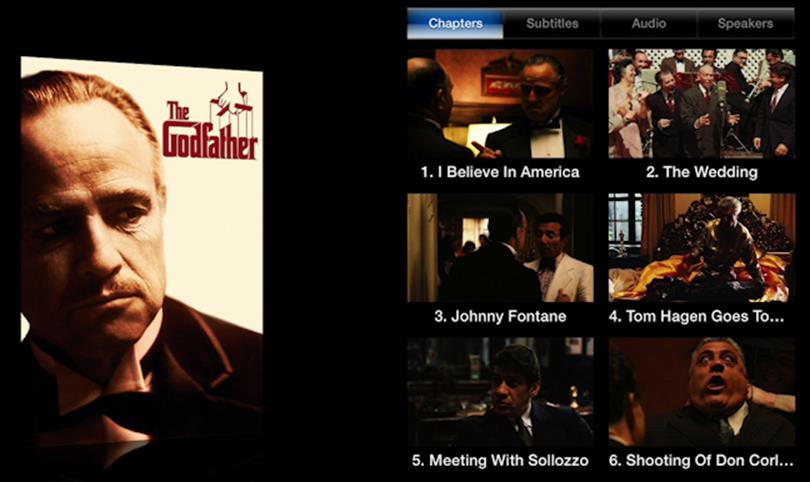
Figure 33: To see special options, such as visual chapter selection, play your video and then hold the Select button.
Tip: In the Remote app, the Options button in the lower left of the interface controls opens this menu.
· Chapters: Available only for iTunes movies, this view—shown in the figure just above—displays all the chapters of the movie in a visual grid.
· Subtitles: It’s usually best to leave Subtitles on Auto, though you can turn them off or pick CC for closed captioning. But, before you pick CC, read More about Subtitles, next.
· Audio: You can select alternative language or commentary tracks, if available.
· Speakers: Open this view to choose AirPlay speakers and control their volume (Figure 34). Select a speaker, and you’re taken back to the video. To change the volume, open the Options menu again, return to Speakers view, scroll to your AirPlay speaker, and then press Left or Right.
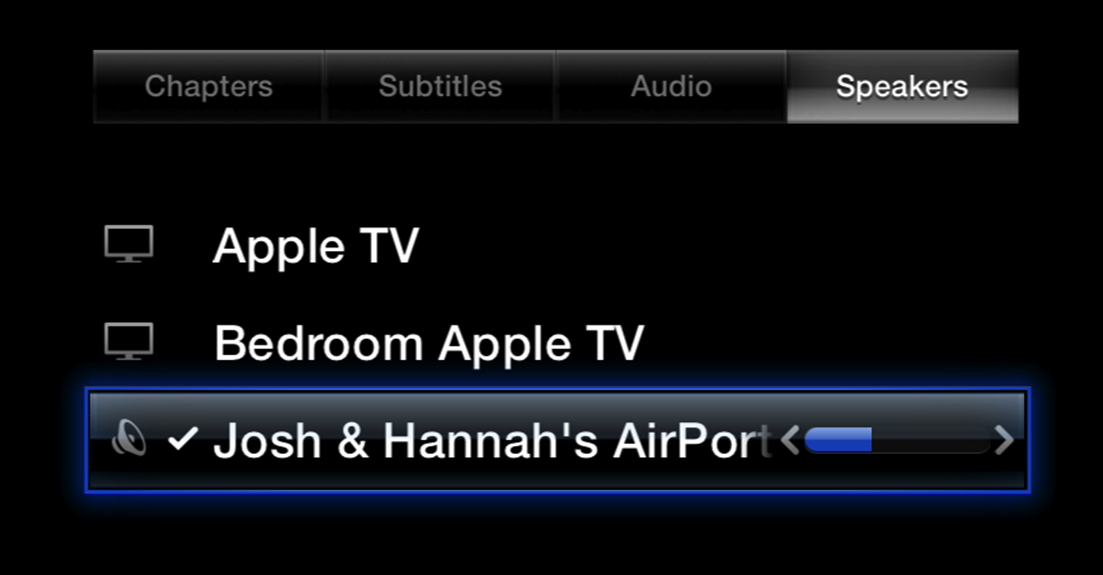
Figure 34: To change the volume of an AirPlay speaker, open the Options menu and select Speakers; then select your speaker and press Left or Right.
More about Subtitles
Two things Apple is famous for are its accessibility features and beautiful text rendering, and it doesn’t disappoint with the Apple TV. You can activate subtitles system-wide and customize them to your heart’s content.
To activate subtitles for all videos, open Settings > General > Accessibility (Figure 35), and turn on Closed Captions + SDH (short for Subtitles for the Deaf and Hard of hearing).
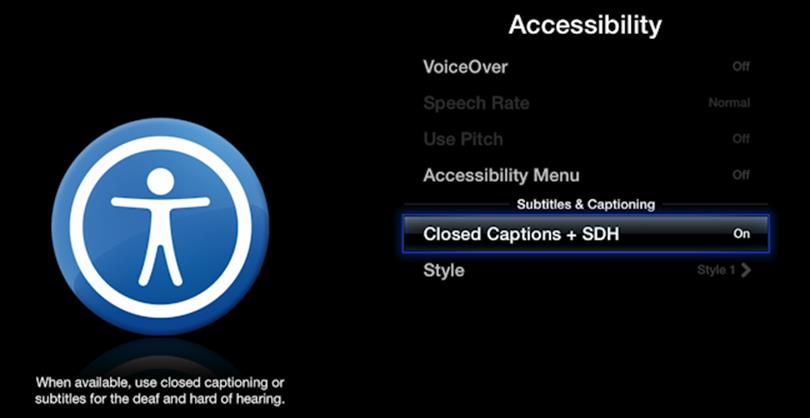
Figure 35: Turn on subtitles for all videos by going to Settings > General > Accessibility and turning on Closed Captions + SDH.
If the subtitle options for your videos are set to Auto, as I specified above, all your videos now show subtitles.
Also on the Accessibility screen, pick Style to customize the look of your subtitles. Select a style (so it has a check mark in its listing) to see what it looks like in the preview pane at left. For a world of style choices, select Edit Styles (Figure 36). You can set text shadows and highlights, backgrounds, and so much more. You can create as many custom styles as you like, so have fun experimenting!
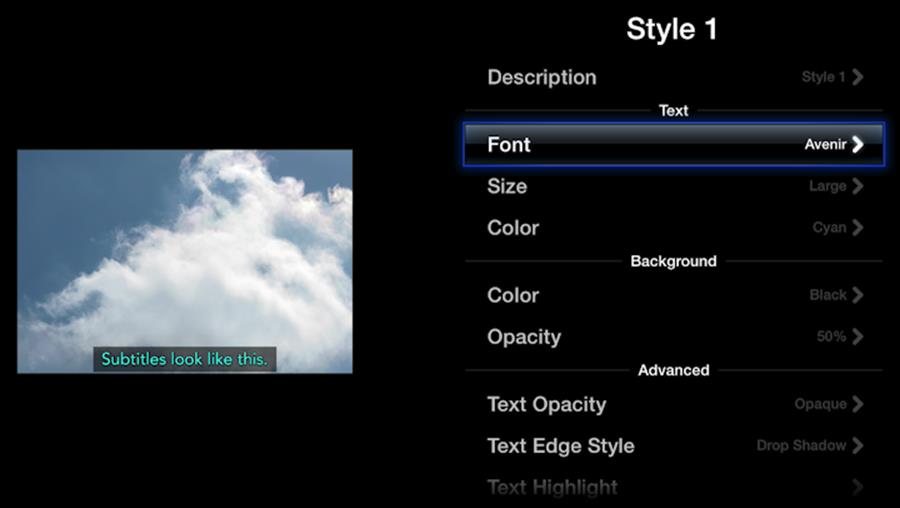
Figure 36: You can customize every aspect of subtitles, including font, size, color, opacity, and backgrounds.
Buy iTunes Movies & TV Shows
By placing the Movies and TV Shows icons first on the Apple TV home screen, Apple emphasizes buying movies and TV shows from iTunes. Select either icon, and a Cover Flow view shows the most popular titles. To move the focus to the Cover Flow view, press Up.
The steps for purchasing content tend to change slightly from time to time, and are pretty obvious, but I’d like to share a few tips:
· When you open either app, you see either the Top Movies or the Top TV Shows view. To change views, press Up. You can view titles you’ve purchased (more on this shortly), filter titles by genre, access Genius recommendations based on past purchases, or search directly for titles.
· In movies, the Wish List view is a handy way to keep track of movies you’d like to buy. To add a movie to your Wish List, open its listing and then select the Wish List button. (The Wish List option appears only after you’ve added a movie to your list.)
· To get the best deals on movies, enter the Top Movies view in the Movies app and scroll to the Discounted Movies row, which features the movies currently on sale. These change regularly, so keep an eye on the list to find titles you’d like to own.
· When you view a movie listing, you can press Up to cycle through available information about the movie. Select More to view select Rotten Tomatoes reviews, customer reviews, and to see more available titles from the people who made the movie. For example, if you look at the details for The Shining, you can select Stanley Kubrick to see more films by the famed director (Figure 37).
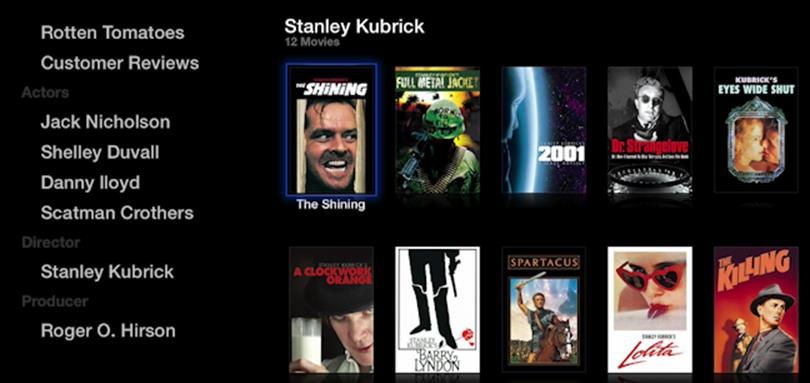
Figure 37: Select More in a movie’s listing to see reviews and find more titles by the principles.
Sadly, TV shows don’t include as much information as movies. The Wish List view is replaced by a far less useful Networks view, and each listing contains only the season and episode name.
Access Purchased Movies & TV Shows
If you’ve purchased movies or TV shows from iTunes in the past, there’s a good chance you can stream them from iTunes in the Cloud.
To find past purchases, open the Movies or TV Shows app, press Up to access the views, and select Purchased on the left. Your purchases are split into recent purchases, all purchases, and genres (Figure 38). Select a title to stream it from the cloud.
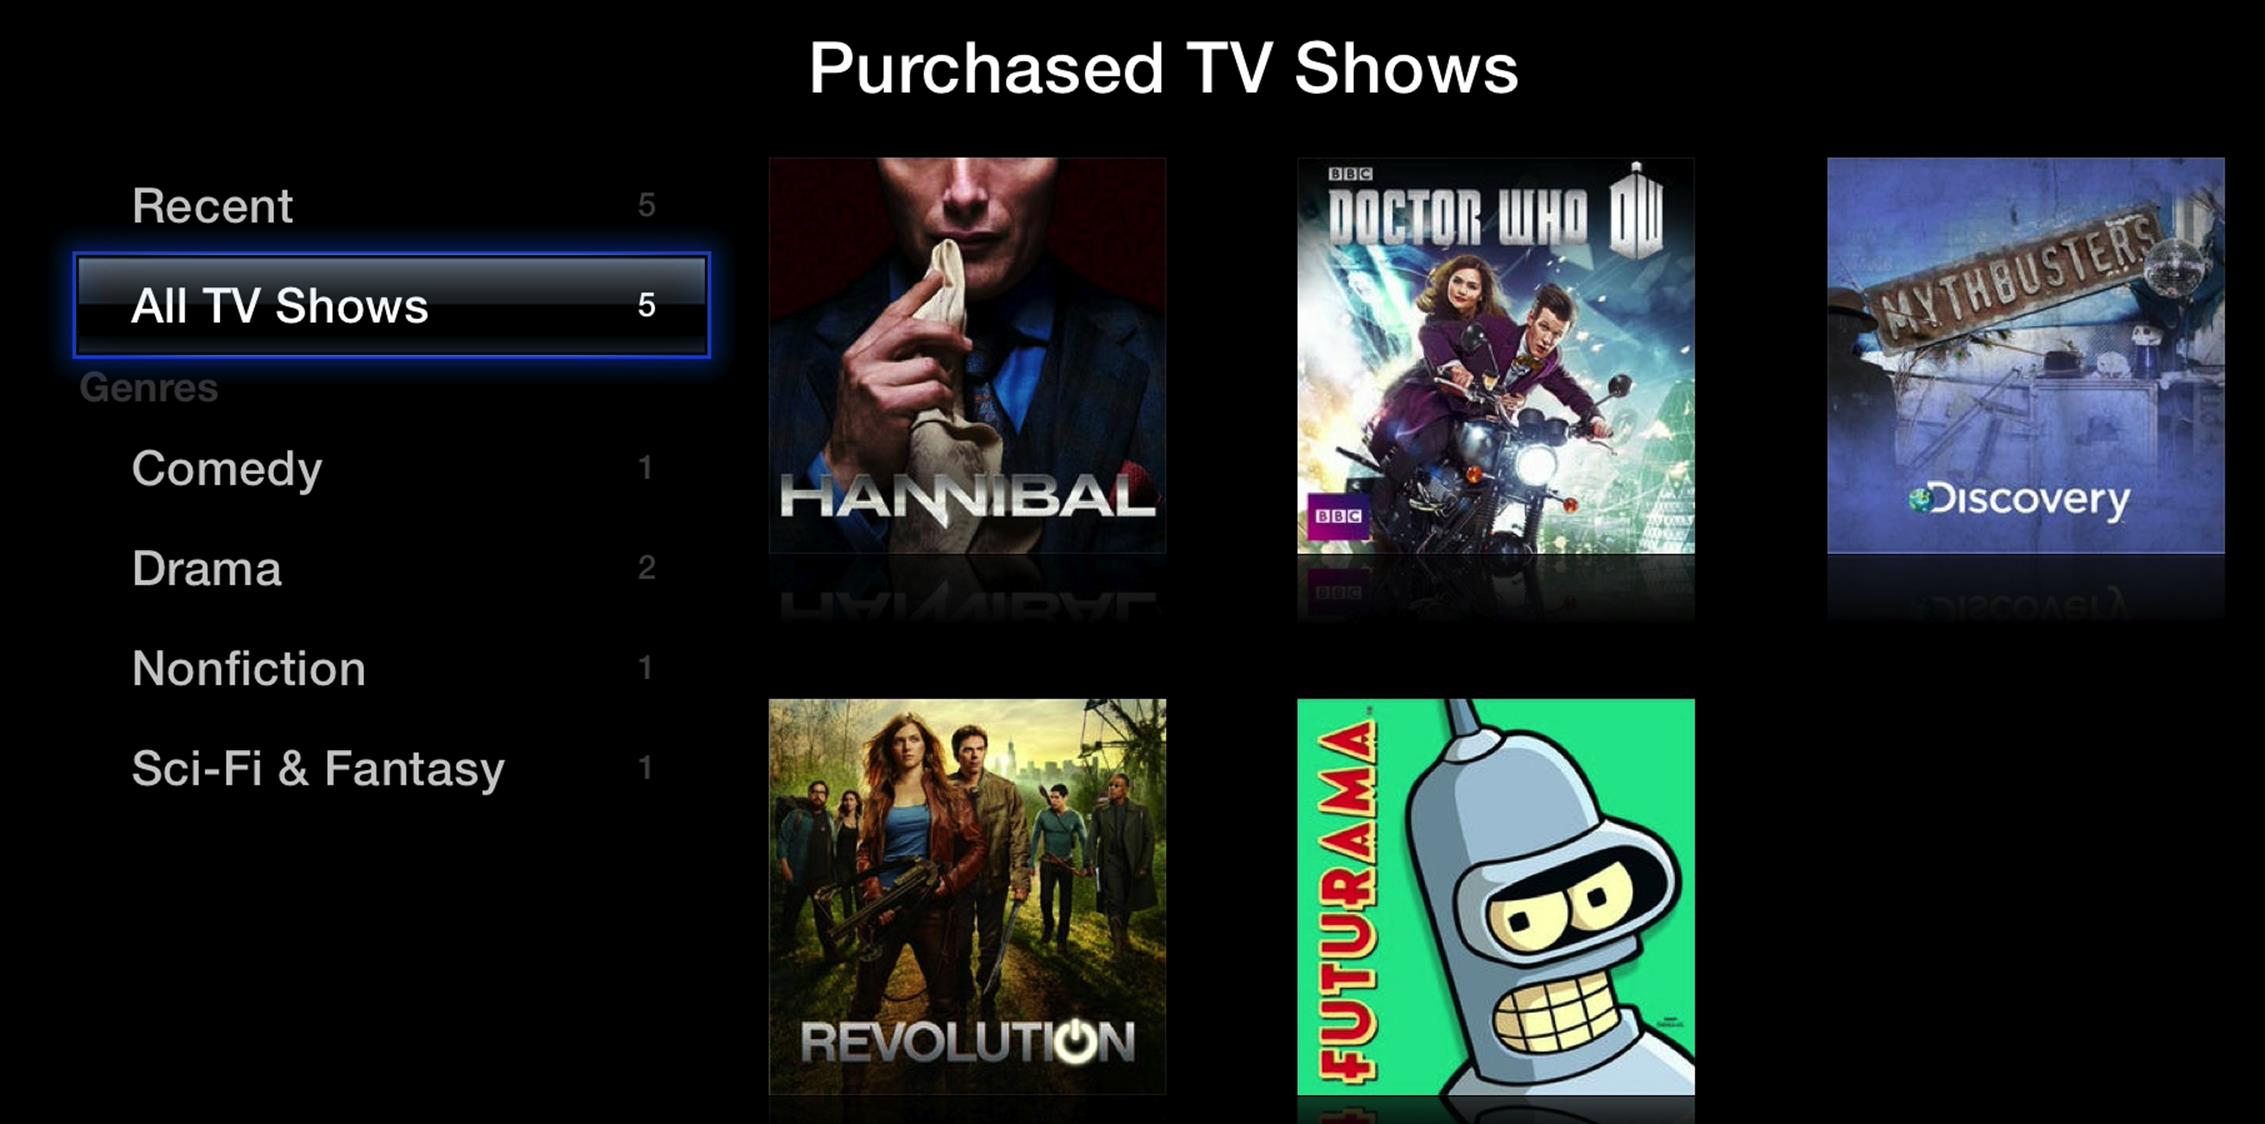
Figure 38: You can access almost all your past iTunes purchases at any time. They’re split into recent purchases, all purchases, and genres.
Where’s My Stuff?
Media licensing is…complicated, to put it mildly. I won’t bore you with the details, but due to various legal agreements, your past purchases may not be available in iTunes in the Cloud. Even worse, there’s always the possibility that your past purchases could be yanked from iTunes in the Cloud (for an example, see the TidBITS article Disney Temporarily Yanks Purchased iTunes Movies). If you value your iTunes purchases, always keep a local backup.
However, if a purchased item appears to be missing, there is a chance that it has just been hidden somehow. In iTunes on your computer, choose Store > View Account. In the “iTunes in the Cloud” section, look for Hidden Purchases and click Manage. Click the appropriate content button at the top (Music, Movies, TV Shows, Apps, or Books) and see if your purchase is listed there. If it is, click the Unhide button, and it should appear on all of your devices.
Home Sharing Video
iTunes in the Cloud is convenient, but if you already have your movies and shows stashed in iTunes locally on your computer, it’s a waste of bandwidth to stream them from Apple. Fortunately, you can access videos from your iTunes libraries over your home network thanks to Home Sharing. To learn how to enable Home Sharing, see Content from Your iTunes Library, earlier.
To access your iTunes movies from the Apple TV, open the Computers app in the main menu. If you see an error message, be sure that the computer is on, and has iTunes open.
There are three categories of videos: Movies, TV Shows, and Home Videos. Simply select one, then select the title you want to watch. You can sort by name or genre, or view only unwatched titles (Figure 39).
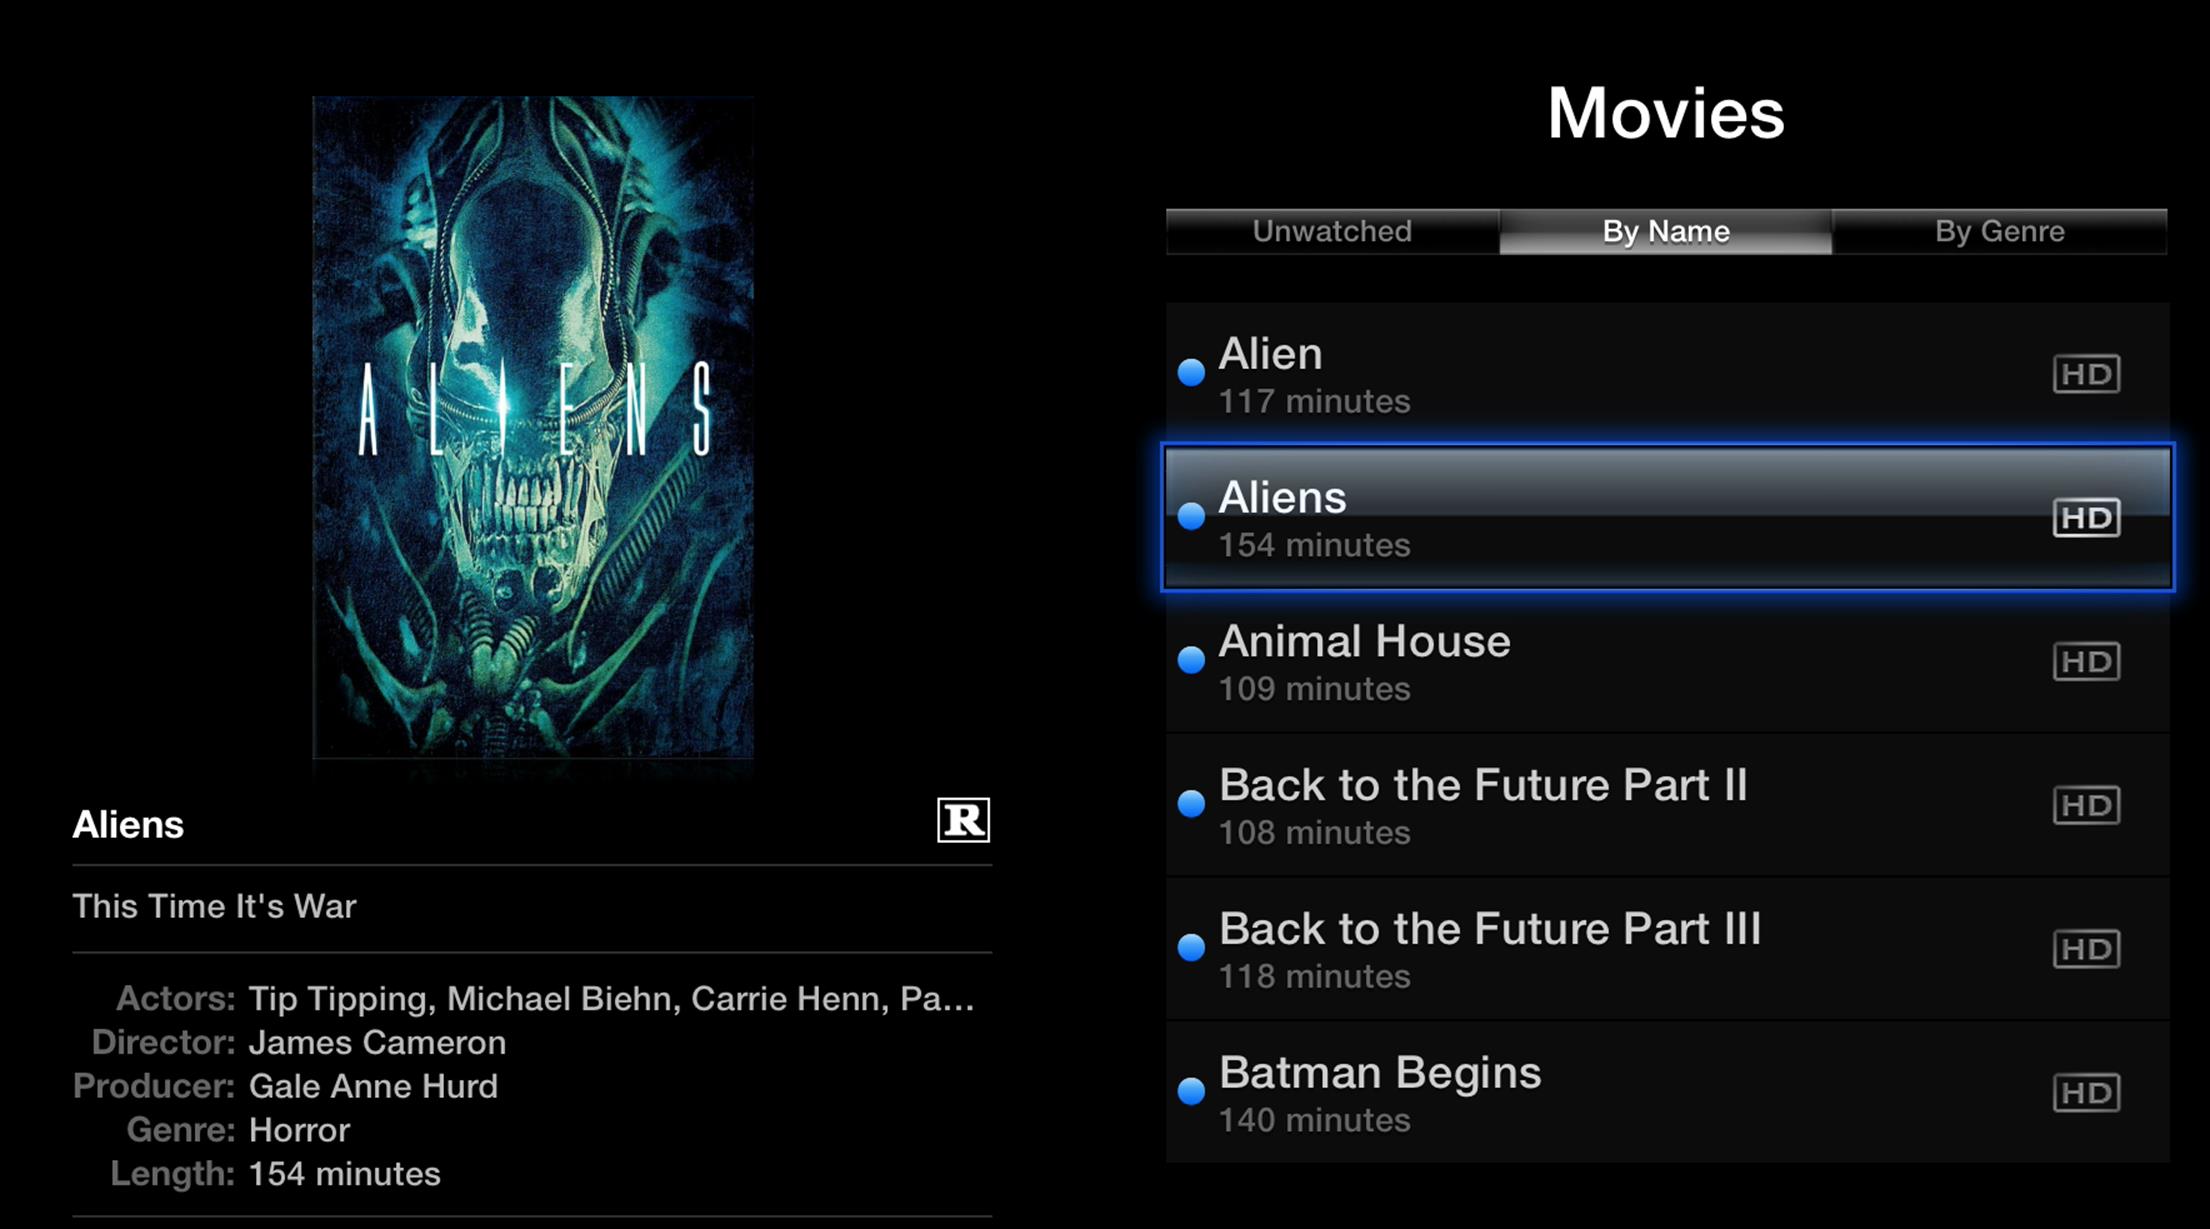
Figure 39: You can access all the movies in your iTunes library from the Apple TV, and sort them by name or genre, or by what you haven’t watched yet.
Rip DVDs for Apple TV
Chances are, you have dozens, if not hundreds, of movies on DVD that you can’t watch on your Apple TV. The good news is that you can use your Mac to convert, or rip, them to a format that the Apple TV will understand. Ripping DVDs is a time-consuming process, but I show you the fastest and easiest way to convert your collection. The hassle is worth it; not only can you play ripped DVDs on your Apple TV, but you’ll never have to worry about scratched discs or entertainment center shelf space again!
Tip: If your Mac isn’t equipped with an optical drive, I offer some suggestions for external drives in The Blu-ray Bag of Hurt.
Warning! Ripping your own DVDs may be technically against the law in your jurisdiction. Consult your lawyer, priest, and/or astrologer before proceeding.
Install libdvdcss
Before proceeding, you must first install the open-source libdvdcss library, from the non-profit VideoLAN Organization. It enables your Mac to decrypt DVD content.
Since the installer is unsigned by Apple, after downloading the package, don’t double-click it as you normally would. Instead, Control-click it and choose Open. If you see an alert warning you that the package is from an unidentified developer, click Open to continue installation.
Rip with HandBrake
With libdvdcss installed, we can get to work. HandBrake is a free, open-source DVD ripping and video conversion tool from the HandBrake Team, with presets for Apple devices.
Note: Your Mac needs to stay awake while it rips discs. The free Caffeine menu bar utility, found in the Mac App Store, lets you disable and re-enable sleep with one click.
Install and open HandBrake, and then do the following:
1. Insert your DVD into your DVD drive.
2. In HandBrake, click the Source button at the left of the toolbar (Figure 40).
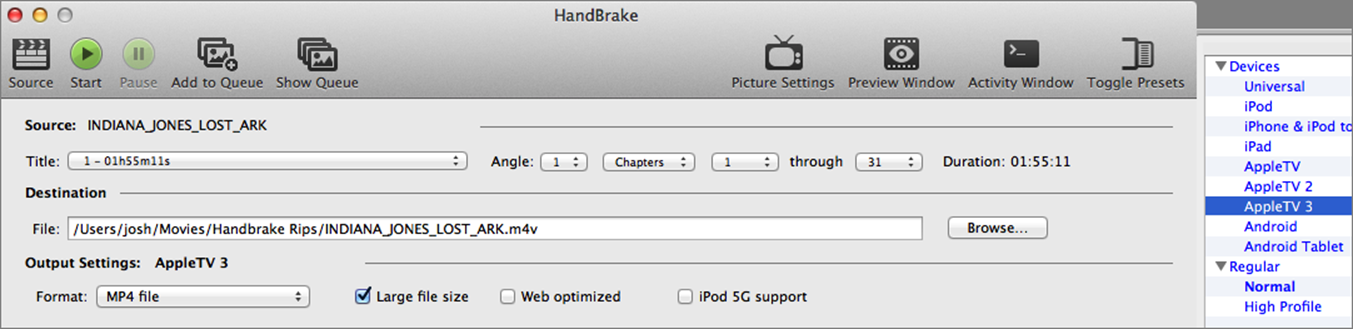
Figure 40: To start ripping a DVD in HandBrake, click Source at the left of the toolbar, and choose your DVD. Be sure to select the Apple TV 3 preset from the drawer at the far right, and then click Start.
3. Choose your DVD in the Open dialog, and click the Open button.
4. Near the upper right, set a destination directory by clicking Browse and then navigating to and selecting the folder where you want to store your ripped movie.
Tip: You can rename the output file name in the File field. However, if you plan to store the file in iTunes and use iFlicks to add metadata to it, the file name isn’t as important. See Improve iTunes Import with iFlicks.
5. Select the Apple TV 3 preset from the right-hand drawer (shown in blue type in Figure 40, above). If you don’t see the drawer, click Toggle Presets at the right of the toolbar.
Choosing the Apple TV 3 preset future-proofs your ripped movie, as it rips the movie in “full HD” (1080p) instead of the 720p resolution that the second-generation Apple TV supports. The files will play just fine on a second-generation Apple TV, so there’s no reason not to choose the Apple TV 3 preset. (The Apple TV preset is for the first-generation Apple TV, which was a different device altogether.)
Note: If you want to include subtitles in the ripped version of your DVD, check out Add Subtitles before proceeding to the next step.
6. If you are ripping a disc containing multiple TV shows, skip ahead to Rip TV Shows.
7. Click the green Start button on the toolbar.
How long HandBrake takes to rip a DVD depends upon the speed of your DVD drive, the speed of the drive you are ripping to, and your processor speed, but it’s usually less than an hour.
When HandBrake is done, the ripped file appears in the destination folder that you selected, with a .m4v extension.
Once HandBrake is done, you can add the resulting video to iTunes manually in order to view it on your Apple TV, as I describe next. However, you may wish to Improve iTunes Import with iFlicks. Or, if your movie is so long that it comes on multiple discs, you may want to Merge Multi-disc Titles next.
Add to iTunes
You don’t need to buy software or do anything fancy to add your ripped video to iTunes:
1. In iTunes, navigate to the Movies pane by choosing Movies from the pop-up source menu near the upper left.
2. Keeping the iTunes window visible, click the Finder icon in your Dock or otherwise open a Finder window. Navigate to the folder holding your movie, and then drag the .m4v file into iTunes.
Your movie may not end up where you’d expect, in the Movies view of the Movies pane. In iTunes 11.1.2, Apple added a Home Videos view to the Movies portion of iTunes. By default, iTunes organizes dragged-in video files as home videos (Figure 41).
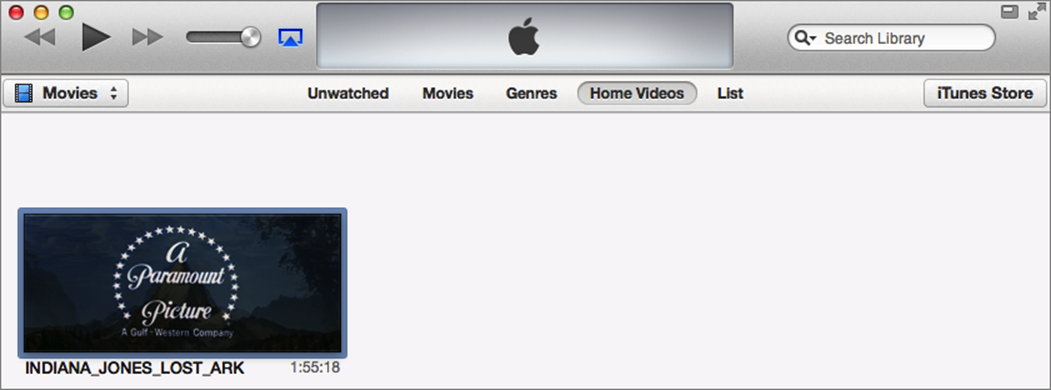
Figure 41: When you drop a ripped movie into iTunes, it may not go where you would expect. In this case, it fell (counterintuitively) into the Home Videos view.
Here’s how to fix this. Click the Home Videos button in the button bar, select your movie in the Home Videos view, and then choose File > Get Info (Command-I). In the Get Info dialog, click Options and from the Media Kind pop-up menu (Figure 42), choose either Movie or TV Show; then click OK.

Figure 42: To put the movie into the correct category, select it in iTunes, and choose File > Get Info. Click Options, and then set Media Kind to Movie or TV Show.
If you opt to not use iFlicks or some other third-party tool to add metadata to your movie, note that you can manually add metadata in the various panes in this dialog.
Add Subtitles
Even if you don’t think you need them, it’s a good idea to extract subtitles from your disc. Consider it a form of future-proofing. What if a hard-of-hearing friend comes over for a movie, you lose your hearing in a freak SodaStream accident, or you want to watch a movie without waking a sleeping baby?
During the ripping process, after choosing the title in HandBrake, click the Subtitles button in the middle of the window. By default, no subtitle is selected. From the pop-up menu under the Track column, choose the desired subtitle—track zero is usually the English subtitle.
By default, the Burned In checkbox is marked, meaning that HandBrake will hard code the subtitle into the video itself, with no way to disable it. Deselect this box to keep your options open (Figure 43). I explain how to enable subtitles while watching a video earlier in this chapter, in Other Video Controls.
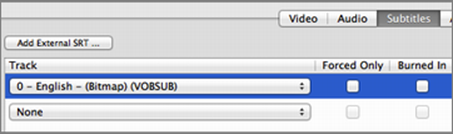
Figure 43: To add optional subtitles to your movie, in HandBrake, open the Subtitles pane, choose the desired subtitle track, and deselect Burned In.
The subtitles will be added to your video when you click the Start button.
Subtitling Foreign Films
If you’re ripping a foreign film, you probably want to add subtitles differently. In this case, select the Foreign Audio Search subtitle track, which automatically enables Forced Only and Burned In. Deselect Burned In and instead select the checkbox under the Default column.
HandBrake scans the disc for foreign audio subtitles, then sets up the subtitles to show only if needed (useful in mixed-language movies), and enables the subtitling by default while still allowing you to turn it off if you like.
Rip TV Shows
Ripping a movie is a straightforward process, because it’s a single video file. A season of TV shows is a little trickier, because there are several files on one disc. (This topic picks up near the end of the general HandBrake directions given earlier in this chapter, so if you aren’t familiar with HandBrake, start with Rip with HandBrake.)
Insert the DVD into your drive, and wait for HandBrake to finish scanning. Now, you have to play a guessing game with the Title pop-up menu to figure out which files are episodes. For example, Figure 44 shows a DVD with 7 episodes of a 30-minute sitcom with a whopping 20 tracks!
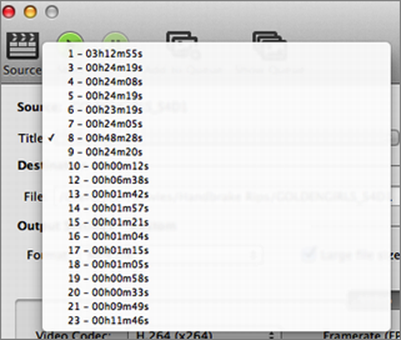
Figure 44: For DVDs full of TV episodes, use common sense to sort out the episodes from any bonus content.
Fortunately, with the application of common sense, we can figure out what’s what. The first title is over 3 hours long—clearly it’s not an individual episode—DVDs of TV shows often contain all the episodes in a single title like this. Titles 3–9 (what happened to 2?) are 23–48 minutes long. That 48-minute title 8 is suspicious, but the remaining tracks after Title 9 are under 12 minutes, so 8 must be a Very Special Episode. Given that most TV shows are 30 or 60 minutes on broadcast television (including commercial breaks), tracks that are between 23 and 48 minutes are the likeliest contenders for being episodes.
If you need further help deducing what’s what, select a title that you think is an episode, then click Preview Window in the toolbar. HandBrake shows a still frame from the episode. If the one image isn’t enough, move your pointer down to get a slider where you can scroll through random stills of the episode. To be absolutely sure, click Live Preview to see a video snippet, but it takes a while to compile a preview and stills are usually good enough (Figure 45).
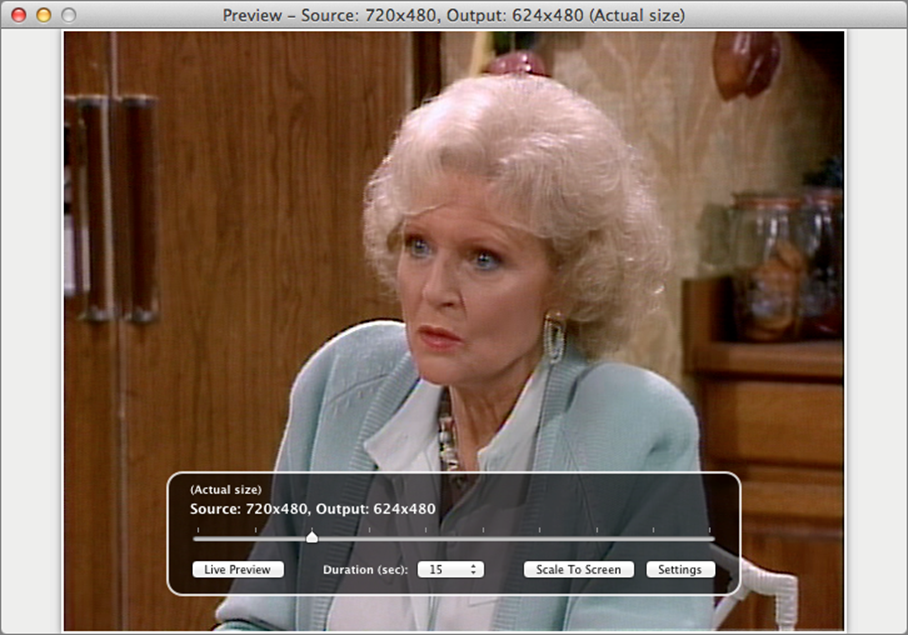
Figure 45: HandBrake’s Preview window is a useful tool to make sure that you’re ripping the right thing.
When you’re satisfied that you’ve identified the files that are episodes (or whatever titles you want to rip), close the Preview window.
Unfortunately, HandBrake isn’t smart enough to create a different filename for each episode by default, so you have to give it a hand by manually naming each episode as you add it to the ripping queue. However, you can enable auto-naming in HandBrake > Preferences.
Choose the first episode to rip from the Title pop-up menu, click the File field, and add some distinguishing text to the filename that appears there. For example, in a disc that I ripped, HandBrake named each file GOLDENGIRLS_S4D1 (the “D” standing for “disc”). For the first episode, I changed this to GOLDENGIRLS_S4E1 (S4E1 stands for Season 4, Episode 1). I then clicked the Add to Queue button in the toolbar. I named the next episode GOLDENGIRLS_S4E2, added it to the queue, and so forth.
Note: Episode naming is a guess. It’s not unusual for TV show titles to be random and out of order. Unfortunately, you might have to do some investigation to make sure you label the episodes correctly.
Once you’ve named each episode and added it to the queue, click Show Queue in the toolbar. A new window opens, showing your queue (Figure 46). Make sure everything looks right, and then click Start in the upper left. Now go grab a cup of coffee or read your email, since HandBrake will take care of the rest!
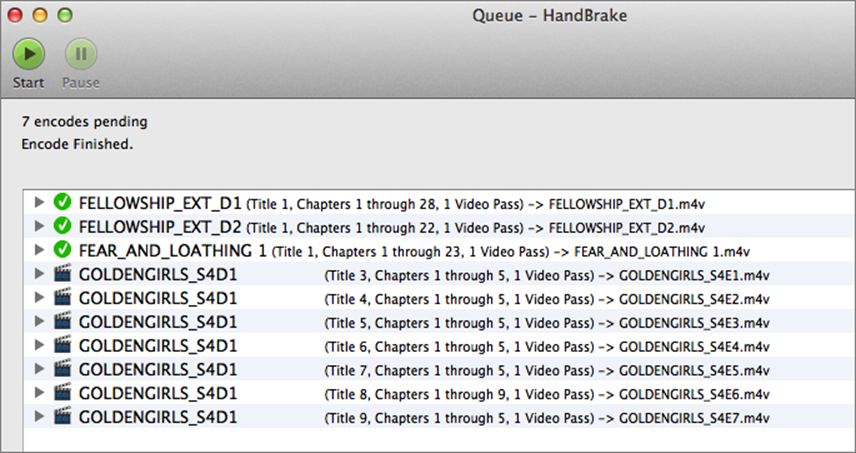
Figure 46: The HandBrake queue lets you encode multiple TV episodes from the same disc.
Merge Multi-disc Titles
Some movies are so long that they can’t fit onto a single DVD. You could rip each DVD and then keep them as separate files, but if you’re like me, you want a cleaner approach that merges them into one file using the free QuickTime app that comes with the Mac.
The QuickTime merge has big drawbacks: it takes a long time, the resulting file is often double the size of the two originals combined, and you lose metadata like chapter separators and subtitles. But, it tidies your library, and there aren’t many multi-disc DVD movies.
To merge ripped movie files into one big file, follow these steps:
1. In QuickTime, choose File > Open and select the rip of the first disc.
2. Once the movie is open in QuickTime, choose Edit > Add Clip to End, and select the rip of the second disc.
3. Choose File > Export > iPad, iPhone, iPod touch & Apple TV. You can also choose to export directly to iTunes. If you plan to store the movie on an external disk or add metadata with iFlicks, save it outside of iTunes first.
4. When asked to choose a size, select the largest available, which is usually iPad, iPhone 4 & Apple TV (Figure 47).
Figure 47: Unfortunately, merging movies in QuickTime requires a re-encode, and you don’t have much control over the final file size.
5. Click Share.
A progress window appears. Expect the conversion to take at least two hours, so go watch a movie or something while QuickTime does its thing.
The Blu-ray Bag of Hurt
Yes, you can rip Blu-ray discs! But the process is a smidge different from ripping normal DVDs, and you need additional hardware and software.
Apple will never sell a Mac with a built-in Blu-ray drive (Steve Jobs once called Blu-ray a “bag of hurt”), so you need to purchase an external Blu-ray drive if you don’t already own one. I use the $85 Samsung SE-506BB Blu-ray writer recommended by The Wirecutter, but it doesn’t include any viewer software for the Mac (but that’s okay, because you’ll be viewing the content on the Apple TV). Unfortunately, if you want to watch Blu-ray movies on your Mac in addition to just ripping them, the software is pricey—from $30 to $50. If you prefer a drive that includes software, you may want to look at the $79 MCE Super-BluDrive, but it can’t write to Blu-ray discs, only read from them (though it can burn DVDs).
You will also need extra software, because HandBrake can’t decode Blu-ray movies. Fortunately, Aurora Mac Blu-ray Copy is a free utility that can decrypt and extract an entire Blu-ray movie to your drive.
In addition to a Blu-ray drive and decryption software, you also need a lot of drive space. Most DVD movies max out at 9 GB. Blu-ray movies on the other hand hover around a whopping 50 GB. As a result, ripping is a lengthy, processor-intensive process. It’s best to start the process before you go to bed and let it run through the night.
Warning! Ripping your own Blu-ray movies may be illegal in your country. Consult your law enforcement agency, rabbi, and/or pediatrician before proceeding.
Extract with Aurora Mac Blu-ray Copy
The first step to viewing your Blu-ray movie on the Apple TV is to copy the decrypted disc to your hard drive with Aurora Mac Blu-ray Copy.
Open the app, then click the button to the right of the Source field and select your disc (Figure 48). Do the same for Destination—I suggest creating a separate folder for raw Blu-ray rips so they’re easy to dispose of when you’re finished.
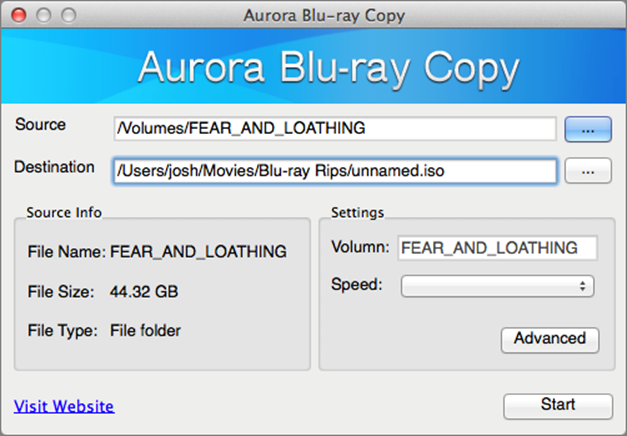
Figure 48: Aurora Blu-ray Copy is simple enough to use—just select the source disc and a destination file, and click Start.
Click Start and wait. It will likely take at least as long as the movie’s runtime to finish ripping.
When the rip is finished, you don’t have a playable video file; instead, you have a giant ISO disk image. Essentially, it’s an exact copy of the Blu-ray disc.
Next, use HandBrake to convert that disk image into a video file that iTunes and the Apple TV can read:
1. In the Finder, double click the Blu-ray ISO image to mount it, if it’s not already mounted.
2. Open HandBrake, and click Source in the left side of the toolbar. Select the mounted ISO image from the Open dialog.
HandBrake scans the contents of the ISO, looking for available video files. This takes a few minutes, so go make a nice cup of coffee.
Movies on DVD and Blu-ray, just like TV shows, have many video files, in addition to the film itself, such as special features and trailers. Of course, you want to convert the movie and not some tangential feature! HandBrake lists all the video segments it has found in the Title pop-up menu near the upper left. It should select the longest one by default, which should be the movie.
3. Check the Title pop-up menu to see if HandBrake chose the correct file. If not, choose the appropriate-length file from the menu. (To make sure, use the Preview Window option as I described above, in Rip TV Shows.)
4. Select the Apple TV 3 preset in the right-hand drawer.
Note: You want to pick all the right options up front because it takes a lot of time and CPU power to encode a Blu-ray movie. For example, you may wish to Add Subtitles, though take note that Blu-ray subtitles are hard-coded, so you have to choose whether to display them at all times or not at all.
5. Click the Start button on the toolbar.
You won’t be able to do anything intensive on your computer while HandBrake is running, and it will take several hours to process the video. Consider it an opportunity to take a break—you’ve earned it!
Improve iTunes Import with iFlicks
Let’s look at improving two types of video files. The first is a file that you’ve ripped using the directions earlier in this chapter (or any video in a format that your Apple TV can accept). This file may be lacking cover art or helpful metadata. The second is a video file in some other format, such as MKV, that you want to Convert for Apple TV.
Add Cover Art & Metadata
So you’ve converted your favorite movies and TV shows, and while the video itself looks fine, the file listings look ugly, with no cover art or metadata.
You could edit that information by hand in iTunes, but who wants to do that for every movie or TV episode? Fortunately, there’s an app for that. iFlicks runs $24.99 in the Mac App Store, and it will save you more than enough time to pay for itself.
Tip: If you didn’t run iFlicks first before copying to iTunes, don’t worry, since you can use iFlicks from within iTunes—drag your video file from the iTunes window into the iFlicks window to begin.
Here’s how to use iFlicks:
Make sure you have an active Internet connection, and launch iFlicks.
1. Drag a video file from the Finder and drop it into the dark gray area to the left of the iFlicks window. To save time, you can add as many files as you like.
iFlicks reads the filename and attempts to pick the correct metadata. If it gets it right, the correct cover art magically appears on your icon.
If iFlicks picks the wrong metadata or can’t find any metadata, you need to look up the metadata manually. Click the icon at the left and then click the gear icon near the right of the toolbar (Figure 49). In the General view that appears, the first two fields are Name and Show, with a search icon next to each. If you’re adding metadata to a movie, click the search icon next to Name. Likewise, if you’re processing a TV show, click the search icon next to Show.
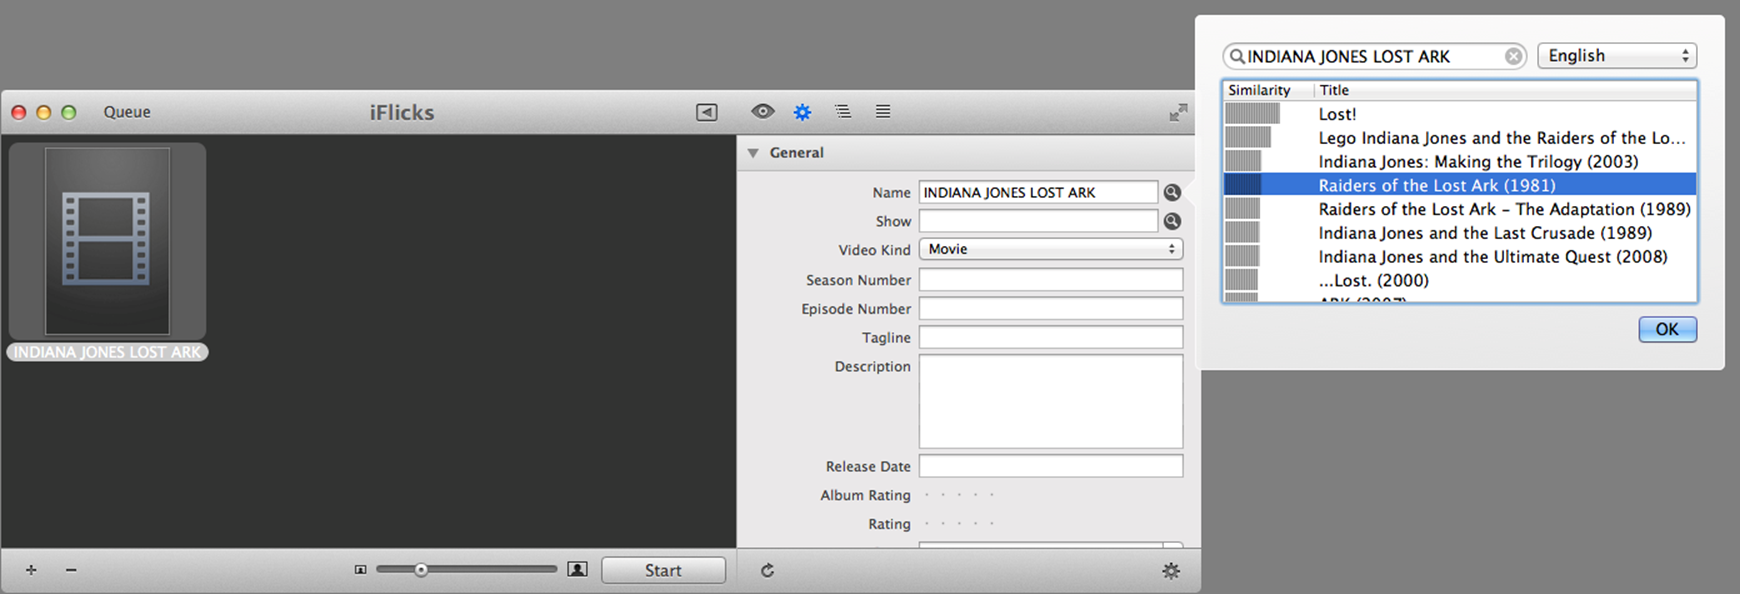
Figure 49: iFlicks uses the video filename to try to figure out what metadata to import, but you might have to look it up yourself.
In the search window, search for and select the movie or TV show you want metadata for, and click OK. The movie suddenly gains artwork and metadata (Figure 50)!
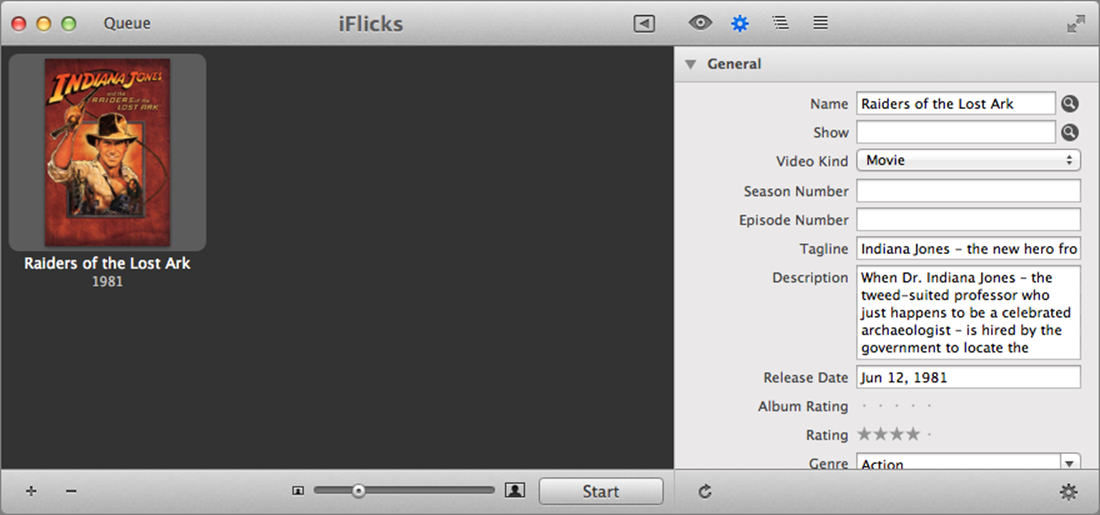
Figure 50: iFlicks shows what it’s going to add to your video before you click the Start button. It’s magic.
Don’t worry if the cover art or metadata is wrong—at this point, iFlicks has written nothing to the file.
2. Click the eye, found in the toolbar next to the gear.
3. In the Preset pop-up menu, the default is iTunes Compatible. iFlicks not only adds metadata, it also converts video! But we’ve already done that, so we want to turn that off. Choose Update Metadata and Rename instead.
Still in the “eye” view, select the Add to iTunes box to let iFlicks save you the trouble of adding the file to iTunes manually. (Naturally, the box is dimmed out if it’s already in iTunes.)
4. When you’re happy with your settings, click Start at the bottom.
Your files will be processed in seconds!
Convert for Apple TV
Let’s say you have movies or TV shows that you didn’t rip the way I specified. Maybe you downloaded them, or they fell off the back of a truck. Hey, I’m not judging! iFlicks can help you convert those for the Apple TV as well.
You might say, “Oh no, not yet another lengthy conversion.” Well, you might be pleasantly surprised to find that for many video files, iFlicks can simply rejigger the movie’s container without affecting the actual video. This seems to be especially true with MKV video files, which are often Apple TV-compatible videos that have been wrapped in an anti-social shell.
To convert video, look up the metadata in iFlicks if necessary (as described just previously), then click the eye icon in the toolbar. Under Preset, choose iTunes Compatible (Figure 51). This preset does as little conversion as possible to get it working on the Apple TV—saving time and preserving video quality. Also, if you like, in the “eye” view, select the Add to iTunes checkbox.
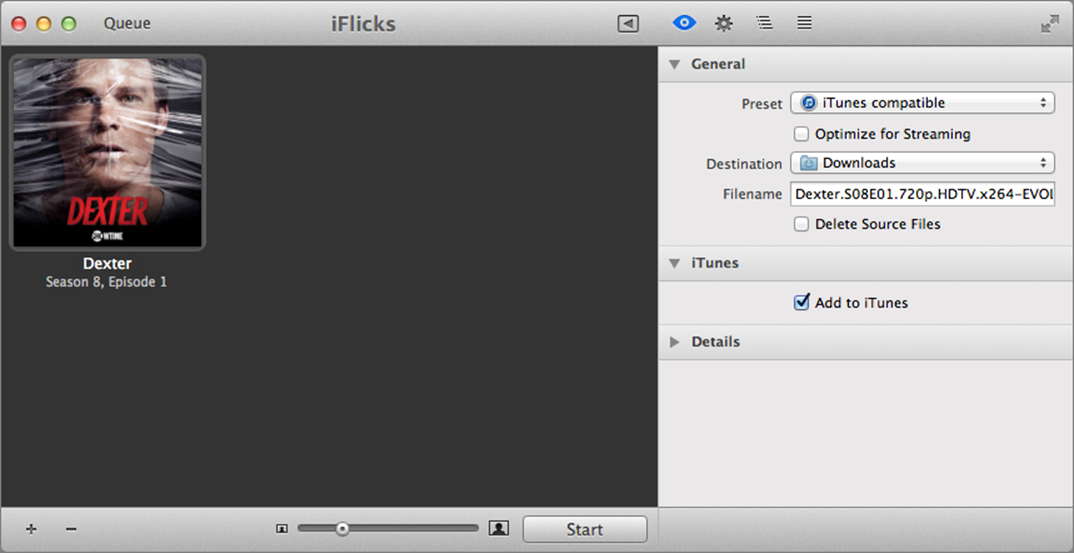
Figure 51: iFlicks can convert video as well, and in the case of this MKV file (it was meowing at the back door, honest!), it takes only a minute, because all that needs to be changed is the container, not the actual encoded movie itself.
When you’re ready, click Start.
Offload Movies to Another Disk
As I’m sure you’ve noticed, ripped DVDs and Blu-rays are huge—ranging from 1 to 10 gigabytes, even after you’ve converted them to iTunes format. You can run out of drive space fast, especially if you use one of the tiny SSDs that Apple prefers in its newer laptops. Fortunately, you can store your videos on an external drive and load them in iTunes without copying them to your boot drive. Here are two methods of doing so, plus a sidebar about Which One to Choose?.
The Easy Option
Move your video files to an external disk. Then, hold down the Option key while dragging them into iTunes. A pointer to each file is added to your iTunes library without iTunes copying the file. Because only a pointer is added, if you move the file in the Finder, iTunes won’t be able to find it. And, if the external drive isn’t mounted, iTunes may not handle the “missing” files well.
Tip: Store all your video files in one place. Don’t mix local and external locations—pick one or the other. That cuts down on confusion as to where any particular file is stored.
With this technique, iTunes may freak out and lose the metadata for your videos. If you use iFlicks, this is easy to fix, because you can simply drag the affected movies to iFlicks.
A Second Option
Another way to store videos on an external disk to is create a separate iTunes library on that disk. It’s a slight pain to switch between iTunes libraries, but you don’t have to worry about iTunes spazzing out and dumping your metadata!
To create another iTunes library, quit iTunes if it’s open, then hold down Option and launch it. When prompted to choose a library (Figure 52), click Create Library. Navigate to the drive that will hold your movies and give the new library a descriptive name, like “iTunes Movies.”
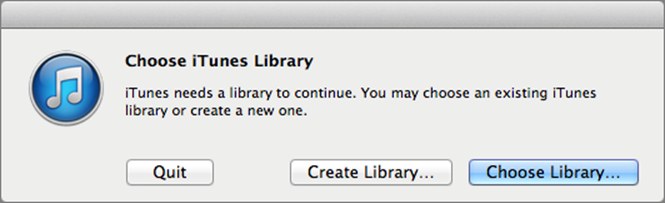
Figure 52: Hold Option as you launch iTunes to create or switch to another library.
Note: To access the new library on the Apple TV, open the library in iTunes and choose File > Home Sharing > Turn On Home Sharing!
iTunes launches with your new library open. Make sure the “Keep iTunes Media folder organized” checkbox in the Advanced iTunes preferences is selected, and then copy your movies into iTunes. After copying your movies to the new library, feel free to delete the originals.
To switch back to your main library, hold Option as you launch iTunes, click Choose Library, and select the desired library.
Tip: In 10.9 Mavericks, you can tag files and folders to easily access them even if they are in different places. Tag your separate iTunes library folders with a tag like “iTunes Library” to make switching between them easier.
Which One to Choose?
The first option is convenient, but the second option is completely reliable. It’s a pain to swap between libraries, but you minimize the chance of something going wrong. If you want the least amount of trouble, pick option two.
A number of third-party apps claim to split your iTunes library. I don’t recommend them. First, they don’t do anything that you can’t already do easily with system tools, and second, they can be unreliable.
In either case, it’s a good idea to back up your external media, particularly if you’ve put a lot of effort into assigning metadata. The best way to do this is by cloning to a second disk on a regular basis using SuperDuper or Carbon Copy Cloner. You can use an online backup service like CrashPlan, but video files are so huge that backing them up across an Internet connection may take weeks or months, and can cause you to exceed bandwidth caps from your Internet service provider. Plus, restoring over the Internet would likely take longer than ripping from scratch again.
Skip iTunes with Silver Screen
Put off by the hassle of iTunes? One alternative is Silver Screen, from Page Zero Software ($19). It’s a simple way to AirPlay any video in just about any format from your Mac to your Apple TV, and it can be controlled by a Web browser from any device.
Note: If you want a media storage and playback system that’s even more powerful (though harder to set up and use) than Silver Screen, see In the Plex.
Once you install and launch Silver Screen, you see its icon ![]() in your Mac’s menu bar. By default, Silver Screen looks for movies in your Movies folder, as well as any subfolders. This can be changed by choosing Silver Screen
in your Mac’s menu bar. By default, Silver Screen looks for movies in your Movies folder, as well as any subfolders. This can be changed by choosing Silver Screen ![]() > Preferences, and changing the Media Directory. While you’re there, you can also enter your Apple TV’s AirPlay password, if it has one (see Lock Down AirPlay, earlier).
> Preferences, and changing the Media Directory. While you’re there, you can also enter your Apple TV’s AirPlay password, if it has one (see Lock Down AirPlay, earlier).
To play a video on your Apple TV, choose Silver Screen ![]() > Open Media Browser. The Media Browser opens in your default Web browser. Be sure to send the URL from your browser to your mobile devices as well, so you can launch videos from the couch!
> Open Media Browser. The Media Browser opens in your default Web browser. Be sure to send the URL from your browser to your mobile devices as well, so you can launch videos from the couch!
Silver Screen is dead simple. Click a video, click Play, and it plays on your Apple TV (Figure 53). You can also resume or restart a video you played previously.
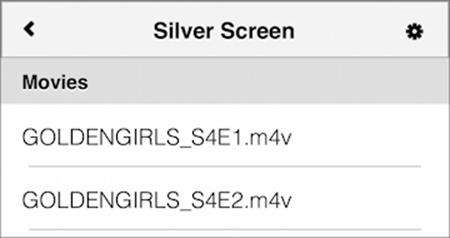
Figure 53: Silver Screen gives you a simple, Web-based interface for AirPlaying videos on the Apple TV.
If you have more than one Apple TV, click the gear ![]() icon in the upper right, and select the one you’d like to use from the list.
icon in the upper right, and select the one you’d like to use from the list.
Other than playing video, Silver Screen offers no other controls, so you’ll want to use your remote of choice like with any other video. Also, note that the video is being streamed from your Mac, not any mobile device you might launch the video from.
AirPlay Apps for Video
In addition to the built-in video options on the Apple TV, you can AirPlay movies and TV shows from a variety of free iOS apps, which are all available in the App Store. Here are some of the best ones to try:
· Aereo: While not available in every area yet, Aereo is a disruptive new service that could change the game for cord cutters. For $8 a month, you can view and record broadcast TV over the Web. Although there isn’t a dedicated iOS app yet, the Web client lets you AirPlay live video to your Apple TV.
· Amazon Instant Video: Amazon’s competitor to Netflix and iTunes, this app lets you AirPlay TV shows and movies you’ve purchased or rented from Amazon Instant Video. Also, Amazon Prime subscribers can take advantage of a Netflix-like streaming service from within the app. Amazon Instant Video has a number of streaming exclusives, including Under the Dome, Downton Abbey, Grimm, Justified, Falling Skies, The Good Wife, and Workaholics, as well as children’s exclusives, including Yo Gabba Gabba, SpongeBob SquarePants, Dora the Explorer, and Blue’s Clues.
· South Park Studios: The beta version of the South Park Studios Web site lets you AirPlay the adventures of everyone’s favorite foul-mouthed cartoon children for free.
· TED: This app brings fascinating talks by interesting people directly to you. Prepare to be amazed and inspired.
Tips for AirPlay Video
AirPlay can be as cantankerous as it is amazing. It sometimes seems like any little thing can cause an AirPlay video to stop playing, but here are some tips to minimize frustration when you AirPlay from an iOS device:
· Do not lock your device, or put it to sleep.
· If your iPad has a Smart Cover, don’t close it.
· Disable Auto-Lock in iOS under Settings > General > Auto-Lock.
· Control AirPlay video directly from the device, not from the Apple TV.