Take Control of Apple TV (1.0) (2014)
Rock Out with Apple TV
The Apple TV isn’t just a great device to watch movies and TV—it’s also a fantastic hub for all your audio. This chapter kicks off with a quick look at the important topic of improving sound quality and then cruises through the most important audio apps on the Apple TV.
In The Music App, I talk about how you can buy music from Apple and play your previous purchases. And, in The iTunes Radio App, I look at how you can play featured stations created by Apple or make your own. Of course, you can also access music from Home Sharing Music, even if its not from Apple, or you may want to learn how to Rip DVDs for Apple TV. Plus, you can listen to The (Internet) Radio App on your Apple TV.
With all the music covered, it’s time to talk about The Podcasts App. Finally, the chapter closes with a careful look at how to AirPlay Audio from Your Mac to an Apple TV.
Take the Sound to Eleven
The Apple TV is a fantastic home audio system, but it needs speakers! If you’re playing music over tinny TV speakers, it won’t sound much better than an old-time wax cylinder.
To improve your audio, consider adding more hardware:
· Receiver and speakers: A home-theater receiver with speakers is the traditional answer to improving the sound from your TV. The downside to this solution is cost and complexity. Also, keep in mind that music is usually recorded for stereo speakers, so an entire 5.1 surround system is overkill. If you’re interested in going this route, look at The Wirecutter’s current recommendations for The Best Receiver, A Great Bookshelf Speaker, and Great Surround Speakers. Expect to spend at least $400, though you could spend many thousands.
· Soundbar: A soundbar is a compact set of speakers, crammed into one bar, that addresses the problems of traditional home theater receivers. A soundbar is a better solution than a receiver for most people, since you don’t have to string wires all over your living room, but a potential downside is that many soundbars attach directly to the TV, so you can’t play audio from the Apple TV unless the TV itself is on—look for a soundbar with an optical audio input so you can connect it directly to the Apple TV. Soundbars aren’t much cheaper than a receiver/speaker combination; expect to spend anywhere from $350 to $1,500 on a good soundbar. I recommend reading The Wirecutter’s current picks for Best Budget Soundbar and Best Soundbar.
· AirPlay speakers: Since your Apple TV can output sound over AirPlay, you can use a wireless speaker that acts as an AirPlay receiver. Many cost less than $200, and they can also work with a Mac, iPhone, iPad, or iPod touch. The downside is that you can’t use an AirPlay speaker for the TV’s audio itself, or anything else connected to the TV. Also, controlling AirPlay volume on the Apple TV is clunky. (See AirPlay from an Apple TV for setup help.)
· AirPort Express and speakers: The $99 Apple AirPort Express isn’t just a router—it’s also an AirPlay receiver. It can receive audio wirelessly via AirPlay and then route it to wired speakers. The 3.5mm audio minijack output port (headphone jack, in plain English) can output analog audio or optical audio, depending on which type of cable you connect. For example, you can make an optical audio connection with PTC’s TOSLINK to Mini-TOSLINK cable.
Which one to choose? Only you can decide, but I will share my setup. I connect my Apple TV’s video directly to my television with HDMI, but I connect the Apple TV’s audio to a Sony home-theater receiver via an optical audio cable (the receiver is old, so it doesn’t accept HDMI input). Attached to the receiver is a set of old 2.1 (two speakers plus a subwoofer) Sony speakers that originally came with a home stereo. The speakers are actually from a 5.1 (five speakers plus a subwoofer) surround-sound set, but I don’t have the extra three speakers connected for a few reasons. First, I hate having wires strewn across my living room. Second, some movies still don’t support 5.1 correctly, which is annoying. Third, music sounds terrible over 5.1, and I hate having to switch between the two. For me, 2.1 sounds great and comes with fewer headaches.
The advantage of my setup is that since audio and video are separate, I don’t have to turn on the TV to hear audio. Remember, the Apple TV wakes up when it receives an AirPlay signal. So, I can pull a song up on my iPhone, in any audio app, and send it via AirPlay to my big speakers in the living room. When I do this, my song travels wirelessly via AirPlay to my Apple TV. The Apple TV routes it through the optical audio port to a cable that transmits the tune to my Sony home-theater receiver and then blasts the sound out of my speakers, waking everyone in the house.
If my old receiver ever bites the dust, I happen to have an AirPort Express next to my TV, so I can plug a set of speakers into that and set up the AirPort Express as an AirPlay receiver.
The Music App
The Music app on the Apple TV serves as your portal to iTunes music—your prior purchases, your iTunes Match library, and music you can purchase from the iTunes Store.
Note: If you’d rather access your music collection—including music you acquired from sources other than the iTunes Store—from an existing iTunes library, you can do that too; see Home Sharing Music.
To access music from the iTunes Store, find the Music app in the main menu. Before opening the app, when you’ve highlighted its icon, you might notice that, like the Movies and TV Shows apps, a Cover Flow menu appears at the top of the screen, showing a sample of your music and the top songs in the iTunes Store.
Select the Music icon to open the app, and you see your iTunes music collection and what’s available for purchase (Figure 54).
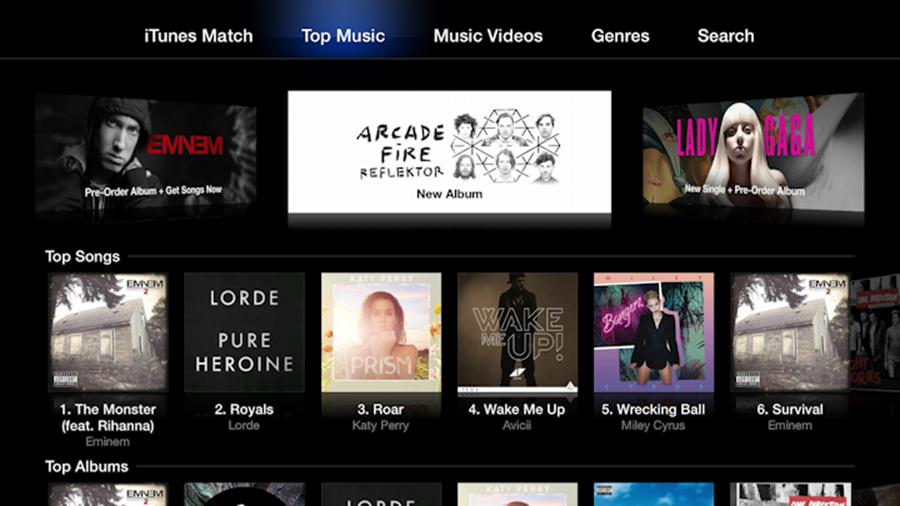
Figure 54: The Apple TV’s Music app is your portal to the iTunes Store, purchased music, and iTunes Match.
Buy iTunes Music
In Music, the default view is Top Music (Figure 54, above), which shows the most popular songs and albums in iTunes. For more viewing options, press Left or Right to select Music Videos, Genres, and Search from the navigation bar.
To buy a song or album, simply select it with your remote. You can preview individual songs before purchase. When you’re ready, select the Buy button, which has the price listed (Figure 55), then select OK at the confirmation screen.

Figure 55: Apple makes it easy to buy music on the Apple TV.
Your iTunes Music on Other Apple Devices
Your new music purchases can download automatically to your other Apple devices, too. In iOS 7, tap Settings > iTunes & App Store and turn on the Music switch; in iTunes on a computer, open the iTunes Store preferences and select the Music checkbox.
If you don’t want automatic downloads, you can still access these purchases; look for a “purchased” option in the Music app (iOS) or iTunes (Mac and Windows).
Listen to Your iTunes Music
To listen to your music, select the leftmost button in the Music navigation bar. The name of this button changes depending on your iTunes account:
· Purchased: If you don’t subscribe to iTunes Match, the button is named Purchased. Select it to listen to your purchased tracks. (If you drill down in this view and see a “no songs in this library” message but you have purchased music with your signed-in Apple ID, Home Sharing may be on. If Home Sharing is on, access your music through the Computers app instead; see Home Sharing Music.)
· iTunes Match or My Music: If you’re an iTunes Match subscriber, the button is initially named iTunes Match. Select it and you are prompted to Turn on iTunes Match (Figure 56). Select that button, wait a few minutes, and your entire music library appears! From now on, the navigation bar button is named My Music.
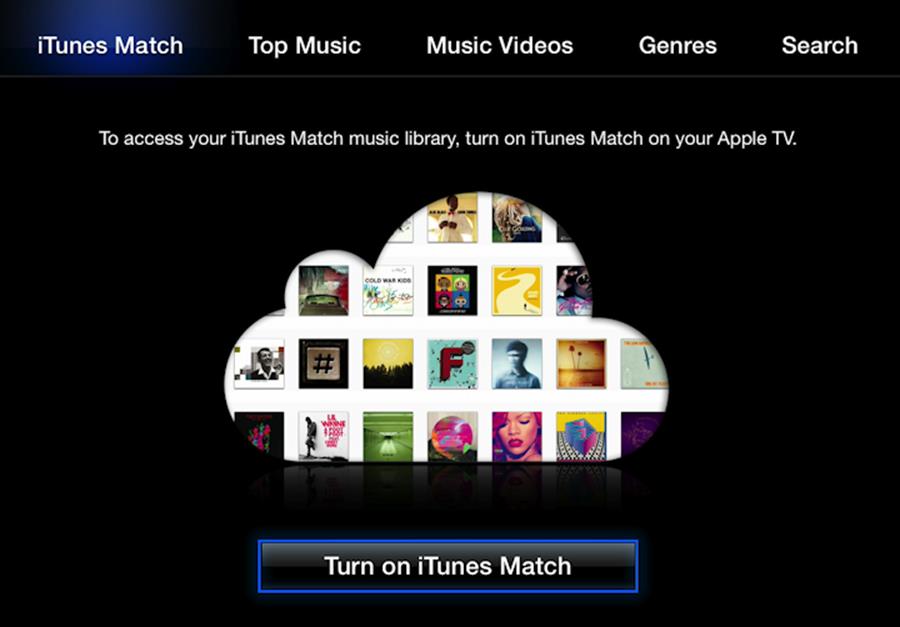
Figure 56: If you subscribe to iTunes Match, the Apple TV replaces the Purchased button with an iTunes Match or My Music button.
No matter what the view is named, the My Music menu is the same (Figure 57). You can view songs by artists, albums, genres, and more. Also, you can play any available playlists or select Shuffle Songs to play your entire music library randomly. Shuffle also appears as an option as you delve further into your music, so, for example, you can shuffle songs in a genre or playlist.
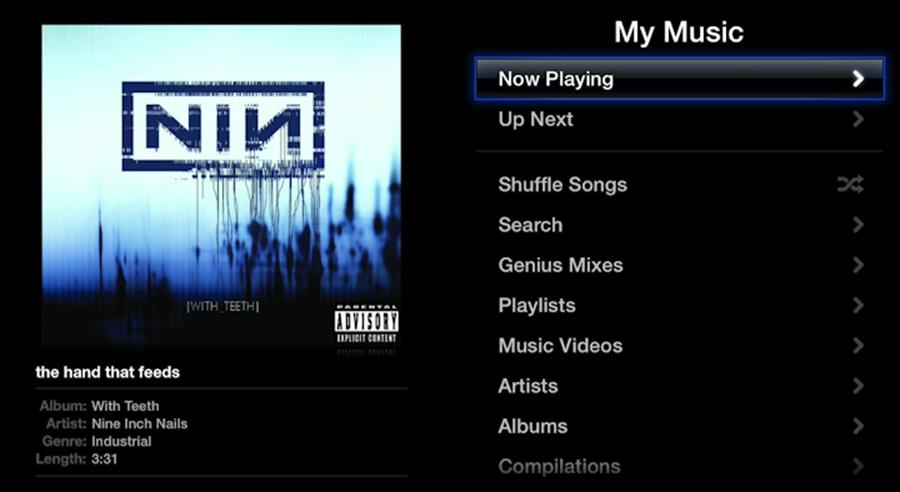
Figure 57: No matter what the leftmost navigation button in Music is called, you can click it to browse your music library, see what’s playing, shuffle songs, and manage the Up Next queue.
To see the currently playing track, select Now Playing.
Control Your Music
While viewing the Now Playing track, press Play/Pause to…well, you know (Figure 58). Press Left once to skip back to the start of a song, and press it again to skip to the previous song. Press Right to skip to the next song. If you hold Left or Right, you can scrub(rewind or fast-forward) within the current song.

Figure 58: While viewing the Now Playing song, hold Left or Right to scrub within the song, press Right to skip to the next song, or Left to skip back to the start of the song.
Hold Select while viewing the Now Playing track to view even more options (Figure 59). You can create a temporary playlist based on the current song with Genius, work with Up Next (see the sidebar just ahead), view all songs by the artist, view all songs on the album, or select and control the volume of AirPlay speakers.
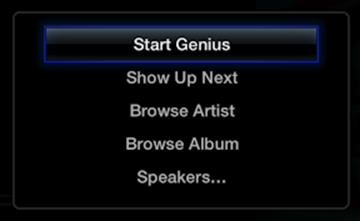
Figure 59: Hold Select in Now Playing to create a Genius playlist based on the current song, show the Up Next queue, see more by the artist or the rest of the album, and control AirPlay Speakers.
Unlike video, audio keeps playing as you move around the interface, even on the main menu. If you step away from the Apple TV, it will show the currently playing track instead of the screen saver. To stop the music at any time, press Play/Pause. But once it’s stopped, if you want to turn the music back on, you’ll have to do so from inside the Music app.
Up Next Keeps the Party Going
Up Next, like its iTunes counterpart, is a feature that automatically queues up music to play after your selections have played. Even if you play just one song, the Apple TV loads tunes to play next.
You have complete control over Up Next. To see your queue, open the Purchased/My Music view and select Up Next. You can scroll through the list and select a track to play it instantly (Figure 60). To reorder your list, press Right to reveal the “hamburger” List button, then press Up or Down to move the track around.
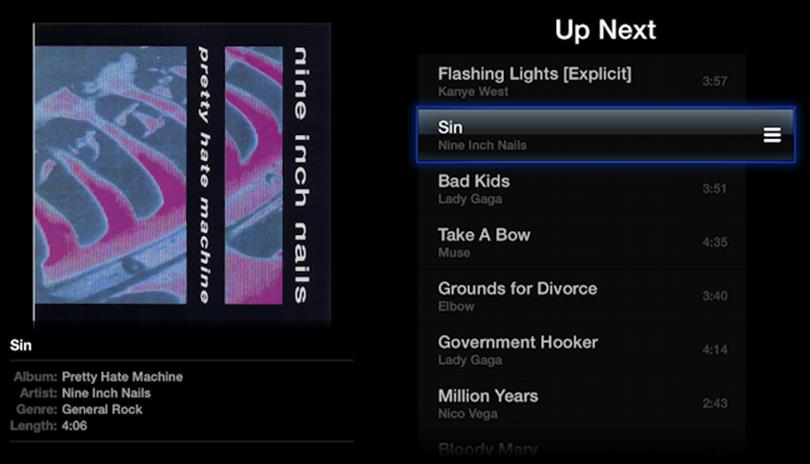
Figure 60: Up Next continues playing music even after your selection has been played. You can add songs to it and rearrange the queue.
To add a song or playlist to Up Next, find it in your library and hold Select, then select Add to Up Next.
The iTunes Radio App
With iTunes Radio you can create custom “radio” stations based on an artist, genre, or song. Stations you create in iTunes on your computer or in the iOS Music app also appear on the Apple TV. You can tailor each station to emphasize or exclude certain artists. iTunes Radio is free, but ad supported unless you pay Apple $24.99 per year for iTunes Match, at which point the ads disappear from iTunes Radio. One particularly cool thing about iTunes Radio is that it sometimes plays upcoming albums for free.
Play a Station
To start, open the iTunes Radio app from the main menu. In the default Stations view, you see featured stations along with any stations that you’ve created (Figure 61). To play a station, select it.
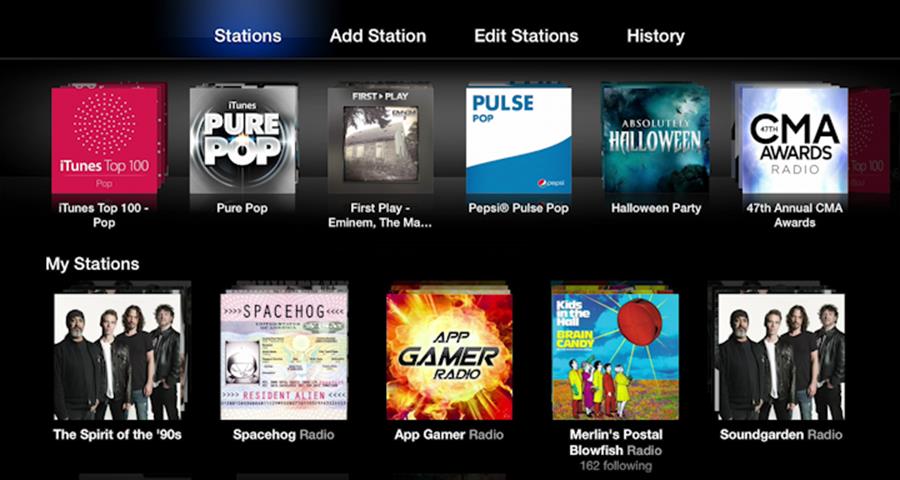
Figure 61: iTunes Radio lets you create custom radio stations and listen to prebuilt featured stations, some of which play albums before they’re released.
The playback controls are a bit different from those in the Music app. Play/Pause works as you would expect, but you can’t scrub inside a track or skip to a previous track. You can press Right to skip to the next track, but there’s a limit of six skips per hour per station.
Press Left, Right, or Up while listening to a song to display more options (Figure 62). For example, you can add the current track to your iTunes wish list, make a new station from it, or tell iTunes Radio to never play it again. The options vary a bit depending on whether you’re listening to one of your own stations, a featured station, or an unreleased album being previewed on iTunes Radio.
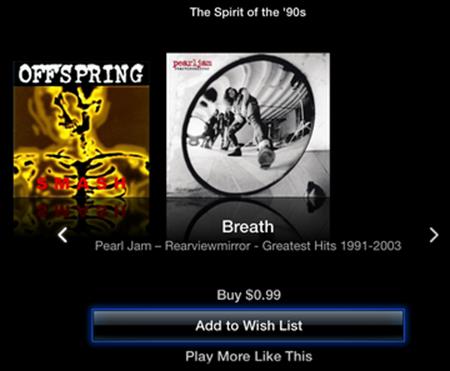
Figure 62: Press Left, Right, or Up while listening to an iTunes Radio station to bring up more options.
If you tire of viewing a song’s options, press Menu to return to the player controls while the song keeps playing. To return to the Stations pane, press Menu again.
Note: If you press Menu while at the player controls in the Now Playing pane, you’ll instead be taken to the nav bar. Confusing!
Add a Station
You can base a new station on an artist, album, or genre. To get started from Stations view, either scroll down and select the Add Station icon or scroll up to the nav bar and select Add Station.
From the Add Station menu, select a genre station or select Create a Station to create a custom one (Figure 63).

Figure 63: In iTunes Radio, you can select a preset station or create a custom station by searching for an artist, song, or genre.
After selecting Create a Station, type the artist, song, or genre you want to base the station on. As you type, suggestions appear to the right. Once you see something you want, keep pressing press Right to highlight it, then select it. The Apple TV adds your new station to your My Stations list and begins playing it.
Tip: While listening to iTunes Radio, if the currently playing song inspires you to create a new station, select it (say, by pressing Down) and then select New Station from Song or New Station from Artist.
Manage Stations
Now that you’ve made an iTunes Radio station, you may want to improve it—or get rid of it. To accomplish these tasks, begin by pressing Up to open the nav bar and then select Edit Stations.
Here’s a rundown of the important options:
· Explicit music: The first option in the menu, Explicit Music, is off by default. Select it to turn on (or off) more risqué songs from all stations at once.
· Deleting: Scroll down to highlight the undesired station. Press Right to highlight the trash icon (Figure 64), and press Select. When prompted, select Delete.
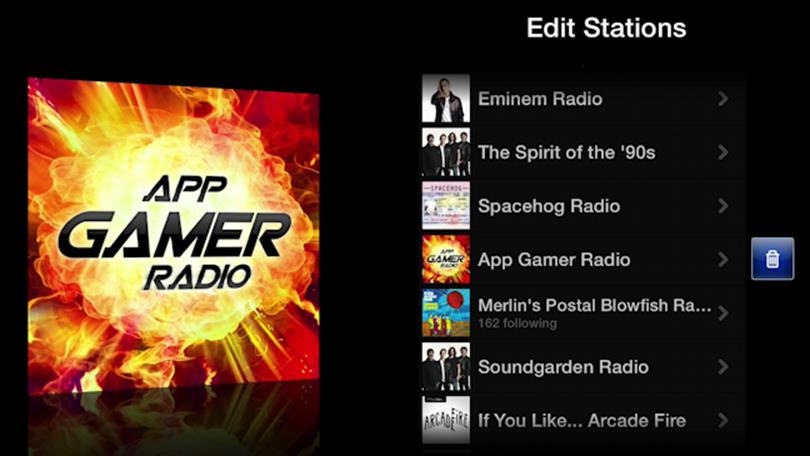
Figure 64: To delete a station, visit the Edit Stations view, scroll to a station, press Right to highlight the trashcan, and then press Select.
· Renaming: Select a station to view its customization options (Figure 65). Select the first item in the menu, Name, to enter a new name.
· Playing more (or fewer) hits: With a station selected, select Tune This Station. Now, pick the default, Hits, to have your station play the most popular tracks associated with your station preferences. Or, select Discovery to hear more obscure songs. Variety is a happy medium between the two.
· Tailoring to your tastes: With a station selected, pick Play More Like This or Never Play This (Figure 65). Under each heading, select Add Artist, Song, or Genre, then look up an entry just as if you were adding a station. These options can be changed at any time.
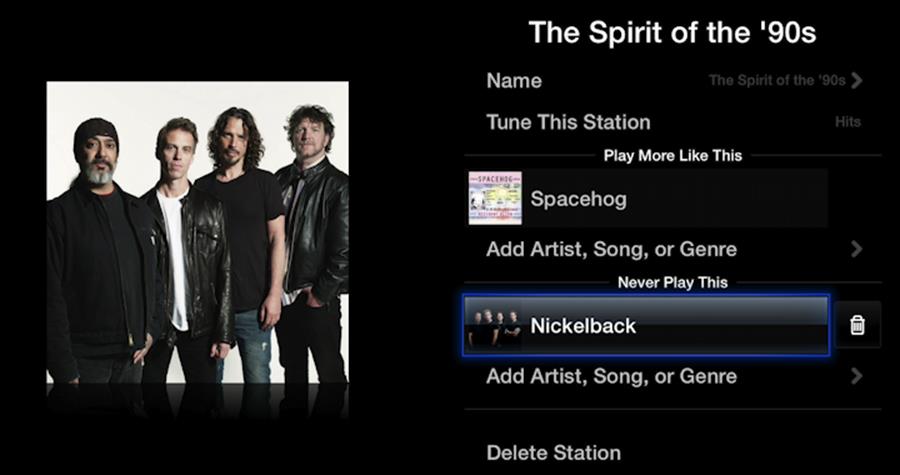
Figure 65: You can edit iTunes Radio stations directly on the TV, customizing them to your taste.
View Your History & Wish List
The last button in the navigation bar in iTunes Radio is History. Although you can look in this view to remind yourself of what you’ve heard recently, Apple’s aim is to encourage you to buy music. History has two sub-views, one showing songs that have recently played (Figure 66) and the other showing songs you’ve added to your Wish List. Press Right and Left to switch between the sub-views.
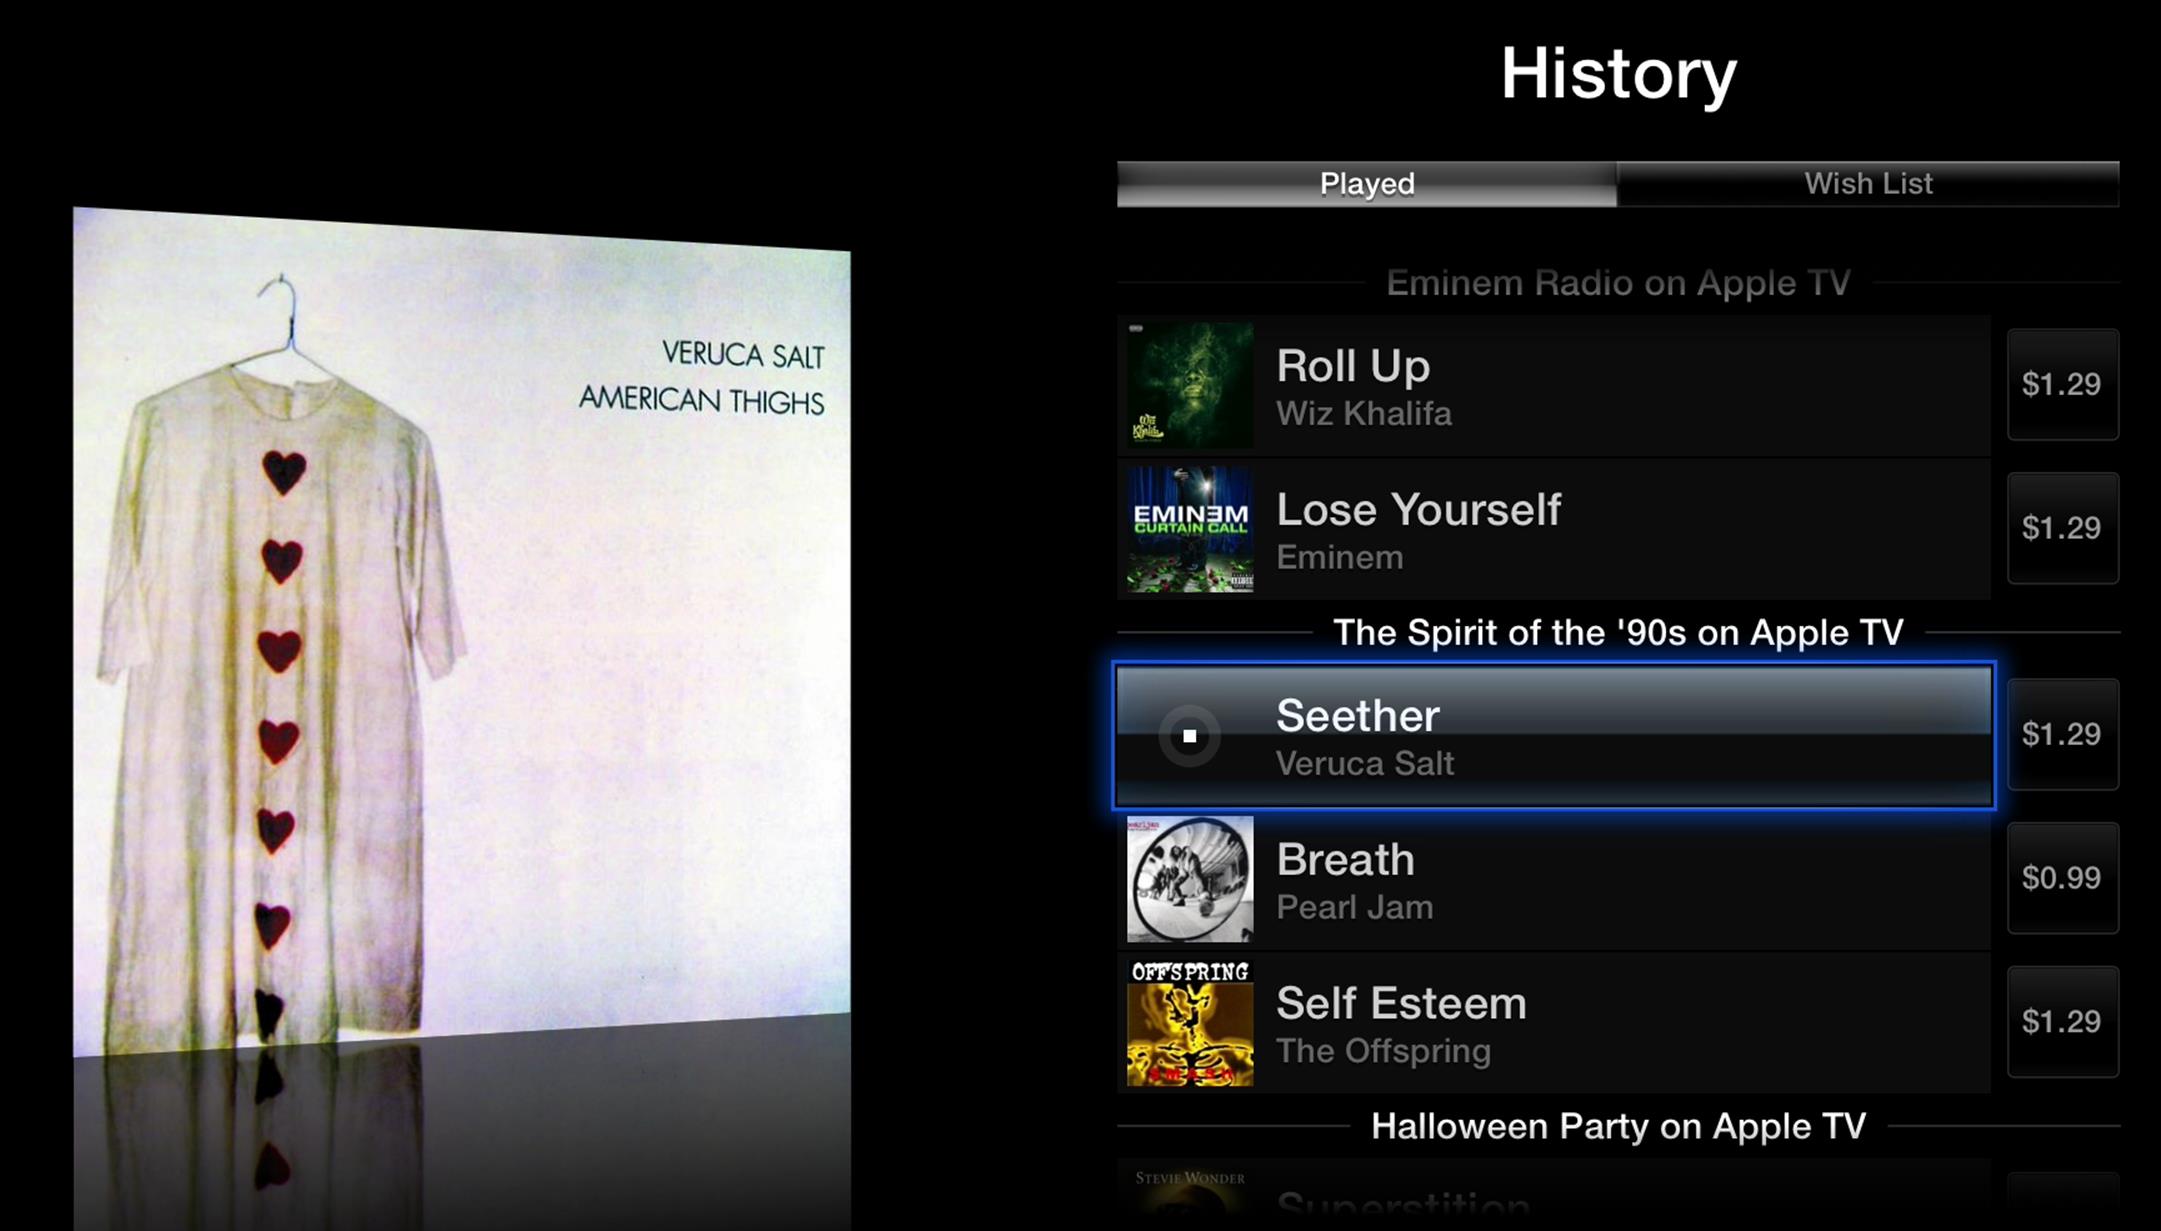
Figure 66: From your iTunes Radio History, you can purchase tracks from your history and Wish List.
Select a track to hear a 90-second preview. A button to the right of each track name displays the song’s price. Press Right while a track is highlighted to highlight the price button, and if you want to buy the track, press Select. When the confirmation appears, press OK and the song is yours.
Home Sharing Music
In the Music app, you can play music from the Apple cloud, but that’s no help if you want to listen to the music stored in the iTunes library on your computer. To pull off this trick, set up Home Sharing. Connect to an iTunes Library has complete directions.
Once you’ve made the necessary Home Sharing connection, open the Computers app (it’s on the main menu) and select Music. The playback controls are identical to those described earlier in this chapter, in Control Your Music.
Rip CDs for Apple TV
Still have your music collection trapped in plastic discs? The bad news is that the Apple TV won’t play them. The good news is that it’s easy to rip CDs to your iTunes collection on your computer, where they can be accessed by your Apple TV or sent into the cloud with iTunes Match.
Before we rip a CD, let’s fix our settings:
1. Open iTunes and choose iTunes > Preferences (Command-,).
2. Click the General button on the toolbar.
3. At the bottom of the General pane, next to “When a CD is inserted,” choose Ask to Import CD from the pop-up menu (Figure 67, red box)—or, if you have a bunch of CDs to rip at once, make the process go faster by choosing Import CD and Eject.
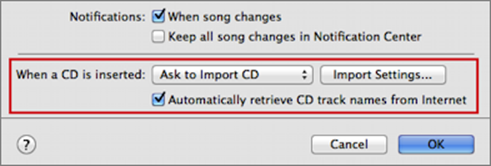
Figure 67: From the iTunes preferences, you can set what iTunes will do when you insert a CD into your computer’s optical drive.
4. Select “Automatically retrieve CD track names from Internet.”
5. Click the Import Settings button to open the Import Settings dialog (Figure 68).
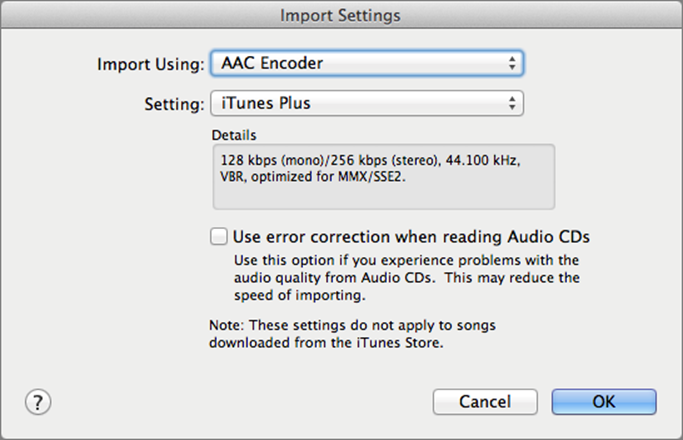
Figure 68: In the Import Settings dialog, you can set the quality you want to rip your CDs at.
6. In the Import Settings dialog, I recommend either of two options:
§ Option #1: To save storage space, choose AAC Encoder from the Import Using pop-up menu. Then choose iTunes Plus from the Setting pop-up menu. These choices (shown in Figure 68, above) tell iTunes to rip CDs in a way that matches the typical quality of songs in the iTunes Store.
§ Option #2: To produce larger files with CD-quality audio, choose Apple Lossless Encoder from the Import Using pop-up menu.
7. When you’re happy with your settings, click OK to leave Import Settings, then OK again to leave Preferences.
Tip: For more details about the choices in the Import Settings dialog, including advice on ripping audiobooks, read Kirk McElhearn’s Take Control of iTunes 11: The FAQ.
Now, insert the CD into your computer’s optical drive (or an external drive). If you need to buy an optical drive, you might as well leap to Blu-ray—see The Blu-ray Bag of Hurt for recommendations.
Note: In unusual situations, you might see a dialog asking you to clarify which album you’ve inserted. Select the choice that seems best to you, and click OK.
Back in Step 3, if you chose an option that included importing, then iTunes begins ripping your CD automatically. Otherwise, iTunes does whatever you chose in Step 3.
To rip the CD manually, click the Source pop-up menu in the upper-left, choose the CD, and then click Import CD near the upper-right. iTunes asks you to confirm your import settings before it begins ripping.
After the rip, if iTunes doesn’t eject your CD automatically, open the Source pop-up menu near the upper left and click the Eject button adjacent the CD’s name in the menu.
While ripping a CD, iTunes tries to import album art into the ripped file, but sometimes it can’t. Fortunately, it’s easy to add it yourself:
1. Search Amazon.com for the CD you imported. Pull up the product listing (Figure 69), and click the artwork at the left to open it at full size.
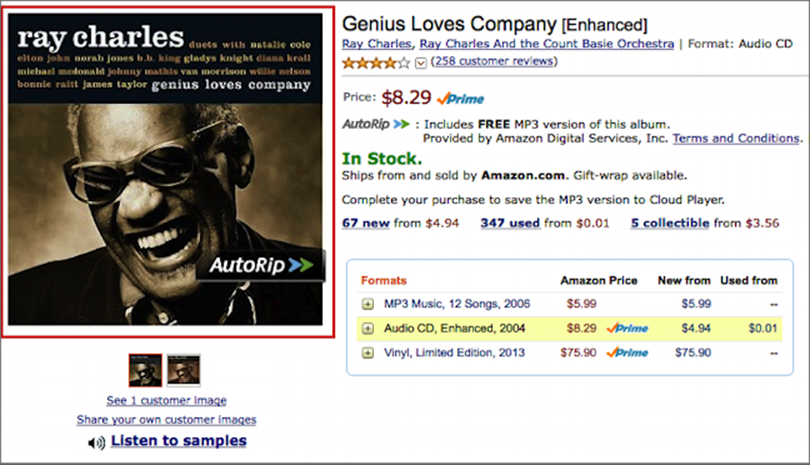
Figure 69: Search Amazon for the CD you need artwork for, then click the album art at the left.
2. Control-click the image, and choose Copy Image (Figure 70).
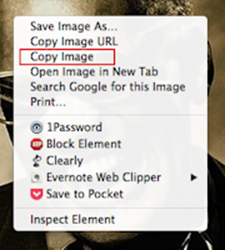
Figure 70: After you click the album art, a pop-up appears with the full-size art. Control-click it and choose Copy Image.
3. In iTunes, select the album with missing artwork and then choose File > Get Info (Command-I).
4. Open the Info pane in the Multiple Item Information window.
5. iTunes may ask if you want to edit information for multiple items. If so, click Yes.
6. Select the well under the Artwork label and press Command-V to paste the artwork in (Figure 71).
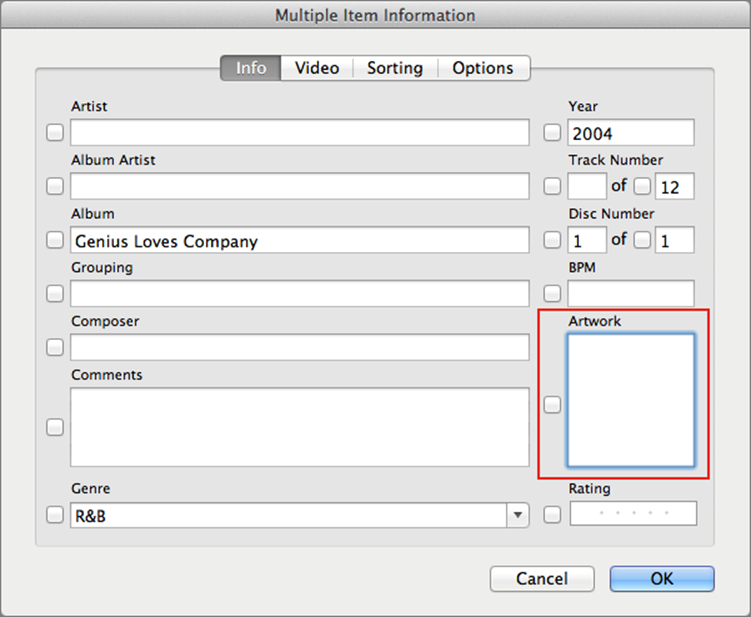
Figure 71: Select the album, choose File > Get Info, then select the Artwork well and paste in the artwork you copied from Amazon.com.
7. Click OK.
After a bit of processing, iTunes associates the artwork with the imported CD.
To listen to your album through your Apple TV, you can AirPlay Audio from Your Mac, add it to an iTunes Match library (see The Music App), or turn on Home Sharing (see Home Sharing Music).
The (Internet) Radio App
In addition to custom iTunes Radio stations, the Apple TV offers more traditional Internet radio options. To find them, go to the main menu and open the Radio app.
The Radio app offers a wide selection of stations (Figure 72), but unfortunately you can’t add your own. Select a station to start playing it, or hold Select while a station is highlighted to add it to your Favorite Stations list.
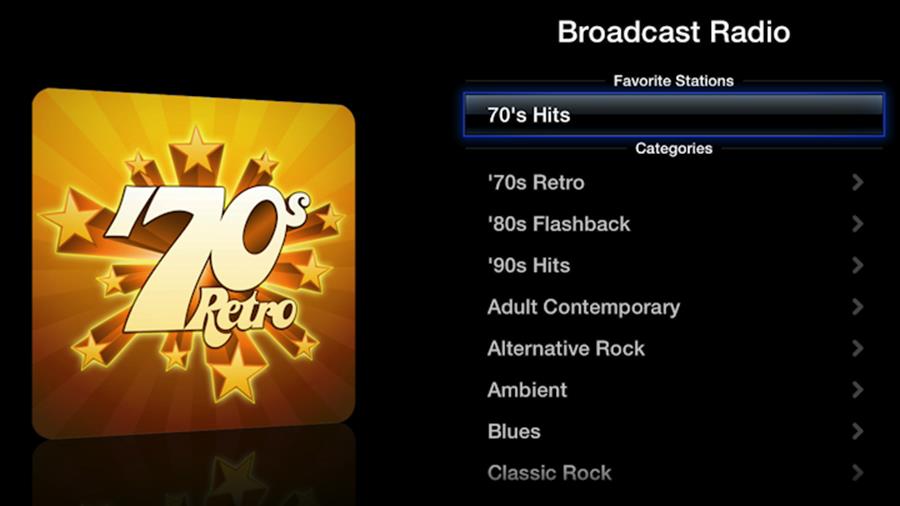
Figure 72: The Radio app offers a number of preset categories and lets you set favorites.
While listening to a station, you can only play or pause; there are no other playback controls. To remove a station from your favorites or to select an AirPlay speaker, hold Select while listening to it.
The Podcasts App
With the Podcasts app on your Apple TV (Figure 73), you can watch, listen to, and subscribe to all your favorite podcasts. In theory, your subscriptions, playback positions, and stations sync via iCloud with iTunes on your computer and the Podcasts app for iOS, but as I describe in the TidBITS article Explaining Podcasts in iTunes 11.1, syncing doesn’t always work like it should.

Figure 73: The Podcasts app gives you a variety of podcasts to listen to, watch, and subscribe to.
Find & Subscribe to Podcasts
The top navigation bar in the Podcasts app has four buttons leading to views where you can find new podcasts: Top Podcasts, Genres, Providers, and Search.
Tip: In each view, look for options that filter the view to show only audio or video podcasts.
Once you find a podcast that looks interesting, you can play a single episode or subscribe to it:
· Play: Select the podcast, and then select the desired episode.
· Subscribe: To subscribe to a podcast so you can more easily listen to it regularly and not miss episodes, select the podcast and then select Subscribe. Apple records your subscription in the signed-in iCloud account. The podcast is added to the Apple TV My Podcasts view, and, in theory, to your subscribed podcasts in iTunes and the iOS Podcasts app. If you hold Select over a podcast episode, you can mark that episode or all episodes of that podcast as unwatched.
Play Podcasts
You can play a podcast directly from its iTunes Store listing, or from the My Podcasts or My Stations view.
About Podcast Stations
A station is a collection of subscribed podcasts, sort of a playlist for podcasts. While you can view these on your Apple TV, you cannot create or edit them. To manage stations, work in iTunes on your computer or in the Podcasts iOS app.
No matter how you select a podcast, here’s how to control playback. First, if you’re watching a video podcast, the controls are the same as they would be for any other video, as I explained in Video Navigation, with one key difference: the audio keeps playing even if you exit the playback screen. As with any audio, you can stop playback at any time by pressing Play/Pause, but you’ll have to go back to the Podcasts app to restart the show.
Just as video podcasts inherit audio controls, audio podcasts have video-like controls: To advance or step back by 1/20th of the episode length, press Right or Left. Or, to fast-forward or rewind, hold down Right or Left.
Manage My Podcasts
The Apple TV doesn’t offer many ways to manage podcasts, something that’s better done in iTunes or the Podcasts app, but you can do a couple of things in My Podcasts view:
· Unsubscribe: Select a podcast, and then select Unsubscribe (Figure 74).
· Rearrange: Highlight a podcast icon and hold Select until it starts to shake. Use the directional ring to move the icon around the grid, and press Select or Menu when you finish.
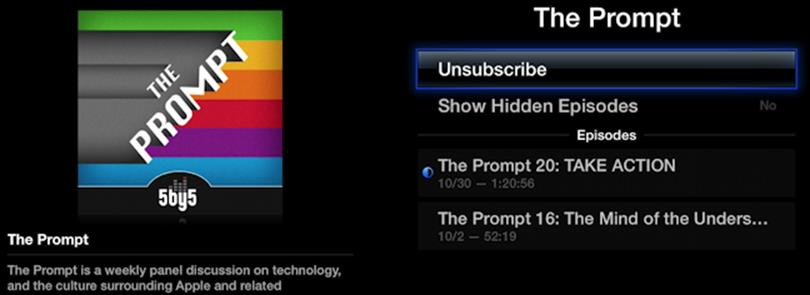
Figure 74: To unsubscribe from a podcast, select it in the My Podcasts view and then select Unsubscribe.
AirPlay Audio from Your Mac
Back in Master AirPlay, you learned the basics of how to send AirPlay audio from your Mac. Now it’s time to learn some audio AirPlay tricks.
AirPlay All Mac Audio
Just as AirPlay Mirroring and AirPlay Display let you send video from your Mac to your Apple TV, you can do the same for audio. Press the Option key and click the volume icon in the menu bar. You see a list of all available audio outputs, including AirPlay devices (Figure 75).
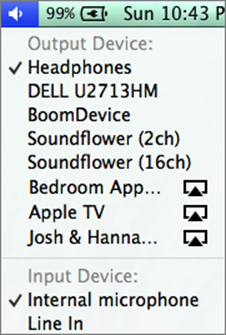
Figure 75: Option-click the volume icon in the menu bar to bring up a list of audio output options, including AirPlay receivers.
Fill Your House with Audio
Sending AirPlay audio to one device is neat, but you know what’s really impressive? Sending AirPlay audio to all the AirPlay devices in your house! That’s right, with iTunes, you can AirPlay audio to multiple devices to fill your whole house with sound. Forget expensive multi-room audio systems; if you have a few AirPlay devices, like speakers, an AirPort Express, or an Apple TV, you can make the party a lot more fun on the cheap.
In iTunes on your Mac, click the AirPlay icon; then choose Multiple from the popover. Click the bubble next to each device you want to send audio to—the bubble turns blue and gains a check mark. You can send audio to as many devices as you like, but Apple suggests that performance may suffer after three to six. To control the volume of a device, adjust its slider in the popover (Figure 76).

Figure 76: In iTunes, you can AirPlay audio to multiple receivers.
When the party’s over, you can either uncheck each item individually, or choose a single device from the popover.
Extend AirPlay with Airfoil
Transmitting all audio from your Mac is cool, but you may hear unwanted sounds as well, like error beeps. And it’s cool that iTunes can output to multiple AirPlay receivers, but what if you want to do that with another application?
Airfoil from Rogue Amoeba makes such AirPlay wizardry possible. It costs $25 for either the Mac or Windows version, or you can buy both together for $40.
Once you’ve installed Airfoil, launch it and select your source app from the menu at the top of the window (Figure 77).

Figure 77: Airfoil can stream audio from any app via AirPlay—even to multiple receivers.
Below the menu is a list of receivers. To send audio to a receiver, click the Transmit ![]() button aligned with it. (You might have to quit and reopen the source application before Airfoil can AirPlay the audio.) You can send audio to multiple outputs, and you can adjust the output volume for each AirPlay device with the slider underneath the Transmit button.
button aligned with it. (You might have to quit and reopen the source application before Airfoil can AirPlay the audio.) You can send audio to multiple outputs, and you can adjust the output volume for each AirPlay device with the slider underneath the Transmit button.
Don’t have enough speakers to go around? With Rogue Amoeba’s free Airfoil Speakers apps for iOS, Mac, Android, Windows, and Linux, you can turn your devices into Airfoil receivers!
Airfoil Headphones
The Apple TV doesn’t support Bluetooth headphones, which is annoying. Fortunately, with Airfoil and Airfoil Speakers, there is a way to listen to your Apple TV via your phone, tablet, or Mac. Unfortunately, there is a bit of latency, so if you watch a movie, the actors’ lips may not match up with the audio.
On your computer, open Airfoil Speakers. Then, on your Apple TV, open Settings > AirPlay, and under Speakers, select the computer running Airfoil Speakers. Now either:
· Open Airfoil Speakers on your phone or tablet. Then, back on your computer, open Airfoil. From the menu at the top, choose Airfoil Speakers and select your phone or tablet as the output. Now sound streams from your Apple TV to Airfoil Speakers on your computer, to Airfoil on your computer, then out to Airfoil Speakers on your phone or tablet. Connect your headphones to the phone or tablet, and you’re good to go.
· Or, if you have wireless Bluetooth headphones for your Mac, you can skip outputting the sound from the Mac to another device. This reduces latency somewhat.
It’s a lot of work for something that isn’t perfect (Unfortunately, due to Apple’s restrictions, Airfoil Speakers can’t be a direct AirPlay receiver), but it’s a good trick if you need wireless headphones for your Apple TV in a pinch.
AirPlay Apps for Audio
I’ve shown you all the great audio features of the Apple TV, but with AirPlay and an iOS device, the possibilities are endless. Here are some of my favorites:
· iHeartRadio: iHeartRadio is a free app from Clear Channel, which has a near-monopoly over radio in the United States. But for once, that monopoly comes in handy, as you can listen to just about any radio station broadcasting from the United States with one app.
· Instacast: If Apple’s podcast solution isn’t cutting it for you, it’s hard to go wrong with the $3.99 Instacast, which works flawlessly with the Apple TV over AirPlay. Instacast has a clean, modern interface, automatic storage management, and an optional Mac client that flawlessly syncs with its little sibling.
· Music: Yes, I am referring to the free Music app that comes preinstalled on every iPhone, iPad, and iPod touch. I find it much easier to pull up songs on my iPhone and AirPlay them to the Apple TV than to look up my music on the TV. Plus, if I leave the house, I can take my music with me without losing a beat.
· Pandora: Also known as The Service Apple Ripped Off for iTunes Radio, Pandora is the mother of all custom Internet radio stations. I much prefer iTunes Radio, but if you want the original, Pandora is it. It’s ad-supported, but for $36 a year, you can subscribe toPandora One, which removes ads and improves audio quality.
· Rdio: There are a number of monthly subscription music services, but Rdio is by far my favorite. There is a free tier, but to get the most out of Rdio, you need to pony up for a $9.99-per-month subscription. It’s well worth it, as Rdio has just about every song you want (unless it’s Led Zeppelin or The Beatles), including most new releases. If you want a cloud-based replacement for iTunes, with a clean interface and great Mac, iOS, and Web apps, then Rdio is worth a look. If you spend more than $10 a month on new music, Rdio will pay for itself.