Learning Core Data for iOS (2014)
8. Preloading Data
Never memorize something you can look up.
Albert Einstein
In Chapter 7, “Picker Views,” you focused on configuring user interface elements bound to Core Data objects. As a result, the main functionality of Grocery Dude is now in place. This chapter will dive back into the data model as preloading default data is explained and demonstrated. There are several approaches to providing default data with an application. In some cases, it makes sense to just import data directly in code, as you’ve experienced in previous chapters. A more advanced technique is to generate a persistent store from an XML file. The resulting persistent store can then be shipped with the application and inserted as the initial persistent store before Core Data is set up for the first time.
Default Data
When your Core Data application is released, you may wish to ship it with some default data. In some cases, default data only serves as an example of how to use an application. In other cases, the application would be useless without it. When no default data is included, it may not be immediately apparent how Grocery Dude is supposed to be used. This is especially true when the user is confronted with empty picker views on the Item view. If default data is included with an application, it becomes easier to learn to use. The easier a program is to use, the more likely it is that people will continue to use it. The longer people use an application, the more chance that word about the application will spread, thus increasing sales potential.
Before an application imports default data, it’s prudent to check for the following:
![]() The import is required.
The import is required.
![]() The user wants the default data imported (optional).
The user wants the default data imported (optional).
The import source for default data can vary greatly from case to case. Whatever the source, it can help to dump the data raw into a spreadsheet, generate XML using the upcoming techniques, and then generate a persistent store to ship with the application. The key to remember is that you must let Core Data generate any persistent store that you want Core Data to use.
Note
To continue building the sample application, you’ll need to have added the previous chapter’s code to Grocery Dude. Alternatively, you may download, unzip, and use the project up to this point from http://www.timroadley.com/LearningCoreData/GroceryDude-AfterChapter07.zip. Any time you start using an Xcode project from a ZIP file, it’s good practice to click Product > Clean. This practice ensures there’s no residual cache from previous projects using the same name.
Is an Import Required?
To indicate that an import is not required, an appropriate value can be set in a persistent store’s metadata. Each time the application runs, this value can be checked to verify whether an import is required. This technique acts as a safety switch against importing duplicate default data. The first time the application is launched, this value won’t exist and the default data is free to import.
You may also wish to include an additional line of defense against duplicate data by asking the user whether he or she wants to import default data. Grocery Dude will use this approach to give the user control over whether the import occurs. A secondary effect of this extra check is that if an accidental import is triggered, perhaps due to a bug, then the user has a chance to cancel the import. A UIAlertView will be used to ask the user whether he or she wants to continue with the data import. A UIAlertViewDelegate will be used to receive and handle the user’s decision.
Update Grocery Dude as follows to add the import alert view:
1. Adopt the UIAlertViewDelegate protocol by updating the interface declaration in CoreDataHelper.h as follows:
@interface CoreDataHelper : NSObject <UIAlertViewDelegate>
2. Add the following property to CoreDataHelper.h below the existing property declarations:
@property (nonatomic, retain) UIAlertView *importAlertView;
When Grocery Dude is launched and the stores have been set up, it’s a good time to check whether a default data import is required. Listing 8.1 shows the first method in a new DATA IMPORT section.
Listing 8.1 CoreDataHelper.m: isDefaultDataAlreadyImportedForStoreWithURL
#pragma mark – DATA IMPORT
- (BOOL)isDefaultDataAlreadyImportedForStoreWithURL:(NSURL*)url
ofType:(NSString*)type {
if (debug==1) {
NSLog(@"Running %@ '%@'", self.class, NSStringFromSelector(_cmd));
}
NSError *error;
NSDictionary *dictionary =
[NSPersistentStoreCoordinator metadataForPersistentStoreOfType:type
URL:url
error:&error];
if (error) {
NSLog(@"Error reading persistent store metadata: %@",
error.localizedDescription);
}
else {
NSNumber *defaultDataAlreadyImported =
[dictionary valueForKey:@"DefaultDataImported"];
if (![defaultDataAlreadyImported boolValue]) {
NSLog(@"Default Data has NOT already been imported");
return NO;
}
}
if (debug==1) {NSLog(@"Default Data HAS already been imported");}
return YES;
}
The isDefaultDataAlreadyImportedForStoreWithURL method has the job of returning YES or NO when asked if default data has already been imported for a particular store. It works this out by looking for an existing metadata value for the key @"DefaultDataImported". If this key doesn’t exist or exists with a NO value, the default data import is assumed to be required.
Note
The key name @"DefaultDataImported" is an arbitrary (random) name. The key name itself is not important. What is important is that it matches the key name set in the upcoming setDefaultDataAsImportedForStoreWithURL method, which is responsible for marking a store as imported.
Update Grocery Dude to add the DATA IMPORT section:
1. Add the code from Listing 8.1 to the bottom of CoreDataHelper.m before @end.
The next method required is checkIfDefaultDataNeedsImporting. This method will call isDefaultDataAlreadyImportedForStoreWithURL as it checks whether an import is required. If an import is required, the importAlert view will be shown to the user in order to double-check that he or she wants the import to occur. If an import is not required, nothing will happen. Listing 8.2 shows the code involved.
Listing 8.2 CoreDataHelper.m: checkIfDefaultDataNeedsImporting
- (void)checkIfDefaultDataNeedsImporting {
if (debug==1) {
NSLog(@"Running %@ '%@'", self.class, NSStringFromSelector(_cmd));
}
if (![self isDefaultDataAlreadyImportedForStoreWithURL:[self storeURL]
ofType:NSSQLiteStoreType]) {
self.importAlertView =
[[UIAlertView alloc] initWithTitle:@"Import Default Data?"
message:
@"If you've never used Grocery Dude before then some default data might help you understand how to use it. Tap 'Import' to import default data. Tap 'Cancel' to skip the import, especially if you've done this before on other devices."
delegate:self
cancelButtonTitle:@"Cancel"
otherButtonTitles:@"Import", nil];
[self.importAlertView show];
}
}
Update Grocery Dude as follows to implement code to check if an import is required:
1. Add the code from Listing 8.2 to the bottom of the DATA IMPORT section of CoreDataHelper.m before @end.
2. Add [self checkIfDefaultDataNeedsImporting]; to the bottom of the existing setupCoreData method of CoreDataHelper.m.
After you’ve made those changes, run the application. The expected result is shown in Figure 8.1. For the moment, this prompt will display every time the application is launched because the data import code hasn’t been implemented yet.
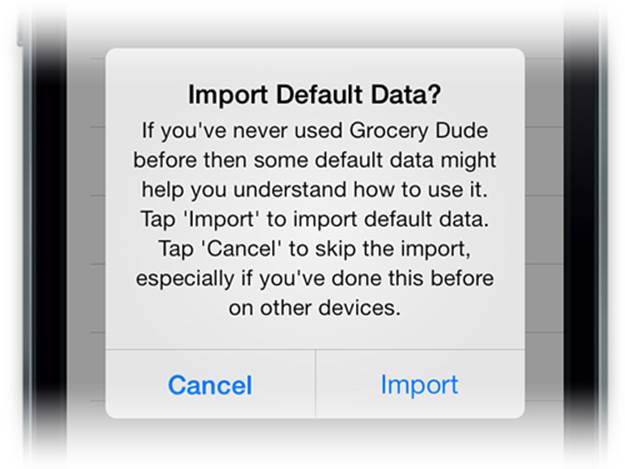
Figure 8.1 Checking whether the user wants to load default data
Importing from XML
Importing data from XML is a technique you can use to generate a persistent store containing default data. Once you have a “default data” persistent store, you can then ship it with your application bundle without the XML file. The advantage with this approach is that the default data will be ready to go instantly because no XML import process is required.
Many good XML parsers are available that can be used to create the default data store. Although some of those parsers would give better performance, the NSXMLParser included in the iOS SDK is fit for this purpose. The process to create the default data store isn’t something the user will have to sit through, so performance isn’t an issue. NSXMLParser is a streaming event-driven parser. This means that once parse is called on an instance of NSXMLParser, its delegate will be informed of what was found in the XML file as it is found.
Note
XML isn’t your only choice for an import source. For example, you could import data using a JSON file with NSJSONSerialization or you could use a property list instead.
Update Grocery Dude as follows to adopt the NSXMLParserDelegate protocol:
1. Adopt the NSXMLParserDelegate protocol by updating the interface declaration in CoreDataHelper.h as follows:
@interface CoreDataHelper : NSObject <UIAlertViewDelegate,
NSXMLParserDelegate>
The next step is to implement importFromXML. This method is responsible for configuring the CoreDataHelper instance as an NSXMLParser delegate and then triggering the XML file parse. Once the parse is complete, a notification is sent to ensure that the table views are refreshed with the latest data. There would be no need for this notification if context were a parent of an import context. Parent context hierarchies are discussed in Chapter 11, “Background Processing.”
The required code is shown in Listing 8.3.
Listing 8.3 CoreDataHelper.m: importFromXML
- (void)importFromXML:(NSURL*)url {
if (debug==1) {
NSLog(@"Running %@ '%@'", self.class, NSStringFromSelector(_cmd));
}
self.parser = [[NSXMLParser alloc] initWithContentsOfURL:url];
self.parser.delegate = self;
NSLog(@"**** START PARSE OF %@", url.path);
[self.parser parse];
[[NSNotificationCenter defaultCenter]
postNotificationName:@"SomethingChanged" object:nil];
NSLog(@"***** END PARSE OF %@", url.path);
}
Update Grocery Dude as follows to implement the XML Parser trigger code:
1. Add the following property to CoreDataHelper.h below the existing property declarations:
@property (nonatomic, strong) NSXMLParser *parser;
2. Add the code from Listing 8.3 to the bottom of the DATA IMPORT section of CoreDataHelper.m before @end.
Before anything can be imported, you’ll need an XML file to import. The XML format that you’ll need for Grocery Dude is shown in Listing 8.4.
Listing 8.4 Default Data XML Example Format
<items>
<item name="" unit="" locationathome=""locationatshop="" ></item>
</items>
Creating an XML file in this format is easy using a spreadsheet application such as Numbers or Excel. After pasting existing data into a spreadsheet, you can then insert the appropriate part of the XML string you’re trying to create between the columns, as shown in Figure 8.2. The advantage in using Numbers or Excel is that you can fill down the repeated XML tags. Alternatively, you can use any editor you’re comfortable with to produce the XML file, so long as the format is consistent.

Figure 8.2 Creating an XML file using Excel or Numbers
The columns in Figure 8.2 have been shaded to indicate what is data and what is part of the XML elements. Once imported, each row will become a managed object based on the Item entity. When the spreadsheet is ready, it’s just a matter of saving it as a plain text file with an XML extension. After you remove any stray tab stops or spaces that may come from converting a spreadsheet to text, the XML will then be ready to use. An XML file containing a big list of ~400 items has been premade for you so you can maintain focus on building Grocery Dude.
Update Grocery Dude as follows to add the Default Data XML file:
1. Extract the premade DefaultData.xml from http://www.timroadley.com/LearningCoreData/DefaultData.xml.zip.
2. Drag DefaultData.xml into the Data Model group. Ensure Copy items into destination group’s folder and the Grocery Dude target are ticked before clicking Finish. The expected result after you click the XML file is shown in Figure 8.3.
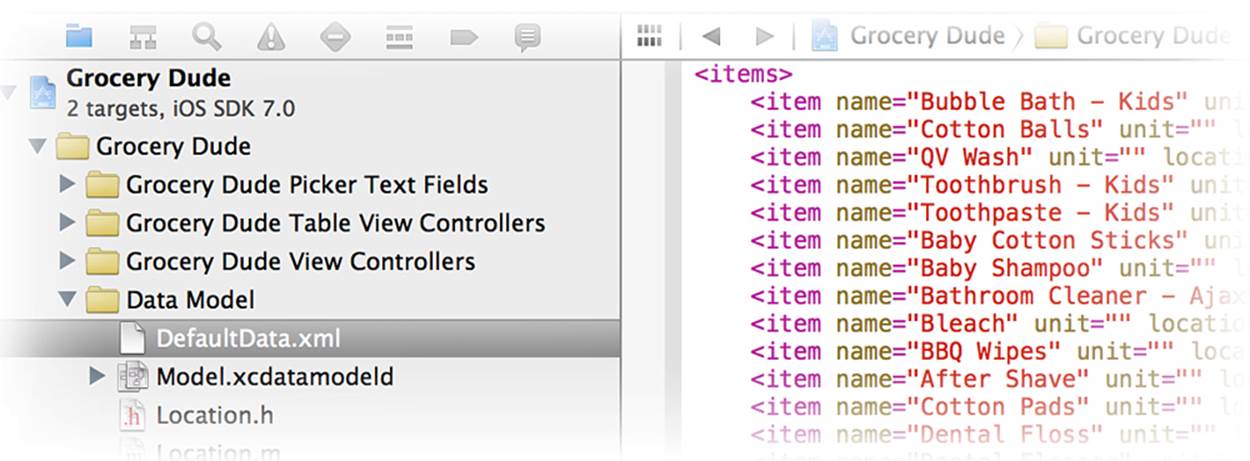
Figure 8.3 Default Data XML, ready for import
Creating an Import Context
When importing data, you should use a managed object context that does not run on the main thread. It is recommended that you use a context existing solely for importing data. This ensures there’s no chance it will block the queue of another context—most importantly, the main queue context. An import context can use the same persistent store coordinator as another context. To reduce the resource requirements of the import context, it is recommended that you disable its undo manager by setting it to nil. On iOS, a context’s undo manager is nil by default. Still, it’s good practice to explicitly set the undo manager to nil just in case this default changes in the future.
Update Grocery Dude as follows to add the importContext property:
1. Add the following property to CoreDataHelper.h on the line after the existing context property is declared:
@property (nonatomic, readonly) NSManagedObjectContext
*importContext;
The import context is implemented in the same way as the foreground context; however, it will have a different concurrency type. You have three concurrency types to choose from when configuring an NSManagedObjectContext:
![]() The NSMainQueueConcurrencyType should be used when you want the context to operate on the main thread. Any heavy work performed in this queue may slow down or even freeze the user interface. You need at least one context working in the foreground to update user interface elements.
The NSMainQueueConcurrencyType should be used when you want the context to operate on the main thread. Any heavy work performed in this queue may slow down or even freeze the user interface. You need at least one context working in the foreground to update user interface elements.
![]() The NSPrivateQueueConcurrencyType should be used when you don’t want the context to operate on the main thread. This is an ideal concurrency type for potentially heavy work, such as saving or importing data.
The NSPrivateQueueConcurrencyType should be used when you don’t want the context to operate on the main thread. This is an ideal concurrency type for potentially heavy work, such as saving or importing data.
![]() The NSConfinementConcurrencyType is the default legacy option, which you should typically avoid unless you need backward compatibility with pre–iOS 5.0 devices.
The NSConfinementConcurrencyType is the default legacy option, which you should typically avoid unless you need backward compatibility with pre–iOS 5.0 devices.
Any context with an NSPrivateQueueConcurrencyType should only be sent messages using performBlock or performBlockAndWait. Choose performBlock if you don’t care when the block returns. Use performBlockAndWait if you need the block to return before continuing. If you callperformBlockAndWait on a context running on the main thread, it will block the main thread. The code to configure the importContext to run on a private (background) queue is shown in Listing 8.5.
Listing 8.5 CoreDataHelper.m: init
_importContext = [[NSManagedObjectContext alloc]
initWithConcurrencyType:NSPrivateQueueConcurrencyType];
[_importContext performBlockAndWait:^{
[_importContext setPersistentStoreCoordinator:_coordinator];
[_importContext setUndoManager:nil]; // the default on iOS
}];
Update Grocery Dude as follows to implement the import context:
1. Add the code from Listing 8.5 to the bottom of the init method of CoreDataHelper.m before return self;.
Preventing Duplicate Default Data
To prevent default data from being imported more than once, a DefaultDataImported metadata key set to YES needs to be applied to the persistent store. To do this, a copy of the persistent store’s existing metadata NSDictionary is needed. The DefaultDataImported key can then be added to the metadata dictionary copy, which can in turn be reapplied to the persistent store. This process occurs in the setDefaultDataAsImportedForStore method, as shown in Listing 8.6.
Listing 8.6 CoreDataHelper.m: setDefaultDataAsImportedForStore
- (void)setDefaultDataAsImportedForStore:(NSPersistentStore*)aStore {
if (debug==1) {
NSLog(@"Running %@ '%@'", self.class, NSStringFromSelector(_cmd));
}
// get metadata dictionary
NSMutableDictionary *dictionary =
[NSMutableDictionary dictionaryWithDictionary:[[aStore metadata] copy]];
if (debug==1) {
NSLog(@"__Store Metadata BEFORE changes__ \n %@", dictionary);
}
// edit metadata dictionary
[dictionary setObject:@YES forKey:@"DefaultDataImported"];
// set metadata dictionary
[self.coordinator setMetadata:dictionary forPersistentStore:aStore];
if (debug==1) {NSLog(@"__Store Metadata AFTER changes__ \n %@", dictionary);}
}
Update Grocery Dude as follows to implement code to set default data as imported:
1. Add the code from Listing 8.6 to the bottom of the DATA IMPORT section of CoreDataHelper.m before @end.
Triggering a Default Data Import
When the importAlertView is displayed, the user can tap Cancel to bypass the import or tap Import to proceed with loading default data. A new method called alertView:clickedButtonAtIndex will be added to a new DELEGATE: UIAlertView section of CoreDataHelper.m to handle the user’s selection. Listing 8.7 shows the code involved.
Listing 8.7 CoreDataHelper.m: alertView:clickedButtonAtIndex
#pragma mark - DELEGATE: UIAlertView
- (void)alertView:(UIAlertView *)alertView
clickedButtonAtIndex:(NSInteger)buttonIndex {
if (debug==1) {
NSLog(@"Running %@ '%@'", self.class, NSStringFromSelector(_cmd));
}
if (alertView == self.importAlertView) {
if (buttonIndex == 1) { // The 'Import' button on the importAlertView
NSLog(@"Default Data Import Approved by User");
[_importContext performBlock:^{
// XML Import
[self importFromXML:[[NSBundle mainBundle]
URLForResource:@"DefaultData" withExtension:@"xml"]];
}];
} else {
NSLog(@"Default Data Import Cancelled by User");
}
// Set the data as imported regardless of the user's decision
[self setDefaultDataAsImportedForStore:_store];
}
}
When a button at index 1 is tapped, the previously implemented importFromXML method will be called. The Import button is at index 1. Note that the import is performed using a performBlock without AndWait. This means the block of code will get back to the application whenever it is ready, without adversely impacting the user experience.
Regardless of what the user has chosen on the importAlertView, the method setDefaultDataAsImportedForStore is called to prevent the alert from harassing the user every time the application launches. If the user selects the wrong option, there is currently no recourse to reverse the decision. For brevity, this issue will remain out of scope in order to maintain focus on the primary objectives of this chapter. If you want to handle this situation in your own applications, examine Chapter 14, “iCloud,” to see how iCloud is toggled with the Settings app. The same approach could be used to expose an import default data flag to the user, which could in turn be used to reverse the effect of the setDefaultDataAsImportedForStore method.
Update Grocery Dude as follows to implement code to trigger a default data import:
1. Add the code from Listing 8.7 to the bottom of CoreDataHelper.m before @end.
Run the application and tap Import to begin the data import. The expected result is shown in Figure 8.4. The lines in the console log may have a different order for you because the parse isn’t executed on the main thread. Notice how after the method setDefaultDataAsImportedForStoreWithURLis run that the store metadata includes a line that reads DefaultDataImported = 1;.

Figure 8.4 DefaultDataImported metadata option
Although the parse is triggered as expected, no data is imported. This is because the NSXMLParser delegate methods have not yet been implemented.
Introducing CoreDataImporter
To create managed objects based on an XML file, you’ll need to map what data goes where. This process requires intimate knowledge of the application source data and destination model. For Grocery Dude, this is a straightforward process because the data model is simple. The principles used for Grocery Dude can be applied to more complicated data models. To keep CoreDataHelper as clear as possible, a new class called CoreDataImporter will be created. CoreDataImporter will contain generic methods used to import unique managed objects. The methods are generic so they can be used with any data model.
Before inserting a new object into the target context, a check will be performed to ensure the proposed object doesn’t already exist. Because the import is from XML, the only uniqueness indicator to match against is one of the target context entity attribute values. For Grocery Dude, this is an easy selection because item name, unit name, location at home storedIn, and location at shop aisle fit the bill nicely. In other applications, email addresses or phone numbers might be more appropriate. In some cases, you may end up needing to add a uniqueness ID to your source and target data.
An instance of CoreDataImporter relies on an NSDictionary with entity names keyed to a selected unique attribute. A new entitiesWithUniqueAttributes dictionary will store the unique attribute selection. To retrieve the name of the unique attribute for a given entity, auniqueAttributeForEntity method will be implemented. The header file for CoreDataImporter, which contains these method headers, is shown in Listing 8.8.
Listing 8.8 CoreDataImporter.h
#import <Foundation/Foundation.h>
#import <CoreData/CoreData.h>
@interface CoreDataImporter : NSObject
@property (nonatomic, retain) NSDictionary *entitiesWithUniqueAttributes;
+ (void)saveContext:(NSManagedObjectContext*)context;
- (CoreDataImporter*)initWithUniqueAttributes:(NSDictionary*)uniqueAttributes;
- (NSString*)uniqueAttributeForEntity:(NSString*)entity;
- (NSManagedObject*)insertUniqueObjectInTargetEntity:(NSString*)entity
uniqueAttributeValue:(NSString*)uniqueAttributeValue
attributeValues:(NSDictionary*)attributeValues
inContext:(NSManagedObjectContext*)context;
- (NSManagedObject*)insertBasicObjectInTargetEntity:(NSString*)entity
targetEntityAttribute:(NSString*)targetEntityAttribute
sourceXMLAttribute:(NSString*)sourceXMLAttribute
attributeDict:(NSDictionary*)attributeDict
context:(NSManagedObjectContext*)context;
@end
Update Grocery Dude as follows to create the CoreDataImporter class:
1. Select the Generic Core Data Classes group.
2. Click File > New > File....
3. Create a new iOS > Cocoa Touch > Objective-C class and then click Next.
4. Set Subclass of to NSObject and Class name to CoreDataImporter. Click Next.
5. Ensure the Grocery Dude target is ticked and then click Create to create the class in the Grocery Dude project directory.
6. Replace all code in CoreDataImporter.h with the code from Listing 8.8.
When an instance of CoreDataImporter is created, it should be initialized using initWithUniqueAttributes. This will ensure there is a dictionary mapping for each target entity to a unique attribute name. As mentioned previously, the uniqueAttributeForEntity method is used to determine the unique attribute for the given entity. The code involved is shown in Listing 8.9.
Listing 8.9 CoreDataImporter.m: saveContext, initWithUniqueAttributes, uniqueAttributeForEntity
#import "CoreDataImporter.h"
@implementation CoreDataImporter
#define debug 1
+ (void)saveContext:(NSManagedObjectContext*)context {
if (debug==1) {
NSLog(@"Running %@ '%@'", self.class, NSStringFromSelector(_cmd));
}
[context performBlockAndWait:^{
if ([context hasChanges]) {
NSError *error = nil;
if ([context save:&error]) {NSLog(
@"CoreDataImporter SAVED changes from context to persistent store");
} else {NSLog(
@"CoreDataImporter FAILED to save changes from context to persistent store: %@"
, error);
}
} else {NSLog(
@"CoreDataImporter SKIPPED saving context as there are no changes");
}
}];
}
- (CoreDataImporter*)initWithUniqueAttributes:(NSDictionary*)uniqueAttributes {
if (debug==1) {
NSLog(@"Running %@ '%@'", self.class, NSStringFromSelector(_cmd));
}
if (self = [super init]) {
self.entitiesWithUniqueAttributes = uniqueAttributes;
if (self.entitiesWithUniqueAttributes) {
return self;
} else {NSLog(
@"FAILED to initialize CoreDataImporter: entitiesWithUniqueAttributes is nil");
return nil;
}
}
return nil;
}
- (NSString*)uniqueAttributeForEntity:(NSString*)entity {
if (debug==1) {
NSLog(@"Running %@ '%@'", self.class, NSStringFromSelector(_cmd));
}
return [self.entitiesWithUniqueAttributes valueForKey:entity];
}
@end
Notice that CoreDataImporter includes a saveContext method separate from the one found in CoreDataHelper. This improves CoreDataImporter’s portability to other applications.
Update Grocery Dude as follows to implement the first few CoreDataImporter methods:
1. Replace all existing code in CoreDataImporter.m with the code from Listing 8.9. There will still be an incomplete implementation warning after this change.
Before you insert a managed object, a check is needed against the target context to ensure that the proposed object does not already exist. To achieve this, a fetch is performed on the target context with a predicate specific to the unique attribute and unique attribute value. The code involved is shown in Listing 8.10.
Listing 8.10 CoreDataImporter.m: existingObjectInContext
- (NSManagedObject*)existingObjectInContext:(NSManagedObjectContext*)context
forEntity:(NSString*)entity
withUniqueAttributeValue:(NSString*)uniqueAttributeValue {
if (debug==1) {
NSLog(@"Running %@ '%@'", self.class, NSStringFromSelector(_cmd));
}
NSString *uniqueAttribute = [self uniqueAttributeForEntity:entity];
NSPredicate *predicate =
[NSPredicate predicateWithFormat:@"%K==%@",
uniqueAttribute, uniqueAttributeValue];
NSFetchRequest *fetchRequest =
[NSFetchRequest fetchRequestWithEntityName:entity];
[fetchRequest setPredicate:predicate];
[fetchRequest setFetchLimit:1];
NSError *error;
NSArray *fetchRequestResults =
[context executeFetchRequest:fetchRequest error:&error];
if (error) {NSLog(@"Error: %@", error.localizedDescription);}
if (fetchRequestResults.count == 0) {return nil;}
return fetchRequestResults.lastObject;
}
Update Grocery Dude as follows to implement the existingObjectInContext method:
1. Add the code from Listing 8.10 to the bottom of CoreDataImporter.m before @end. There will still be an incomplete implementation warning after this change.
If the existingObjectInContext method returns nil, the object does not exist in the target context. This result indicates that a new object with the given unique attribute value is required in the target context. To insert objects, a new method called insertUniqueObjectInTargetEntity is required, which is shown in Listing 8.11.
Listing 8.11 CoreDataImporter.m: insertUniqueObjectInTargetEntity
- (NSManagedObject*)insertUniqueObjectInTargetEntity:(NSString*)entity
uniqueAttributeValue:(NSString*)uniqueAttributeValue
attributeValues:(NSDictionary*)attributeValues
inContext:(NSManagedObjectContext*)context {
if (debug==1) {
NSLog(@"Running %@ '%@'", self.class, NSStringFromSelector(_cmd));
}
NSString *uniqueAttribute = [self uniqueAttributeForEntity:entity];
if (uniqueAttributeValue.length > 0) {
NSManagedObject *existingObject =
[self existingObjectInContext:context
forEntity:entity
withUniqueAttributeValue:uniqueAttributeValue];
if (existingObject) {
NSLog(@"%@ object with %@ value '%@' already exists",
entity, uniqueAttribute, uniqueAttributeValue);
return existingObject;
} else {
NSManagedObject *newObject =
[NSEntityDescription insertNewObjectForEntityForName:entity
inManagedObjectContext:context];
[newObject setValuesForKeysWithDictionary:attributeValues];
NSLog(@"Created %@ object with %@ '%@'",
entity, uniqueAttribute, uniqueAttributeValue);
return newObject;
}
} else {
NSLog(@"Skipped %@ object creation: unique attribute value is 0 length",
entity);
}
return nil;
}
The insertUniqueObjectInTargetEntity method returns an NSManagedObject with its attributes populated from the dictionary of attribute values given to the method. If no unique attribute value is supplied, nil will be returned. Update Grocery Dude as follows to implement theinsertUniqueObjectInTargetEntity method:
1. Add the code from Listing 8.11 to the bottom of CoreDataImporter.m before @end. There will still be an incomplete implementation warning after this change.
The final method required in CoreDataImporter is called insertBasicObjectInTarget-Entity and will leverage insertUniqueObjectInTargetEntity. Its purpose will be to insert a basic NSManagedObject with only one attribute populated (namely, the unique attribute). It exists solely to make the final import code easier to read. To use this method, you’ll need to supply a target entity, target entity attribute, equivalent source XML attribute, the full attributeDict from the XMLParser delegate method, and a context. This method returns the resulting managed object, which can then be updated with the remaining attributes, if any. Listing 8.12 shows the code involved.
Listing 8.12 CoreDataImporter.m: insertBasicObjectInTargetEntity
- (NSManagedObject*)insertBasicObjectInTargetEntity:(NSString*)entity
targetEntityAttribute:(NSString*)targetEntityAttribute
sourceXMLAttribute:(NSString*)sourceXMLAttribute
attributeDict:(NSDictionary*)attributeDict
context:(NSManagedObjectContext*)context {
NSArray *attributes = [NSArray arrayWithObject:targetEntityAttribute];
NSArray *values =
[NSArray arrayWithObject:[attributeDict valueForKey:sourceXMLAttribute]];
NSDictionary *attributeValues =
[NSDictionary dictionaryWithObjects:values forKeys:attributes];
return [self insertUniqueObjectInTargetEntity:entity
uniqueAttributeValue:[attributeDict valueForKey:sourceXMLAttribute]
attributeValues:attributeValues
inContext:context];
}
Update Grocery Dude as follows to implement insertBasicObjectInTargetEntity:
1. Add the code from Listing 8.12 to the bottom of CoreDataImporter.m before @end. The incomplete implementation warning should disappear after this change.
Note
You may have noticed CoreDataImporter doesn’t use NSManagedObject subclasses. Instead, key-value coding is used to access entity attributes. This is intentional because it provides the flexibility to remain data model agnostic at the cost of losing the convenient dot-notation syntax provided by NSManagedObject subclasses. When using this approach, note that %K is used as a substitution for a key path when specifying a predicate. An example of %K usage was shown previously in Listing 8.10.
Selecting Unique Attributes
A CoreDataImporter relies on a unique attribute being preselected for each entity before it can begin importing data. The mapping from entity to unique attribute will be configured in a new method called selectedUniqueAttributes. This method returns an NSDictionary with the unique attribute selection, as shown in Listing 8.13. Note that this code will go into CoreDataHelper and not CoreDataImporter. If you redeploy CoreDataImporter and CoreDataHelper to your own applications to import data, you will need to update this method with selected unique attributes specific to your own managed object model.
Listing 8.13 CoreDataHelper.m: selectedUniqueAttributes
#pragma mark - UNIQUE ATTRIBUTE SELECTION (This code is Grocery Dude data specific and is used when instantiating CoreDataImporter)
- (NSDictionary*)selectedUniqueAttributes {
if (debug==1) {
NSLog(@"Running %@ '%@'", self.class, NSStringFromSelector(_cmd));
}
NSMutableArray *entities = [NSMutableArray new];
NSMutableArray *attributes = [NSMutableArray new];
// Select an attribute in each entity for uniqueness
[entities addObject:@"Item"];[attributes addObject:@"name"];
[entities addObject:@"Unit"];[attributes addObject:@"name"];
[entities addObject:@"LocationAtHome"];[attributes addObject:@"storedIn"];
[entities addObject:@"LocationAtShop"];[attributes addObject:@"aisle"];
NSDictionary *dictionary = [NSDictionary dictionaryWithObjects:attributes
forKeys:entities];
return dictionary;
}
Update Grocery Dude as follows to implement the UNIQUE ATTRIBUTE SELECTION section:
1. Add the code from Listing 8.13 to the bottom of CoreDataHelper.m before @end.
Mapping XML Data to Entity Attributes
The data import engine that CoreDataImporter provides can now be leveraged by the parse results of an NSXMLParser. All that’s left to do is implement the appropriate delegate methods defined by the NSXMLParserDelegate protocol. There are two methods to be implemented in a new DELEGATE: NSXMLParser section:
![]() A parseErrorOccurred method will be used to log any errors that occur during the XML parse, usually from the NSXMLParserErrorDomain. If you receive errors, they’ll probably be due to a formatting error or invalid character in the XML file.
A parseErrorOccurred method will be used to log any errors that occur during the XML parse, usually from the NSXMLParserErrorDomain. If you receive errors, they’ll probably be due to a formatting error or invalid character in the XML file.
![]() A didStartElement method will be called every time the parser finds a new element in the given XML file. In the case of Grocery Dude’s default data XML file, this is the <item> element. Every attribute and associated value found within this element is passed to the delegate method as an NSDictionary. This dictionary is perfect for creating managed objects with. If you were to adapt this import technique to another application, the didStartElement method is where you would do the model-specific import customization.
A didStartElement method will be called every time the parser finds a new element in the given XML file. In the case of Grocery Dude’s default data XML file, this is the <item> element. Every attribute and associated value found within this element is passed to the delegate method as an NSDictionary. This dictionary is perfect for creating managed objects with. If you were to adapt this import technique to another application, the didStartElement method is where you would do the model-specific import customization.
The code involved is shown in Listing 8.14.
Listing 8.14 CoreDataHelper.m: DELEGATE: NSXMLParser
#pragma mark - DELEGATE: NSXMLParser (This code is Grocery Dude data specific)
- (void)parser:(NSXMLParser *)parser
parseErrorOccurred:(NSError *)parseError {
if (debug==1) {
NSLog(@"Parser Error: %@", parseError.localizedDescription);
}
}
- (void)parser:(NSXMLParser *)parser
didStartElement:(NSString *)elementName
namespaceURI:(NSString *)namespaceURI
qualifiedName:(NSString *)qName
attributes:(NSDictionary *)attributeDict {
[self.importContext performBlockAndWait:^{
// STEP 1: Process only the 'item' element in the XML file
if ([elementName isEqualToString:@"item"]) {
// STEP 2: Prepare the Core Data Importer
CoreDataImporter *importer =
[[CoreDataImporter alloc] initWithUniqueAttributes:
[self selectedUniqueAttributes]];
// STEP 3a: Insert a unique 'Item' object
NSManagedObject *item =
[importer insertBasicObjectInTargetEntity:@"Item"
targetEntityAttribute:@"name"
sourceXMLAttribute:@"name"
attributeDict:attributeDict
context:_importContext];
// STEP 3b: Insert a unique 'Unit' object
NSManagedObject *unit =
[importer insertBasicObjectInTargetEntity:@"Unit"
targetEntityAttribute:@"name"
sourceXMLAttribute:@"unit"
attributeDict:attributeDict
context:_importContext];
// STEP 3c: Insert a unique 'LocationAtHome' object
NSManagedObject *locationAtHome =
[importer insertBasicObjectInTargetEntity:@"LocationAtHome"
targetEntityAttribute:@"storedIn"
sourceXMLAttribute:@"locationathome"
attributeDict:attributeDict
context:_importContext];
// STEP 3d: Insert a unique 'LocationAtShop' object
NSManagedObject *locationAtShop =
[importer insertBasicObjectInTargetEntity:@"LocationAtShop"
targetEntityAttribute:@"aisle"
sourceXMLAttribute:@"locationatshop"
attributeDict:attributeDict
context:_importContext];
// STEP 4: Manually add extra attribute values.
[item setValue:@NO forKey:@"listed"];
// STEP 5: Create relationships
[item setValue:unit forKey:@"unit"];
[item setValue:locationAtHome forKey:@"locationAtHome"];
[item setValue:locationAtShop forKey:@"locationAtShop"];
// STEP 6: Save new objects to the persistent store.
[CoreDataImporter saveContext:_importContext];
// STEP 7: Turn objects into faults to save memory
[_importContext refreshObject:item mergeChanges:NO];
[_importContext refreshObject:unit mergeChanges:NO];
[_importContext refreshObject:locationAtHome mergeChanges:NO];
[_importContext refreshObject:locationAtShop mergeChanges:NO];
}
}];
}
The didStartElement delegate method is called every time the XML parser finds a new element in the XML file. If the XML element name is equal to “item,” the import routine begins. First, a CoreDataImporter instance is created using the selectedUniqueAttributes method. Basic managed objects with one unique attribute value are then inserted using the insertBasicObjectInTargetEntity method. Once inserted, additional attributes and relationships can be set. Finally, the context is saved and objects turned into faults to save memory. This whole process is run withinperformBlockAndWait on the import context so that each item is completely processed before moving on to the next. The main thread is not blocked and the application remains usable during the import only because the importContext runs on a private queue.
Update Grocery Dude as follows to implement the DELEGATE: NSXMLParser section:
1. Add #import "CoreDataImporter.h" to the top of CoreDataHelper.m.
2. Add the code from Listing 8.14 to the bottom of CoreDataHelper.m before @end.
3. Delete Grocery Dude from the iOS Simulator so the persistent store does not have the DefaultDataImported key set to 1.
4. Click Product > Clean and run Grocery Dude on the iOS Simulator. Tap Import to begin the import. As the default data is imported, you can still use the application. The expected result is shown in Figure 8.5.
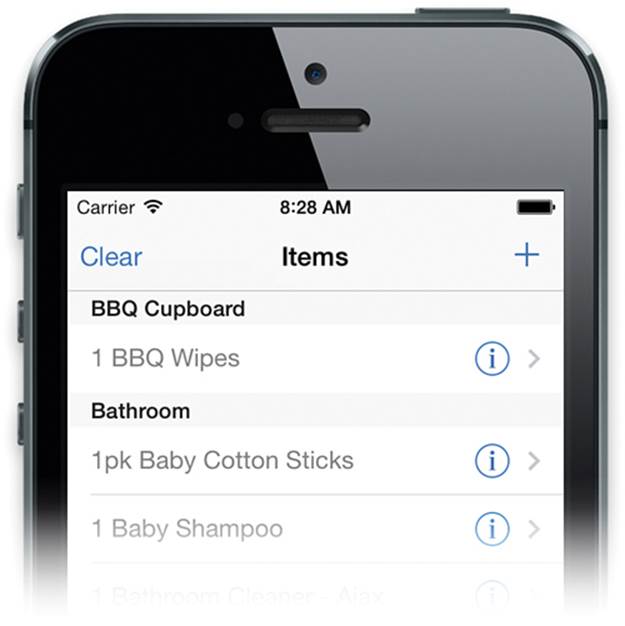
Figure 8.5 Preloaded default data
Importing from a Persistent Store
If you want to ship an application with default data from a persistent store, you have a couple of options. Which option you choose will depend on whether customer devices already have an existing persistent store:
![]() Option 1: Use the default data persistent store as the initial persistent store. This is achieved by copying the default data store onto the device before Core Data is set up for the first time. This is by far the easiest and most efficient option. This approach cannot be used when you have already shipped your application without default data. If that’s the case, users will have already generated a persistent store with their own data, which you likely don’t want to overwrite.
Option 1: Use the default data persistent store as the initial persistent store. This is achieved by copying the default data store onto the device before Core Data is set up for the first time. This is by far the easiest and most efficient option. This approach cannot be used when you have already shipped your application without default data. If that’s the case, users will have already generated a persistent store with their own data, which you likely don’t want to overwrite.
![]() Option 2: Deep copy unique data from the default data persistent store to an existing persistent store. This is achieved by copying the attribute values and relationships of each entity. The copy is referred to as “deep” because the relationships are all walked and objects are created as necessary. This find-or-create technique is a processor-intensive task that is best performed in the background. This option is a complicated topic and is discussed in Chapter 9, “Deep Copy.” You should avoid this option when feasible. One alternative that is faster yet will potentially create duplicate objects is the migratePersistentStore instance method of NSPersistentStore.
Option 2: Deep copy unique data from the default data persistent store to an existing persistent store. This is achieved by copying the attribute values and relationships of each entity. The copy is referred to as “deep” because the relationships are all walked and objects are created as necessary. This find-or-create technique is a processor-intensive task that is best performed in the background. This option is a complicated topic and is discussed in Chapter 9, “Deep Copy.” You should avoid this option when feasible. One alternative that is faster yet will potentially create duplicate objects is the migratePersistentStore instance method of NSPersistentStore.
Using the Default Data Store as the Initial Store
A persistent store full of default data has been created by Core Data as a part of the XML import. Core Data created the database so the format will be correct. To set a default store as the initial store, the database file needs to exist in the application bundle. When preparing a default database to ship with your application, you’ll need to take into account the database journaling mode. Since iOS 7, a new default journaling mode called Write-Ahead Logging (WAL) has been set for SQLite databases. This new default increases performance and provides better concurrency support. As a side effect, there are now three files per database by default:
![]() The sqlite file is the database file, as per usual.
The sqlite file is the database file, as per usual.
![]() The sqlite-wal file is the Write-Ahead Log file containing uncommitted database transactions. If you delete this file, you will lose data. If this file does not exist, there are no pending transactions waiting to be committed.
The sqlite-wal file is the Write-Ahead Log file containing uncommitted database transactions. If you delete this file, you will lose data. If this file does not exist, there are no pending transactions waiting to be committed.
![]() The sqlite-shm file is the Shared Memory file containing an index of the WAL file. This file can be regenerated automatically so you don’t need to worry about it.
The sqlite-shm file is the Shared Memory file containing an index of the WAL file. This file can be regenerated automatically so you don’t need to worry about it.
Figure 8.6 shows an example of Grocery Dude SQLite WAL and SHM files.
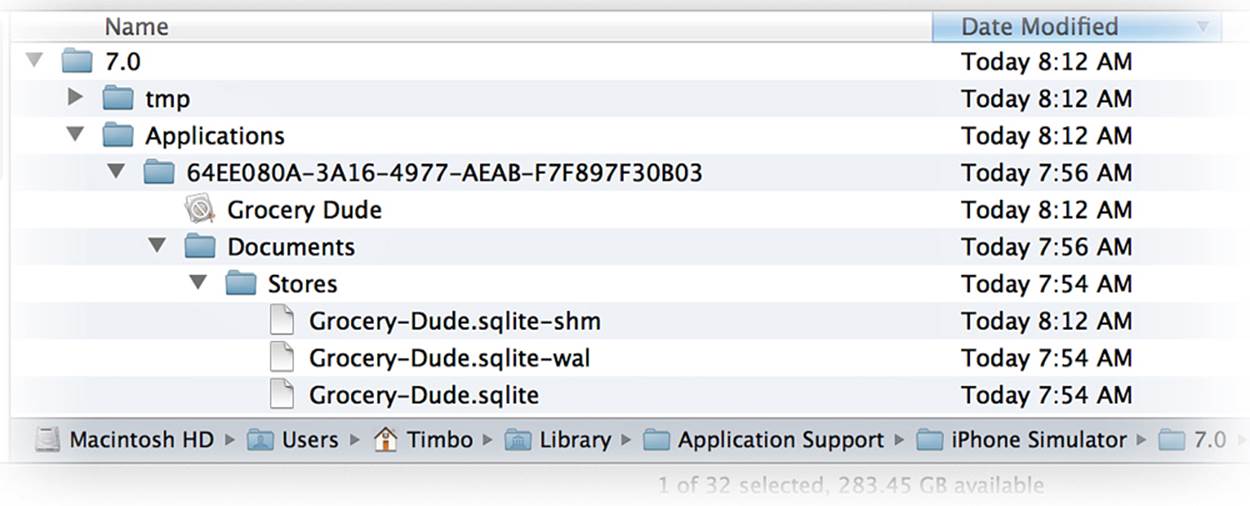
Figure 8.6 SQLite database files in WAL journaling mode
The journal_mode was intentionally set to DELETE in Chapter 2, “Managed Object Model Basics,” to ensure that -wal and -shm files aren’t present. This allows you to take a copy of the newly generated persistent store file without having to worry about extra files.
Extract the Grocery Dude persistent store as follows:
1. Right-click Finder and then select Go to Folder....
2. Enter /Users/Tim/Library/Application Support/iPhone Simulator/ in the Go to the Folder dialog box. (Note: You’ll need to substitute “Tim” with your own account name.)
3. Navigate the folder structure to find the Grocery-Dude.sqlite file, as shown in Figure 8.7. The application GUID will vary. If you have a lot of applications installed in the simulator and need help locating the appropriate GUID, search the console log for Grocery-Dude.sqlite and examine its containing path.
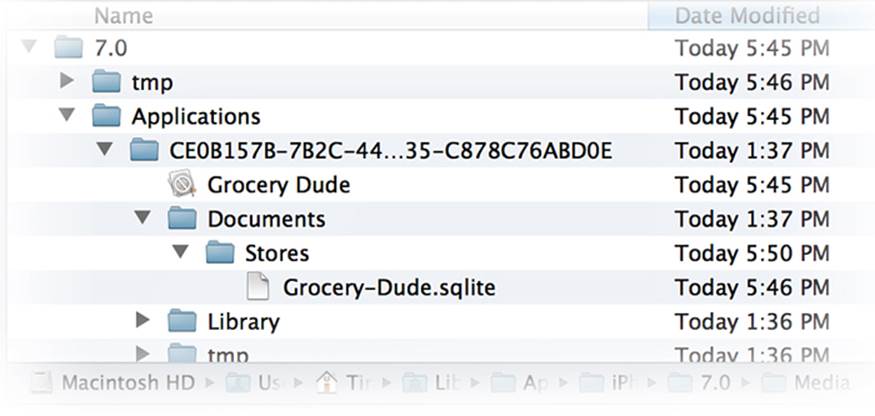
Figure 8.7 SQLite database file in DELETE journaling mode
4. Ensure Grocery Dude isn’t running.
5. Copy Grocery-Dude.sqlite to the desktop and rename it to DefaultData.sqlite.
Figure 8.7 shows an example of where the persistent store is located in the iOS Simulator application sandbox.
Note
If you are unable to find Grocery-Dude.sqlite, you may download a copy from http://www.timroadley.com/LearningCoreData/DefaultData.sqlite.zip.
Now that you have a DefaultData.sqlite store, you can include it in the application bundle and re-enable WAL mode.
Update Grocery Dude as follows:
1. Re-enable WAL journaling by commenting out the NSSQLitePragmasOption option in the loadStore method of CoreDataHelper.m.
2. Drag DefaultData.sqlite from your desktop into the Data Model group in Xcode. Ensure Copy items into destination group’s folder and the Grocery Dude target are ticked before clicking Finish.
Now that the DefaultData.sqlite file exists in the application bundle, a new method called setDefaultDataStoreAsInitialStore can be implemented. This method will be called first by setupCoreData, so the default store can be put in place before it is required, as long as it doesn’t already exist. There are a couple of ways to move the default store into place. You could use the NSPersistentStoreCoordinator method migratePersistentStore, which, it should be noted, can transparently handle store type conversions. The other option is the more basic NSFileManager methodcopyItemAtURL, which Grocery Dude will use. The code involved is shown in Listing 8.15.
Listing 8.15 CoreDataHelper.m: setDefaultDataStoreAsInitialStore
- (void)setDefaultDataStoreAsInitialStore {
if (debug==1) {
NSLog(@"Running %@ '%@'", self.class, NSStringFromSelector(_cmd));
}
NSFileManager *fileManager = [NSFileManager defaultManager];
if (![fileManager fileExistsAtPath:self.storeURL.path]) {
NSURL *defaultDataURL =
[NSURL fileURLWithPath:[[NSBundle mainBundle]
pathForResource:@"DefaultData" ofType:@"sqlite"]];
NSError *error;
if (![fileManager copyItemAtURL:defaultDataURL
toURL:self.storeURL
error:&error]) {
NSLog(@"DefaultData.sqlite copy FAIL: %@",
error.localizedDescription);
}
else {
NSLog(@"A copy of DefaultData.sqlite was set as the initial store for %@",
self.storeURL.path);
}
}
}
The setDefaultDataStoreAsInitialStore method first checks if there is already a persistent store at the target location. If there isn’t, it proceeds to copy the default store into place from the main bundle using copyItemAtURL.
Update Grocery Dude as follows to implement setDefaultDataStoreAsInitialStore:
1. Add the code from Listing 8.15 to the bottom of the DATA IMPORT section of CoreDataHelper.m.
2. Add [self setDefaultDataStoreAsInitialStore]; to the setupCoreData method of CoreDataHelper.m on the line before [self loadStore];.
3. Delete Grocery Dude from your device or simulator.
4. Click Product > Clean to clear any residual cache.
5. Run the application, which should open prepopulated with default data. The expected result is shown in Figure 8.8.
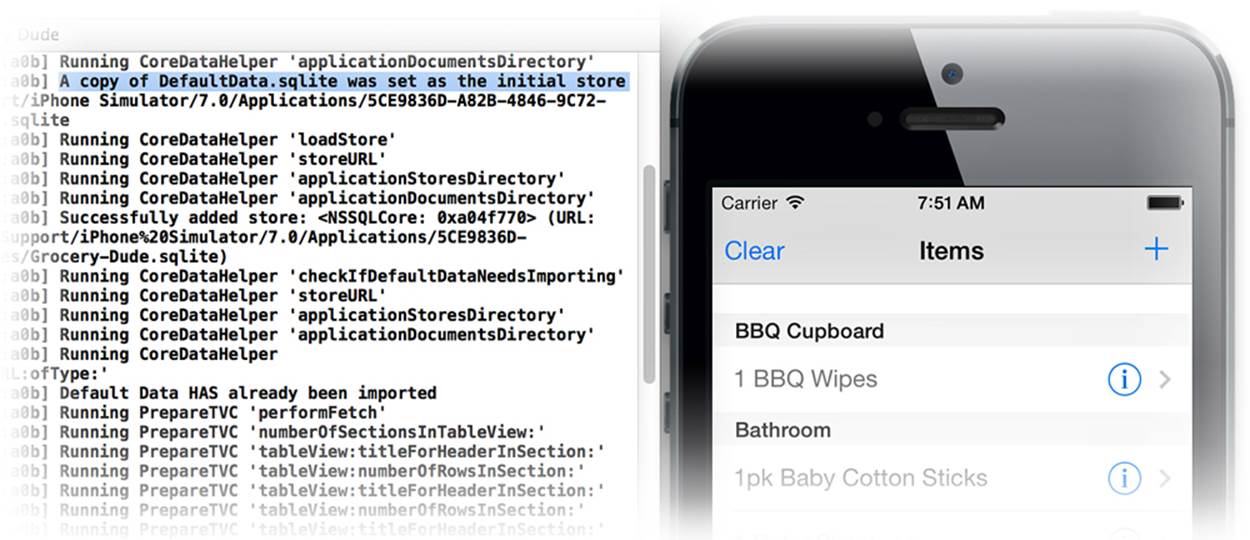
Figure 8.8 Preloaded default data
Summary
This chapter has shown how to configure multiple managed object contexts to allow a data import to occur in the background. Tips for preparing an XML file from raw data were given as the basic functionality of CoreDataImporter was implemented. This new class has enabled a model-agnostic creation of unique managed objects in a target context, based on an XML file. Don’t forget that the size of any imported XML file should be kept to a minimum because the entire file needs to be stored in memory while the import occurs. This isn’t too much of a problem when you’re running an import on the iOS Simulator to create a default store. Where possible, it is recommended that you ship a prepopulated persistent store with your applications so it may be used as the initial store. If a persistent store already exists on customer devices then you may have to deep copy or migrate data from a preloaded persistent store. This topic is covered in the next chapter.
Exercises
Why not build on what you’ve learned by experimenting?
1. Add a quantity attribute with a random number to some of the items in the DefaultData.XML file.
2. Reactivate XML import by commenting out [self setDefaultDataStoreAsInitialStore]; in the setupCoreData method of CoreDataHelper.m. Add the code shown in Listing 8.16 to the bottom of STEP 4 in the parser:didStartElement method of CoreDataHelper.m. Delete and re-run the application to trigger the import. The quantities added to DefaultData.XML should have applied to the appropriate objects that were imported.
3. Turn off WAL journaling mode and re-run the application. Stop the application and edit the name of an item in the persistent store using SQLite Database Browser. Run the application again and see that the change appears in the iOS Simulator. Be careful not to have the SQLite file open by both the browser and simulator at the same time.
Listing 8.16 CoreDataHelper.m: didStartElement (STEP 4)
NSNumberFormatter *f = [NSNumberFormatter new];
if ([attributeDict valueForKey:@"quantity"]) {
[item setValue:[f numberFromString:[attributeDict valueForKey:@"quantity"]]
forKey:@"quantity"];
}
Reverse any changes made during the exercises before moving to the next chapter.