iOS 6 Application Development For Dummies (2013)
Part IV. The Model and Application Structure
Chapter 13. Working with Split View Controllers and the Master View
In This Chapter
![]() Working with Split View controllers
Working with Split View controllers
![]() Checking out the versatile Table view
Checking out the versatile Table view
![]() Making the table look good
Making the table look good
![]() Ensuring that your application is usable worldwide
Ensuring that your application is usable worldwide
![]() Peeking behind the Table View screen
Peeking behind the Table View screen
![]() Using model objects
Using model objects
This chapter is primarily about the iPad user interface, because Split View controllers aren’t supported on the smaller iPhone. In Chapter 5, I explain a bit about iPad navigation using the example of a Navigation controller within a Split View controller. But the iPad has some even slicker ways to navigate, which I get to in this chapter. You’ll be happy to know that you’re going to be replacing the Navigation controller style of navigation with something more appropriate to the RoadTrip application.
The Problem with Using a Navigation Controller in Detail View
As I explain in Chapter 5, the Master-Detail Application template you’re using sets up the iPad’s Split View controller in such a way that, when a cell in the Master view is tapped (Test Drive for example), the Navigation controller pushes the next view controller onto the stack. The new view controller’s view slides into place, and the Navigation bar items are updated appropriately. The result, as you can see on the right side of Figure 13-1, is a Back button in the Detail view that enables you to return to the previous Detail view. (I’m using the pre–Chapter 12 version of RoadTrip, because it is easier to show you the flow in Figure 13-1.)
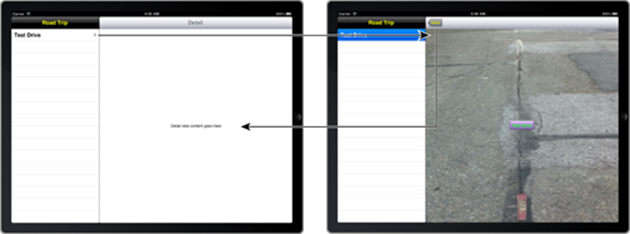
Figure 13-1: On the iPad, it’s back and forth using a Navigation controller and Navigation bar.
But as I explain in Chapter 1, while the user experiences on the iPhone and iPad have similarities, in some ways, the experiences are quite different. And one major and very obvious difference is the screen size — a difference which can have a major impact on the ways you can navigate and display information.
On the iPhone, you go from one view to another using the navigator approach you see in Figure 13-2.
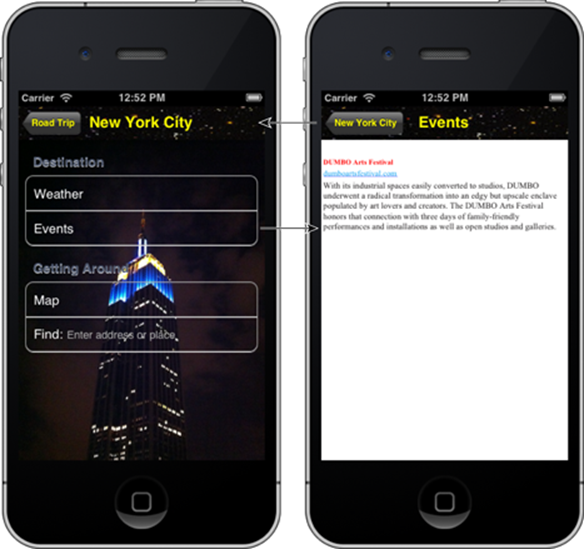
Figure 13-2: Navigating with a Navigation controller on the iPhone.
The only difference is that, with the increased real estate on the iPad, you can show both the Table view that you use for navigation as well as the associated content you want to display at the same time, as you see in Figure 13-3.
But while you can take advantage of the larger display using the Navigation controller approach, a problem is lurking in the background that I want to call your attention to.
In the current (unimproved) version of RoadTrip, when you tap the Test Drive cell (before Chapter 12), the Test Drive controller is pushed onto the stack (as I explain in Chapter 5), and the view slides into place. A Back button (labeled Detail) is displayed, and you use the Back button to return to the previously displayed view.
The process doesn’t initially appear to be particularly problematic if you stick to Landscape orientation (although take my word for it, it is), but when you switch to Portrait orientation, you soon realize that you’re in a bit of a bind. You can see the outlines of that bind in the sequence inFigure 13-4. Again, in the current (unimproved) version of RoadTrip, when you’re in Landscape orientation, tapping the Master button displays the Master view in a popover. If you then tap the Test Drive cell, the Test Drive view slides into place. (You also need to tap anywhere in the Test Drive view to dismiss the popover — you’ll fix that so it’s automatically dismissed when a new view is displayed.)
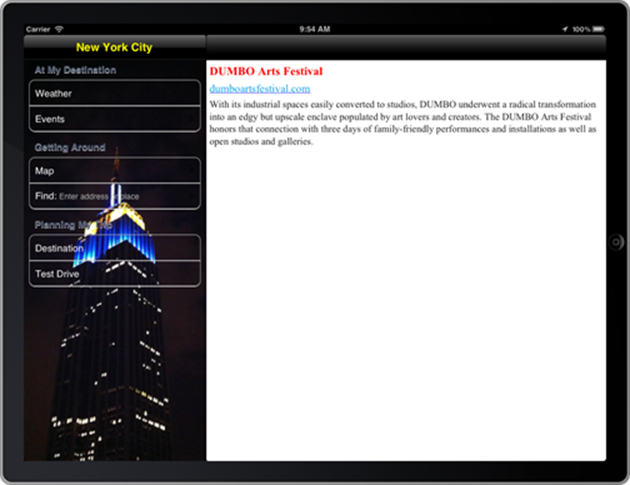
Figure 13-3: Master view and Detail view using a Split view.

Figure 13-4: Navigating in a Split view using a Navigation controller.
At that point, you see a Back button (Detail) that’s designed to get you back to the original view. But what if you didn’t want to go back to the Detail view and just wanted to tap another item (say, Weather) in the Master view? The way things are implemented now, you’re out of luck. The only way you can get back to the Master view in Portrait orientation is to keep tapping the Back button until you’re at the Detail view you see on the left side of Figure 13-4.
I’m not crazy about this user experience. If I had my druthers, whenever I wanted to go from one Detail view to another in Portrait orientation, the Master button would always be present and I would tap it to display the Master view in a popover, which would allow me to make another selection. In Landscape orientation, the Maser View would be present, so I could just make a selection and get to where I wanted to go, and there would be no Back button to get me back to a previous view; I’d just select what I wanted to see in the Master view. In other words, I don’t want to push the next view controller when I select a cell in the Master view; I want to replace the Detail View controller with another view controller.
Using a Navigation Controller in the Master View
Before I explain how to replace one view controller with another, I want to make it clear that I am in no way saying I never want to do the traditional kind of Navigation controller navigation on the iPad. For example, I might want to use a Navigation controller in the Master view. I’ll show you how to do that by creating a segue — a storyboard object that creates a transition from one view controller to another — so that when you select Test Drive in the Master view, the Test Drive view will slide into place, Back button and all, in the Master view (as opposed to the Detail view, which had been the case). Then, when you tap the Back button, you’ll be back in the Master view.
I’m doing this just to show you how to do it. After I explain it, I’ll have you go back to having the Test Drive view display in the Detail view.
Here is how to create a push segue that allows your Test Drive button to display the Test Drive controller.
1. Select MainStoryboard_iPad in the Project navigator.
The storyboard will appear.
2. Select the Test Drive cell, control-drag it to the Test Drive controller, as I have done in Figure 13-5, and then release the mouse button.
You’ll see the pop-up menu that allows you to select the Storyboard Segues type, as shown in Figure 13-6.
3. Choose Push from the Selection Segue menu items.
Let me remind you that I explained the difference between Selection Segues and Accessory Actions in Chapter 5. You’ll notice that the Test Drive view resizes to the same size as the Master view.
Select the segue in the Document Outline, as I have in Figure 13-7. The Attributes inspector shows you that the Destination is set to Current. (Current is in fact the default.) That means that the Destination view for this segue — the view that is displayed by the Test Drive controller — is the view that the segue is from, or the Master view.
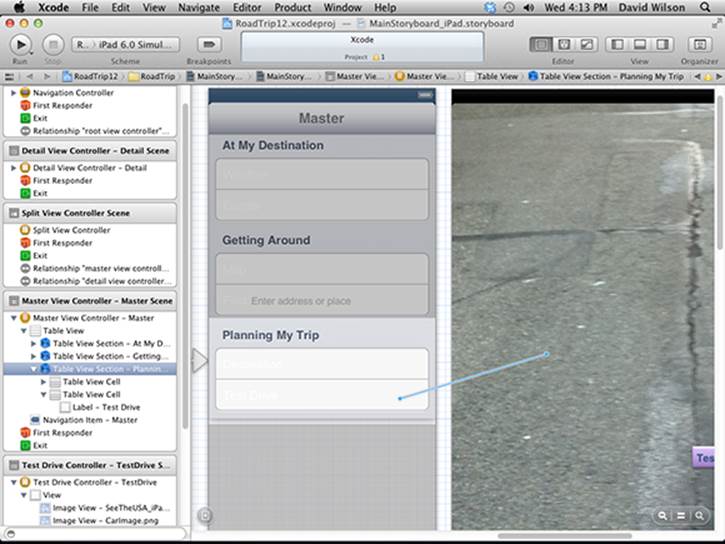
Figure 13-5: Control-drag to create a segue.
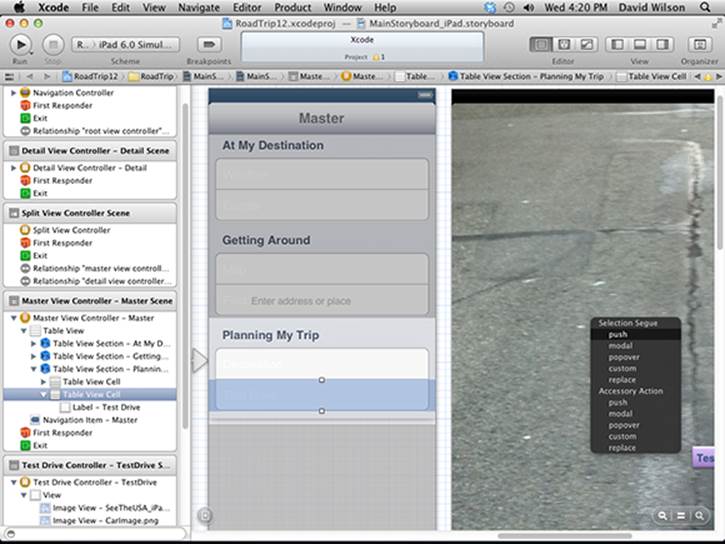
Figure 13-6: Create a push segue.
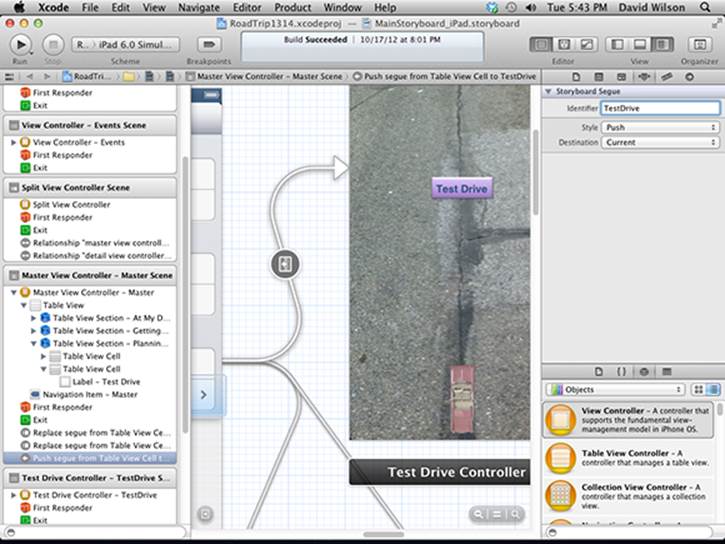
Figure 13-7: The Destination is Current — the Master View.
4. Enter TestDrive in the Identifier field, as I have in Figure 13-7.
5. Select the Table View cell and, in the Attributes inspector, change the Accessory field from Disclosure Indicator to None.
I’m of the opinion that a disclosure indicator isn’t necessary here, but feel free to reject my opinion if you so desire.
If you click the Run button now and then tap Test Drive in the Master view, you get to test drive the 1959 Cadillac Eldorado Biarritz in the Master view; tapping the New York City button (as you recall, what appears in the Back button is the title of the previous view controller and you made that your destination in Chapter 12) in the Test Drive view takes you back to the Master view. This works even in Portrait orientation, as you can see in Figure 13-8.
If you tap Road Trip to return to the Master view, you may notice that the Test Drive cell stays highlighted; not to worry, you’ll fix that soon.
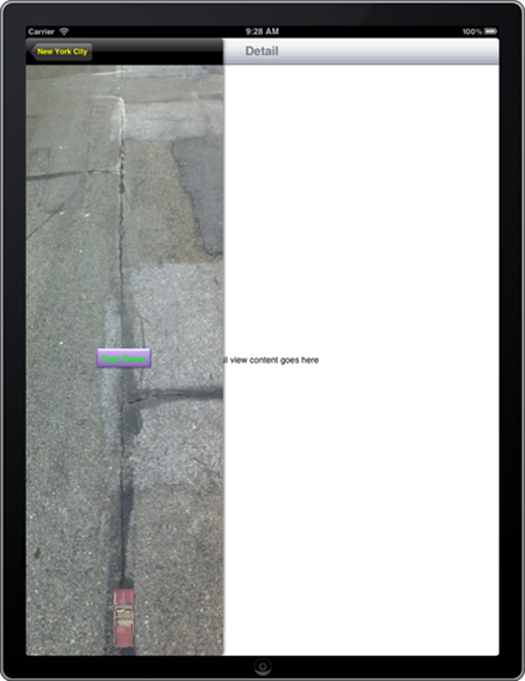
Figure 13-8: Using a Navigation controller in the Master view.
Adding a Gesture Recognizer
If you want to truly understand the iOS user experience, you need to understand the importance of gestures, one of the features that make the use of any iOS device an intimate experience for the user, as I explain in Chapter 1.
UIKit includes gesture recognizers that you can use in your app to make it work the same way as all those fancy apps Apple has come up with. In this section, you’ll use UIKit to add a gesture recognizer to the Main view so that the user can swipe to the left to make the Test Drive view appear.
Adding the gesture recognizer is easy for both the iPhone and iPad. In RTMasterViewController.m, add the bolded code in Listing 13-1 to viewDidLoad.
Listing 13-1: Adding a Gesture Recognizer
- (void)viewDidLoad
{
[super viewDidLoad];
RTAppDelegate* appDelegate =
[[UIApplication sharedApplication] delegate];
self.title = appDelegate.trip.destinationName;
UIImageView* imageView = [[UIImageView alloc]
initWithImage:[appDelegate.trip destinationImage]];
self.tableView.backgroundView = imageView;
UISwipeGestureRecognizer *swipeGesture =
[[UISwipeGestureRecognizer alloc] initWithTarget:self
action:@selector(handleSwipeGesture:)];
swipeGesture.direction =
UISwipeGestureRecognizerDirectionLeft;
[self.view addGestureRecognizer:swipeGesture];
}
UISwipeGestureRecognizer is a subclass of UIGestureRecognizer — the abstract base class for concrete gesture-recognizer classes. The gesture recognizer does the hard work of recognizing a specific gesture and then sends an action message (that you specify) to the target (that you also specify) to go ahead and do something.
In addition to UISwipeGesture, you have gesture recognizers for
![]() Tap: UITapGestureRecognizer
Tap: UITapGestureRecognizer
![]() Pinch: UIPinchGestureRecognizer
Pinch: UIPinchGestureRecognizer
![]() Rotate: UIRotationGestureRecognizer
Rotate: UIRotationGestureRecognizer
![]() Pan: UIPanGestureRecognizer
Pan: UIPanGestureRecognizer
![]() Touch and hold: UILongPressGestureRecognizer
Touch and hold: UILongPressGestureRecognizer
A window delivers touch events to a gesture recognizer before it delivers them to the hit-tested view — the view where it determined the user has touched — attached to the gesture recognizer. (Note that the gesture recognizer is attached to the view and isn’t part of the responder chain.) Generally, if a gesture recognizer doesn’t recognize its gesture, the touches are passed on to the view. If a gesture recognizer does recognize its gesture, the remaining touches for the view are canceled.
UISwipeGestureRecognizer is a concrete subclass of UIGestureRecognizer that looks for swiping gestures in one or more directions. Because a swipe is a discrete gesture, the action message is sent only once per gesture.
UISwipeGestureRecognizer recognizes a gesture as a swipe when the specified number of touches (numberOfTouchesRequired) have moved mostly in an allowable direction (direction) far enough to be considered a swipe. You can configure the UISwipeGestureRecognizer recognizer for the number of touches (the default is 1) and the direction (the default is right), as follows:
UISwipeGestureRecognizer *swipeGesture =
[[UISwipeGestureRecognizer alloc] initWithTarget:self
action:@selector(handleSwipeGesture:)];
Here, you create a swipe gesture with a target of self and an action of handleSwipeGesture:. This means that when the gesture recognizer determines it is a swipe, it will send the handleSwipeGesture: to the RTMasterViewController (self in this case).
Next, because we want the user to swipe to the left to make the Test Drive view appear, you set the direction to left from the default right, as follows:
swipeGesture.direction =
UISwipeGestureRecognizerDirectionLeft;
To handle the swipe — in effect program the response you want to come up with when the swipe occurs — add the code in Listing 13-2 to RTMasterViewController.m.
Listing 13-2: Adding handleSwipeGesture to RTMasterViewController.m
- (IBAction)handleSwipeGesture:(id)sender {
UIStoryboard *storyboard =
[UIStoryboard storyboardWithName:@”MainStoryboard_iPad”
bundle:nil];
UIViewController *viewController =
[storyboard instantiateViewControllerWithIdentifier:
@”TestDrive”];
[[self navigationController]
pushViewController:viewController animated:YES];
}
What you do here is first find the storyboard in the bundle — in iOS (and OS X) a bundle is a directory that appears to be a single file and contains the executable code, resources such as images and sound, and the nib (storyboard) files.
UIStoryboard *storyboard =
[UIStoryboard storyboardWithName:
@”MainStoryboard_iPad” bundle:nil];
Then the code in Listing 13-2 creates TestDriveController. This is the same thing that the storyboard does (in the segue logic) when you tap the Test Drive button:
UIViewController *viewController =
[storyboard instantiateViewControllerWithIdentifier:
@”TestDrive”];
Here’s where that identifier I nagged you about entering comes in handy. It’s the only way you can find the view controller that you’ve configured in the storyboard.
Next, you tell the Navigation controller to push the View controller onto the stack (note that this method also updates the Navigation bar) and have it slide its view into place. (If the animated parameter is YES, the view is animated into position; otherwise, the view is simply displayed in place.)
[[self navigationController] pushViewController:
viewController animated:YES];
This is what would’ve been done for you in the segue logic generated by the storyboard.
While this is all très cool — so cool, in fact, that it’s how I implemented the Test Drive view in one of the (many) iterations of this book — it’s really not a good idea to do it this way. Navigation like this works best when it allows a user to drill down into a data hierarchy (like albums to songs in the Music app). In that case, the views have a relationship to each other — the next view gives you more detail about what you selected in the previous view. In the case of RoadTrip, however, the Map view for example, is not a more detailed look at the Weather.
 Oh, and by the way — you’ve only installed the Swipe gesture in the Master View controller. When you are in the Test Drive view, you can only go back by using the Back (New York City) button.
So, rather than push view controllers here, there, and everywhere, in the next few sections, you find out how to replace one view controller with another. And the place to start is with the Split View controller.
The Split View Controller
The UISplitViewController class is an iPad-only view controller that simply manages the presentation of two side-by-side view controllers in Landscape orientation — it is, in this respect, a container controller. It has no interface — its job is to coordinate the presentation of its two view controllers and to manage the transitions between different orientations.
Using this class, a view controller is created on the left which is referred to as the Master view (and is named that in the template), which presents a list of items, and another view controller on the right, which presents the details, or content, of the selected item and which is referred to as the Detail view (and is named that in the template).
After you create and initialize a UISplitViewController object, you assign two view controllers to it by using the viewControllers property — an array that contains the two (and only the two) controllers. The first view controller (index 0) is displayed on the left side (in the case of RoadTrip, the RTMasterViewController), and the second view controller (index 1) is displayed on the right side (the RTDetailViewController).
All of this is set up for you in the storyboard (see Figure 13-9). You’ll notice that both of the view controllers managed by the Split View controllers are embedded in Navigation controllers, which is why when you select a cell in the RTMasterViewController view, a Navigation bar appears with a Back button (in either the Master or Detail view).
As you have seen, when the iPad is in Landscape orientation, you can see both view controllers’ views side by side. When you rotate to Portrait orientation, however, the RTMasterViewController’s view is hidden, and the RTDetailViewController displays a button in the Navigation barthat enables you to see the RTDetailViewController’s view in a popover. Adding the button is done in the UISplitViewControllerDelegate protocol method. And if you look at the RTDetailViewController interface file, you see it has adopted the protocol — the popover sends its delegate messages at the right time so that the delegate can add and remove the button.
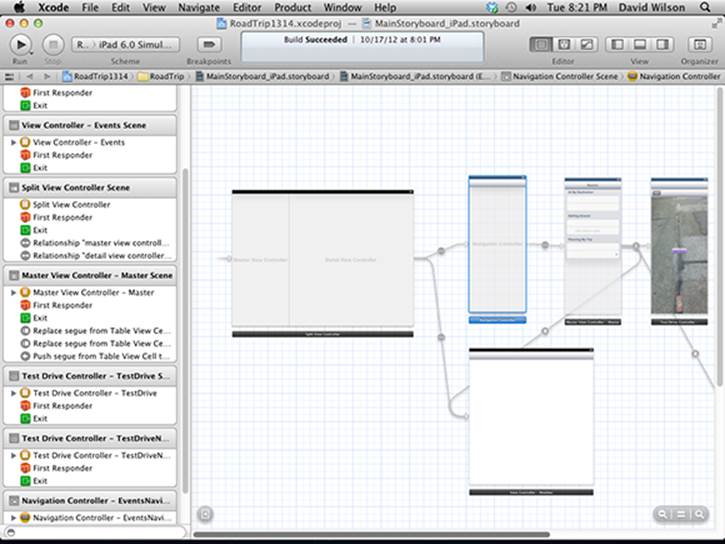
Figure 13-9: The Master and Detail View controllers in the storyboard.
I’ve made my preferences clear, however. I don’t want a Navigation controller and its bar when I select Weather, for example, in RoadTrip. Admittedly, one could implement the popover button by placing it on the right side of the Navigation bar, but then you end up with a gaggle of Navigation controllers that really serve no purpose (and whose views have no relation to each other) because I can just as easily navigate to any view I’d like (including the last one) using the Master view.
The way to implement the user interface I want is to use a toolbar instead, and have the Display View controller be responsible for managing the toolbar. In fact, I’ll show you how to implement the delegate to use either a toolbar or a Navigation bar when you choose a cell in theRTMasterViewController. I’m doing both because some of the features I want to implement (like the UIPageViewController page transitions in the EventsController) require a Navigation bar. In addition, at some point you may want to implement some functionality where a Navigation controller is the right way to go.
To start with, you’ll add a toolbar to the TestDriveController and make TestDriveController a UISplitViewController delegate. But first I want to explain a little more about how the UISplitViewController delegate works.
The UISplitViewController delegate
The UISplitViewController does what you’d expect a class doing delegation to do: It sends its delegate messages at the appropriate times to add and remove the button that enables the user to display the Master View controller in the popover you see in Figure 13-10. The Master button is displayed in Portrait view until the user touches it. Then it is covered by the Master view, which slides in from the left.
If you look at the RTDetailViewController interface (RTDetailViewController.h) in your project, you can see that this whole delegation business has already been done for you. Listing 13-3 gives the details:
Listing 13-3: The RTDetailViewController Interface
#import <UIKit/UIKit.h>
@interface RTDetailViewController : UIViewController
<UISplitViewControllerDelegate>
@property (strong, nonatomic) id detailItem;
@property (strong, nonatomic)
IBOutlet UILabel *detailDescriptionLabel;
@end
You see that RTDetailViewController adopts the UISplitViewControllerDelegate protocol, and as you see in Figure 13-10, it already adds a button to the Navigation bar when the user moves into Portrait orientation. It also removes the button when the iPad is rotated back from Portrait to Landscape orientation.
All you’ll need to do is modify what the UISplitViewControllerDelegate already does and have it place the button in a toolbar or a Navigation bar, depending on what you’re using. You’ll do all of that in the RTDetailViewController, and then, if you end up deriving all your view controllers (including the TestDriveController you’ve already implemented) from RTDetailViewController, voilà, all your view controllers will be able to add a button to the toolbar or a Navigation bar when the iPad is in Landscape orientation, dutifully display the popover when the user selects the button, and then remove the button when the user rotates the iPad to Portrait orientation.
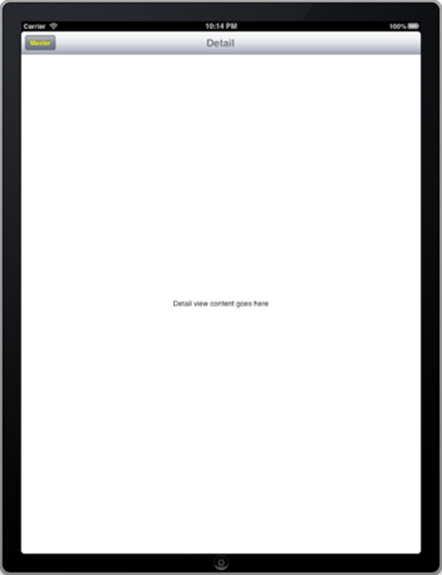
Figure 13-10: The Road Trip button that displays the Master view in Portrait orientation.
To prepare for that occurrence, you’ll start by getting rid of the “sample” code that was included by the template to display something in the Detail view — you won’t use the Detail View controller to actually display anything; that will be done in the individual view controllers you’ll create to display the Road Trip content (the weather, for example, or a map) as well as the Test Drive controller you’ve already created.
Start by pruning two properties used by the Master View controller that you definitely won’t need. Delete the commented out bold, underline, and italic lines in Listing 13-4 in RTDetailViewController.h, and add the code in bold. (You’ll add some properties that will be used in managing the popover.)
Listing 13-4: Update RTDetailViewController.h Interface
#import <UIKit/UIKit.h>
@interface RTDetailViewController : UIViewController
<UISplitViewControllerDelegate>
//@property (strong, nonatomic) id detailItem;
//@property (strong, nonatomic)
IBOutlet UILabel *detailDescriptionLabel;
@property (weak, nonatomic) IBOutlet UIToolbar *toolbar;
@property (weak, nonatomic)
UIBarButtonItem * popOverButton;
@property (strong, nonatomic)
UIPopoverController *masterPopoverController;
@end
I’ll explain these new properties as you use them, but it’s worth noting here that you’re adding a toolbar as a home for the button the user will use to display the Master View controller in Portrait orientation.
You have more things to prune in the RTDetailViewController implementation file. To do that, delete the commented out code in bold, underline, and italic in Listing 13-5 from the RTDetailViewController.m implementation file.
Listing 13-5: Update the RTDetailViewController.m Implementation File
#import “RTDetailViewController.h”
//@interface RTDetailViewController ()
//@property (strong, nonatomic)
UIPopoverController *masterPopoverController;
//- (void)configureView;
//@end
@implementation RTDetailViewController
Here you’re mostly getting rid of the instance variables you no longer need. In Listing 13-4, you also moved the masterPopoverController property to the interface file from where it was to the implementation file. As you’ll soon see, you had to do that because the Master View controller will need to access the masterPopoverController property in order to dismiss the popover after the user makes a selection in the Master View controller in the popover.
Finally you can delete the methods that display “content” in the Detail view — that means the two methods in bold, underline, and italic in Listing 13-6 in RTDetailViewController.m.
Listing 13-6: Delete the Unnecessary Methods
#pragma mark - Managing the detail item
- (void)setDetailItem:(id)newDetailItem
{
if (_detailItem != newDetailItem) {
_detailItem = newDetailItem;
// Update the view.
[self configureView];
}
if (self.masterPopoverController != nil) {
[self.masterPopoverController
dismissPopoverAnimated:YES];
}
}
- (void)configureView
{
// Update the user interface for the detail item.
if (self.detailItem) {
self.detailDescriptionLabel.text =
[self.detailItem description];
}
}
You’ll need to delete the message sent to configure the view. In DetailViewController.m, delete the commented out code in bold, underline, and italic in viewDidLoad, as shown in Listing 13-7.
Listing 13-7: Delete the Unnecessary Code in viewDidLoad
- (void)viewDidLoad
{
[super viewDidLoad];
// Do any additional setup after loading the view, typically from a nib.
// [self configureView];
}
Now, I look at how the delegate mechanism works and how the button is added when the iPad is rotated from Landscape to Portrait orientation and then removed when it is rotated back. In RTDetailViewController.m, the code in this template already does what you need to do to display the kind of popover I just explained. It does so by implementing two UISplitViewController delegate methods:
splitViewController:willHideViewController:
withBarButtonItem:forPopoverController:
and
splitViewController:willShowViewController:
invalidatingBarButtonItem:
The first of these methods is invoked when the Split View controller rotates from a Landscape to Portrait orientation and hides the Master View controller. When that happens, the Split View controller sends a message to add a button to the Navigation bar (or toolbar) of the Detail View controller. If you look in Listing 13-8, this is how it works in RTDetailViewController.m:
Listing 13-8: Adding the Button
- (void)splitViewController:
(UISplitViewController *)splitController
willHideViewController:
(UIViewController *)viewController
withBarButtonItem:
(UIBarButtonItem *)barButtonItem
forPopoverController:
(UIPopoverController *)popoverController
{
barButtonItem.title =
NSLocalizedString(@”Master”, @”Master”);
[self.navigationItem setLeftBarButtonItem:
barButtonItem animated:YES];
self.masterPopoverController = popoverController;
}
In this method, you are passed a button that you can use to display the popover. This is no ordinary button, however; its target is a selector implemented for you that can display the popover. The way the app works now, only one view controller displays a popover — but in the final version of the RoadTrip app, all the view controllers will be able to display a popover, so you’ll need to pass that button to the view controller that’s replacing the current one.
You’ll notice the presence of NSLocalizedString in Listing 13-9. NSLocalizedString is a macro that can be used to localize the text you display. And because I let the term localize drop here, I might as well explain about localization.
Localization
When you localize an app, you display the text the user sees on the screen in the user’s preferred language (and even a language-specific image).
Localizing an application isn’t difficult, just tedious. To localize your application, you create a folder in your application bundle (I’ll get to that) for each language you want to support. Each folder has the application’s translated resources.
For example, if the user’s language is Spanish, available regions range from Spain to Argentina to the United States and lots of places in between. When a localized application needs to load a resource (such as an image, property list, or nib), the application checks the user’s language and region and looks for a localization folder that corresponds to the selected language and region. If it finds one, it loads the localized version of the resource instead of the base version — the one you’re working in.
Looking up such values in the table is handled by the NSLocalizedString macro in your code.
As you can see, the text “Master” button will change based on the user’s preferred language.
barButtonItem.title =
NSLocalizedString(@”Master”, @”Master”);
The macro has two inputs. The first is the string in your language, and the second is the general comment for the translator. At runtime, NSLocalizedString looks for a strings file named localizable.strings in the language that has been set: Spanish, for example. (A user would’ve done that by going to Settings and selecting General⇒International⇒Language⇒Español). If NSLocalizedString finds the strings file, it searches the file for a line that matches the first parameter. If the macro doesn’t find the file or a specified string, it returns its first parameter — and the string will appear in the base language.
To create the localizable.strings file, you run a command-line program named genstrings, which searches your code files for the macro and places them all in a localizable.strings file (which it creates), ready for the (human) translator. genstrings is beyond the scope of this book, but it’s well documented. When you’re ready, I leave you to explore it on your own.
Back to the main feature
After absorbing that little localization detour, you then add the longed-for button to the Navigation bar:
[self.navigationItem setLeftBarButtonItem:
barButtonItem animated:YES];
Passing in YES to animated animates the adding of the button. Specifying NO sets the item immediately, without animating the change. In this case, it really makes no difference.
Finally, you save a reference to the popover controller that you’ll dismiss when the user makes a selection:
self.masterPopoverController = popoverController;
As I said, when the user selects a new view in the popover, you’ll need to pass this button on to the new view controller so it can display it as well. (You’ll do that later in this chapter in a method called prepareForSegue: in Listing 13-16.) In addition, as I explained, you’ll also use toolbars in addition to Navigation bars to display the button; adding the button to a toolbar is done differently than adding it to the Navigation bar. To do that, enter the code in bold in Listing 13-9 and delete the bold, underline, and italic code in RTDetailViewController.m.
Listing 13-9: Extending the splitViewController: willHideViewController: withBarButtonItem:forPopoverController:
- (void)splitViewController:
(UISplitViewController *)splitController
willHideViewController:
(UIViewController *)viewController
withBarButtonItem:
(UIBarButtonItem *)barButtonItem
forPopoverController:
(UIPopoverController *)popoverController
{
// barButtonItem.title = NSLocalizedString(@”Master”, @”Master”);
barButtonItem.title =
NSLocalizedString(@”Road Trip”, @”Road Trip”);
if ([[self.splitViewController.viewControllers lastObject] isKindOfClass:[UINavigationController class]])
[self.navigationItem
setLeftBarButtonItem:barButtonItem animated:YES];
else {
NSMutableArray *itemsArray =
[self.toolbar.items mutableCopy];
[itemsArray insertObject:barButtonItem atIndex:0];
[self.toolbar setItems:itemsArray animated:YES];
}
self.masterPopoverController = popoverController;
self.popOverButton = barButtonItem;
}
Listing 13-9 starts off by changing the title of the button from Master to Road Trip — I think it’s less ominous sounding and more descriptive — indicating the view controller that you’d see if you tap the button:
//barButtonItem.title =
NSLocalizedString(@”Master”, @”Master”);
barButtonItem.title =
NSLocalizedString(@”Road trip”, @”Road Trip”);
You then check to see whether you’re dealing with a Navigation bar or toolbar.
if ([[self.splitViewController.viewControllers lastObject] isKindOfClass:[UINavigationController class]])
As I mention earlier, the Split View controller manages two view controllers, with the last one in its list of controllers corresponding to what’s displayed in the Detail view. You check if the Detail View controller is embedded in a Navigation controller by sending it the isKindOfClass:message. This method returns a Boolean indicating whether it is, in this case, a UINavigationController.
As you know, classes in Objective-C are first-class objects in and of themselves, so you can use a class method to determine what class something is. This method is defined in the NSObject class, from which all your classes are (ultimately) derived.
If you’re dealing with a Navigation controller, you do what you’ve already been doing and set the left bar button.
[self.navigationItem
setLeftBarButtonItem:barButtonItem animated:YES];
If you’re not dealing with a Navigation controller, you go through some similar logic to add the button to the toolbar.
NSMutableArray *itemsArray =
[self.toolbar.items mutableCopy];
[itemsArray insertObject:barButtonItem atIndex:0];
[self.toolbar setItems:itemsArray animated:NO];
On a toolbar, the buttons are specified in the items property as an array. So you make a copy of the array and add the button you’re passed to the top of the array. The items — instances of UIBarButtonItem — are shown on the toolbar in the order they appear in this array. You then take that array and assign it as the items property.
You’ll notice that you first make a copy of the toolbar items, insert the button, and then assign the items property. You do it this way because (as you’ll see in Chapter 16) there may be other buttons on the toolbar that you’ll want to keep there.
Then you save a reference to the button that you’ll use later.
self.popOverButton = barButtonItem;
The second of the delegate methods is invoked when the view controller rotates from Portrait to Landscape orientation and the “hidden” Master View controller is displayed.
When the iPad is rotated back to Landscape orientation, the splitViewController:willShowViewController:invalidatingBarButtonItem: message is sent.
If you added the button to your toolbar to allow the user to display the Master View controller in a popover, you remove the button in the splitViewController:willShowViewController:invalidatingBarButtonItem: method. Listing 13-10 shows howsplitViewController:willShowViewController:invalidatingBarButtonItem: is currently implemented in DetailViewController.m:.
Listing 13-10: splitViewController:willShowViewController: invalidatingBarButtonItem:
- (void)splitViewController:
(UISplitViewController *)splitController willShowViewController:
(UIViewController *)viewController invalidatingBarButtonItem:
(UIBarButtonItem *)barButtonItem
{
// Called when the view is shown again in the split view, invalidating the button and popover controller.
[self.navigationItem
setLeftBarButtonItem:nil animated:YES];
self.masterPopoverController = nil;
}
This method as implemented sets the leftBarButtonItem and the masterPopoverController (the reference to the popover controller) to nil.
Here you’ve simply reversed what you did earlier — you’ve removed the button from the toolbar and set the self.popoverController property to nil.
As with the splitViewController:willHideViewController:withBarButtonItem: forPopoverController: method, you’ll now have to deal with both a toolbar and a Navigation controller. So add the code in bold in Listing 13-11 tosplitViewController:willShowViewController:invalidatingBarButtonItem: in DetailViewController.m.
Listing 13-11: Update splitViewController:willShowViewController: invalidatingBarButtonItem:
- (void)splitViewController:
(UISplitViewController *)splitController willShowViewController:
(UIViewController *)viewController invalidatingBarButtonItem:
(UIBarButtonItem *)barButtonItem
{
if
([[self.splitViewController.viewControllers lastObject]
isKindOfClass:[UINavigationController class]])
[self.navigationItem setLeftBarButtonItem:nil
animated:YES];
else {
NSMutableArray *itemsArray =
[self.toolbar.items mutableCopy];
[itemsArray removeObject:barButtonItem];
[self.toolbar setItems:itemsArray animated:YES];
}
self.popOverButton = nil;
self.masterPopoverController = nil;
}
The logic here determines whether it’s a Navigation controller or a toolbar, with managing the toolbar identical to what you did in Listing 13-9, when you extended the splitViewController:willHideViewController: with BarButtonItem:forPopoverController: method.
While you have the button saved, you still need to transfer the button — and have it displayed — when the user taps the Road Trip button and selects an entry (Weather, for example) that results in a new view controller being instantiated to display its view.
The display part will be done in the viewDidLoad method of the new controller.
Currently, the viewDidLoad method does nothing but send its superclass the same viewDidLoad message (you removed the configureView message in Listing 13-7).
- (void)viewDidLoad
{
[super viewDidLoad];
// Do any additional setup after loading the view, typically from a nib.
}
Add the code in bold in Listing 13-12 to viewDidLoad in RTDetailViewController.m.
Listing 13-12: Update viewDidLoad
- (void)viewDidLoad
{
[super viewDidLoad];
if (self.popOverButton) {
if ([[self.splitViewController.viewControllers
lastObject]
isKindOfClass:[UINavigationController class]]) {
[self.navigationItem setLeftBarButtonItem:self.popOverButton
animated:YES];
}
else {
NSMutableArray *itemsArray =
[self.toolbar.items mutableCopy];
[itemsArray
insertObject:self.popOverButton atIndex:0];
[self.toolbar setItems:itemsArray animated:NO];
}
}
}
When the view is loaded, it’s checked to see whether it contains a popover button. If it does, it simply uses the same logic you see in splitViewController: willHideViewController:withBarButtonItem:forPopoverController: (Listing 13-9) using the button that you saved insplitViewController:willHideViewController: withBarButtonItem:forPopoverController: in the popOverButton property.
Finally, you can add what you’ve done to the TestDriveController. Update the TestDriveController.h interface to make the TestDriveController a subclass of the RTDetailViewController by deleting the commented out bold, underline, and italic code and adding the bolded code inListing 13-13.
Listing 13-13: Update the TestDriveController.h Interface
#import <UIKit/UIKit.h>
#import “RTDetailViewController.h”
//@interface TestDriveController : UIViewController
@interface TestDriveController : RTDetailViewController
@end
Adding the Toolbar
Finally, to eliminate the Navigation controller in the Detail view and set it up so that you always see the button to display the Master view in a popover (Road Trip in this case), you’ll need to add the toolbar to the Test Drive controller in the storyboard and create an outlet to the toolbar. The outlet is needed to be able to add and remove the Road Trip button (and other buttons you’ll add along the way, in Chapter 16 for example).
Follow these steps to add the toolbar that supports the RoadTrip button (needed by the popover) to the Test Drive controller.
1. In the Project navigator, select MainStoryboard_iPad, and in the View selector, display the Utility area.
2. Select the segue from the Master View controller (it is really from the Table View cell but you can’t see that) to the Test Drive controller in the Canvas to display it in the Attributes inspector.
Optionally, you could select Push Segue from Table View Cell to TestDrive in the Master View Controller – Master Scene in the Document Outline.
 If the Attributes inspector isn’t visible, select its icon in the Inspector selector.
3. In the Attributes inspector, choose Replace from the Style drop-down menu, choose Detail Split from the Destination drop-down menu, and enter TestDrive in the Identifier field, as I have in Figure 13-11.
You’ll notice that doing so resizes the view so it can display in the Detail view. That means Test Drive will no longer be displayed in the Master view. If you really want Test Drive to still display in the Master view, you can take that on as your personal exercise.
4. In the Document Outline (or in the Canvas — as you can see you can use either) select the SeeTheUSA Image View in Test Drive Controller – TestDrive Scene.
5. In the Size inspector that appears, set the origin of the Image view to x = 0, y = 44 and the height to 704 to make room for the toolbar, as I have in Figure 13-12.
6. Drag in a toolbar from the Library in the Utility area and delete the Item button (it’s included in the toolbar by default), as I have in Figure 13-13.
 In the Library, the toolbar item is way down at the bottom of the gallery. Don’t confuse the toolbar item with a Navigation bar.
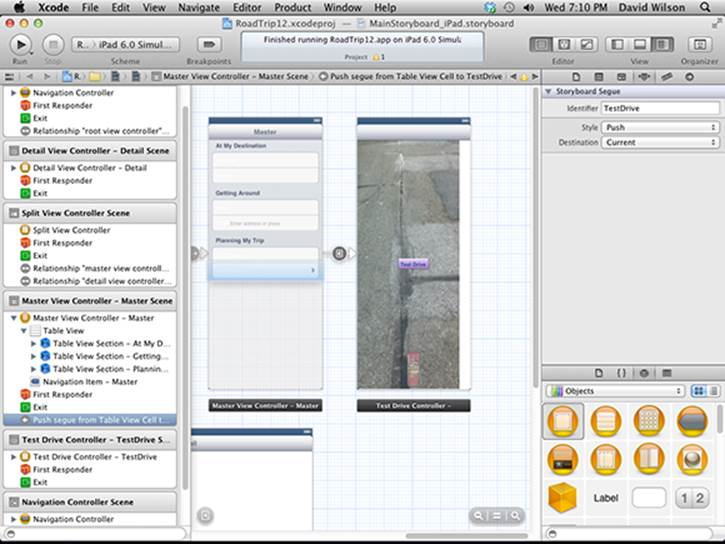
Figure 13-11: Update the segue.
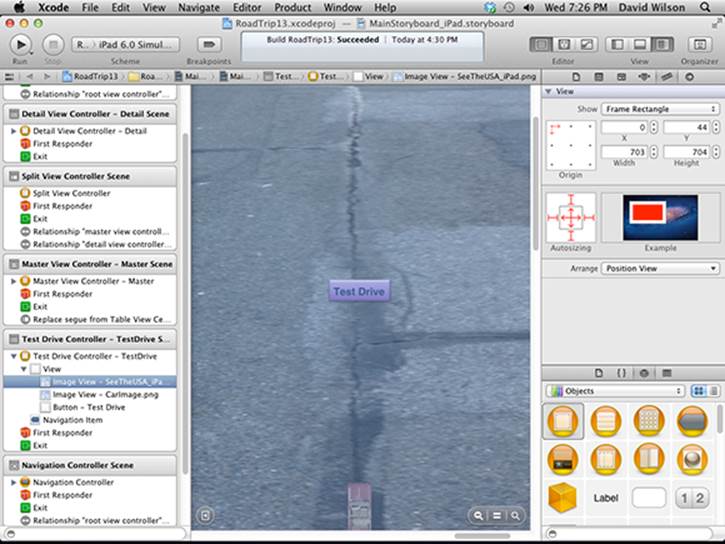
Figure 13-12: Make room for the toolbar.
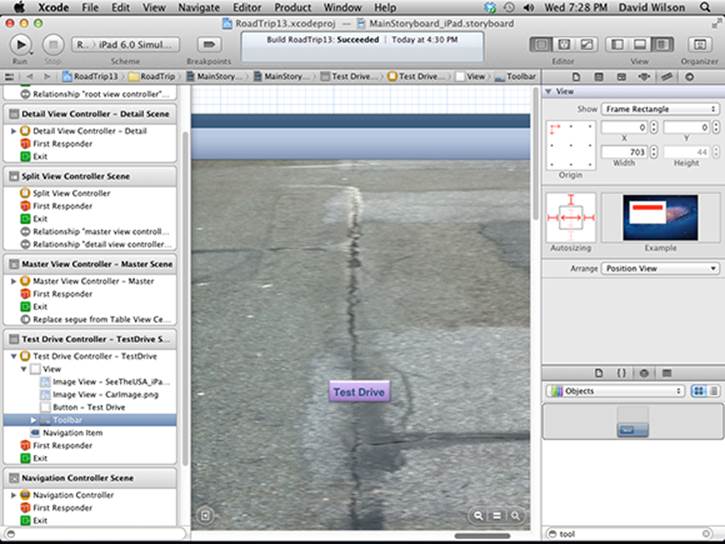
Figure 13-13: The new toolbar.
Keep in mind that you’ll also have to adjust the Sizing inspector’s Autosizing parameters. Right now, the toolbar is configured based on the iPhone, where the toolbar is on the bottom. (While that may seem odd, the iPhone was the first kid on the block and toolbars on the iPhone were originally only on the bottom.)
7. To keep the toolbar on top of the screen, click the bottom center strut in the inspector’s Autosizing section to disable it, and click the top strut to enable it. (Again, Figure 13-13 shows you what I mean.)
We’re getting there, but now you’ll need to connect the toolbar to the outlet in the RTDetailViewController base class.
8. Select the Test Drive controller in the Document Outline and open the Connections inspector.
 You’d open the Connections inspector as you’d open any inspector: by clicking its icon in the Inspector selector.
9. In the Connections inspector, drag from the Toolbar outlet to the toolbar proper, as I have in Figure 13-14.
You may remember that you added the Toolbar outlet to the RTDetailViewController base class in Listing 13-4.
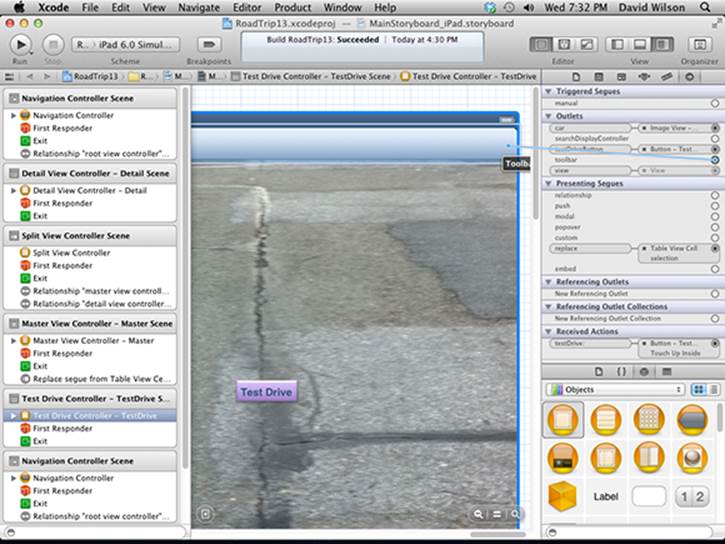
Figure 13-14: Set the toolbar outlet.
Because you deleted the RTDetailViewController’s detailDescriptionLabel outlet in Listing 13-4, you’ll have to delete it in the storyboard as well. (If you don’t, you get a runtime error that I explain in Chapter 15. Just Control-click the Detail View controller entry in the Document Outline to open the Connections window, as I have in Figure 13-15. You’ll see a yellow warning triangle next to the detailDescriptionLabel line in the Outlets section of the window. Simply delete that outlet by clicking the x in front of the Label – Detail view content goes here line. (I explain this more in Chapter 15.)
Because you’ve added the toolbar, you’ll have to change the math controlling the route your car takes in the TestDriveController.
Update the TestDriveController’s testDrive: method in TestDriveController.m with the code in bold in Listing 13-14.
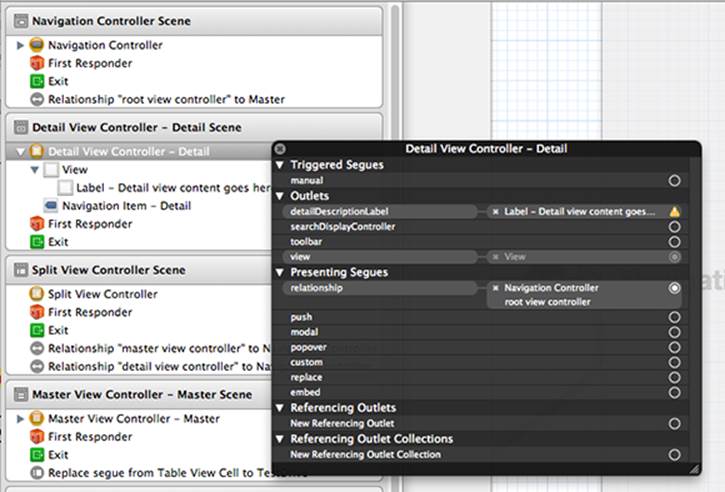
Figure 13-15: An unused outlet.
Listing 13-14: Take the Toolbar into Account
- (IBAction)testDrive:(id)sender {
AudioServicesPlaySystemSound(burnRubberSoundID);
[self performSelector:@selector(playCarSound)
withObject:self afterDelay:.2];
CGPoint center = CGPointMake(car.center.x, self.view.frame.origin.y + car.frame.size.height/2 + self.toolbar.frame.size.height);
void (^animation)() = ^(){
car.center = center;
};
void (^completion)(BOOL) = ^(BOOL finished){
[self rotate];
};
[UIView animateWithDuration:3 animations:animation
completion:completion];
}
Adding the button when the view controller is replaced
While all of this gets you close to wrapping up the whole toolbar business, you still need to do one more important thing — and a couple of minor things. The first of these — the important one — I cover in this section. Because you’re replacing the view controller with a new one — albeit one from the same base class — the new view controller has no access to the button it needs to display or the popover it needs to dismiss. Fortunately, the folks at Apple provide a perfect place to do that.
When a segue is triggered — which you do when you tap a Table entry — but before the new controller slides its view into place, the storyboard runtime calls the current view controller’s method so that it can pass data to the view controller that’s about to be displayed. That means that you can pass the button information on to the new view controller before it even gets launched. Then, prepareForSegue:sender:, the method you override in Listing 13-15, will both assign the button to be used in viewDidLoad (Listing 13-12) and (if necessary) dismiss the view controller as well.
prepareForSegue:sender: is a view controller method that notifies a view controller that a segue is about to be performed. segue is the UIStoryboardSegue object, and it contains information about the view controllers involved in the segue.
While default implementation of this method does nothing, UIViewController subclasses can override it and pass data to the view controller that’s about to be displayed. The segue object has properties that point to the source view controller as well as the destination view controller (among other information).
sender is the object that caused the segue, but you won’t need to use it here.
You add the code to the prepareForSegue:sender: method to make the DestinationController the UISplitViewController delegate and assign the popOverButton and masterPopoverController properties.
You’ll also dismiss the popover when it’s present so the user doesn’t have to touch in the view to get rid of it.
To do all that, add the code in Listing 13-15 to RTMasterViewController.m.
Listing 13-15: Overriding prepareForSegue:sender:
- (void)prepareForSegue:
(UIStoryboardSegue *)segue sender:(id)sender {
if ([[UIDevice currentDevice] userInterfaceIdiom] ==
UIUserInterfaceIdiomPad) {
RTDetailViewController *currentDetailViewController;
if ([[self.splitViewController.viewControllers
lastObject] isKindOfClass:[UINavigationController class]])
currentDetailViewController =
(RTDetailViewController *) ((UINavigationController *)
[self.splitViewController.viewControllers
lastObject]).topViewController;
else
currentDetailViewController = [self.splitViewController.viewControllers
lastObject];
if(currentDetailViewController.masterPopoverController
!= nil)
[currentDetailViewController.masterPopoverController
dismissPopoverAnimated:YES];
RTDetailViewController
*destinationDetailViewController;
if ([segue.destinationViewController isKindOfClass:[UINavigationController class]])
destinationDetailViewController =
(RTDetailViewController *)
((UINavigationController *)
segue.destinationViewController).topViewController;
else
destinationDetailViewController =
segue.destinationViewController;
self.splitViewController.delegate =
destinationDetailViewController;
destinationDetailViewController.popOverButton =
currentDetailViewController.popOverButton;
destinationDetailViewController.
masterPopoverController =
currentDetailViewController.masterPopoverController;
}
}
You start by finding the current Detail View controller because it has the button and popover properties the new view controller needs.
This code appears more complicated than it is. You use the very same logic you used earlier (say, in Listing 13-8) to decide whether you’re faced with a Navigation bar or toolbar. That means I first check to see whether I’m running on an iPad. If I am, I get the current Detail View controller by accessing the list of view controllers in the splitViewController’s viewController array. Fortunately, the UIViewController class has a splitViewController property to make that easy for me.
I then check to see whether a Navigation controller is in the viewControllers array and, if one is there, I get the Navigation controller’s topViewController (the current view controller); if not, I simply use the controller in the array. (You’ll notice a whole lot of casting going on here; I leave it to you to work your way through it.)
if ([[self.splitViewController.viewControllers lastObject]
isKindOfClass:[UINavigationController class]])
currentDetailViewController =
(RTDetailViewController *)((UINavigationController *)
[self.splitViewController.viewControllers
lastObject]).topViewController;
else
currentDetailViewController = [self.splitViewController.viewControllers
lastObject];
Next, if I see a popover, I want to dismiss it. I check to see whether a popover controller (that’s why you had to make the masterPopoverController property accessible by moving it into the header file in Listing 13-4) is currently there, and if I see one, I dismiss it.
if (currentDetailViewController.masterPopoverController
!= nil)
[currentDetailViewController.masterPopoverController
dismissPopoverAnimated:YES];
Next, I find the new destination controller (the one being transitioned to) using logic similar to the logic I used to find the current Detail View controller.
if ([segue.destinationViewController isKindOfClass:[UINavigationController class]])
destinationDetailViewController =
(RTDetailViewController *)((UINavigationController *)
segue.destinationViewController).topViewController;
else
destinationDetailViewController =
segue.destinationViewController;
Then I simply set the Split View Controller delegate to the new view controller, so it will get the splitViewController:willHideViewController: withBarButtonItem:forPopoverController: and splitViewController:willShowViewController:invalidatingBarButtonItem: messages.
self.splitViewController.delegate =
destinationDetailViewController;
Finally, I assign the popOverButton and masterPopoverController properties in the new view controller.
destinationDetailViewController.popOverButton = currentDetailViewController.popOverButton;
destinationDetailViewController.masterPopoverController =
currentDetailViewController.masterPopoverController;
Admittedly, this just dismisses the popover and assigns the properties, but doesn’t do anything to display the button. That actually gets done in viewDidLoad — which you added earlier in Listing 13-12.
You also can specify the size of the popover window by assigning a value to the contentSizeForViewInPopover property. You should be aware that the actual size may be reduced so that the popover fits on the screen and that the popover does not overlap a keyboard when a keyboard is presented. You can see the code that does that in the RTMasterViewController’s awakeFromNib method.
- (void)awakeFromNib
{
if ([[UIDevice currentDevice] userInterfaceIdiom] ==
UIUserInterfaceIdiomPad) {
self.clearsSelectionOnViewWillAppear = NO;
self.contentSizeForViewInPopover =
CGSizeMake(320.0, 600.0);
}
[super awakeFromNib];
}
The awakeFromNib message is sent to an object that has been instantiated from the storyboard after all the objects have been loaded and initialized. When the message is sent, all its outlet and action connections have been set.
If you decide to ignore the advice in this section and don’t dismiss the popover controller, taps outside the popover window will cause the popover to be dismissed. You can, however, allow the user to interact with the specified views and not dismiss the popover, using thepassthroughViews property (although you won’t be doing that here). You’d then have to dismiss the popover yourself.
A Few More Tweaks to the RTMasterViewController
You’re almost, but not quite, done. Right now, when you make a selection in the Table view, it stays highlighted. To fix that, you’ll need to implement a Table view method tableView:didSelectRowAtIndexPath:. Add the method in Listing 13-16 to RTMasterViewController.m to unhighlight a selected cell.
Listing 13-16: Deselect the Cell
- (void)tableView:(UITableView *)tableView
didSelectRowAtIndexPath:(NSIndexPath *)indexPath {
[tableView deselectRowAtIndexPath:indexPath
animated:YES];
}
This is a Table View Delegate method that is invoked when the user selects a cell. Normally, you’d launch a view controller here or do something else. (I explain more about this method and other Table View Delegate and Data Source methods in Chapter 20.) But because you’re using a segue, the only thing you need to do is deselect the cell that was tapped, which will remove the highlight.
A partner in crime here is the self.clearsSelectionOnViewWillAppear = NO; statement you see in the RTMasterViewController’s awakeFromNib method I mention in the previous section. If that were set to YES, a highlighted selection wouldn’t stay highlighted when a view appeared. I have you deselect it here so you begin to get a feel of how things are connected in a Table view — and that I explain in detail in Chapter 20.
And (a Little Extra) One More Thing
While tapping the Test Drive cell now replaces the Detail View controller with the Test Drive controller, the gesture recognizer still works. The only problem with it is that now you have both a Navigation bar and a toolbar.
To fix that, you’ll need to duplicate the Test Drive controller in the storyboard (select it and then choose Edit⇒Duplicate from the main menu) and give it a different identifier (TestDriveNavigation, for example). Remove the toolbar and change the image view origin and size in the Size inspector back to where it was when you started this Chapter (origin of x = 0, y = 0, and height of 1004 — the change in height has to do with the fact that this is now just a view controller without any segues that influence the size). Then change handleSwipeGesture in Listing 13-2 to instantiate the new view controller in RTMasterViewController.m.
Delete
UIViewController *viewController =
[storyboard instantiateViewControllerWithIdentifier:
@”TestDrive”];
and replace it with
UIViewController *viewController =
[storyboard instantiateViewControllerWithIdentifier:
@”TestDriveNavigation”];
You should also add the following to TestDriveController to keep the popover the right size in Portrait orientation:
- (void)awakeFromNib
{
if ([[UIDevice currentDevice] userInterfaceIdiom] ==
UIUserInterfaceIdiomPad) {
self.contentSizeForViewInPopover =
CGSizeMake(320.0, 600.0);
}
[super awakeFromNib];
}
Well, that concludes your long and winding tour of Split View controllers. While it may have been a bit arduous, at this point you have a firm understanding of how Split views and popovers work together — one that you can apply to whatever you want to do in your own app.
Before you do that, however, you’ll want to complete the storyboard so you can start adding features and functionality to RoadTrip (besides the Test Drive functionality). You’ll also want to change the Detail view that appears when you launch the RoadTrip application.
Don’t Forget the iPhone
This chapter was primarily about how to handle the Split View controller used in the iPad user interface. The iPhone doesn’t use a Split view, but it does use the TestDriveController. In the last section of this chapter, you added another TestDriveController scene to the iPad storyboard with a TestDriveNaviagtion identifier. This second scene does not need a toolbar, because it is launched with a swipe gesture.
Well, you need that same “toolbarless” scene for using swipe gestures on the iPhone. In fact, the handleSwipeGesture: method shown in Listing 13-2 still works fine on the iPhone, so you don’t have to do any extra work. It’s a bit odd, because it uses part of the iPad storyboard on the iPhone, but it works.