iOS 6 Application Development For Dummies (2013)
Part V. Adding the Application Content
Chapter 18. Geocoding
In This Chapter
![]() Understanding geocoding
Understanding geocoding
![]() Getting a feel for reverse geocoding
Getting a feel for reverse geocoding
![]() Displaying the address of the user’s current location
Displaying the address of the user’s current location
Being able to see where I am on an iPad map has visual appeal — that dot is a real nice shade of blue — but I’m an exacting kind of guy who’d like to know exactly where I am in the scheme of things. I’d like to know the street address of where I’m standing, in other words. Geocoding makes that possible. (If I have the address, I can also write some code to turn the iPad’s current address into an Address Book contact.)
In this chapter, I explain geocoding and have you write the code that will take the user’s current location and turn it into an address that you display in the Current Location annotation. (In the next chapter, I show you how to take an address or point of interest and display it as an annotation on a map.)
Understanding Geocoding on the iPad
Converting an address to a set of map coordinates is called forward geocoding, while converting from a set of coordinates to an address is called reverse geocoding. Both forward and reverse geocoding are supported in Apple’s CLGeocoder class — which is part of Apple’s CoreLocationframework. I showed you how to add the CoreLocation framework to the RoadTrip project way back in Chapter 11.
The CLGeocoder class provides services for converting between a coordinate (specified as a latitude and longitude) and the user-friendly representation of that coordinate. User-friendly representation of the coordinate means the street, city, state, and country information of a given location or a relevant point of interest, landmark, or other identifying information. The CLGeocoder class also provides services for the reverse: returning the coordinate value for a text string that is the user-friendly representation of that coordinate.
To use a CLGeocoder object, first create it and then send it a forward- or reverse-geocoding message.
![]() Reverse-geocoding: These requests take a latitude and longitude value and find a user-readable address.
Reverse-geocoding: These requests take a latitude and longitude value and find a user-readable address.
![]() Forward-geocoding: These requests take a user-readable address and find the corresponding latitude and longitude value. Forward-geocoding requests may also return additional information about the specified location, such as a point of interest or building at that location.
Forward-geocoding: These requests take a user-readable address and find the corresponding latitude and longitude value. Forward-geocoding requests may also return additional information about the specified location, such as a point of interest or building at that location.
For both types of request, the results are returned as an array of CLPlacemark objects to a completion handler block. In the case of forward-geocoding requests, multiple placemark objects may be returned if the provided information yields multiple possible locations.
A CLPlacemark object contains, among other things, the following properties:
![]() location: Very useful for forward geocoding, which I explain in Chapter 19
location: Very useful for forward geocoding, which I explain in Chapter 19
![]() name: The name of the placemark
name: The name of the placemark
![]() addressDictionary: A dictionary containing the Address Book keys and values for the placemark
addressDictionary: A dictionary containing the Address Book keys and values for the placemark
![]() ISOcountryCode: The abbreviated country name
ISOcountryCode: The abbreviated country name
![]() country: The name of the country
country: The name of the country
![]() postalCode: The postal code
postalCode: The postal code
![]() administrativeArea: The state or province
administrativeArea: The state or province
![]() subAdministrativeArea: Additional administrative area information (such as county)
subAdministrativeArea: Additional administrative area information (such as county)
![]() locality: The city
locality: The city
![]() subLocality: Additional city-level information such as neighborhood or a common name for the location
subLocality: Additional city-level information such as neighborhood or a common name for the location
![]() thoroughfare: The street
thoroughfare: The street
![]() subThoroughfare: Additional street-level information, such as the building number
subThoroughfare: Additional street-level information, such as the building number
![]() region: The CLRegion
region: The CLRegion
Landmark and geographic information may also be available in the CLPlacemark object in the following properties:
![]() areasOfInterest: The relevant areas of interest associated with the placemark
areasOfInterest: The relevant areas of interest associated with the placemark
![]() inlandWater: The name of the inland water body associated with the placemark
inlandWater: The name of the inland water body associated with the placemark
![]() ocean: The name of the ocean associated with the placemark
ocean: The name of the ocean associated with the placemark
To make smart decisions about what types of information to return, the geocoder server uses all the information provided to it when processing the request. For example, if the user is moving quickly along a highway, the geocoder might return the name of the overall region rather than the name of a small park that the user is passing through.
Here are some rather loose rules (Apple’s) for using the CLGeocoder object:
![]() Send at most one geocoding request for any single user action. That is, don’t start another request until the first one has completed.
Send at most one geocoding request for any single user action. That is, don’t start another request until the first one has completed.
![]() If the app needs the geocoded location in more than one map location, save and then reuse the results from the initial geocoding request instead of doing another one.
If the app needs the geocoded location in more than one map location, save and then reuse the results from the initial geocoding request instead of doing another one.
![]() When you want to update the user’s current location automatically (such as when the user is moving), issue new geocoding requests only when the user has moved a significant distance, a reasonable amount of time has passed, or both. For example, in a typical situation, you should not send more than one geocoding request per minute.
When you want to update the user’s current location automatically (such as when the user is moving), issue new geocoding requests only when the user has moved a significant distance, a reasonable amount of time has passed, or both. For example, in a typical situation, you should not send more than one geocoding request per minute.
![]() Do not start a geocoding request if your application is inactive or in the background.
Do not start a geocoding request if your application is inactive or in the background.
![]() An iOS-based device must have access to the network in order for the CLGeocoder object to return detailed placemark information. Although iOS stores enough information locally to report the localized country name and ISO country code for many locations, if country information is not available for a specific location, the CLGeocoder object may still report an error.
An iOS-based device must have access to the network in order for the CLGeocoder object to return detailed placemark information. Although iOS stores enough information locally to report the localized country name and ISO country code for many locations, if country information is not available for a specific location, the CLGeocoder object may still report an error.
 You can use a CLGeocoder object either in conjunction with, or independent of, the classes of the MapKit framework.
In this chapter, I show you how to add the code to do a reverse geocode. Essentially, you are going to update the goToLocation: method to use reverse geocoding to display the address of the current location in the annotation. In the next chapter, you get to do pretty much the same thing in order to set up a forward geocode, although you send a different message and process the placemark differently.
Reverse Geocoding
You’ll begin the process of implementing reverse geocoding by adding a new instance variable to MapController.m to store a reference to the CLGeocoder object. You do all this by adding the bolded code in Listing 18-1 to MapController.m. As you’ll see later, you’ll need that reference to cancel a request.
Listing 18-1: Updating the MapController Implementation
#import “MapController.h”
#import “RTAppDelegate.h”
#import “Trip.h”
@interface MapController () {
CLGeocoder* geocoder;
}
- (IBAction)mapType:(id)sender;
- (void)setInitialRegion;
- (NSString *)mapTitle;
- (void)addAnnotations;
@end
Next, you allocate and initialize the CLGeocoder and send it a message to return the information for the current location. Adding the bolded code in Listing 18-2 to goToLocation in MapController.m does that for you.
Listing 18-2: Updating goToLocation
- (void)goToLocation:(id)sender {
void (^clGeocodeCompletionHandler)(NSArray *, NSError *) =
^(NSArray *placemarks, NSError *error){
CLPlacemark *placemark = [placemarks objectAtIndex:0];
if (error!= nil || placemark == nil) {
NSLog(@”Geocoder failure! Error code: %u,
description: %@, and reason: %@”, error.code, [error localizedDescription],
[error localizedFailureReason]);
}
else {
self.mapView.userLocation.subtitle =
[NSString stringWithFormat: @” lat:%f lon:%f”, placemark.location.coordinate.latitude,
placemark.location.coordinate.longitude];
if ([placemark.areasOfInterest objectAtIndex:0]) {
self.mapView.userLocation.title =
[placemark.areasOfInterest objectAtIndex:0];
}
else {
if (placemark.thoroughfare) {
if (placemark.subThoroughfare)
self.mapView.userLocation.title =
[NSString stringWithFormat:@”%@ %@”,
placemark.subThoroughfare,
placemark.thoroughfare];
else
self.mapView.userLocation.title =
[NSString stringWithFormat:@”%@”,
placemark.thoroughfare];
}
else {
if (placemark.locality) {
self.mapView.userLocation.title =
placemark.locality;
}
else
self.mapView.userLocation.title = @”Your location”;
}
}
}
};
MKUserLocation *annotation = self.mapView.userLocation;
CLLocation *location = annotation.location;
if (nil == location)
return;
CLLocationDistance distance = MAX(4*location.horizontalAccuracy,500);
MKCoordinateRegion region = MKCoordinateRegionMakeWithDistance
(location.coordinate, distance, distance);
[self.mapView setRegion:region animated:NO];
if ([[UIDevice currentDevice] userInterfaceIdiom] ==
UIUserInterfaceIdiomPad) {
NSArray *itemsArray = self.toolbar.items];
UIBarButtonItem *locateButton = [itemsArray
objectAtIndex:[itemsArray count]-1];
locateButton.action = @selector(goToDestination:);
locateButton.title = @”Destination”;
}
else {
self.navigationItem.rightBarButtonItem.action =
@selector(goToDestination:);
self.navigationItem.rightBarButtonItem.title =
@”Destination”;
}
geocoder = [[CLGeocoder alloc]init];
[geocoder reverseGeocodeLocation:location completionHandler:clGeocodeCompletionHandler];
}
The code you’ve added allocates and initializes the CLGeocoder, sends it the message to reverse geocode, and provides it with a completion handler block (just as you did with the animation you did in Chapter 10).
geocoder = [[CLGeocoder alloc]init];
[geocoder reverseGeocodeLocation:location completionHandler:clGeocodeCompletionHandler];
Sending the reverseGeocodeLocation:completionHandler: message is how you make a reverse-geocoding request for the specified location.
This method submits the location data to the geocoding server asynchronously and returns. Your completion handler block will be executed on the main thread. (As I explain in Chapter 8, the main thread encompasses the application’s main run loop — applications can add [spawn] additional threads, which is beyond the scope of this book).
After initiating a reverse-geocoding request, you shouldn’t make another reverse- or forward-geocoding request until the first request is completed.
For both types of requests, the results are returned to the completion block in a CLPlacemark object. In the case of forward-geocoding requests, multiple placemark objects may be returned if what you submitted results in more than one possible location.
 Note that the block is called whether or not the request is successful. It’s invoked when the CLGeocoder either finds placemark information for its coordinate or receives an error. The CLPlacemark object, as you previously saw in the “Understanding Geocoding on the iPad” section, earlier in this chapter, will contain placemark data for a given latitude and longitude. Placemark data includes the properties that hold the country, state, city, and so on.
The completion handler is a block that appears in the following form:
void (^CLGeocodeCompletionHandler)
(NSArray *placemark, NSError *error);
As you can see, placemark contains an array of CLPlacemark objects. For most geocoding requests, this array should contain only one entry. However, forward-geocoding requests may return multiple placemark objects in situations in which the specified address couldn’t be resolved to a single location.
If the request was canceled or an error in obtaining the placemark information occurred, placemark is nil.
error contains a pointer to an error object (if any) indicating why the placemark data wasn’t returned.
if (error!= nil || placemark == nil) {
NSLog(@”Geocoder failure! Error code:%u, description:
%@, and reason: %@”, error.code,
[error localizedDescription],
[error localizedFailureReason]);
}
The CLGeocoder can fail for a variety of reasons, such as the service is down or it can’t find an address for the coordinate. If the CLGeocoder fails, you get back an error object that can have some useful information. I’ll leave it to you to explore the details of the error information on your own.
Although I simply log a message here, you may want to expand the user interface to inform the user what’s happening. Doing so isn’t important in this case because you can always just leave the annotation as Current Location, but when you start dragging annotations (which you can do, but won’t in this book), you might want to develop a plan for what to display in the annotation if the CLGeocoder fails.
If the CLGeocoder is successful, you update the userLocation annotation — provided, as always by the Map view (if you set the showsUserLocation property to YES as you did in Chapter 17) — in the completion handler. userLocation, as I explain in Chapter 17, is a Map View property representing the user’s current location.
As I explain earlier, the CLPlacemark object returned when the block is invoked stores placemark data for a given latitude and longitude. To update what’s displayed in the annotation using the information you get back from the geocoder, you start by setting the subtitle using thecoordinate in the Placemark Location property:
self.mapView.userLocation.subtitle =
[NSString stringWithFormat: @” lat:%f lon:%f”,
placemark.location.coordinate.latitude,
placemark.location.coordinate.longitude];
If an areasOfInterest exists in the placemark, you set the title to that:
if ([placemark.areasOfInterest objectAtIndex:0]) {
self.mapView.userLocation.title =
[placemark.areasOfInterest objectAtIndex:0];
}
Otherwise, you see whether you have a thoroughfare and use that for the title (along with a subthoroughfare; together they provide the “street address”). Occasionally, however, you may find that a thoroughfare (street) exists, but no sub-thoroughfare (street number). When that’s the case, you just display the thoroughfare.
if (placemark.thoroughfare) {
if (placemark.subThoroughfare)
self.mapView.userLocation.title =
[NSString stringWithFormat:@”%@ %@”,
placemark.subThoroughfare, placemark.thoroughfare];
else
self.mapView.userLocation.title =
[NSString stringWithFormat:@”%@”,
placemark.thoroughfare];
}
If no thoroughfare exists, you try for a locality, and if all else fails, you use a general-purpose location string.
if (placemark.locality ) {
self.mapView.userLocation.title = placemark.locality;
}
else
self.mapView.userLocation.title = @”Your location”;
Because the CLGeocoder operates asynchronously, the user might tap the button to return to the Destination map before the CLGeocoder has completed the request. If that’s the case, you’ll want to cancel the CLGeocoder request. To do so, add the bolded code in Listing 18-3 togoToDestination: in MapController.m.
Listing 18-3: Updating goToDestination:
- (void)goToDestination:(id)sender {
[geocoder cancelGeocode];
geocoder = nil;
[self setInitialRegion];
self.navigationItem.rightBarButtonItem.title =
@”Locate”;
self.navigationItem.rightBarButtonItem.action =
@selector(goToLocation:);
}
The cancelGeocode message cancels a pending geocoding request, which causes the completion handler block to be called.
You cancel the CLGeocoder request in this method because although you start the CLGeocoder in the goToLocation: method, it actually doesn’t return the information in that method. It operates asynchronously when it constructs the placemark, gives up, or sends an error. You also set the instance variable to nil so that ARC will release the CLGeocoder.
But not only might the user return to the Destination map before the geocoder request completes, he or she might also leave the Map view entirely and return to the Content controller. This means that you’ll want to cancel the request when the view disappears as well, and the logical place to do that is in viewWillDisappear:, which notifies the view controller that its view is about to be dismissed, covered, or otherwise hidden from view. In the Map controller, that will happen only if the user taps the Back button to return to the Main view.
Add viewWillDisappear: to MapController.m with the code in Listing 18-4. (If you added the capability to track user location changes in Chapter 17, viewWillDisappear will already be there.)
Listing 18-4: Overriding viewWillDisappear:
- (void) viewWillDisappear:(BOOL)animated {
[geocoder cancelGeocode];
geocoder = nil;
[super viewWillDisappear:animated];
}
After initiating a forward-geocoding request, don’t make another forward- or reverse-geocoding request until the first one completes or you cancel it.
Figure 18-1 shows the result of your adventures in reverse geocoding.
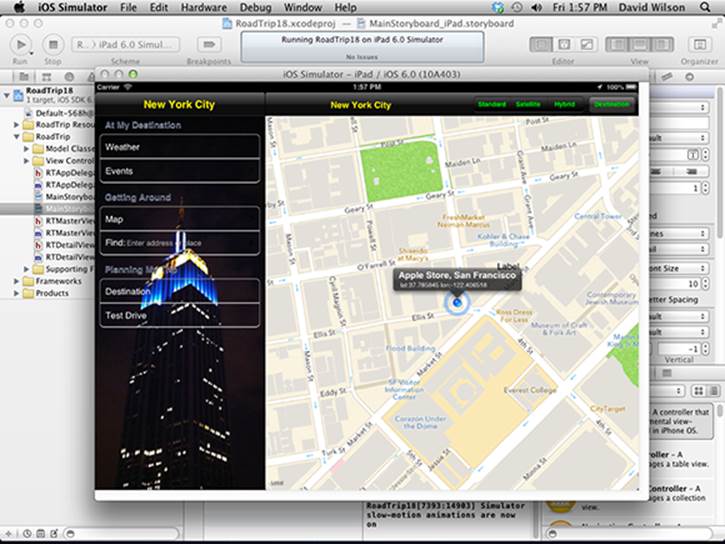
Figure 18-1: Reverse geocoding.
All materials on the site are licensed Creative Commons Attribution-Sharealike 3.0 Unported CC BY-SA 3.0 & GNU Free Documentation License (GFDL)
If you are the copyright holder of any material contained on our site and intend to remove it, please contact our site administrator for approval.
© 2016-2026 All site design rights belong to S.Y.A.