iOS 6 Application Development For Dummies (2013)
Part V. Adding the Application Content
Chapter 17. Finding Your Way
In This Chapter
![]() Using the MapKit framework
Using the MapKit framework
![]() Specifying and changing the type, location, and zoom level of a map
Specifying and changing the type, location, and zoom level of a map
![]() Identifying the iPad’s current location
Identifying the iPad’s current location
![]() Annotating significant locations on the map
Annotating significant locations on the map
One of the things that makes an iOS app compelling is the ability you have as a developer to incorporate the user’s location into the application functionality. One of the more compelling ways to do that is through the use of maps.
Including the capability to display a map in an application became important as people began to realize the kinds of solutions that can be delivered on the iPad or iPhone. To many travelers, nothing brands you as a tourist like unfolding a large paper map (except, of course, looking through a thick guidebook). In this chapter, I show you how to take advantage of the device’s built-in capability to display a map of virtually anywhere in the world, as well as its capability to quickly determine the device location and then indicate it on the map. As I mention way back inChapter 1, this awareness of your location is one of the things that enables you to develop a totally new kind of application.
In this chapter, I show you how to center your map on an area you want to display (New York, for example), add annotations (those cute pins in the map that display a callout to describe that location when you touch them), and even show the user’s current location.
The Plan
Your tasks in this chapter are summarized in the following list:
1. First, you define a new custom view controller class, MapController, which will be used to display an instance of Apple’s MKMapView. MKMapView is a very useful class, because it does most of the hard work involved in displaying maps, and allowing users to find their way. You will, however, have to add some code to your MapController class, so that users can control exactly what map data is displayed. In later chapters, you will even allow users to find specific locations — or themselves — on the map.
2. You will add the MapController scene to your iPad storyboard.
3. In your iPad storyboard, you’ll use a Replace segue to connect the Map table cell in your RTMasterViewController to your new MapController. The result will be as shown in Figure 17-1.
4. You will also need to add Apple’s MapKit framework to your project, so that the MKMapView actually can work.
5. Then you add a MapController scene to your iPhone storyboard file.
6. In your iPhone storyboard, you’ll use a Push segue to connect the Map table cell in your RTMasterViewController to the MapController. The result is shown in Figure 17-2.
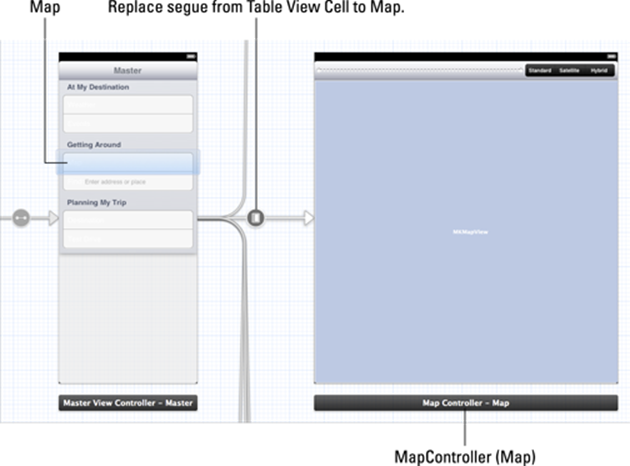
Figure 17-1: The MapController scene in your iPad storyboard.
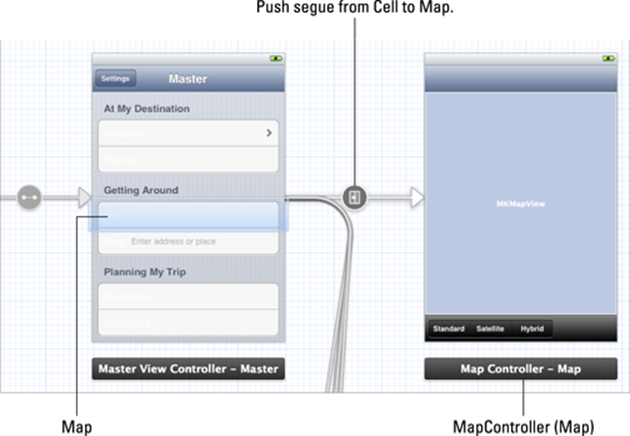
Figure 17-2: The MapController scene in your iPhone storyboard.
Setting Up the Map Controller
In this section, you will use the same approach for adding a new view controller that you did in Chapter 16. In this chapter, you will create a new MapController class, and use it with a new Map controller scene that you will add to your storyboard. Here we go again!
Adding the custom view controller
To add the MapController to the RoadTrip project, follow these steps:
1. In the Project navigator, select the View Controller Classes group and then either right-click the selection and choose New File from the menu that appears or choose File⇒New⇒New File from the main menu (or press ![]() +N).
+N).
Whatever method you choose, you’re greeted by the New File dialog.
2. In the left column of the dialog, select Cocoa Touch under the iOS heading, select the Objective-C class template in the top-right pane, and then click Next.
You’ll see a dialog that will enable you to choose the options for your file.
3. Enter MapController in the Class field, choose or enter RTDetailViewController in the Subclass Of field, make sure that the Target for iPad check box is selected and that With XIB User Interface is deselected, and then click Next.
4. In the Save sheet that appears, click Create.
Setting up the MapController in the MainStoryboard_iPad
Now that you have a custom view controller, you need to tell the iPad storyboard to load your custom view controller rather than a UIViewController. Follow these steps:
1. In the Project navigator, select MainStoryboard_iPad and then select View Controller in the View Controller – Map Scene in the Document Outline.
 2. Using the Inspector selector, open the Identity inspector in the Utility area and then choose MapController from the Custom Class section’s Class drop-down menu, as you did in Chapters 15 and 16.
Now when Map is selected in the Master View controller, MapController will be instantiated and initialized and will receive events from the user and connect the view to the Trip model.
3. In the Library pane, scroll back up and drag a Map view onto the Map controller in the Canvas, right below the toolbar.
The MKMapView class provides a way to display maps and has a lot of functionality that I describe later in this chapter.
4. Open the main disclosure triangle next to Map Controller in the Document Outline (notice that the name changed from View Controller to Map Controller) and then open the sub-disclosure triangle next to View (see Figure 17-3).
Notice in Figure 17-3 how the name of the view in the Document Outline is now Map View.
 5. After selecting the Size inspector in the Inspector selector, update the Autosizing values as I have in Figure 17-3 — selecting all the struts and springs.
This setting will result in the map being resized to fill the view as the iPad is rotated.
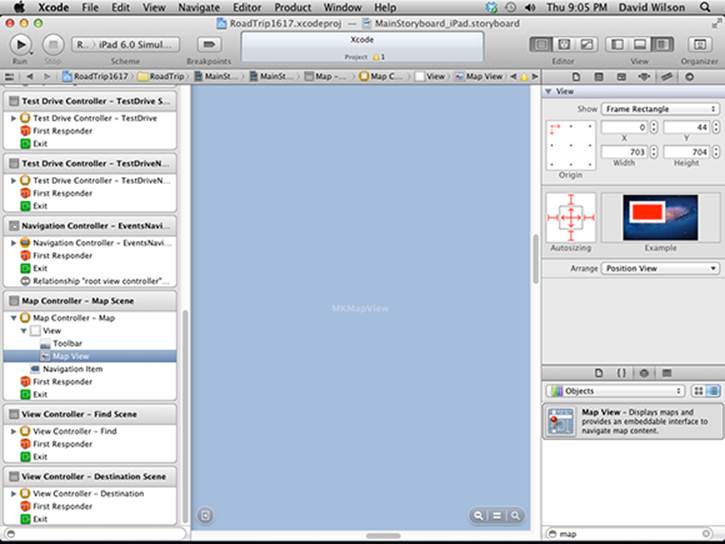
Figure 17-3: Making sure the Web view is sized correctly for the orientation.
You still need to connect the toolbar to the view controller in RTDetailViewController, the MapController’s superclass. You do that just as you did it in Chapter 15.
 6. Select Map Controller on the Canvas, click the Connections icon in the Inspector selector bar to open the Connections inspector, and then just drag from the toolbar Outlet in the inspector to the toolbar in the MapController in the Canvas or the Document Outline.
You could also right- or Control-click the Map controller in the Document Outline to open the Connections window and then click and drag from there.
I want to have a nice segmented control in the toolbar to allow the user to select a particular Map type — standard, satellite, hybrid, whatever. Fortunately, the code that implements the Split View Delegate methods that add the Road Trip button won’t get in the way of that. It will just insert the Road Trip button on the extreme left of the toolbar.
But what if I want the Type selector to be aligned right (and I do)? All I have to do is add in Interface Builder (or in the code itself, which you did in Chapter 15) a Flexible Space Bar button item — space that’s distributed equally between the other Bar Button items on the toolbar and the segmented control. (This is shown in Figure 17-4.)
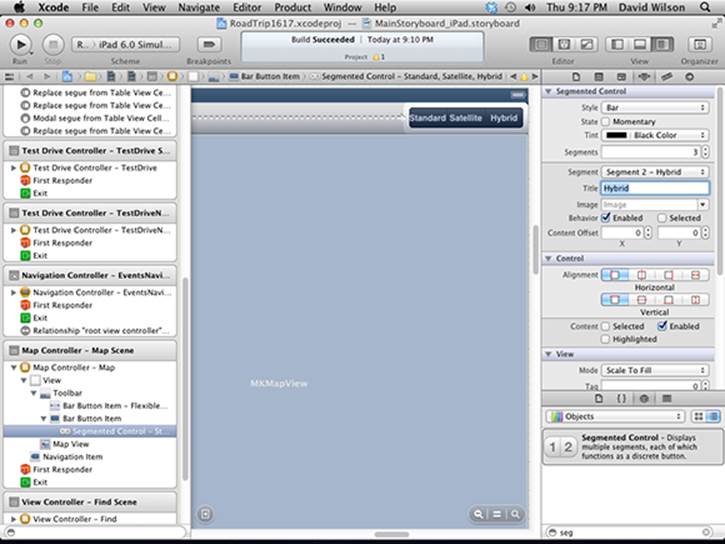
Figure 17-4: A Flexible Space Bar button item is added.
To do that, do the following:
1. To set up a segmented control (the Map Type selector on the toolbar), drag a Flexible Space Bar button item onto the toolbar in the MapController, as I have in Figure 17-4.
This item will expand appropriately to make your segmented control aligned right (along with any other button you may add subsequently — look ahead to Figure 17-8).
2. Drag a Segmented Control from the Library onto the toolbar and place it to the right of the Flexible Space Bar button item (see Figure 17-5).
3. Click the Attributes Inspector icon in the Inspector selector bar to open the Attributes inspector; in the Segmented Control section, change the number of segments to 3.
4. Still in the Segmented Control section, make sure that Segment – 0 is selected in the Segment menu, enter Standard in the Title field, and then press Return.
The Segment menu should change to Segment – 0 Standard.
5. Now select Segment – 1 in the Segment menu and enter Satellite in the Title field; then select Segment – 2 and enter Hybrid in the Title field.
Be sure to press Return after each change.
6. Finally, select Black Color from the Segmented Control section’s Tint drop-down menu.
Your Map controller should now look like Figure 17-5.
With your Map selector taken care of, it’s time to create an outlet so that MapController has access to the Map view to center the map and have the annotations display. Follow these steps:
 1. Close the Utility area and select the Assistant from the Editor selector on the Xcode toolbar.
If the MapController.m file isn’t the one that’s displayed, go up to the Assistant’s Jump bar and select it.
2. Control-drag from the Map view in the Canvas or the Document Outline to the MapController private interface and create an IBOutlet named mapView.
You’ll notice a compiler (Live Issue) error (see Figure 17-6) — Unknown type name ‘MKMapView’.
3. Because you’ll be using the MapKit framework that you add in Chapter 11, and have a property of type MKMapView, you need to update the MapController public interface (in the MapController.h file) with the bolded code in Listing 17-1 that follows. (You have it adopt theMKMapViewDelegate protocol as well.)
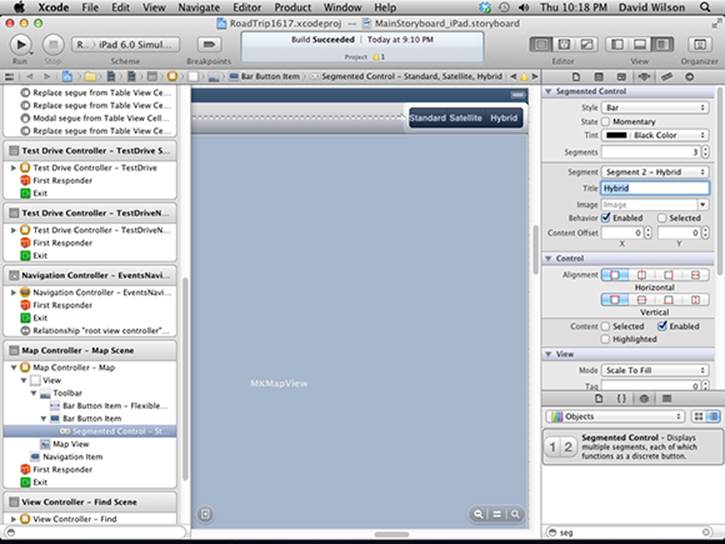
Figure 17-5: A segmented control on the right side of the toolbar.
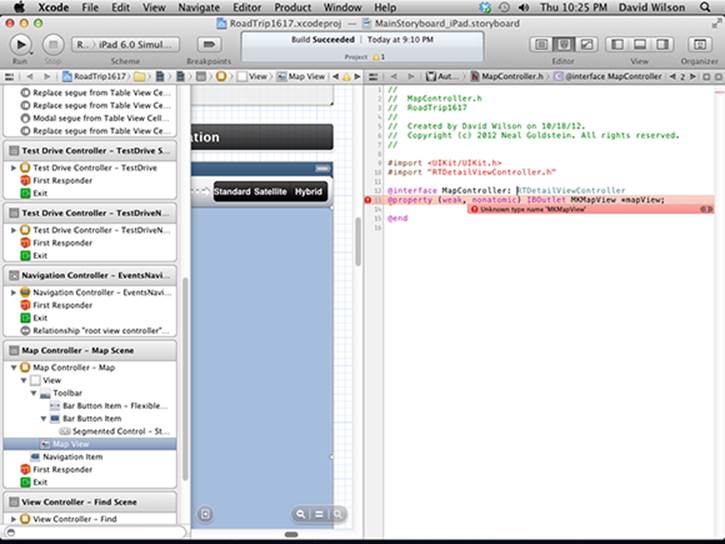
Figure 17-6: Whoops!
4. Select and then Control-drag from the segmented control (in this case, it is easier to select and drag from the Document Outline) to the MapController private interface between the @interface and @end statements.
5. In the dialog that appears, choose Action from the Connection drop-down menu.
6. In the same dialog, leave Value Changed as the selection in the Event drop-down menu.
Value Changed is the event that is generated when the user touches a segment to change the selection.
7. Still in the same dialog, name this action mapType by entering mapType in the Name field, as shown in Figure 17-7; then click Connect.
This action will be provided to your code the type of map selected by the user making a choice using the segmented control.
Because you now have an outlet set up, you’ll make the Map controller a delegate in your code as opposed to doing it in Interface Builder as you have been doing previously. I prefer to do it that way because it’s more visible when I can see it in the code (it’s up to you, though). You’ll do this delegating business a bit later — in Listing 17-2, to be precise.
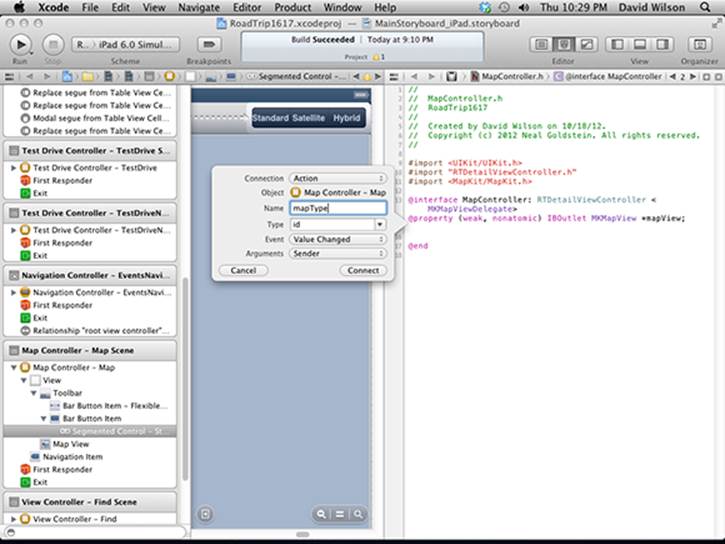
Figure 17-7: Connecting the segmented control.
Listing 17-1: Updating the MapController Interface
#import “RTDetailViewController.h”
#import <MapKit/MapKit.h>
@interface MapController : RTDetailViewController
<MKMapViewDelegate>
@end
Adding the MapKit framework
Since you are using an MKMapView, you need to add the MapKit framework to your project, in the same way that you added other frameworks to the project. The process is:
1. Select the project file in the Project Navigator.
2. Select the RoadTrip target.
3. Select the Build Phases tab.
4. Open the Link Binaries with Libraries section.
5. Click on the + button to add a new framework.
6. Select MapKit.framework.
7. In the Project Navigator Drag, drag your new framework into the Frameworks folder.
Test
Go ahead and run the project.
Presto change-o! If you select the Map entry in the Content controller, you’ll see a map centered in the United States as shown in Figure 17-8 (at least you will if you’re in the United States). It’s as easy as that.
Cute — and pretty impressive given how little work you’ve done. (The segmented control doesn’t count because you still have to implement it.) You need to do some more work to make the map really useful, though.
 This is the general approach that you follow when you add more functionality to your application — add the new controller classes, update the storyboard, and so on.
But you — and your users — want and deserve more than a map centered on the United States. Figure 17-9 shows what you’d like to see on your road trip, rather than the standard Map view you get right out of the box.
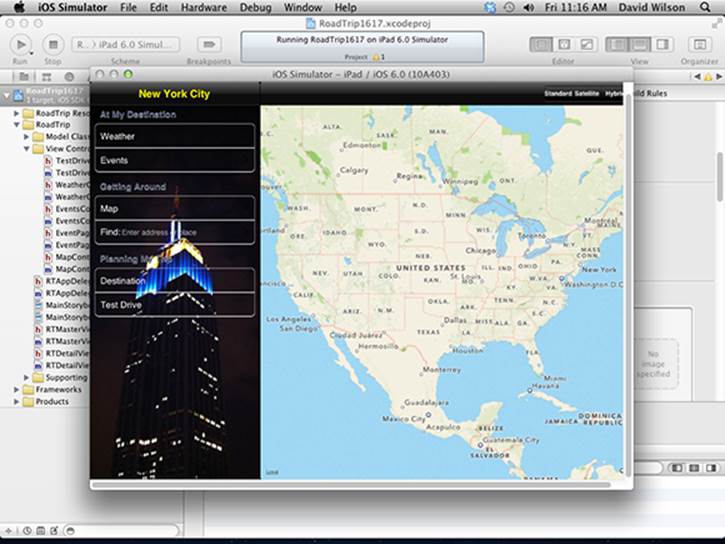
Figure 17-8: Your first map.
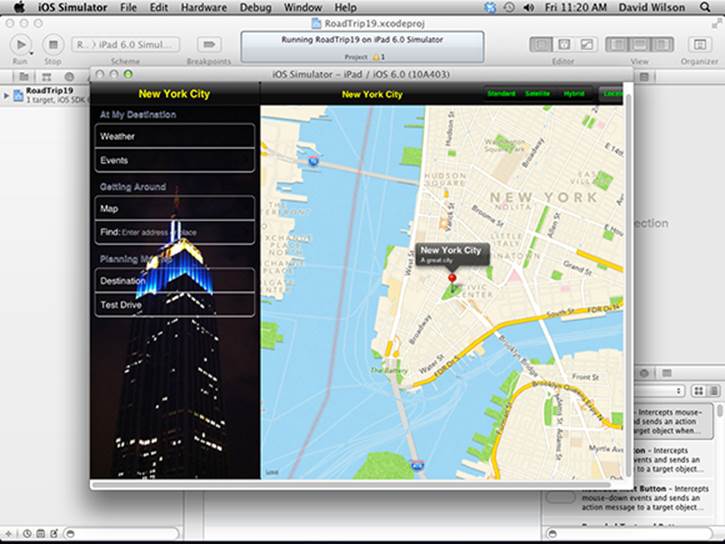
Figure 17-9: New York, New York, a helluva town.
Putting MapKit through Its Paces
You’ve done the groundwork for some great map functionality, and now it’s time to put the code in place to get that done. Apple’s MapKit.framework provides all the heavy lifting to make this actually function. MapKit enables you to bring up a simple map and also do things with your map without having to do much work at all.
The map looks like the maps in the iOS’s built-in apps and creates a seamless mapping experience across multiple applications.
MKMapView
The essence of mapping in iOS is the MKMapView. It’s a UIView subclass, and as you saw in the previous section, you can use it out of the box to create a map. You use this class as is to display map information and to manipulate the map contents from your application. It enables you to center the map on a given coordinate, specify the size of the area you want to display, and annotate the map with custom information (by becoming a Map View delegate).
When you initialize a Map view, you can specify the initial region for that map to display. You do this by setting the region property of the map. A region is defined by a center point and a horizontal and vertical distance, referred to as the span. The span defines how much of the map will be visible and also determines the zoom level. The smaller the span, the greater the zoom.
The Map view supports these standard map gestures:
![]() Scroll
Scroll
![]() Pinch (to zoom)
Pinch (to zoom)
![]() Double-tap (to zoom in)
Double-tap (to zoom in)
![]() Two-finger tap (to zoom out)
Two-finger tap (to zoom out)
You can also specify the Map type — regular, satellite, or hybrid — by changing a single property.
Because MapKit.framework was written from scratch, it was developed with the limitations of the iPhone (and later the iPad) in mind. As a result, it optimizes performance on iOS 6 devices by caching data as well as managing memory and seamlessly handling connectivity changes (such as moving from a cellular network to Wi-Fi, for example).
The map data itself is network-hosted, so network connectivity is required.
Although you shouldn’t subclass the MKMapView class itself, you can tailor a Map view’s behavior by providing a delegate object. The delegate object can be any object in your application, as long as it conforms to the MKMapViewDelegate protocol.
Enhancing the map
Having this nice global map centered on the United States is kind of interesting but not very useful if you’re planning to go to New York. The following sections show you what you would have to do to make the map more useful.
To get things started, you need to close the Assistant, show the Project navigator, and select MapController.m.
The current location
What about showing the user’s location on the map? That’s almost as easy!
In the MapController.m file, add the code in bold shown in Listing 17-2 to viewDidLoad in MapController.m.
Listing 17-2: Updating viewDidLoad
- (void)viewDidLoad
{
[super viewDidLoad];
self.mapView.delegate = self;
self.mapView.showsUserLocation = YES;
}
Your additions in Listing 17-2 start by making the MapController the Map View delegate. showsUserLocation is a MKMapView property that tells the Map view whether to show the user location. If YES, you get that same blue pulsing dot you see displayed in the iPad’s built-in Map application.
If you were to compile and run the application as it stands now on your iPad, you’d be asked if it were okay to use your current location, and if you tapped OK, you’d get what you see in Figure 17-10 — a U.S. map in Landscape orientation with a blue dot that represents the iPad’s current location. (You may have to pan the map to see it; a lag may occur while the iPad determines that location, but you should see it eventually.) Of course, to see it in Landscape orientation, you have to turn the iPad, or choose Hardware⇒Rotate Right (or Rotate Left) from the Simulator menu.
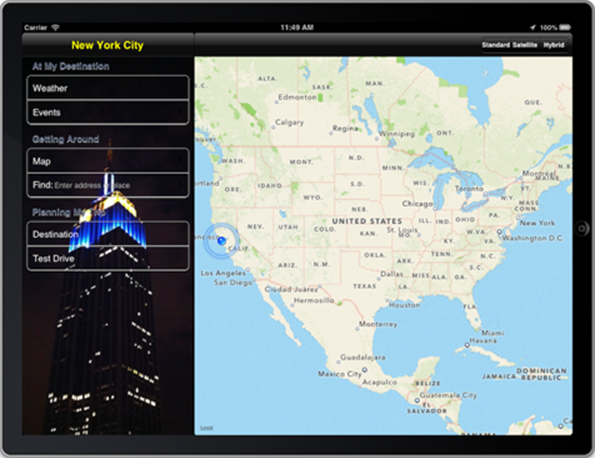
Figure 17-10: Displaying a map in Landscape orientation with a user location.
 If you don’t see the current location, you might want to check to make sure that you’ve created the mapView outlet to the Map view in the storyboard.
You get your current location if you’re running your app on the iPad. If you’re running it on the Simulator, you get to choose a simulated location.
After launching the application in the Simulator (see Figure 17-11), I’ve chosen San Francisco by showing the Debug area in the View selector on the toolbar, clicking the Simulate Location icon (it looks like the standard Location icon) in the Debug bar in the Workspace window, and then selecting San Francisco from the menu that appears. I didn’t choose New York because later you’re going to add some code to shift your map back and forth from the current location to your destination. You can also add more locations (but you don’t do that in this book).
You also can simulate the location (with some interesting choices) on the Simulator Debug menu — choose Debug⇒Location. Check out City Run for example, or even enter the GPS coordinates for any location (choose Custom Location).
Touching the blue dot also displays what’s called an annotation, and I tell you how to customize the text to display whatever you cleverly devise — including, as you discover in Chapter 18, the address of the current location.
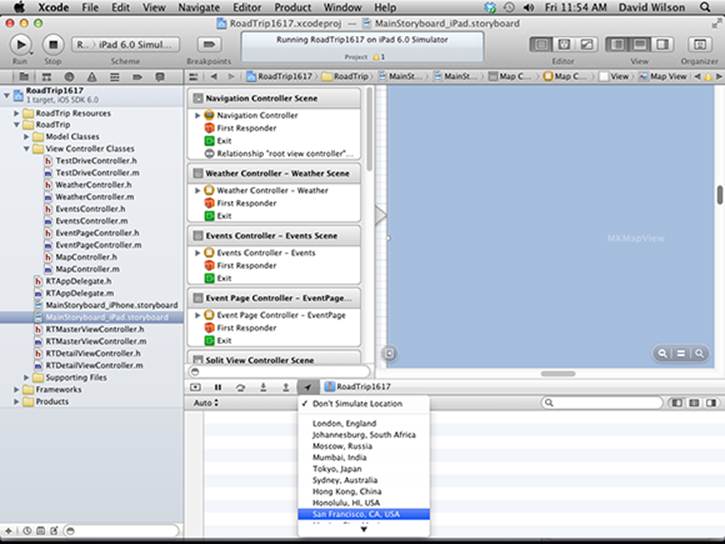
Figure 17-11: Simulating a location.
It’s about the region
Okay, now you’ve got a blue dot on a map. Cute, but still not that useful for the purposes of the app.
As I mention at the beginning of this chapter, ideally, when you get to New York (or wherever), you should see a map that centers on New York as opposed to the entire United States. To get there from here, however, is also pretty easy. First, you need to look at how you center the map. To do that, you need to add the method declaration setInitialRegion to MapController.m.
First, update the private interface by adding the bolded code in Listing 17-3 to the class extension in MapController.m.
Listing 17-3: Updating the MapController’s Private Interface
@interface MapController ()
- (IBAction)mapType:(id)sender;
- (void)setInitialRegion;
@end
Because the Map controller will get its data from the Trip object, as it should, you have to update the implementation to import the Trip class as well. Add the bolded code in Listing 17-4 to MapController.m.
Listing 17-4: Updating the MapController Implementation
#import “MapController.h”
#import “RTAppDelegate.h”
#import “Trip.h”
Finally, add the setInitialRegion method in Listing 17-5 to MapController.m.
Listing 17-5: Add setInitialRegion
- (void) setInitialRegion {
RTAppDelegate* appDelegate =
[[UIApplication sharedApplication] delegate];
MKCoordinateRegion region;
CLLocationCoordinate2D initialCoordinate =
[appDelegate.trip destinationCoordinate];
region.center.latitude = initialCoordinate.latitude;
region.center.longitude = initialCoordinate.longitude;
region.span.latitudeDelta = .05;
region.span.longitudeDelta = .05;
[self.mapView setRegion:region animated:NO];
}
You then need to update viewDidLoad to use this method. Add the code in bold in Listing 17-6 to viewDidLoad in MapController.m to send this message.
Listing 17-6: Updating viewDidLoad
- (void)viewDidLoad
{
[super viewDidLoad];
self.mapView.delegate = self;
self.mapView.showsUserLocation = YES;
[self setInitialRegion];
}
If you run this now, you see more or less the region you see back in Figure 17-9 (but not the annotations . . . at least not yet).
Setting the region is how you center the map and set the zoom level. You accomplish all this with the following statement:
[self.mapView setRegion:region animated:NO];
A region is a Map view property that specifies four pieces of information (as illustrated in Figure 17-12):
![]() region.center.latitude: Specifies the latitude of the center of the map.
region.center.latitude: Specifies the latitude of the center of the map.
![]() region.center.longitude: Specifies the longitude of the center of the map.
region.center.longitude: Specifies the longitude of the center of the map.
For example, the center of the map would be New York if I were to set those values as
region.center.latitude = 40.712756;
region.center.longitude = -74.006047;
![]() region.span.latitudeDelta: Specifies the north-to-south distance (in latitudinal degrees) to display on the map. One degree of latitude is approximately 111 kilometers (69 miles). A region.span.latitudeDelta of 0.0036 would specify a north-to-south distance on the map of about a quarter of a mile. Latitudes north of the equator have positive values, whereas latitudes south of the equator have negative values.
region.span.latitudeDelta: Specifies the north-to-south distance (in latitudinal degrees) to display on the map. One degree of latitude is approximately 111 kilometers (69 miles). A region.span.latitudeDelta of 0.0036 would specify a north-to-south distance on the map of about a quarter of a mile. Latitudes north of the equator have positive values, whereas latitudes south of the equator have negative values.
![]() region.span.longitudeDelta: Specifies the east-to-west distance (in longitudinal degrees) to display on the map. Unfortunately, the number of miles in one degree of longitude varies based on the latitude. For example, one degree of longitude is approximately 69 miles at the equator, but shrinks to 0 miles at the poles. Longitudes east of the zero meridian (by international convention, the zero or prime meridian passes through the Royal Observatory, Greenwich, in east London) have positive values, and longitudes west of the zero meridian have negative values.
region.span.longitudeDelta: Specifies the east-to-west distance (in longitudinal degrees) to display on the map. Unfortunately, the number of miles in one degree of longitude varies based on the latitude. For example, one degree of longitude is approximately 69 miles at the equator, but shrinks to 0 miles at the poles. Longitudes east of the zero meridian (by international convention, the zero or prime meridian passes through the Royal Observatory, Greenwich, in east London) have positive values, and longitudes west of the zero meridian have negative values.

Figure 17-12: How regions work and determine what you see on the map.
Although the span values provide an implicit zoom value for the map, the actual region you see displayed may not equal the span you specify because the map will go to the zoom level that best fits the region that’s set. This also means that even if you just change the center coordinate in the map, the zoom level may change because distances represented by a particular span may change at different latitudes and longitudes. To account for that, those smart developers at Apple included a property you can set that changes the center coordinate without changing the zoom level:
@property (nonatomic)
CLLocationCoordinate2D centerCoordinate
When you change the value of this property with a new CLLocationCoordinate2D, the map is centered on the new coordinate, and the span values are updated to maintain the current zoom level.
That CLLocationCoordinate2D type is something you’ll be using a lot, so I’d like to explain that before I take you any further. The CLLocationCoordinate2D type is a structure that contains a geographical coordinate using the WGS 84 reference frame (the reference coordinate system used by the Global Positioning System):
typedef struct {
CLLocationDegrees latitude;
CLLocationDegrees longitude;
} CLLocationCoordinate2D;
Here’s a little explanation:
![]() latitude: The latitude in degrees. This is the value you set in the code you just entered (region.center.latitude = latitude;). Positive values indicate latitudes north of the equator. Negative values indicate latitudes south of the equator.
latitude: The latitude in degrees. This is the value you set in the code you just entered (region.center.latitude = latitude;). Positive values indicate latitudes north of the equator. Negative values indicate latitudes south of the equator.
![]() longitude: The longitude in degrees. This is the value you set in the code you just entered (region.center.longitude = longitude;). Measurements are relative to the zero meridian, with positive values extending east of the meridian and negative values extending west of the meridian.
longitude: The longitude in degrees. This is the value you set in the code you just entered (region.center.longitude = longitude;). Measurements are relative to the zero meridian, with positive values extending east of the meridian and negative values extending west of the meridian.
CLLocationDegrees represents a latitude or longitude value specified in degrees and is a double.
To center the map display on New York, you send the setInitialRegion message (the code you just entered) when the view is loaded in the viewDidLoad: method.
Dealing with network failure
But what if the Internet isn’t available? The Apple Human Interface Guidelines (and common sense) say that you should keep the user informed of what’s going on. By virtue of the fact that you’ve made the MapController an MKMapView delegate, your app is in the position to send a message in the event of a load failure, because if a failure occurs, you’re notified if you implement the mapViewDidFailLoadingMap: method. You can respond to a load failure by adding the code in Listing 17-7 to MapController.m.
Listing 17-7: Implementing mapViewDidFailLoadingMap:
- (void)mapViewDidFailLoadingMap:(MKMapView *)mapView
withError:(NSError *)error {
NSLog(@”Unresolved error %@, %@”, error,
[error userInfo]);
UIAlertView *alert = [[UIAlertView alloc]
initWithTitle:@”Unable to load the map”
message:@”Check to see if you have internet access”
delegate:self cancelButtonTitle: @”Thanks”
otherButtonTitles:nil];
[alert show];
}
Testing this failure business requires disconnecting from the Internet after you have launched RoadTrip. And because of map caching, you might have to pan the map to get the warning.
Changing the Map Type
MapKit supports three Map types — standard, satellite, and hybrid.
The Map type is a Map View property and is represented as an enumerated type, which I have cleverly made the segment numbers in the segmented control correspond to:
enum {
MKMapTypeStandard,
MKMapTypeSatellite,
MKMapTypeHybrid
};
Add the code in bold in Listing 17-8 to the mapType: method stub that was created when you added the action in Interface Builder. The code ensures that, when the user selects a new value in the segmented control, it will change the Map type based on the selection.
Listing 17-8: Updating mapType:
- (IBAction)mapType:(id)sender {
self.mapView.mapType =
((UISegmentedControl *)sender).selectedSegmentIndex;
}
Avoiding the cast
Because I know that the sender in the mapType: method is a UISegmentedControl, I could have been clever and instead changed the Sender type in the method declaration:
- (IBAction)mapType:(UISegmentedControl *)sender {
self.mapView.mapType = sender.selectedSegmentIndex;
}
I could’ve changed the Sender type because you have the option to specify the Sender type when you create the action. (Just be sure you’ve got the right type.) In fact, I could’ve changed it by changing the type in the dialog back in Step 6 in the “Setting up the MapController in the MainStoryboard_iPad” section earlier in this chapter, where I first created the action.
When the user selects a segment in the segmented control, a value-changed event is generated. This is the event (Value Changed) that you specified when you created the action in Step 4 in the “Setting up the MapController in the MainStoryboard_iPad” section, earlier in this chapter.
The segmented control has a selectedSegmentIndex property, which contains the value of the selected segment.
I had to do a cast here because the sender is of type id — a pointer to an object — which doesn’t have a selectedSegmentIndex property.
Notice that the text is white — pretty plain vanilla, if you know what I mean. To change the text to something more spring-like — a nice green, in other words — add the code in bold in Listing 17-9 to application:didFinishLaunchingWithOptions: in RTAppDelegate.m.
Listing 17-9: Making the Segmented Control Text Green
- (BOOL)application:(UIApplication *)application
didFinishLaunchingWithOptions:
(NSDictionary *)launchOptions
{
… // other code here
[[UIApplication sharedApplication] setStatusBarStyle:UIStatusBarStyleBlackOpaque
animated:NO];
navigationController.navigationBar.barStyle =
UIBarStyleBlack;
[navigationController.navigationBar setTitleTextAttributes:[NSDictionary dictionaryWithObject:[UIColor yellowColor] forKey:UITextAttributeTextColor]];
[[UIButton appearance] setTitleColor:
[UIColor greenColor] forState:UIControlStateNormal];
[[UIBarButtonItem appearanceWhenContainedIn:
[UINavigationBar class], nil] setTitleTextAttributes:
[NSDictionary dictionaryWithObject:
[UIColor yellowColor]
forKey:UITextAttributeTextColor]
forState:UIControlStateNormal];
[[UIButton appearanceWhenContainedIn:
[UIAlertView class], nil] setTitleColor:
[UIColor whiteColor] forState:UIControlStateNormal];
[[UIToolbar appearance] setBarStyle:UIBarStyleBlack];
[[UISegmentedControl appearance]
setTitleTextAttributes:[NSDictionary dictionaryWithObject:[UIColor greenColor] forKey:UITextAttributeTextColor] forState:UIControlStateNormal];
[self createDestinationModel:0];
return YES;
}
This will set the text in every segmented control to green.
Adding Annotations
The MKMapView class supports the capability to annotate the map with custom information. The annotation has two parts: the annotation itself, which contains the data for the annotation, and the Annotation view, which displays the data.
Creating the annotation
Any object that conforms to the MKAnnotation protocol is an Annotation object; typically, Annotation objects are existing classes in your application’s model. The job of an Annotation object is to know its location (coordinates) on the map along with the text to be displayed in the callout. The MKAnnotation protocol requires a class that adopts that protocol to implement the coordinate property. It can also optionally implement title and subtitle properties. In that case, that text will be displayed in the annotation callout when the user taps the annotation.
Actually, you already have one class that meets that criteria — Destination.
And that’s why, when you create the Destination class in Chapter 11 (I told you that I would explain this), I have you add the property with the attributes in the way I do. Annotations are required by the protocol to have the properties I have bolded in the following code:
@property (nonatomic, readwrite)
CLLocationCoordinate2D coordinate;
@property (nonatomic, readwrite, copy) NSString *title;
@property (nonatomic, readwrite, copy) NSString *subtitle;
That’s it. You already have the properties in place and initialized (see Chapter 12 if you need to review why that’s the case).
Also, in Chapter 11, you include some point-of-interest data in your plist. Although in this example, you only have one point of interest (annotation), you can imagine that in a complete RoadTrip app, you’d have quite a few. You want your points of interest to be annotations as well.
You’re going to need to go back to the Trip object to create the annotations, but first you have to add an Annotation class to the Model Classes group by following these steps:
1. In the Project navigator, select the Model Classes group, and then either right-click the selection and choose New File from the menu that appears or choose File⇒New⇒New File from the main menu (or press ![]() +N) to open the New File dialog.
+N) to open the New File dialog.
2. In the left column of the dialog, select Cocoa Touch under the iOS heading, select the Objective-C Class template in the top-right pane, and then click Next.
You’ll see a dialog that will enable you to choose the options for your file.
3. Enter Annotation in the Class field.
4. Choose or enter NSObject in the Subclass Of field and then click Next.
Note that the Target for iPad and With XIB for User Interface check boxes are dimmed because they are not relevant here — Events is derived from NSObject, and not any type of view controller.
5. In the Save sheet that appears, click Create.
Next, you need to add the code necessary for an annotation.
Add the code in bold in Listing 17-10 to Annotation.h.
Listing 17-10: Updating the Annotation Interface
#import <Foundation/Foundation.h>
#import <MapKit/MapKit.h>
@interface Annotation: NSObject <MKAnnotation>
@property (nonatomic, readwrite)
CLLocationCoordinate2D coordinate;
@property (nonatomic, readwrite, copy) NSString *title;
@property (nonatomic, readwrite, copy) NSString *subtitle;
@end
I’m using a generic Annotation class to display the points of interest. As you build out the app, you could also include more information about the points of interest and other information, and create a PointOfInterest class. Then you could make it and Destination subclasses ofAnnotation. In an annotation, you can also have a right and left Callout Accessory view, which display on the right and left side of the standard callout bubble, respectively.
The Callout view is typically used to link to more detailed information about the annotation. Also, you could link to something such as the EventController to display information about a PointOfInterest. Just food for thought.
You need to update the Trip initialization method to create the annotation, but first you have to import the headers you need. Add the bolded code in Listing 17-11 to Trip.m.
Listing 17-11: Updating the Trip Implementation
#import “Trip.h”
#import “Destination.h”
#import “Events.h”
#import “Annotation.h”
@interface Trip () {
NSDictionary *destinationData;
Destination* destination;
Events *events;
NSMutableArray *pois;
}
@end
Now you can add the bolded code in Listing 17-12 to initWithDestinationIndex: in Trip.m. This will turn the point-of-interest data in the plist (the POIs) into annotations (okay, just one) and add the destination as an annotation to boot.
Listing 17-12: Updating initWithDestinationIndex:
- (id)initWithDestinationIndex:(int)destinationIndex {
self = [super init];
if (self)) {
NSString *filePath = [[NSBundle mainBundle]
pathForResource:@”Destinations” ofType:@”plist”];
NSDictionary *destinations =
[NSDictionary dictionaryWithContentsOfFile:filePath];
NSArray *destinationsArray =
[destinations objectForKey:@”DestinationData”];
destinationData =
[destinationsArray objectAtIndex:destinationIndex];
destination = [[Destination alloc]
initWithDestinationIndex:destinationIndex];
events = [[Events alloc] initWithDestinationIndex:destinationIndex];
NSArray *poiData = destinationData[@”POIs”];
pois = [[NSMutableArray alloc]
initWithCapacity:[ poiData count]+1];
[pois addObject:destination];
for (NSDictionary *aPOI in poiData) {
Annotation *annotation = [[Annotation alloc] init];
CLLocationCoordinate2D coordinate;
coordinate.latitude =
[aPOI[@”Latitude”] doubleValue];
coordinate.longitude =
[aPOI[@”Longitude”] doubleValue];
annotation.coordinate = coordinate;
annotation.title = aPOI[@”Title”];
annotation.subtitle = aPOI[@”Subtitle”];
[pois addObject:annotation];
}
}
return self;
}
As you can see, you’re creating an Annotation for each point of interest (aPOI) in the poiData array and adding it to a pois array you create — an array that will hold all the annotations I want to display on the map. poiData is the POIs array in the Destination.plist you created in Chapter 11. Note that instead of adding an initialization method to Annotation, you’re simply assigning the properties directly rather than sending them as parameters in an initialization method.
If you look closely, you can see that I’m adding Destination to the pois array as well. That way, it, too, will display on the map.
You have to add some new methods to the interface so that Trip can return the annotations (and a map title). You also need to update the Trip interface. To do that, add the bolded code in Listing 17-13 to Trip.h.
Listing 17-13: Updating the Trip Interface
@interface Trip : NSObject
- (UIImage *) destinationImage;
- (NSString *) destinationName;
- (CLLocationCoordinate2D) destinationCoordinate;
- (id)initWithDestinationIndex:(int)destinationIndex;
- (NSString *)weather;
- (NSUInteger)numberOfEvents;
- (NSString *)getEvent:(NSUInteger)index;
- (NSArray *)createAnnotations;
- (NSString *)mapTitle;
@end
Now you get to add all the Trip methods that will be used by the MapController. Start by adding the createAnnotations method shown in Listing 17-14 to Trip.m.
Listing 17-14: Adding createAnnotations
- (NSArray *)createAnnotations {
return pois;
}
Even though pois is a mutable array, I return it as a basic array because that’s all that is needed. MapController won’t be adding any annotations to it.
You also need to add a method to return the map title. Add the mapTitle method in Listing 17-15 to Trip.m.
Listing 17-15: Add mapTitle
- (NSString *)mapTitle {
return destination.destinationName;
}
All that’s really left at this point is to add the code to MapController to get the annotations and send them to the Map view. The next section walks you through that.
Displaying the map title and annotations
Start by adding the bolded code in Listing 17-16 to update the private interface in MapController.m. As you can see, you’ll be adding two methods — one to add the annotations, and another to provide the map title. I explain both as you go along.
Listing 17-16: Updating the MapController Private Interface
@interface MapController ()
- (IBAction)mapType:(id)sender;
- (void)setInitialRegion;
- (void)addAnnotations;
- (NSString *)mapTitle;
@end
With these code additions, you’ll display the annotations by sending yourself the addAnnotations message in viewDidLoad. But another thing I would like to do is display the title of the destination either on the Navigation bar or the toolbar, and I’ll do that in viewDidLoad as well.
Displaying a title in the Navigation bar is really easy, as you can see in Listing 17-17 — all you need to do is assign whatever you want it to be to the view controller’s title property. But if you have a toolbar, your task isn’t quite as easy, but it does give me a chance to show you a little more about how to work with toolbar items, so in a sense that’s a good thing.
Update viewDidLoad by adding the bolded code in Listing 17-17 to viewDidLoad in MapController.m.
Listing 17-17: Update viewDidLoad
- (void)viewDidLoad
{
[super viewDidLoad];
self.mapView.delegate = self;
self.mapView.showsUserLocation = YES;
[self setInitialRegion];
RTAppDelegate* appDelegate = [[UIApplication
sharedApplication] delegate];
if ([[UIDevice currentDevice] userInterfaceIdiom] ==
UIUserInterfaceIdiomPad) {
UILabel * titleLabel = [[UILabel alloc]
initWithFrame:CGRectMake (0,0,250,44)];
titleLabel.textColor = [UIColor yellowColor];
titleLabel.font = [UIFont boldSystemFontOfSize:17];
titleLabel.textAlignment = NSTextAlignmentCenter;
titleLabel.backgroundColor = [UIColor clearColor];
titleLabel.text = [self mapTitle];
UIBarButtonItem *titleView = [[UIBarButtonItem alloc]
initWithCustomView:titleLabel];
UIBarButtonItem *flexibleSpace=
[[UIBarButtonItem alloc] initWithBarButtonSystemItem:
UIBarButtonSystemItemFlexibleSpace
target:nil action:nil];
flexibleSpace.width = 1.0;
NSMutableArray *itemsArray =
[self.toolbar.items mutableCopy];
[itemsArray insertObject:flexibleSpace atIndex:
[itemsArray count]-2];
[itemsArray insertObject:titleView atIndex:
[itemsArray count]-2];
[self.toolbar setItems:itemsArray animated:NO];
}
else
self.title = [appDelegate.trip mapTitle];
[self addAnnotations];
}
You begin by determining whether you’re on the iPad or the iPhone. If you’re on the iPad, I make the assumption that you have a toolbar. (You could add the logic to see whether it is a toolbar or a Navigation bar on the iPad if you need to, just as you do in Chapter 8).
If you’re on an iPad, you create a Label object with a clear background, a bold system font of size 17, aligned center and with a width of 250. (You could determine the actual size you need by using a number of methods in NSString, but that’s pretty complicated and outside the scope of this book.) You also send the mapTitle message to get the title, which I get to next.
UILabel * titleLabel = [[UILabel alloc]
initWithFrame:CGRectMake (0,0,250,44)];
titleLabel.textColor = [UIColor yellowColor];
titleLabel.font = [UIFont boldSystemFontOfSize:17];
titleLabel.textAlignment = NSTextAlignmentCenter;
titleLabel.backgroundColor = [UIColor clearColor];
titleLabel.text = [self mapTitle];
You then create a UIBarButtonItem by initializing it with the view (UILabel) you just created. This enables you to add virtually whatever you want to the toolbar, as long as it’s a view.
UIBarButtonItem *titleView = [[UIBarButtonItem alloc]
initWithCustomView:titleLabel];
Then you create a flexible space of the kind you did in Chapter 15 — doing so adds a space that’s distributed equally between the other Bar Button items on the toolbar — so the title will be centered between the Map-type segmented control on the right (which already has a flexible space item in front of it) and the Road Trip button (if there is one) or the left side of the toolbar (if there isn’t).
UIBarButtonItem *flexibleSpace=
[[UIBarButtonItem alloc] initWithBarButtonSystemItem:
UIBarButtonSystemItemFlexibleSpace
target:nil action:nil];
flexibleSpace.width = 1.0;
You then add the items to the toolbar’s items array just as you do in Chapter 13.
[itemsArray insertObject:flexibleSpace atIndex:
[itemsArray count]-2];
[itemsArray insertObject:titleView atIndex:
[itemsArray count]-2];
[self.toolbar setItems:itemsArray animated:NO];
The [itemsArray count]-2 index means that you’ll add this item before the two existing items (the existing flexible space and the segmented control).
If you are not on the iPad, you just assign whatever you want the title to be to the title property of the view controller and it is displayed on the Navigation bar.
else
self.title = [appDelegate.trip mapTitle];
With the title taken care of, you send yourself the addAnnotations message.
[self addAnnotations];
Before I get to the addAnnotations method you’ll need to add, I’ll have you finish up the title by adding the mapTitle method in Listing 17-18 to MapController.m.
Listing 17-18: Add mapTitle
- (NSString *)mapTitle {
RTAppDelegate* appDelegate = [[UIApplication
sharedApplication] delegate];
return [appDelegate.trip mapTitle];
}
mapTitle gets the map title by sending the mapTitle message to the Trip object — another model responsibility. (This also gives you a chance, as you’ll see in Chapter 19, to title the map based on whatever criteria you would like, such as the current location.)
With your title taken care of, it’s time to add the annotations. Start by adding the addAnnotations method in Listing 17-19 to MapController.m.
Listing 17-19: Add addAnnotations
- (void)addAnnotations {
RTAppDelegate* appDelegate =
[[UIApplication sharedApplication] delegate];
[self.mapView addAnnotations:
[appDelegate.trip createAnnotations]];
}
I make this a separate method because I want to be able to add more annotations after the view is loaded. Although you won’t be adding additional annotations here, you take advantage of this method when you implement the FindController in Chapter 19 to display locations the user wants to see on a map.
To add an annotation to a Map view, just send the addAnnotations message with an array of annotations that have adopted the MKAnnotation protocol; that is, each one has a coordinate property and an optional title (and subtitle) method — if it turns out you want to actually display something in the annotation callout.
The Map view places annotations on the screen by sending its delegate the mapView:viewForAnnotation: message. This message is sent for each annotation object in the array. Here you can create a custom view or return nil to use the default view. (If you don’t implement this delegate method — which you won’t, in this case — the default view is also used.)
Creating your own (customized) Annotation views is beyond the scope of this book (although I can tell you that the most efficient way to provide the content for an Annotation view is to set its image property). Fortunately, the default Annotation view is fine for your purposes. It displays a pin in the location specified in the coordinate property of the Annotation delegate. When the user touches the pin, the optional title and subtitle text will display if the title and subtitle methods are implemented in the Annotation delegate.
 You can also add callouts to the Annotation view, such as a Detail Disclosure button (the one that looks like a white chevron in a blue button in a Table View cell) or the Info button (like the one you see in many of the utility apps), by using the built-in MKPinAnnotationView — you don’t have to create your own Annotation view, in other words.
If you compile and build your project, your map is going to proudly display the annotations you added, as shown in Figure 17-13. (You’ll have to pan a bit to see both annotations). Notice the Map view is beginning to look more and more like our gal back in Figure 17-9.
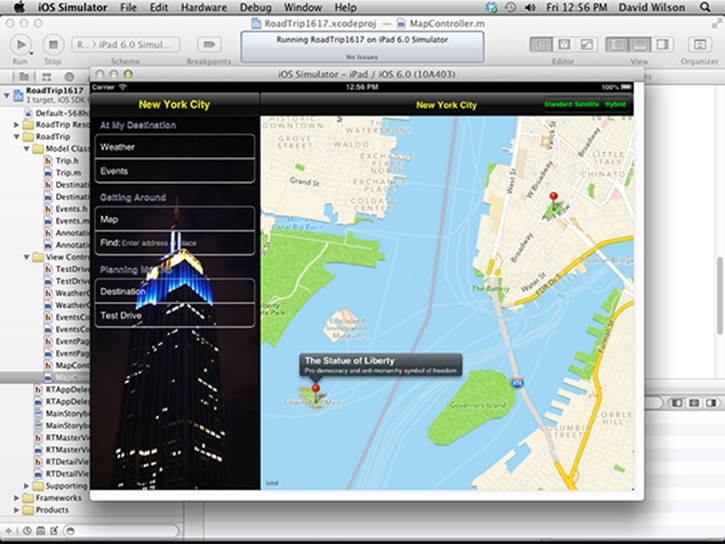
Figure 17-13: Displaying an annotation and its callout.
Going to the Current Location
Although you require the user to pan to the user location on the map if he or she wants to see it, it’s kind of annoying in this particular case unless you’re actually coding this in or around New York City. To remove at least that annoyance from your life, I show you how easy it is to add a button to the Navigation bar to zoom in to the current location and then back to the map region and span you’re currently displaying.
Add the bolded code in Listing 17-20 to add the button in the MapController method viewDidLoad.
Listing 17-20: Updating viewDidLoad
- (void)viewDidLoad
{
[super viewDidLoad];
self.mapView.delegate = self;
self.mapView.showsUserLocation = YES;
[self setInitialRegion];
RTAppDelegate* appDelegate = [[UIApplication
sharedApplication] delegate];
if ([[UIDevice currentDevice] userInterfaceIdiom] ==
UIUserInterfaceIdiomPad) {
UILabel * titleLabel = [[UILabel alloc]
initWithFrame:CGRectMake (0,0,250,44)];
titleLabel.textColor = [UIColor yellowColor];
titleLabel.font = [UIFont boldSystemFontOfSize:17];
titleLabel.textAlignment = NSTextAlignmentCenter;
titleLabel.backgroundColor = [UIColor clearColor];
titleLabel.text = [self mapTitle];
UIBarButtonItem *titleView = [[UIBarButtonItem alloc]
initWithCustomView:titleLabel];
UIBarButtonItem *flexibleSpace=
[[UIBarButtonItem alloc] initWithBarButtonSystemItem:
UIBarButtonSystemItemFlexibleSpace
target:nil action:nil];
flexibleSpace.width = 1.0;
NSMutableArray *itemsArray =
[self.toolbar.items mutableCopy];
[itemsArray insertObject:flexibleSpace atIndex:
[itemsArray count]-2];
[itemsArray insertObject:titleView atIndex:
[itemsArray count]-2];
[self.toolbar setItems:itemsArray animated:NO];
}
else {
self.title = [appDelegate.trip mapTitle];
}
[self addAnnotations];
UIBarButtonItem *locateButton = [[UIBarButtonItem alloc] initWithTitle:@”Locate” style:UIBarButtonItemStyleBordered target:self action:@selector(goToLocation:)];;
if ([[UIDevice currentDevice] userInterfaceIdiom] == UIUserInterfaceIdiomPad) {
NSMutableArray *itemsArray =
[self.toolbar.items mutableCopy];
[itemsArray insertObject:locateButton
atIndex:[itemsArray count]];
[self.toolbar setItems:itemsArray animated:NO];
}
else {
self.navigationItem.rightBarButtonItem = locateButton;
}
}
This may look familiar because it’s what you did to add the Back button in Chapter 15. When the user taps the Locate button you create here, you’ve specified that the goToLocation: message is to be sent [action:@selector(goToLocation:)] to the MapController (target:self).
UIBarButtonItem *locateButton =
[[UIBarButtonItem alloc] initWithTitle: @”Locate”
style:UIBarButtonItemStylePlain target:self
action:@selector(goToLocation:)];
self.navigationItem.rightBarButtonItem = locateButton;
Notice that I don’t check to see whether this is a Navigation bar or a toolbar. I’m assuming a toolbar, but if you think you may want to someday, for some reason, make this a Navigation bar, I leave this as an exercise for the reader.
Don’t forget, to go back to a location you need to choose a simulated location if you are using the Simulator, as you did in the earlier section “Enhancing the map.”
Next, add the goToLocation: method in Listing 17-21 to MapController.m.
Listing 17-21: Adding goToLocation:
- (void)goToLocation:(id)sender {
MKUserLocation *annotation = self.mapView.userLocation;
CLLocation *location = annotation.location;
if (nil == location)
return;
CLLocationDistance distance = MAX(4*location.horizontalAccuracy,500);
MKCoordinateRegion region = MKCoordinateRegionMakeWithDistance
(location.coordinate, distance, distance);
[self.mapView setRegion:region animated:NO];
if ([[UIDevice currentDevice] userInterfaceIdiom] ==
UIUserInterfaceIdiomPad) {
NSArray *itemsArray = self.toolbar.items;
UIBarButtonItem *locateButton = [itemsArray
objectAtIndex:[itemsArray count]-1];
locateButton.action = @selector(goToDestination:);
locateButton.title = @”Destination”;
}
else {
self.navigationItem.rightBarButtonItem.action =
@selector(goToDestination:);
self.navigationItem.rightBarButtonItem.title =
@”Destination”;
}
}
When the user taps the Locate button, your app first checks to see whether the location is available. (It may take a few seconds after the application starts for the location to become available.) If not, you simply return from the method without changing the region. (You could, of course, show an alert informing the user what’s happening and to try again in 10 seconds or so — I leave that up to you.)
If the location is available, your app computes the span for the region the user is moving to. In this case, the following code
CLLocationDistance distance =
MAX(4*location.horizontalAccuracy,500);
computes the span to be four times the horizontalAccuracy of the device (but no less than 1,000 meters). horizontalAccuracy is a radius of uncertainty given the accuracy of the device; that is, the user is somewhere within that circle.
You then call the MKCoordinateRegionMakeWithDistance function that creates a new MKCoordinateRegion from the specified coordinate and distance values. distance and distance correspond to latitudinalMeters and longitudinalMeters, respectively. (I’m using the same value for both parameters here.)
If you didn’t want to change the span, you could’ve simply set the Map view’s centerCoordinate property to userLocation, and as I said earlier in the “It’s about the region” section, that would’ve centered the region at the userLocation coordinate without changing the span.
When the user taps the Location button, you change the title on the button to the Map title and change the @selector to (goToDestination:). You access the button on the iPad in the toolbar itemsArray and on the iPhone via the navigationItem.
This means that the next time the user touches the button, the goToDestination: message will be sent, so you’d better add the code in Listing 17-22 to MapController.m. This sets the region back to the Destination region and toggles the button title back to Locate.
Listing 17-22: Adding goToDestination:
- (void)goToDestination:(id)sender {
[self setInitialRegion];
if ([[UIDevice currentDevice] userInterfaceIdiom] == UIUserInterfaceIdiomPad) {
NSArray *itemsArray = self.toolbar.items;
UIBarButtonItem *locateButton = [itemsArray objectAtIndex:[itemsArray count]-1];
locateButton.action = @selector(goToLocation:);
locateButton.title = @”Locate”;
}
else {
self.navigationItem.rightBarButtonItem.action =
@selector(goToLocation:);
self.navigationItem.rightBarButtonItem.title =
@”Locate”;
}
}
Now run your app (and if you’re running on the Simulator, choose your default location as explained in the section “Enhancing the map,” earlier in this chapter).
By the way, look at the button style. Because you use an appearance proxy in Chapter 8, all your buttons will be customized in the way you specified.
You can see the result of touching the Locate button in Figure 17-14.
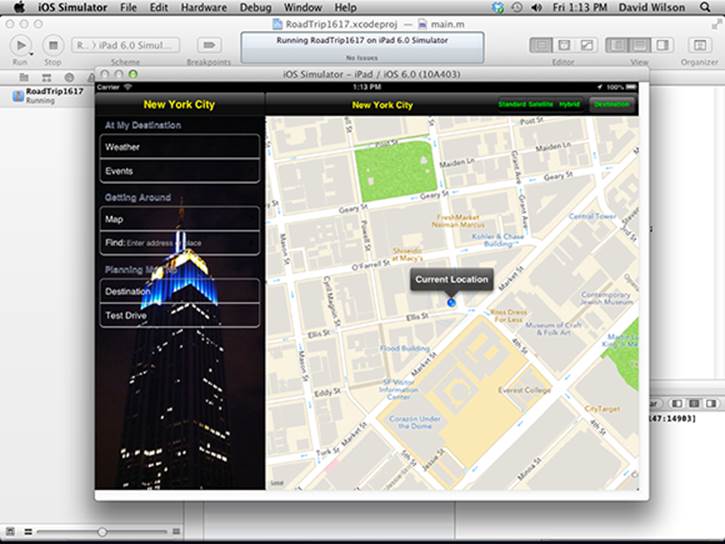
Figure 17-14: Go to the current location.
 Because you have the user location, you might be tempted to use that to center the map, and that would work fine, as long as you start the location-finding mechanism stuff as soon as the program launches. The problem is that the hardware may take a while to find the current location, and if you don’t wait long enough, you get an error. You can add the code to center the map to a method that executes later, such as
-(void)observeValueForKeyPath:(NSString *)keyPath
ofObject:(id)object change:(NSDictionary *)change
context:(void *)context {
This message is sent as soon as the map starts getting location information, but you’ll see an initial view and then a redisplay of the centered view. For aesthetic reasons, you really need to initialize MapController and MapView at program startup — an exercise for the reader.
Update the iPhone Storyboard
The iPhone storyboard for maps is very similar to the iPad storyboard. In fact, the quick and easy way to update your iPhone storyboard is as follows:
1. Select the iPad storyboard file in the Project Navigator.
2. Click the mouse on the Map Controller – Map Scene to select it. Make sure that the whole Map Scene is selected and highlighted.
3. Copy the Map Controller Scene by choosing Edit⇒Copy.
4. Select your iPhone storyboard file in the Project Navigator.
5. Paste the Map Controller Scene into the iPhone storyboard file.
6. Control-drag from the Map item in the Master View controller over to the Map Controller Scene, and choose the Push segue from the pop-up menu.
7. Test your new map capabilities in the iPhone simulator.
8. Congratulate yourself on a job well done.