iOS 6 Application Development For Dummies (2013)
Part I. Getting Started
Chapter 3. The Nuts and Bolts of an Xcode Project
In This Chapter
![]() Getting a handle on your Xcode project
Getting a handle on your Xcode project
![]() Setting Xcode preferences
Setting Xcode preferences
![]() Building and running an iPad app
Building and running an iPad app
![]() Getting inside the Simulator
Getting inside the Simulator
![]() Adding application icons
Adding application icons
As I explain in Chapter 2, to use Xcode to create an app, you need to create an Xcode project. An Xcode project includes all the files, resources, and information required to build your application. It’s your partner in creating your application, and the sooner you make friends with it, the easier your life will become.
In this chapter, I show you how to create an Xcode project and then build and run your app in the Simulator.
Creating Your Project
Because developing an iPhone and/or an iPad app requires you to work in an Xcode project, it’s time to create one. The app you’ll be building is called RoadTrip (and will also be the name of the project). The app, as I mention in the introduction to this book, is like a travel guide on your iOS device. Here’s how you get your RoadTrip project off the ground:
1. Launch Xcode.
With Xcode 4.5, Xcode is now an application in the Mac App Store, which, right from the start, makes your life simpler. (You used to have to download a .dmg, or Disk Image file, and then run an installer). Simply go the Mac App Store, search for Xcode 4, click the FREE button, and then click the INSTALL APP button that the Free button transmogrifies into, and you are done. After the download you’ll find the Xcode in your Applications folder. Double-click to launch it.
 Here are a couple of hints to make Xcode handier and more efficient right from the start:
• Create a shortcut. Control-click the Xcode icon that appears in the Dock and then choose Options⇒Keep in Dock. You’ll be using Xcode a lot, so it wouldn’t hurt to be able to launch it from the Dock.
• Nix the Welcome to Xcode screen if you’d like. When you first launch Xcode, you see the Welcome to Xcode screen with several links. (After you use Xcode to create projects, your Welcome screen lists all your most recent projects in the right column.) If you don’t want to be bothered with the Welcome screen in the future, deselect the Show This Window When Xcode Launches check box.
You can also just click Cancel to close the Welcome screen.
If you ever want to see the Welcome screen again, you can access it through the Window menu or by pressing Shift+![]() +1.
+1.
2. Click the Create a New Xcode Project link on the left side of the Welcome screen, or choose File⇒New⇒New Project to create a new project.
Alternatively, you can just press Shift+![]() +N.
+N.
No matter how you decide to start a new project, you’re greeted by the Choose a Template for Your New Project sheet (a “sheet” is also known as a “document-modal dialog”). Its purpose in life is pretty clear: It’s there to let you choose a new template for your new project. Note that the leftmost pane has two sections: one for iOS and the other for OS X (Apple’s latest name for the Macintosh operating system).
3. In the upper-left corner of the Choose a Template dialog, select Application under the iOS heading (if it isn’t already selected).
After clicking Application, the main pane of the Choose a Template sheet refreshes, revealing several choices. (See Figure 3-1.) Each choice is actually a template that, when chosen, generates code to get you started.
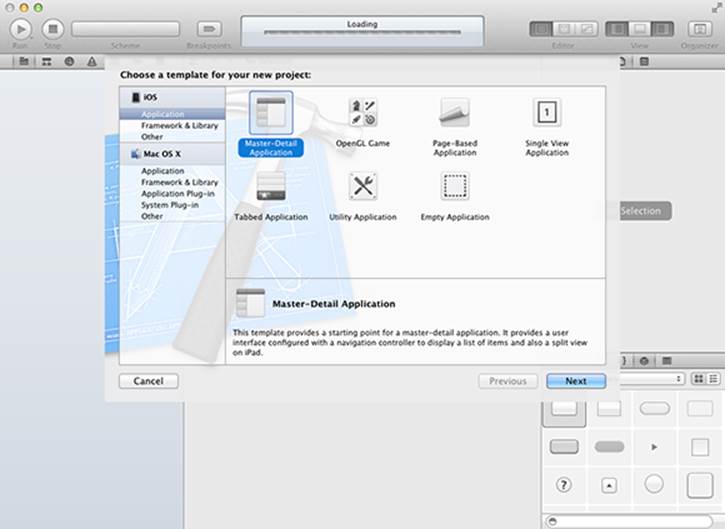
Figure 3-1: Choose a template first.
4. Select Master-Detail Application from the template choices displayed (as I have in Figure 3-1) and then click Next.
After you click Next, the Choose Options for Your New Project sheet appears.
This Master-Detail Application template provides a starting point for the appropriately named Master-Detail application. What you get is a skeleton app with a Split view. (I explain all about split views in the “The iPad’s Split views” section, later in this chapter.) A Split view is what you see in the Mail application. In Landscape orientation on the left is a Master view, and on the right is a Detail view. In Portrait orientation you see the Detail view with a button that enables you to display the Master view in a popover.
Note that when you select a template, a brief description of the template is displayed underneath the main pane. (Again, refer to Figure 3-1 to see a description of the Master-Detail Application template.) In fact, go ahead and click some of the other template choices just to see how they’re described as well. Just be sure to click the Master-Detail Application template again when you’re done, and then click Next, to follow along with developing the RoadTrip app.
These template names do change from time to time, so don’t be surprised if yours are a little different from the ones I refer to in this book. For the most part, the kinds of application they build tend to stay the same.
5. In the Choose Options for Your New Project sheet (see Figure 3-2), enter a name for your new project in the Product Name field, and add a company name (or your name) in the Company Identifier field.
I named this project RoadTrip. (You should do the same if you’re following along with developing RoadTrip.)
Class prefix is something that will get prepended to the classes the template will generate, so enter RT (for RoadTrip) in the Class Prefix field.
 If you don’t enter a prefix here, the template will create generically named classes that seem to have no connection to your project.
6. Select Universal from the Devices Family pop-up menu (if it isn’t already selected).
Doing so creates a skeleton app that will be configured to run on the iPad, iPhone, or iPod touch.
By choosing Universal, you’re creating an app that can run on iPhone (and iPod touch) and iPad.
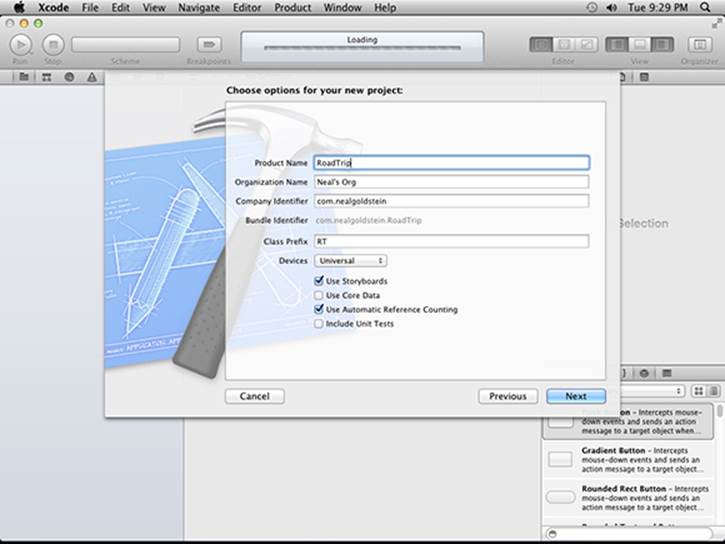
Figure 3-2: Choose project options.
While any iPhone application will run on the iPad, it doesn’t work the other way around unless you create a Universal application.
 I have you select Universal because, with the introduction of storyboards in iOS 5 and Xcode 4.2, creating a universal application has become much easier.
Other options to select or deselect in this sheet are the following:
• Use Storyboard: Whatever you do, be sure to select this check box. The Use Storyboard option enables you to create the entire user interface flow graphically.
• Use Core Data: Deselect this check box. In some of the templates, you can also choose to generate the code necessary to use Core Data. The Core Data framework supports object persistence and is beyond the scope of this book. You can find quite a bit of sample code in the iOS Dev Center that does a good job of illustrating how to use it.
• Use Automatic Reference Counting: Select this check box. As I explain in Chapter 6, this option makes memory management much easier.
• Include Unit Tests: Deselect this check box. Although unit testing is a valuable feature, covering it is beyond the scope of this book. Unit tests are part of a style of programming that involves writing test cases before writing the code to be tested. You can set requirements in concrete before writing any code. I don’t use unit testing for RoadTrip because it would make the process of explaining Xcode more complicated. The feature is worth examining on your own, however.
7. Click Next and choose a location to save the project (the Desktop or any folder works just fine), deselect the Source Control: Create Local Git Repository for This Project check box, and then click Create.
Git is a software control management (SCM) system that keeps track of changes in the code and saves multiple versions of each file on your hard drive. Git can be used as a local repository — thus the Create Local Git Repository for This Project option — or you can install a Git server on a remote machine to share files among team members. Git is beyond the scope of this book — but if you want to find out more about it, check out the Xcode 4 User Guide (choose Help⇒Xcode User Guide).
After you click Create, Xcode creates the project and opens the Workspace window for the project — which should look like what you see in Figure 3-3.
Xcode will remember your choices for your next project.
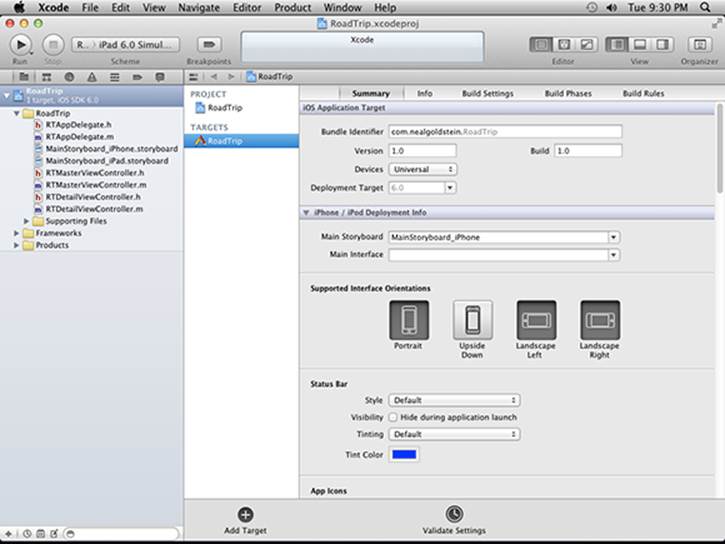
Figure 3-3: The Xcode Workspace window.
Exploring Your Project
Not to sound like a broken record, but to develop an iOS app, you have to work within the context of an Xcode project, very much like the one shown in Figure 3-3. This is, in effect, Command Central for developing your app; it displays and organizes your projects, source files, and the other resources needed to build your apps.
The project
 If the project isn’t open, go ahead and open it in Xcode by tracking down the project file — on the Desktop, in a folder, wherever — and double-clicking it. As I explain in Chapter 2, when your project is launched in Xcode, the Navigator area appears on the left side of the Workspace window. When using the Master-Detail Application template — you did select the Master-Detail Application template when you created your project, right? — the following options are selected for you by default:
![]() The Utility and Debug areas are hidden.
The Utility and Debug areas are hidden.
![]() The Navigator area is shown, with the Project navigator selected by default in the Navigator selector.
The Navigator area is shown, with the Project navigator selected by default in the Navigator selector.
![]() The project (RoadTrip, in this case) is selected in the Project navigator.
The project (RoadTrip, in this case) is selected in the Project navigator.
And as a result, the Project editor displays the RoadTrip project information in the Standard editor.
Long story short, when you launch your RoadTrip project in Xcode, what you see in the editor is the Project editor displaying the RoadTrip project.
 When I refer to (or ask you to select) the RoadTrip project in the Project Navigator, I am referring to the RoadTrip project that you see selected in Figure 3-3.
The Project editor
Having your RoadTrip project selected in the Navigator area’s Project navigator (refer to Figure 3-3) sets a couple of balls rolling. In the first column of the Project editor, under the Project heading, you see the project itself. (It turns out that a workspace can actually have more than one project, but you won’t be doing that in this book.) A bit below the Project heading, you see the Targets heading. (Yes, there’s room for more than one target here as well.) Any project you create defines the default build settings for all the targets in that particular project. (Note that each target can also specify its own build settings, which could potentially override the project build settings.)
A target is really just the app (the product you are building) and includes the information that Xcode requires to build the product from a set of files in a project or workspace — stuff like the build settings and build phases which you can see and edit in the Xcode project editor. A target inherits the build settings for the project, but you can override one or more of them by specifying different settings at the target level. There is one active target at a time, with the Xcode scheme (iPad Simulator for example) specifying the target.
The Project editor shows tabs across the top; clicking these tabs opens panes that enable you to examine and change project settings. Most of the default settings will work for your needs, but as you develop the example project in Chapter 8, you’ll be changing a setting in the Compile Sources section in the Build Phases tab. (Won’t that be exciting!) The tabs are as follows:
![]() Summary: Each setting in the Summary tab is actually found in one of the other tabs. When you edit a setting, Xcode updates the data in the appropriate tab automatically (which is where the data really resides), meaning you probably won’t have to go into the other tabs.
Summary: Each setting in the Summary tab is actually found in one of the other tabs. When you edit a setting, Xcode updates the data in the appropriate tab automatically (which is where the data really resides), meaning you probably won’t have to go into the other tabs.
The iOS Application Target and iPhone/iPad Deployment Info sections of the Summary tab display settings based on the choices you made when you first created the RoadTrip project. (Notice that one of the settings is Deployment Target. While you must compile your project using the current SDK, you can target it to run on earlier iOS versions. I cover that in more detail in a document on my website — Running Sideways and Backwards (which also explains the business about universal applications).
There’s a section on the Summary tab for adding an app icon — you’ll be doing that for the RoadTrip app in the “Adding Application Icons” section, later in this chapter — as well as a section for adding a launch image for your app. (The launch image is what is displayed while your app is launching — kind of like provisional eye candy that hangs around until the app is ready to use.)
The Summary tab is also your go-to place for adding a new framework to your app — I cover adding a new framework in Chapter 9 — as well as for setting Entitlements. (Entitlements confer specific capabilities or security permissions to your app, and are beyond the scope of this book.)
![]() Info: If you listened to my advice and actually created the RoadTrip project earlier in this chapter and were then to open the disclosure triangle next to the Supporting Files folder in the Project navigator, you’d see a file called RoadTrip-Info.plist. The Info tab contains more or less the same information as that file. An information property list file contains essential configuration information for a bundled executable (the executable code and the accompanying resources, such as the storyboard, nibs, images, sounds, and so on). The system uses these keys and values to obtain information about your application and how it’s configured. As a result, all bundled executables (plug-ins, frameworks, and applications) are expected to have an information property list file.
Info: If you listened to my advice and actually created the RoadTrip project earlier in this chapter and were then to open the disclosure triangle next to the Supporting Files folder in the Project navigator, you’d see a file called RoadTrip-Info.plist. The Info tab contains more or less the same information as that file. An information property list file contains essential configuration information for a bundled executable (the executable code and the accompanying resources, such as the storyboard, nibs, images, sounds, and so on). The system uses these keys and values to obtain information about your application and how it’s configured. As a result, all bundled executables (plug-ins, frameworks, and applications) are expected to have an information property list file.
![]() Build Settings: Most developers can get by with the default build settings, but if you have special requirements — ones that require anything from tweaking a setting or two to creating an entirely new build configuration — you’ll take care of them in this tab.
Build Settings: Most developers can get by with the default build settings, but if you have special requirements — ones that require anything from tweaking a setting or two to creating an entirely new build configuration — you’ll take care of them in this tab.
![]() Build Phases: This tab has a number of sections that control how Xcode builds your products. For example, Xcode detects when one of your products is dependent on another and automatically builds those products in the correct order. However, if you need to tweak the order in which Xcode builds your products, you can use the Build Phases tab to create explicit target dependencies.
Build Phases: This tab has a number of sections that control how Xcode builds your products. For example, Xcode detects when one of your products is dependent on another and automatically builds those products in the correct order. However, if you need to tweak the order in which Xcode builds your products, you can use the Build Phases tab to create explicit target dependencies.
![]() Build Rules: Xcode processes your source files according to file type using a set of built-in rules. For example, property list (plist) files are copied into the product using the CopyPlistFile script located in the Xcode directory. Because the built-in rules are fine for almost all circumstances, you won’t need to mess with this particular tab for a long time — and if you’re lucky, never.
Build Rules: Xcode processes your source files according to file type using a set of built-in rules. For example, property list (plist) files are copied into the product using the CopyPlistFile script located in the Xcode directory. Because the built-in rules are fine for almost all circumstances, you won’t need to mess with this particular tab for a long time — and if you’re lucky, never.
The Project navigator
After your project is created, the Xcode workspace displays the Project navigator. I introduce the Project navigator in Chapter 2, but give you a full tour here.
Xcode has a lot of context-based help. Whenever you’re curious about what something does, try Control-clicking in an area, and you’ll likely find a menu with a Help selection. In Figure 3-4, for example, I Control-clicked in the Project navigator to bring up a shortcut menu from which I can choose the Project Navigator Help menu.
The Navigator area is an optional area on the left side of the Workspace window where you can load different navigators — including the Project navigator — with the help of the Navigator selector. To hide or show the Navigator area, click the left View selector button in the workspace toolbar, shown in Figure 3-5.
The Navigator area includes the Navigator selector bar, the Content area, and the Filter bar. It can also include other features specific to the selected navigator.
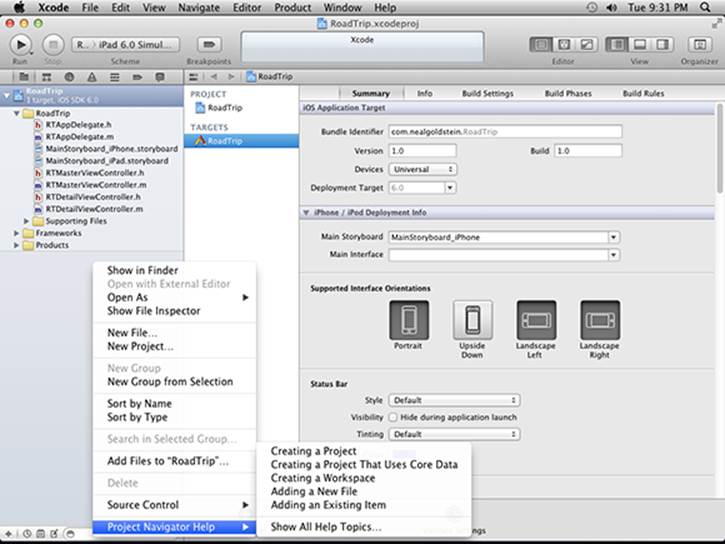
Figure 3-4: Project navigator help.
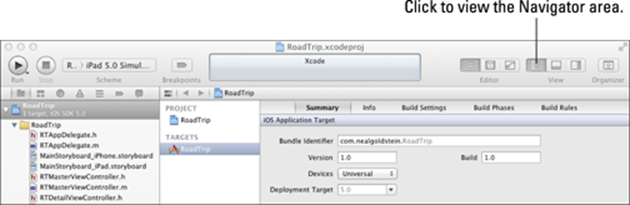
Figure 3-5: The View selector in the workspace toolbar.
 The Project navigator enables you to do things like add, delete, group, and otherwise manage files in your project or choose a file to view or edit in the Editor area. (Depending on which file you choose, you’ll see the appropriate editor, as I explain in Chapter 2.) In Figure 3-6, for example, you can see that I’ve decided to open all the disclosure triangles so that the Project navigator displays all the files in the project.

Figure 3-6: The RoadTrip Project navigator.
The Filter bar lets you restrict the content that’s displayed — such as recently edited files, unsaved files, or filenames.
Making your way down the folder structure shown in the Project navigator (refer to Figure 3-6), the first folder listed is labeled RoadTrip. This folder contains all the source elements for the project, including source code, resource files, graphics, and a number of other pieces that will remain unmentioned for now (but I get to those in due course). Although each template organizes these source elements in different ways, the Master-Detail Application template organizes the interface header and implementation code files (along with the Storyboard file(s) and a Supporting Files folder) inside the RoadTrip folder. (For good measure, the RoadTrip folder also includes a Frameworks folder and a Products folder.)
Here’s the kind of stuff that gets tossed into folders for projects like the RoadTrip project:
![]() AppDelegate files: The RTAppDelegate.h and RTAppDelegate.m files contain the code for app-specific behavior that customizes the behavior of a framework object (so that you don’t have to subclass it — as I describe in Chapter 6). A behavior-rich framework object (used as is) delegates the task of implementing one of its responsibilities to an application delegate for a very specific behavior. The delegation pattern of adding behaviors to objects is described in more detail in Chapter 6.
AppDelegate files: The RTAppDelegate.h and RTAppDelegate.m files contain the code for app-specific behavior that customizes the behavior of a framework object (so that you don’t have to subclass it — as I describe in Chapter 6). A behavior-rich framework object (used as is) delegates the task of implementing one of its responsibilities to an application delegate for a very specific behavior. The delegation pattern of adding behaviors to objects is described in more detail in Chapter 6.
![]() Storyboard: The storyboard files live in your project as the MainStoryboard.storyboard_iPad file and the MainStoryboard.storyboard_iPhone file (for a universal app), or just as a lone MainStoryboard.storyboard_whatever file (for a device-specific app). With a storyboard, you can create and implement an overall view of the flow of your application and the user interface elements. I go into great detail on storyboards in Chapter 4. Soon you’ll like the .storyboard files as much as I do.
Storyboard: The storyboard files live in your project as the MainStoryboard.storyboard_iPad file and the MainStoryboard.storyboard_iPhone file (for a universal app), or just as a lone MainStoryboard.storyboard_whatever file (for a device-specific app). With a storyboard, you can create and implement an overall view of the flow of your application and the user interface elements. I go into great detail on storyboards in Chapter 4. Soon you’ll like the .storyboard files as much as I do.
![]() View controllers: The RTMasterViewController.h and RTMasterViewController.m files contain the code to control the initial view of the RoadTrip (based on the Master-Detail Application template). You’ll do a lot more with view controllers in later chapters.
View controllers: The RTMasterViewController.h and RTMasterViewController.m files contain the code to control the initial view of the RoadTrip (based on the Master-Detail Application template). You’ll do a lot more with view controllers in later chapters.
![]() Supporting Files: In this folder, you typically find the precompiled headers (header files that are compiled to reduce your application compilation time) of the frameworks you’ll be using — such as RoadTrip_Prefix.pch — as well as the property list (RoadTrip-Info.plist) andmain.m, your application’s main function. You may even find images and other media files, and some data files. The InfoPlist.strings file is used for localization (translating the text in your app to the user’s language preference).
Supporting Files: In this folder, you typically find the precompiled headers (header files that are compiled to reduce your application compilation time) of the frameworks you’ll be using — such as RoadTrip_Prefix.pch — as well as the property list (RoadTrip-Info.plist) andmain.m, your application’s main function. You may even find images and other media files, and some data files. The InfoPlist.strings file is used for localization (translating the text in your app to the user’s language preference).
![]() Frameworks: This folder holds the code libraries that act a lot like prefab building blocks for your app. (I talk about frameworks in Chapter 4.) By choosing the Master-Detail Application template, you let Xcode know that it should add the UIKit, Foundation, and CoreGraphicsframeworks to your project, because it expects that you’ll need them in this kind of application.
Frameworks: This folder holds the code libraries that act a lot like prefab building blocks for your app. (I talk about frameworks in Chapter 4.) By choosing the Master-Detail Application template, you let Xcode know that it should add the UIKit, Foundation, and CoreGraphicsframeworks to your project, because it expects that you’ll need them in this kind of application.
You’ll be adding more frameworks yourself in addition to these three in developing RoadTrip. You find out how to add more frameworks in Chapter 8.
![]() Products: The Products folder is a bit different from the others. In it, you’ll find the final RoadTrip.app file — not the source code of the app, but rather the built version of the app, which means that it has been translated from the source code into the object code for the iPad’s processor to execute. At the moment, this file is listed in red because the file can’t be found.
Products: The Products folder is a bit different from the others. In it, you’ll find the final RoadTrip.app file — not the source code of the app, but rather the built version of the app, which means that it has been translated from the source code into the object code for the iPad’s processor to execute. At the moment, this file is listed in red because the file can’t be found.
When a filename appears in red, this means that Xcode can’t find the underlying physical file. And because you’ve never compiled the RoadTrip app, it makes sense that the RoadTrip.app file (the app itself) is missing.
You may notice that some items in the Project navigator look like folders, but you’ll soon discover that they often don’t act like folders. If you just happen to open the RoadTrip folder on your Mac — outside of the Xcode context — you won’t see all the “folders” that appear in the Xcode window. That’s because those folders are simply groupings that help organize and find what you’re looking for.
Setting Your Xcode Preferences
Xcode gives you options galore. I’m guessing that you won’t change any of them until you have a bit more programming experience under your belt, but a few options are actually worth thinking about now — so in this section, I show you how to set some of the preferences you might be interested in.
Follow these steps to set some of the preferences you’ll find useful:
1. With Xcode open, choose Xcode⇒Preferences from the main menu.
2. Click the Behaviors tab at the top of the Preferences window to show the Behaviors pane.
The Xcode Preferences window refreshes to show the Behaviors pane.
The left side of the pane shows the Events pane (the check marks indicate events for which settings are set), while the right side shows the possible actions for an event.
3. Select (Running) Generates output in the left column and then choose the Show, Hide, or If No Output Hide option from the Debug area pop-up menu to the left of the debugger in the right pane.
This step controls what appears while you run your app. By default, you’ll find that the check box for showing the debugger in the Debug area is selected. (See Chapter 8 for more about debugging.)
4. Select other options from the left column (perhaps (Build) Starts, (Build) Generates new issues, (Build) Succeeds, and (Build) Fails)) and experiment with the options available.
You can link an event with playing a sound (something I like to do) or have an event trigger the Xcode icon bouncing up and down in the Dock. You can change many options in the Behaviors pane — too many to cover in this chapter! But take a look through them and experiment — they can make your life much easier.
Figure 3-7 shows the behaviors I have chosen if the run pauses. (By pause, I mean the run hits, say, a breakpoint; I cover breakpoints in Chapter 8.) I like to have a sound inform me in case I’m busy daydreaming (submarine seems like the appropriate sound to play here).
Figure 3-8 shows the behaviors I have chosen if a build fails. I like to use a sound for this occurrence as well. I also want to have the Issue navigator display. (See Chapter 8 for more about the value and use of the Issue navigator.) I also want it to navigate to the first new issue.
5. Click the Downloads tab at the top of the Preferences window and then select Documentation in the segmented control.
6. Select the Check for and Install Updates Automatically check box, and then click the Check and Install Now button.
This step ensures that the documentation remains up-to-date and allows you to load and access other documentation.
7. (Optional) Click the Fonts & Colors tab at the top of the Preferences window and use the options to change your workspace theme.
When I get bored, I sometimes change the theme to Midnight to get a black background.
8. (Optional) Click the Text Editing tab at the top of the Preferences window and set your text editing preferences.
I set the Indent width to 2 in the Indentation settings to get as much code on a line as possible.
9. Click the red Close button in the top-left corner of the window to close the Xcode Preferences window.
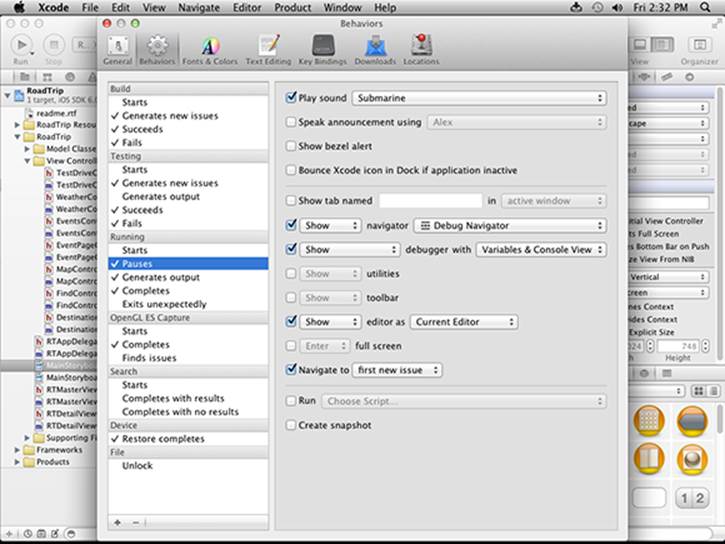
Figure 3-7: Setting behaviors.
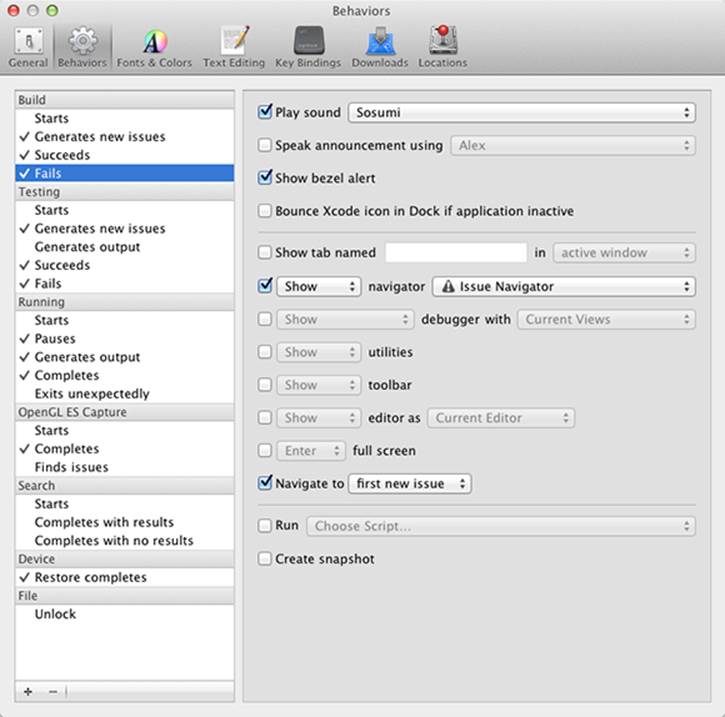
Figure 3-8: Choosing a behavior for when a build fails.
Building and Running Your Application
As I mention in Chapter 2, the Xcode toolbar (see Figure 3-9) is where you do things like run your application. I spell out the process a bit more here.
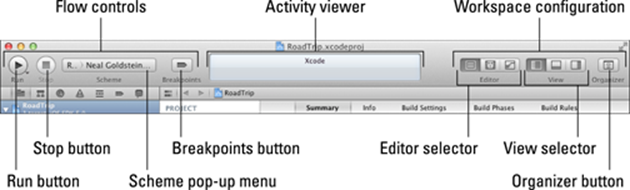
Figure 3-9: The Xcode toolbar.
The Flow controls are for defining, choosing, running, and stopping projects. They consist of the following:
![]() Run button: Clicking the Run button builds and runs the targets — a target is a product to build and the instructions for building the product from a set of files in a project or workspace for the currently selected scheme. Pressing and holding the mouse button opens a menu — also available in the Product menu — that allows you to run, test, profile, or analyze your application.
Run button: Clicking the Run button builds and runs the targets — a target is a product to build and the instructions for building the product from a set of files in a project or workspace for the currently selected scheme. Pressing and holding the mouse button opens a menu — also available in the Product menu — that allows you to run, test, profile, or analyze your application.
Holding various modifier keys while clicking the Run button allows you to select these other run options:
Control key: Run without building.
Shift key: Build without running.
Option key: Edit the scheme and run.
![]() Stop button: Terminates your (executing) application in the Simulator or the device.
Stop button: Terminates your (executing) application in the Simulator or the device.
![]() Scheme menu: A scheme defines characteristics such as build targets, build configurations, and the executable environment for the product to be built. The scheme menu lets you select which scheme and which build destination you want to use. (I describe schemes in greater detail in the next section of this chapter.)
Scheme menu: A scheme defines characteristics such as build targets, build configurations, and the executable environment for the product to be built. The scheme menu lets you select which scheme and which build destination you want to use. (I describe schemes in greater detail in the next section of this chapter.)
![]() Breakpoints button: Activates or deactivates all breakpoints. The Breakpoints button turns breakpoints on and off. (A breakpoint tells Xcode to stop execution at a point in the code — I explain breakpoints more fully in Chapter 8.)
Breakpoints button: Activates or deactivates all breakpoints. The Breakpoints button turns breakpoints on and off. (A breakpoint tells Xcode to stop execution at a point in the code — I explain breakpoints more fully in Chapter 8.)
The Activity viewer shows the progress of tasks currently executing by displaying status messages, build progress, and other information about your project. For example, when you’re building your project, Xcode updates the Activity viewer to show where you are in the process — and whether or not the process completed successfully. If an Issues icon appears in the Activity viewer, click it to open the Issues navigator and look there for messages about your project. (None exist yet in Figure 3-9, so you won’t see an Issues icon there.)
The Workspace configuration includes the Editor and View controls (which I explain in Chapter 2) as well as the Organizer window button.
Building an app
Building an app in Xcode means compiling all the source code files in the project. It’s really exciting (well, I exaggerate a bit) to see what you get when you build and run a project that you created from a template. Building and running an app is relatively simple; just follow these steps:
1. In the Flow Controls section of the toolbar, choose a scheme from the Scheme pop-up menu.
A scheme tells Xcode the purpose of the built product. The schemes in the Scheme pop-up menu specify which targets (actual products) to build, what build configuration to use when building them, which debugger to use when testing them, and which executable to launch when running them on the device or Simulator.
Xcode automatically creates several schemes with configurations for you, and you can create more schemes and edit any of the schemes.
To work with the example app I came up with for this book (the RoadTrip app), you just want to make sure that the scheme is set either to the Simulator or the device and that the proper SDK has been selected. Remember that when you download an SDK, you actually download multiple SDKs — a Simulator SDK and a device SDK for each of the current iOS releases. You should use the Simulator SDK for iOS 6.0 (as of this writing) for apps that you want to submit to the App Store — until a newer version of iOS is released.
In a document on my website, I show you how to switch to the device SDK and transfer your app to a real-world iOS device. But before you do that, you need to be a card-carrying member of the iOS Developer Program. (Only members can run an app on a device, even on your very own iPhone or iPad.) Go to http://developer.apple.com/ios to learn about enrolling in the program if you haven’t done so already.
2. Choose Product⇒Run from the main menu to build and run the application.
You can also click the Run button in the top-left corner of the Work-space window. The Activity viewer (shown previously in Figure 3-9) tells you all about the build progress, flags any build errors (such as compiler errors) or warnings, and (oh, yeah) tells you whether the build was successful.
Figure 3-10 shows you what you’ll see in the Simulator (in the Portrait mode), and then you tap the Master button. I know it’s not much to look at, but it’s a start — and it is a functioning iPad app.
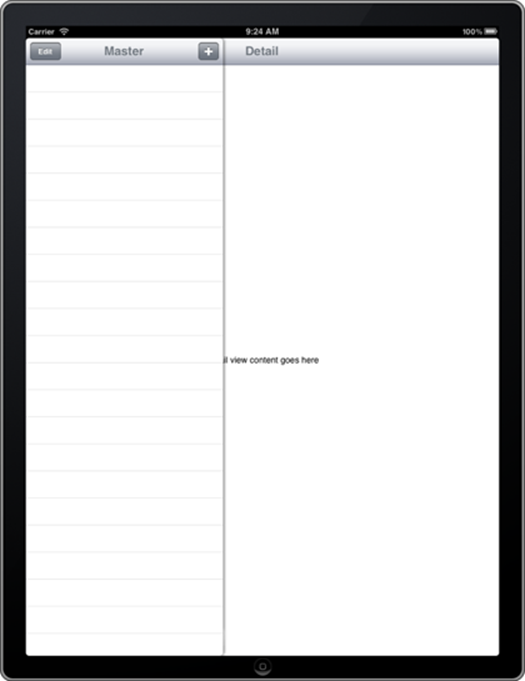
Figure 3-10: Not much of an app, but it is yours.
If you rotate the Simulator by choosing Hardware⇒Rotate Left, in the Simulator menu you see a nice Split view (as shown in Figure 3-11). (I talk more about the mechanics behind this — the use of a split view controller — in the next section, and in even more detail in Chapter 13.)
The iPad’s Split views
While it’s true that on the iPhone you often see only one view at a time, on the iPad you get to see two views, courtesy of the Master-Detail Application template (and something called a split view controller, which I explain in detail in Chapter 13).
If you take another look at Figure 3-11, you can see what I’m talking about. The view on the left displays what is called the master view. While technically it could be any type of view you’d like, in the case of the Master-Detail Application template, you get something called a table view, which displays a list of what is referred to as cells, entries, or rows. On the left side of Figure 3-12, I tapped the + button and you see a timestamp (in Coordinated Universal Time [UTC], the primary time standard and the successor to Greenwich Mean Time [GMT]) in the first cell in the master view. When I tap that cell, as I have on the right side of Figure 3-12, the same timestamp is displayed in the detail view and the cell is highlighted in the master view.
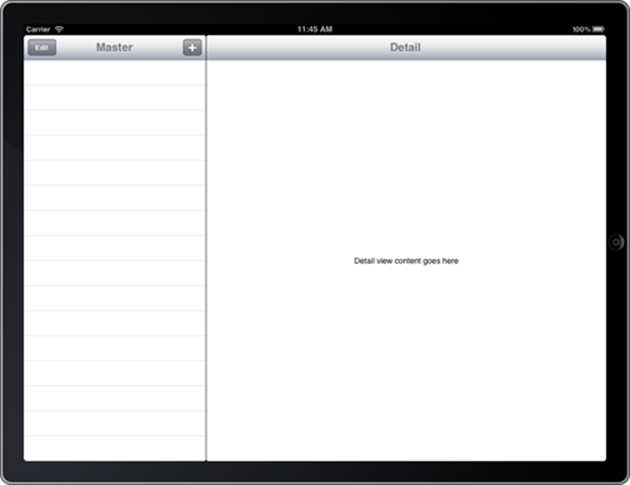
Figure 3-11: Your app in landscape mode.
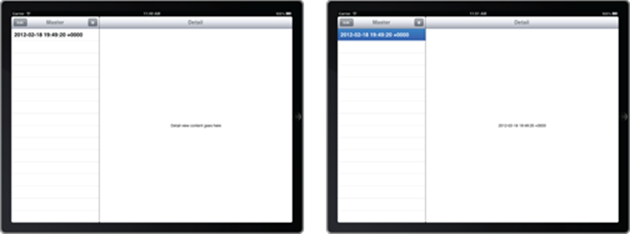
Figure 3-12: Splits aren’t just for bananas.
All the detail view does right now is display “Detail view content goes here.” Well, that’s not all it does. When you rotate the iPad into portrait mode, it’s also responsible for both displaying a nice Master button as well as for displaying the master view in the popover that you see when you tap the nice Master button. (Refer to Figure 3-10.)
In landscape view, the master view on the left side also includes a toolbar with Edit and + “bar button items” that allow the user to modify content in this particular example program.
Again, it probably doesn’t seem like much, but (as you’ll see when I explain the RoadTrip app in Chapter 4) this is pretty much all the “infrastructure” you’ll need to put together a really cool app.
The Log navigator
If you want to look at how the build works, now is as good a time as any to explain how the Log navigator works.
 Xcode generates a series of logs during the build process, which meticulously record the actions performed. You can view these logs by selecting the Log navigator, either by using the Navigator selector or by choosing View⇒Navigators⇒Show Log Navigator from Xcode’s main menu. In Figure 3-13, you can see a log of all my recent builds.
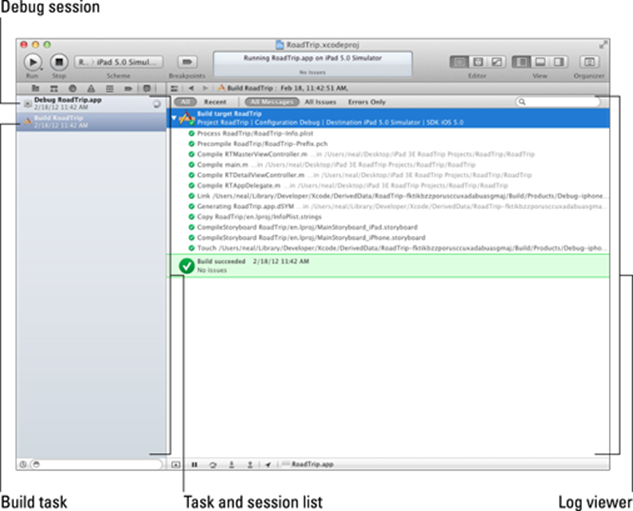
Figure 3-13: Build results.
The Log navigator lists these two types of actions:
![]() Tasks: The Task log lists all the operations Xcode performed to carry out the task, such as building operations, archiving operations, and source control operations.
Tasks: The Task log lists all the operations Xcode performed to carry out the task, such as building operations, archiving operations, and source control operations.
![]() Sessions: A Session log is the transcript of the events that occurred during a session (a period during which an activity is performed). Running or debugging an application, for example, generates a session log that would include all debugger output.
Sessions: A Session log is the transcript of the events that occurred during a session (a period during which an activity is performed). Running or debugging an application, for example, generates a session log that would include all debugger output.
The Log navigator contains the Task and Session list. When you select an item in this list, the corresponding log appears in the Log viewer. You can filter this list with the Filter bar.
It turns out you won’t need to use the Log navigator for the example app in this book, simply because I have you examine all debug activity in the Debug area instead and any task-related issues in the Issue navigator.
The ultimate success (or failure) of your build is also displayed in the Activity viewer.
Running in the Simulator
When you run your app, Xcode installs it on the Simulator (or on a real device if you specified a device as the active SDK) and launches it. Using the Hardware menu and your keyboard and mouse, the Simulator mimics most of what a user can do on a real device, albeit with some limitations that I point out shortly.
At first, the iPad Simulator looks like any iPad model would — kind of like what you can see back in Figure 3-11. If you were to click the Home button at the bottom center of the Simulator window once, you’d quit your app. The app would then appear on the Home screen with a standard blank icon. Click the blank icon once to launch the app again.
Interacting with your simulated hardware
Any simulator worth its salt has to be able to duplicate the actions you’d expect from a real device. The Xcode Simulator — no surprise here — can mimic a wide range of activities, all accessed from the Simulator Hardware menu. The Hardware menu items allow you to control various simulator behaviors, including:
![]() Choose a device. Switch the simulated device to an iPad, any model iPhone, or the Retina display found on iPhone 4, iPhone 4S, and fourth-generation iPod touch models.
Choose a device. Switch the simulated device to an iPad, any model iPhone, or the Retina display found on iPhone 4, iPhone 4S, and fourth-generation iPod touch models.
![]() Choose a version. Switch to a different version of iOS.
Choose a version. Switch to a different version of iOS.
![]() Rotate left. Choosing Hardware⇒Rotate Left rotates the Simulator to the left. If the Simulator is in Portrait view, it changes to Landscape view; if the Simulator is already in Landscape view, it changes to Portrait view.
Rotate left. Choosing Hardware⇒Rotate Left rotates the Simulator to the left. If the Simulator is in Portrait view, it changes to Landscape view; if the Simulator is already in Landscape view, it changes to Portrait view.
![]() Rotate right. Choosing Hardware⇒Rotate Right rotates the Simulator to the right. Again, if the Simulator is in Portrait view, it changes to Landscape view; if the Simulator is already in Landscape view, it changes to Portrait view.
Rotate right. Choosing Hardware⇒Rotate Right rotates the Simulator to the right. Again, if the Simulator is in Portrait view, it changes to Landscape view; if the Simulator is already in Landscape view, it changes to Portrait view.
![]() Use a shake gesture. Choosing Hardware⇒Shake Gesture simulates shaking the device.
Use a shake gesture. Choosing Hardware⇒Shake Gesture simulates shaking the device.
![]() Go to the Home screen. Choosing Hardware⇒Home does the expected — you go to the Home screen.
Go to the Home screen. Choosing Hardware⇒Home does the expected — you go to the Home screen.
![]() Lock the Simulator (device). Choosing Hardware⇒Lock locks the Simulator, which then displays the Lock screen.
Lock the Simulator (device). Choosing Hardware⇒Lock locks the Simulator, which then displays the Lock screen.
![]() Send the running app low-memory warnings. Choosing Hardware⇒Simulate Memory Warning fakes out your app by sending it a (fake) low-memory warning.
Send the running app low-memory warnings. Choosing Hardware⇒Simulate Memory Warning fakes out your app by sending it a (fake) low-memory warning.
![]() Simulate the hardware keyboard. Choose Hardware⇒Simulate Hardware Keyboard to check out how your app functions when the device is connected to an optional physical keyboard dock or paired with a Bluetooth keyboard.
Simulate the hardware keyboard. Choose Hardware⇒Simulate Hardware Keyboard to check out how your app functions when the device is connected to an optional physical keyboard dock or paired with a Bluetooth keyboard.
![]() Choose an external display. To bring up another window that acts like an external display attached to the device, choose Hardware⇒TV Out and then choose 640 x 480, 1024 x 768, 1280 x 720 (720p), or 1920 x 1080 (1080p) for the window’s display resolution. Choose Hardware⇒TV Out⇒Disabled to close the external display window.
Choose an external display. To bring up another window that acts like an external display attached to the device, choose Hardware⇒TV Out and then choose 640 x 480, 1024 x 768, 1280 x 720 (720p), or 1920 x 1080 (1080p) for the window’s display resolution. Choose Hardware⇒TV Out⇒Disabled to close the external display window.
Making gestures
On the real device, a gesture is something you do with your fingers to make something happen in the device — a tap, a drag, a swipe, and so on. Table 3-1 shows you how to simulate gestures using your mouse and keyboard.
Table 3-1 Gestures in the Simulator
|
Gesture |
iPad Action |
|
Tap |
Click the mouse. |
|
Touch and hold |
Hold down the mouse button. |
|
Double tap |
Double-click the mouse button. |
|
Two-finger tap |
1. Move the mouse pointer over the place where you want to start. 2. Hold down the Option key, which makes two circles appear that stand in for your fingers. 3. Click the mouse button. |
|
Swipe |
1. Click where you want to start and hold down the mouse button. 2. Move the mouse slowly in the direction of the swipe and then release the mouse button. |
|
Flick |
1. Click where you want to start and hold the mouse button down. 2. Move the mouse quickly in the direction of the flick and then release the mouse button. |
|
Drag |
1. Click where you want to start and hold down the mouse button. 2. Move the mouse slowly in the drag direction. |
|
Pinch |
1. Move the mouse pointer over the place where you want to start. 2. Hold down the Option key, which makes two circles appear that stand in for your fingers. 3. Hold down the mouse button and move the circles in (to pinch) or out (to unpinch). |
Uninstalling apps and resetting your device
You uninstall applications on the Simulator the same way you do on the iPad, except you use your mouse instead of your finger. Follow these steps:
1. On the Home screen, place the pointer over the icon of the app you want to uninstall and hold down the mouse button until all the app icons start to wiggle.
2. Click the app icon’s Remove button — the little x that appears in the upper-left corner of the icon — to make the app disappear.
3. Click the Home button — the one with a little square in it, centered below the screen — to stop the other app icons from wiggling and finish the uninstall.
On a separate note, you can always reposition an app’s icon on the Home screen by clicking and dragging it around with the mouse.
You can remove an application from the background the same way you’d do on the iPad, except that you use your mouse instead of your finger. Follow these steps:
1. Double-click the Home button to display the applications running in the background.
2. Place the pointer over the icon of the application you want to remove, and hold down the mouse button until the icon starts to wiggle.
3. Click the icon’s Remove button — the red circle with the x — that appears in the upper-left corner of the application’s icon.
4. Click the Home button to stop the icons from wiggling and then click once again to return to the Home screen.
To reset the Simulator to the original factory settings — which also removes all the apps you’ve installed — choose iOS Simulator⇒Reset Content and Settings, and then click Reset in the warning dialog that appears.
Living with the Simulator’s limitations
Keep in mind that, despite the Simulator’s many virtues, running apps in the Simulator is still not the same thing as running them on the iPad. Here’s why:
![]() Different frameworks: The Simulator uses Mac OS X versions of the low-level system frameworks, instead of the actual frameworks that run on the device. That means that occasionally some code may run fine in the Simulator but not on actual iOS devices. Although the Simulator is useful for testing functionality, there’s no substitute for debugging the app on the device itself if you want to find out how it will really run.
Different frameworks: The Simulator uses Mac OS X versions of the low-level system frameworks, instead of the actual frameworks that run on the device. That means that occasionally some code may run fine in the Simulator but not on actual iOS devices. Although the Simulator is useful for testing functionality, there’s no substitute for debugging the app on the device itself if you want to find out how it will really run.
![]() Different hardware and memory: The Simulator uses the Mac hardware and memory. To accurately determine how your app will perform on an honest-to-goodness iOS device, you have to run it on a real iOS devices.
Different hardware and memory: The Simulator uses the Mac hardware and memory. To accurately determine how your app will perform on an honest-to-goodness iOS device, you have to run it on a real iOS devices.
![]() Different installation procedure: Xcode installs your app in the Simulator automatically when you build the app using the iOS SDK. It’s a different kettle of fish to install your app on the device for testing. And, by the way, you don’t have a way to get Xcode to install apps from the App Store in the Simulator.
Different installation procedure: Xcode installs your app in the Simulator automatically when you build the app using the iOS SDK. It’s a different kettle of fish to install your app on the device for testing. And, by the way, you don’t have a way to get Xcode to install apps from the App Store in the Simulator.
![]() Lack of GPS: You can’t fake the Simulator into thinking that it’s lying on the beach at Waikiki.
Lack of GPS: You can’t fake the Simulator into thinking that it’s lying on the beach at Waikiki.
You can, however, choose to simulate a location in the Debug area. I tell you more about simulating a location in Chapter 15.
![]() Two-finger limit: You can simulate a maximum of two fingers. If your application’s user interface can respond to touch events involving more than two fingers, you need to test that on an actual device. (The motion of two fingers in itself is a tad limited in the Simulator — you can’t do two-figure swipes or drags.)
Two-finger limit: You can simulate a maximum of two fingers. If your application’s user interface can respond to touch events involving more than two fingers, you need to test that on an actual device. (The motion of two fingers in itself is a tad limited in the Simulator — you can’t do two-figure swipes or drags.)
![]() Accelerometer differences: You can access your computer’s accelerometer (if it has one) through the UIKit framework. Its reading, however, will differ from the accelerometer readings on an actual iPad (for some technical reasons that I don’t have the space to go into).
Accelerometer differences: You can access your computer’s accelerometer (if it has one) through the UIKit framework. Its reading, however, will differ from the accelerometer readings on an actual iPad (for some technical reasons that I don’t have the space to go into).
![]() Differences in rendering: OpenGL ES (Open Graphics Library for Embedded Systems, in other words) is one of the many 3D graphics libraries that works with the iOS SDK. It turns out that the renderers it uses on devices are slightly different from the ones it uses in the iPad Simulator. As a result, a scene on the Simulator and the same scene on a device may not be identical at the pixel level.
Differences in rendering: OpenGL ES (Open Graphics Library for Embedded Systems, in other words) is one of the many 3D graphics libraries that works with the iOS SDK. It turns out that the renderers it uses on devices are slightly different from the ones it uses in the iPad Simulator. As a result, a scene on the Simulator and the same scene on a device may not be identical at the pixel level.
![]() Telephony: You can’t make a phone call on the iPhone simulator.
Telephony: You can’t make a phone call on the iPhone simulator.
Adding the Image and Sound Resources and an Application Icon
If you select the Home button — either on the Simulator or the iPad itself — you can’t help but notice that the icon assigned to your fledgling app is rather undistinguished looking, to say the least.
Even though your app doesn’t do anything yet, you can have a nice, shiny app icon by following these steps:
1. Download the iOS 6 RoadTrip Resources folder from my website at www.nealgoldstein.com/support/downloads.
Store the folder somewhere handy where you’ll be sure to find it again.
This folder includes not only the application icon but also a number of other resource files (images and sound) you’ll be using in your application.
You’ll start by adding the resources you’ll need.
2. Control-click RoadTrip project in the Project Navigator, choose Add Files to “RoadTrip” from the contextual menu, use the dialog that appears to navigate to the RoadTrip Resources folder you downloaded, and then select the RoadTrip Resources folder. Or choose File⇒Add Files to RoadTrip, as shown in Figure 3-14.
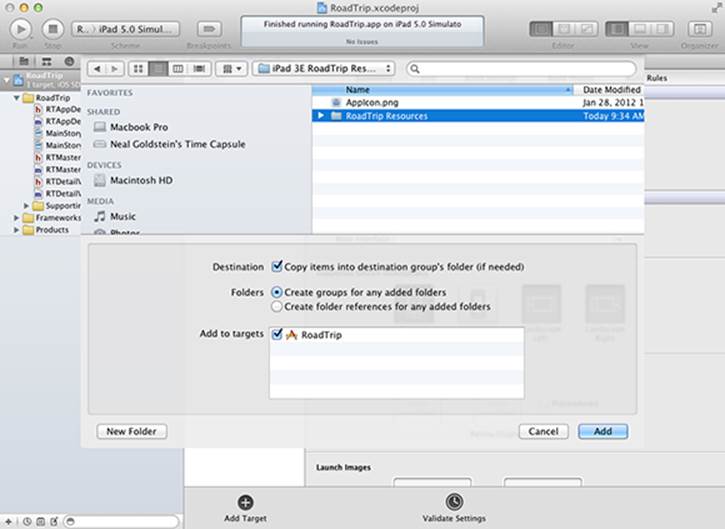
Figure 3-14: Adding files to your project.
Xcode asks you (via a check box in the aforementioned dialog) whether you want to make a copy of the file. If you don’t select the check box, Xcode creates a pointer (alias) to the file. The advantage of using an alias is that if you modify the file later, Xcode will use that modified version. The disadvantage is that Xcode won’t be able to find the file if you move it.
3. Select the Copy Items into Destination Group’s Folder (If Needed) check box, make sure the check box in front of Road Trip in the Add to Targets section is selected, and then click Add to copy the files.
This adds the resource files you need. Now you can turn your attention to getting the application icon to show up on the Home screen.
You can also drag files into the Project navigator.
Standard and Retina display images
Starting with iOS 4, you can include two separate files for each image resource. (You’ll just be using a single file in this book, however.) One file provides a standard-resolution version of a given image, and the second provides a high-resolution version of the same image (for the Retina display). The naming conventions for each pair of image files are as follows:
![]() Standard: <ImageName><device_modifier>.<filename_extension>
Standard: <ImageName><device_modifier>.<filename_extension>
![]() High resolution: <ImageName>@2x<device_modifier>.<filename_extension>
High resolution: <ImageName>@2x<device_modifier>.<filename_extension>
The <ImageName> and <filename_extension> portions of each name specify the usual name and extension for the file. The <device_modifier> portion is optional and contains either the string ~ipad or ~iphone. You include one of these modifiers when you want to specify different versions of an image for the iPhone and iPad. The inclusion of the @2x modifier for the high-resolution image lets the system know that the image is the high-resolution variant of the standard image.
 When creating high-resolution versions of your images, place the new versions in the same location in your application bundle as the original images.
If you click one of the resources, you see it displayed in the Editor area. Because Xcode doesn’t have a graphics editor, as I explain in Chapter 2, Xcode uses the same quick-look functionality as used by the Finder.
Adding the application icons
Ideally, you should provide four different-sized applications icons, with descriptive filenames (you can actually use any filenames you like) such as
![]() Icon57.png: 57x57 pixels in PNG format for normal iPhone
Icon57.png: 57x57 pixels in PNG format for normal iPhone
![]() Icon114.png: 114x114 pixels in PNG format for Retina iPhone
Icon114.png: 114x114 pixels in PNG format for Retina iPhone
![]() Icon72.png: 72x72 pixels in PNG format for normal iPad
Icon72.png: 72x72 pixels in PNG format for normal iPad
![]() Icon144.png: 144x144 pixels in PNG format for Retina iPad
Icon144.png: 144x144 pixels in PNG format for Retina iPad
I created icons matching those measurements in a graphics program, and you can find them in the RoadTrip Resources folder (the one you downloaded in Step 1 in the previous section). To add those icons and have them used as your application icons, do the following:
1. Select the Project navigator by clicking the first icon in the Navigator selector bar — the one that looks like a folder.
The Project navigator displays the RoadTrip project container and the files and resources in your project.
2. Select the RoadTrip project container — the first item in the Project navigator.
The Project editor launches.
3. Control-click the first selection box in the App Icons subsection of the iPhone Deployment info section (be sure to click outside the No Image Specified image but within the selection box), and choose Select File.
4. Using the dialog that appears, navigate back to the RoadTrip Resources folder you downloaded, select Icon57.png for the normal iPhone icon, and click Choose.
The Prerendered check box you see back in Figure 3-9 allows you to specify that you don’t want the shine and glossy effect applied to your icon. I chose to select the box, although it’s your choice on whether you like the look.
5. Repeat the process using Icon144.png for the Retina iPhone, Icon72.png for the iPad, and Icon144.png for the Retina iPad.
6. If you’d like, drag all the app icons into the Resources group (I will) to get them out of the way.
 App icons are very important if you want to sell apps in the App Store. People are unlikely to buy an app with an ugly icon — no one believes that “beauty is only skin deep.” It is generally good practice to pay a professional artist to create a family of app icons, unless you are a professional artist along with being a rock-star programmer.
Run your project with its new icon
To run your project with its new icon, select Run for the iPhone on the Xcode toolbar. Then click the Home button, and you should see your application icon. Then repeat for the iPad version. (Check out Figure 3-15 to see how the icons look on both platforms.)
It is generally a good idea to make your iPad icons look a bit different than your iPhone icons, which is why I added HD to the iPad icons. This helps the user know that he is running the iPad version when on the iPad.
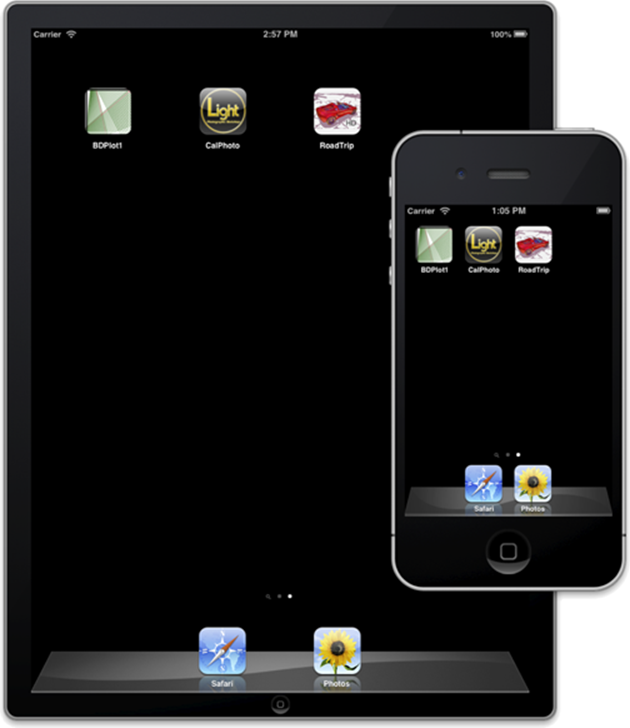
Figure 3-15: The app icon in all its glory.