iOS 6 Application Development For Dummies (2013)
Part II. Building RoadTrip
Chapter 6. The Runtime, Managing Memory, and Using Properties
In This Chapter
![]() Understanding the application life cycle
Understanding the application life cycle
![]() Handling interruptions
Handling interruptions
![]() Using Automatic Reference Counting to manage memory
Using Automatic Reference Counting to manage memory
![]() Understanding the five rules of memory management
Understanding the five rules of memory management
![]() Customizing framework behaviors
Customizing framework behaviors
![]() Taking advantage of the power of declared properties
Taking advantage of the power of declared properties
Previous chapters provide you with at least a basic understanding of how to graphically build your user interface. Now it’s time to add some code to have your application actually do something. But before you do that, I want to explain three things about writing iPad apps.
First, a lot of what you’ll be doing is customizing and extending the behavior of framework classes. You customize and extend the behavior of these classes through subclassing, delegation, and using a powerful Objective-C feature called declared properties.
Second, on the iPhone or iPad, like any other device, you create objects to do your bidding — which means that you allocate memory, which happens to be a scarce resource on the iPad. Running out of memory is the main cause of applications crashing (not to mention being rejected from the App Store), so you need to understand memory management.
And finally, to know what message to send to what objects at what time, as well as what messages will be sent to your app at runtime, you need to understand the application life cycle.
Dealing with these three aspects of writing iOS apps is your pass to the Successful iOS Programmers’ Secret Society, and in this chapter, you start your initiation. And because you’ll find all this stuff easier to understand if you understand the overall context, I begin with the application life cycle.
 This chapter is like the Classic Comics version of several hundred pages of Apple documentation, reference manuals, and how-to guides. Although a lot is left unsaid (though less than you might suspect), what’s in this chapter is enough to get you started and also keep you going as you develop your own iPad apps. It provides a frame of reference on which you can hang the concepts I throw around with abandon in upcoming chapters — as well as the groundwork for a deep enough understanding of the application life cycle to give you a handle on the detailed documentation.
So relax. Get yourself a cup of coffee (or something stronger if you want) and be prepared to be entertained.
Stepping through the App Life Cycle
Although simple for the eventual user, the birth, life, and death of an application is a pretty complex process. In this section, I explain what happens throughout the time that the user launches the app from the Home screen, uses the app, and then stops using the app, either because she is done or decides to respond to an interruption such as an SMS message.
The life of an iOS app begins when a user launches it by tapping its icon on the Home screen. The system launches your app by calling its main function — which Xcode kindly lets you peek at if you go to the Project navigator, open the disclosure triangle next to the Supporting Files group, and select main.m.
 The details of the implementation shown here may change, but the overall architecture will stay the same from one iOS version to another.
#import <UIKit/UIKit.h>
#import “RTAppDelegate.h”
int main(int argc, char *argv[])
{
@autoreleasepool {
return UIApplicationMain(argc, argv, nil, NSStringFromClass([RTAppDelegate class]));
}
}
The main function is where a program starts execution. This function is responsible for the high-level organization of the program’s functionality and typically has access to the arguments given to the program when it gets executed.
The main function does only these two things:
1. Sets up an autorelease pool:
@autoreleasepool {
This is a piece of memory-management plumbing that you don’t need to use in this book (other than here), or perhaps ever, but feel free to investigate on your own if you are interested.
2. Calls the UIApplicationMain function to create the application object and delegate and set up the event loop:
return UIApplicationMain(argc, argv, nil,
NSStringFromClass([RTAppDelegate class]));
This is your entrance into the entire application startup process and its underlying architecture.
UIApplicationMain
The UIApplicationMain function creates the application object (a singleton — the only — UIApplication object) and the application delegate (a class created for you by the Xcode template). It also sets up the main event loop, including the application’s run loop (which is responsible for polling input sources) and begins processing events.
In the following section, I explain the role of each of these elements in the application life cycle.
UIApplication provides application-wide control
The UIApplication object provides the application-wide control and coordination for an iOS application. It’s responsible for handling the initial routing of incoming user events (touches, for example) as well as for dispatching action messages from control objects (such as buttons) to the appropriate target objects. The application object sends messages to its application delegate to allow you to respond in an application-unique way to occurrences such as application launch, low-memory warnings, and state transitions such as moving into background and back into foreground.
 Delegation is a mechanism used to avoid subclassing complex UIKit objects, such as the UIApplication object. Instead of subclassing and overriding methods in a framework or other object, you go ahead and use that object unmodified and opt for putting your custom code inside a delegate object instead. As interesting events occur, the framework or other object sends messages to your delegate object. You use these methods to execute your custom code and implement the behavior you need. I explain the delegation pattern more in “The Delegation pattern” section, later in this chapter.
The Application Delegate object (the AppDelegate you see in the template) is responsible for handling several critical system messages and must be present in every iOS application. The object can be an instance of any class you like, as long as it adopts the UIApplicationDelegateprotocol. In the template, you’ll find that it’s a subclass of UIResponder, which enables it to respond to and handle events. (UIApplication is also derived from UIResponder.)
The methods of this protocol correspond to behaviors that are needed during the application life cycle and are your way of implementing this custom behavior. Although you aren’t required to implement all the methods of the UIApplicationDelegate protocol, you’ll often find yourself writing code to handle the following:
![]() Initialization in your application delegate’s application:didFinishLaunchingWithOptions: method.
Initialization in your application delegate’s application:didFinishLaunchingWithOptions: method.
![]() State transitions such as moving in and out of background and foreground. I explain these in more detail in the section “Knowing what to do when the normal processing of your application is interrupted,” later in this chapter.
State transitions such as moving in and out of background and foreground. I explain these in more detail in the section “Knowing what to do when the normal processing of your application is interrupted,” later in this chapter.
![]() Low-memory warnings, which I cover in the section “Observing Low-Memory Warnings,” later in this chapter.
Low-memory warnings, which I cover in the section “Observing Low-Memory Warnings,” later in this chapter.
The UIApplication is a singleton object (there is just the one). To get a reference to it, you send the class message. (In Objective-C, you can send messages to classes, which are really objects on their own.) Sending the UIApplication object the delegate message gives you a pointer to the delegate object:
RTAppDelegate *appDelegate =
[[UIApplication sharedApplication] delegate];
You’ll be doing that a lot, so much so, in fact, that it should become second nature to you.
UIApplicationMain loads the storyboard
If the application’s Info.plist file specifies a storyboard file (or a main nib file), as RoadTrip’s Info.plist file does, the UIApplicationMain function loads it. The application’s Info.plist file provides a map to the high-level structure of the application.
 To see the RoadTrip-Info.plist file, select RoadTrip-Info.plist under the Supporting Files heading in the Project navigator, as shown in Figure 6-1. The file dutifully appears in the Editor area.
 A nib file is a resource file that contains the specifications for one or more objects and is used to graphically create your user interface using Interface Builder in applications when you’ve opted not to use a storyboard. (A storyboard consists of a series of linked nib files created for you; for more on storyboards, see Chapters 4 and 5.)
If you’re using a storyboard, the initial view controller is instantiated for you. As you can see in the Attributes inspector in Figure 6-2, the Initial View Controller setting is a standard View Controller property and is set for you by Interface Builder. (You usually don’t even have to think about it.) In the iPad storyboard file, the initial view controller is a Split view controller that was included by the template. The nib-loader will also instantiate both Navigation controllers as well as their Root view controllers. (I explain Navigation controllers and Root view controllers inChapter 5.)
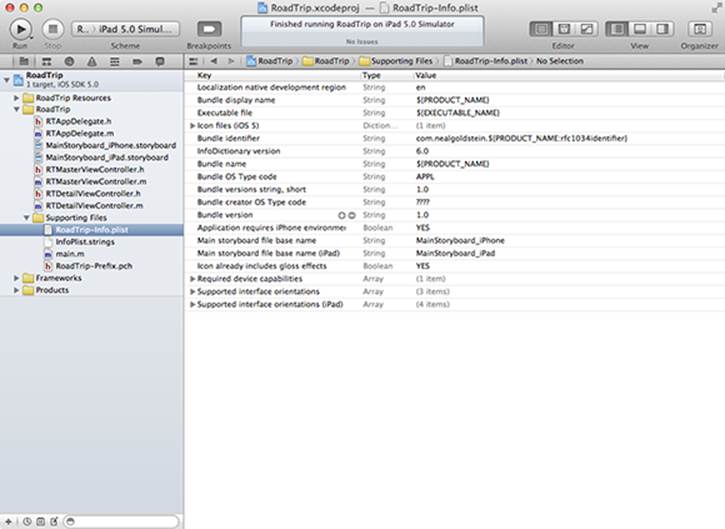
Figure 6-1: The RoadTrip-Info.plist file.
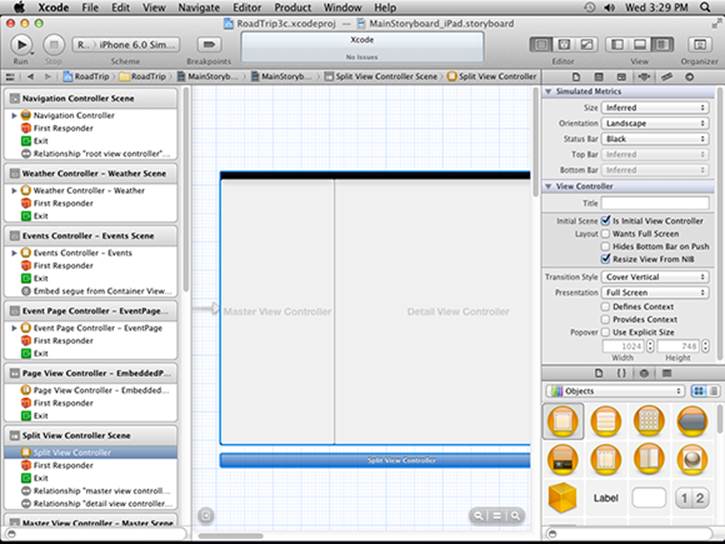
Figure 6-2: The initial view controller is specified for the iPad storyboard.
In the iPhone storyboard file, the initial view controller is a Navigation controller that uses a Table View controller as its root view controller.
UIApplication sends the application:didFinishLaunchingWithOptions: message to its delegate
If the method is implemented in the application delegate, the application:didFinishLaunchingWithOptions: message is sent to the application delegate.
Launch time is a particularly important point in an application’s life cycle. In addition to the user launching an application by tapping its icon, an application can be launched to respond to a specific type of event. For example, it could be launched in response to an incoming push notification, it could be launched to open a file, or it could be launched to handle some background event that it had specified it wanted to handle (a location update, for example). In all these cases, an Options dictionary passed to the application:didFinishLaunchingWithOptions: method provides information about the reason for the launch. (An application launched by the system for a specific reason — other than the user tapping its icon — is beyond the scope of this book.)
The application:didFinishLaunchingWithOptions: message is sent to the delegate when the application has launched and its storyboard has been loaded. In this step, as you will see, you initialize and set up your application. At the time this message is sent, your application is in the inactive state. At some point after this method returns (completes) — unless your application does some kind of background processing — your application will become active and will receive the applicationDidBecomeActive: message when it enters the foreground (becomes the application that the user sees on the screen).
The class interface (usually declared in the .h file) lists the messages to which an object of that class can respond. The actual code for implementing a message is called a method and will be found in the associated .m file. When you want to have an object execute a method, you send it a message. In other words, the message is what you want done, while the method is how to do it.
Your goal during startup is to present your application’s user interface as quickly as possible — and quick initialization equals happy users. Don’t load large data structures that your application won’t use right away. If your application requires time to load data from the network (or perform other tasks that take noticeable time), get your interface up and running first and then launch the task that takes a longer time on a background thread. Then you can display a progress indicator or other feedback to the user to indicate that your application is loading the necessary data or doing something important.
In the templates that don’t use a storyboard, the application:didFinishLaunchingWithOptions: method allocates and initializes the window and the Split view controller (as well as its initial view controllers), adds it all to the window, and makes the window visible.
In a storyboard-based application, this is all done by the storyboard for you, and the application:didFinishLaunchingWithOptions: method does nothing other than return YES (the usual return).
You would return NO only if your application was launched because another application opened a URL that’s owned by your application and your application can’t handle the URL.
You will be adding some code to this method in Chapter 8.
Handling events while your application is executing
Most events sent to an application are encapsulated in an event object — an instance of the UIEvent class. In the case of touch-related events, the event object contains one or more touch objects (UITouch) representing the fingers that are touching the screen. As the user places fingers on the screen, moves them around, and finally removes them from the screen, the system reports the changes for each finger in the corresponding touch object.
Distributing and handling events is the job of responder objects, which are instances of the UIResponder class. The UIApplication, UIViewController, UIWindow, and UIView classes (and your own RTAppDelegate) all inherit from UIResponder. After pulling an event off the event queue, the application dispatches that event to the UIWindow object where it occurred. The window object, in turn, forwards the event to its first responder, designated to be the first recipient of events other than touch events. In the case of touch events, the first responder is typically the view object (UIView) in which the touch took place. For example, a touch event occurring in a button is delivered to the corresponding button object.
If the first responder is unable to handle an event, it forwards the event to its next responder, which is typically a Parent view or view controller. If that object is unable to handle the event, it forwards it to its next responder, and so on until the event is handled. This series of linked responder objects is known as the responder chain. Messages continue traveling up the responder chain — toward higher-level responder objects, such as the window, the application, and the application’s delegate — until the event is either handled or discarded.
The responder object that handles an event often sets in motion a series of programmatic actions by the application — such as when you drag an image of a 1959 Cadillac Eldorado Biarritz convertible across the screen as I describe in Chapter 10.
The following list provides the chronology of what actually happens when the user taps something:
1. You have an event — the user taps a button, for example.
The touch of a finger (or the lifting of a finger from the screen) adds a touch event to the application’s event queue, where that event is encapsulated in — placed into, in other words — a UIEvent object. A UITouch object exists for each finger touching the screen, so that you can track individual touches. As the user manipulates the screen with his or her fingers, the system reports the changes for each finger in the corresponding UITouch object.
2. The run loop monitor dispatches the event.
When something occurs that needs to be processed, the event-handling code of the UIApplication processes touch events by dispatching them to the appropriate responder object — the object that has signed up to take responsibility for doing something when an event happens (when the user touches the screen, for example). As mentioned previously, responder objects can include instances of UIApplication, UIWindow, and UIView (and any of its subclasses), as well as UIViewController (and any of its subclasses). All these classes inherit from UIResponder.
3. A responder object decides how to handle the event.
For example, a touch event occurring with a button in a view is delivered to the button object. The button object handles the event by sending an action message to another object — in this case, the UIViewController object. This enables you to use standard button objects without having to muck about in their internals — you just tell the button what method you want to have invoked in your target (usually the view controller as I explain in Chapter 9), and you’re basically set.
Processing the message may result in changes to a view, a new view altogether, or some other kind of change in the user interface. When one of these results occurs, the view and graphics infrastructure takes over and processes the required drawing events.
4. Your application then returns to the run loop.
After an event is handled or discarded, application control passes back to the run loop. The run loop then processes the next event or puts the thread to sleep if it has nothing more to do.
But because your application isn’t alone on the device, it can be interrupted by an SMS message, or the user touching the Home button. When your application is interrupted, you’ll have to take care of some things before control is switched to another application.
Knowing what to do when the normal processing of your application is interrupted
On an iOS device running iOS 4.2 or newer versions, various events besides termination can interrupt your app to allow the user to respond — for example, calendar alerts or the user pressing the Sleep/Wake button — and your app moves into the inactive state. If the user chooses to ignore an interruption, your app moves back into the active state and continues running as before. If the user decides to tap the alert to deal with it (or if the interruption was from the user touching the Home button to switch out of your application), your app then moves into itsbackground state, where it’s suspended but remains in memory.
iOS sends you a number of messages to let you know exactly what’s happening as well as to give you the opportunity to take actions such as save user data and state information, which means saving at the point where the user was in the application. (If an app needs to continue running, it can request execution time from the system.) Because the app is in the background (running or suspended) and still in memory, relaunching is nearly instantaneous. An app’s objects (including its windows and views) remain in memory, so they don’t need to be re-created when the app relaunches. If memory becomes constrained, iOS may purge background apps to make more room for the foreground app.
Because these interruptions cause a temporary loss of control by your app, touch events are no longer sent to your app. When developing your app, you need to take this fact into account. For example, if your app is a game, you should pause the game when your game is interrupted. In general, your app should store information about its current state when it moves to the inactive state and be able to restore itself to the current state upon a subsequent relaunch.
In all cases, the sequence of events starts the same way — with the applicationWillResignActive: message sent to your application delegate when the application is about to move from active to inactive state. In this method, you should pause ongoing tasks, disable timers, throttle down OpenGL ES frame rates (that is, you should use this method to pause the game), and generally put things on hold.
What happens after this depends on a) the nature of the interruption, and b) how the user responds to the interruption. Your application may be either moved to the background or reactivated. I explain these occurrences next.
Before I do that, however, check out Figure 6-3, which shows the application life cycle and how interruptions are handled.
If the user responds to the interruption (the SMS message for example) or has launched another application, your application is moved to the background.
When the user accepts the notification or interruption, or presses the Home button (or when the system launches another application), your application moves into the background state, where it’s suspended. (If an app needs to continue running, it can request execution time from the system.)
The next two bullets explain the messages your application can respond to after it’s been moved into the background:
![]() The applicationDidEnterBackground: message: When your app first enters the background state, it’s sent the applicationDidEnterBackground: message. In this method, you should save any unsaved data or state (where the user is in the app — the current view, options selected, and stuff like that) to a temporary cache file or to the preferences database “on disk.” (Okay, I know that Apple calls the iOS storage system a disk even though it is a solid-state drive, but if Apple calls it that, I probably should too, just so I don’t confuse too many people.)
The applicationDidEnterBackground: message: When your app first enters the background state, it’s sent the applicationDidEnterBackground: message. In this method, you should save any unsaved data or state (where the user is in the app — the current view, options selected, and stuff like that) to a temporary cache file or to the preferences database “on disk.” (Okay, I know that Apple calls the iOS storage system a disk even though it is a solid-state drive, but if Apple calls it that, I probably should too, just so I don’t confuse too many people.)
 Even though your application enters the background state, you have no guarantee that it will remain there indefinitely. If memory becomes constrained, iOS will purge background apps to make more room for the foreground app. You need to do everything necessary to be able to restore your application in case it’s subsequently purged from memory so that the next time the user launches your app, your application can use that information to restore your app to its previous state. You also have to do additional cleanup operations, such as deleting temporary files.

Figure 6-3: The application life cycle.
 If your application is purged when it’s in this suspended state, it receives no notice that it’s removed from memory. You need to save any data beforehand!
When your delegate is sent the applicationDidEnterBackground: method, your app has an undocumented amount of time to finish things up. If the method doesn’t return before time runs out (or if your app doesn’t request more execution time from iOS), your app is terminated and purged from memory.
If your application requests more execution time or it has declared that it does background execution, it’s allowed to continue running after the applicationDidEnterBackground: method returns. If not, your (now) background application is moved to the suspended state shortly after returning from the applicationDidEnterBackground: method.
If the application is in the background, it then may be relaunched. This can happen if the user selects the app from the Home screen or the multitasking bar, or it’s launched by the system if the app processes events in the background or monitors a significant location change, for example.
![]() The applicationWillEnterForeground: message: When your application is relaunched from the background, it’s sent the applicationWillEnterForeground: message. In this method, you need to undo what you did in the applicationDidEnterBackground: method (notapplicationWillResignActive; you undo that next).
The applicationWillEnterForeground: message: When your application is relaunched from the background, it’s sent the applicationWillEnterForeground: message. In this method, you need to undo what you did in the applicationDidEnterBackground: method (notapplicationWillResignActive; you undo that next).
If the user ignores the SMS message, or the app is relaunched from the background, your application is reactivated and starts getting touch and other events.
When your application is reactivated, it’s sent the applicationDidBecomeActive: message.
You can use the applicationDidBecomeActive: method to restore the application to the state it was in before the interruption. Here you undo what you did in the applicationWillResignActive method, such as restart any tasks that were paused (or not yet started) while the application was inactive. If the application was previously in the background, you might need to refresh the user interface.
While an application is in the suspended state, the system tracks and coalesces (really nets out) events that might have an impact on that application when it relaunches. As soon as your application is up and running again, the system delivers those events to it. For most of these events, your application’s existing infrastructure should just respond appropriately. For example, if the device orientation changed, your application’s view controllers would automatically update the interface orientation in an appropriate way.
Apps are generally moved to the background when interrupted or when the user quits. But if the app was compiled with an earlier version of the SDK, or is running on an earlier version of the operating system that doesn’t support multitasking — or if you decide that you don’t want your app to run in the background and you set the UIApplicationExitsOnSuspend key in its Info.plist file — iOS terminates your app.
Even if your application supports multitasking (almost all do at this point), you must still be prepared for your application to be killed without any notification. The user can kill applications explicitly using the multitasking bar. In addition, if memory becomes constrained, the system might remove applications from memory to make more room. If it does remove your suspended application, it doesn’t give you any warning, much less notice! However, if your application is currently running in the background state, the system does call theapplicationWillTerminate: method of the application delegate.
When your application delegate is sent the applicationWillTerminate: message in nonmultitasking applications, or those running in the background, you need to do the same kinds of things you do in applicationDidEnterBackground:, except this time you do them knowing that your application won’t be returning from the background.
Your applicationWillTerminate: method implementation has a limited (albeit undocumented) amount of time to do what it needs to do and return. Any longer than that and your application is terminated and purged from memory. (The Terminator doesn’t kid around.)
An overview of the view controller life cycle
View controllers have a life cycle just as applications do, but I don’t need to go into much detail about it here. The important part to know is that certain messages sent as views are displayed and hidden.
The two methods you need to know about in order to work with views are the following:
![]() viewDidLoad
viewDidLoad
![]() viewWillAppear:
viewWillAppear:
The viewDidLoad message is sent to your view controller. This message is sent after the view controller has loaded its associated views into memory. This method is used to perform additional view initialization on views loaded from the storyboard or nib file, and the message isn’tnecessarily sent every time the view appears. If, for example, the user makes a selection in the view that causes a new view controller to load and slide its view into place, and the user then taps the Back button, this message isn’t sent when the originating view reappears. That’s the job ofviewWillAppear:.
The viewWillAppear: message is sent when the view is about to become visible. The first time it’s sent is after the viewDidLoad message, and then whenever the view reappears, such as when you tap the Back button, for example. You use this method to do the things that are necessary to present the view. For example, if you are displaying the location of the nearest book store that carries iOS 6 Application Development For Dummies, update that information in this method.
Numerous other methods are also placed in the view controller for you as stubs. I leave you to explore them on your own.
Of course, aside from all this system stuff that happens, your application will be chugging along doing what the user wants it to do. And in responding to user requests, you’ll create objects to do the user’s bidding — which means that you allocate memory. And because memory is a scarce resource on the iPad, you need to understand memory management, discussed in the next section.
Working within the Managed Memory Model Design Pattern
As powerful as it is, the iPhone — and even the iPad — is limited in resources, and the most critical of these resources is memory. To truly understand how to manage memory correctly in your application, you need to understand how the iOS memory works.
Understanding memory management
Whenever you (or a framework object) create an object using Objective-C, you allocate memory for the object. Although iOS devices and the Mac all use what’s known as virtual memory, unlike the Mac, virtual memory in iOS is limited to the actual amount of physical memory. So when it begins to run low on memory, the Memory Manager frees memory pages that contain read-only content (such as code); this way, all it has to do is load the “originals” back into memory when they’re needed. In contrast to what the Mac does, the iPad doesn’t temporarily store “changeable” memory (such as object data) to the disk to free space and then read the data back later when it’s needed. This state of affairs limits the amount of available memory.
So as you can see, when one object is done using memory, it’s critical that the memory be released for use by other objects.
If memory continues to be limited, the system may also send notifications to the running application, asking it to free additional memory. This is one of the critical events that all applications must respond to, and I explain this process in the section “Observing Low-Memory Warnings,” later in this chapter.
In Objective-C, memory is managed in iOS apps by reference counting — keeping the system up-to-date on whether an object is currently being used. Read on for all the details.
Using reference counting
In many ways, Objective-C is like the coolest guy in your school who now makes a seven-figure income surfing, bungee jumping, and skateboarding during the summers and then snowboarding around the world in the winter. In other ways, though, Objective-C is like the nerd in your class who grew up to be an accountant and reads the Financial Times for fun. Memory management falls into this category. In fact, memory management is simply an exercise in counting. To manage its memory, Objective-C (actually the iOS memory manager) uses a technique known asreference counting. Every object has its own reference count, or retain count. As long as the retain count is greater than zero, the memory manager assumes that someone cares about that object and leaves it alone. When an object’s retain count goes to zero, the memory manager knows that no one needs it anymore and sends the object a dealloc message, and after that, its memory is returned to the system to be reused.
That process sounds pretty straightforward, but how does the retain count get incremented and decremented? Until Xcode 4.2 and iOS 5.0, you had to manage the retain count in your application. When an object is created via alloc or new or through a copy or mutableCopy message (which creates a copy of an object but has subtleties beyond the scope of this book), the object’s retain count is set to 1. When your application uses one of those methods, ownership is transferred to the object that sent the message — that is, the object has been retained and that object that sent the message becomes a nonexclusive owner of the object. Ownership here means that the object will be there to use until it’s explicitly released by sending it a release message when it’s no longer needed (although if other active owners exist, it wouldn’t be deallocated until all of them have released it).
Before Xcode 4.2 and iOS 5.0, if you didn’t create an object by one of those methods but you wanted to become an owner, thereby making sure that the object stayed around for you to use until you were done with it, it was up to you to send a retain message to increase the retain count, and when you were done, to send a release message. This was because the creator of the object (which caused the retain count to be set to 1) may have autoreleased it — sent an object a release message that will cause it to be released later (usually the next tine the run loop is entered). This is useful in situations in which you want to relinquish ownership of an object but avoid the possibility of its being deallocated immediately (such as when you return an object from a method). In either instance, you were maintaining a pointer to the object so that it could be used.
Although this approach was simple in theory, it was a real headache for programmers. The vast majority of system crashes occurred because apps ran out of memory and were shut down by the system. In some of these cases, the application didn’t respond to the memory warning methods and manage the low-memory warnings I explain in the section “Observing Low-Memory Warnings,” later in this chapter.
Most of the time, however, even if the application responded to the low-memory warnings, it was limited to what it could do because the memory was leaked. Memory was actually available because some objects were not being used, but those objects’ memory had not been released back to the system. In fact, there were no longer pointers to these objects (for a variety of reasons), so they couldn’t be released and then deallocated and the memory reused.
 You have ways to manage memory automatically. One is garbage collection, which scans through memory and releases objects that have no pointers to them. Garbage collection for Objective-C is available on the Mac (and for many other languages on other platforms), but garbage collection has a few problems. It can start up and pause your applications at the most inopportune time, and it affects performance and the user experience because you have no control, or any idea, when it will occur.
Having to do all this memory management in your application has changed with the latest version of the Objective-C compiler, which now comes with automatic reference counting (ARC), which you can enable whenever you create a project. (For more on options when creating a project, see Chapter 3.) ARC does for you in the compiler what you used to have to do on your own. It handles all those releases, autoreleases, and retains for you. I tell you much more about ARC in the next section.
Automatic Reference Counting (ARC)
Automatic reference counting (ARC) is a compiler-level feature that simplifies the process of managing the lifetimes of Objective-C objects. Instead of you having to remember when to retain or release an object, ARC evaluates the lifetime requirements of your objects and automatically synthesizes the appropriate method calls at compile time. It isn’t a new runtime memory model — and it isn’t a garbage collector. All the action takes place in the compiler.
ARC takes care of the process of retaining and releasing objects by taking advantage of (and having the compiler enforce) naming conventions. It also relies on new object pointer ownership qualifiers (more on that later).
Lest you worry, ARC is actually much faster (has better performance) than doing memory management on your own.
ARC doesn’t automate malloc() and free() (C functions I won’t get into here) and doesn’t automate CoreFoundation (CF) or CoreGraphics (CG). You’ll be using some of those kinds of functions, and I talk about them in Chapter 10.
To be able to manage memory for you, ARC imposes some restrictions — primarily enforcing some best practices and disallowing some other practices. You won’t have to worry about most of this in an application that was created to use ARC. You may see some things in non-ARC samples, but hopefully my discussion here will help you figure out how to work within the ARC restrictions.
In the following, I explain the rules that you have to follow to use ARC in your application.
![]() Rule 1: Don’t call the retain, release, or autorelease methods. In addition, you can’t implement custom retain or release methods.
Rule 1: Don’t call the retain, release, or autorelease methods. In addition, you can’t implement custom retain or release methods.
If you’re new to Objective-C programming, this rule won’t mean anything to you because it isn’t something you’ll have been doing in your existing applications. The only reason you’ll need to know about this rule is to understand what non-ARC code is doing to manage memory. If you’re an old hand, you’ll have been using these methods, and you’ll be happy to be told not to use them.
You can provide a custom implementation of dealloc if you need to manage other resources — but I don’t have you do that for the example app developed in this book.
![]() Rule 2: Don’t store object pointers in C structures. Because the compiler must know when references come and go, you can’t store object pointers in. For most readers, that won’t be a problem because you’ll be using objects rather than C structures.
Rule 2: Don’t store object pointers in C structures. Because the compiler must know when references come and go, you can’t store object pointers in. For most readers, that won’t be a problem because you’ll be using objects rather than C structures.
![]() Rule 3: Inform the compiler about ownership when using Core Foundation–style objects. In iOS applications, you often use the CoreFoundation framework. An example is in Chapter 10, when you add sound to your application.
Rule 3: Inform the compiler about ownership when using Core Foundation–style objects. In iOS applications, you often use the CoreFoundation framework. An example is in Chapter 10, when you add sound to your application.
CoreFoundation objects are anything beginning with a CF — things like the address book functions, for example. A CoreFoundation object would look like this:
AudioServicesCreateSystemSoundID(
(__bridge CFURLRef)burnRubberURL, burnRubberSoundID);
ARC doesn’t automatically manage the lifetimes of CoreFoundation types, and there are CoreFoundation memory management rules and functions you can use, such as CFRetain and CFRelease (or the corresponding type-specific variants).
In this book, and most of the time, you don’t have to worry about memory management because you usually will be casting an Objective-C object to a CoreFoundation type object, or vice versa — with the result that you end up with no CoreFoundation memory management in your code. You still have to let the compiler know about any memory management implications, though.
Again, in this book, and much of the time elsewhere, you simply tell ARC not to worry by using a __bridge cast. (You’ll use a __bridge cast in Chapter 10.)
If you do have CoreFoundation memory management, macros such as CFBridgingRetain or CFBridgingRelease will transfer ownership between ARC and CoreFoundation. (This topic is beyond the scope of this book, however.)
![]() Rule 4: Use the @autoreleasepool keyword to mark the start of an autorelease block. This isn’t something you’ll be concerned about — or will ever do, for that matter. But it’s a rule nonetheless.
Rule 4: Use the @autoreleasepool keyword to mark the start of an autorelease block. This isn’t something you’ll be concerned about — or will ever do, for that matter. But it’s a rule nonetheless.
![]() Rule 5: Follow the naming conventions. The compiler knows whether to retain an object based on what gets returned. Sometimes the object being returned by a method is retained, and sometimes it’s autoreleased later. If the object is going to be autoreleased, the object needs to be retained. If it’s already retained, you don’t want the compiler to do anything.
Rule 5: Follow the naming conventions. The compiler knows whether to retain an object based on what gets returned. Sometimes the object being returned by a method is retained, and sometimes it’s autoreleased later. If the object is going to be autoreleased, the object needs to be retained. If it’s already retained, you don’t want the compiler to do anything.
The only way the compiler knows whether an object has been retained when it’s returned is through certain naming conventions. Under ARC, these naming conventions are now part of the language, and you must follow them.
The compiler knows that a retained object has been returned when the first word in the first part of the selector (the method name) is alloc, new, copy, mutableCopy, or init. These methods transfer ownership — where transferred ownership means that the object has been retained for you. An example is the NSString initWithFormat: method.
In addition, you can’t give a property a name that begins with new.
![]() Rule 6: Just follow the rules. That’s it — no retaining releasing or autoreleasing. Just follow the rules and code to your heart’s content without worrying about memory management.
Rule 6: Just follow the rules. That’s it — no retaining releasing or autoreleasing. Just follow the rules and code to your heart’s content without worrying about memory management.
Except, of course, in some situations, you’ll need to explicitly tell the compiler about what you want to do. In those cases, you’ll have to tell the compiler explicitly about an object’s lifetime. I explain how to do that in the next section.
Working with variable types according to ARC
Because the reference to an object lives in a variable, object pointers can be qualified using ownership type or lifetime qualifiers. These qualifiers determine when the compiler can deallocate an object to which a pointer points. These qualifiers are as follows:
__strong
__weak
__unsafe_unretained
__autoreleasing
The following sections describe the function of each of these qualifiers.
![]() __strong variables retain their values. __strong is the default. You almost never have to specify it, and all stack local variables, including parameters, are __strong. A __strong pointer to an object will cause that object to be retained while it’s in scope (or not set to nil). No moredangling references (objects that have been deallocated that you expect to be there)!
__strong variables retain their values. __strong is the default. You almost never have to specify it, and all stack local variables, including parameters, are __strong. A __strong pointer to an object will cause that object to be retained while it’s in scope (or not set to nil). No moredangling references (objects that have been deallocated that you expect to be there)!
![]() __weak variables don’t retain values. _ weak variables don’t cause an object to be retained (that is, you don’t use them in the reference count) and are, in fact, set to nil (zeroed) as soon as the referenced object starts deallocating. You need to be concerned with these only to prevent retain cycles, which I explain shortly.
__weak variables don’t retain values. _ weak variables don’t cause an object to be retained (that is, you don’t use them in the reference count) and are, in fact, set to nil (zeroed) as soon as the referenced object starts deallocating. You need to be concerned with these only to prevent retain cycles, which I explain shortly.
![]() __ unsafe_unretained variables don’t retain values and aren’t zeroed. Some Apple-provided classes (only on the Mac and some third-party libraries) don’t work with zeroing weak references. These have to be cleared in a dealloc method elsewhere.
__ unsafe_unretained variables don’t retain values and aren’t zeroed. Some Apple-provided classes (only on the Mac and some third-party libraries) don’t work with zeroing weak references. These have to be cleared in a dealloc method elsewhere.
 Using ARC, __strong, __weak, and __autoreleasing stack variables are now implicitly initialized with nil.
![]() __ autoreleasing for indirect pointers. These variables aren’t for general use. They’re used for out parameters that pass values back to the calling routine. They’re retained and then autoreleased when they’re read into, and are beyond the scope of this book.
__ autoreleasing for indirect pointers. These variables aren’t for general use. They’re used for out parameters that pass values back to the calling routine. They’re retained and then autoreleased when they’re read into, and are beyond the scope of this book.
Understanding the deadly retain cycle
ARC works very well to manage memory except in one circumstance. In this section, I explain how that circumstance can arise, and what you’ll need to do to keep it from happening.
When you create an object, the compiler makes sure that ownership is transferred and all is well. The compiler will release that object when it goes out of scope, so if it’s an instance variable, it will stay in scope until the object itself is deallocated.
I take you through this process using a little program called RetainCycle that I wrote to illustrate the retain cycle.
I create a new RetainIt object in the viewDidLoad method of my RetainCycleViewController object. It will be released only when the retainIt variable goes out of scope (it’s __strong by default). In this case, it will be released and then deallocated (assuming that no other object takes ownership) at the end of viewDidLoad because the retainIt variable will go out of scope:
- (void)viewDidLoad
{
[super viewDidLoad];
RetainIt* retainIt = [[RetainIt new]init];
}
But when I create the RetainIt object, in the RetainIt class’s initialization method, init (see the following), I create a Cycle object and assign it to the cycle instance variable I declared. As you might expect, the Cycle object will be retained until the RetainIt object is deallocated because it’s referenced by an instance variable, which stays in scope until the object is deallocated:
- (id)init
{
self = [super init];
if (self) {
self.cycle = [[Cycle new] init];
cycle.retainIt = self;
}
return self;
}
I also, however, assign to the Cycle object’s retainIt property a reference back to the RetainIt object. The Cycle class looks like this:
@interface Cycle : NSObject
@property (strong, nonatomic) RetainIt* retainIt;
@end
At the end of the day, it looks like Figure 6-4.
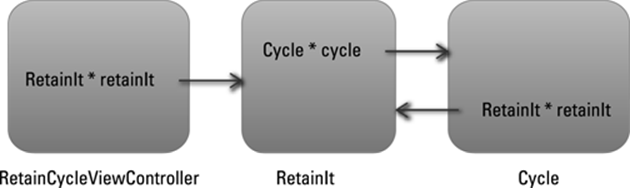
Figure 6-4: The retain cycle.
This means that the RetainIt object won’t be deallocated until the Cycle object is deallocated, and the Cycle object will be deallocated only when the RetainIt object is deallocated. Whoops!
Although this example may appear a bit contrived, it actually can occur in real life when you have one object with a back pointer to the object that creates it (either directly or through a chain of other objects, each with a strong reference to the next leading back to the first).
The __weak lifetime qualifiers for objects take care of this. Although I haven’t explained properties yet, the solution is to make the lifetime qualifier back pointer __weak.
@property (weak, nonatomic) RetainIt* retainIt;
I explain this more when I explain property attributes later in this chapter.
Observing Low-Memory Warnings
Even if you’ve done everything correctly, in a large application, you may simply run out of memory. When that situation occurs, the system dispatches a low-memory notification to your application — and it’s something you must pay attention to. If you don’t, it’s a reliable recipe for disaster. (Think of your low-fuel light going on as you approach a sign on the highway that says, “Next services 100 miles.”) UIKit provides several ways for you to set up your application so that you receive timely low-memory notifications:
![]() Override the viewDidUnload and didReceiveMemoryWarning methods in your custom UIViewController subclass.
Override the viewDidUnload and didReceiveMemoryWarning methods in your custom UIViewController subclass.
![]() Implement the applicationDidReceiveMemoryWarning: method of your application delegate.
Implement the applicationDidReceiveMemoryWarning: method of your application delegate.
![]() Register to receive the UIApplicationDidReceiveMemoryWarningNotification: notification.
Register to receive the UIApplicationDidReceiveMemoryWarningNotification: notification.
The viewDidUnload method
When a low-memory condition occurs, one way to free some memory is to remove views that aren’t being used. You don’t have to worry about that, however, because it’s handled in the view controller class from which you derive your view controllers — UIViewController.
What you do have to worry about, though, is managing any references to the view or its subviews that you have. This includes managing the outlets you create in Chapter 9.
That’s why Interface Builder will so kindly add (in Chapter 9, where you add the car and testDriveButton outlets) the following code to your project:
- (void)viewDidUnload
{
[self setCar:nil];
[self setTestDriveButton:nil];
[super viewDidUnload];
}
Here you set the references to the outlets you will create to nil, which will tell ARC to generate the code to release these references and which will enable them to be released from memory. You can also use this method to release any objects that you created to support the view but that are no longer needed now that the view is gone, by setting them to nil as well. You shouldn’t use this method to release user data or any other information that can’t be easily re-created.
The didReceiveMemoryWarning method
The didReceiveMemoryWarning method is sent to the view controller when the application receives a memory warning. The default implementation of this method checks to see whether the view controller can safely release its view. If the view can be released, this method releases it and sends the viewDidUnload message (see the preceding section).
You should override this method to release any additional memory used by your view controller, but be sure to send the [super didReceiveMemoryWarning] to allow the view controller to release its view.
The applicationDidReceiveMemoryWarning: method
Similar to viewDidUnload, your application delegate should set any references to objects it can safely free to nil.
The UIApplicationDidReceiveMemoryWarningNotification: notification
Low-memory notifications are sent to the Notification Center, where all notifications are centralized. An object that wants to get informed about any notifications registers itself to the Notification Center by telling which notification it wants to be informed about, and a block (to be explained in Chapter 10) to be called when the notification is raised. A model object, for example, could then release data structures or objects it owns that it doesn’t need immediately and can re-create later by setting references to nil. However, this approach is beyond the scope of this book.
For those of you who are curious, in your model object (which you create in Chapter 11), you could add the following:
[[NSNotificationCenter defaultCenter] addObserverForName:
UIApplicationDidReceiveMemoryWarningNotification
object:[UIApplication sharedApplication] queue:nil
usingBlock:^(NSNotification *notif) {
//your code here
}];
You can test applicationDidReceiveMemoryWarning: and UIApplicationDidReceiveMemoryWarningNotification: in the Simulator by choosing Hardware⇒Simulate Memory Warning.
Picking the right memory-management strategy for your application
Each of these strategies gives a different part of your application a chance to free the memory it no longer needs (or doesn’t need right now). How you actually get these strategies working for you depends on your application’s architecture, so you’ll have to explore that on your own.
Not freeing enough memory will result in iOS sending your application the applicationWillTerminate: message and shutting the app down. For many apps, though, the best defense is a good offense, which means you need to manage your memory effectively and eliminate any memory leaks in your code by following the ARC rules.
Customizing the Behavior of Framework Classes
Although you’ll be creating classes of your own (especially model classes), often you’re going to want to customize the behavior of a particular framework class. You have three ways to go about it:
![]() Subclassing
Subclassing
![]() Delegating
Delegating
![]() Declared properties
Declared properties
In this section, I’ll cover the first two, and the third in the following section.
Subclassing
Objective-C, like other object-oriented programming languages, permits you to base a new class definition on a class already defined. The base class is called a superclass; the new class is its subclass. The subclass is defined only by its extension to its superclass; everything else remains the same. Each new class that you define inherits methods and instance variables of its superclass.
Some framework classes are expected to be subclassed. Among them are view controllers, which you’ll be subclassing quite a bit. Others aren’t expected to be subclassed because you’re going to need to customize their behavior; in those situations, you use delegation instead.
The Delegation pattern
Delegation is a pattern used extensively in the iOS frameworks, so much so that, if you want to do any serious app development work, you’re going to have to get your head around it. In fact, when you do understand it, your life will instantly become much easier to manage.
Delegation, as I mention in the previous section, is a way of customizing the behavior of an object without subclassing it. Instead, one object (a framework or any other object) delegates the task of implementing one of its responsibilities to another object. You’re using a behavior-rich object supplied by the framework as is and putting the code for program-specific behavior in a separate (delegate) object. When a request is made of the framework object, the method of the delegate that implements the program-specific behavior is automatically called.
The iOS frameworks have been designed to (mostly) use delegation rather than subclassing (for technical reasons, which are beyond the scope of this book).
For example, the UIApplication object handles most of the actual work needed to run the application. But, as you saw, it sends your application delegate the application:didFinishLaunchingWithOptions: message to give you an opportunity to create model objects that are unique to your app.
When a framework object has been designed to use delegates to implement certain behaviors, the behaviors it requires (or gives you the option to implement) are defined in a protocol.
Protocols define an interface that the delegate object implements. In iOS, protocols can be formal or informal, although I concentrate solely on the former because formal protocols include support for things like type checking and runtime checking to see whether an object conforms to the protocol.
In a formal protocol, you usually don’t have to implement all the methods; many are declared optional, meaning that you have to implement only the ones relevant to your app. Before a formal protocol attempts to send a message to its delegate, the host object determines whether the delegate implements the method (via a respondsToSelector: message) to avoid the embarrassment of branching into nowhere if the method isn’t implemented.
Delegation and protocols are the preferred way to manage model views (so says Apple, after much trial and error), and you create your own protocol to manage model views in Chapter 19.
Understanding Declared Properties
Although properties and instance variable access and accessors are often mashed together in the minds of programmers, I want to make sure that you understand the unique nature of properties and how they really work.
Whereas methods are concerned with sending messages to objects to get things done, properties are concerned with the state of the objects. Frameworks and other objects behave based on what they find in their properties (hence you can modify object behavior by changing a property); for example, a button’s background image is a property you set (indirectly, in Interface Builder) in Chapter 5.
You also may want to know something about the state of the object, such as its color, or about a window’s Root view controller.
In Chapter 12, I discuss creating a model object — Trip. Your app’s view controllers, which act as a bridge between the views and the model, need to be able to find the Trip object to get data and send it updates. All of this is done using properties.
As I discuss when creating an outlet in Chapter 9, a property looks like the following:
@property (strong, nonatomic) IBOutlet UIImageView *car;
But not all properties are outlets. If you select the RTAppDelegate.h file in the Project inspector, you can see that it includes a window property:
@property (strong, nonatomic) UIWindow *window;
And in Chapter 11, you add a trip property to RTAppDelegate:
@property (nonatomic, strong) Trip *trip;
As you can see, the order of the attributes (strong, nonatomic vs. nonatomic, strong, which I explain in the later section “Setting attributes for a declared property”) doesn’t matter.
What comprises a declared property
A declared property has two parts: its declaration and its implementation.
The declaration uses the @property keyword, followed by an optional parenthesized set of attributes, the type information, and the name of the property.
Access to properties is implemented by accessor methods (although within the class that declares the property, the property can be accessed directly, just as instance variables are). You can write your own accessor methods or you can let the compiler do it for you. To have the compiler do it for you, you use the @synthesize directive to tell the compiler to create the accessor methods. The code it generates matches the attributes you’ve specified. (I explain the attributes in the upcoming “Setting attributes for a declared property” section.)
However, starting with Xcode 4.4, the Objective-C compiler automatically calls @synthesize for properties with no explicit accessor methods, so you no longer need to add @synthesize statements to your .m files. Therefore, you will not see any @synthesize statements used in this book.
The default names for the getter and setter methods associated with a property are whateverThePropertyNameIs for the getter and setWhateverThePropertyNameIs: for the setter. In the case of trip, the getter method is trip, and the setter method is setTrip:.
To access the trip property in the appDelegate, you would use
RTAppDelegate* appDelegate =
[[UIApplication sharedApplication] delegate];
Trip* thisTrip = [appDelegate trip];
or to set that property, use
RTAppDelegate* appDelegate =
[[UIApplication sharedApplication] delegate];
[appDelegate setTrip:newTrip];
delegate, by the way is a UIApplication property
As I said, the UIApplication is a singleton object (there is just the one). To get a reference to it, you send the class message (in Objective-C, you can send messages to classes, which are really objects on their own). Sending the UIApplication object the delegate message gives you a pointer to the delegate object.
Using dot syntax
Objective-C provides a dot (.) operator that offers an alternative to square bracket notation ([ ]) to invoke accessor methods. You use dot syntax in the same way you would when accessing a C structure element:
Trip* thisTrip = appDelegate.trip;
or to set that property, use
appDelegate.trip = newTrip;
When used with objects, however, dot syntax acts as “syntactic sugar” — it’s transformed by the compiler into an accessor message. Dot syntax doesn’t directly get or set an instance variable. The code examples using it are the exact equivalent to using the bracket notation.
Many programmers like the dot syntax because it may be more readable; just think of those bracket notation situations where you’re accessing a property that is a property of another object (that is a property of another object, and so on). The real advantage of dot syntax, though, is that the compiler will generate an error when it detects an attempt to write to a read-only declared property. This is so much better than having to settle for an undeclared method warning because you invoked a nonexistent setter method, with the app subsequently failing at runtime.
When you use the compiler to create accessor methods for you, the compiler creates an instance variable of the type you have declared that it will then use to store and retrieve the property value with the name of the property. For example for the following property:
@property (weak, nonatomic) IBOutlet UIImageView *car;
the statement
@synthesize car;
generates an instance variable with the name of car of type UIImage.
However, if you let the compiler automatically generate an @synthesize statement for you, it actually uses an instance variable name beginning with an underscore character, so you would get the following code generated:
@synthesize car = _car;
This allows you to distinguish between the property name (accessed by self.car) and the instance variable name (accessed simply as _car).
Apple recommends that you use the property reference (self.car) in normal methods, but use the _car variable in init methods.
Setting attributes for a declared property
I mention earlier in this chapter that you can set certain property attributes when you declare a property. I cover some of those attributes in this section.
Setter semantics/ownership
These properties specify how instance variable storage should be managed (see the earlier section “Working with variable types according to ARC” for more):
![]() strong (similar to retain, which was used previous to ARC) creates an accessor method that means that the object this property points to will be retained while it is in scope (or whenever it’s set to nil or some other value).
strong (similar to retain, which was used previous to ARC) creates an accessor method that means that the object this property points to will be retained while it is in scope (or whenever it’s set to nil or some other value).
![]() weak (similar to assign, which was used previous to ARC) creates an accessor that uses simple assignment. This attribute is the default, and you typically use this attribute for scalar types such as NSInteger and CGRect, or (in a reference-counted environment) for objects you don’t own — delegates, for example — and to avoid retain cycle problems, as I explain in “Understanding the deadly retain cycle,” earlier in this chapter.
weak (similar to assign, which was used previous to ARC) creates an accessor that uses simple assignment. This attribute is the default, and you typically use this attribute for scalar types such as NSInteger and CGRect, or (in a reference-counted environment) for objects you don’t own — delegates, for example — and to avoid retain cycle problems, as I explain in “Understanding the deadly retain cycle,” earlier in this chapter.
![]() copy specifies that a copy of the object should be used for assignment. The previous value is sent a release message.
copy specifies that a copy of the object should be used for assignment. The previous value is sent a release message.
The copy is made by invoking the copy method. This attribute is valid only for object types, which must implement the NSCopying protocol (and is beyond the scope of this book).
For object properties, you must explicitly specify one of the types listed previously; otherwise, you get a compiler warning. So you need to think about what memory management behavior you want, and type the behavior explicitly.
Writability
The following attributes specify whether a property has an associated set accessor. They are mutually exclusive.
![]() readwrite indicates that the property should be treated as read/write. This attribute is the default. With the @synthesize directive, the getter and setter methods are synthesized; otherwise, both a getter and setter method are required.
readwrite indicates that the property should be treated as read/write. This attribute is the default. With the @synthesize directive, the getter and setter methods are synthesized; otherwise, both a getter and setter method are required.
![]() readonly indicates that the property is read-only. With the @synthesize directive, only a getter method is synthesized. Otherwise, only a getter method is required. If you attempt to assign a value using the dot syntax, you get a compiler error.
readonly indicates that the property is read-only. With the @synthesize directive, only a getter method is synthesized. Otherwise, only a getter method is required. If you attempt to assign a value using the dot syntax, you get a compiler error.
Accessor method names
You’ll remember that the default names for the getter and setter methods associated with a property are propertyName and setPropertyName:, respectively. For example, for the property trip, the accessors are trip and setTrip:. You can, however, specify custom names instead. They’re both optional and can appear with any other attribute (except for readonly in the case of setter =):
![]() getter = getterName specifies the name of the get accessor for the property. The getter must return a type matching the property’s type and take no parameters.
getter = getterName specifies the name of the get accessor for the property. The getter must return a type matching the property’s type and take no parameters.
![]() setter = setterName specifies the name of the set accessor for the property. The setter method must take a single parameter of a type matching the property’s type and must return void.
setter = setterName specifies the name of the set accessor for the property. The setter method must take a single parameter of a type matching the property’s type and must return void.
Typically, you should specify accessor method names that are key-value coding compliant (which is beyond the scope of this book). A common reason for using the getter decorator is to adhere to the isPropertyName convention for Boolean values.
Atomicity
You can use this attribute to specify that accessor methods aren’t atomic. (No keyword denotes atomic.) This has to do with currency and thread issues that are way beyond the scope of this book. If you specify nonatomic, a synthesized accessor for an object property simply returns the value directly. Otherwise, a synthesized get accessor for an object property uses a lock and retains and autoreleases the returned value. You use nonatamic throughout this book and on the iPad in general.
Writing your own accessors
You don’t have to use the accessors generated by the compiler; and, sometimes, it even makes sense to implement them yourself (although such times don’t arise in this book). If you implement the accessor methods yourself, you should make sure that your approach matches the attributes you’ve declared. (For example, if you specify copy, you must make sure that you do copy the input value in the setter method.)
For example, if you have a lot of overhead to create an object that might not be used, you can create your own getter accessor that creates the object the first time it’s accessed. In addition, writing your own accessor means you don’t have to have an instance variable associated with the property. The UIView frame property, for example, is actually computed based on the bounds and center properties.
Accessing instance variables with accessors
If you don’t use self, you access the instance variable directly. In the following example, the set accessor method for currentDestinationIndex isn’t invoked:
currentDestinationIndex = [[NSUserDefaults
standardUserDefaults]objectForKey:CurrentDestinationKey];
The preceding isn’t the same as
self.currentDestinationIndex = [[NSUserDefaults
standardUserDefaults]objectForKey:CurrentDestinationKey];
To use an accessor, you must use self.
Hiding Instance Variables
When properties were first developed, they were looked at as a way to avoid the tedium of writing accessors for instance variable-based properties.
People used to think about properties as a way to access instance variables. In fact, instance variables shouldn’t be equated to properties, and more important, instance variables shouldn’t be made public. (Doing so violates the object-oriented principle of encapsulation, but that’s a conversation for a different time.) In fact, Apple’s new approach is to put instance variable declarations in the implementation file of the class.
Before the new Objective-C compiler that comes with Xcode 4.2 came about, programmers declared instance variables in the header file in the @interface class declaration. In the old times, you would’ve added the following bolded code to the TestDriveController.h file:
@interface TestDriveController : UIViewController
<DestinationControllerDelegate> {
AVAudioPlayer *backgroundAudioPlayer;
SystemSoundID burnRubberSoundID;
BOOL touchInCar;
}
This approach made instance variables (ivars) visible to everyone and everything and was, as I mentioned, at odds with the principle of encapsulation (even if the variables couldn’t be accessed).
Starting with Xcode 4.2, you can now hide instance variables by declaring them in the implementation file in one of two ways. The first is as a class extension, which you create by adding a second interface block in the implementation file followed by open and close parentheses:
@interface TestDriveController () {
AVAudioPlayer *backgroundAudioPlayer;
SystemSoundID burnRubberSoundID;
BOOL touchInCar;
}
@end
The second way is by declaring the instance variable in the @implementation block of the class:
@implementation TestDriveController
AVAudioPlayer *backgroundAudioPlayer;
SystemSoundID burnRubberSoundID;
BOOL touchInCar;
A class extension is a variation of an Objective-C category, which is beyond the scope of this book.
The approach you use is your choice; I prefer the class extension because I think it makes the variables easier to distinguish.
You can also use class extensions to have a publicly declared set of methods and then declare additional methods for use solely by the class:
@interface TestDriveController () {
AVAudioPlayer *backgroundAudioPlayer;
SystemSoundID burnRubberSoundID;
BOOL touchInCar;
}
- (void) privateMethod;
@end
These methods are not really private, but are not visible in the header file. They are “private APIs.”
All materials on the site are licensed Creative Commons Attribution-Sharealike 3.0 Unported CC BY-SA 3.0 & GNU Free Documentation License (GFDL)
If you are the copyright holder of any material contained on our site and intend to remove it, please contact our site administrator for approval.
© 2016-2026 All site design rights belong to S.Y.A.