OS X Mavericks For Dummies (2014)
Part V. The Care and Feeding of Your Mavericks
Chapter 19. Utility Chest
In This Chapter
![]() Crunching numbers with the Calculator
Crunching numbers with the Calculator
![]() Setting up lots of stuff, including AirPort Base Stations and Bluetooth devices
Setting up lots of stuff, including AirPort Base Stations and Bluetooth devices
![]() Plumbing your Mavericks’ innards
Plumbing your Mavericks’ innards
![]() And much, much more . . .
And much, much more . . .
OS X Mavericks comes with a plethora of useful utilities that make using your computer more pleasant and/or make you more productive when you use your computer. In this chapter, I give you a glimpse of the ones that aren’t covered elsewhere in this book.
The first item, Calculator, is in your Applications folder; all the other items in this chapter are in your Utilities folder, inside your Applications folder (or you can use the Utilities folder’s keyboard shortcut, ![]() +Shift+U).
+Shift+U).
Calculator
 Need to do some quick math? The Calculator application gives you a simple calculator with all the basic number-crunching functions that your pocket calculator has. To use it, you can either click the keys with the mouse or type numbers and operators (math symbols such as +, –, and =) using the number keys on your keyboard (or numeric keypad, if you have one). Calculator also offers a paper tape (Window⇒Show Paper Tape) to track your computations — and, if you want, provide a printed record. It can even speak numbers aloud (Speech⇒Speak Button Pressed and Speech⇒Speak).
Check out the Calculator in Figure 19-1.
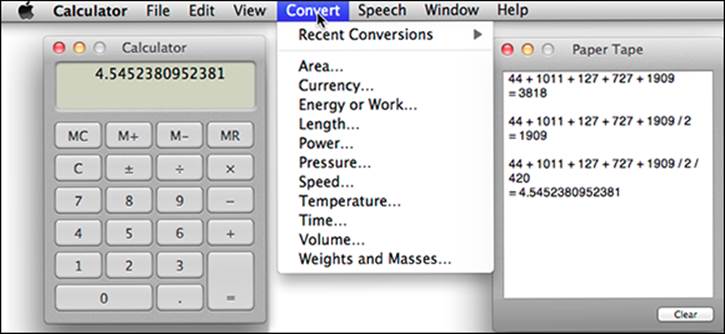
Figure 19-1: The Calculator (left), Convert menu (middle), and Paper Tape (right).
In my humble opinion, the most useful feature in the Calculator (after the Paper Tape) is the Convert menu — more specifically, the currency-conversion feature. It actually checks the Internet for the exchange rate before calculating the conversion for you. That’s very cool.
Beyond that, Calculator has three modes: Basic, Scientific, and Programmer. Basic is the default, and you access the other two modes as follows:
![]() Pressing
Pressing ![]() +2 (View⇒Scientific) turns the formerly anemic calculator into a powerful scientific calculator.
+2 (View⇒Scientific) turns the formerly anemic calculator into a powerful scientific calculator.
![]()
 Choosing View⇒Programmer (
![]() +3) turns it into the programmer’s friend, letting you display your data in binary, octal, hexadecimal, ASCII, and Unicode. It also performs programming operations such as shifts and byte swaps. (If you’re a programmer, you know what all that means; if you aren’t, it really doesn’t matter.)
+3) turns it into the programmer’s friend, letting you display your data in binary, octal, hexadecimal, ASCII, and Unicode. It also performs programming operations such as shifts and byte swaps. (If you’re a programmer, you know what all that means; if you aren’t, it really doesn’t matter.)
Activity Monitor
 In Unix, the underlying operating system that powers OS X, applications and other things going on behind the scenes are called processes. Each application and the operating system itself can run a number of processes at the same time.
In Figure 19-2, you see 78 different processes running, most of them behind the scenes. Note that when this picture was taken, I had half a dozen or more programs running, including the Finder, FaceTime, the Mac App Store, and Activity Monitor itself.
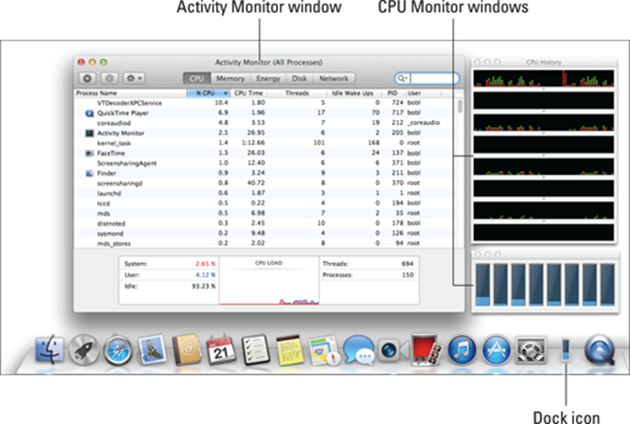
Figure 19-2: Activity Monitor window, two little CPU Monitors, and the Dock icon.
To display the two CPU Monitor panes on the right side of the Activity Monitor window as shown in Figure 19-2, choose Window⇒CPU Usage (keyboard shortcut ![]() +2) and CPU History (keyboard shortcut
+2) and CPU History (keyboard shortcut ![]() +3).
+3).
You also select what appears in the Activity Monitor’s Dock icon — CPU Usage, CPU History, Network Usage, Disk Activity, or the Activity Monitor icon — by choosing View⇒Dock Icon. All but the Activity Monitor icon appear live, meaning that they update every few seconds to reflect the current state of affairs.
To choose how often these updates occur, choose View⇒Update Frequency.
 But be careful — setting Activity Monitor to update more frequently causes it to use more CPU cycles, which can decrease overall performance slightly.
Finally, the bottom portion of the Activity Monitor window can display one of five monitors. Just click the appropriate tab — CPU, Memory, Energy, Disk, or Network — to see that particular monitor.
Because all Macs that can run Mavericks have at least a dual-core processor, you’ll see at least two, and possibly four or more, CPUs displayed in Activity Monitor, one for each core.
Geeks and troubleshooters (and even you) can use Activity Monitor to identify what processes are running, which user owns the process, and how much CPU capacity and memory the process is using. You can even use this feature to quit or force-quit a process that you think might be causing problems for you.
Messing around in Activity Monitor isn’t a good idea for most users. If you’re having problems with an application or with OS X, try quitting open applications, force-quitting applications (press ![]() +Option+Esc — the Mac “three-finger salute”), or logging out and then logging back in again before you start mucking around with processes.
+Option+Esc — the Mac “three-finger salute”), or logging out and then logging back in again before you start mucking around with processes.
AirPort Utility
 You use AirPort Utility to set up an AirPort Base Station, AirPort Extreme, AirPort Express, or Time Capsule and configure its individual settings, such as base-station and wireless-network passwords, network name, Internet connection type, and so on.
When you first open AirPort Utility, select the AirPort Base Station you want to work with by clicking its icon on the left side of the window.
If you want assistance with setting up your base station, just click the Continue button in the bottom-right corner of the AirPort Utility window. You’re asked a series of questions, and your base station is configured accordingly. If you know what you’re doing and want to change your base station’s settings manually, choose Base Station⇒Manual Setup (![]() +L) instead.
+L) instead.
ColorSync Utility
 ColorSync helps ensure color consistency when you’re scanning, printing, and working with color images. This package includes ColorSync software as well as premade ColorSync profiles for a variety of monitors, scanners, and printers. And the ColorSync Utility has a bunch of tools designed to make working with ColorSync profiles and devices easier. You’ll probably never need it, but I wanted to let you know it’s there, just in case.
A ColorSync profile is a set of instructions for a monitor, scanner, or printer, which tells the device how to deal with colors and white so the device’s output is consistent with that of other devices, as determined by the ColorSync profiles of the other devices. In theory, if two devices have ColorSync profiles, their output (onscreen, on a printed page, or in a scanned image) should match. Put another way, the color that you see onscreen should be exactly the same shade of color that you see on a printed page or in a scanned image.
 If you’re not a graphic artist working with color files and calibrating monitors and printers to achieve accurate color matching, you probably don’t need the ColorSync Utility (unless you’ve gotten hooked on iPhoto and want your printed inkjet color pictures to match up correctly).
If you’re compelled to do whatever it takes to get accurate color on your monitor and printer, check out Color Management For Digital Photographers For Dummies, by Ted Padova and Don Mason (Wiley).
DigitalColor Meter
 The DigitalColor Meter program displays what’s on your screen as numerical color values, according to two different systems: RGB (red-green-blue) and CIE (the abbreviation for a chromaticity coordinate system developed by the Commission Internationale de l’Eclairage, the international commission on illumination). If you’re not a graphic artist or otherwise involved in the production of high-end color documents, or working in HTML, you’ll probably never need it.
Disk Utility
 If you’re having problems with your hard drive or need to make changes to it, Disk Utility is a good place to start. Start by clicking a disk or volume in the column on the left and then click one of the five tabs described in the following sections.
First Aid tab
If you suspect that something’s not quite right with your Mac, the First Aid portion of Disk Utility should be among your first stops. Use First Aid to verify and (if necessary) repair an ailing drive. To use it, click the First Aid button on the left side of the Disk Utility window. Click a volume’s icon and then click Verify. You get information about any problems that the software finds. If First Aid doesn’t find any problems, you can go on your merry way, secure in the knowledge that your Mac is A-okay. If verification turns up trouble, click Repair to have the problem fixed. You can also use First Aid to fix disk-permission problems.
You won't be able to use the copy of Disk Utility in your Applications/Utilities folder to repair your OS X boot disk. To do that, you must reboot from Mavericks Recovery Disk or another bootable disk.
You can’t use Disk Utility First Aid to fix a CD or DVD, nor can you use it to fix most disk image files. These disks are read-only and can’t be altered.
Erase tab
Use Erase to format (completely erase) any disk except the current startup disk.
When you format a disk, you erase all information on it permanently. Formatting can’t be undone — so unless you’re absolutely sure this is what you want to do, don’t do it. Unless you have no use for whatever’s currently on the disk, make a complete backup of the disk before you format it. If the data is critical, you should have at least two (or even three) known-to-be-valid backup copies of that disk before you reformat.
Partition tab
Use this tab to create disk partitions (multiple volumes on a single disk). OS X treats each partition as a separate disk. When you select an item in the column on the left, you see only a partition tab when you select a disk, such as the 750.16GB Hitachi and 500.11GB Seagate drives inFigure 19-3.
Be careful here. While some adjustments can be made to partitions without loss of data, not all adjustments can. You’ll be warned if what you’re about to do will permanently erase your data, but I thought I’d give you fair warning first.
Of partitions and volumes
Partitioning a drive lets you create multiple volumes. A volume is a storage space that (from the Mac’s point of view) looks and acts just like a hard drive; a partition is simply a designated volume on a drive, completely separate from all other partitions (volumes). You can create any number of partitions, but it’s a good idea to limit yourself to no more than a small handful.
You can create drive partitions only on a newly formatted drive. So to partition a drive, first format it in Drive Setup and then create partitions. Before you do that, give some thought to how large a partition you want to create. You won’t be able to change your mind about it later.
By the same token, it’s absolutely not necessary to use partitions unless you’re running Boot Camp. Many users never partition a hard drive and get along just fine. If you do choose to partition, you should probably limit the number of partitions you create. An iMac with a 500GB drive will do just fine with one or two (or maybe three) partitions; there’s no need to create more.
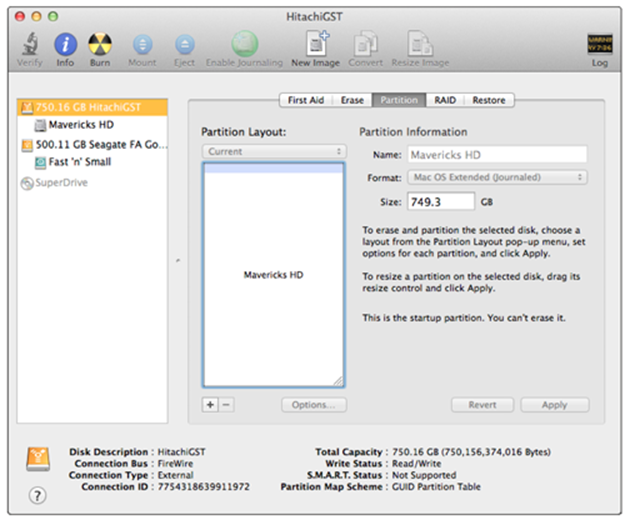
Figure 19-3: Select a disk (750GB Hitachi or 500GB Seagate), and the Partition tab makes itself available.
By the way, you won’t see a Partition tab if you select a volume or partition — Fast ’n’ Small and Mavericks HD in Figure 19-3, instead of a disk (750GB Hitachi or 500GB Seagate in Figure 19-3). Makes sense when you think about it.
RAID tab
By using Redundant Array of Individual (or Independent) Disks (RAID), you can treat multiple disks as a single volume, which is sort of the opposite of partitioning.
Restore tab
Use the Restore tab to restore your Mac to factory-fresh condition from a CD-ROM or disk-image file. In most cases, you install new software on your Mac from the Mac App Store, a CD or DVD, or the Internet. Software vendors typically use an installer program that decompresses and copies files to their proper places on your hard drive. After you’ve installed the software, you’re back in business.
Apple’s variation on this theme is a humongous file called the disk image — everything you’d normally find on a disk, without the disk. These days, more developers are adopting the disk-image format for their downloadable installers and updaters. When mounted on your Desktop (more on what mounting means in a minute), a disk image looks and acts just like a real disk. You can open it and see its contents in a Finder window, copy files from its window to another disk, drag it to the Eject button to remove it from your Desktop — go wild. To make a disk image appear on your Desktop, you double-click the image file. At that point, the Disk Utility application takes over and puts an icon (which for all intents and purposes looks like a disk) on your Desktop.
Disk Utility not only mounts images when you double-click them but also lets you create your own disk-image files and burn them onto CD-Rs and DVD-Rs.
Because you can transfer disk images via the Internet — and because they act just like disks — they’re great substitutes for CD-ROMs and other disk-based software installers. A software maker can create both a CD version of an installer and a disk image that can be downloaded.
By the way, you find out more about Disk Utility (mostly how to use it for troubleshooting) in Chapter 20.
Grab
 Want to take a picture of your screen? You can use Grab to take a picture of all or part of the screen and save that file for printing or sending around (say, to all your screaming fans who want to see your Desktop pattern or how you’ve organized your windows).
Grab’s best feature is its capability to do a timed screen capture. Like those cameras that let you start the timer and then run to get into the shot, Grab gives you ten seconds to bring the window you want to the front, pull down a menu, and get the cursor out of the way or whatever you need to do to get the screen just right.
Grab’s default behavior is to display no cursor. If you want to show a cursor in your screen shots, choose Grab⇒Preferences and then select a pointer from the ten choices in the Preferences window. To have no cursor, click the topmost, leftmost item, which is an empty box that indicates no cursor.
Grapher
 Grapher is a venerable piece of eye candy that shows off your CPU’s computational power. A quick, visual math instructor, Grapher can graph equations in two or three dimensions and speaks hexadecimal, octal, base ten (decimal), and binary to boot. You can even graph curves, surfaces, inequalities, differential equations, discrete series, and vector and scalar fields . . . whatever that means. (I found all that information in Apple Help.)
Keychain Access
 A keychain is a way to consolidate your passwords — the one you use to log in to your Mac, your e-mail password, and passwords required by any websites. Here’s how it works: You use a single password to unlock your keychain (which holds your various passwords), and then you don’t have to remember all your other passwords. Rest assured that your passwords are secure because only a user who has your keychain password can reach the other password-protected applications.
The Keychain Access utility is particularly cool if you have multiple e-mail accounts and each one has a different password. Just add them all to your keychain, and you can get all your mail at the same time with one password.
A special “master” keychain called the Login Keychain is created automatically for every OS X Mavericks user.
Here’s how to add passwords to your login keychain:
![]() To add passwords for applications, just open Mail or another application that supports the keychain. When the program asks for your password, supply it and choose Yes to add the password to the keychain.
To add passwords for applications, just open Mail or another application that supports the keychain. When the program asks for your password, supply it and choose Yes to add the password to the keychain.
How do you know which programs support the Keychain Access utility? You don’t until you’re prompted to save your password in a keychain in that Open dialog, connect window, or so forth. If a program supports Keychain Access, it offers a check box for it in the user ID/password dialog or window.
![]() To add a website password to a keychain, open the Keychain Access application and click the Password button. In the New Password Item window that opens, type the URL of the page (or copy and paste it) in the Keychain Item Name text field, type your username in the Account Name field, and then type your password in the Password text field, as shown in Figure 19-4.
To add a website password to a keychain, open the Keychain Access application and click the Password button. In the New Password Item window that opens, type the URL of the page (or copy and paste it) in the Keychain Item Name text field, type your username in the Account Name field, and then type your password in the Password text field, as shown in Figure 19-4.
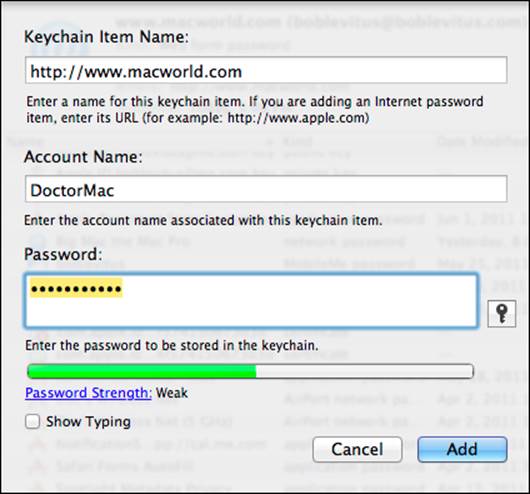
Figure 19-4: Add a URL to the keychain manually by using Keychain Access.
To use the new URL password, use Safari to open the URL. If the account name and password aren’t filled in for you automatically, choose Edit⇒AutoFill Form (![]() +Shift+A), and they will be. Now just click the appropriate button on the web page to log in.
+Shift+A), and they will be. Now just click the appropriate button on the web page to log in.
If you select the User Names and Passwords check box on the AutoFill tab of Safari’s Preferences window (Safari⇒Preferences or ![]() +,), you don’t have to add sites, accounts, or passwords manually. Instead, the first time you visit a site that requires an account name and password, when you log in, Safari asks whether you would like to save your password, as shown in Figure 19-5.
+,), you don’t have to add sites, accounts, or passwords manually. Instead, the first time you visit a site that requires an account name and password, when you log in, Safari asks whether you would like to save your password, as shown in Figure 19-5.
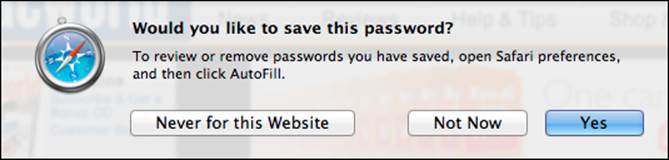
Figure 19-5: The easy way to add to your keychain in Safari.
 iCloud syncing is a great new Mavericks feature that makes keychains even better. Turn it on (System Preferences⇒iCloud) and your passwords will be securely synced to (and from) all of your Apple devices.
Migration Assistant
 Migration Assistant is pretty much a one-trick pony, but that pony is a prize winner. You use the Migration Assistant to transfer your account and other user information from another Mac or another volume on the current Mac to this one. You need to authenticate as an administrator to use it, but it’s a pretty handy way to transfer an account without having to re-create all the preferences and other settings. When you first installed Mavericks (or when you booted your nice, new Mavericks-based Mac for the first time), the setup utility asked you whether you wanted to transfer your information from another Mac. If you answered in the affirmative, it ran the Migration Assistant.
It's not just for new Mavericks. You can launch this one-trick-pony anytime to transfer all or some user accounts, applications, settings, and files from another Mac or PC to this one. Or use it after replacing a hard drive or reinstalling OS X (see the Appendix). Download the Appendix from www.dummies.com/downloads/osxmavericks. Last but not least, Migration Assistant can import user accounts, applications, settings, and files from Windows PCs as well as from Macs.
System Information
 System Information (the App Formerly Known as System Profiler) is a little program that is launched when you click the More Info button in the About This Mac window (
![]() ⇒About This Mac). It provides information about your Mac. (What a concept!) If you’re curious about arcane questions such as what processor your Mac has or what devices are stashed inside it or are connected to it, give this baby a try. Click various items in the Contents list on the left side of the window, and information about the item appears on the right side of the window. Feel free to poke around this little puppy as much as you like; it’s benign and can’t hurt anything.
⇒About This Mac). It provides information about your Mac. (What a concept!) If you’re curious about arcane questions such as what processor your Mac has or what devices are stashed inside it or are connected to it, give this baby a try. Click various items in the Contents list on the left side of the window, and information about the item appears on the right side of the window. Feel free to poke around this little puppy as much as you like; it’s benign and can’t hurt anything.
If you ever have occasion to call for technical support for your Mac, software, or peripherals, you’re probably going to be asked to provide information from System Information, so don’t get rid of it just because you don’t care about this kind of stuff.
Terminal
 OS X is based on Unix. If you need proof — or if you actually want to operate your Mac as the Unix machine that it is — Terminal is the place to start.
Because Unix is a command-line-based operating system, you use Terminal to type your commands. You can issue commands that show a directory listing, copy and move files, search for filenames or contents, or establish or change passwords. In short, if you know what you’re doing, you can do everything on the command line that you can do in OS X. For most folks, that’s not a desirable alternative to the windows and icons of the Finder window. But take my word for it; true geeks who are also Mac lovers get all misty-eyed about the combination of a command lineand a graphical user interface.
You can wreak havoc upon your poor operating system with Terminal. You can harm your Mavericks in many ways that just aren’t possible using mere windows and icons and clicks. So — before you type a single command in Terminal — think seriously about what I just said. And if you’re not 100 percent certain about the command you’ve just typed, don’t even think about pressing Return or Enter.
![]()
All materials on the site are licensed Creative Commons Attribution-Sharealike 3.0 Unported CC BY-SA 3.0 & GNU Free Documentation License (GFDL)
If you are the copyright holder of any material contained on our site and intend to remove it, please contact our site administrator for approval.
© 2016-2026 All site design rights belong to S.Y.A.