OS X Mavericks For Dummies (2014)
Part V. The Care and Feeding of Your Mavericks
Chapter 20. Troubleshooting OS X
In This Chapter
![]() Facing the ol’ “My Mac Won’t Boot” blues
Facing the ol’ “My Mac Won’t Boot” blues
![]() Dealing with the prohibitory sign
Dealing with the prohibitory sign
![]() Recovering from startup crashes
Recovering from startup crashes
As a bleeding-edge Mac enthusiast with over a quarter century of Mac experience under my belt, I’ve had more than my share of Mac troubles. Over those years, I’ve developed an arsenal of mostly surefire tips and tricks that I believe can resolve more than 90 percent of Mac issues without a trip to the repair shop.
Alas, if your hardware is dead, then, sadly, neither you nor I can do anything about it because it is now a job for your friendly Mac repairman — and your fat checkbook or high-limit credit card. But if your hardware is okay, you have a fighting chance of using the suggestions in this chapter to get your machine up and running.
About Startup Disks and Booting
Although you usually see a stylish Apple logo when you turn on your computer, once in a blue moon, you may not. You may instead see a solid blue screen, a solid gray screen, a solid black screen, or something else entirely, as described in the next section.
The point is that your Mac isn’t starting up as it should. When this happens, it usually indicates that something bad has happened to your Mac. Sometimes, it’s a hardware component that has bitten the dust; at other times, OS X itself has somehow been damaged.
Rest assured that these occurrences are rather uncommon — many Macs and Mac users go an entire lifetime without seeing one. If you ever have a Mac that won’t boot, don’t despair. Before you declare your Mac terminally ill, try out the advice in this chapter.
Finding or creating a startup disk
 When I talk about booting, I mean using a particular disk or disk partition as your startup disk.
With Mavericks, however, because there is no bootable DVD, the Installer creates a bootable partition named Recovery HD on that disk when you first install Mavericks.
 For the entire history of OS X, I’ve advised my readers to keep their OS X installation disc close at hand . . . the one that came in the boxed retail copy they bought. At the time I’m writing this chapter, I can’t repeat that advice for Mavericks. Apple has announced that only App Store purchases will be available for people upgrading to Mavericks. In other words, unless Apple changes its policy between now and the time you read this, you won’t have a Mavericks Install DVD from which to work. So whatever else you do, make backup copies of the Mavericks Installer file that you receive from the App Store. The lack of a bootable installer disc solution should do wonders for the sale of external hard drives and high-capacity flash drives.
 Explaining how to create a bootable recovery disk is beyond the purview of this book, but I hope you’ll take it upon yourself to figure it out and make one. The Recovery HD partition is a good concept, but if your hard disk dies, the Recovery HD partition dies, too. Which is why I recommend making a bootable clone of your startup disk as soon as possible, just in case.
 Apple offers a free program called Recovery Disk Assistant (http://support.apple.com/kb/DL1433), which can create a bootable Mavericks installer disk for you. Another option is Carbon Copy Cloner (www.bombich.com), a donationware app that lets you create a clone of your boot disk with a minimum of fuss. Or try my favorite, "SuperDuper!" (shareware from www.shirt-pocket.com); just add a hard disk as large as or larger than your boot disk, and you'll be good to go.
They call it a prohibitory sign for a reason
When you turn on your Mac, the first thing it does (after the hardware tests) is check for a startup disk that has OS X on it. If your system doesn’t find such a disk on your internal hard drive, it begins looking elsewhere — on a FireWire, Thunderbolt, Universal Serial Bus (USB) disk or thumb drive, or on DVD.
If you have more than one startup disk attached to your Mac, as many users do, you can choose which one your Mac boots from in the Startup Disk System Preference pane.
At this point, your Mac usually finds your hard drive, which contains your operating system, and the startup process continues on its merry way with the subtle Apple logo and all the rest. If your Mac can’t find your hard drive (or doesn’t find on it what it needs to boot OS X), you encounter the dreaded prohibitory sign. Think of the prohibitory sign as your Mac’s way of saying, “Please provide me a startup disk.”
If Apple can figure out a way to put a prohibitory sign on the screen, why the heck can’t the software engineers find a way to put the words I need a startup disk on the screen as well? The curtness of these icons is one of my pet peeves about the Macintosh. I know — you’re clever and smart (because, of course, you’re smart enough to be reading OS X Mavericks For Dummies), so you know that a prohibitory sign means you should insert a startup disk. But what about everyone else?
If you encounter any of these warning icons, shown in Figure 20-1, go through the steps I outline later in this chapter. You can try different options, such as using Disk Tools and First Aid, zapping the parameter RAM (PRAM), and performing a Safe Boot. Try them in the order listed, starting with Step 1. Then, if one doesn’t work, move on to the next.
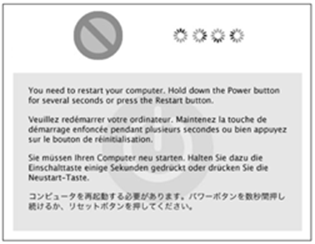
Figure 20-1: Any of these means it’s troubleshooting time.
Recovering with Recovery HD
If you see a prohibitory sign (top left in Figure 20-1), spinning-disc cursor (top right), or kernel panic alert (the text in six languages that appears below the other two images) that doesn’t go away when you start up your Mac, the first thing to do is attempt to repair hidden damage to your hard drive with the Disk Utility program’s First Aid feature. And to do that, you’ll have to boot from the Recovery HD partition. That’s because you can’t run Disk Utility’s First Aid feature on the current startup disk.
To start up from this magical disk (actually, a disk partition), here’s what to do:
1. Restart your Mac.
2. Press and hold ![]() +R until you see the Apple logo.
+R until you see the Apple logo.
If your Mac doesn’t boot from the Recovery HD after Step 2, hold down the Option key while booting to display the built-in Startup Manager (see Figure 20-2).
If you press Option after the startup chime instead of ![]() +R, the built-in Startup Manager appears. From this screen, you can click the Recovery HD icon (see Figure 20-2), and then click the arrow below it or press Enter or Return to boot from it. Or, if you’re going to boot from a disk other than the Recovery HD, you can select it here.
+R, the built-in Startup Manager appears. From this screen, you can click the Recovery HD icon (see Figure 20-2), and then click the arrow below it or press Enter or Return to boot from it. Or, if you’re going to boot from a disk other than the Recovery HD, you can select it here.
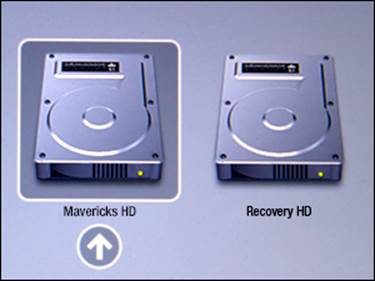
Figure 20-2: The built-in Startup Manager.
Pressing Option during startup displays icons for all bootable volumes it sees and allows you to select one (including the Recovery HD partition).
Click the disk you want to start up from (Mavericks HD in Figure 20-2), and then click the arrow below it or press Return or Enter to start up your Mac from it.
This technique is quite useful if your usual startup disk is damaged or having an identity crisis during startup and the ![]() +R trick isn’t working to boot from the Recovery HD partition.
+R trick isn’t working to boot from the Recovery HD partition.
If you can boot from the Recovery HD partition (or an external startup drive, clone, DVD-ROM, or other disk): If you see the OS X Utilities window after booting from the Recovery HD partition, hope flickers for your Mac. The fact that you can boot from another volume indicates that the problem lies in one of two places: your startup volume and/or the OS X installation on that volume.
Regardless of what the cause is, your Mac will probably respond to one of the techniques I discuss throughout the rest of this chapter.
Please skip to Step 1.
If you can’t boot from the Recovery HD partition (or an external startup drive, clone, DVD-ROM, or other disk): If you can’t get your Mac to boot from the Recovery HD partition or another bootable disk, please skip to Step 5.
Step 1: Run First Aid
In most cases, after you’ve booted successfully from the Recovery HD or another bootable disk, the first logical troubleshooting step is to use the First Aid option in the Disk Utility application.
 Every drive has several strangely named components such as B-trees, extent files, catalog files, and other creatively named invisible files. They’re all involved in managing the data on your drives. Disk Utility’s First Aid feature checks all those files and repairs the damaged ones.
One last thing: If you booted from a disk other than the Recovery HD partition, you’ll have to find and launch Disk Utility on that disk before you can follow these instructions.
1. Boot from the Recovery HD volume by restarting your Mac while pressing the ![]() and R keys.
and R keys.
The OS X Utilities window appears.
2. Select Disk Utility and click Continue.
3. When the Disk Utility window appears, click the First Aid tab to select that function of Disk Utility.
4. Click the icon for your boot hard drive at the left of the Disk Utility window.
Your boot drive is the one with OS X and your Home folder on it; mine is called Mavericks HD.
5. Click the Repair Disk button.
Your Mac whirs and hums for a few minutes, and the results window tells you what’s going on. Ultimately, First Aid tells you (you hope) that the drive has been repaired and is now okay. If so, go back to work.
6. Quit Disk Utility by choosing Disk Utility⇒Quit Disk Utility, by pressing ![]() +Q, or by clicking the red Close Window gumdrop.
+Q, or by clicking the red Close Window gumdrop.
7. Reboot without holding any keys down.
If First Aid finds damage that it can’t fix, a commercial disk-recovery tool, such as Alsoft’s DiskWarrior (my personal favorite) or Prosoft’s also-excellent Drive Genius 3, may be able to repair the damage. And even if First Aid gave you a clean bill of health, you may want to run DiskWarrior or another third-party utility anyway, just to have a second opinion. Make sure you’re running a current version; older versions may not be compatible with OS X Mavericks boot disks.
DiskWarrior has resurrected more dead and dying hard drives for me than any other disk-repair utility I’ve ever tried — more than all of them combined. If you’re going to buy only one utility, make sure that it’s DiskWarrior. It’s almost like magic.
If everything checks out with First Aid, restart and try to boot from your hard drive again. If you still get the prohibitory sign, proceed to the next section to try a dance called booting into Safe Mode.
Step 2: Safe Boot into Safe Mode
Booting your Mac in Safe Mode may help you resolve your startup issue by not loading nonessential (and non–OS X) software at boot time. You do it by holding down the Shift key during startup.
If your Mac is set up so you don’t have to log in, keep pressing the Shift key until the Finder loads completely. If you do log in to your Mac, type your password as usual, but before clicking the Log In button, press the Shift key again and hold it until the Finder loads completely.
You know you held the Shift key long enough if your Login Items don’t load (assuming that you have Login Items; you can designate them in the Users & Groups System Preferences pane, although some programs create them for you).
Booting in Safe Mode does three things to help you with troubleshooting:
![]() It forces a directory check of the startup (boot) volume.
It forces a directory check of the startup (boot) volume.
![]() It loads only required kernel extensions (some of the items in /System/Library/Extensions).
It loads only required kernel extensions (some of the items in /System/Library/Extensions).
![]() It runs only Apple-installed essential startup items (some of the items in /Library/StartupItems and /System/Library/StartupItems). Note that the Startup Items in the Library folders are different from the Login Items in the Users & Groups System Preferences pane. Startup Items run at boot time before the login window even appears; Login Items don't run until after you've logged into your user account.
It runs only Apple-installed essential startup items (some of the items in /Library/StartupItems and /System/Library/StartupItems). Note that the Startup Items in the Library folders are different from the Login Items in the Users & Groups System Preferences pane. Startup Items run at boot time before the login window even appears; Login Items don't run until after you've logged into your user account.
Taken together, these changes often work around issues caused by software or directory damage on the startup volume.
Some features don’t work in Safe Mode. Among them are DVD Player, capturing video (in iMovie or other video-editing software), using an AirPort card, using some audio input or output devices, and using a USB modem. Use Safe Mode only if you need to troubleshoot a startup issue.
If your Mac boots in Safe Mode, you may be able to determine what's causing the issue by moving the contents of your Preferences folder (in Home/Library, which you can make visible by pressing the Option key when opening the Go menu) to the Desktop temporarily or by disabling Login Items (in the Users & Groups System Preference pane). If either of these things resolves the issue, you can put preferences files back in Home/Library/Preferences a few at a time, or you can re-enable login items one at a time until you figure out which preferences file or login item is causing your problems. If your Mac still has problems, try Step 3.
Step 3: Zapping the PRAM/NVRAM
Sometimes your parameter RAM (PRAM) or Non-Volatile RAM (NVRAM) becomes scrambled and needs to be reset. Both of these are small pieces of memory that aren’t erased or forgotten when you shut down. They keep track of things such as
![]() Time-zone setting
Time-zone setting
![]() Startup volume choice
Startup volume choice
![]() Speaker volume
Speaker volume
![]() Any recent kernel-panic information
Any recent kernel-panic information
![]() DVD region setting
DVD region setting
To reset (a process often called zapping) your PRAM/NVRAM, restart your Mac and press ![]() +Option+P+R (that’s four keys — good luck; it’s okay to use your nose) until your Mac restarts itself. It’s kind of like a hiccup. You might see the spinning-disc cursor for a minute or two while your Mac thinks about it — then the icon disappears, and your Mac chimes again and restarts. Most power users believe you should zap it more than once, letting it chime two, three, or even four times before releasing the keys and allowing the startup process to proceed.
+Option+P+R (that’s four keys — good luck; it’s okay to use your nose) until your Mac restarts itself. It’s kind of like a hiccup. You might see the spinning-disc cursor for a minute or two while your Mac thinks about it — then the icon disappears, and your Mac chimes again and restarts. Most power users believe you should zap it more than once, letting it chime two, three, or even four times before releasing the keys and allowing the startup process to proceed.
Now restart your Mac without holding down any keys. If the PRAM/NVRAM zap didn’t fix your Mac, move on to “Step 4: Reinstalling OS X.”
Remember that your chosen startup disk, time zone, and sound volume are reset to their default values when you zap your PRAM. So after zapping, open the System Preferences application to reselect your usual startup disk and time zone, and set the sound volume the way you like it.
Unlike previous versions of the Mac OS, OS X doesn’t store display or network settings in PRAM. If you’re having problems with video or networking, resetting PRAM probably won’t help.
Step 4: Reinstalling OS X
I present the procedure to reinstall the system software as a second-to-last resort when your Mac won't boot correctly because it takes the longest and is the biggest hassle. I detail this procedure at length in the Appendix. Download the Appendix fromwww.dummies.com/downloads/osxmavericks.
Read the Appendix, and follow the instructions. If you’re still unsuccessful after that point, you have no choice but to consider Step 5. . . .
Step 5: Things to try before taking your Mac in for repair
To get your Mac up and running again, you can try any of the following:
![]() Call the tech-support hotline. Before you drag it down to the shop, try calling 1-800-SOS-APPL, the Apple Tech Support hotline. The service representatives there may be able to suggest something else that you can try. If your Mac is still under warranty, it’s even free.
Call the tech-support hotline. Before you drag it down to the shop, try calling 1-800-SOS-APPL, the Apple Tech Support hotline. The service representatives there may be able to suggest something else that you can try. If your Mac is still under warranty, it’s even free.
![]() Ask a local user group for help. Another thing you might consider is contacting your local Macintosh user group. You can find a group of Mac users near you by visiting Apple's User Group web pages at www.apple.com/usergroups.
Ask a local user group for help. Another thing you might consider is contacting your local Macintosh user group. You can find a group of Mac users near you by visiting Apple's User Group web pages at www.apple.com/usergroups.
![]() Try Dr. Mac Consulting. Shameless plug alert! You can check out my consulting services at www.boblevitus.com or call 408-627-7577. My team of expert troubleshooters does nothing but provide technical help and training to Mac users, via telephone, e-mail, and/or our unique Internet-enabled remote-control software, which allows us to see and control your Mac no matter where in the world you are. Best of all, if we don't fix it, you pay nothing!
Try Dr. Mac Consulting. Shameless plug alert! You can check out my consulting services at www.boblevitus.com or call 408-627-7577. My team of expert troubleshooters does nothing but provide technical help and training to Mac users, via telephone, e-mail, and/or our unique Internet-enabled remote-control software, which allows us to see and control your Mac no matter where in the world you are. Best of all, if we don't fix it, you pay nothing!
![]() Check whether you have RAM issues. Here’s a common problem: If you have problems immediately after installing random-access memory (RAM) — or any new hardware, for that matter — double-check that the RAM chips are properly seated in their sockets. (Warning: Don’t forget to shut down your Mac first.) With the power off and your Mac unplugged, remove and reinsert the RAM chips to make sure they’re seated properly. If you still have problems, remove the RAM chips temporarily and see whether the problem still exists.
Check whether you have RAM issues. Here’s a common problem: If you have problems immediately after installing random-access memory (RAM) — or any new hardware, for that matter — double-check that the RAM chips are properly seated in their sockets. (Warning: Don’t forget to shut down your Mac first.) With the power off and your Mac unplugged, remove and reinsert the RAM chips to make sure they’re seated properly. If you still have problems, remove the RAM chips temporarily and see whether the problem still exists.
Follow the installation instructions that came with the RAM chips — or the ones in the booklet that came with your Mac. But even if they don’t say to get rid of the static spark, you should — either by using an antistatic strap (available from most RAM sellers) or by touching an appropriate surface (such as the power-supply case inside your Mac) before you handle RAM chips.
If none of my suggestions works for you, and you’re still seeing anything you shouldn’t when you start up your Mac, you have big trouble. You could have any one of the following problems:
![]() Your hard drive is dead.
Your hard drive is dead.
![]() You have some other type of hardware failure.
You have some other type of hardware failure.
![]() All your startup disks and your system software DVDs are defective (unlikely).
All your startup disks and your system software DVDs are defective (unlikely).
The bottom line: If you still can’t start up normally after trying all the cures I list in this chapter, you almost certainly need to have your Mac serviced by a qualified technician.
If Your Mac Crashes at Startup
Startup crashes are another bad thing that can happen to your Mac. These crashes can be more of a hassle to resolve than prohibitory-sign problems, but they are rarely fatal.
You know that a crash has happened when you see a Quit Unexpectedly dialog, a frozen cursor, a frozen screen, or any other disabling event. A startup crash happens when your system shows a crash symptom any time between the moment you flick the power key or switch (or restarting) and the moment you have full use of the Desktop.
Try all the steps in the previous sections before you panic. The easiest way to fix startup crashes (in most cases) is to just reinstall OS X from the Recovery HD partition. I detail this procedure at great length in the Appendix. Read the Appendix, and follow the instructions. If you’re still unsuccessful after that point, come back and reread the “Step 5: Things to try before taking your Mac in for repair” section.
All materials on the site are licensed Creative Commons Attribution-Sharealike 3.0 Unported CC BY-SA 3.0 & GNU Free Documentation License (GFDL)
If you are the copyright holder of any material contained on our site and intend to remove it, please contact our site administrator for approval.
© 2016-2026 All site design rights belong to S.Y.A.