OS X Mavericks For Dummies (2014)
Part I. Getting Started with OS X Mavericks
Chapter 2. The Desktop and Windows and Menus (Oh My!)
In This Chapter
![]() Checking out the parts of a window
Checking out the parts of a window
![]() Dealing with dealie-boppers in windows
Dealing with dealie-boppers in windows
![]() Resizing, moving, and closing windows
Resizing, moving, and closing windows
![]() Getting comfortable with menu basics
Getting comfortable with menu basics
This chapter introduces important features of OS X, starting with the first things you see when you log in: the Finder and its Desktop. After a quick look around the Desktop, you get a look into two of its most useful features: windows and menus.
Windows are (and have always been) an integral part of Macintosh computing. Windows in the Finder (or, as a PC user would say, “on the Desktop”) show you the contents of the hard drive, optical drive, flash (thumb) drive, network drive, disk image, and folder icons; windows in applications do many things. The point is that windows are part of what makes your Mac a Mac; knowing how they work — and how to use them — is essential.
Menus are another quintessential part of the Macintosh experience. The latter part of this chapter starts you out with a few menu basics. As needed, I direct you to other parts of the book for greater detail. So relax and don’t worry. By the end of this chapter, you’ll be ready to work with windows and menus in any application that uses them (and most applications, games excluded, do).
Touring the Finder and Its Desktop
The Finder is the program that creates the Desktop, keeps track of your files and folders, and is always running. Just about everything you do on your Mac begins and ends with the Finder. It’s where you manage files, store documents, launch programs, and much more. If you ever expect to master your Mac, the first step is to master the Finder and its Desktop. Check out the default Mac Finder and Desktop for OS X Mavericks in Figure 2-1.

Figure 2-1: The default Mavericks Finder and Desktop.
The Finder is the center of your Mac OS experience, so before I go any further, here’s a quick description of its most prominent features:
![]() Desktop: The Desktop is the area behind the windows and the Dock. In Mavericks, it looks like a wave (which I assume is breaking on OS X Mavericks namesake beach in Northern California). It’s also where your hard-drive icon (ordinarily) lives, though if you bought a new Mac with Mavericks preinstalled, there won’t be any icons at all.
Desktop: The Desktop is the area behind the windows and the Dock. In Mavericks, it looks like a wave (which I assume is breaking on OS X Mavericks namesake beach in Northern California). It’s also where your hard-drive icon (ordinarily) lives, though if you bought a new Mac with Mavericks preinstalled, there won’t be any icons at all.
 If you don’t see your disk icon(s) and you’re old-school like me and prefer to always see them on the Desktop, never fear — you’ll learn how to enable this behavior in Chapter 5.
The Desktop isn’t a window, yet it acts like one. Like a folder window or disk window, the Desktop can contain icons. But unlike most windows, which require a bit of navigation to get to, the Desktop is a great place for things you use a lot, such as folders, applications, or particular documents.
 Some folks use the terms Desktop and Finder interchangeably to refer to the total Macintosh environment you see after you log in — the icons, windows, menus, and all that other cool stuff. Just to make things confusing, the background you see on your screen — the picture behind your hard-drive icon and your open windows — is also called the Desktop. In this book, I refer to the application you use when the Desktop is showing as the Finder. When I say Desktop, I’m talking about the picture background behind your windows and the Dock, which you can use as a storage place for icons if you want.
To make things even more confusing, the Desktop is a full-screen representation of the icons in the Desktop folder inside your Home folder. Don’t panic — this is all explained in more detail in Chapters 5 and 6.
![]() Dock: The Dock is the Finder’s main navigation shortcut tool. It makes getting to frequently used icons easy, even when you have a screen full of windows. Like the Desktop, the Dock is a great place for the folders, applications, and specific documents you use most. Besides putting your frequently used icons at your fingertips, it’s extremely customizable; read more about it in Chapter 4.
Dock: The Dock is the Finder’s main navigation shortcut tool. It makes getting to frequently used icons easy, even when you have a screen full of windows. Like the Desktop, the Dock is a great place for the folders, applications, and specific documents you use most. Besides putting your frequently used icons at your fingertips, it’s extremely customizable; read more about it in Chapter 4.
![]() Icons: Icons are the little pictures you see in your windows and even on your Desktop. Icons represent the things you work with on your Mac, such as applications (programs), documents, folders, utilities, and more.
Icons: Icons are the little pictures you see in your windows and even on your Desktop. Icons represent the things you work with on your Mac, such as applications (programs), documents, folders, utilities, and more.
![]() Windows: Opening most icons (by double-clicking them) makes a window appear. Windows in the Finder show you the contents of hard-drive and folder icons, and windows in applications usually show you the contents of your documents. In the sections that follow, you can find the full scoop on Mavericks’ windows, which may be different from Mac windows in previous OS releases.
Windows: Opening most icons (by double-clicking them) makes a window appear. Windows in the Finder show you the contents of hard-drive and folder icons, and windows in applications usually show you the contents of your documents. In the sections that follow, you can find the full scoop on Mavericks’ windows, which may be different from Mac windows in previous OS releases.
![]() Menus: Menus let you choose to do things, such as create new folders; duplicate files; cut, copy, or paste text; and so on. I introduce menu basics later in this chapter in the “Menu Basics” section; you find details about working with menus for specific tasks throughout this book.
Menus: Menus let you choose to do things, such as create new folders; duplicate files; cut, copy, or paste text; and so on. I introduce menu basics later in this chapter in the “Menu Basics” section; you find details about working with menus for specific tasks throughout this book.
Whereas this chapter offers a basic introduction to the Finder and Desktop, Chapters 5 and 6 explain in detail how to navigate and manage your files in the Finder. You find out how to use the Finder toolbar, navigate folders and subfolders, and switch among views, among other things. But before you start using the Finder, it helps to know the basics of working with windows and menus; if these Mac features are new to you, I suggest that you read this entire chapter and pay special attention to Chapters 5 and 6 later.
Anatomy of a Window
Windows are a ubiquitous part of using a Mac. When you open a folder, you see a window. When you write a letter, the document that you’re working on appears in a window. When you browse the Internet, web pages appear in a window . . . and so on.
For the most part, windows are windows from program to program. You’ll probably notice that some programs (Adobe Photoshop or Microsoft Word, for example) take liberties with windows by adding features (such as pop-up menus), custom toolbars, or textual information (such as zoom percentage or file size) that may appear around the edges of the document window.
Don’t let it bug you; that extra fluff is just window dressing (pun intended). Maintaining the window metaphor, many information windows display different kinds of information in different panes, or discrete sections within the window.
When you finish this chapter, which focuses exclusively on OS X Finder windows, you’ll know how to use most windows in most applications.
And so, without further ado, the following list gives you a look at the main features of a typical Finder window (as shown in Figure 2-2). I discuss these features in greater detail in later sections of this chapter.
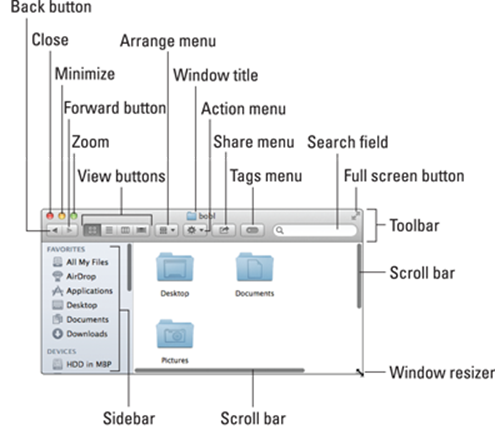
Figure 2-2: A typical Finder window in OS X Mavericks.
If your windows don’t look exactly like the one shown in Figure 2-2, don’t be concerned. You can make your windows look and feel any way you like. As I explain later in the “Working with Windows” section, moving and resizing windows are easy tasks. Chapter 3 explains how to customize certain window features. Chapter 5 focuses on ways you can change a window’s view, specifically when you’re using the Finder.
Meanwhile, here’s what you see (clockwise from top left):
![]() Close, Minimize, and Zoom (gumdrop) buttons: Shut ’em, shrink and place ’em in the Dock, and make ’em grow.
Close, Minimize, and Zoom (gumdrop) buttons: Shut ’em, shrink and place ’em in the Dock, and make ’em grow.
![]() View buttons: Choose among four exciting views of your window: Icon, List, Column, and Cover Flow. Find out more about views in Chapter 5.
View buttons: Choose among four exciting views of your window: Icon, List, Column, and Cover Flow. Find out more about views in Chapter 5.
![]() Arrange menu: Click this little doohickey to arrange this window’s icons by Kind, Application, Date Modified, Date Created, Date Last Opened, Date Added, Size, or Label. Or, of course, by None.
Arrange menu: Click this little doohickey to arrange this window’s icons by Kind, Application, Date Modified, Date Created, Date Last Opened, Date Added, Size, or Label. Or, of course, by None.
![]() Action menu: This button is really a pop-up menu of commands you can apply to currently selected items in the Finder window or on the Desktop. (These are generally the same commands you’d see in the shortcut menu if you right-clicked or Control-clicked the same items.)
Action menu: This button is really a pop-up menu of commands you can apply to currently selected items in the Finder window or on the Desktop. (These are generally the same commands you’d see in the shortcut menu if you right-clicked or Control-clicked the same items.)
![]() Window title: Shows the name of the window.
Window title: Shows the name of the window.
![]() -click the name of the window to see a pop-up menu with the complete path to this folder (try it). This tip applies to most windows you’ll encounter, not just Finder windows. So
-click the name of the window to see a pop-up menu with the complete path to this folder (try it). This tip applies to most windows you’ll encounter, not just Finder windows. So ![]() -click a window’s title, and you’ll usually see the path to its enclosing folder on your disk.
-click a window’s title, and you’ll usually see the path to its enclosing folder on your disk.
You can also have the path displayed at the bottom of every Finder window by choosing View⇒Show Path Bar, as shown in the active window (Applications) if you look ahead to Figure 2-4.
![]() Share menu: Another button that’s actually a menu; click it to share selected files or folders via e-mail, Messages, or AirDrop.
Share menu: Another button that’s actually a menu; click it to share selected files or folders via e-mail, Messages, or AirDrop.
![]()
 Tags menu: Yet another button/menu; click it to assign a tag to the selected files or folders.
![]() Search field: Type a string of characters here, and OS X Mavericks digs into your system to find items that match by filename or document contents (yes, words within documents).
Search field: Type a string of characters here, and OS X Mavericks digs into your system to find items that match by filename or document contents (yes, words within documents).
![]() Full screen button: Click it to expand the window to full screen.
Full screen button: Click it to expand the window to full screen.
![]() Toolbar: Buttons for frequently used commands and actions.
Toolbar: Buttons for frequently used commands and actions.
![]() Scroll bars: Use the scroll bars for moving around a window.
Scroll bars: Use the scroll bars for moving around a window.
![]() Sidebar: Frequently used items live here.
Sidebar: Frequently used items live here.
![]() Window Resizer: This helpful little visual cue appears when you hover over an edge or corner of a window, or over the dividing line between two panes in the same window (the sidebar and main area of Finder windows, for example). If you click a Resizer, you can then drag the edge, corner, or dividing line to resize the window or pane.
Window Resizer: This helpful little visual cue appears when you hover over an edge or corner of a window, or over the dividing line between two panes in the same window (the sidebar and main area of Finder windows, for example). If you click a Resizer, you can then drag the edge, corner, or dividing line to resize the window or pane.
![]() Forward and Back buttons: These buttons take you to the next or previous folder displayed in this particular window.
Forward and Back buttons: These buttons take you to the next or previous folder displayed in this particular window.
If you’re familiar with web browsers, the Forward and Back buttons in the Finder work the same way. The first time you open a window, neither button is active. But as you navigate from folder to folder, these buttons remember your breadcrumb trail so you can quickly traverse backward or forward, window by window. You can even navigate this way from the keyboard by using the shortcuts ![]() +[ for Back and
+[ for Back and ![]() +] for Forward.
+] for Forward.
The Forward and Back buttons remember only the other folders you’ve visited that appear in that open window. If you’ve set a Finder Preference so that a folder always opens in a new window — or if you forced a folder to open in a new window, which I describe in a bit — the Forward and Back buttons won’t work. You have to use the modern, OS X–style window option, which uses a single window, or the buttons are useless.
Kudos to Apple for fixing something I ranted about in earlier editions of this book. In Snow Leopard and earlier releases of OS X, if you hid the toolbar, the Sidebar was also hidden, whether you liked it or not. Conversely, if you wanted to see the toolbar, you’d have to see the Sidebar as well. Mavericks gives you the flexibility to show or hide them independently in its View menu, as you see in Chapter 5.
Top o’ the window to ya!
Take a gander at the top of a window — any window. You see three buttons in the top-left corner and the name of the window in the top center. The three buttons (called gumdrop buttons by some folks because they look like, well, gumdrops) are officially known as Close, Minimize, and Zoom, and their colors (red, yellow, and green, respectively) pop off the screen. Here’s what they do:
![]() Close (red): Click this button to close the window.
Close (red): Click this button to close the window.
![]() Minimize (yellow): Click this button to minimize the window. Clicking Minimize appears to close the window, but instead of making it disappear, Minimize adds an icon for the window to the right side of the Dock.
Minimize (yellow): Click this button to minimize the window. Clicking Minimize appears to close the window, but instead of making it disappear, Minimize adds an icon for the window to the right side of the Dock.
See the section about minimizing windows into application icons in Chapter 4 if a document icon doesn’t appear in your Dock when you minimize its window.
To view the window again, click the Dock icon for the window that you minimized. If the window happens to be a QuickTime movie, the movie continues to play, albeit at postage-stamp size, in its icon in the Dock. (I discuss the Dock in detail in Chapter 4.)
![]() Zoom (green): Click this button to make the window larger or smaller, depending on its current size. If you’re looking at a standard-size window, clicking Zoom usually makes it bigger. (I say usually because if the window is larger than its contents, clicking this button shrinks the window to the smallest size that can completely enclose the contents without scrolling.) Click the Zoom button again to return the window to its previous size.
Zoom (green): Click this button to make the window larger or smaller, depending on its current size. If you’re looking at a standard-size window, clicking Zoom usually makes it bigger. (I say usually because if the window is larger than its contents, clicking this button shrinks the window to the smallest size that can completely enclose the contents without scrolling.) Click the Zoom button again to return the window to its previous size.
A scroll new world
Yet another way to see more of what’s in a window or pane is to scroll through it. Scroll bars appear at the bottom and right sides of any window or pane that contains more stuff — icons, text, pixels, or whatever — than you can see in the window. Figure 2-3, for example, shows two instances of the same window: Dragging the scroll bar on the right side of the front window reveals the items above Dashboard and Dictionary and below Game Center and Image Capture (that is, items that are visible in the expanded window in the background). Dragging the scroll bar on the bottom of the window reveals items to the left and right, such as Font Book, Mail, Launchpad, and Notes.
Simply click and drag a scroll bar to move it up or down or side to side.
 If your scroll bars don’t look exactly like the ones in Figure 2-3 or work as described in the following list, don’t worry. These are System Preferences you can configure to your heart’s desire, but you’ll have to wait until Chapter 3 to find out how.
Here are some ways you can scroll in a window:
![]() Click a scroll bar and drag. The content of the window scrolls proportionally to how far you drag the scroll bar.
Click a scroll bar and drag. The content of the window scrolls proportionally to how far you drag the scroll bar.
![]() Click in the scroll bar area but don’t click the scroll bar itself. The window scrolls either one page up (if you click above the scroll bar) or down (if you click below the scroll bar). You can change a setting in your General System Preference pane to cause the window to scroll proportionally to where you click.
Click in the scroll bar area but don’t click the scroll bar itself. The window scrolls either one page up (if you click above the scroll bar) or down (if you click below the scroll bar). You can change a setting in your General System Preference pane to cause the window to scroll proportionally to where you click.
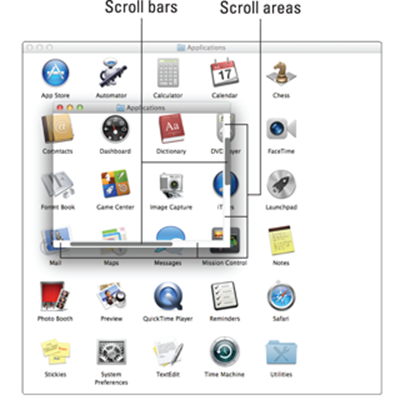
Figure 2-3: The same window twice; in the front window, you use the scroll bars to see the hidden icons that are visible in the back window.
 For what it’s worth, the Page Up and Page Down keys on your keyboard function the same way as clicking the grayish scroll bar area (the vertical scroll bar only) in the Finder and many applications. But these keys don’t work in every program; don’t become too dependent on them. Also, if you’ve purchased a mouse, trackball, or other pointing device that has a scroll wheel, you can scroll vertically in the active (front) window with the scroll wheel or press and hold the Shift key to scroll horizontally. Alas, this horizontal scrolling-with-the-Shift-key works in Finder windows, but not in all applications. For example, it works in Apple’s TextEdit application, but not in Microsoft Word.
![]() Use the keyboard. In the Finder, first click an icon in the window and then use the arrow keys to move up, down, left, or right. Using an arrow key selects the next icon in the direction it indicates — and automatically scrolls the window, if necessary. In other programs, you might or might not be able to use the keyboard to scroll. The best advice I can give you is to try it — either it’ll work or it won’t.
Use the keyboard. In the Finder, first click an icon in the window and then use the arrow keys to move up, down, left, or right. Using an arrow key selects the next icon in the direction it indicates — and automatically scrolls the window, if necessary. In other programs, you might or might not be able to use the keyboard to scroll. The best advice I can give you is to try it — either it’ll work or it won’t.
![]() Use a two-finger swipe (on a trackpad). If you have a notebook with a trackpad or use a Magic Trackpad or Magic Mouse, just move the arrow cursor over the window and then swipe the trackpad with two fingers to scroll.
Use a two-finger swipe (on a trackpad). If you have a notebook with a trackpad or use a Magic Trackpad or Magic Mouse, just move the arrow cursor over the window and then swipe the trackpad with two fingers to scroll.
(Hyper)Active windows
To work within a window, the window must be active. The active window is always the frontmost window, and inactive windows always appear behind the active window. Only one window can be active at a time. To make a window active, click it anywhere — in the middle, on the title bar, or on a scroll bar. It doesn’t matter where; just click anywhere to activate it.
Look at Figure 2-4 for an example of an active window in front of an inactive window (the Applications window and the Utilities window, respectively).

Figure 2-4: An active window in front of an inactive window.
The following is a list of the major visual cues that distinguish active from inactive windows:
![]() The active window’s title bar: The Close, Minimize, and Zoom buttons are red, yellow, and green. The inactive windows’ buttons are not.
The active window’s title bar: The Close, Minimize, and Zoom buttons are red, yellow, and green. The inactive windows’ buttons are not.
This is a nice visual cue — colored items are active, and gray ones are inactive. Better still, if you move your mouse over an inactive window’s gumdrop buttons, they light up in their usual colors so you can close, minimize, or zoom an inactive window without first making it active. Neat!
![]() Other buttons and scroll bars in an active window: They’re bright. In an inactive window, these features are grayed out and more subdued.
Other buttons and scroll bars in an active window: They’re bright. In an inactive window, these features are grayed out and more subdued.
![]() Bigger and darker drop shadows in an active window: They grab your attention more than those of inactive windows and trick your eye into thinking the active window is further away from the background than the inactive one.
Bigger and darker drop shadows in an active window: They grab your attention more than those of inactive windows and trick your eye into thinking the active window is further away from the background than the inactive one.
Dialog Dealie-Boppers
Dialogs are special windows that pop up over the active window. You generally see them when you select a menu item that ends in an ellipsis (. . .).
Dialogs can contain a number of standard Macintosh features (I call them dealie-boppers), such as radio buttons, pop-up menus, tabs, text-entry fields, and check boxes. You see these features again and again in dialogs. Take a moment to look at each of these dealie-boppers in Figure 2-5.
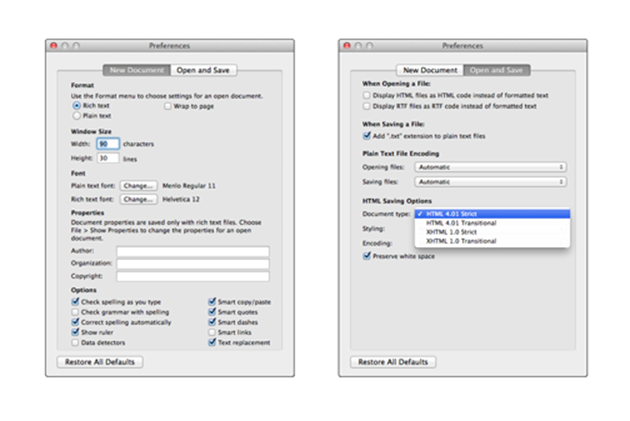
Figure 2-5: This window offers most dealie-boppers you’re ever likely to encounter.
![]() Radio buttons: Radio buttons are so named because, like the buttons on your car radio (if you have a very old car), only one at a time can be active. (When they’re active, they appear to be pushed in, just like the old radio buttons.) Radio buttons always appear in a group of two or more; when you select one, all the others are automatically deselected.
Radio buttons: Radio buttons are so named because, like the buttons on your car radio (if you have a very old car), only one at a time can be active. (When they’re active, they appear to be pushed in, just like the old radio buttons.) Radio buttons always appear in a group of two or more; when you select one, all the others are automatically deselected.
Here’s a nifty and undocumented shortcut: You can usually select check boxes and radio buttons by clicking their names (instead of the buttons or boxes).
![]() Tabs: When a dialog contains more information than can fit in a single window, the info may be divided among panes denoted by tabs. In Figure 2-5, the New Document tab is selected on the left, and the Open and Save tab is selected on the right.
Tabs: When a dialog contains more information than can fit in a single window, the info may be divided among panes denoted by tabs. In Figure 2-5, the New Document tab is selected on the left, and the Open and Save tab is selected on the right.
![]() Pop-up menus: These menus are appropriately named because that’s what they do: They pop up when you click them. In Figure 2-5, the Document Type menu has been clicked and is popped up; the other pop-up menus — Opening Files, Saving Files (mostly obscured by the popped-up Document Type menu), Styling, and Encoding — are unclicked and unpopped.
Pop-up menus: These menus are appropriately named because that’s what they do: They pop up when you click them. In Figure 2-5, the Document Type menu has been clicked and is popped up; the other pop-up menus — Opening Files, Saving Files (mostly obscured by the popped-up Document Type menu), Styling, and Encoding — are unclicked and unpopped.
You can always recognize a pop-up menu because it appears in a slightly rounded rectangle and has a double-ended arrow symbol (or a pair of triangles, if you like) on the right.
Have you figured out yet what radio buttons, tabs, and pop-up menus have in common? Hint: All three enable you to make a single selection from a group of options. (Well, okay, that was more of an answer than a hint.)
![]() Text-entry fields: In text-entry fields, you type text (including numbers) from the keyboard. In Figure 2-5, the Width, Height, Author, Organization, and Copyright options are text-entry fields.
Text-entry fields: In text-entry fields, you type text (including numbers) from the keyboard. In Figure 2-5, the Width, Height, Author, Organization, and Copyright options are text-entry fields.
![]() Check boxes: The last dealie-bopper that you see frequently is the check box. In a group of check boxes, you can select as many options as you like. Check boxes are selected when they contain a check mark, and they’re deselected when they’re empty, as shown in Figure 2-5.
Check boxes: The last dealie-bopper that you see frequently is the check box. In a group of check boxes, you can select as many options as you like. Check boxes are selected when they contain a check mark, and they’re deselected when they’re empty, as shown in Figure 2-5.
 Some applications have tri-state check boxes (and no, I’m not talking geography here). These special check boxes are empty when nothing in the group is selected, sport an X when everything in the group is selected, and sport a minus sign (–) when some items in the group are selected and some are not. This type of check box is often used for the Custom Install screen of OS X installers.
Working with Windows
In the following sections, I give you a closer look at windows themselves: how you move them, size them, and use them. And although Mavericks windows are similar to windows you’ve used in other versions of Mac OS (and even, dare I say it, Windows), you may just discover a new wrinkle or two.
If you’re relatively new to the Mac, you may want to read this section while sitting at your computer, trying the techniques as you read them. You may find it easier to remember something you read if you actually do it. If you’ve been using your Mac for a while, you’ve probably figured out how windows work by now.
Opening and closing windows
To start peering into windows on your Mac, first you need to know how to open and close them. When you’re working in the Finder, you can choose the following commands from the File menu. Note that you’ll probably find similar commands on the File menu of programs other than the Finder.
You’ll use many of these commands frequently, so it would behoove you to memorize the keyboard shortcuts. If you’re not sure how keyboard shortcuts work, check out “Using keyboard shortcut commands,” later in this chapter.
![]() New Finder Window (
New Finder Window (![]() +N): Opens a new Finder window. In other programs,
+N): Opens a new Finder window. In other programs, ![]() +N might open a new document, project, or whatever that program helps you create.
+N might open a new document, project, or whatever that program helps you create.
![]() Open (
Open (![]() +O): Opens the selected item, be it an icon, a window, or a folder.
+O): Opens the selected item, be it an icon, a window, or a folder.
![]() Close Window (
Close Window (![]() +W): Closes the active window. If no windows are open or if no window is selected, the Close Window command is grayed out and can’t be chosen. Or if you prefer, you can close a window by clicking the red Close button in the top-left corner.
+W): Closes the active window. If no windows are open or if no window is selected, the Close Window command is grayed out and can’t be chosen. Or if you prefer, you can close a window by clicking the red Close button in the top-left corner.
 If you hold down the Option key with the File menu open, the Close Window command changes to Close All. This very useful command enables you to close all open Finder windows. But it shows up only when you press the Option key; otherwise, it remains hidden.
Note that several other commands in the File menu transmogrify when you press the Option key. It would be off topic to get into them here, but here’s a tip: Press the Option key, and browse all the Finder menus. At least a dozen useful commands appear only if the Option key is pressed. Press it early and often for hidden (often time-saving) commands.
Resizing windows and window panes
If you want to see more (or less) of what’s in a window, just hover the pointer over any edge or corner and drag. When the cursor turns into a little double-headed arrow, as shown in Figure 2-6, click and drag to resize the window.
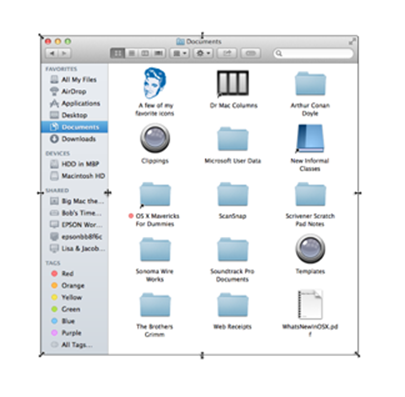
Figure 2-6: Hover over any corner or edge (except the upper-right corner); when the double-headed arrow resizer appears, click and drag to resize the window.
![]() Display windows, like those in the Finder, frequently consist of multiple panes. If you look at Figure 2-6, the line divides the blue Sidebar to the left of it and the actual contents of the window to the right. When your mouse pointer hovers over the resizing area of this bar, the cursor changes to a vertical bar (or it could be horizontal if the panes are one above the other) with little arrows pointing out of both sides, as shown in the margin and Figure 2-6.
Display windows, like those in the Finder, frequently consist of multiple panes. If you look at Figure 2-6, the line divides the blue Sidebar to the left of it and the actual contents of the window to the right. When your mouse pointer hovers over the resizing area of this bar, the cursor changes to a vertical bar (or it could be horizontal if the panes are one above the other) with little arrows pointing out of both sides, as shown in the margin and Figure 2-6.
When you see this cursor, you can click and drag anywhere in the dividing line that separates the Sidebar from the rest of the window. Doing so resizes the two panes relative to each other; one gets larger and one gets smaller.
Moving windows
To move a window, click anywhere in a window’s title bar (or anywhere in the gray part of a display window, except on a button, menu, search field, or scroll bar) and drag the window to wherever you want it. The window moves wherever you move the mouse, stopping dead in its tracks when you release the mouse button.
Shuffling windows
I’ve already spent plenty of pages giving you the scoop on how to work with windows. But wait; there’s more . . . the commands on the Window menu provide tools you can use to manage your windows. (Refer to Figure 2-1.) Here is a brief look at each of the items on the Window menu (and if you’re unfamiliar with menus and keyboard shortcuts, I explain how they work later in this chapter):
![]() Minimize (
Minimize (![]() +M): Use this command to minimize the active Finder window to the Dock and unclutter your Desktop. It’s the same as clicking the yellow gumdrop button.
+M): Use this command to minimize the active Finder window to the Dock and unclutter your Desktop. It’s the same as clicking the yellow gumdrop button.
![]() Zoom: This command does the same thing as the green gumdrop button. If you’ve forgotten what the green gumdrop does already, just turn back a few pages to the “Top o’ the window to ya!” section and read it again.
Zoom: This command does the same thing as the green gumdrop button. If you’ve forgotten what the green gumdrop does already, just turn back a few pages to the “Top o’ the window to ya!” section and read it again.
![]() Cycle Through Windows (
Cycle Through Windows (![]() +`): Each time you choose this command or use the keyboard shortcut for it, a different window becomes active. So if you have three windows — call ’em Window 1, Window 2, and Window 3 — and you’re using Window 1, this command deactivates Window 1 and activates Window 2. If you choose it again, the command deactivates Window 2 and activates Window 3. Choose it one more time, and it deactivates Window 3 and reactivates Window 1.
+`): Each time you choose this command or use the keyboard shortcut for it, a different window becomes active. So if you have three windows — call ’em Window 1, Window 2, and Window 3 — and you’re using Window 1, this command deactivates Window 1 and activates Window 2. If you choose it again, the command deactivates Window 2 and activates Window 3. Choose it one more time, and it deactivates Window 3 and reactivates Window 1.
 The next four commands in the Windows menu help you manage Mavericks’ new Finder window Tabs. If you’re a fan of tabbed browsing (à la Safari), you’ll love tabs even more in a Finder window.
The modern Mavericks way of doing things lets you view multiple folders and disks in a single window, with each folder or disk in its own tab, as shown in Figure 2-7.
Tabbed windows are an ingenious way to cram a lot of information into a little space. I’ve tried a number of third-party utilities that purported to provide tabbed Finder windows, but I’ve never found one that’s reliable and robust enough to continue using. This one, on the other hand, just works.
![]() Show Previous Tab (Ctrl+Shift+Tab): Each time you choose this command or use the keyboard shortcut for it, the previous tab — the one to its left, unless it’s the leftmost tab — becomes active. For example, in Figure 2-7, Documents is the active tab. Use this command, and Applications becomes the active tab. Use it a third time, and Downloads becomes active. Because Downloads is the leftmost tab, if you use this command yet again, it wraps around and Documents becomes the active tab again.
Show Previous Tab (Ctrl+Shift+Tab): Each time you choose this command or use the keyboard shortcut for it, the previous tab — the one to its left, unless it’s the leftmost tab — becomes active. For example, in Figure 2-7, Documents is the active tab. Use this command, and Applications becomes the active tab. Use it a third time, and Downloads becomes active. Because Downloads is the leftmost tab, if you use this command yet again, it wraps around and Documents becomes the active tab again.
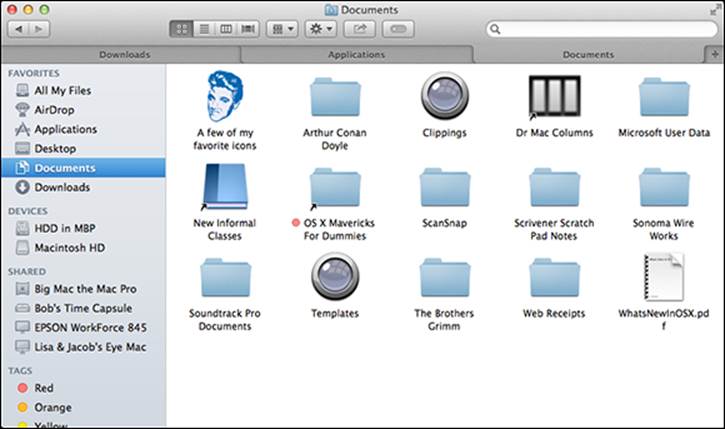
Figure 2-7: I can view the contents of my Downloads, Applications, or Documents folders by merely clicking the appropriate tab.
![]() Show Next Tab (Ctrl+Tab): Same as above except in reverse. Instead of showing the previous tab (the one to the left), this command shows the next tab (the one to the right). Use this command three times in a row (refer to order in Figure 2-7), and you see the Downloads, then the Applications, and finally the Documents tabs again.
Show Next Tab (Ctrl+Tab): Same as above except in reverse. Instead of showing the previous tab (the one to the left), this command shows the next tab (the one to the right). Use this command three times in a row (refer to order in Figure 2-7), and you see the Downloads, then the Applications, and finally the Documents tabs again.
![]() Move Tab to New Window: Does just what it says: Moves the active tab into a new window of its own.
Move Tab to New Window: Does just what it says: Moves the active tab into a new window of its own.
![]() Merge All Windows: Combines all open windows and tabs in one window.
Merge All Windows: Combines all open windows and tabs in one window.
You can click a tab and drag it left or right to change the order. You can also drag and drop a tab from one Finder window to another. The trick is to drag it right onto the tabs in the target window. If you drop it anywhere else, the tab will be displayed in a new window.
![]() Bring All to Front: In OS X Mavericks, windows from different applications interleave. For example, you can have (from front to back) a Finder window, a Microsoft Word window, an Adobe Photoshop window, another Microsoft Word window, and another Finder window. In this example, choosing Bring All to Front while the Finder is the active application enables you to have both of the Finder windows move in front of those belonging to Word and Photoshop.
Bring All to Front: In OS X Mavericks, windows from different applications interleave. For example, you can have (from front to back) a Finder window, a Microsoft Word window, an Adobe Photoshop window, another Microsoft Word window, and another Finder window. In this example, choosing Bring All to Front while the Finder is the active application enables you to have both of the Finder windows move in front of those belonging to Word and Photoshop.
If you want to bring all the windows belonging to the Finder (or any other program, for that matter) to the front at the same time, you can also click the appropriate Dock icon (the Finder, in this case).
If you hold down the Option key when you click the Window menu, Minimize Window changes to Minimize All, and the Zoom command changes to Zoom All.
![]() Other items: The remaining items on the Window menu are the names of all currently open Finder windows (Applications in Figure 2-1). Click a window’s name to bring it to the front.
Other items: The remaining items on the Window menu are the names of all currently open Finder windows (Applications in Figure 2-1). Click a window’s name to bring it to the front.
Menu Basics
Mac menus are often referred to as pull-down menus. To check out the OS X menus, click the Finder button in the Dock to activate the Finder and then look at the top of your screen. From left to right, you see the Apple menu, the Finder menu, and six other menus. To use an OS X menu, click its name to make the menu appear and then pull (drag) down to select a menu item. Piece of cake!
Ever since Mac OS 8, menus stay down after you click their names until you either select an item or click outside a menu’s boundaries.
The ever-changing menu bar
Before you start working with OS X menus, you really, really should know this about menus in general: They can change unexpectedly. Why? Well, the menus you see on the menu bar at the top of the screen always reflect the program that’s active at the time. When you switch from the Finder to a particular program — or from one program to another — the menus change immediately to match whatever program you switched to.
Figure 2-8 shows the menu bars for the Finder, TextEdit, and Preview applications.
An easy way to tell which program is active is to look at the application menu — it’s the leftmost menu with a name, just to the right of the ![]() menu. When you’re in the Finder, of course, the application menu reads Finder. But if you switch to another program (by clicking its icon in the Dock or by clicking any window associated with the program) or launch a new program, that menu changes to the name of the active program.
menu. When you’re in the Finder, of course, the application menu reads Finder. But if you switch to another program (by clicking its icon in the Dock or by clicking any window associated with the program) or launch a new program, that menu changes to the name of the active program.
When you have an application open, the commands on the menu change, too — but just a little bit. What makes this cool is that you have access to some standard application menu items whether you’re running Mail or Safari. For example, most (but not all) applications have Cut, Copy, and Paste commands in their Edit menus, and Open, Save, and Print commands in their File menus. You can find much more about commands for applications in Part III, which explains how applications that come with OS X Mavericks can help you get things you want to do done.
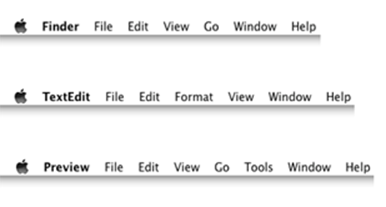
Figure 2-8: Menu bars change to reflect the active application.
Shortcut menus: They’re sooo contextual . . .
Shortcut menus (also known as contextual menus) list commands that apply only to the item that is currently selected. Shortcut menus might be available in windows, on icons, and in most places on the Desktop.
To use them, you either hold down the Control key and click — which you can call a Control-click to sound cool to your Mac friends — or, if your mouse has two or more buttons, right-click.
Most Mac laptops (as well as the Magic Trackpad and the Magic Mouse) let you click the trackpad using two fingers to simulate a right-click or Control-click.
If this doesn’t work for you, make sure the Secondary Click check box is enabled in the Two Fingers section of the Trackpad System Preference pane.
Actions appear in shortcut menus only if they make sense for the item that you Control-click or right-click. (That’s why people call ’em shortcuts! They stick to the immediate context.) Figure 2-9 shows the shortcut menu that appears when you Control-click (or right-click) a document icon on the left and the shortcut menu for the Desktop on the right.
Shortcut menus are also available in most applications. Open your favorite app and try Control-clicking to find out whether those menus are there. In most cases, using a shortcut menu is a quick way to avoid going to the menu bar to choose a command. In some programs — such as iMovie, iTunes, and many more — shortcut menus are the only way to access some commands.
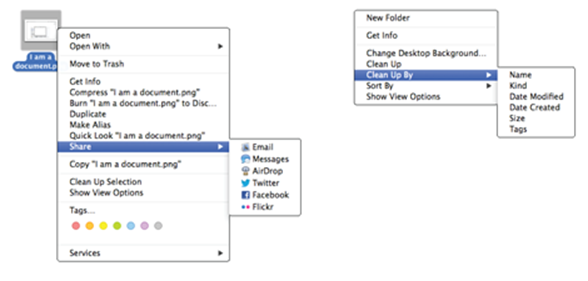
Figure 2-9: Only relevant items appear in a shortcut menu.
To make the Finder-related shortcut menus available to users who didn’t have the foresight to purchase this book, Apple added the Actions button to the toolbar. As a result, people who don’t know about Control-clicking or right-clicking (or have only one free hand) can access most shortcut menus by clicking the Actions button and displaying its shortcut menu. You, on the other hand, gentle reader, know how to get at these commands without having to run your mouse all the way up to the Action button in the toolbar, plus a handful of commands appear in the Control-click/right-click shortcut menu that don’t appear in the Actions button/menu.
I’m a big fan of multibutton mice, and shortcut menus are a huge reason for this preference. Fortunately, Apple now includes multibutton mice with all its desktop computers (except the Mac mini, which doesn’t include a mouse, keyboard, or monitor). You may have to enable it. If you have an older Mac with a single-button mouse, you may want to replace that mouse with one that offers you at least two buttons. With a multibutton mouse, you need only one hand to access these beautiful little shortcut menus.
Get in the habit of Control-clicking (or right-clicking or two-finger clicking) items on your screen. Before you know it, using shortcut menus will become second nature to you.
Recognizing disabled options
Menu items that appear in black on a menu are currently available. Menu items that aren’t currently available are grayed out, meaning that they’re disabled for the time being. You can’t select a disabled menu item.
In Figure 2-10, the File menu on the left is pulled down while nothing is selected in the Finder; this is why many of the menu items are disabled (in gray). These items are disabled because an item (such as a window or icon) must be selected for you to use one of these menu items. For example, the Show Original command is grayed out because it works only if the selected item is an alias. On the right side of Figure 2-10, I selected a document before I pulled down the menu; notice that many of the formerly disabled commands are enabled when an icon is selected. (The Show Original command is still grayed out because the selected icon is not an alias.)
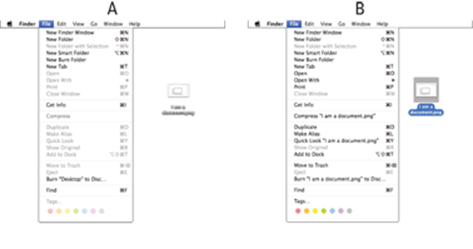
Figure 2-10: File menu with nothing selected (left) and with a document icon selected (right); the disabled items are grayed out.
Finally, notice that items that end in an ellipsis (. . .), such as the Burn “I Am a Document.png” to Disc command in Figure 2-10, will open a dialog with additional options.
Navigating submenus
Some menu items have more menus attached to them, and these are called submenus — menus that are subordinate to a menu item. If a menu has a black triangle to the right of its name, it has a submenu.
To use a submenu, click a menu name once (to drop the menu down) and then slide your cursor down to any item with a black triangle. When the item is highlighted, move your mouse to the right just slightly. The submenu should pop out of the original menu’s item, as shown in Figure 2-11.
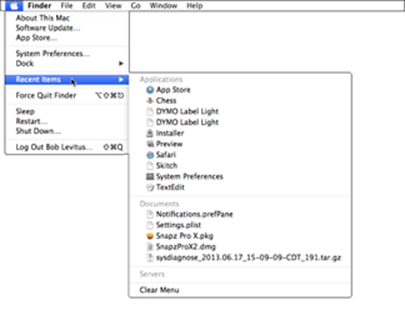
Figure 2-11: The Apple menu’s Recent Items selection, with its submenu popped out.
Underneath the Apple menu tree
On the far-left side of the menu bar sits a little ![]() , which, if you click it, actually displays a menu. No matter what application is active, the
, which, if you click it, actually displays a menu. No matter what application is active, the ![]() menu is always available in the top-left corner of your menu bar.
menu is always available in the top-left corner of your menu bar.
The menu bar is always available, even with apps that hide it in full-screen mode. To make it reappear, move your cursor to the top of the screen, wait a second or two, and watch the menu bar magically reappear.
From top to bottom, the ![]() menu gives you a number of options, including the following:
menu gives you a number of options, including the following:
![]() About This Mac: Choose this item to see what version of OS X you’re running, what kind of Mac and processor you’re using, how much memory your Mac has, and the name of your Startup Disk. The window that appears also sports a Get Info button that will launch the Apple System Information utility; there, you can find out more than you’ll probably ever want or need to know about your Mac’s hardware and software.
About This Mac: Choose this item to see what version of OS X you’re running, what kind of Mac and processor you’re using, how much memory your Mac has, and the name of your Startup Disk. The window that appears also sports a Get Info button that will launch the Apple System Information utility; there, you can find out more than you’ll probably ever want or need to know about your Mac’s hardware and software.
If you click the version number in this window, it changes to the build number (Apple’s internal tracking number for versions). If you click the build number in this window, it changes to the serial number of your Mac. Finally, if you click the serial number of your Mac in this window, it changes to the version number again. This interesting effect is shown in Figure 2-12.
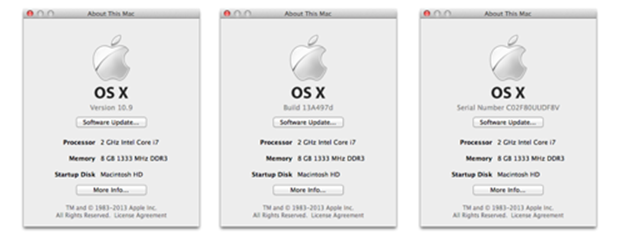
Figure 2-12: Click the Version, Build, or Serial number to cycle through these three informative items in this window.
![]() Software Update: If you’re connected to the Internet, choose this item to have your Mac check with the mothership (Apple) to see whether any updates are available for OS X, its included applications, other Apple-branded applications such as iPhoto, Final Cut Pro, Pages, or even Apple-branded peripheral devices, such as the iPod or iPhone.
Software Update: If you’re connected to the Internet, choose this item to have your Mac check with the mothership (Apple) to see whether any updates are available for OS X, its included applications, other Apple-branded applications such as iPhoto, Final Cut Pro, Pages, or even Apple-branded peripheral devices, such as the iPod or iPhone.
![]() App Store: Choose this item to launch the Mac App Store.
App Store: Choose this item to launch the Mac App Store.
![]() System Preferences: Choose this item to open the System Preferences window (which I discuss further in Chapter 3 and elsewhere).
System Preferences: Choose this item to open the System Preferences window (which I discuss further in Chapter 3 and elsewhere).
![]() Dock (submenu): This lets you mess with options for the Dock. Scour Chapter 4 for more info on the Dock.
Dock (submenu): This lets you mess with options for the Dock. Scour Chapter 4 for more info on the Dock.
![]() Recent Items: This lets you quickly access applications, documents, and servers you’ve used recently, as shown earlier in Figure 2-11.
Recent Items: This lets you quickly access applications, documents, and servers you’ve used recently, as shown earlier in Figure 2-11.
![]() Force Quit: Use this option only in emergencies. What’s an emergency? Use it when an application becomes recalcitrant or otherwise misbehaves or refuses to quit when you say Quit.
Force Quit: Use this option only in emergencies. What’s an emergency? Use it when an application becomes recalcitrant or otherwise misbehaves or refuses to quit when you say Quit.
Memorize the keyboard shortcut for Force Quit (![]() +Option+Power Button). Sometimes a program gets so badly hosed that you can’t click anywhere and other keyboard shortcuts won’t do anything at all. It doesn’t happen often, nor does it happen to everyone. If it should happen to you, calmly press the magic key combo you memorized (
+Option+Power Button). Sometimes a program gets so badly hosed that you can’t click anywhere and other keyboard shortcuts won’t do anything at all. It doesn’t happen often, nor does it happen to everyone. If it should happen to you, calmly press the magic key combo you memorized (![]() +Option+power button), and the Force Quit Applications dialog (usually) appears. Click the name of the program that’s acting up and then click the Force Quit button or press the Return or Enter key to make the balky application stop balking.
+Option+power button), and the Force Quit Applications dialog (usually) appears. Click the name of the program that’s acting up and then click the Force Quit button or press the Return or Enter key to make the balky application stop balking.
 The reason Force Quit should be used only in an emergency is that if you use it on an application that’s working fine and have any unsaved documents, your work since the last time you saved the file will be blown away.
Or not. The Auto Save and Versions features, which first appeared in Lion, are still the default for Apple’s own applications. You’ll hear more about these features in Chapter 6; if the app you’re using supports Auto Save features, you shouldn’t lose any (or at least not much) of your work regardless of when you last saved.
![]() Shut Down options: These four commands do exactly what their names imply:
Shut Down options: These four commands do exactly what their names imply:
• Sleep: Puts your Mac into an energy-efficient state of suspended animation. See the section about Energy Saver in Chapter 17 for details on the Energy Saver System Preference pane and sleeping.
• Restart: Quits all open programs and restarts your Mac. It’s quite polite about this task, asking if you want to save any unsaved changes in open documents before complying.
• Shut Down: Turns off your Mac. Refer to Chapter 1 for details.
• Log Out: Quits all open programs and logs you out. Again, your Mac will be ever so polite, asking if you want to save unsaved changes in open documents before complying. When it’s done, the login screen appears.
Using keyboard shortcut commands
Most menu items, or at least the most common ones, have keyboard shortcuts to help you quickly navigate your Mac without having to haggle so much with the mouse. Using these key combinations activates menu items without using the mouse; to use them, you press the Command (![]() ) key and then press another key (or keys) without releasing the
) key and then press another key (or keys) without releasing the ![]() key. Memorize the shortcuts that you use often.
key. Memorize the shortcuts that you use often.
You’ll learn how to change keyboard shortcuts and even how to create ones of your own, but not until the next chapter (Chapter 3).
Some people refer to the Command key as the Apple key. That’s because on many keyboards that key has both the pretzel-like Command-key symbol (![]() ) and an Apple logo (
) and an Apple logo (![]() ) on it. To avoid confusion, I always refer to
) on it. To avoid confusion, I always refer to ![]() as the Command key.
as the Command key.
Here are five things that will give you a handle on keyboard shortcuts:
![]() Keyboard shortcuts are shown in menus. For example, Figure 2-10 shows that the keyboard shortcut for the Print command appears on the menu after the words Print:
Keyboard shortcuts are shown in menus. For example, Figure 2-10 shows that the keyboard shortcut for the Print command appears on the menu after the words Print: ![]() +P. Any menu item with one of these pretzel-symbol+letter combinations after its name can be executed with that keyboard shortcut. Just hold down the
+P. Any menu item with one of these pretzel-symbol+letter combinations after its name can be executed with that keyboard shortcut. Just hold down the ![]() key and press the letter shown in the menu — N for New Finder Window, F for Find, and so on — and the appropriate command executes.
key and press the letter shown in the menu — N for New Finder Window, F for Find, and so on — and the appropriate command executes.
![]() Capital letters don’t mean that you have to press Shift as part of the shortcut. Although the letters next to the
Capital letters don’t mean that you have to press Shift as part of the shortcut. Although the letters next to the ![]() symbol in the Finder menus are indeed capitals, they just identify the letter on the keyboard. For example, if you see
symbol in the Finder menus are indeed capitals, they just identify the letter on the keyboard. For example, if you see ![]() +P, just hold down the
+P, just hold down the ![]() key and then press P. Some programs have keyboard combinations that require the use of
key and then press P. Some programs have keyboard combinations that require the use of ![]() and the Shift key, but those programs tell you so by calling the key combination something like ⇧+
and the Shift key, but those programs tell you so by calling the key combination something like ⇧+![]() +S or ⇧+
+S or ⇧+![]() +O. (Look at the Empty Trash shortcut in Figure 2-13 to see one of these up-facing arrows in its natural environment.)
+O. (Look at the Empty Trash shortcut in Figure 2-13 to see one of these up-facing arrows in its natural environment.)
![]() Recognize the funky-looking Option-key symbol. You’ll see one other symbol sometimes used in keyboard shortcuts: It represents the Option key (sometimes abbreviated in keyboard shortcuts as Opt and, on some keyboards, also labeled Alt). Check it out next to the Hide Others command, shown in Figure 2-13.
Recognize the funky-looking Option-key symbol. You’ll see one other symbol sometimes used in keyboard shortcuts: It represents the Option key (sometimes abbreviated in keyboard shortcuts as Opt and, on some keyboards, also labeled Alt). Check it out next to the Hide Others command, shown in Figure 2-13.
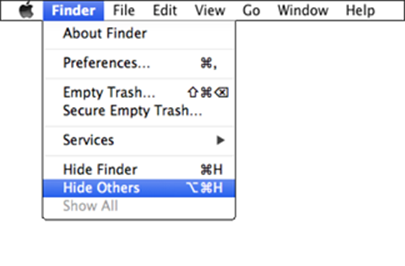
Figure 2-13: Some keyboard shortcuts, such as Hide Others, use the Option (![]() ) key in combination with the Command (
) key in combination with the Command (![]() ) key.
) key.
What this freakish symbol means in the Finder menu item (Hide Others in Figure 2-13) is that if you hold down both the Option and the ![]() keys as you press the H key, all applications other than the Finder will be hidden.
keys as you press the H key, all applications other than the Finder will be hidden.
![]() Okay, there was more than one more symbol. Occasionally, you’ll see a caret (^) used as the symbol for the Control key.
Okay, there was more than one more symbol. Occasionally, you’ll see a caret (^) used as the symbol for the Control key.
![]() If it makes sense, it’s probably a shortcut. Most keyboard shortcuts have a mnemonic relationship with their names. For example, the following table shows some of the basic keyboard shortcuts.
If it makes sense, it’s probably a shortcut. Most keyboard shortcuts have a mnemonic relationship with their names. For example, the following table shows some of the basic keyboard shortcuts.
|
Command |
Mnemonic Keyboard Shortcut |
|
New Finder Window |
|
|
New Folder |
Shift+ |
|
Open |
|
|
Get Info |
|
|
Select All |
|
|
Copy |
|
|
Duplicate |
|
More menus 4 U
If you like the menus you've seen so far, have I got a treat for you: OS X Mavericks includes 23 additional special-purpose menus, known as Menu Extras, that you can install if you like. Some — including Sound, Displays, Battery, and others — can be enabled from the appropriate System Preference pane. But the easiest way is to open the Menu Extras folder (System/Library/CoreServices/Menu Extras) and double-click each Menu Extra you want to install.
The following figure shows a handful of the Menu Extras installed in the menu bar.
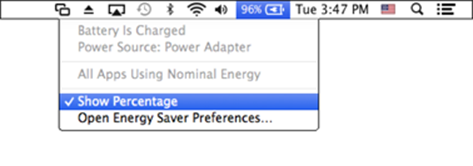
If you install a Menu Extra and later decide that you don’t need or want it in your menu bar, hold down the ![]() key and drag it off the menu bar; it disappears with a satisfying poof.
key and drag it off the menu bar; it disappears with a satisfying poof.
![]()