OS X Mavericks For Dummies (2014)
Part I. Getting Started with OS X Mavericks
Chapter 3. Have It Your Way
In This Chapter
![]() Making it just the way you like it with System Preferences
Making it just the way you like it with System Preferences
![]() Beautifying your Mavericks with a Desktop background and screen saver
Beautifying your Mavericks with a Desktop background and screen saver
![]() Working with those wonderful Dashboard widgets
Working with those wonderful Dashboard widgets
![]() Customizing hardware and keyboard shortcuts
Customizing hardware and keyboard shortcuts
![]() Setting up for superb sound
Setting up for superb sound
Everyone works a bit differently, and everyone likes to use the Mac in a particular way. In this chapter, you find out how to tweak various options so everything is just the way you like it. The first things most people like to do are set their background and screen saver and populate the Dashboard with handy widgets. You can begin with that stuff, but keep in mind that you can do much more.
You can change the colors in windows, the standard font, and more if you like. Your Mac lets you choose how onscreen elements behave and how your hardware — such as the keyboard, mouse, and any wireless Bluetooth gadgets — interacts with your Mac.
Introducing System Preferences
You should start by becoming familiar with System Preferences, which appears on the Apple (![]() ) menu and in the Dock.
) menu and in the Dock.
The following steps explain how to move around the System Preferences window, no matter what you’re trying to tweak:
1. Open the System Preferences window, shown in Figure 3-1.
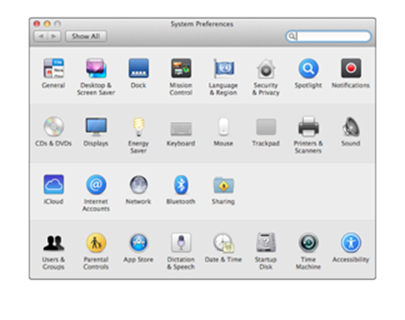
Figure 3-1: The System Preferences window is where you change many of Mavericks’ options.
You can do so in at least four ways: Choose ![]() ⇒System Preferences, double-click the System Preferences icon in your Applications folder, click the System Preferences icon in Launchpad, or click the System Preferences icon on your Dock.
⇒System Preferences, double-click the System Preferences icon in your Applications folder, click the System Preferences icon in Launchpad, or click the System Preferences icon on your Dock.
2. Click any of the icons in the System Preferences window.
The bottom part of the window changes to reflect the options for whichever icon you click. When this happens, I call the bottom part of the window a pane. So, for example, when you click the General icon in the System Preferences window, the bottom part of the window becomes the General Preference pane.
When you finish working with System Preferences panes, you should (of course) quit by choosing System Preferences⇒Quit System Preferences (shortcut: ![]() +Q).
+Q).
3. To work with a different Preference pane, click the Show All button in the toolbar, choose View⇒Show All Preferences, or press ![]() +L to return to the window with icons for all available System Preferences panes.
+L to return to the window with icons for all available System Preferences panes.
Alternatively, you can choose a different Preference pane right from the View menu or the Dock icon menu, both shown in Figure 3-2.
 If you press the System Preferences icon in the Dock (don’t click; just press and keep pressing for a couple of seconds), a menu pops up listing all available Preference panes. The cool part is that this works even if the System Preferences window isn’t open. When you know which pane you need, this shortcut is often the fastest way to get to it.
Last but not least, notice that you can navigate to the next or previous pane you’ve viewed with the Back and Forward buttons below the red and yellow gumdrops (shortcuts ![]() +[ and
+[ and ![]() +], respectively). Back and Forward commands also appear on the View menu.
+], respectively). Back and Forward commands also appear on the View menu.
One last general tip before you work with an actual Preference pane: You can get rid of the categories altogether and display the icons in alphabetical order. As a bonus, it makes the System Preferences window roughly 25 percent smaller onscreen. To switch to alphabetical view, choose View⇒Organize Alphabetically. The categories disappear, the window shrinks, and the icons are alphabetized, as shown in Figure 3-2. To switch from alphabetical view back to category view, choose View⇒Organize by Categories.
 Mavericks lets you hide little-used System Preferences pane icons. To manage icons, choose View⇒Customize, and a little check box appears next to each icon. Uncheck the box if you want to hide the icon; recheck the box to make the icon reappear.
Click Done when you’re finished checking and unchecking.
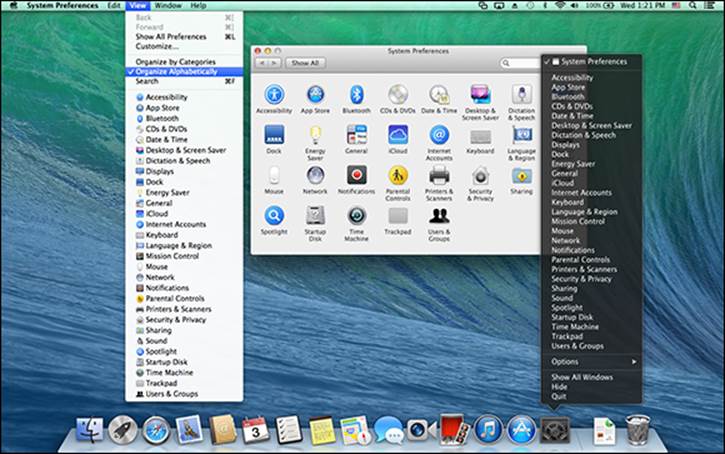
Figure 3-2: The View menu (left), the System Preferences window organized alphabetically (center), and the Dock icon menu (right).
 System Preferences is actually an application; you can find it in the Applications folder. The
 ![]() menu item and Dock icon are merely shortcuts that open the System Preferences application. The actual files for preference panes are stored in the Preference Panes folder, inside the Library folder in the System folder. If you choose to install third-party preference panes, they should go either in the Preference Panes folder in the Library folder at the top level of your startup disk (if you want them to be available to all users) or in the Preference Panes folder in the (hidden) Library inside your Home folder (if you want to keep them to yourself). Don’t sweat this technical stuff too much; most third-party preference panes come with an installer that puts them in the proper folder for you. (You discover the thrills and chills of that hidden Home/Library folder in Chapter 6.)
menu item and Dock icon are merely shortcuts that open the System Preferences application. The actual files for preference panes are stored in the Preference Panes folder, inside the Library folder in the System folder. If you choose to install third-party preference panes, they should go either in the Preference Panes folder in the Library folder at the top level of your startup disk (if you want them to be available to all users) or in the Preference Panes folder in the (hidden) Library inside your Home folder (if you want to keep them to yourself). Don’t sweat this technical stuff too much; most third-party preference panes come with an installer that puts them in the proper folder for you. (You discover the thrills and chills of that hidden Home/Library folder in Chapter 6.)
Putting a Picture on the Desktop
Figure 3-3 shows my Desktop with a portrait of my dog Zeke painted by artist Jeanne Illenye. (Refer to the default Desktop background in Figure 3-2.)
Here’s how you can change your Desktop picture if you care to:
1. From the Desktop, choose ![]() ⇒System Preferences.
⇒System Preferences.
Or Control-click the Desktop and choose Change Desktop Background from the contextual menu, and skip to Step 3.
The System Preferences window appears.
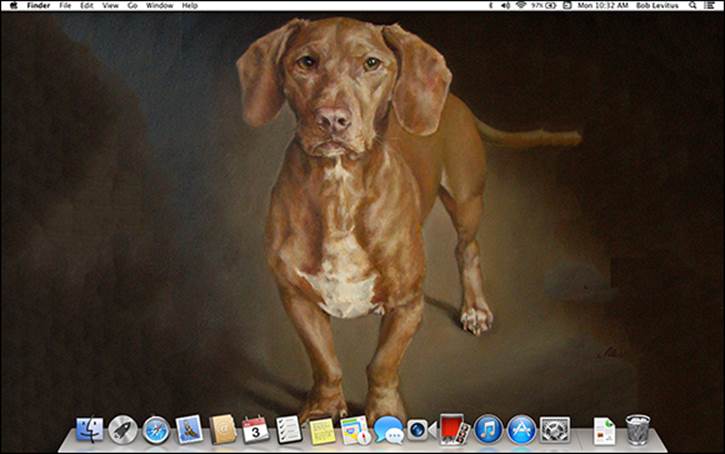
Figure 3-3: My beautified Desktop.
![]() 2. Click the Desktop & Screen Saver icon.
2. Click the Desktop & Screen Saver icon.
When the Desktop & Screen Saver pane appears, click the Desktop tab if it’s not selected already, as it is in Figure 3-4.
3. Click a folder in the column on the left and then click a picture in the area on the right.
In Figure 3-4, I clicked a picture called Elephant, one of the items in the Desktop Pictures folder.
 You have at least three other ways to change your Desktop picture:
![]() Drag a picture file from the Finder onto the image well (the little rectangular picture to the left of the picture’s name).
Drag a picture file from the Finder onto the image well (the little rectangular picture to the left of the picture’s name).
![]() Choose the Pictures Folder in the list of folders on the left side of the Desktop & Screen Saver Preference pane and then choose a folder by using the standard Open File dialog. That folder then appears in the list; you can use any picture files it contains for your Desktop picture.
Choose the Pictures Folder in the list of folders on the left side of the Desktop & Screen Saver Preference pane and then choose a folder by using the standard Open File dialog. That folder then appears in the list; you can use any picture files it contains for your Desktop picture.
![]() Click one of the iPhoto or Aperture items in the column on the left side of the Desktop & Screen Saver Preference pane.
Click one of the iPhoto or Aperture items in the column on the left side of the Desktop & Screen Saver Preference pane.
Although I love having a beautiful Desktop picture, I use a plain white Desktop (click Solid Colors in the list, and then click the white color swatch) for most of the figures in this book so you can see fine details.
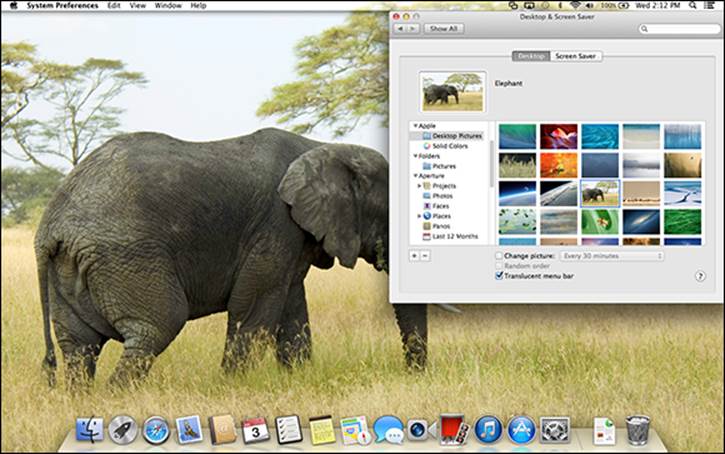
Figure 3-4: Choosing an elephant as my Desktop picture.
Setting Up a Screen Saver
OS X comes with several screen-saver modules, and many more are available for free (search for OS X Screen Saver). To set up your screen saver, follow these steps:
1. Open System Preferences, click the Desktop & Screen Saver icon, and then click the Screen Saver tab to see the options shown in Figure 3-5.
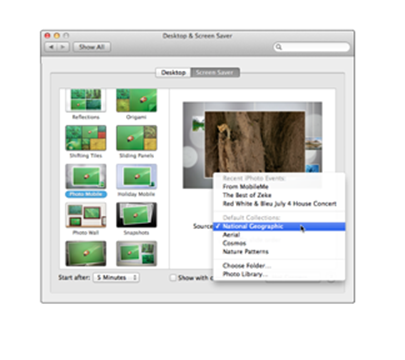
Figure 3-5: The Screen Saver tab.
2. In the Screen Savers column on the left side of the pane, choose a screen saver that interests you.
Scroll down to see all the available Slideshows and Screen Savers.
If you can’t decide, scroll to the bottom of the screen savers list and choose Random to have your Mac choose a different screen saver at random each time the screen saver kicks in.
3. (Optional) To see what the chosen module looks like in action, click the large Preview image on the right.
A little Preview button appears on the image when you hover your cursor over it to remind you how to see a preview. Nice touch!
Press any key or click anywhere to end the test.
4. After you’ve chosen a screen saver, select the number of minutes you want the Mac to wait before activating the screen saver from the Start After pop-up menu.
5. Choose the Show with Clock check box to display a digital clock along with the screen saver.
6. (Optional) Click the Hot Corners button to choose which corner of your screen activates the screen saver and which disables it.
If you enable this option, when you move your cursor to the chosen corner of the screen, you activate or disable the screen saver until you move the cursor elsewhere. Note that hot corners are optional and are turned off by default.
7. When you’re done, close the Desktop & Screen Saver pane.
You can require a password to wake your Mac from sleep or a screen saver. To do so, follow these steps:
1. Open System Preferences, click the Security and Privacy icon, and then click the General tab at the top of the System Preferences window.
2. Choose the Require Password after Sleep or Screen Saver Begins check box.
3. Choose a length of time from the pop-up menu between the words Password and After, which contains options such as Immediately, 15 minutes, and 4 hours.
From now on, you must supply the user account password to wake up your computer. (I discuss user accounts and passwords in Chapter 16 and the Appendix. Download the Appendix from www.dummies.com/downloads/osxmavericks.)
Putting Widgets on the Dashboard
 Dashboard offers a way-cool set of widgets, Apple’s name for the mini-applications that live inside the Dashboard layer. You see, Dashboard takes over your screen when you invoke it (as shown in Figure 3-6) by clicking Dashboard’s Dock icon or pressing its keyboard shortcut: F4 on newer Mac keyboards or F12 (or fn+F12) on almost any Mac keyboard. In Figure 3-6, Dashboard is shown with just a few of its default widgets: Calculator, Weather, World Clock, and Calendar.
Widgets are small, single-function applications that work only within Dashboard. Some widgets, such as Contacts and Calendar, talk to applications on your hard drive. Other widgets — such as Flight Tracker, Stocks, Movies, and Weather — gather information for you via the Internet.

Figure 3-6: Dashboard lives in its own gray overlay layer.
The following tips can help you work with widgets:
![]() Each time you invoke Dashboard, widgets that were open the last time you used it will be on your screen.
Each time you invoke Dashboard, widgets that were open the last time you used it will be on your screen.
![]() To close an open widget, click the minus sign in a circle in the lower-left corner of the screen and then click the encircled X in the top-left corner of the widget you want to close. Alternatively, you can press the Option key and hover over a widget to reveal its encircled X; click the X to close the widget.
To close an open widget, click the minus sign in a circle in the lower-left corner of the screen and then click the encircled X in the top-left corner of the widget you want to close. Alternatively, you can press the Option key and hover over a widget to reveal its encircled X; click the X to close the widget.
![]() To configure most widgets, move your cursor over the bottom-right corner of a widget and click the little i that appears (as it does with the Weather widget in Figure 3-6). The widget then flips around so you can see its backside, where the configuration options reside. For example, the Weather widget gives you choices that include your City, State, or Zip Code, Fahrenheit or Celsius, and whether to include lows in the six-day forecast (as shown in Figure 3-6), and the Clock widget allows you to choose your region and city. When you finish configuring a widget, click the Done button, which is usually (but not always) in the bottom-right corner; doing so flips the widget around again.
To configure most widgets, move your cursor over the bottom-right corner of a widget and click the little i that appears (as it does with the Weather widget in Figure 3-6). The widget then flips around so you can see its backside, where the configuration options reside. For example, the Weather widget gives you choices that include your City, State, or Zip Code, Fahrenheit or Celsius, and whether to include lows in the six-day forecast (as shown in Figure 3-6), and the Clock widget allows you to choose your region and city. When you finish configuring a widget, click the Done button, which is usually (but not always) in the bottom-right corner; doing so flips the widget around again.
Not all widgets can be configured. For example, the Calendar and Calculator widgets have no options to configure. If a little i doesn’t appear when you hover over the bottom-right corner of a widget with your cursor (or hover while pressing the Option key), that widget has no options to configure.
![]() To access widgets other than the four on your screen by default, click the Open button (the large encircled plus sign shown earlier in the bottom-left corner of Figure 3-6) to open the Widget Selection Screen, which displays your currently available widgets, as shown in Figure 3-7.
To access widgets other than the four on your screen by default, click the Open button (the large encircled plus sign shown earlier in the bottom-left corner of Figure 3-6) to open the Widget Selection Screen, which displays your currently available widgets, as shown in Figure 3-7.
Widget Selection Screen may sound like a mouthful, but its former moniker, The Widget Bar, made it sound like some trendy watering hole downtown.
![]() To add a widget from the Widget Selection Screen to your Dashboard, click the widget on the Widget Selection Screen.
To add a widget from the Widget Selection Screen to your Dashboard, click the widget on the Widget Selection Screen.
![]() To manage your widgets on the Widget Selection Screen, click the Manage Widgets button (the large encircled minus sign visible in the bottom-left corner of Figure 3-7), and all your widgets will begin to wiggle on the screen. If you have an iPhone, iPad, or iPod touch, you’ll recognize this wiggling as the “rearrange the icons dance.”
To manage your widgets on the Widget Selection Screen, click the Manage Widgets button (the large encircled minus sign visible in the bottom-left corner of Figure 3-7), and all your widgets will begin to wiggle on the screen. If you have an iPhone, iPad, or iPod touch, you’ll recognize this wiggling as the “rearrange the icons dance.”
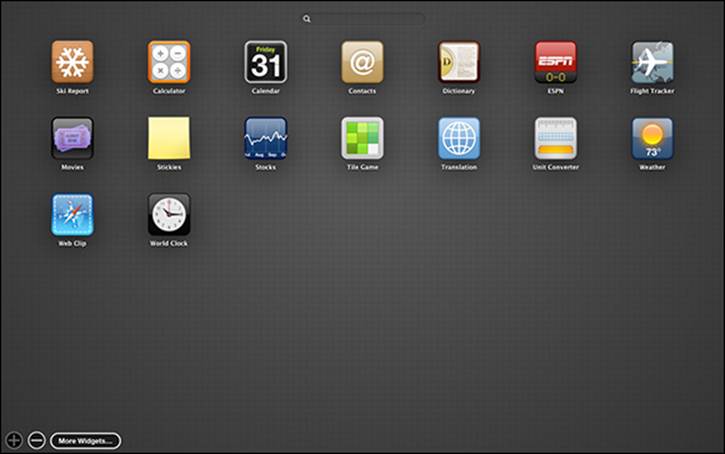
Figure 3-7: The Widget Selection Screen with the default selection of widgets.
![]() To close the Widget Selection Screen, click anywhere on the gray background or click the Open button again.
To close the Widget Selection Screen, click anywhere on the gray background or click the Open button again.
![]() To move a widget around on your screen, click almost anywhere on the widget and then drag it to the appropriate location.
To move a widget around on your screen, click almost anywhere on the widget and then drag it to the appropriate location.
At the bottom of the Widget Selection Screen is a button titled More Widgets. Clicking it launches your web browser and shows you additional widgets you can download from the Apple website.
![]() To uninstall a third-party widget that you no longer want, merely open the Widget Selection Screen and click the red minus sign next to its name. Your Mac politely asks whether you want to move this widget to the trash. You do.
To uninstall a third-party widget that you no longer want, merely open the Widget Selection Screen and click the red minus sign next to its name. Your Mac politely asks whether you want to move this widget to the trash. You do.
Finally, to close your Dashboard, press the same key you pressed to open Dashboard (F4 on newer Mac keyboards, or F12 or fn+F12 on almost any Mac keyboard), press the Esc key, or click the encircled arrow at the bottom-right corner of the screen.
If you’re using a trackpad, the three-fingered swipe is your friend. Try this: Swipe right to left with three fingers, and your Dashboard will magically appear. Now swipe left to right with three fingers to make it go bye-bye. Or use the keyboard shortcuts Control+left-arrow and Control+right-arrow. Bear in mind that both keyboard and trackpad shortcuts require you to enable the option to treat Dashboard as a Space.
Think of your Dashboard widgets as being handy-yet-potent mini-programs available at any time with a keystroke or click. Widgets are just so danged cool that I want to give you a quick look at a couple I consider particularly useful. Read on for details.
Translation
 The Translation widget could be a lifesaver. You’ve been able to do this trick on the web for a while, but you can also do it right on your Dashboard. This widget translates words from one language to another. It offers more than a dozen language choices — including French, German, Spanish, Russian, Dutch, Chinese, and more — and can translate in either direction. I love the Translation widget, shown in Figure 3-8, so much that sometimes it hurts.
 It’s fun at parties, too. Try this: Type a paragraph or two of your purplest prose into Translation. Now translate back and forth to any language a few times. Howl when prose written as “It was a dark and stormy night when our heroine met her untimely demise” turns into something like “It was one night dark and stormy where our heroin met an ugly transfer.” It doesn’t get much better than this, folks. Alternatively, you could use iTranslate or Google Translate, both free translation apps, on your iPhone or iPad.
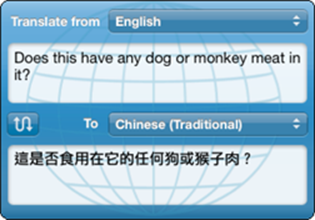
Figure 3-8: The Translation widget is incredibly useful when you travel abroad.
Flight Tracker
 Flight Tracker, shown in Figure 3-9, can find flights on most airlines and report the flight’s status in real time — a terrific timesaver when you have to meet a flight.

Figure 3-9: Finding a flight (top) and viewing its status (bottom).
When you have to meet someone’s flight, this widget can be a lifesaver. Just open Dashboard every few minutes, and you know exactly what the flight’s status is at that moment.
This is a really good tip for harried air travelers: You can open more than one instance of a widget. So if you’re trying to track more than one flight, or you want to know the weather or time in more than one city, just click the appropriate widget on the Widget Selection Screen, and another instance of it appears.
Giving Buttons, Menus, and Windows a Makeover
 Computers don’t care about appearances, but if you want your Mac to look a bit more festive (or, for that matter, businesslike), you have options in the General pane (see Figure 3-10) at your disposal. To open this pane, choose
 ![]() ⇒System Preferences, and then click the General icon.
⇒System Preferences, and then click the General icon.
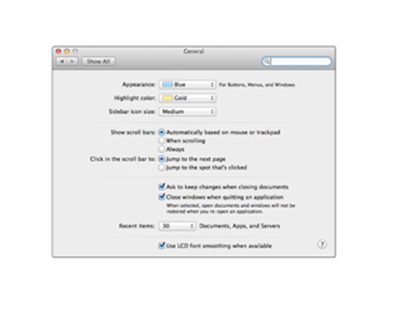
Figure 3-10: The General pane.
First up are the general appearance options:
![]() Appearance pop-up menu: Use this menu to choose different appearances and change the overall look of buttons, such as the three gumdrop buttons in the top-left corner of most windows.
Appearance pop-up menu: Use this menu to choose different appearances and change the overall look of buttons, such as the three gumdrop buttons in the top-left corner of most windows.
Apple, however, in its infinite wisdom, provides only two choices: Blue and Graphite.
![]() Highlight Color pop-up menu: From here, you can choose the color that text is surrounded by when you choose it in a document or select an icon. This time, Apple isn’t so restrictive: You have eight highlight colors you can choose, plus Other, which brings up a color picker from which you can choose almost any color.
Highlight Color pop-up menu: From here, you can choose the color that text is surrounded by when you choose it in a document or select an icon. This time, Apple isn’t so restrictive: You have eight highlight colors you can choose, plus Other, which brings up a color picker from which you can choose almost any color.
 I’m partial to Gold, which makes selections look like they’ve been run over by a yellow highlighter.
![]() Sidebar Icon Size pop-up menu: Choose Small, Medium, or Large for icons in your Finder Sidebar.
Sidebar Icon Size pop-up menu: Choose Small, Medium, or Large for icons in your Finder Sidebar.
The next area in the General pane enables you to set the behavior of scroll bars and title bars:
![]() The Show Scroll Bars radio buttons let you choose when you want to see scroll bars on windows. Your choices are Automatically Based on Mouse or Trackpad, When Scrolling, or Always.
The Show Scroll Bars radio buttons let you choose when you want to see scroll bars on windows. Your choices are Automatically Based on Mouse or Trackpad, When Scrolling, or Always.
![]() The Click in the Scroll Bar To radio buttons give you the option of moving your view of a window up or down by a page (the default) or to the position in the document roughly proportionate to where you clicked in the scroll bar.
The Click in the Scroll Bar To radio buttons give you the option of moving your view of a window up or down by a page (the default) or to the position in the document roughly proportionate to where you clicked in the scroll bar.
An easy way to try these options is to open a Finder window and place it side by side with the General pane, as shown in Figure 3-11, reducing the size of the window if necessary to make scroll bars appear. Select an option, observe the behavior of the scroll bars, and then select a different option and observe again.
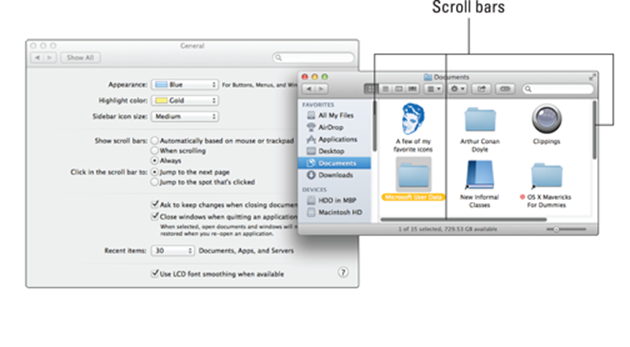
Figure 3-11: Here’s how I try different scroll-bar settings.
Choose the Jump to the Spot That’s Clicked radio button if you often work with long (multipage) documents. It’s quite handy for navigating long documents. And don’t forget — the Page Down key does the same thing as choosing the Jump to the Next Page choice, so you lose nothing by choosing Jump to the Spot That’s Clicked.
It would be even nicer if all third-party apps supported this feature, but some — including Microsoft Office 2011 — don’t behave properly no matter what you choose for this setting.
The first two items in the next section are a pair of check boxes:
![]() Ask to Keep Changes when Closing Documents: Like Lion and Mountain Lion before it, Mavericks can save versions of your documents automatically and without any action on your part. So when you quit an application or close a document, your changes are saved automatically. If you want to be able to close documents without having to manually save your changes, enable this option.
Ask to Keep Changes when Closing Documents: Like Lion and Mountain Lion before it, Mavericks can save versions of your documents automatically and without any action on your part. So when you quit an application or close a document, your changes are saved automatically. If you want to be able to close documents without having to manually save your changes, enable this option.
![]() Close Windows when Quitting an Application: Your Mac’s default behavior is to reopen documents and windows that were open when you quit that app. When you launch the app again, all the windows and documents magically reappear right where you left them. So enable this option to have your apps open to a clean slate, without reopening documents or windows from the previous session.
Close Windows when Quitting an Application: Your Mac’s default behavior is to reopen documents and windows that were open when you quit that app. When you launch the app again, all the windows and documents magically reappear right where you left them. So enable this option to have your apps open to a clean slate, without reopening documents or windows from the previous session.
 These last two items may not work as expected with older third-party applications. As a rule of thumb, the longer it’s been since a program’s last update, the more likely it is that the app will ignore these two settings.
The last item in this section of the General pane is Recent Items. It controls the number of recent items that are remembered and displayed in your ![]() ⇒Recent Items submenu. The default is ten, but I like having access to more than ten applications and documents in my Recent Items submenu, so I crank mine up to 30, as shown in Figure 3-11.
⇒Recent Items submenu. The default is ten, but I like having access to more than ten applications and documents in my Recent Items submenu, so I crank mine up to 30, as shown in Figure 3-11.
The final area offers a single option for how fonts look: The Use LCD Font Smoothing when Available check box, which makes text look better on most flat-screen displays. Unless your monitor is a very old tube-type (CRT) display or you’re a photographer or artist who insists on a CRT for its color accuracy, you probably want to select this check box.
Adjusting the Keyboard, Mouse, Trackpad, and Other Hardware
No one uses the keyboard and mouse in the same way. Some folks don’t use a mouse at all. (You might not even use the keyboard much if you use voice-recognition software or other devices, as I explain in Chapter 16.) If you’re using OS X on a notebook, you have a trackpad, that little surface where you move your finger around to control the cursor. Or perhaps you have a Bluetooth-enabled keyboard and mouse so you can hook them up wirelessly. Regardless of what you have, you should give some thought to customizing the way it works so it feels “just right” for you.
The Keyboard, Mouse, and Trackpad System Preference panes offer several tabs to do just that: enable you to modify the behavior of your keyboard, mouse, and trackpad in a myriad of ways. So the first thing to do is open the Keyboard Preference pane by choosing ![]() ⇒System Preferences and clicking the Keyboard icon.
⇒System Preferences and clicking the Keyboard icon.
Keyboard
 The Keyboard System Preference pane has four tabs: Keyboard, Text, Shortcuts, and Input Sources.
Keyboard tab
On the Keyboard tab, you can adjust your settings in the following ways:
![]() Drag the Key Repeat Rate slider to set how fast a key repeats when you hold it down. This feature comes into play when (for example) you hold down the hyphen (-) key to make a line or the asterisk (*) key to make a divider.
Drag the Key Repeat Rate slider to set how fast a key repeats when you hold it down. This feature comes into play when (for example) you hold down the hyphen (-) key to make a line or the asterisk (*) key to make a divider.
![]() Drag the Delay until Repeat slider to set how long you have to hold down a key before it starts repeating.
Drag the Delay until Repeat slider to set how long you have to hold down a key before it starts repeating.
If you have a notebook Mac (such as a MacBook, MacBook Pro, or MacBook Air), you also see one or more of these additional features:
![]() Use all F1, F2 Keys as Standard Function Keys: If this check box is selected, the F keys at the top of your keyboard control the active software application.
Use all F1, F2 Keys as Standard Function Keys: If this check box is selected, the F keys at the top of your keyboard control the active software application.
To use the special hardware features printed on each F key (display brightness, screen mirroring, sound volume, mute, and so on), you have to press the Fn (Function) key before pressing the F key. If the check box is left deselected, you have to press the Fn key if you want to use the F keys with a software application. Got it? Good.
Finally, these keys may not work if you use a third-party keyboard (one not manufactured by Apple).
![]() Adjust Keyboard Brightness in Low Light: This check box turns your laptop’s ambient keyboard lighting on and off.
Adjust Keyboard Brightness in Low Light: This check box turns your laptop’s ambient keyboard lighting on and off.
![]() Turn Off When Computer Is Not Used For: This slide control lets you determine how long the ambient keyboard lighting remains on when your computer isn’t in use.
Turn Off When Computer Is Not Used For: This slide control lets you determine how long the ambient keyboard lighting remains on when your computer isn’t in use.
Of course, if your notebook computer doesn’t have ambient keyboard lighting, as many don’t, you don’t see the last two items.
Ambient keyboard lighting is a cool feature, but remember that it reduces battery life. My recommendation is to use it only when you really need it.
![]() Show Keyboard & Character Viewers in the Menu Bar: This check box adds a new menu for opening either of these useful windows, as shown in Figure 3-12.
Show Keyboard & Character Viewers in the Menu Bar: This check box adds a new menu for opening either of these useful windows, as shown in Figure 3-12.
Click any character (smiley faces in Figure 3-12) to insert it in your document; click the little icons at the bottom of the window to view additional screens full of characters.

Figure 3-12: (Clockwise) Keyboard tab, Character Viewer window (Characters), Keyboard and Character Viewer menu, and Keyboard Viewer window (U.S.) in all their glory.
![]() If you’ve used the Character Viewer in earlier versions of OS X, you’ve noticed that it looks completely different in Mavericks. While it still offers the same old characters you know and love, the presentation has changed. Never fear. If you prefer the old look and feel, scroll to the top of the window and click the little Character Viewer icon to the right of the search field (shown in the margin). This transforms the Character Viewer back to its pre-Mavericks look, as shown in Figure 3-13.
If you’ve used the Character Viewer in earlier versions of OS X, you’ve noticed that it looks completely different in Mavericks. While it still offers the same old characters you know and love, the presentation has changed. Never fear. If you prefer the old look and feel, scroll to the top of the window and click the little Character Viewer icon to the right of the search field (shown in the margin). This transforms the Character Viewer back to its pre-Mavericks look, as shown in Figure 3-13.
To return the window to its new Mavericky glory, just click the little icon again.
Click the Action menu (the little gear near the upper-left corner) and choose Customize List to enable additional character categories, including Braille Patterns, Dingbats, Geometrical Shapes, Musical Symbols, and many more.
![]() Set Up Bluetooth Keyboard button: Launches the Bluetooth assistant and walks you through pairing and setup as described in Chapter 16.
Set Up Bluetooth Keyboard button: Launches the Bluetooth assistant and walks you through pairing and setup as described in Chapter 16.
![]() Modifier Keys button: Lets you change the action performed by the Caps Lock, Control, Option, and Command keys. It’s particularly useful if you use a non-Apple keyboard, although it works just fine on Apple keyboards, too.
Modifier Keys button: Lets you change the action performed by the Caps Lock, Control, Option, and Command keys. It’s particularly useful if you use a non-Apple keyboard, although it works just fine on Apple keyboards, too.
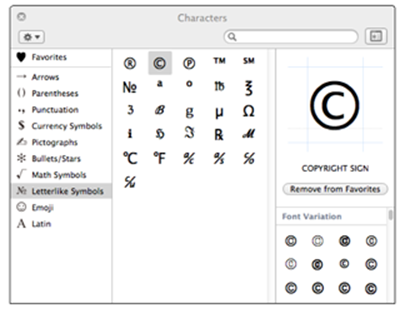
Figure 3-13: The little icon on the right of the search field toggles the look of the Character Viewer window between the old look shown here and the new look (shown in Figure 3-12).
I’m always engaging the Caps Lock key accidentally with my overactive left pinky, so I set my Caps Lock key to perform No Action. Now I never type half a sentence in ALL CAPS BECAUSE I ACCIDENTALLY PRESSED THE CAPS LOCK KEY.
 The Text and Input Sources tabs aren’t new in Mavericks, but they’re new to the Keyboard System Preference pane. In Mountain Lion, these two tabs appeared in the Language & Text System Preference pane, which made little sense. That pane has now been renamed Language & Region in Mavericks, and those two keyboard-related tabs have been relocated to the Keyboard System Preference pane.
Text tab
This is one of my favorite features in all of Macdom ’cause it saves me countless keystrokes every day. Not because it’s the tab with the Correct Spelling Automatically check box. Enable it (if it’s not already enabled) and be done. Spelling correction is good, but the reason I love the Text tab so much is because it lets me create shortcuts to replace short phrases with longer ones.
|
When I type: |
My Mac replaces it with: |
|
btw |
by the way . . . |
|
vty |
Very truly yours, |
|
blc |
boblevitus@boblevitus.com |
It’s a very handy trick indeed. Plus, a preview pops up just below your typing so you can accept the replacement by pressing the Spacebar or reject it by clicking the little x or pressing Esc.
To create your own shortcuts, click the little plus sign near the bottom-left corner of the window. Type the short phrase in the Replace field, click in the With field or press Tab, and then type the replacement phrase. You can see what happens when I type blc in the TextEdit window in the foreground of Figure 3-14.
Although it’s not obvious, you can create multiline substitutions. Just hold down Option and press Enter or Return to start a new line of text.
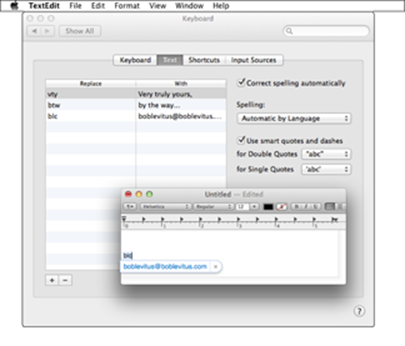
Figure 3-14: The Text tab of the Keyboard System Preference pane (background) and what I see when I type blc in a TextEdit document (foreground).
Shortcuts tab
If you really hate to use your mouse or if your mouse is broken, keyboard shortcuts can be really handy. I tend to use them more on my laptop because I really don’t like using the built-in-touch-mouse thing (technically, it’s a trackpad, and I talk more about it in the next section).
I introduce some commonly used keyboard shortcuts in Chapter 2. You probably don’t want to mess with those, but you can assign other commands you use often to just about any key combination you like. By creating your own keyboard shortcuts, you can have whatever commands you need literally at your fingertips.
Not only can you add, delete, or change keyboard shortcuts for many operating-system functions (such as taking a picture of the screen or using the keyboard to choose menu and Dock items), but you can also add, delete, or change keyboard shortcuts for your applications.
To begin, choose the Keyboard Shortcuts tab in the Keyboard System Preference pane. Now you can do any or all of the following:
![]() To change a shortcut, first click the appropriate application, preference, or feature in the left column. Next, double-click the shortcut you want to change on the right side of the right column (for example, F3 or
To change a shortcut, first click the appropriate application, preference, or feature in the left column. Next, double-click the shortcut you want to change on the right side of the right column (for example, F3 or ![]() +G). The old shortcut becomes highlighted; when it does, press the new shortcut keys you want to use.
+G). The old shortcut becomes highlighted; when it does, press the new shortcut keys you want to use.
![]() To add a new shortcut, click the + button. Choose the appropriate application from the Application pop-up menu, type the exact name of the menu command you want to add in the Menu Title field, and then type the shortcut you want to assign to that command in the Keyboard Shortcut field. If the shortcut you press is in use by another application or preference, a yellow triangular caution symbol appears next to it. It really is that simple.
To add a new shortcut, click the + button. Choose the appropriate application from the Application pop-up menu, type the exact name of the menu command you want to add in the Menu Title field, and then type the shortcut you want to assign to that command in the Keyboard Shortcut field. If the shortcut you press is in use by another application or preference, a yellow triangular caution symbol appears next to it. It really is that simple.
![]() To delete a shortcut, choose it and then click the – button.
To delete a shortcut, choose it and then click the – button.
The Keyboard Shortcuts tab also offers options for changing the tab order. The Full Keyboard Access radio buttons control what happens when you press the Tab key in a window or dialog:
![]() If you choose the Text Boxes and Lists Only radio button, the Tab key moves the cursor from one text box to the next or from one list item to the next item (usually alphabetically).
If you choose the Text Boxes and Lists Only radio button, the Tab key moves the cursor from one text box to the next or from one list item to the next item (usually alphabetically).
![]() If you choose the All Controls radio button, you can avoid using the mouse for the most part, if that’s your preference.
If you choose the All Controls radio button, you can avoid using the mouse for the most part, if that’s your preference.
When All Controls is selected, the Tab key moves the focus from one item to the next in a window or dialog. So (for example) every time you press the Tab key in an Open File dialog, the focus moves — say, from the Sidebar to the file list to the Cancel button to the icon view button, and so on. Each item is highlighted to show it’s selected, and you can activate the highlighted item from the keyboard by pressing the spacebar.
You can toggle this setting by pressing Control+F7. And if you don’t care for Control+F7 as its shortcut, you can change it by clicking Keyboard in the left column, double-clicking the Change the Way Tab Moves Focus item in the right column, and then pressing the new shortcut.
Input Sources tab
The Input Sources tab is where you can choose to display one or more foreign language keyboards in the Input menu.
![]() The Input menu and the Keyboard and Character Viewer menu are one and the same. If you select one or more foreign keyboards, the icon in your menu bar changes from the rather tame icon shown in Figure 3-13 to the flag of the selected keyboard, as shown in the margin (it’s the Lithuanian flag, by the way).
The Input menu and the Keyboard and Character Viewer menu are one and the same. If you select one or more foreign keyboards, the icon in your menu bar changes from the rather tame icon shown in Figure 3-13 to the flag of the selected keyboard, as shown in the margin (it’s the Lithuanian flag, by the way).
Mouse
The Mouse System Preference pane is where you set your mouse tracking speed, scrolling speed, and double-click delays.
If you use a notebook Mac, you may see a Mouse icon in the System Preferences application, but unless you have a mouse connected via USB or Bluetooth, it will just sit there searching for a mouse.
Don’t be sad. If you use a notebook or an Apple Magic Trackpad, you have something that most iMac, Mac mini, and Mac Pro users don’t have — namely, the System Preference pane named Trackpad, which I tell you about in the upcoming section “Trackpad (notebooks and desktops with a Magic Trackpad).”
The first item in this pane is a check box: Scroll Direction: Natural. If scrolling or navigating in windows feels backward to you, try unchecking this box.
Moving right along, here are the features you’ll find in the Mouse System Preference pane (if you have a mouse connected):
![]() Move the Tracking Speed slider to change the relationship between hand movement of the mouse and cursor movement onscreen. This slider works just like the slider for trackpads, as I explain in the upcoming section on trackpads.
Move the Tracking Speed slider to change the relationship between hand movement of the mouse and cursor movement onscreen. This slider works just like the slider for trackpads, as I explain in the upcoming section on trackpads.
![]() The Double-Click Speed setting determines how close together two clicks must be for the Mac to interpret them as a double-click and not as two separate clicks. Move the slider arrow to the leftmost setting, Very Slow, for the slowest. The rightmost position, Fast, is the fastest setting. I prefer the setting one tick shy of Fast.
The Double-Click Speed setting determines how close together two clicks must be for the Mac to interpret them as a double-click and not as two separate clicks. Move the slider arrow to the leftmost setting, Very Slow, for the slowest. The rightmost position, Fast, is the fastest setting. I prefer the setting one tick shy of Fast.
![]() If your mouse has a scroll ball or scroll wheel, you also see a Scrolling Speed slider, which lets you adjust how fast the contents of a window scroll when you use the scroll wheel or ball.
If your mouse has a scroll ball or scroll wheel, you also see a Scrolling Speed slider, which lets you adjust how fast the contents of a window scroll when you use the scroll wheel or ball.
![]() If your mouse has more than one button, you see a pair of Primary Mouse Button radio buttons. These let you choose which button — left or right — you use to make your primary (regular) click. Conversely, the other mouse button (the one you didn’t choose) becomes your secondary (Control or right) click.
If your mouse has more than one button, you see a pair of Primary Mouse Button radio buttons. These let you choose which button — left or right — you use to make your primary (regular) click. Conversely, the other mouse button (the one you didn’t choose) becomes your secondary (Control or right) click.
This is a setting many lefties like to change. Set the primary button as the right button, and you can click with the index finger of your left hand.
Being right-handed, I’ve done the opposite in Figure 3-15 and set the left button as the primary and the right button as the secondary (Control or right) click.
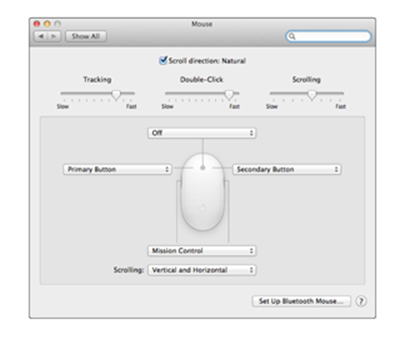
Figure 3-15: The Mouse System Preference pane set up for a right-hander.
Notice that I have the center button — the scroll ball, on this particular mouse — set to the Off position and the side (squeeze) button on this Apple mouse set to Mission Control. Why? Because I find that I click the scroll ball button accidentally far too often when I’m trying to scroll. And I like having an instant shortcut to Mission Control, which you explore in great detail in Chapter 7.
Changes in the Mouse System Preference pane take place immediately, so you should definitely play around a little and see what settings feel best for you.
Bluetooth
![]() Bluetooth is a technology that lets you make wireless connections between your Mac and devices such as Bluetooth mice and phones. You can see a Bluetooth tab in the Mouse System Preference pane if you’re using a Bluetooth mouse. Most Macs manufactured in the past few years have Bluetooth built in; some older models don’t.
Bluetooth is a technology that lets you make wireless connections between your Mac and devices such as Bluetooth mice and phones. You can see a Bluetooth tab in the Mouse System Preference pane if you’re using a Bluetooth mouse. Most Macs manufactured in the past few years have Bluetooth built in; some older models don’t.
You configure Bluetooth devices you want to use with your Mac elsewhere in the Bluetooth System Preference pane (as I describe in Chapter 16 and Chapter 17).
If your Mac has Bluetooth built in, the Bluetooth tab shows you the battery level of your Bluetooth mouse or keyboard. It also offers a check box to add a Bluetooth status menu to your menu bar and a check box to let Bluetooth devices wake your computer from sleep.
Trackpad (notebooks and desktops with a Magic Trackpad)
 If you use a notebook Mac — a MacBook, MacBook Air, and MacBook Pro — or a Magic Trackpad, you’ll have an additional System Preferences pane called Trackpad. This pane lets you configure tracking and clicking speed as well as the gesturing behavior of your Mac’s built-in trackpad.
Note that in 2008, Apple began equipping all its notebooks with a new and improved multi-touch trackpad. These features distinguish the new model from its predecessor:
![]() It’s 40 percent larger than the original MacBook Pro and MacBook trackpads.
It’s 40 percent larger than the original MacBook Pro and MacBook trackpads.
![]() It’s fabricated from some kind of high-tech glass. So it’s even smoother and more touch-friendly than the original trackpads.
It’s fabricated from some kind of high-tech glass. So it’s even smoother and more touch-friendly than the original trackpads.
![]() The whole trackpad is the click button; you just tap anywhere on it to click.
The whole trackpad is the click button; you just tap anywhere on it to click.
![]() It supports multi-finger gestures that use up to four fingers at once.
It supports multi-finger gestures that use up to four fingers at once.
If your Mac doesn’t have a mouse, I recommend you check out Apple’s $69 Magic Trackpad. This nifty wireless device can be used with any Mac or PC that has Bluetooth. It’s also the biggest glass multi-touch trackpad yet, nearly 80 percent larger than the MacBook Pro’s built-in trackpad. Yes, you can use the Magic Trackpad with your MacBook Pro, and yes, that does mean you have dual trackpads.
I have become more of a trackpad believer since OS X 10.7 (Lion) introduced iPhone-like gestures on the Mac. I have a Magic Trackpad and a mouse and grab whichever is appropriate at the moment.
The Trackpad System Preference pane has three tabs — Point & Click, Scroll & Zoom, and More Gestures — as shown in Figure 3-16.
If you have an older notebook with the older-style trackpad, you may not see all the controls in Figure 3-16.
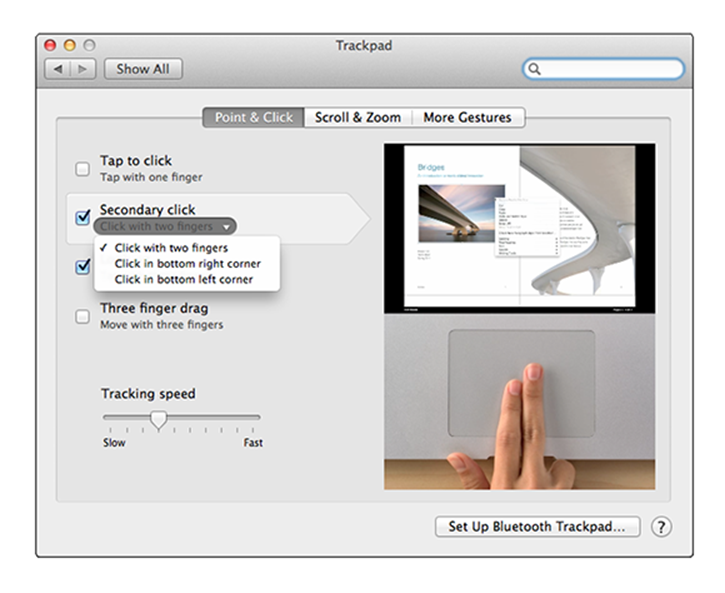
Figure 3-16: The Trackpad System Preference pane offers controls for one-finger and multi-finger gestures.
All three tabs work the same way as the Point & Click tab shown in Figure 3-16. To enable or disable a feature, click its check box. To see how a feature works, just move your cursor over it (you don’t even have to click), and a movie demonstrates that gesture on the right side of the window. In Figure 3-16, I’m pointing to the Secondary Click feature on the left; how it works is demonstrated in the movie playing on the right. Pretty cool, don’t you think?
You need to know a couple of other things about the Trackpad System Preference pane before you move on:
![]() If you see a little black triangle next to a feature’s description (Click with Two Fingers in Figure 3-16), a drop-down menu is available; click near the triangle to display the options for that feature.
If you see a little black triangle next to a feature’s description (Click with Two Fingers in Figure 3-16), a drop-down menu is available; click near the triangle to display the options for that feature.
![]() The Tracking Speed slider lets you change the relationship between finger movement on the trackpad and cursor movement onscreen. A faster tracking-speed setting (moving the slider to the right) sends your cursor flying across the screen with a mere flick of the finger; slower tracking-speed settings (moving the slider to the left) make the cursor crawl across in seemingly slow motion, even when your finger is flying. Set this setting as fast as you can stand it — I like the fastest speed. Try it: You might like it.
The Tracking Speed slider lets you change the relationship between finger movement on the trackpad and cursor movement onscreen. A faster tracking-speed setting (moving the slider to the right) sends your cursor flying across the screen with a mere flick of the finger; slower tracking-speed settings (moving the slider to the left) make the cursor crawl across in seemingly slow motion, even when your finger is flying. Set this setting as fast as you can stand it — I like the fastest speed. Try it: You might like it.
Styling Your Sound
 Out of the box, OS X Mavericks comes with a preset collection of beeps and controls. By using the Sound Preference pane, however, you can change the way your Mac plays and records sound by changing settings on each of its three tabs: Sound Effects, Output, and Input.
Three items appear at the bottom of the Sound pane, no matter which of the three tabs is active:
![]() To make your Mac’s volume louder or softer, use the Output Volume slider. You can also change or mute the volume with the designated volume and mute keys found on most Apple keyboards.
To make your Mac’s volume louder or softer, use the Output Volume slider. You can also change or mute the volume with the designated volume and mute keys found on most Apple keyboards.
![]() Select the Mute check box to turn off all sound.
Select the Mute check box to turn off all sound.
![]() Click the Show Volume in Menu Bar check box to add a volume control menu to your menu bar.
Click the Show Volume in Menu Bar check box to add a volume control menu to your menu bar.
A shortcut to the Sound System Preference pane is to press Option while pressing any of the volume keys (usually the F11 and F12 keys on newer laptops and keyboards and F4 and F5 keys on older ones).
Changing sound effects
On the Sound Effects tab, choose an alert (beep) sound by clicking its name; set its volume by using the Alert Volume slider control.
You can also specify the output device through which sound effects play (if you have more than one device) by choosing it from the Play Sound Effects Through pop-up menu.
The Play User Interface Sound Effects check box turns on sound effects for actions, such as dragging a file to the Trash. The Play Feedback when Volume Is Changed check box tells your Mac to beep once for each key press to increase or decrease volume.
Choosing output and input options
If you have more than one sound-output device (in addition to the built-in speakers), you can choose it here. The Balance slider makes one stereo speaker — left or right — louder than the other.
If you have more than one sound-input device (in addition to the built-in microphone on many Macs or an iSight camera, which contains its own mic), you can choose it here. The Input Volume slider controls the Input Level (how loud input from that device will be), which is displayed as a row of blue dots. If the dots light up all the way to the right side, your input volume is too loud. Ideally, the input level should light up with about three-fourths of the little blue dots — and no more.
Some input sources (microphones) don’t let you adjust their level in the Sound System Preference pane.
![]()