Bleeding Edge Press Developing an iOS 7 Edge (2013)
6. Map Directions in 3D
IN THIS CHAPTER
· User Interface Changes
· 180th Meridian Span
· Overlays
· Local Search
· Directions
· Perspectives
· Saving and Restoring Map State
Moving on from the previous chapter which explored the topic of AirDrop and Multi-Peer Connectivity, this chapter will focus on the new improvements on the ever-maturing Apple Maps, in its second iteration since Apple's decision to build their own solution from the ground-up. Granted, Apple Maps received a lot of negative press since it came out last year, due to incomplete data compared to Google Maps, but no one could deny that visually, the cartography with fly-overs looked amazing.
In iOS 7, it is quite obvious Apple has spent a great deal of resources in not only ironing out missing geospatial data, but improving the UI markedly, first in order to get it visually in-line with the iOS 7 theme, but also with subtle improvements in the cartography. MapKit, the API that powers the maps has also received some great updates.
MapKit changes in iOS 7 include some eye-candy 3D perspectives, allowing developers to control camera pitch and position programmatically, as well as some overlay improvements, better direction engine logic as well as some other nifty things, such as Directions, which will be examined in this chapter.
We are continuing on with our BepBop app, which you can find in the Chapter 9 section of the sample code. In this chapter, we will be demonstrating many of the features available in iOS 7, including setting annotations, manipulating the 3D camera perspective, searching using natural query language, working with overlay poly-lines, and getting directions to a particular location. You can compile and run the BepBop project and go to Chapter 9 section, and you will see a screen resembling the one below, which you can use to test the various new features of MapKit, along with the sample code for the chapter:
User Interface changes
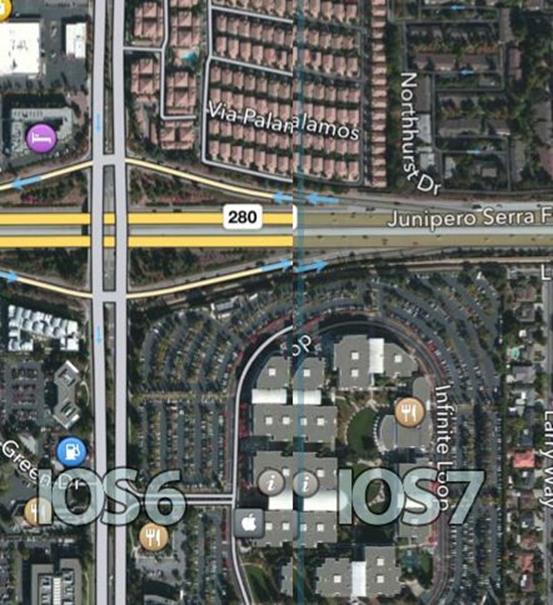
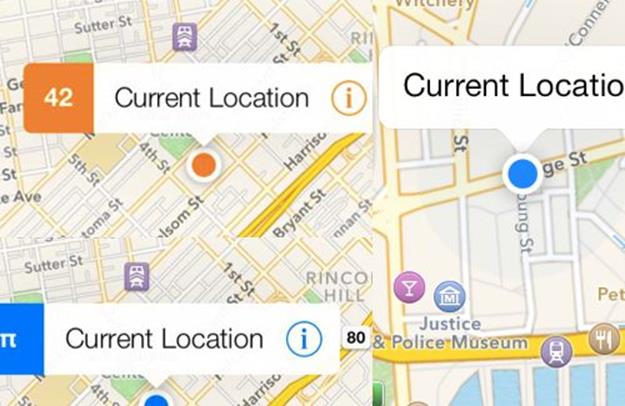
In iOS 7, Maps was visually refreshed in line with the rest of Apple's UI, following the flattening trend, which included predominant cartographic amendments. These are eye-candy improvements, but do provide more detail, crisper data, in both normal mapping and hybrid mapping views.
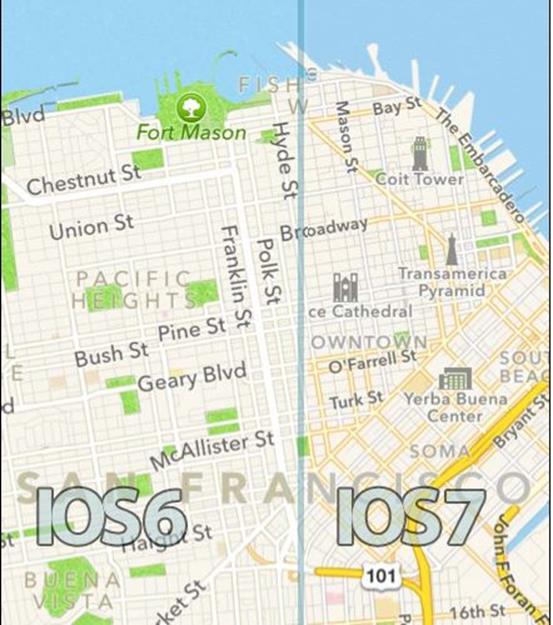
In both normal and hybrid map perspectives, the roads and labels have been better defined, to make reading them more clear.
The annotation pins, callouts and user location indicators have also been flattened, with the depth in gradients removed and cleaned out. The tintColor is a new property that allows you to set a tinting theme to the callout and user-location dot.
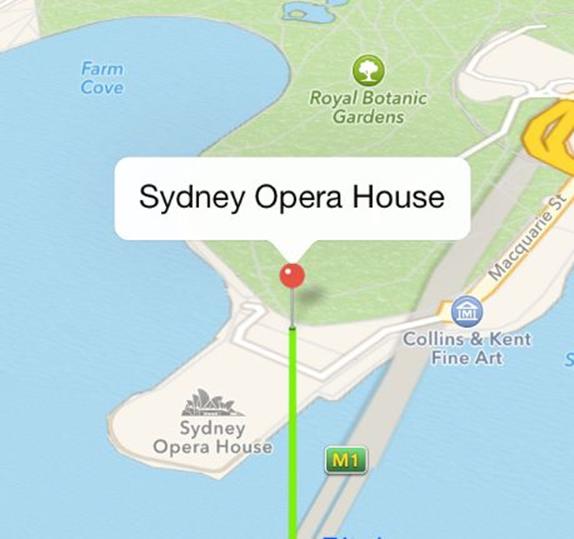
The next illustration compares how the MKAnnotationPins have been flattened iOS 7, subtly.
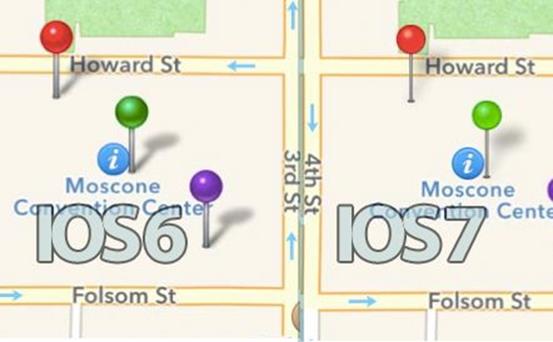
Even when you pitch the map in 3D, the MKAnnotation pins retain the same dimensions, so as a developer you don't have to worry about any pin distortions if you implement your own custom pin view.
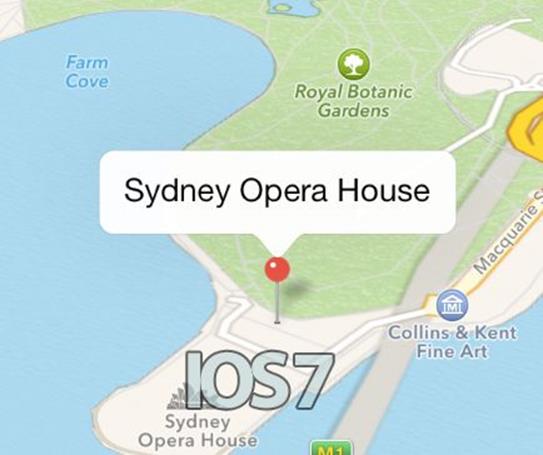
The best part of migrating from iOS 6 to iOS 7 is that so far you, the developer, don't need to do anything extra. The existing pin dimensions and aspect ratio remain the same as they did in iOS 6, so your assets won't get distorted when the map pans into 3D in any angle. One new API as far as annotations goes is a convenience method to show more than one pin easily:
[self.mapView showAnnotations:@[pointOperaHouse, pointBondiBeach] animated:YES];
This is certainly more convenient than previously having to individually add an annotation:
[self.mapView addAnnotation:point];
Another improvement from Apple requires no API changes, and comes pre-baked, the ability to cross the 180th meridian span, either via touch or programmatically, as the next section will outline.
180th Meridian Span
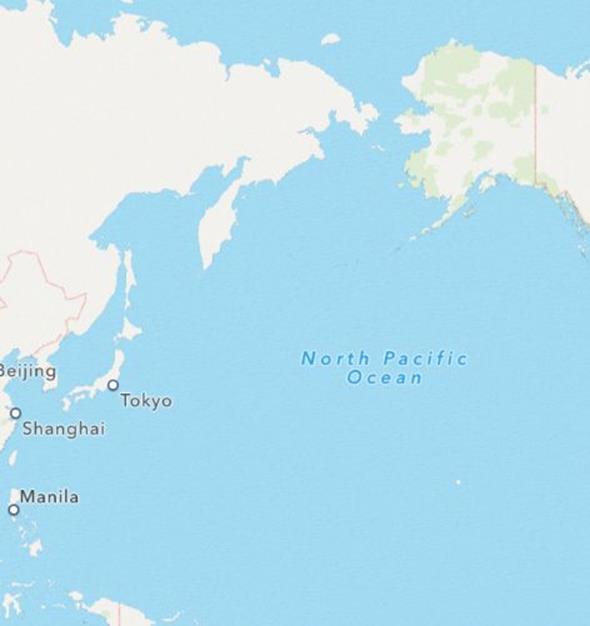
While Apple's Maps app was able to scroll the entire map across all meridians, developers were not able to replicate that easily in their own apps. New to iOS 7, without any extra coding requirements developers are now able to pan from the west coast of the U.S to Sydney, across the 180th meridian. The implications being, you can now set two points, one in Los Angeles and another across the anti-meridian, such as Sydney, and drawing a geodesic polyline will show you the shortest path between these two points, which is across the Pacific ocean. Previously, it would work it's way across the Atlantic Ocean, Europe and Asia to make it's way down to Sydney.
The 180th meridian or antimeridian is the meridian which is 180° east or west of the Prime Meridian with which it forms a great circle. It is common to both east longitude and west longitude. It is used as the basis for the International Date Line, because it for the most part passes through the open waters of the Pacific Ocean. However, the meridian passes throughRussia and Fiji as well as Antarctica. -- Wikipedia (http://goo.gl/36UbVg)
This makes things easier for apps such as flight apps, where you want to show the shortest path between any location, and assert that you will always get the shortest route. You can test that theory by setting up a region or coordinate that is on the 180th meridian line, like:
self.mapView.centerCoordinate = CLLocationCoordinate2DMake (0, 180);
This sets the point at 0 latitude and 180th longitude. So, regardless of any point on the planet, you will now get the shortest route plotted. Speaking of drawing paths between two points, there are some improvements in overlays and geodesic polyline paths, newly introduced in iOS 7 which will now be examined.
Overlays
Overlays in iOS 7 Maps has been overhauled significantly, starting with API changes that require developers ensure in SDK 7 that MKOverlayView is replaced with MKOverlayRenderer, a more light-weight and robust reference that allows the developer to set overlays at specific levels in the map. The API works the same way as previously, but loses the ancenstry to UIView.
Overlays can now also be inserted at two levels:
1. MKOverlayLevelAboveRoads : sets the overlay above the roads but beneath labels, POIs and Annotation Views;
2. MKOverlayLevelAboveLabels : covers the entire map, including labels, but still affords you the ability to add annotation views visibly above the overlay.
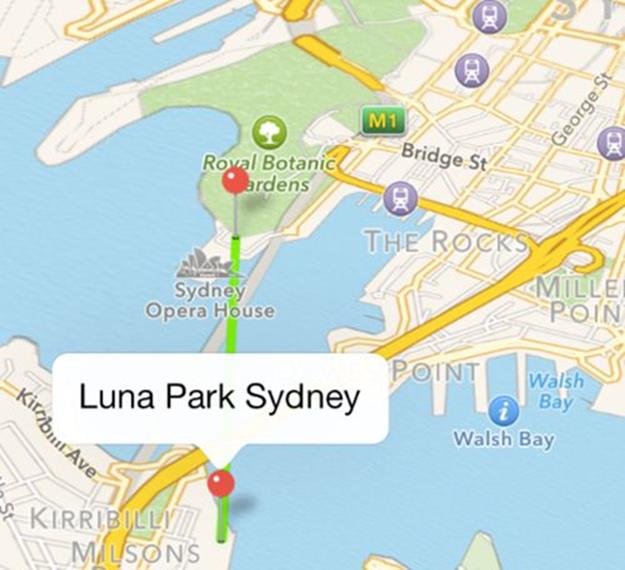
Apple have also given us access to a new class, called MKGeodesicPolyline which is the shortest path between two points along a curved surface. Here is how we implemented a simple poly-line between two points in our BepBop.app:
0001:CLLocationCoordinate2D points[] = {lunaParkCoordinate, sydneyOperaHouseCoordinate};
0002: geodesic = [MKGeodesicPolyline polylineWithCoordinates:points count:2];
0003: [self.mapView addOverlay:geodesic level:MKOverlayLevelAboveRoads];
The result is shown below, a simple geodesic line between two coordinates, Sydney Opera House and Luna Park Sydney. Note that this is just a direct poly-line and not using the directions API, which would present the route through various roads.
The next topic deals with Local Search, which in iOS 7 has introduced the ability to search for nearby places, using natural query language, like "Cafes" or "Cinema", which we will dive into next.
Local Search
While we were previously able to perform searches using geo-coding and reverse-geocoding, iOS 7 has given us the ability to search contextually (locally) through natural language queries. This is done by firstly creating an object of type MKLocalSearchRequest, assigning a local search query string to the object, and constraining the search locally to newRegion, which we passed in the Sydney Opera House region:
0001: MKLocalSearchRequest *request = [[MKLocalSearchRequest alloc] init];
0002:
0003: request.naturalLanguageQuery = searchString;
0004: request.region = newRegion;
We then set out the search completion handler, prior to initiating the search:
0001: MKLocalSearchCompletionHandler completionHandler = ^(MKLocalSearchResponse *response, NSError *error)
0002: {
0003: if (error != nil)
0004: {
0005: //handle error
0006: }
0007: else
0008: {
0009: NSLog(@"response %@", response.mapItems);
0010: self.places = [response mapItems];
0011: [self addPlacesAnnotation];
0012:
0013: }
0014: ...
0015: };
We get a set of MKMapItem back, which we then store in an array, before setting them as annotations in the map.
...
0001: self.localSearch = [[MKLocalSearch alloc] initWithRequest:request];
0002:
0003: [self.localSearch <strong>startWithCompletionHandler:completionHandler];</strong>
0004: [UIApplication sharedApplication].networkActivityIndicatorVisible = YES;
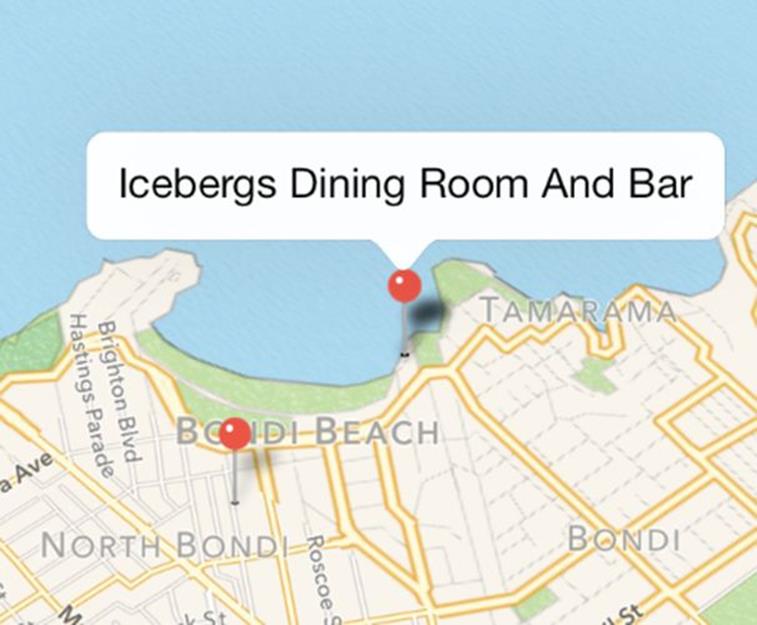
We have an instance of MKLocalSearch that we use to call startWithCompletionHandler, passing in the handler block we just defined previously, so that it can run asynchronously. We searched using the query string "Icebergs", with result finding two locations, as illustrated in the figure below:
Once you've searched for a location, wouldn't it be nice to get directions to it? The next section will show you how to make use of the new routing API to get the best route between two points.
Directions
In iOS 7, Apple has given developers greater power through exposing a routing API that is truly empowering. With the latest API revisions, we are able to provide directions that:
· Adapt to either driving or walking modes of transport; Walking;
· Displaying alternative routes to the destination;
· Estimation of time to destination based on current traffic conditions;
· Estimation of future time to destination based on historical traffic data;
To use the routing API is also quite straightforward. First, you create an MKDirectionsRequest object, passing it a source and destination MKMapItem. You then set optional properties, such as whether you require alternative routing to be displayed, before calling the block method to get directions, as we had done in our BepBop app:
0001:MKDirections *directions = [[MKDirections alloc] initWithRequest:request];
0002: [directions calculateDirectionsWithCompletionHandler:
0003: ^(MKDirectionsResponse *response, NSError *error) {
0004: if (error) {
0005: //handle error
0006: } else {
0007: [self displayDirectionsWithResponse:response];
0008: } }];
In calling the block, provided we have no errors come our way, we call the displayDirectionsWithResponse: method, passing in our MKDirectionsResponse object. When then, wrapped in another UIView Animation block, loop through all the routes in the response and add them as poly-line overlays in our map.
0001:for (MKRoute *route in response.routes) {
0002: [self.mapView addOverlay:route.polyline level:MKOverlayLevelAboveRoads];
The following shows the two routes returned in the BepBop app, between the Sydney Opera House and Bondi Beach, taking into account traffic conditions.
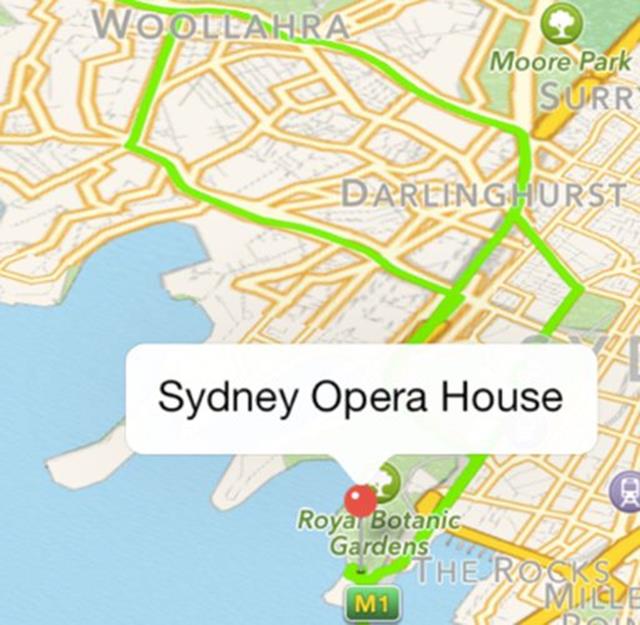
A thing to note is that in the MKDirectionsResponse object returned, it echos the source and destination passed in the request back, to allow you to re-confirm that those are the locations originally intended. It may actually vary from the original request, due of various reasons, such as a more optimal point/path being chosen by the API as the starting or ending point.
The response also delivers other properties worth noting, such as:
· Localised Name of the route, such as "Route 49M";
· Distance of the journey;
· Localised advisory notices, such as "requires toll";
· Expected travel time;
· Geometry poly-line (which we use to draw on our map);
· Steps in the journey, also known as way-points;
As you can see, directions is quite easy to implement, with only a few lines of code. There currently isn't any application-capped or developer-capped usage limits, with Apple promising that popular apps won't be throttled because of their popularity. Having said that, Apple does recommend that fair-use apples, and Apple will throttle apps with extremely high usage, or emit high usage because of a bug.
The final section will dive into one of the most exciting parts of maps, working with 3D perspectives, and playing around with the 3D camera programmatically.
Perspectives
The most prominent visual change when Apple went with its own implementation of its mobile mapping platform was the feature of 3D buildings, and fly-overs, which certainly made Apple Maps one of the prettiest mapping apps, if anything. The ability to pitch and rotate and go across the entire meridian all existed in iOS 6, but not in MapKit, meaning in your own custom applications, you could not replicate the same wholesome features we had in Apple Maps.
When we talk about 3D maps, it isn't truly accurate that the map is 3D. In fact the cartography is 2D, so we have a 2D map, with 3D buildings that are extruded, giving the illusion of a complete 3D map, when in fact it is actually 2.5D, as shown in the following diagram:

The user is able to use the same set of gestures to rotate and pan vertically the maps, with pinching to zoom that we are accustomed to in the Maps app itself. In fact, in XCode 5, you are even able to mimic the same gestures to test your app in the simulator, rotating using option + drag in a circular motion, whereas to pitch, option + shift + drag vertically.
As far as displaying 3D buildings, as well as pitching/rotating and zooming, that works right out of the box, when you compile your app in iOS 7. However, there are a few changes in the API that do require re-adapting, especially to take advantage of 3D, with the use of MKMapCamera.
Currently, you may be familiar with setting up a 2D simple map, without rotation, for instance like:
0001:[MKMapView setVisibleMapRect:]
0002: [MKMapView setRegion:]
With 3D maps, because of the angle of the camera, the code aims ot get the best visible region taking into account the camera angle, based on a property called centerCoordinate, which is the center coordinate the camera should focus on. Whereas if we are viewing the map from the top, the center area is equally visible as a circle, but as we pitch the camera/angle, the area of visibility changes as well.
In previous iterations of iOS, we had MapKit expose four methods, to convert geometric properties, namely:
· convertPoint:toCoordinateFromView;
· convertCoordinate:toPointToView;
· convertRect:toRegionFromView;
· convertRegion:toRectToView;
The difference in iOS 7 is that when the user hits a point on the screen, because we are in 3D space, the user is now able to hit areas that are not physically on the map, such as beyond the horizon, towards the sky, where we are not really able to get coordinates for. Thus, the change is that now we can expect that it's possible to get invalid values as well, that may be returned, and this needs to be anticipated. This can in fact be anticipated with kCLLocationCoordinate2DInvalid and CGRectNull.
MKMapCamera is a new API class to iOS 7, that allows developers to play around with the perspective in 3D space. In order to understand how MKMapCamera works in the context of a 3D coordinate system, we must first understand that we have three axis to work with, the x, y and z.
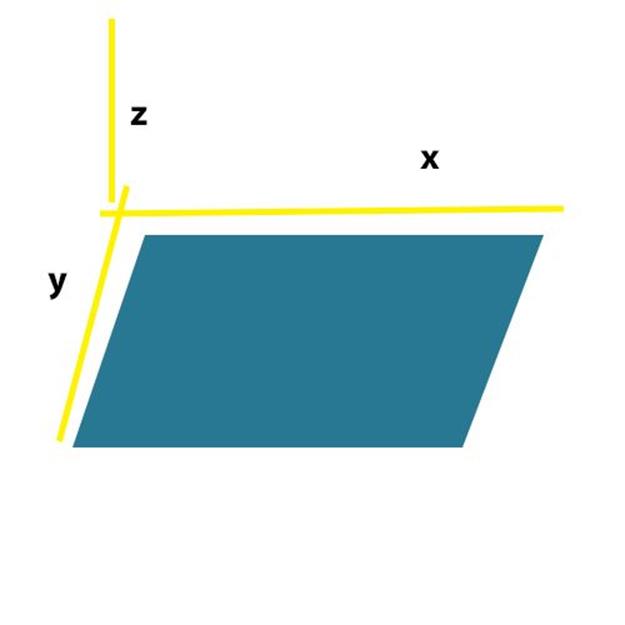
The x and y axis form part of the 2D plane, whereas the z axis is the altitude, or third dimension. Looking at MKMapCamera, this correlates to the four important properties that help define the perspective:
1. Center Coordinate: which is the point on the ground as longitude and latitude, that is the center of the screen;
2. Altitude: refering to how high above the ground the camera should be;
3. Heading: which is the direction the camera should face, with 0 degrees being North, 180 degrees being South. This could conceptually be thought of as rotating along the Z-axis;
4. Pitch: is the angle the camera tilts at, with 0 being straight down, and the higher up from 0 in value, the more towards the horizon the camera points.
The last property, pitch in fact gets clamped or restricted to within a reasonable value, rather than allowing you to pitch all the way to the sky. The maximum value is different based on the other three properties, so the maximum is not always the same.
Using the camera convenience method is also non-trivial,and we will show you that as we demo it in our BepBop app:
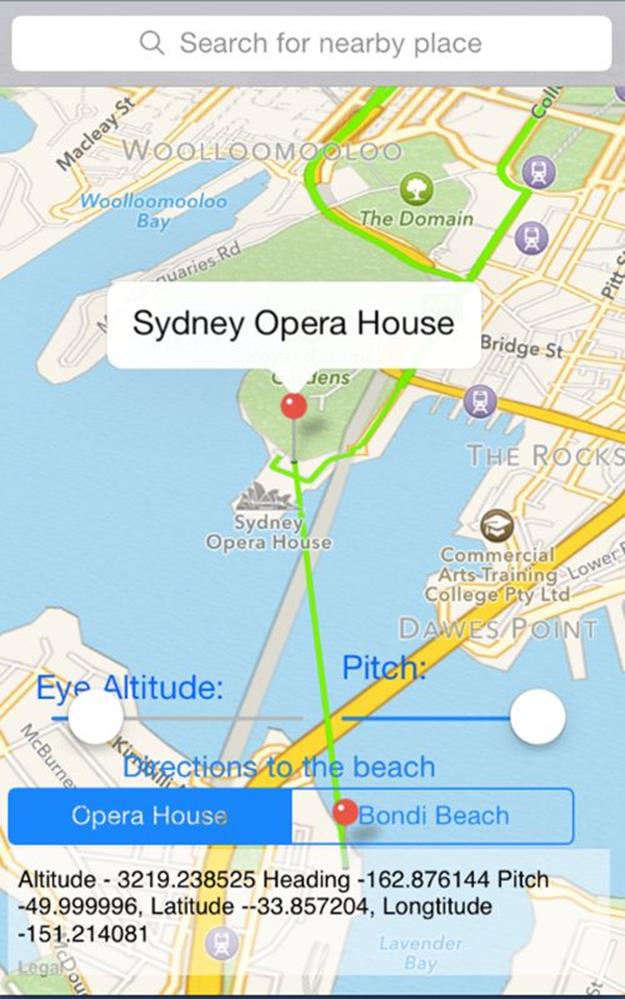
1. In our ViewDidLoad: method, we set an MKMapCamera object, which will be our initial camera perspective. We set the lookingAtCoordinate to the specified Sydney Opera House coordinate, and set the fromEyeCoordinate: to be nearby landmark of Luna Park. We did that so we can get the viewing point, as if you are looking at the Opera House from Luna Park. We then set an eye altitude of 900 metres, so we can be hugh up, and set a pitch explicitly to 60.
0001:MKMapCamera *camera = [MKMapCamera cameraLookingAtCenterCoordinate:sydneyOperaHouseRegion.center fromEyeCoordinate:lunaParkRegion.center eyeAltitude:900];
0002: camera.pitch = 60;
0003: stepperValue = camera.pitch;
0004:
0005: //camera.altitude = 1500;
0006: [self.mapView setCamera:camera animated:NO];
The resulting perspective is illustrated below:
To demonstrate a fly-over effect in the BepBop app, we used multiple cameras to get from one location, Sydney Opera House to another location, Bondi Beach. We created a toggle button to switch between the two locations:
0001:- (IBAction)changeCameraView:(id)sender {
0002: UISegmentedControl *segment=(UISegmentedControl*)sender;
0003:
0004: if (segment.selectedSegmentIndex == 0)
0005: [self goToCoordinate:sydneyOperaHouseCoordinate];
0006: else
0007: [self goToCoordinate:bondiBeachCoordinate];
0008:
0009:}
We then created a method goToCoordinate: passing in the coordinate to animate to:
0001:- (void)goToCoordinate:(CLLocationCoordinate2D)coordionate{
0002: MKMapCamera* end = [MKMapCamera cameraLookingAtCenterCoordinate:coordionate
0003: fromEyeCoordinate:coordionate
0004: eyeAltitude:500];
0005: end.pitch = 55;
0006:
0007: CLLocationCoordinate2D startingCoordinate = self.mapView.centerCoordinate;
0008: MKMapPoint startingPoint = MKMapPointForCoordinate(startingCoordinate);
0009: MKMapPoint endPoint = MKMapPointForCoordinate(end.centerCoordinate);
0010:
0011: MKMapPoint midPoint = MKMapPointMake(startingPoint.x + ((endPoint.y - startingPoint.y) / 2.0),
0012: startingPoint.y + ((endPoint.y - startingPoint.y) / 2.0)
0013: );
0014:
We created an end camera point, with the coordinates for the destination passed in as center coordinate as well as fromEye perspective, setting the altitude to be 500. We also set the end pitch to be 55. The starting Coordinate is the current location prior to the animation.
We then define the mid-point on the map to be half way between the starting and ending points. We also set the altitude distance zoom out four times, as shown below:
0001: CLLocationCoordinate2D midCoord = MKCoordinateForMapPoint(midPoint);
0002:
0003: CLLocationDistance midAltitude = end.altitude * 4; // zoom out 4 times
0004:
0005: MKMapCamera* midCamera = [MKMapCamera cameraLookingAtCenterCoordinate:end.centerCoordinate
0006: fromEyeCoordinate:midCoord
0007: eyeAltitude:midAltitude];
0008:
0009: listOfCameras = [[NSMutableArray alloc] init];
0010:
0011: [listOfCameras addObject:midCamera];
0012: [listOfCameras addObject:end];
0013: [self goToNextCamera];
0014:
0015:}
We initialise a mutable array to store the list of Cameras (start, end and mid) and add the mid and end camera, before calling goToNextCamera:
0001:- (void)goToNextCamera{
0002: if (listOfCameras.count ==0){
0003: return;
0004: }
0005:
0006: MKMapCamera* nextCamera = [listOfCameras firstObject];
0007: [listOfCameras removeObject:0];
0008: [UIView animateWithDuration:1.0
0009: delay:0.0
0010: options:UIViewAnimationOptionCurveEaseInOut
0011: animations:^{
0012: self.mapView.camera = nextCamera;
0013: } completion:NULL];
0014:
0015:}
As long as we added cameras to the queue/stack we can continue with the method, getting the next camera and assigning it to our mapView, within a UIView animateWithDuration: block. So in three simple methods, we were able to re-created the fly-over effect that we see in Apple Maps, within our own mapping solution.
The final topic is certainly a pleasant attribute, the ability to archive and unarchive our map state using NSArchiver, and Unarchive, the same we we are normally accustomed to with other objects.
Saving and Restoring Map State
Saving and Restoring state is another thing the developer needs to bare in mind. When a user is pitched in a certain position and exits the app and gets back in, it would be nice to restore the state. With MKMapCamera, it inherits from <NSSecureCoding>, therefore you can follow the same archiving and de-archiving steps, we did in BepBop:
0001:-(void)encodeRestorableStateWithCoder:(NSCoder *)coder{
0002: MKMapCamera* camera = [self.mapView camera];
0003:
0004: NSArray *paths = NSSearchPathForDirectoriesInDomains(NSDocumentDirectory, NSUserDomainMask, YES);
0005: NSString *docDir = [paths objectAtIndex: 0];
0006: NSString* docFile = [docDir stringByAppendingPathComponent: @"BepBopMap.plist"];
0007:
0008: [NSKeyedArchiver archiveRootObject:camera toFile:docFile];
0009:
0010: [super encodeRestorableStateWithCoder:coder];
0011:}
0012:
0013:- (void)decodeRestorableStateWithCoder:(NSCoder *)coder{
0014:
0015: NSArray *paths = NSSearchPathForDirectoriesInDomains(NSDocumentDirectory, NSUserDomainMask, YES);
0016: NSString *docDir = [paths objectAtIndex: 0];
0017: NSString* docFile = [docDir stringByAppendingPathComponent: @"BepBopMap.plist"];
0018:
0019: MKMapCamera* camera = [NSKeyedUnarchiver unarchiveObjectWithFile: docFile];
0020: [self.mapView setCamera:camera];
0021:
0022: [super decodeRestorableStateWithCoder:coder];
0023:}
The snippet above you should be accustomed to. The first method creating a directory path and file, BepBopMap.plist and archiving the current camera perspective to the file, whereas the second method unarchives the specified file accordingly and assigns it to the current mapView camera.
Summary
This chapter explored many of the new APIs introduced in MapKit, that allow you to leverage all the interactive and visually pleasing features found in Apple Maps. We introduced Overlays and new Local Search methods, using natural search query language, as well as the new Directions API to allow you to formulate the best routing path between two points.
We then walked through creating a 3D Camera animation, using MKMapCamera, programmatically adjusting the center coordinates, panning and pitching to customize your 3D viewing perspective. We concluded the chapter by outlining how we save and restore state for our mapping data objects, using the Archiving methodology.
In the next chapter we look at XCode 5 and the new build improvements and continuous integration, and how the latest IDE iteration saves you time.