Take Control of FileVault (1.1) (2015)
Activate and Use FileVault
In most cases, it takes just a few clicks and a minute or two to turn on FileVault. But before you do, you need to make sure your Mac meets the necessary requirements—and to be on the safe side, I recommend a few extra preliminary steps. Once FileVault is enabled, the way you use your Mac will change only slightly. But you’ll also want to know what to do when trouble arises—for example, you forget your password, or your Mac is lost or stolen.
Check System Requirements
Every Mac running Lion or later supports FileVault 2. If you have a reasonably standard setup, you’re probably in good shape, but if you’ve done anything unusual with your disk’s structure, you should be aware of these two additional requirements:
· A Recovery HD volume: This special, hidden partition (see the sidebar About OS X Recovery, just ahead) is mandatory on the disk containing your FileVault volume. As a result, if your Mac doesn’t permit you to create a Recovery HD volume (you will have seen an error message to this effect when installing or upgrading to Lion or later), you can’t use FileVault either. Software RAID volumes created in Disk Utility are right out, but hardware RAIDs (and RAID-like devices, such as Drobo) should support the Recovery HD volume.
If you’re unsure whether your Mac has a Recovery HD volume, restart while holding down Command-R. If you boot into Recovery mode, you’re golden.
Note: In earlier versions of Mac OS X, FileVault required that your drive have a single visible volume. But in Mavericks and later, I’ve successfully used FileVault to encrypt only the startup volume on disks with two or three volumes.
· At least one home folder on the startup disk: If for some reason you’ve moved all the home folders (that is, all the top-level folders inside the /Users folder) to a separate volume, FileVault won’t work. You must have at least one home folder on your startup disk, and that user’s account must be authorized for FileVault (see Turn On FileVault). Very few typical users do this; if you’ve done it, you’ll know.
About OS X Recovery
Since 10.7 Lion, Mac OS X installers have created a hidden partition on your disk called Recovery HD. You can boot from this special volume by holding down Command-R while restarting, at which point you can repair a damaged disk, reinstall Mac OS X, and perform other maintenance tasks. Apple refers to all these features collectively as OS X Recovery.
FileVault, too, relies on the Recovery HD volume. In particular, the remote lock and wipe capabilities (see Find or Wipe a FileVault-enabled Mac) require your Mac to be able to boot, but without the startup disk being decrypted. Recovery HD serves this purpose, and that’s one reason Apple requires that this hidden volume be present before you can enable FileVault.
Normally, running the Mac OS X installer for Lion or later creates a Recovery HD volume for you automatically. However, certain volume structures—such as RAIDs created in Disk Utility and drives with Boot Camp volumes that later had manual partitioning changes—don’t support the creation of Recovery HD, which in turn means they don’t support FileVault. (For more details, read Apple’s article OS X: “Some features of Mac OS X are not supported for the disk (volume name)” appears during installation.)
However, you may have a drive—for example, a bootable duplicate you stored on an external drive—that supports OS X Recovery and yet lacks a Recovery HD volume. In such cases, you can add a Recovery HD volume after the fact. See Make Sure Your Destination Disk Has a Recovery HD Volume for details.
Make a Backup
I’ve turned FileVault on and off, on numerous Macs and external drives, dozens of times. Nearly always, it works just fine—Apple engineered FileVault carefully to avoid the possibility of data loss. However, I have occasionally seen odd and inexplicable situations in which a FileVault-enabled Mac accepted my password but then refused to log me in, or in which other wacky misbehavior made it difficult for me to access my data. And at these times, I was extremely grateful to have backups!
Because you’re going to be encrypting every single file on your disk, you do not want to take the chance that some random error could leave all your data inaccessible. Just as I recommend when installing a new version of Mac OS X, I strongly suggest making a bootable duplicate (or “clone”)—a complete copy of your startup disk, stored on an external drive in such a way that you could boot your Mac from it if necessary—before turning on FileVault. Even if you use CrashPlan, Time Machine, or any of countless other excellent programs that create versioned backups, a bootable duplicate is what you want right now, because only a duplicate will enable you to get back to work immediately if something goes wrong, as well as offer a way to restore your entire disk to its previous state.
Many Mac backup apps can create bootable duplicates, but the best two tools for this particular purpose are Carbon Copy Cloner and SuperDuper. For details, see the documentation that comes with the app or check out my book Take Control of Backing Up Your Mac.
Note: To learn about backing up after you’ve enabled FileVault, see Understand FileVault and Backups.
Repair Your Disk
Although it doesn’t happen often, on rare occasions damaged files and other disk errors can derail the encryption process. So I suggest using Disk Utility to repair your disk first:
1. Restart your Mac and immediately hold down Command-R until the Apple logo appears. This enables you to boot into Recovery mode.
2. When the OS X Utilities window appears, select Disk Utility and click Continue. Disk Utility opens.
3. Select your disk (the one you’ll be using for FileVault) in the list on the left and then click Repair Disk on the right. Disk Utility reports any errors it finds and corrects.
4. After the repair process is complete, quit Disk Utility.
5. Quit OS X Utilities and click Restart.
Your Mac restarts, and you can proceed with setting up FileVault. (If Disk Utility finds errors it can’t fix, you may need to turn to a different tool, such as DiskWarrior—or erase your disk and restore it from a backup. Don’t proceed with turning on FileVault if you know your disk has errors.)
Turn On FileVault
Now it’s time to start the actual encryption process—and, in so doing, use one or more methods to store a recovery key that can help you if you forget your password.
Note: If you’ve just upgraded from a Mac running Snow Leopard with the original version of FileVault enabled, you must turn that off first. See Upgrade from Legacy FileVault for details.
Start with these steps:
1. If any other users are logged in using Fast User Switching, switch to those accounts (or have the other users do so) and log out—you should be the only user logged in when you complete these steps.
2. Go to System Preferences > Security & Privacy and click FileVault (Figure 1).
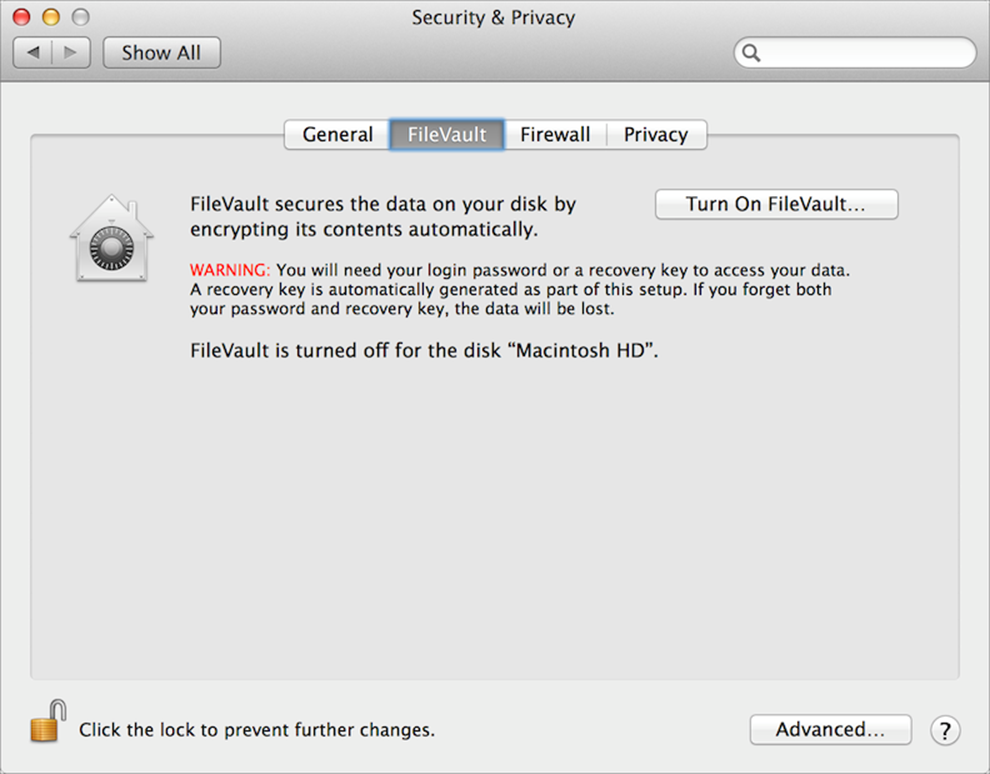
Figure 1: Click Turn On FileVault to begin the process of activating FileVault.
3. If the lock ![]() icon is locked, click it and enter your login password to unlock it.
icon is locked, click it and enter your login password to unlock it.
4. Click Turn On FileVault.
From here on, the path you’ll follow depends on which operating system you’re running. Under Yosemite, proceed through the remaining steps in order—but pay attention to the instructions at the end of Choose a Recovery Method, which may take you in any of three directions depending on your circumstances.
If you’re running Mavericks or earlier, you’ll proceed in a different order (and don’t worry, I’ll remind you where to go next at each step in the process):
· First, skip ahead to Grant Other Users Access.
· Next, you’ll Record Your Recovery Key.
· Optionally, Store Your Recovery Key with Apple (or Not).
· Once you’ve done all this, you need only Wait for Encryption to Finish.
Choose a Recovery Method
(As a reminder, if you’re running Mavericks or earlier, skip this topic and go straight to Grant Other Users Access.)
Starting with Yosemite, Apple has simplified your options for choosing a recovery method, giving you a fallback plan in case you lose or forget your password. You’ll see a dialog (Figure 2) asking whether you want to use your iCloud account to unlock your disk or create a recovery key.
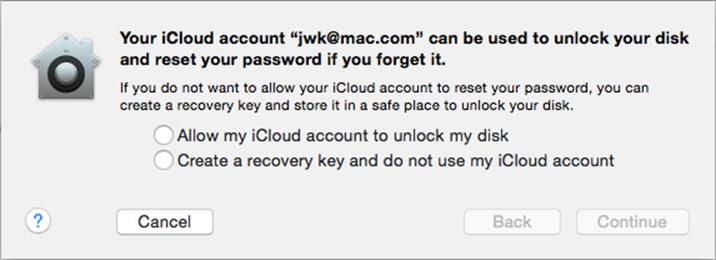
Figure 2: Choose a recovery method in this dialog.
Here’s what these options mean:
· Allow my iCloud account to unlock my disk: If you forget your login/FileVault password, you can use your iCloud password to reset it. This is the simplest method, but it also means that someone who obtained both your Mac and your iCloud password could decrypt your disk. If you select this method and you have only one user account on your Mac, click Continue followed by Restart and then skip straight to Wait for Encryption to Finish. If you have two or more user accounts on your Mac, instead click Continue and then flip ahead to Grant Other Users Access.
Note: If you aren’t already signed in to your iCloud account, the wording of this first choice is different: “Set up my iCloud account to reset my password.” If you select this and click Continue, you’ll be prompted to sign in to your iCloud account before restarting.
· Create a recovery key and do not use my iCloud account: If you forget your password, you can use a 29-character recovery key to unlock your Mac’s disk. This is more secure in the sense that your iCloud password won’t be doing double duty, but it’s also riskier in the sense that you must remember that recovery key, because if you lose both that and your password, you’re totally out of luck. If you select this method, click Continue and then proceed with the next topic.
Record Your Recovery Key
In Mavericks or earlier—or if you chose to create a recovery key in Yosemite—the next thing you see is a dialog with a 29-character string—six groups of four alphanumeric characters separated by hyphens (Figure 3). This is your randomly generated recovery key, which is extremely important, because it can enable you to unlock your Mac if you forget or lose your password.
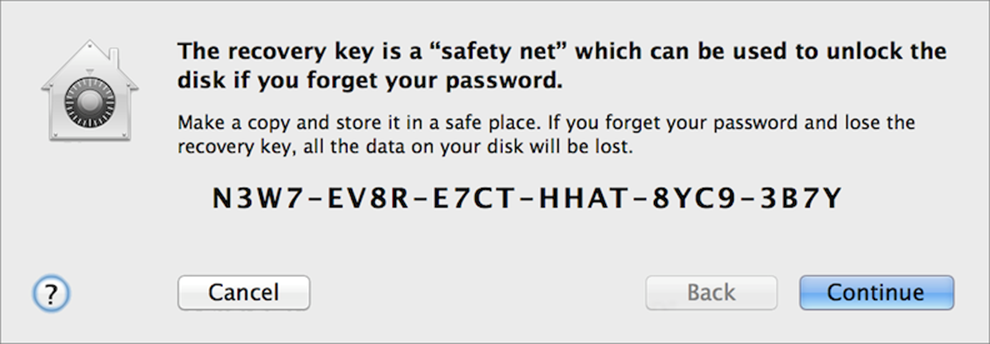
Figure 3: Apple generates a random recovery key for you. Be sure to record it in a safe place! (Note: This is not my real recovery key!)
So, before you do anything else—and definitely before you click Continue!—make a copy of this key. You could, for example:
· Write it down on a piece of paper and keep it somewhere safe.
· Take a screenshot (press Command-Shift-4, press Spacebar, and click on the window) and store that file in a safe place (such as an encrypted external drive). Don’t store it on the same drive, since that drive will be locked when you need the code.
· Type the key into a password manager such as 1Password, and/or drag your screenshot into the password manager.
Whatever you do, hang onto that key—make sure it’s stored somewhere that you can access it if your Mac is locked, but also somewhere no one else will be able to find it.
Note: Large organizations that manage Macs for their employees can set an institutional recovery key (IRK) so a system administrator can unlock the system if necessary. When an IRK is used, you won’t see or be able to use a personal recovery key as described here. If you need instructions for creating and using an IRK, please see Apple’s article OS X: How to create and deploy a recovery key for FileVault 2.
Once you’re sure you have a copy of that key, click Continue. Then:
· If you’re running Yosemite or later and have only one user account on your Mac, click Restart and skip all the way to Wait for Encryption to Finish.
· If you’re running Yosemite or later and have two or more user accounts on your Mac, skip ahead to Grant Other Users Access.
· If you’re running Mavericks or earlier, continue with the next topic.
Store Your Recovery Key with Apple (or Not)
For anyone running Mavericks or earlier, your next decision is whether to let Apple store a copy of your recovery key. In the dialog that appears (Figure 4), select either Store the Recovery Key with Apple or Do Not Store the Recovery Key with Apple.
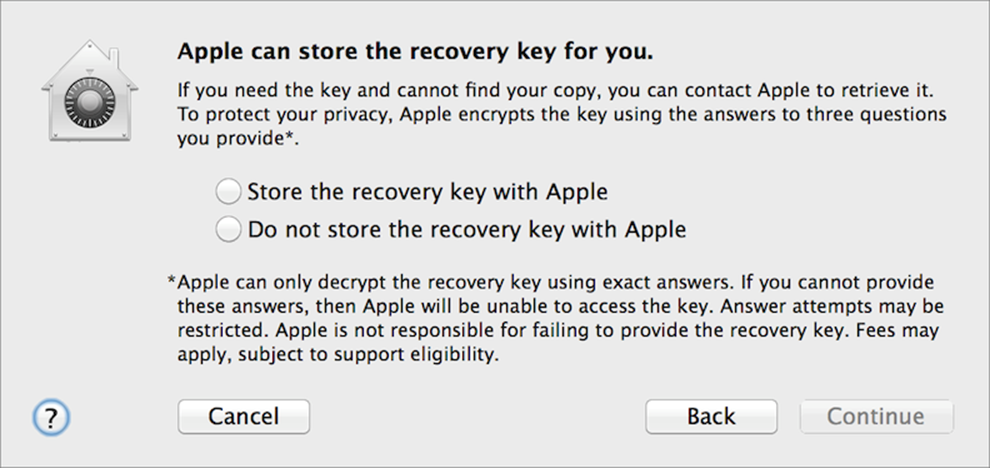
Figure 4: Choose whether to store your recovery key with Apple.
You can make whichever choice you’re most comfortable with; here are the facts you should consider:
· If you don’t store the recovery key with Apple, keeping it safe is entirely your responsibility—you’ll have no recourse if you lose it.
· If you do store the recovery key with Apple, then you’ll have a secondary backup plan if you forget your login password and lose your recovery key. It will be possible (though not convenient) to retrieve your recovery key from Apple and thereby gain access to your Mac.
· When you store a recovery key with Apple, you must choose three security questions and answers. Apple then uses encrypted copies of those answers to encrypt your recovery key, and that encrypted data is what Apple stores. In other words, Apple can’t see your recovery key itself or even the answers to your questions; all its databases record are encrypted versions of those items. So the only way for you to get the key back from Apple is to correctly answer your three questions over the phone, at which point an Apple employee types them into a computer. If they match your previously stored answers exactly, then the computer decrypts your recovery key, which the Apple support person can then read to you.
Having looked into the details of how Apple stores recovery keys, I’m completely comfortable with its level of security. But it’s up to you.
If you do select Store the Recovery Key with Apple, the dialog expands (Figure 5) to reveal the security questions.
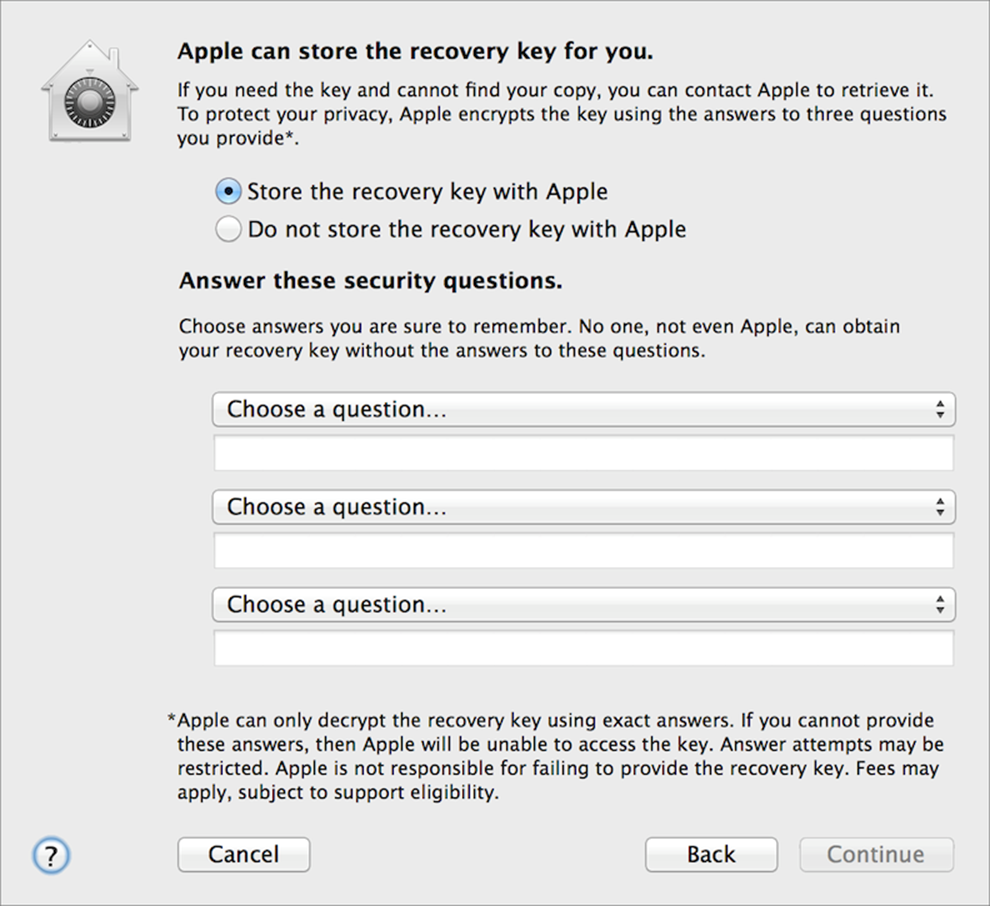
Figure 5: If you choose Store the Recovery Key with Apple, you must choose three security questions and enter their answers.
From each of the three pop-up menus (Figure 6), choose a question and then type its answer in the field below.
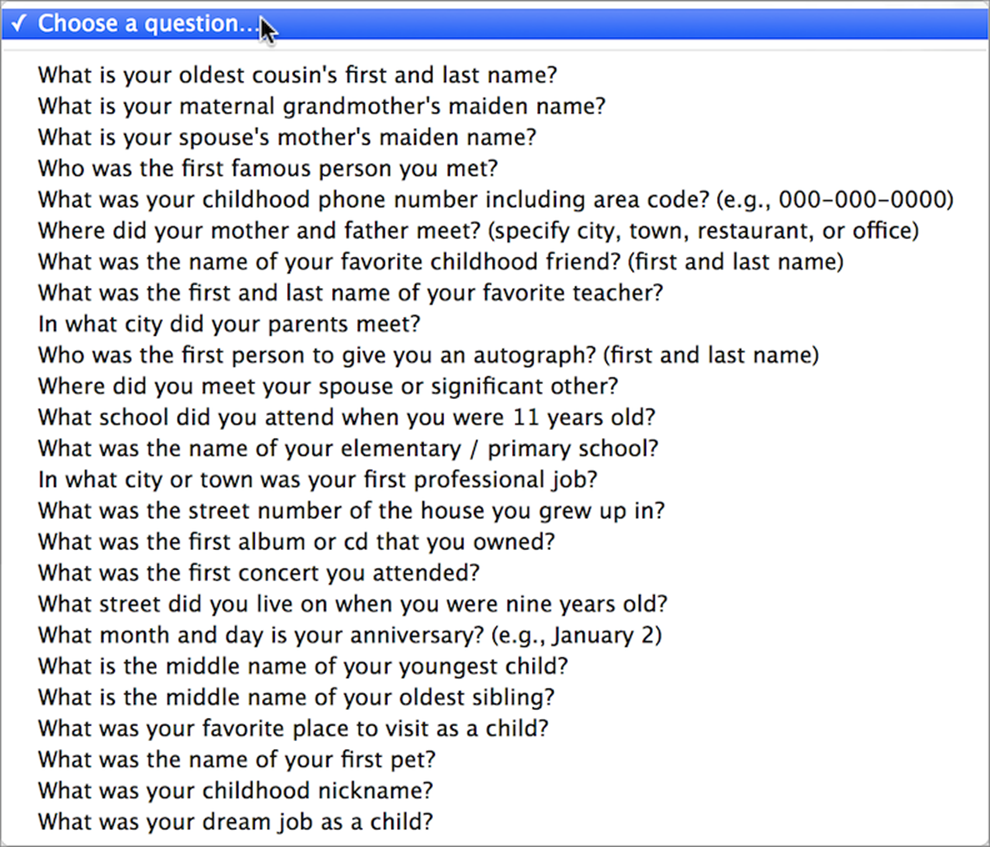
Figure 6: You can choose from a long list of security questions.
Tip: Remember, if you have to supply these answers later in order to retrieve your recovery password, you must do so over the phone, and the person typing in your answers must get everything—including case and punctuation—exactly correct. So try to make your answers easy to understand and type correctly.
You are, of course, free to lie. After all, lots of people probably know your childhood nickname and your anniversary, so giving the correct answers could give an attacker a leg up. However, if you make up answers, be careful to remember your lies—or record them somewhere accessible, like a password manager on your phone or another computer. If you can’t tell the Apple support person exactly what you typed here, you won’t get your recovery key back.
Once you’ve selected questions and filled in your answers—or selected Do Not Store the Recovery Key with Apple—click Continue. Enter your password again if prompted to do so, and then click Restart. Now you can skip ahead to Wait for Encryption to Finish.
Grant Other Users Access
As you read earlier (How Do I Choose a FileVault Password?), your login password is normally used to unlock FileVault. If you have more than one user account on your Mac, you probably want those other users to be able to unlock FileVault too—but without knowing your password! You can authorize other users now, later, or not at all (as you prefer). But keep in mind that once any user unlocks FileVault, other users can log in normally, without needing to be authorized.
When you click Turn On FileVault on a Mac with multiple user accounts (in Mavericks or earlier) or turn on FileVault and then choose a recovery method (in Yosemite or later), you’ll see a dialog with each account listed (Figure 7). For each user you want to allow to unlock FileVault, click Enable User.
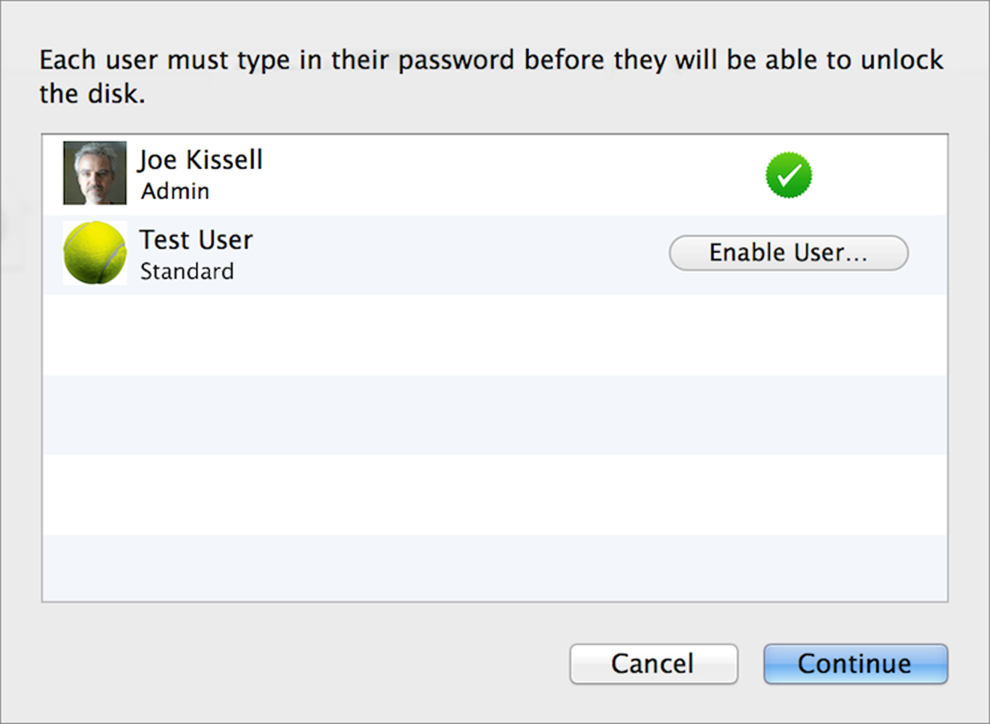
Figure 7: In this dialog, enable FileVault access for each user (besides yourself) you trust to decrypt your disk. (Or skip it and come back to it later.)
A password dialog (Figure 8) then appears. You (or the user in question) must now type that user’s login password and click OK. Repeat this process as necessary to authorize other users. (Or, if you prefer, skip it for now—you can always enable more users later.)
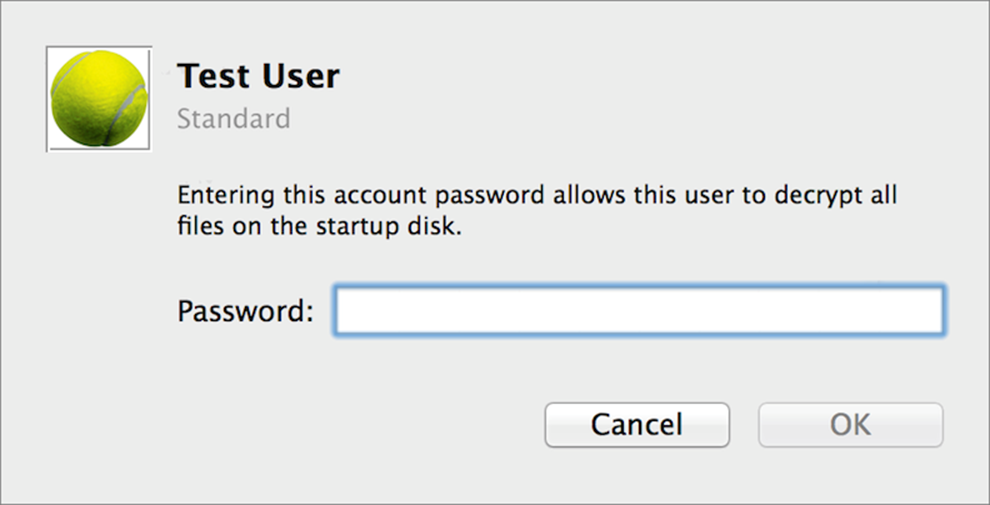
Figure 8: Enter the user’s login password and click OK.
When you’re finished authorizing any additional users, click Continue.
Note: If you add a new user account after enabling FileVault, that user is automatically authorized to unlock FileVault. If that’s a problem, use the command line afterward to De-authorize a specific user.
And now for a geek moment! (Technologically squeamish readers, skip the next two paragraphs.)
Your Mac has just one FileVault key, but you never see it or interact with it directly. It’s stored encrypted on disk until you log in, at which time it’s decrypted and kept in RAM while your Mac is on. But you can grant any user access to unlock FileVault with her own password (thus getting access to the whole disk), so how does that square with there being just one FileVault key?
The FileVault key itself is encrypted with another randomly generated key, called (of course) a key-encrypting key, or KEK. Each user on your Mac with FileVault access gets a copy of that KEK, encrypted with her own login password. So the process is: Mary enters her login password, which unlocks her personal copy of the KEK. The KEK, in turn, is used to unlock the FileVault key, and that is what your Mac uses to decrypt your files. So, it doesn’t matter which copy of the KEK was unlocked or by whom; once it’s unlocked, anyone with physical access to the Mac can access its files.
At this point, if you’re running Mavericks or earlier, it’s time to flip back to Record Your Recovery Key. If you’re running Yosemite or later, continue with the next topic.
Wait for Encryption to Finish
When your Mac reboots, the first thing you see is a login screen with a light-gray background and icons for each of the users authorized to unlock FileVault. Click a username (if there’s more than one), enter the corresponding password, and press Return.
Note: I’ve heard of cases in which, at this first login screen, third-party keyboards (particularly Bluetooth keyboards) did not work. If you have the option to use a wired keyboard or an Apple Bluetooth keyboard for this step, that will likely avoid the problem.
Once your Mac finishes booting (which may take longer than usual), the encryption process continues in the background until it’s done. You can use your Mac however you like—run apps, create documents, log out, or even restart—and FileVault will do its best to stay out of your way. You may notice slower performance, and extra fan noise and heat, during the encryption process, but it won’t take long—anywhere from an hour to a day, depending on the type, size, and speed of your storage.
To monitor FileVault’s progress, go to System Preferences > Security & Privacy > FileVault. A time estimate appears at the bottom (Figure 9). But note that these time estimates are notoriously unreliable, are influenced by numerous factors, and may change dramatically as time goes on. You might see “23 hours” one moment, “4 hours” the next, and “8 minutes” soon thereafter. So, don’t take the estimate too seriously—just keep checking back periodically until it’s done.
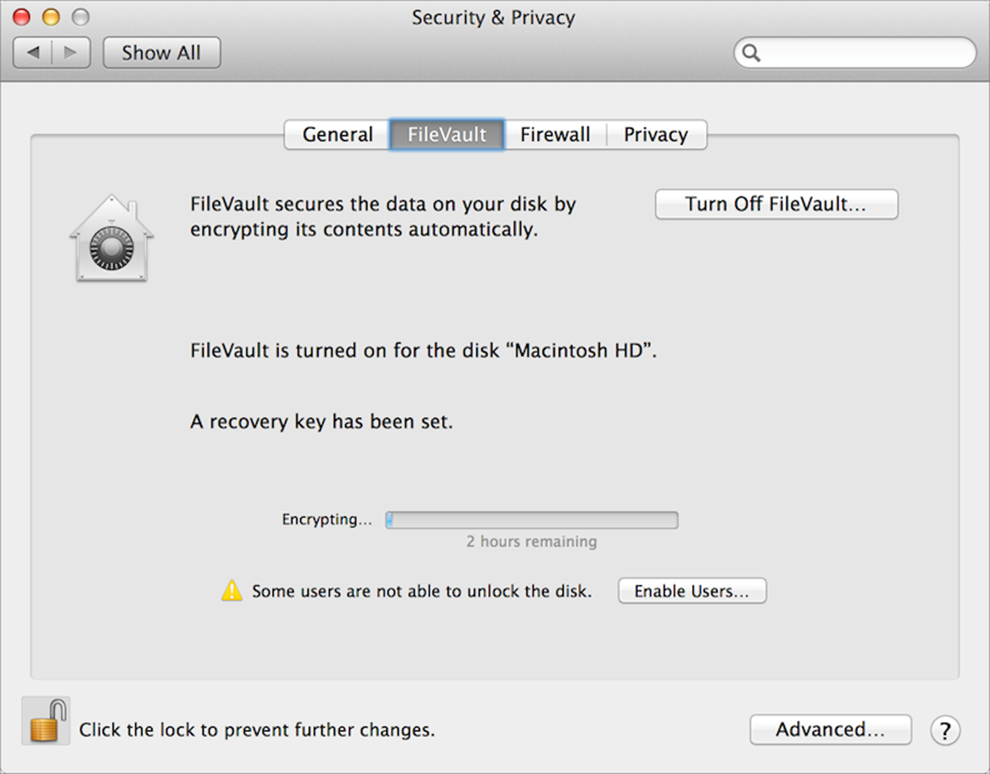
Figure 9: If you open System Preferences > Security & Privacy > FileVault after turning on encryption, a progress bar at the bottom tells you how long until the volume is completely encrypted.
When Encryption Stalls
If encryption stalls completely—as in, the progress bar doesn’t move at all for hours—you can try either of two remedies. First, reset your NVRAM by restarting while holding down Command-Option-P-R (you can let go of the keys as soon as you hear the second startup chime). If that doesn’t work, boot into Recovery mode by holding down Command-R at startup, open Disk Utility, select your disk, and click Repair Disk. Once the disk repair has finished, restart normally.
If you notice an alert (as in Figure 9, above) that “Some users are not able to unlock the disk,” you can click Enable Users to add them, using the procedure I described earlier in Grant Other Users Access.
Upgrade from Legacy FileVault
Legacy FileVault is long dead, and good riddance. But if you have it enabled in 10.6 Snow Leopard and then upgrade your Mac to Lion or later, you’ll see that Legacy FileVault is still there, and still functions exactly as before—unless or until you disable it.
Specifically, the Security & Privacy pane of System Preferences will have an extra view, Legacy FileVault. As soon as you open Security & Privacy, you’ll see an alert (Figure 10) inviting you to turn it off and walk toward the light.
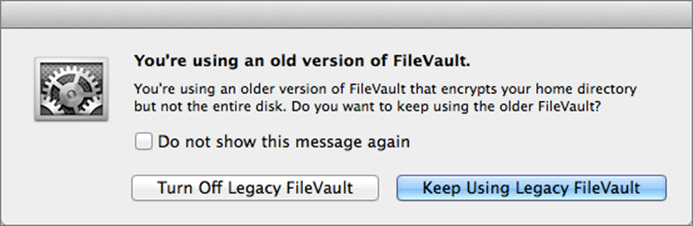
Figure 10: If you go to System Preferences > Security & Privacy after upgrading to Lion or later from a Mac running Snow Leopard with FileVault enabled, this alert appears.
You’re free to ignore this. You can click Keep Using Legacy FileVault (and even, if you’re feeling really intransigent, select Do Not Show This Message Again) to leave FileVault the way it was. But please don’t! Instead, click Turn Off Legacy FileVault and follow the prompts to enjoy the modern FileVault 2 goodness. Once your home folder has been decrypted, you can then Turn On FileVault to use FileVault 2, and the Legacy FileVault view will disappear.
One caution: in order to turn off Legacy FileVault, your Mac needs a good bit of free space on your disk—in fact, a bit more than your home folder currently occupies—because it first copies all your files out of its encrypted disk image and verifies them, and only then deletes the encrypted copy. If you run into error messages about disk space, read Apple’s article OS X Legacy FileVault - “There isn’t enough space on your hard disk…” alert for advice.
Log In with FileVault
From now on, when you restart your Mac, you’ll see the same login screen you did this time, which is subtly different from the normal login screen. This is called the EFI Login screen (also referred to as the “EFI pre-boot environment,” the “EFI Login Window,” and the “pre-boot login screen,” among other terms). It’s different from your regular login screen in the following ways:
· Under Mavericks and earlier (Figure 11, bottom), the EFI Login screen has a light gray background with a dark gray Apple logo, whereas the regular login screen has a dark gray background and a light gray Apple logo. Under Yosemite and later (Figure 11, top), both screens show a blurry version of your Desktop image, but the regular login screen has a small Apple logo in the upper-left corner.

Figure 11: Cropped views of the EFI Login screen, left, and the regular login screen, right. (Top—Yosemite; bottom—Mavericks)
· The EFI Login screen shows only the users authorized to unlock FileVault, while the regular login screen shows all user accounts—that’s why you see Test User in the right-hand screens in the above Figure 11.
· The EFI Login screen has only Restart and Shut Down icons at the bottom, whereas the regular login screen also has a Sleep icon. (These buttons appear below the portion of the screens shown in Figure 11.)
· If you go to System Preferences > Users & Groups > Login Options and select Name and Password next to “Display login window as,” this preference does apply to the regular login screen, but does not apply to the EFI Login screen, which always lists users.
Note: If you have a Guest User account enabled, it will appear on both types of login screen. See the Guest User bullet item in Enable Find My Mac for details.
Although you’ll normally see only the EFI Login screen when you (re)start your Mac, you’ll still see the regular login screen in certain situations—for example, if, after unlocking FileVault at startup, you log out of your account (which returns you to the standard login screen), or if you perform a Safe Boot (see the sidebar Safe Boot and FileVault). You’ll also see both login screens successively if you Use a Separate Password for FileVault.
Tip: Instead of clicking your username on the EFI Login screen, instead type the first letter or two to select it, and then press Return to display the Password field. Type your password and press Return again to log in, all without touching your mouse or trackpad.
Tip: In Mavericks and later, the Input ![]() menu appears in the upper-right corner of the EFI Login screen, so you can use an alternative input method—such as Kotoeri for Japanese—to type your password.
menu appears in the upper-right corner of the EFI Login screen, so you can use an alternative input method—such as Kotoeri for Japanese—to type your password.
Use a Separate Password for FileVault
If you’re extremely security-conscious and want to use a different password for FileVault than your login password, you can. Be aware that you’ll face two consecutive login prompts whenever you start your Mac—the first on the EFI Login screen to unlock FileVault, and the second to log in to your user account.
The way to accomplish this is to turn off FileVault’s Auto-login feature, which normally logs you in to your account using the same password you just entered to unlock FileVault. To do this, open Terminal (in /Applications/Utilities) and type this, followed by Return:
sudo defaults write /Library/Preferences/com.apple.loginwindow DisableFDEAutoLogin -bool YES
Enter your administrator password, and press Return again.
After you do this, you’ll get two password prompts when you restart, but the two passwords will still be the same. You can change your login password in System Preferences > Users & Groups > Password by clicking Change Password and following the prompts. It’s also possible (but less convenient) to change the FileVault disk password—you’ll need to use the diskutil cs changeVolumePassphrase command (see Use diskutil for details).
To return to automatic login, use this command:
sudo defaults delete /Library/Preferences/com.apple.loginwindow DisableFDEAutoLogin
Manually Unlocking a FileVault Volume
Ordinarily, you’ll unlock your FileVault volume as you log in to your Mac. But in some situations, you may boot your Mac and find a FileVault volume still locked. This could happen, for example, if you boot into Recovery mode to repair your disk or reset your administrator password, if you remove your FileVault disk and connect it to another Mac, or if you boot your Mac from a different volume and then try to access your normal startup volume.
Depending on the circumstances, you may see a password dialog immediately when Mac OS X tries to mount the FileVault disk. If not, open Disk Utility, select the FileVault disk in the list on the left, and click the Unlock button in the toolbar (which is where “Mount” would normally be). Enter your password and the disk should mount. This procedure also works for encrypted non-startup volumes (see Encrypt a Non-startup Volume).
Reset a Lost Password
What happens if you forget your login password and therefore can’t get past the EFI Login screen? You’re OK if you do have your recovery key (which you wisely wrote down and kept in a safe place) or if you’re using Yosemite and opted to use your iCloud account as a recovery method. Use the key (or your Apple ID, as the case may be) in lieu of your password to log in and reset your password:
1. Enter your password incorrectly (which shouldn’t be hard, since you’ve forgotten it!) three times.
2. After the third incorrect guess, the display changes to show a pop-up message asking if you’d like to try your recovery key (or, in Yosemite or later, your Apple ID) instead (Figure 12).
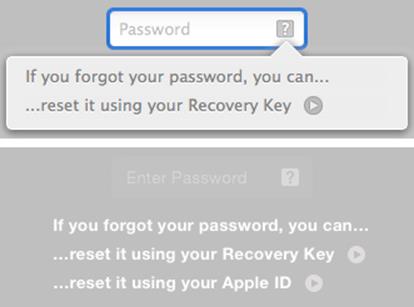
Figure 12: Third time’s a charm: Try your recovery key or Apple ID instead. This shows the recovery prompt as it appears in Mavericks (top) and Yosemite (bottom).
3. To use your recovery key (if you have it), continue with these steps (if not, skip ahead to Step 4):
a. Click the arrow ![]() next to Recovery Key, and the display changes from a Password field to a Recovery Key field (Figure 13).
next to Recovery Key, and the display changes from a Password field to a Recovery Key field (Figure 13).
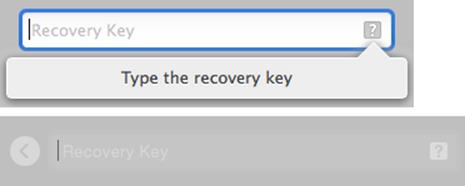
Figure 13: Type your recovery key here. This shows the prompt as it appears in Mavericks (top) and Yosemite (bottom).
b. Type your recovery key and press Return.
c. You see a new prompt (Figure 14) asking you to reset your password. Type and repeat a new password, enter an optional hint, and click Reset Password. This changes your account’s login password (which also, of course, unlocks FileVault).
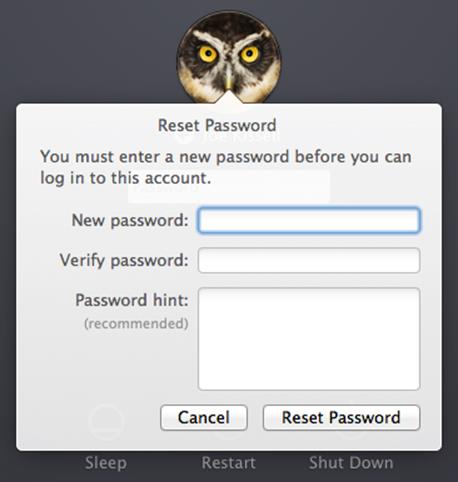
Figure 14: If you’ve had to use your recovery key, FileVault assumes that you’ve forgotten your login password, so you must reset it immediately.
4. Your Mac then continues to boot normally.
5. If, under Yosemite or later, you chose the iCloud recovery option, you can use your Apple ID to reset your password:
a. Click the arrow ![]() next to Apple ID.
next to Apple ID.
b. Your Mac restarts. You see a white Apple logo on a black screen (possibly with a ghost of the password field superimposed on it).
c. Enter your Apple ID and password when prompted, and click Next.
d. If you previously set up two-step verification for your account, follow the prompts to verify your identity.
e. On the Terms and Conditions screen, click Agree, and then confirm your agreement by clicking Agree again.
f. Reset your password by typing and repeating a new password and optionally entering a hint. Click Next, and then click Restart.
Your Mac then continues to boot normally.
If you’re running Mavericks or earlier and you’ve lost both your password and your recovery key, you may have another option. If you stored the key with Apple—described in Store Your Recovery Key with Apple (or Not)—you can still retrieve it.
To do so, you must call Apple. On the telephone. (To find the number for your country, visit the Contact Apple page.) The friendly rep on the other end of the phone will ask you for several pieces of information, including your Mac’s serial number, your iCloud username, and the answers to the three security questions you provided when you set up FileVault.
If you answer all the questions correctly, the rep will read you your recovery key, which you’ll then type into your Mac at the Recovery Key prompt (followed by the obligatory password reset). Remember, you can’t sweet-talk Apple with a sob story; they can’t decrypt your recovery key or even see the answers to your questions. They’ll only know you got them right if you answer them all correctly.
Note: This service is free if your Mac is still under warranty or covered by AppleCare. If not, there may be a fee. (Currently Apple’s pay-per-incident fee for OS X is $49.) Sorry.
If you lost your recovery key and didn’t store it with Apple (or can’t remember the answers you provided to your security questions), tough luck—seriously, there aren’t any other options.
You can reformat the disk and start over from scratch (see Use diskutil if you have trouble ), but you won’t get your data back. Remember (through the tears) that that’s exactly how you want FileVault to behave. If there were a trick or back door, then your data wouldn’t be safe from the bad guys.
Note: To learn about how to wipe a FileVault volume, skip ahead to Find or Wipe a FileVault-enabled Mac.
What If Your Mac Needs Repairs?
Here’s a puzzler. Say your Mac acts up and you need it repaired—but your disk is encrypted with FileVault. The repairperson may need to boot your Mac and log in to fix the problem, but that means you have to hand over your FileVault password—and trust the repairperson with your confidential data. How can you get around this?
If you can boot the Mac—and you have a complete, recent, bootable duplicate—you could erase the startup volume and reinstall a clean copy of Mac OS X (with a new password). When your Mac returns from the shop, you can restore your old system from your backup.
If you’re unable to boot your Mac at all (even in Recovery mode, or from an external drive) in order to erase its disk, you can ask the repairperson whether there’s any way they can get by without the password—perhaps there is. If not, I have no suggestions other than to bite the bullet, give them your password, and hope for the best.
Deactivate FileVault
Should you ever decide you don’t want or need FileVault anymore, you can turn it off:
1. Go to System Preferences > Security & Privacy > FileVault.
2. If the lock ![]() icon is locked, click it and enter your login password to unlock it.
icon is locked, click it and enter your login password to unlock it.
3. Click Turn Off FileVault and confirm by clicking Turn Off Encryption (on a notebook Mac) or Restart & Turn Off Encryption (on a desktop Mac).
FileVault begins decrypting your disk immediately—no restart needed on a notebook Mac. It’ll take about as long as it took to encrypt your disk in the first place, and as before, you can use your Mac normally during this time.
FileVault and OS X Upgrades
When it comes time to upgrade to the next major version of OS X, you can do so without disabling FileVault. It doesn’t hurt to turn it off first, and it might make the process a wee bit smoother (in that you’ll have fewer password prompts, so most of the installation can proceed without requiring any intervention), but it’s not a requirement. However, if you’re upgrading from Snow Leopard to Lion or later, you might find it beneficial to turn off (Legacy) FileVault first, rather than doing the after-the-fact dance described in Upgrade from Legacy FileVault.
In rare cases, you may encounter odd behavior after disabling FileVault—for example, if you later try to reenable it on the same volume, you may see a mysterious error message claiming that the volume is already encrypted (which clearly it isn’t). If this happens to you, see Use diskutil, in “Appendix A: FileVault on the Command Line.” You may need to use Terminal and the diskutil cs revert command to set things right.
Safe Boot and FileVault
If your Mac is on the fritz, you may want to restart it without startup and login items (and other clutter that can cause problems) for the purposes of troubleshooting. To trigger this kind of startup (called Safe Boot or Safe Mode) you hold down the Shift key while restarting.
In earlier releases of Mac OS X, Safe Boot didn’t work properly with FileVault, and Apple’s official advice, if you wanted to do a Safe Boot, was to first disable FileVault and then, after performing any necessary tests or repairs, turn it back on. Yuck!
However, at least as of 10.8.3 Mountain Lion, Safe Boot works with FileVault—it’s just a little different. Restart your Mac, immediately hold down the Shift key, and release it as soon as you see the EFI Login screen. Unlock FileVault as usual, and after a few moments you should see a progress bar slowly make its way across the bottom of the screen. Then the dark-gray login screen appears, with “Safe Boot” in red on the right side of the menu bar. Log in normally, do whatever you need to do, and restart to return to your Mac’s normal operating mode.
All materials on the site are licensed Creative Commons Attribution-Sharealike 3.0 Unported CC BY-SA 3.0 & GNU Free Documentation License (GFDL)
If you are the copyright holder of any material contained on our site and intend to remove it, please contact our site administrator for approval.
© 2016-2026 All site design rights belong to S.Y.A.