Take Control of FileVault (1.1) (2015)
Use Find My Mac with FileVault
The main point of FileVault is to protect your data from being seen by other people if your Mac goes missing. Should the fateful day arrive when you discover your Mac has been lost or stolen, you can turn to an iCloud feature called Find My Mac to recover it (or at least make it useless to whoever has it).
Although Find My Mac works hand in hand with FileVault, it’s an optional feature. You have to enable it in advance—before your Mac goes astray!—and that, in turn, requires that your Mac be signed in to your iCloud account.
As the name suggests, Find My Mac can help you locate your Mac—either by showing its location on a map (assuming it’s turned on and connected to a network) or by playing a sound on it (to help you find it somewhere in your house). If your Mac can’t be found, or if you realize it’s somewhere you can’t or shouldn’t venture, you can remotely lock your disk with a special six-digit passcode (which will then be required before the EFI Login screen even appears). Or, if all else fails, you can remotely erase your disk.
Without FileVault, erasing a whole disk could take a day or more. But with FileVault enabled, the remote erase instruction (which Apple refers to as “instant wipe”) immediately deletes the FileVault encryption key, making it virtually impossible for anyone to recover your data (even with your password). Then, for good measure, your Mac also proceeds with the lengthy data overwriting process.
You may well ask what the point of remote locking or wiping is, since FileVault is already so secure. If the bad guys have your Mac but the disk is encrypted, your data should be totally safe, right? Well, yes, unless they guess your password—or use some as-yet-undiscovered exploit to recover your key from RAM. Locking your Mac creates a barrier to guessing your password, while wiping your data eliminates any lingering worries you might have about potential vulnerabilities.
Note: Locking and wiping are mutually exclusive. If you remotely lock your Mac, you can’t later wipe it.
There’s a catch to all this magic, however: locating, locking, and wiping your Mac remotely all require that it be turned on and connected to the Internet. Since FileVault prevents anyone else from logging in, the opportunities for that to happen are limited to these situations:
· If your Mac is turned on but asleep or locked when it’s purloined—and you have Power Nap enabled (see Enable Find My Mac, next)—it will still turn itself on periodically and attempt to connect to any open Wi-Fi network to do things like checking for software updates and email; remote location/lock/wipe instructions can also be received at that time.
· If you enable a Guest User account, anyone can log in to your Mac in a mode that, with FileVault turned on, gives him or her access only to Safari—but that’s sufficient to connect to the Internet.
· If the thief were to reboot in Recovery mode by restarting while holding Command-R, that’s yet another way your Mac could connect to the Internet.
I explain how to set up all the necessary options just ahead.
One last point: This being a book about Macs, I refer to the feature in question as Find My Mac. But the first Apple device to gain this capability was the iPhone, and the app you use to locate a missing Mac (whether on an iOS device or on the iCloud Web site) is still called Find My iPhone. Don’t let that throw you; you can use Find My iPhone to find your Mac, too.
Enable Find My Mac
Before you can use Find My Mac, you must activate it if you haven’t already done so. To activate it:
1. Go to System Preferences > iCloud.
2. If you’re not already signed in, enter your iCloud username and password and click Sign In.
3. Select the Find My Mac checkbox. When you do so, you may be prompted to enable location services too; if so, be sure to do that.
In addition to turning on Find My Mac, you should also enable two other features to increase your odds of being able to successfully communicate with a lost or stolen Mac:
· Power Nap: If you have a recent-vintage Mac that supports Power Nap, be sure to enable this feature so that your Mac will be able to connect to the Internet periodically even when it’s asleep. You can do this by going to System Preferences > Energy Saver. For desktop Macs, select Enable Power Nap. For notebook Macs, click Battery and select Enable Power Nap While on Battery Power; then click Power Adapter and select Enable Power Nap While Plugged into a Power Adapter.
Note: To find out whether your Mac supports Power Nap and if it needs an SMC (System Management Controller) firmware update to do so, read Apple’s support article OS X: About Power Nap.
· Guest User: In addition to regular (standard and administrator) user accounts, you can enable an optional Guest User. When you do so, Guest User appears on the EFI Login screen, and anyone can select it to log in without a password—but in a special mode that gives access only to Safari, and not to anything on your disk. To enable the Guest User, go to System Preferences > Users & Groups. If the lock ![]() icon is locked, click it and enter your password to unlock it. Select Guest User in the list on the left, and then select Allow Guests to Log In to This Computer. (Leave Allow Guests to Connect to Shared Folders deselected.)
icon is locked, click it and enter your password to unlock it. Select Guest User in the list on the left, and then select Allow Guests to Log In to This Computer. (Leave Allow Guests to Connect to Shared Folders deselected.)
Once you’ve done all this, you’ll be able to call on the capabilities of Find My Mac if your Mac runs away from home.
Find or Wipe a FileVault-enabled Mac
In order to find, lock, or wipe your missing Mac, you’ll need to use the Find My iPhone app—and here’s hoping Apple changes its name soon to reflect the broader range of devices it can find! There’s a version of this app on the iCloud Web site (log in and click Find My iPhone), and another version available as a downloadable iOS app. Both versions have the same features and similar interfaces, but because of differences in screen size and layout, a few minor details are different.
Whichever app you use, the process is basically as follows:
1. Open the app and, if prompted to do so, sign in with your Apple ID password (not your Mac’s login password).
2. If you have only one device with Find My Device turned on, that should appear on the map immediately. If you have more than one device, select the Mac you want to find:
§ On the Web: Click All Devices at the top of the screen and choose the Mac you want to find from the list that appears.
§ On an iPhone or iPod touch: In the list at the bottom of the screen, tap the Mac you want to find. Then tap the Mac’s icon on the map.
§ On an iPad: Tap My Devices in the upper-left of the screen, and then tap the Mac you want to find. Now tap the Mac’s icon on the map.
Note: In the device list, a status dot appears beside each device name: gray ![]() means “trying to connect,” red
means “trying to connect,” red ![]() means “location unknown,” and green
means “location unknown,” and green ![]() means “location determined recently.”
means “location determined recently.”
The map display changes to show only the selected Mac (if it’s on and its location is known) and an inset view appears (Figure 22) with details on the device—including a battery-level indicator if it’s a notebook. (The options shown here are different for Macs and iOS devices; in this book I’m concerned only with the Mac options.) If the Mac is not on and online, but has been recently, the map should show the last known location, along with how recently its location was determined.
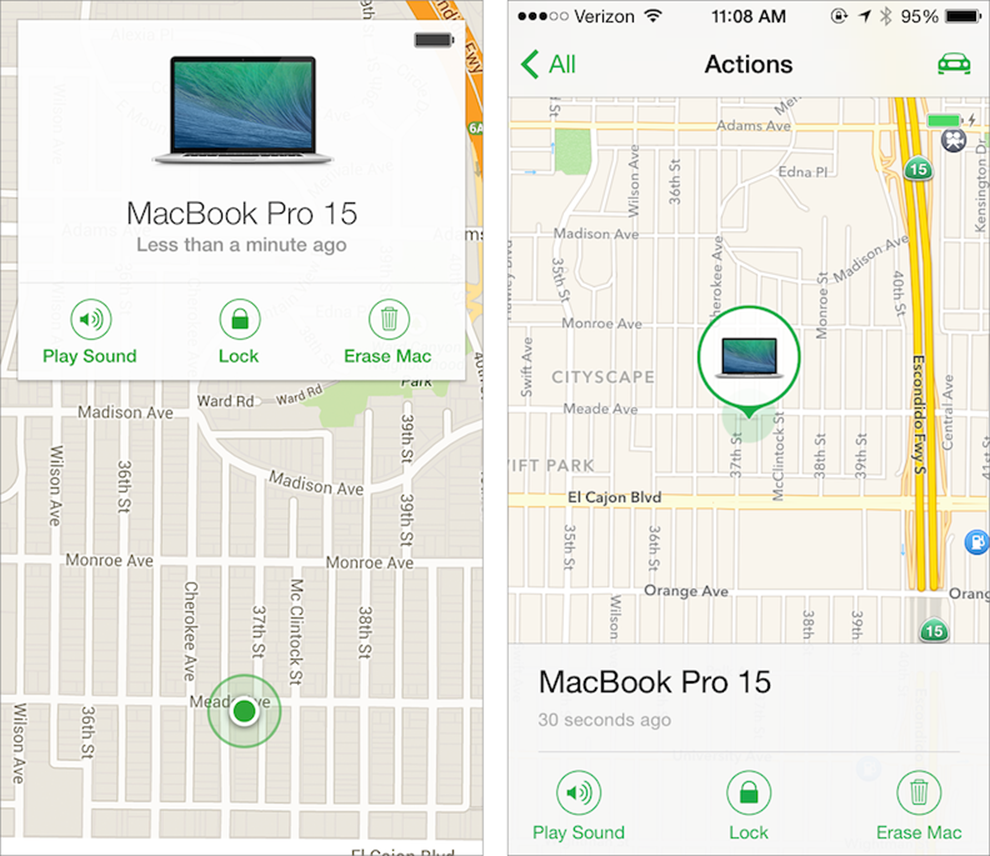
Figure 22: Find My iPhone, with the inset view showing details and controls for a selected Mac, as it appears on the Web (left) and an iPhone (right).
Note: If the device was most recently located more than an hour ago, you can select the Notify Me When Found checkbox; when the device next comes online, iCloud will alert you by email so you can return to Find My iPhone and take the next step.
3. Click or tap the icon for the action you want to perform (Play Sound, Lock, or Erase Mac) and follow the prompts. Read on for further details about each of these activities.
Tip: Assuming your device’s location is known, you can also tap the car ![]() icon (on an iOS device only) for driving directions.
icon (on an iOS device only) for driving directions.
Play Sound
If your Mac is awake and online, clicking (or tapping) Play Sound will play a pinging sound at full volume. This can help you locate it if you misplaced it in your home or office. On the wayward Mac, you can turn off the sound and/or dismiss the message by unlocking the device (if necessary) and then tapping or clicking the OK button. If the sound has been played, iCloud sends you an email message to confirm this.
Lock
To lock your Mac so no one else can access it:
1. Click (or tap) Lock, and then click Lock again to confirm.
2. Enter and repeat a 6-digit passcode.
3. Enter an optional message to appear on the screen (such as your contact information, which might help an honest citizen return a lost Mac)
4. Click Lock.
Your Mac will lock itself immediately and restart with a passcode prompt. Only entering the code you chose will unlock it. If the Mac was successfully locked, Apple sends you a confirmation by email.
Warning! If you remotely lock your Mac, you can’t later use Find My Mac’s Erase feature to remotely wipe it. So if you think there’s a good chance you’ll never recover your Mac, it’s safer to erase it instead of locking it.
Erase Mac
To remotely (and irrevocably) wipe your Mac’s disk or SSD:
1. Click (or tap) Erase Mac, read the warning, and click Erase.
2. Confirm your Apple ID password.
3. Enter and confirm a numeric passcode (either four or six digits, depending on the Mac) that can be used to unlock the device—although not to recover the erased data.
4. Enter an optional message that will appear on the Mac’s screen.
5. Click Done.
The Mac restarts and its data is wiped—immediately if the device is online, or as soon as it comes back online if not. When the wiping process has begun, Apple sends you a confirmation email message. As I mentioned earlier, wiping deletes the FileVault encryption key, making your data immediately unusable—but for extra security the data is also overwritten, and that second process can take up to a day.
On the Mac that’s being wiped, the display will show only a passcode prompt. If you later recover the Mac, you can enter the passcode to unlock it and reboot in Recovery mode—your data will be gone already, but at least you’ll be able to use the Mac and reinstall Mac OS X or restore a backup. On the other hand, to a thief who doesn’t know the passcode, the Mac will be completely useless.
Tip: Somewhat counterintuitively, if you wipe a Mac’s data remotely, you may still be able to locate it later with Find My iPhone. Some components used by Find My Mac are kept on the hidden Recovery HD volume—and that’s not included in the data that’s wiped.
Warning! According to Apple’s online help, if you remotely erase a Mac that had an EFI firmware password set, then you may not be able to unlock it yourself—even with the passcode—if and when you recover it. If this happens, you must take the Mac to an Apple Store or authorized repair center.
Other Theft Recovery Software
Find My Mac isn’t the only way to locate and recover a lost or stolen Mac. Numerous third-party apps, such as Hidden, GadgetTrak, Prey, and Undercover, offer their own forms of tracking. Some of them have features Find My Mac lacks, like the capability to take screenshots—or even photos with the built-in camera—and then upload these to a secure location, the better to help you and the police identify a thief.
However, none of these other apps is compatible with FileVault, because none of them can run from a locked disk, when your Mac is logged out, or in Recovery mode. Find My Mac, thanks to components built into OS X (and especially those located on the unencrypted Recovery HD volume), is useful in all those situations.
If you aren’t satisfied with Find My Mac and desperately want to use a third-party tool, you could create a second partition on your disk with an account that logs in automatically, and install the third-party software there. But then a thief would have to be smart enough to reboot your Mac with the Option key held down and start from that extra partition—something you certainly can’t count on. Alternatively, you could use System Preferences > Startup Disk to make the secondary partition as the main startup disk, but that would make it more complicated for you to start from your regular boot volume (you’d have to use the Option key trick each time), and that setting would also be a nonstarter for any Mac that needs to reboot automatically in the event of a power failure.
In short, I think it’s best to consider FileVault and third-party recovery software an either/or proposition. If your Mac is covered by insurance, I suggest using FileVault, skipping third-party theft recovery software, and writing off lost or stolen hardware immediately—that dramatically decreases the risk of your personal information falling into someone else’s hands.