Take Control of FileVault (1.1) (2015)
Understand FileVault and Backups
Before you activated FileVault, I hope you followed my advice to Make a Backup. For that matter, I hope you follow a solid backup regimen all the time. But when you combine FileVault with backups, things get a bit more complicated, and in this chapter I spell out what you need to know.
Tip: To learn all the essential details about creating a complete backup plan, read my book Take Control of Backing Up Your Mac.
After reviewing some basic concepts about encrypted backups, I talk about encrypted backups from both angles: backing up a FileVault-encrypted volume to another destination (whether encrypted or not), and backing up data to an encrypted destination volume (whether the source volume is encrypted or not).
Learn Basic Encrypted Backup Concepts
I mentioned this earlier, but I want to repeat it here because it’s a frequent source of confusion—the fact that your disk is encrypted with FileVault does not mean your backups will automatically be encrypted too! FileVault is only for data on your disk. Once the data is no longer on your disk, it’s no longer encrypted!
If you don’t want your backups to be encrypted, then you can keep backing up your Mac exactly as before, and nothing will change. But if you do want encrypted backups, you’ll have to take some extra steps to make that happen.
Why would you (or wouldn’t you) want encrypted backups?
On the plus side, encrypted backups protect your data in the same way FileVault does: if your backup drive were lost or stolen (perhaps along with your Mac), your data would be safe. My feeling is that if your data is worth encrypting while it’s on your Mac, it’s worth encrypting in your backups too. If anything, backup drives may be more vulnerable to theft and loss, especially if you store some of them offsite (which is generally a good idea), so I prefer not to take any chances.
On the other hand, encrypted backups introduce an extra element of risk. If you forget the password to your backups, or if something goes wrong with the backup drive, having an encrypted backup could be just as bad as having none. For example, I was having trouble booting my MacBook Pro. Even though I could get past the EFI Login screen—meaning my disk was unlocked—the regular login screen appeared, too, and although it accepted my password, it wouldn’t log me in. It just put me in a perpetual loop of asking for the password. Well, no problem, I thought—I’ll just boot from my (encrypted) duplicate. But when I did, the same thing happened! Hardly surprising, if you think about it, because duplicates are supposed to be identical—but it was a real pain.
(I never did discover the cause of the problem. To solve it, I had to erase my MacBook Pro’s SSD, reinstall Mac OS X, and migrate all my data from the bootable duplicate. It took a few hours, but at least it returned my computer to proper operation.)
I’m merely pointing out that there’s a certain comfort to be had from knowing you have an unencrypted copy of your data, and that’s at odds with a different sort of comfort you may get from knowing all your data is safely encrypted! So, the choice is yours, but if you choose to keep unencrypted backups, please keep them in a secure location (such as a safe or a safe deposit box).
You can encrypt a disk and then store a backup on it, or back up a disk and then encrypt it. Both methods work equally well. But if the type of backup you’re creating is a bootable duplicate—meaning you want to be able to boot your Mac from an encrypted duplicate—you should bear in mind that your Mac won’t let you encrypt a volume already containing OS X unless the disk it’s on also has a Recovery HD volume (which may require extra effort to create). Thus, there are two possible paths:
· Encrypt the external disk in the Finder (or in Disk Utility) and then use your backup software to create a bootable duplicate.
· Create your bootable duplicate first, on an unencrypted destination disk—but one that includes a Recovery HD volume. Then restart from that disk and turn on FileVault.
Although both approaches work, the second one is much better because you get all the benefits of FileVault—a recovery key (optionally stored with Apple), per-user passwords, and Find My Mac support. I discuss the steps to do both types of backup in Encrypt a Bootable Duplicate, ahead.
Back Up from an Encrypted Volume
Now that your startup volume is encrypted with FileVault, you may wonder how that affects the way you back it up. The short answer is “probably not at all.” Whatever backup software you may have been using—Time Machine, CrashPlan, Carbon Copy Cloner, Prosoft Data Backup, or whatever—should continue functioning exactly as before. In fact, your backup software won’t even notice the fact that your disk is encrypted; the operation should be entirely transparent.
I spell this out because none of this was true for Legacy FileVault (see How Is FileVault 2 Different from Legacy FileVault?), and you may find information on the Web that implies FileVault still has trouble with backups. It doesn’t. You need not log out of your account to back up with Time Machine, or perform any other special tricks.
In fact, let me take this matter of transparency a step further. Most backup software checks for new and modified files every time it runs, and backs up only the items that are different from the previous backup. The process of encrypting your disk changes all the data on it, but crucially, it does not change the files themselves in any way from the perspective of your backup software. Because the encryption operates at a lower level than files, not even the modification date will change. So don’t worry that activating FileVault will trigger your backup software to recopy everything—it won’t.
Back Up to an Encrypted Volume
Now let’s look at the other side of backups—the destination volumes (typically external hard drives). As I explained earlier, backing up an encrypted volume doesn’t automatically give you an encrypted backup. As your backup software copies files onto other media, FileVault automatically decrypts them. So, if you want encrypted backups, you’ll have to take steps to encrypt them yourself.
If your backup software has a built-in encryption capability, you can turn that on and use it to encrypt your backups, while leaving the backup disk itself unencrypted. But if you want to use Core Storage to encrypt the entire volume your backups are stored on, read on.
Encrypt a Time Machine Backup
If you use Time Machine for backups, you can encrypt them by checking a box and entering a password. In Lion, encryption applies only to local Time Machine volumes; in Mountain Lion and later, encryption is also available when backing up to an AirPort Time Capsule or other supported network destination (such as another Mac).
Note: Local Time Machine backup volumes must be partitioned using the GUID Partition Table scheme; if you get an error message saying your drive needs to be repartitioned, see this Apple support article (which is about a different symptom that has the same solution) for instructions.
Turn On Encryption for a New Disk
It’s easiest to enable encryption when you first set up Time Machine.
If you attach a new hard drive to your Mac, the first thing you’ll see is a dialog (Figure 18) asking if you’d like to use it for Time Machine.
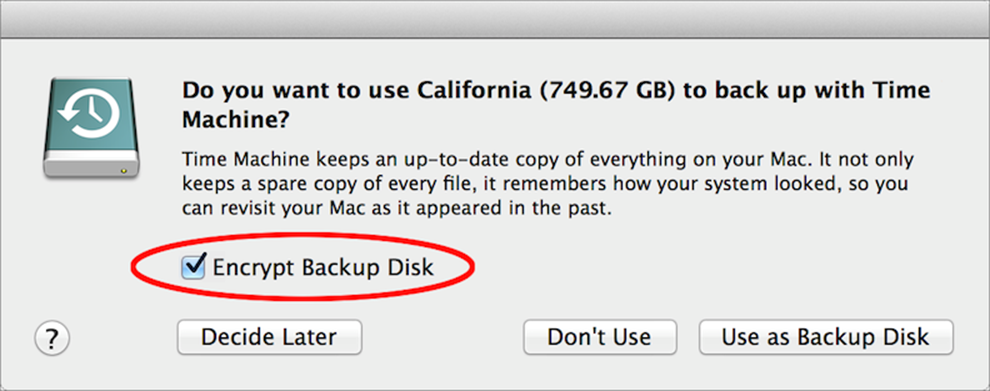
Figure 18: You can turn on Time Machine backups in this dialog and add encryption with one click.
If you select Encrypt Backup Disk before clicking Use as Backup Disk, you’ll turn on Time Machine, set the destination volume, and enable encryption all in one go. After you do this, you may have to enter your login password to unlock the Time Machine preference pane; you can then (Figure 19) type and repeat a password for the backup disk, enter an optional hint, and click Encrypt Disk to begin the encryption and backup process.
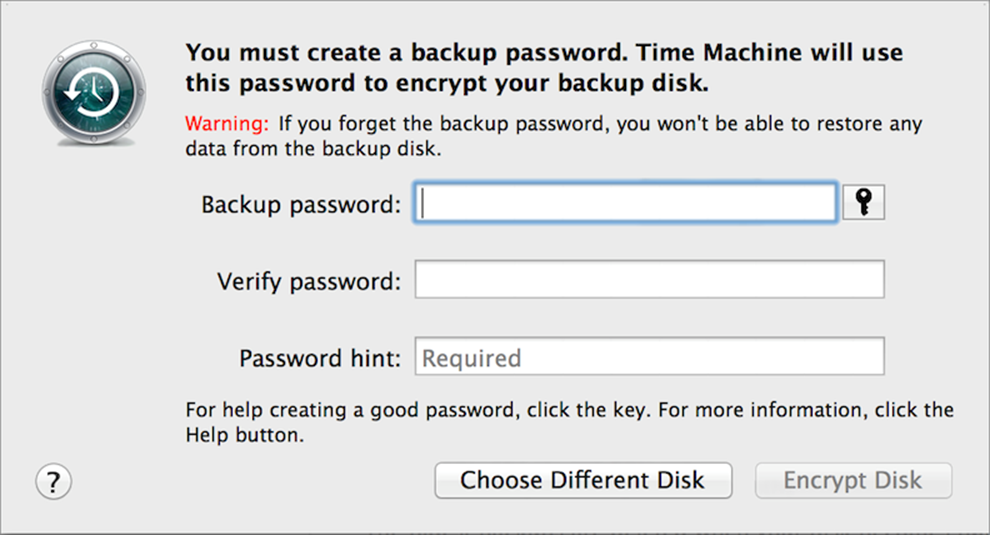
Figure 19: After you select a Time Machine disk with encryption enabled, you must choose a password for the disk.
If you later disconnect and reconnect the drive, you’ll be prompted for the password; as usual, you can save the password in your keychain for convenience—most likely a good idea, because Time Machine won’t be able to run without a mounted destination volume.
To set up Time Machine to use a disk that’s already connected—or an AirPort Time Capsule or other network destination—go to System Preferences > Time Machine, click Select Backup Disk (or—if you have two or more destination volumes already—Add or Remove Backup Disk), select the disk you want to use, and make sure Encrypt Backups is checked at the bottom (Figure 20). Click Use Disk, and you’ll then you’ll be prompted for a password just as in Figure 19 above.
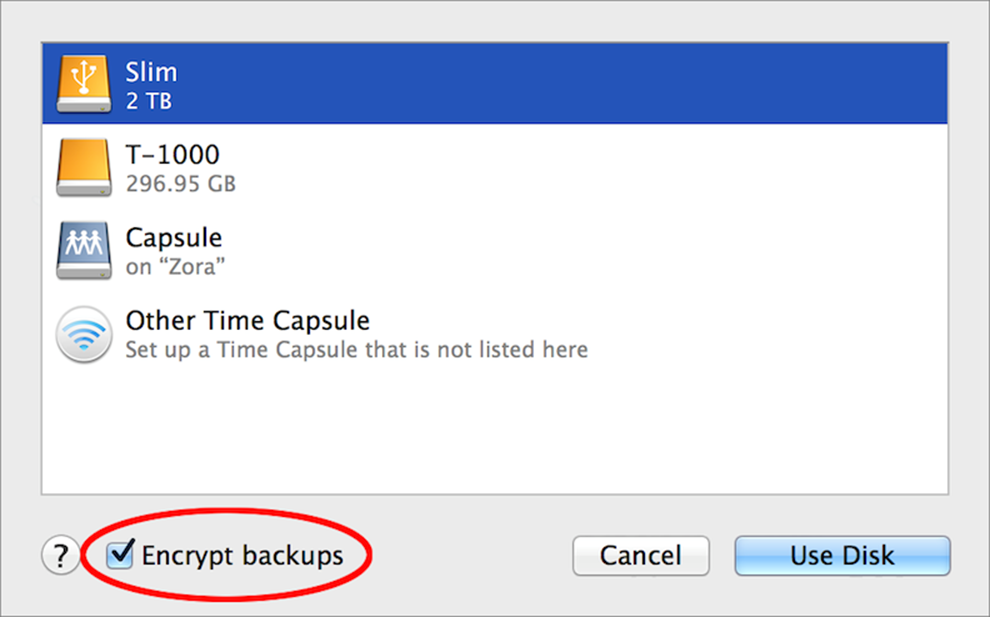
Figure 20: After selecting your Time Machine destination volume, select Encrypt Backups to encrypt them.
Note: In Mountain Lion and later, you can choose more than one destination disk for Time Machine. So you can repeat this process to add another disk—and you can decide, for each destination, whether it should be encrypted.
Turn On Encryption for an Existing Disk
If you’re already using Time Machine with an unencrypted disk, you can (usually) turn on encryption after the fact, but it’s more complicated than it should be—and quite time-consuming.
For locally attached backup disks, follow these steps:
1. In the Time Machine pane of System Preferences, click Select Disk (or Add or Remove Backup Disk).
2. In the list that appears, select your existing backup disk (at the top, under Backup Disks), click Remove Disk, and then click Stop Using This Disk to confirm. (Yes, I really mean it!)
3. Now click Select Backup Disk (or Select Disk, or Add or Remove Backup Disk, depending on your setup) and reselect the same disk you just removed, which likely appears lower in the list.
4. Select the Encrypt Backups checkbox, and then click Use Disk.
5. Enter and verify your password, type an optional hint, and click Encrypt Disk.
Time Machine encrypts your existing backups—brace yourself, because it could take quite a long time—and then continues with its regularly scheduled hourly backups.
Unfortunately, the above procedure doesn’t work on AirPort Time Capsules and other network destinations. After Step 4 you’ll see a warning (Figure 21) with three options: Use Unencrypted Backup (to keep going as you had been), Erase Existing Backup (to start over with a new, encrypted backup but erase your previously backed-up files), or Choose a Different Disk. There’s no workaround here—the only way to get an encrypted Time Machine backup in this situation is to start over.

Figure 21: If you try to encrypt an existing Time Machine backup on a network destination, you’ll run into this roadblock.
Encrypt Other Versioned Backups
If you use something other than (or in addition to) Time Machine to store versioned backups (that is, backups that hang onto older versions of changed or deleted files instead of overwriting them)—and if that software doesn’t have its own encryption capability—you can encrypt your backups by encrypting the entire destination drive as described in Encrypt a Volume in the Finder. As long as that volume is unlocked and mounted, your backups should proceed normally, but when you eject the disk, it’ll be safe from anyone who doesn’t have its password.
Keep in mind that if your Mac is asleep and backup software wakes it up in order to run, nothing will happen until you manually enter your password to unlock FileVault. For that reason, it’s best to use backup software that runs continuously in the background rather than software that expects you to schedule daily runs for when you’re not using your Mac.
Encryption and Cloud Backups
Virtually all backup services that store your data in the cloud—CrashPlan, Backblaze, DollyDrive, MozyHome, SpiderOak, and many others—encrypt all your data before it leaves your Mac, and then store it, still encrypted, on their servers. As usual, your security depends on how good your password is, but in general, encryption isn’t a worry with cloud backups.
You should ask your cloud backup provider how your encryption key is stored. If the provider holds the key, then the provider can, in theory, decrypt the data. If you alone hold the key, then only you can decrypt your backups—but you won’t have any recourse if you lose the key. CrashPlan (to cite my favorite example of cloud backup services) lets you choose—letting the company hold the key or keeping it private. The latter is less convenient, but extremely safe.
Encrypt a Bootable Duplicate
Before FileVault appeared, having a fully encrypted duplicate that would also boot your Mac required special (and extra-expensive) hardware—basically a hard drive that had its own encryption chip, unlocked with a fingerprint scan, a numeric keypad, or a hardware key. Thankfully, those days are behind us, and any off-the-shelf hard drive can be used to make a bootable duplicate that’s also encrypted.
But…
There’s a little snag in the process. As you know, FileVault can be enabled only on startup disks that have a Recovery HD volume. And, if you try to encrypt a volume you aren’t currently booted from that already has Mac OS X installed, the same rule applies—unless it has a Recovery HD volume, you can’t enable encryption. The problem is that normally, the Recovery HD volume is created only when you install Mac OS X on a disk. If you bring home a new (blank) external drive and attach it to your Mac, it won’t have that magic partition, but you’ll probably want it to!
It’s best to address the Recovery HD problem before you attempt to create an encrypted bootable duplicate. There are a few ways to do this.
Make Sure Your Destination Disk Has a Recovery HD Volume
I know of three good ways to get a Recovery HD volume onto a disk that doesn’t currently have one:
· Install Mac OS X: You can install on a blank external drive—just for the side effect of creating the Recovery HD volume—and then overwrite the Mac OS X installation yourself with your bootable duplicate. That works, but it’s a hassle, and kind of time-consuming.
· Use Recovery Partition Creator: The free Recovery Partition Creator app (not yet compatible with Yosemite, alas) can install the hidden Recovery HD volume on a disk that doesn’t have one. It requires a full installer for Lion or later (that is, the installer from the Mac App Store), so if you no longer have that, you must download it again first. The app, based on AppleScript, takes several minutes to do its thing, and for part of that time it appears as though nothing at all is happening. Never fear: it does do the trick.
· Use Carbon Copy Cloner: Carbon Copy Cloner is one of many utilities that can create a bootable duplicate of a startup volume on another disk. But it’s the only one I’m aware of that—either as part of the cloning process or as a separate operation—can also clone the Recovery HD volume from a main disk or SSD to a secondary disk. (In Carbon Copy Cloner, go to Window > Disk Center > Recovery HD and follow the instructions.) If you were considering using Carbon Copy Cloner to create a bootable duplicate anyway, this feature makes it the ideal choice, because you can do everything necessary in the same app. In fact, if you try to clone your disk onto a disk without a Recovery HD volume, Carbon Copy Cloner prompts you to clone that as well—it takes just a few clicks and a couple of minutes.
Note: With the last two methods, you can create the Recovery HD volume either before or after cloning your disk, as long as you do it before encrypting the disk.
Choose whichever one of these methods you prefer. I recommend preparing your destination disk with a Recovery HD volume before you encrypt it.
Create a Bootable Duplicate
As I mentioned earlier, you can create an encrypted bootable duplicate in either of two ways—encrypt the disk in the Finder and then create the duplicate, or create your duplicate first and then boot from it and enable FileVault. Both approaches work, but they give you different results:
· Encrypt first, then clone: If you choose the first path, you’ll Encrypt a Volume in the Finder or Encrypt a Volume in Disk Utility, wait until the encryption is complete, and then use your favorite cloning utility to copy everything from your startup disk to the external disk. The result will be that when you later boot from that backup, you’ll be prompted for the disk password, and if you enter it correctly, your Mac will start up normally from that disk. That works, but because the backup disk is not using FileVault, it won’t have a recovery key or user-specific passwords. So, in my opinion, it’s a less-good option.
· Clone first, then enable FileVault: The second and better path is to make sure your external disk includes a Recovery HD volume, clone your startup volume onto the unencrypted external disk, and finally boot from that disk and enable FileVault on it, just as you did on your main startup disk. You’ll then get a second recovery key, just for that drive (which, again, you can store with Apple or not, as you prefer). When you later restart from your main disk, you’ll have to enter the backup disk’s password in order to mount it. Once you’ve done so, you can update your bootable duplicate as often as you like and everything should just work.
Note: Remember that it may take several hours for FileVault to complete its encryption, and you’ll have to remain booted from the clone that entire time. So arrange your schedule accordingly!
Whichever of these approaches you take, when you get to the point of creating the duplicate, you can use any backup app with the necessary features. I like Carbon Copy Cloner myself, mainly because of its handy capability to clone Recovery HD volumes, butSuperDuper is another excellent choice, and at least a dozen other Mac backup apps can also create bootable duplicates.
Tip: Once again, I refer you to my book Take Control of Backing Up Your Mac for complete details on creating bootable duplicates as well as other types of backups.
After you create your encrypted duplicate, the first thing you should do is confirm that you can indeed boot from it. There are two ways to do this—if one doesn’t work for any reason, try the other:
· Option-restart: Restart your Mac while holding down the Option key. You should see a list of all valid startup disks attached to your Mac. Select your duplicate and press Return to boot from it.
· Startup Disk: Before restarting, go to System Preferences > Startup Disk. Select your duplicate, click Restart, and then click Restart again to confirm. After starting from your duplicate, repeat this procedure—but select your main startup disk, so that when you restart a second time, you boot from your main startup volume.
In fact, it’s a good idea to test your duplicates periodically, just in case. At Take Control we recommend doing this every Friday the 13th, or as we call it, International Verify Your Backups Day!
One final tip: If your main startup disk dies and you have to restore your backup—that is, re-clone the clone back onto your internal disk or SSD—you may in some cases lose the Recovery HD volume on your internal disk, meaning that you won’t be able to reenable FileVault. If this happens, don’t panic. Restart from your clone, and then use either Recovery Partition Creator or Carbon Copy Cloner to restore Recovery HD (refer back to Make Sure Your Destination Disk Has a Recovery HD Volume). Then you can restart from your main disk and reenable FileVault.