iOS 7 Game Development: Develop powerful, engaging games with ready-to-use utilities from Sprite Kit (2014)
Chapter 2. Our First Sprite Kit Project
In this chapter, we will look into Sprite Kit basics. Sprite Kit consists of a lot of small elements and we need to have a clear understanding of what they do to have an overview of a typical Sprite Kit project to see how we might plan and implement a full-featured game.
We will explore everything that we might need when creating our own project, as the main goal of the book is to provide an understanding of Sprite Kit as a tool for game development. We will start with the project that we will be creating in this book—an endless runner game.
This style of game is really popular on mobile devices, as it allows for quick gameplay when you get a minute and has this "just one more" feeling to it. A player wants to beat/better his own score, maybe even beat his friend's scores. Our game will feature jumping and you will want to evade dangerous things that may appear on screen.
You get a higher score the longer you run without failing.
Sprite Kit basics
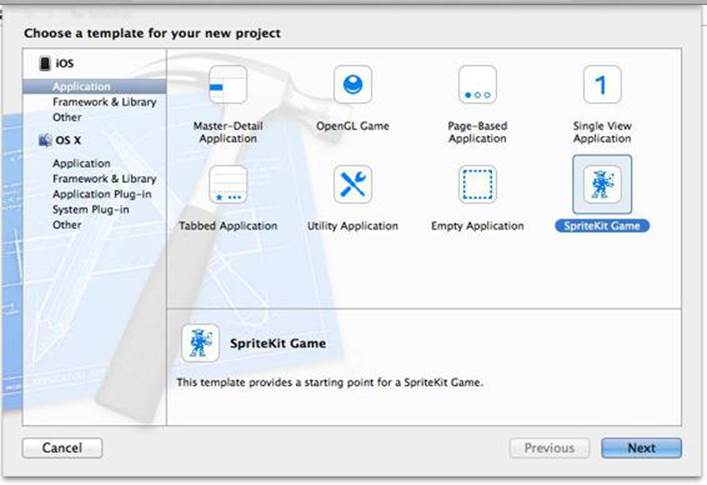
First of all, we need to create a basic project from the template to see how everything works from the inside. Create a new project in Xcode by navigating to File | New |
Project. Choose SpriteKit Game after navigating to iOS | Application, as shown in the following screenshot:
Creating a Sprite Kit project
On the next screen, enter the following details:
• Product Name: Endless Runner.
• Organization name: Enter your name.
• Company Identifier: This is a unique Identifier that identifies you as a developer. The value should be similar to what you entered while registering your Apple developer account or com.your_domain_name.
• Class Prefix: This is used to prefix your classes due to poor Objective-C
namespace. People often ignore this (it makes sense when you make small projects, but if you use any third-party libraries or want to follow best practices, use three-lettered prefixes). We will use ERG (denoting Endless Runner Game) for this. Apple reserves using two-lettered prefixes for internal use.
• Devices: We are making the game for iPhones, so ensure iPhone is selected.
Now, save the project and click on Create.
Once you have created the project, build and run it by clicking on the play button at the top-left corner of the window.
You will see the Hello, World! label at the center of the screen, and if you tap the screen, you will get a rotating spaceship at that point. At the bottom-right corner of the screen, you can see the current FPS (frames per second) and number of nodes in the scene.
Anatomy of a Sprite Kit project
A Sprite Kit project consists of things usual to any iOS project. It has the AppDelegate, Storyboard, and ViewController classes. It has the usual structure of any iOS application. However, there are differences in ViewController.view, which has the SKView class in Storyboard.
You will handle everything that is related to Sprite Kit in SKView. This class will render your gameplay elements such as sprites, nodes, backgrounds, and everything else. You can't draw Sprite Kit elements on other views.
It's important to understand that Sprite Kit introduces its own coordinate system.
In UIkit, the origin (0,0) is located at the top-left corner, whereas Sprite Kit locates the origin at the bottom-left corner. The reason why this is important to understand is because of the fact that all elements will be positioned relative to the new coordinate system. This system originates from OpenGL, which Sprite Kit uses in implementation.
Scenes
An object where you place all of your other objects is the SKScene object. It represents a single collection of objects such as a level in your game. It is like a canvas where you position your Sprite Kit elements. Only one scene at a time is present on SKView.
A view knows how to transition between scenes and you can have nice animated transitions. You may have one scene for menus, one for the gameplay scene, and another for the scene that features after the game ends.
If you open your ViewController.m file, you will see how the SKScene object is created in the viewDidLoad method.
Each SKView should have a scene, as all other objects are added to it. The scene and its object form the node tree, which is a hierarchy of all nodes present in the scene.
Open the ERGMyScene.m file. Here, you can find the method where scene initialization and setup take place:
- (id)initWithSize:(CGSize)size
The scene holds the view hierarchy of its nodes and draws all of them. Nodes are very much like UIViews; you can add nodes as children to other nodes, and the parent node will apply its effects to all of its children, effects such as rotation or scaling, which makes working with complex nodes so much easier.
Each node has a position property that is represented by CGPoint in scene coordinates, which is used to set coordinates of the node. Changing this position property also changes the node's position on the screen.
After you have created a node and set its position, you need to add it to your scene node hierarchy. You can add it either to the scene or to any existing node by calling the addChild: method. You can see this in your test project with the following line:
[self addChild:myLabel];
After the node has been added to a visible node or scene, it will be drawn by the scene in the next iteration of the run loop.
Nodes
The methods that create SKLabelNode are self-explanatory and it is used to represent text in a scene.
The main building block of every scene is SKNode. Most things you can see on the screen of any given Sprite Kit game is probably a result of SKNode.
Node types
There are different node types that serve different purposes:
• SKNode: This is a parent class for different types of nodes
• SKSpriteNode: This is a node that draws textured sprites
• SKLabelNode: This is a node that displays text
• SKShapeNode: This is a node that renders a shape based on a Core Graphics path
• SKEmitterNode: This is a node that creates and renders particles
• SKEffectNode: This is a node that applies a Core Image filter to its children
Each of them has their own initializer methods—you create one, add it to your scene, and it does the job it was assigned to do.
Some node properties and methods that you might find useful are:
• position: This is a CGPoint representing the position of a node in its parent coordinate system.
• zPosition: This is a CGFloat that represents the position of a node on an imaginary Z axis. Nodes with higher zPosition will be over the nodes that have lower zPosition. If nodes have the same zPosition, the ones that were created later will appear on top of those that were created before.
• xScale and yScale: This is a CGFloat that allows you to change the size of any node. The default is 1.0 and setting it to any other value will change the sprite size. It is not recommended, but if you have an image of a certain resolution, scaling it will upscale the image and it will look distorted. Making nodes smaller can lead to other visual artifacts. But if you need quick and easy ways to change the size of your nodes, this property is there.
• name: This is the name of the node that is used to locate it in the node hierarchy. This allows you to be flexible in your scenes as you no longer need to store pointers to your nodes, and also saves you a lot of headache.
• childNodeWithName:(NSString *)name: This finds a child node with the specified name. If there are many nodes with the same name, the first one is returned.
• enumerateChildNodesWithName:usingBlock:: This allows you to run custom code on your nodes. This method is heavily used throughout any Sprite Kit game and can be used for movement, state changing, and other tasks.
Actions
Actions are one of the ways to add life to your game and make things interactive.
Actions allow you to perform different things such as moving, rotating, or scaling nodes, playing sounds, and even running your custom code. When the scene processes its nodes, actions that are linked to these nodes are executed.
To create a node, you run a class method on an action that you need, set its properties, and call the runAction: method on your node with action as a parameter.
You may find some actions in the touchesBegan: method in ERGMyScene.m. In this method, you can see that a new node (of the type SKSpriteNode) is created, and then a new action is created and attached to it. This action is embedded into another action that makes it repeat forever, and then a sprite runs the action and you see a rotating sprite on the screen.
To complete the preceding process, it took only five lines, and it is very intuitive.
This is one of the Sprite Kit strengths—simplicity and self-documenting code.
As you might have noticed, Apple names methods in a simpler way so that you can understand what it does just by reading the method. Try to adhere to the same practice and name your variables and methods so that their function can be understood immediately. Avoid naming objects a or b, use characterSprite or enemyEmitter instead.
There are different action types; here we will list some that you may need in your first project:
• Move actions (moveTo:duration:, moveBy, followPath) are actions that move the node by a specified distance in points
• Rotate actions are actions that rotate your nodes by a certain angle (rotateByAngle:duration:)
• Actions that change node scale over time (scaleBy:duration)
• Actions that combine other actions (sequence: to play actions one after another, and repeatAction: to play an action a certain amount of times or forever)
There are many other actions and you might look up the SKAction class reference if you want to learn more about actions.
Game loop
Unlike UIKit, which is based on events and waits for user input before performing any drawing or interactions, Sprite Kit evaluates all nodes, their interactions, and physics as fast as it can (capped at 60 times per second) and produces results on screen. In the following figure, you can see the way a game loop operates: update:
Evaluating actions
Simulating physics
Rendering scene
The update loop
First, the scene calls the update:(CFTimeInterval)currentTime method and sends it the time at which this method was invoked. The usual practice is to save the time of the last update and calculate the time that it took from the last update (delta) to the current update to move sprites by a given number of points, by multiplying the velocity of a sprite by delta, so you will get the same movement regardless of FPS.
For example, if you want a sprite to move 100 pixels every second, regardless of your game performance, you multiply delta by 100. This way, if it took long to process the scene, your sprite will move slightly further for this frame; if it is processed fast, it will move just a short distance. Either way you get expected results without complex calculations.
After the update is done, the scene evaluates actions, simulates physics, and renders itself on screen. This process repeats itself as soon as it's finished. This allows for smooth movement and interactions.
You will write the most essential code in the update: method, since it is getting called many times per second and everything on screen happens with the code we write in this method.
You will usually iterate over all objects in your scene and dispatch some job for each to do, such as character moving and bullets disappearing off screen. The update: method is not used in a template project, but it is there if you want to customize it.
Let's see how we can use it to move the Hello, World! label off the screen.
First, find where the label is created in the scene init method, and find this line: myLabel.text = @"Hello, World!";
Add this code right after it:
myLabel.name = @"theLabel";
Find the update: method; it looks like this:
- (void)update:(CFTimeInterval)currentTime
Insert the following code into it:
[self enumerateChildNodesWithName:@"theLabel" usingBlock:^(SKNode
*node, BOOL *stop) {
node.position = CGPointMake(node.position.x - 2, node.
position.y);
if (node.position.x < - node.frame.size.width) {
node.position = CGPointMake(self.frame.size.width, node.
position.y);
}
}];
This method first finds the child node with the name "theLabel", and as we named our label the same, it finds it and gives control to the block inside. The child that it found is a node. If it finds other nodes with the name "theLabel", it will call the same block on all of them in the order they were found. Inside the block, we change the label position by 2 pixels to the left, keeping the vertical position the same.
Then, we do a check, if the position of the label from the left border of the screen is further than the length of the label, we move the label to the right-hand side of the screen. This way, we create a seamless movement that should appear to be coming out of the right-hand side as soon as the label moves off screen.
But if you run the project again, you will notice that the label does not disappear. The label takes a bit longer to disappear and blinks on screen instead of moving gracefully.
There are two problems with our code. The first issue is that the frame is not changing when you rotate the screen, it stays the same even if you rotate the screen. This happens because the scene size is incorrectly calculated at startup.
But we will fix that using the following steps:
1. Locate the Endless Runner project root label in the left pane with our files.
It says Endless Runner, 2 targets, iOS SDK 7.0. Select it and select the General pane on the main screen.
There, find the device orientation and the checkboxes near it.
Remove everything but Landscape Left and Landscape Right.
We will be making our game in landscape and we don't need the Portrait mode.
2. Next, locate your ERGViewController.m file. Find the viewDidLoad method.
Copy everything after the [super viewDidLoad] call.
3. Make a new method and add the following code:
- (void) viewWillLayoutSubviews
{
// Configure the view.
[super viewWillLayoutSubviews];
SKView * skView = (SKView *)self.view;
skView.showsFPS = YES;
skView.showsNodeCount = YES;
// Create and configure the scene.
SKScene * scene = [ERGMyScene sceneWithSize:skView.bounds.
size];
scene.scaleMode = SKSceneScaleModeAspectFill;
// Present the scene.
[skView presentScene:scene];
}
4. Let's see why calculations of frame size are incorrect by default. When the view has finished its load, the viewDidLoad method is getting called, but the view still doesn't have the correct frame. It is only set to the correct dimensions sometime later and it returns a portrait frame before that time. We fix this issue by setting up the scene after we get the correct frame.
The second problem is the anchoring of the nodes. Unlike UIViews, which are placed on screen using their top-left corner coordinates, SKNodes are getting placed on the screen based on their anchorPoint property. The following figure explains what anchor points are. By default, the anchor point is set at (0.5, 0.5), which means that the sprite position is its center point. This comes in handy when you need to rotate the sprite, as this way it rotates around its center axis.
0,1
1,1
0.5,0.5
0,0
1,0
Anchor point positions
Imagine that the square in the preceding figure is your sprite. Different anchor points mean that you use these points as the position of the sprite. The anchor point at (0, 0) means that the left-bottom corner of our sprite will be on the position of the sprite itself. If it is at (0.5, 0.5), the center of the sprite will be on the position point.
Anchor points go from 0 to 1 and represent the size of the sprite. So, if you make your anchor point (0.5, 0.5), it will be exactly on sprite center.
We might want to use the (0,0) anchor point for our text label.
The problem is that we can't set an anchor point for SKLabelNode.
There are several ways to overcome this problem, such as adding an empty SKSpriteNode, attaching SKLabelNode to it, and setting the anchor point of the first node to (0,0). We will leave this as an exercise for you.
Adding a background image to our game
First we need to add the background file to our project. Xcode 5 offers new ways to handle your assets. Find background.png in resource files for this chapter. Find images.xcassets in the project navigator on the left-hand side of the screen. Click on it and you will see a list of resources currently in your application. Drag-and-drop background.png into the left-hand list near Appicon and LaunchImage. Background will be added to the list of available resources. Select it and drag it from the 1x box to the 2x box, as this is a high-resolution image to use on retina devices.
Next, we should utilize this image somehow. The first thing that comes to mind is to make SKSpriteNode out of the image and move it in the update: method.
Sounds good, but if we add everything into the scene, it will be too bloated and unmanageable. Let's make a separate class file that will handle background images for us:
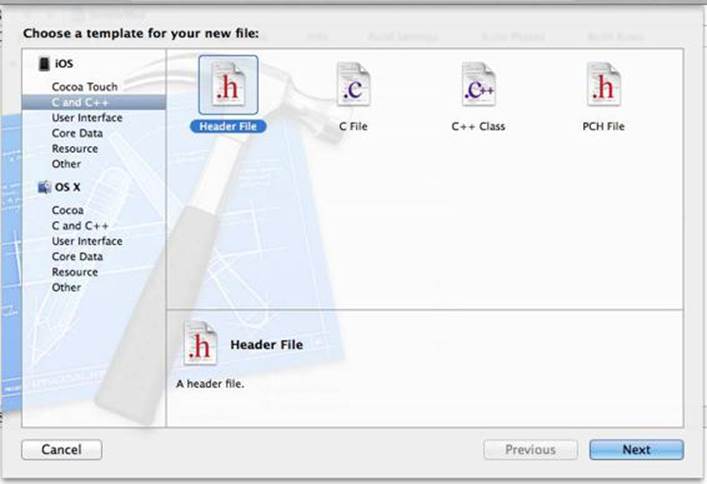
1. We will need some place to store all our constants and variables that we might need throughout our game. Common header file looks like a good place to store them. Navigate to File | New File, click on C and C++ on the left-hand side under the iOS category and select Header File there.
Name it Common.h.
2. Locate the file Endless Runner-Prefix.pch. The contents of this file are added to every source file in our project. Add the #import "Common.h" line right after Foundation.h. This way, our header file will be automatically imported into everything. You can find this file inside the Supporting Files folder in the list of project files on the left-hand side of the Xcode window.
3. Add the name of our background node, static NSString
*backgroundName = @"background"; to the Common.h file so we can reference it from anywhere.
4. Again, create a new file, an Objective-C class, name it ERGBackground, and set SKSpriteNode as its parent class when asked.
We will be handling everything background related in the ERGBackground class. Let's make the class method return the preset background so we can use it in our game.
Add this method to the implementation file and its prototype to the header file:
+ (ERGBackground *)generateNewBackground
{
ERGBackground *background = [[ERGBackground alloc]
initWithImageNamed:@"background.png"];
background.anchorPoint = CGPointMake(0, 0);
background.name = backgroundName;
background.position = CGPointMake(0, 0);
return background;
}
This method starts by creating a new background node from the file that we have added before. We set the anchor point to (0,0) to help with scrolling. This way, the position of the node will be at the left-bottom corner of the image so that we don't have to calculate the starting position of the node. By default, the anchor point is (0.5,0.5), and if we want to set two sprites back-to-back, we have to calculate halves of those nodes. If we use (0,0) as the anchor point, we just add a new sprite on the position where the last sprite ended and that's it.
Why did we assign static NSString as the name of the background and not just type some arbitrary string? Compilers offer no error handling for the names of files or names, so you can miss small mistakes in filenames, and this mistake won't be easy to find. By using static NSString, we let compilers handle errors for us. Next is the node position on screen—we want it to start from the left edge of screen, so we set it there.
After we have created the background, we need to use it somewhere. In the ERGMyScene.m file, import ERGBackground.h, and inside the header file, add the
@class ERGBackground line before the @interface declaration, and also add a new property:
@property (strong, nonatomic) ERGBackground *currentBackground
We will hold the currently shown background in it. Next up, remove everything inside the brackets of the initWithSize: method, create a new background there, and add it as a child node to the scene:
-(id)initWithSize:(CGSize)size {
if (self = [super initWithSize:size]) {
self.currentBackground = [ERGBackground
generateNewBackground];
[self addChild:self.currentBackground];
}
return self;
}
Build and run the project now and you will see the background there.
Everything looks pretty good. But how do we get it to move?
We may go into the update: method and do it in the same quick and dirty way as we did with the label—just move it by some amount of pixels each time it updates.
But we don't want a different speed of scrolling on different devices. That's why we will implement the moving speed based on time and not on iterations per second.
To do this, we need to add a new property to ERGMyScene.h:
@property (assign) CFTimeInterval lastUpdateTimeInterval; This will hold the time of the last update, and having this and currentTime (which we get from the update: method), we can find the delta (difference) since the last update.
In your update: method, remove any old code and add this code: CFTimeInterval timeSinceLast = currentTime - self.
lastUpdateTimeInterval;
self.lastUpdateTimeInterval = currentTime;
if (timeSinceLast > 1) { // more than a second since last update timeSinceLast = 1.0 / 60.0;
}
The preceding code is taken from Apple and it looks good enough for us. It calculates the delta we need in timeSinceLast and handles this value if too much time has passed since the last update (for example, you exit the application and came back to it or took a call).
Having done this, we can set up a much more precise movement. Let's add a new constant to the Common.h file:
static NSInteger backgroundMoveSpeed = 30;
We will use this to handle background scrolling, new code to scroll background that uses timing, and add it after handling time in the update: method:
[self enumerateChildNodesWithName:backgroundName
usingBlock:^(SKNode *node, BOOL *stop) {
node.position = CGPointMake(node.position.x -
backgroundMoveSpeed * timeSinceLast, node.position.y);
}];
We multiply time passed by speed to get the amount of pixels that the background needs to be shifted in this frame (by frame, we mean the picture that gets drawn 60 times per second on screen, not the sprite bounding box). On the next frame, the calculation proceeds, and if for some reason the frame rate drops, the user won't notice it as the background moves at the same speed regardless of the frame rate. There is a problem when the background scrolls too far to the left; we are left with an empty screen. We will fix this in Chapter 4, Animating Sprites.
The next thing that we need to do is to add a character. Add the character.png image to the project in the same way as you did with the background (find Images.
xcassets, select it, drag-and-drop the file there). Don't forget to set this image as a 2x image, since it is high resolution.
We will need a separate class for our player. First, let's add a new string to Common.h to identify the player node:
static NSString *playerName = @"player";
After this, create a new class called ERGPlayer and make it inherit from SKSpriteNode. Import the header file (ERGPlayer) into ERGScene.m so that our program can access methods and properties from it.
We need to redefine its init method so that we always get the same character for the player. Add the following code to ERGPlayer.m:
-(instancetype)init
{
self = [super initWithImageNamed:@"character.png"];
{
self.name = playerName;
}
return self;
}
This method calls the parent implementation of the designated initializer.
Next, add the player object to ERGMyScene.m by adding this code to the scene init method:
ERGPlayer *player = [[ERGPlayer alloc] init];
player.position = CGPointMake(100, 68);
[self addChild:player];
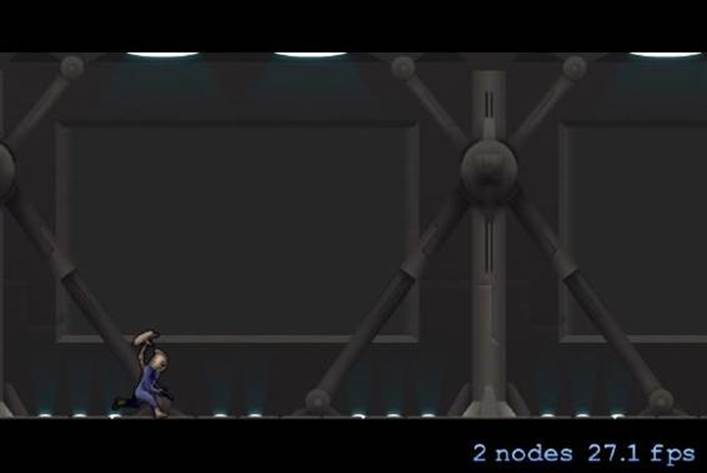
If you run the project now, you will see the moving background and character sprite on it, as shown in the following screenshot:
Background and character sprites on screen
Moving the character with actions
Let's discover how we can add simple player movements to our game, for example, jumping. One of the ways to handle this could be by creating a new action that will move the character up by a certain amount of pixels and then move the character down. Let's try this out.
Remove everything from the touchesBegan: method in ERGMyScene.m. It should look like this:
-(void)touchesBegan:(NSSet *)touches withEvent:(UIEvent *)event {
// we are creating action to move the node that runs it by vector
// of x and y components with duration in seconds
SKAction *moveUp = [SKAction moveBy:CGVectorMake(0, 100)
duration:0.8];
// same as before, but it is opposite vector to go down, and it is a bit
// faster, since gravity accelerates you
SKAction *moveDown = [SKAction moveBy:CGVectorMake(0, -100) duration:0.6];
// sequence action allows you to compound few actions into one SKAction *seq = [SKAction sequence:@[moveUp, moveDown]];
// childNodeWithName: method allows you to find any node in hierarchy with
// certain name. This is useful if you don't want to store things
// as instance variables or properties
ERGPlayer *player = (ERGPlayer *)[self
childNodeWithName:playerName];
// after creating all actions we tell character to execute them
[player runAction:seq];
}
If you tap now, the character sprite will jump (that is, move up and then go down).
Notice that we didn't write anything regarding the player in the update loop and it still works. The actions system is separate from the update loop. If we set some player movement in the update: method, they would work simultaneously, running the action for a duration and updating every frame. Also, notice that if you jump a couple of times, these will all stack up and work awkwardly. We could fix this by adding a variable that tells us whether the character is in the middle of a jump, and further jump and other actions should be ignored.
But this is unnecessarily complicated. What if we wanted to add platforms, how would we handle that?
Generally speaking, the action system is useful if you know you need to do a certain thing with your objects and nothing changes while executing them.
This way, actions are useful and very helpful, since doing something like that in the update loop can be daunting.
Another powerful feature of actions is that they can be sequenced or repeated, and you can make very complex movements and effects with them.
Adding infinite scrolling
Since having the background disappear is not the way it is meant to be, we will add an infinite background. One way to do it is to load as large a background as the memory allows and hope the player loses before reaching the end of the background image. But there is a much better way. We will have relatively small background segments, and when the background segment is going to end, we will create a new one and attach it to the end of the current segment. When the old one goes off the screen, it is removed and destroyed.
This way, we will have only two backgrounds in memory at any time, and this makes it easier and simpler to manage.
First we need to adjust the zPosition property of the player and the Background object. If we make a new background when the player is on screen, eventually it will cover the player, as nodes that were made later are rendered on top of earlier ones.
Go to ERGPlayer.m, and in the init method, add self.zPosition = 10. Do the same for ERGBackground.m in the class method that generates the background by setting backg.zPosition = 1.
Nodes with a predetermined zPosition will always be rendered in the correct order. Nodes with a higher zPosition will be rendered on top of nodes with a lower zPosition.
Here is the new update: method that gives us infinite background:
-(void)update:(CFTimeInterval)currentTime {
CFTimeInterval timeSinceLast = currentTime - self.
lastUpdateTimeInterval;
self.lastUpdateTimeInterval = currentTime;
if (timeSinceLast > 1) { // more than a second since last update timeSinceLast = 1.0 / 60.0;
self.lastUpdateTimeInterval = currentTime;
}
[self enumerateChildNodesWithName:backgroundName
usingBlock:^(SKNode *node, BOOL *stop) {
node.position = CGPointMake(node.position.x -
backgroundMoveSpeed * timeSinceLast, node.position.y);
if (node.position.x < - (node.frame.size.width + 100)) {
// if the node went completely off screen (with some extra pixels)
// remove it
[node removeFromParent];
}}];
if (self.currentBackground.position.x < -500) {
// we create new background node and set it as current node ERGBackground *temp = [ERGBackground generateNewBackground]; temp.position = CGPointMake(self.currentBackground.position.x
+ self.currentBackground.frame.size.width, 0);
[self addChild:temp];
self.currentBackground = temp;
}
}
You can adjust the speed in Common.h to check if the scrolling is really infinite.
You can do this by modifying backgroundMoveSpeed. There are some optimizations that can be done about this. Instead of creating new nodes each time, we could just keep two backgrounds in memory at all times and just reposition them every time one went off the screen. But this way, you are limited to the same background image.
Adding a score label
The next thing we need to have in our game is a label that shows how far we have gone. First, add two new properties to ERGMyScene.h:
@property (strong, nonatomic) SKLabelNode *scoreLabel;
@property (assign) double score;
After this, add a new label and actions for it in the scene initWithSize: method: self.score = 0;
self.scoreLabel = [[SKLabelNode alloc] initWithFontNamed:@"Ch alkduster"];
self.scoreLabel.fontSize = 15;
self.scoreLabel.color = [UIColor whiteColor];
self.scoreLabel.position = CGPointMake(20, 300);
self.scoreLabel.zPosition = 100;
[self addChild:self.scoreLabel];
SKAction *tempAction = [SKAction runBlock:^{
self.scoreLabel.text = [NSString
stringWithFormat:@"%3.0f", self.score];
}];
SKAction *waitAction = [SKAction waitForDuration:0.2];
[self.scoreLabel runAction:[SKAction
repeatActionForever:[SKAction sequence:@[tempAction, waitAction]]]]; Why would we need so many actions? We could go the easier way of refreshing a label in the update: method, but rendering text on labels is an expensive task, and calling it for every update is not a good idea. That's why we create an action that updates the label every 0.2 seconds.
The label is created the way you expect; we set the properties that we need and add it as a child to the scene.
Next, add the following code to the end of the update: method: self.score = self.score + (backgroundMoveSpeed * timeSinceLast / 100); Now the label updates in real time. As our character moves, the score increases.
Summary
In this chapter, we have learned the basics of Sprite Kit. There are many things that have to be finished in our game, but we have a robust background now. Our project is relatively small, but we can already see the basic gameplay elements in action.
Things that we have learned are:
• The properties and hierarchy of SKNodes
• SKSpriteNode, anchoring, and drawing
• How to draw an infinite scrolling background
• How to draw a text label
• How to move a sprite on screen (actions and update method)
• How a game loop operates
In the next chapter, we will discuss interacting with our game, handling touches and gesture recognizers, and moving sprites.