iOS 7 Game Development: Develop powerful, engaging games with ready-to-use utilities from Sprite Kit (2014)
Chapter 4. Animating Sprites
In the last few chapters, we managed to get the basics of our game out of the way—
we already have an infinite scrolling background, we handle collision detection with the physics engine, and we already have established controls. How can we improve our game? Of course, it can be enhanced with animation.
Our character does not move his legs while running, and that is clearly not the way it should be. In this chapter, we are going to add animations to our character—he will animate when he is running and jumping. We will also learn about texture atlases and how to efficiently animate our game.
What is animation?
In order to achieve the desired effect of animating our character, we need to understand a little more about animation. Behind the scenes, we will be showing a rapid succession of images, which gives the illusion of movement. This is exactly what we are going to do.
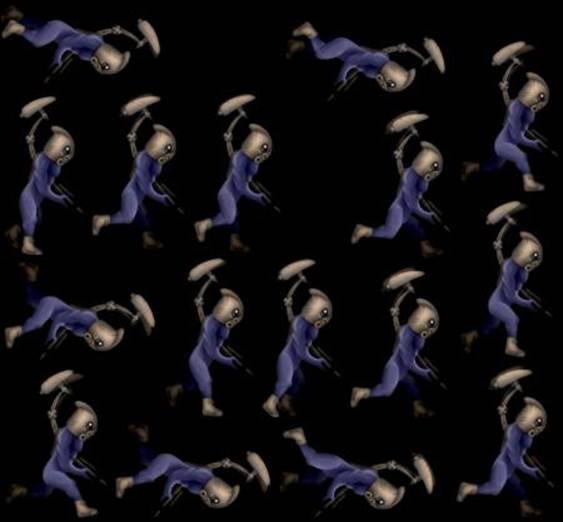
Animation is an easy way to add life to your game, to make it look nice and engaging. We are going to use animation actions in order to run animations on our character. An easy way to do this is by simply adding animation frames to some array, feeding it to an action, and instructing the character sprite to run it as shown in the following figure:
Changing the animation frames creates an illusion of movement Animating Sprites
But there are some problems with it. Rendering individual frames from separate textures is not a fast task. It requires a lot of so-called draw calls. Each time you draw something on screen, you transfer that data to the video chip, and it performs the drawing. But each of these calls is expensive as it bears some overhead. If you have many animated objects on screen, you might experience slowdowns (lags) and the frame rate may drop. To optimize our sprite drawing, we will use texture atlases.
What is a texture atlas?
To understand what a texture atlas is, check the figure following this section. As you can see, an atlas is an image that contains many subimages. Our game is able to access certain images in a texture atlas due to a special configuration file that keeps the coordinates of each image in a texture atlas.
Before Xcode 5 and Sprite Kit, you had to use third-party tools in order to create texture atlases, but now, all you need to do is create a folder named name.atlas, where the name can be anything; add images to it and add that into your project in Xcode. Xcode will handle everything for you transparently, and you won't have to worry about plists, coordinates, efficiency, and everything else.
Benefits that texture atlases provide are as follows:
• All drawing from one atlas can be processed in one draw call, thereby increasing performance dramatically.
• If your image has empty space, it will be cropped, and when you need the image, it will be restored. This way, you save memory, and your applications are smaller, which is a good thing.
However, you should remember that a texture atlas may not exceed 2000 x 2000
pixels, and if you have images that are larger than that, there is no point putting them into atlases. If the sum of all images exceeds this value, the second image of the atlas will be created in order to fit all images, as you can see in the following figure:
Images in a texture atlas
Texture atlases are also smart. If you run on a retina device and you have two versions of the atlas—one for the retina and one for regular resolution—it will use the correct images. All you have to do is have one atlas with all of the images, but retina images should have a @2x suffix, for example, spaceship.atlas, and images such as spaceship1.png and spaceship1@2x.png. Xcode will create different texture atlases for different devices, so you don't have to worry about memory and other limitations.
Adding animations to our project
In order to add animations to our endless runner game, we need to perform the following steps:
1. Find run.atlas, shield.atlas, deplete.atlas, and jump.atlas in the resources for this chapter. Drag-and-drop them into the project and be sure to check Copy items into destination group's folder.
2. Add the following property to ERGPlayer.h. We will use it to store animation frames:
@property (strong, nonatomic) NSMutableArray *runFrames;
3. Add the following code at the end of the ERGPlayer.m init method:
[self setupAnimations];
[self runAction:[SKAction repeatActionForever:[SKAction
animateWithTextures:self.runFrames timePerFrame:0.05 resize:YES
restore:NO]] withKey:@"running"];
First, we will call the setupAnimations function, where we will create an animation from the atlas. On the second line, we will create an action that repeats forever, takes an array of animation frames, and animates the sprite, showing each frame for 0.05 seconds. The resize property is needed to adjust the size of the sprite if it is smaller or larger in a new frame of animation.
The restore property changes the sprite back to the texture it had before animation. If we add a key to the animation, we will be able to find it later and remove it if needed.
4. The next thing to add is the method that makes that animation; add it to ERGPlayer.m:
- (void) setupAnimations
{
self.runFrames = [[NSMutableArray alloc] init];
SKTextureAtlas *runAtlas = [SKTextureAtlas atlasNamed:@"run"]; for (int i = 0; i < [runAtlas.textureNames count]; i++) {
NSString *tempName = [NSString
stringWithFormat:@"run%.3d", i];
SKTexture *tempTexture = [runAtlas textureNamed:tempName]; if (tempTexture) {
[self.runFrames addObject:tempTexture];
}
}
}
On the third line of this method, we create a new array for animation frames.
Then, we load the texture atlas named run. In the for loop, we create a new name for the texture and load it with that name into the frames array. We need to check for nil, as adding nil objects to an array raises an exception, and we don't want that. The format specifier, @"run%.3d", might have caught your attention. It means that we want a string starting with run and ending with a decimal number .3d means that the number has to be at least 3 digits long; if it is smaller, replace the missing digits with zeroes. The names that this code generates will look like run000, run001, and so on. If you are using a retina device, they will automatically be adjusted to run000@2x and run001@2x.
You don't need to specify the file extension. You can read more about format specifiers in the NSString class reference.
Build and run the project in a simulator. As you can see, our character has gained nice animation. Try adjusting the scroll speed and animation speed to fit each other better. There are some other adjustments we can do, which are as follows:
• If the player is already running, we don't want to start the animation again
• We may want a way to stop an animation
To accomplish these tasks, add the following two methods to ERGPlayer.m:
- (void) startRunningAnimation
{
if (![self actionForKey:@"running"]) {
[self runAction:[SKAction repeatActionForever:[SKAction
animateWithTextures:self.runFrames timePerFrame:0.05 resize:YES
restore:NO]] withKey:@"running"];
}
}
- (void) stopRunningAnimation
{
[self removeActionForKey:@"running"];
}
In the startRunningAnimation method, we do the same action that we did before in the init block, but we check if the player already has an animation with this key, and if he does, we do nothing here. In the second method, we find the animation and remove it, effectively stopping it.
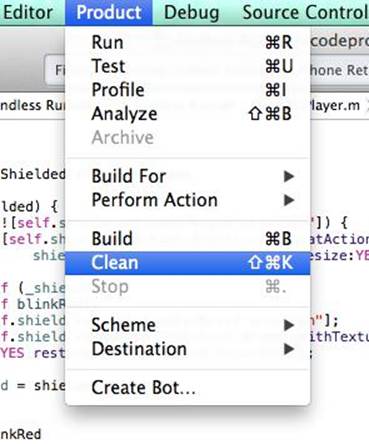
If you change the images in your project or add new ones, Xcode doesn't make new atlases. In order to do that, execute the Run and Clean commands from the Product menu on the Xcode file menu.
This forces Xcode to recreate texture atlases. You can see this in the following screenshot:
Next up is the jump animation. We will add it in the same way as before.
The following things need to be done:
1. Check if you have jump.atlas in your project. If you don't, add jump.atlas to your project in the same way as run.atlas.
2. Add the following property to ERGPlayer.h:
@property (strong, nonatomic) NSMutableArray *jumpFrames;
3. Add the following code to the setupAnimations method in ERGPLayer.m.
It does the same, in that we create an array and add frames to it: self.jumpFrames = [[NSMutableArray alloc] init];
SKTextureAtlas *jumpAtlas = [SKTextureAtlas
atlasNamed:@"jump"];
for (int i = 0; i < [runAtlas.textureNames count]; i++) {
NSString *tempName = [NSString
stringWithFormat:@"jump%.3d", i];
SKTexture *tempTexture = [jumpAtlas
textureNamed:tempName];
if (tempTexture) {
[self.jumpFrames addObject:tempTexture];
}
}
4. Add a new method to handle jumping:
- (void) startJumpingAnimation
{
if (![self actionForKey:@"jumping"]) {
[self runAction:[SKAction sequence:@[[SKAction
animateWithTextures:self.jumpFrames timePerFrame:0.03 resize:YES
restore:NO],[SKAction runBlock:^{
self.animationState = playerStateInAir;
}]]] withKey:@"jumping"];
}
}
The only interesting thing in this method is the new action—the runBlock action. It lets you run any code in action, and here we set the player's state to playerStateInAir, which means that the player is neither running nor jumping.
This is pretty much it. But how can we determine when to execute the jump animation or run animation? We don't want our character to run while they are in the air. This is why we need a state system for a player sprite.
Character states
In order to correctly handle states, we will expand our character code to handle different states that can occur. Firstly, we need to identify the states, which are as follows:
• Running state: This is the default state when the character is running on the ground
• Jumping state: This is the state when we press a button to jump, but it should be limited so that we don't continue the jumping state when we are in the air
• In air state: This is the state when the character is still in the air following a jump
In order to use these states, let's define them in ERGPlayer.h: typedef enum playerState {
playerStateRunning = 0,
playerStateJumping,
playerStateInAir
} playerState;
This code creates a new type of variable that is internally a usual integer, and we use that to identify the state of the character. We could use integer, character, or even string, but these can lead to problems. We will have to remember what state corresponds to what integer, and here we just write the state as it is.
Now, we need to store this state in our character data. Add the following line to ERGPlayer.h:
@property (assign, nonatomic)playerState animationState;
In this case, we want to execute some custom code when the animationState property is changed, so we implement our own setAnimationState: method.
It is called each time we change the animationState property:
- (void) setAnimationState:(playerState)animationState
{
switch (animationState) {
case playerStateJumping:
if (_animationState == playerStateRunning) {
[self stopRunningAnimation];
[self startJumpingAnimation];
}
break;
case playerStateInAir:
[self stopRunningAnimation];
break;
case playerStateRunning:
[self startRunningAnimation];
break;
default:
break;
}
_animationState = animationState;
}
This method is triggered every time we try to set self.animationState, and instead of the default implementation, it goes through this. We have a switch here that looks for what kind of animationState we received. If it is the jumping state, and the previous state was running, we stop the running animation and start the jumping animation. As you may remember, after we have finished the jumping animation, it changes its state to playerStateInAir. If we get to the running state, we start the running animation. After everything has been handled, we set our instance variable to the new value that we received. We do this only now as we need to know the last known state, and we can get it from _animationState.
Properties and instance variables
There are two ways to store data in your classes—by using properties or instance variables. Instance variables are easy and fast to access, and you might use them if you need high-performance code. Properties usually add some overhead to access, but offer much more. Properties are essentially instance variables that are accessed with special methods. If you have
@property NSString *myString, it will be stored internally in _myString, even if you don't add anything else. There will also be two methods that access the said variable—(NSString *) myString and (void) setMyString: (NSString *)myString. These methods are hidden and generated by the compiler. Each time you access properties, these methods are called. All of this is generated for us by Xcode behind the scenes. However, if you need to change the way they are accessed—like we do in this chapter—you can redefine these setter and getter methods.
You might want to inform someone or call some other methods from there.
This functionality adds a little bit of overhead, which in most situations is negligible. But should you need to perform some very complicated and CPU-intensive calculations, make sure to check the performance difference.
There are also other technologies that are only possible with properties such as key-value observing.
The next thing that needs to be done is the location where we change states. The place where everything changes is the update: method in ERGMyScene.m; find the line where we enumerate child nodes with the name player and replace the current implementation with this:
[self enumerateChildNodesWithName:@"player" usingBlock:^(SKNode
*node, BOOL *stop) {
ERGPlayer *player = (ERGPlayer *)node;
if (player.accelerating) {
[player.physicsBody applyForce:CGVectorMake(0,
playerJumpForce * timeSinceLast)];
player.animationState = playerStateJumping;
} else if (player.position.y < 75) {
player.animationState = playerStateRunning;
}
}];
The preceding code searches for a player node and applies force to it—this is all old code. The thing that was added here is the state change. Right after we apply force, we know that we are probably jumping. Handling further jumping continues in the previously discussed method. If the position of the sprite on the y axis is less than 75, the state is probably running, since even the smallest impulse will get us out of that position. The actual position for the default sprite is 68, but as the frames of animations change, this can fluctuate up to 75. Build and run the project to see the animation in action.
Adding shield animations
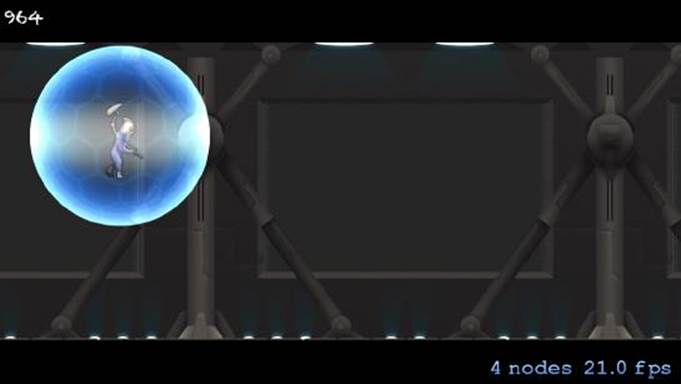
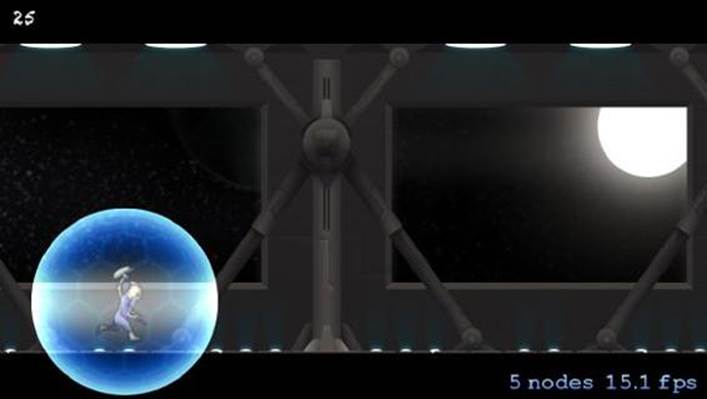
Other animations and methods that we might want to add are the shield animations.
A shield is something that protects the player from different hazards. It has on and off animations. You can check how the effect looks in the following screenshot: The background looks dull
Let's check the course of the action:
1. Add the following properties to ERGPlayer.h:
@property (strong, nonatomic) NSMutableArray *shieldOnFrames;
@property (strong, nonatomic) NSMutableArray *shieldOffFrames;
@property (strong, nonatomic) SKSpriteNode *shield;
@property (assign, nonatomic) BOOL shielded;
2. The first two properties are arrays for animation frames, the shield node is added to a character sprite in order to show shield animations (we can't show it on the character itself as it will disappear), and shielded is a state variable so that other nodes can find out if we are shielded or not.
3. The next step is to create a shield node in the init method of EGPlayer: self.shield = [[SKSpriteNode alloc] init];
self.shield.blendMode = SKBlendModeAdd;
[self addChild:self.shield];
Here, we change blendMode to add since it results in a better visual effect.
Blending modes
A blending mode is the way how different pixels are added together. By default, SKBlendModeAlpha is used. It uses an alpha value of the pixel to determine which pixels and what percent of color of each pixel are visible, and which are not.
Other blending modes are used if you need to stimulate light (the additive blending mode) or increase the brightness and color, or completely overlay one layer by another. The list of available blending modes can be found in the SKBlendMode
class reference.
4. The next thing to do is add another custom setter for the shielded variable, where we will handle all animations:
- (void) setShielded:(BOOL)shielded
{
if (shielded) {
if (![self.shield actionForKey:@"shieldOn"]) {
[self.shield runAction:[SKAction
repeatActionForever:[SKAction animateWithTextures:self.
shieldOnFrames timePerFrame:0.1 resize:YES restore:NO]]
withKey:@"shieldOn"];
}
} else if (_shielded) {
[self blinkRed];
[self.shield removeActionForKey:@"shieldOn"];
[self.shield runAction:[SKAction animateWithTextures:self.
shieldOffFrames timePerFrame:0.15 resize:YES restore:NO]
withKey:@"shieldOff"];
}
_shielded = shielded;
}
5. First, we look for a new value that we are presented with. If it is YES and we don't have the animation running, we start the shield on animation. It repeats itself since we want the shield to animate while it is on. If we are presented with NO, the other portion of this method gets triggered. It checks if the player was shielded before, and if it was, the character sprite blinks red, and it is time to run the shield off the animation. If there was no shield before, we don't want to play the shield dismissing animation. We want it to run only once.
We also don't want to have the shield on animation repeating itself, so we remove the old action. After that, we set the shielded variable to the provided value.
6. Add the blinkRed method:
- (void) blinkRed
{
SKAction *blinkRed = [SKAction sequence:@[
[SKAction
colorizeWithColor:[SKColor redColor] colorBlendFactor:1.0
duration:0.2],
[SKAction
waitForDuration:0.1],
[SKAction
colorizeWithColorBlendFactor:0.0 duration:0.2]]];
[self runAction:blinkRed];
}
7. This method makes our player sprite red for a short while and then returns it back to its regular state. To do this, it uses an action named colorizeWithColor:, waits a little, and proceeds to colorize with the default value, which is 0.0, meaning no colorization. The blend factor specifies the amount of target color to be added to the existing texture.
The higher the blend factor is, the more intense is the color, and on 1.0, all pixels of the texture will be of the chosen color.
8. Next is the setupAnimations method; we need to add new textures to it: self.shieldOnFrames = [[NSMutableArray alloc] init];
SKTextureAtlas *shieldOnAtlas = [SKTextureAtlas
atlasNamed:@"shield"];
for (int i = 0; i < [shieldOnAtlas.textureNames count]; i++) {
NSString *tempName = [NSString
stringWithFormat:@"shield%.3d", i];
SKTexture *tempTexture = [shieldOnAtlas
textureNamed:tempName];
if (tempTexture) {
[self.shieldOnFrames addObject:tempTexture];
}
}
self.shieldOffFrames = [[NSMutableArray alloc] init];
SKTextureAtlas *shieldOffAtlas = [SKTextureAtlas
atlasNamed:@"deplete"];
for (int i = 0; i < [shieldOffAtlas.textureNames count]; i++)
{
NSString *tempName = [NSString stringWithFormat:@"deplete%
.3d", i];
SKTexture *tempTexture = [shieldOffAtlas
textureNamed:tempName];
if (tempTexture) {
[self.shieldOffFrames addObject:tempTexture];
}
}
9. Same as before, we create arrays and populate them with textures extracted from texture atlases.
10. In order to test the shielding functionality, you can add self.shielded = NO
to the startRunningAnimation method, and self.shielded = YES to the startJumpingAnimation method. This way, while you are in the air, the shield will work, but if you touch the ground, it will fade away.
Build and run the project now to see if everything runs as expected.
Now that we have most of our animations out of the way, we can recall the process of adding animations to the node:
• Create an array to hold animation frames
• Extract textures from the texture atlas by iterating over it in a loop
• Create a method to run the animation action on the needed node
• Remove the action from the node if needed
Adding a parallax background
As you may have noticed, we have huge grey windows in our background (see the screenshot in the Adding shield animations section), and it would be great to add a parallax background over it. We will do it the same way we did with the original background. We will add new sprite nodes and move them every frame.
The things that need to be done to add a parallax background are as follows: 1. Add parallax.png to images.xcassets in the Xcode project, either by drag-and-drop or by clicking on the plus button in Xcassets. Select parallax in the left Xcassets pane and move it from 1x to 2x by dragging, as we have high-resolution artwork (see the following screenshot).
2. The next thing we need is some variables in Common.h: static NSString *parallaxName = @"parallax";
static NSInteger parallaxMoveSpeed = 10;
3. We also need to have parallax as a property in ERGMyScene.h in order to replace it with a new one. Add the following line:
@property (strong, nonatomic) ERGBackground *currentParallax; 4. The next thing that we need to do is create that background layer. To do that, go to the scene's initWithSize: method, and right after the creation of self.background, add the code for the parallax layer's creation: self.currentParallax = [ERGBackground generateNewParallax];
[self addChild:self.currentParallax];
5. In order to generate a new parallax, we need to expand ERGBackground.h.
Add the following method definition there:
+ (ERGBackground *)generateNewParallax;
6. In ERGBackground.m, write the method itself:
+ (ERGBackground *)generateNewParallax
{
ERGBackground *background = [[ERGBackground alloc]
initWithImageNamed:@"parallax.png"];
background.anchorPoint = CGPointMake(0, 0);
background.name = parallaxName;
background.position = CGPointMake(0, 0);
background.zPosition = 4;
return background;
}
7. Here, we create the new sprite node, set its position and anchor point for our convenience, and adjust its position on the z axis. Within the same file, in the generateNewBackground method, change the assigned zPosition value from 1 to 5 so that it appears above the parallax layer.
8. And finally, in the update: method in ERGMyScene.m, add code to handle the moving and creating of new parallax layers:
[self enumerateChildNodesWithName:parallaxName
usingBlock:^(SKNode *node, BOOL *stop) {
node.position = CGPointMake(node.position.x -
parallaxMoveSpeed * timeSinceLast, node.position.y);
if (node.position.x < - (node.frame.size.width + 100)) {
// if the node went completely off screen (with some
extra pixels)
// remove it
[node removeFromParent];
}}];
if (self.currentParallax.position.x < -500) {
// we create new background node and set it as current
node
ERGBackground *temp = [ERGBackground generateNewParallax]; temp.position = CGPointMake(self.currentParallax.
position.x + self.currentParallax.frame.size.width, 0);
[self addChild:temp];
self.currentParallax = temp;
}
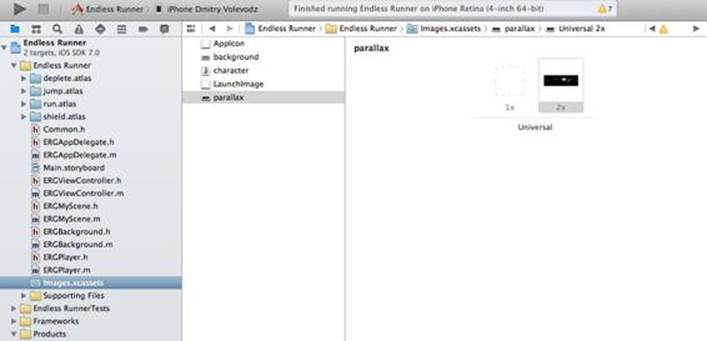
9. Here, we find a node with parallaxName, and we remove it if it is off the screen. If the current parallax layer is halfway done or so, we create a new parallax layer and set its position to where the last one ends, so that they interconnect flawlessly. The following screenshot shows the addition of parallax.png to Images.xcassets:
Adding parallax.png to Images.xcassets
Build and run the project, and you will see that the parallax background layer adds to the atmosphere and look of the project. Suddenly, our game has gained depth and looks great, as shown in the following screenshot:
The parallax layer adds depth to our game
What is parallax?
Parallax is an effect that allows us to simulate depth on a two-dimensional screen. This effect can be seen when you travel by train or by car. Trees that are near you move fast, those that are at a distance move slowly, and things on the horizon barely move. When some objects move faster and other objects move slower, we get a feeling that there is depth to the scene.
We use this effect to add polish to our game.
Summary
In this chapter, we have learned that animation is a powerful way to add life to your game. It helps to engage the player, as smooth and nice-looking animations are always an eye candy. Learn to appreciate your animations and players will enjoy your games. We have also learned about animations; how to create them, and how to run and cancel them. We also found out what texture atlases are and how they increase performance and save memory. We also learned how to colorize sprites, how to perform parallax scrolling, and how to add depth to our game.
In the next chapter, we will learn about particle effects, and how to create and use them to add more eye candy to your game.