iOS 7 Game Development: Develop powerful, engaging games with ready-to-use utilities from Sprite Kit (2014)
Chapter 5. Particle Effects
In this chapter, we will be discussing particle effects. These are the effects that are created by utilizing particles, which are very small graphical entities. They are not sprites and are rendered very efficiently, and you can have thousands of particles on screen without any slowdown.
Particle effects are used for various effects that could be hard to implement otherwise.
This is why particle effects are often used to add polish and engagement to your game. There are different kinds of effects that can be implemented by particle effects, such as fire, explosions, rain, smoke, snow, fireworks, stars, and so on.
A particle is just a small sprite that appears on the screen for a very short amount of time and disappears. Its speed, velocity, and other properties affect the outcome that you will get on screen. There are hundreds and even thousands of those particles on screen at any time particle effect is used. This is possible due to the fact that graphics chips are optimized to show many objects with the same texture.
Particles are generated and destroyed by a special object called the particle emitter.
It knows when to make a new particle, when to kill off old particles, and the properties of particles.
Particle emitters
Particle effects are generated by the SKEmitterNode particle emitter that generates and manages particles. Generally, particles originate from their emitter. Each emitter has a plethora of properties. There are more than twenty properties that affect the emitter itself and the particles it generates.
Particle emitters are smart and they re-use particles like many other classes in iOS ecosystem (for example UITableView and UICollectionView). Rather than creating a new particle every time, it re-uses particles that have gone off-screen instead. This is one of the reasons why particle effects are so efficient.
Particle Effects
There are two ways to create the particle emitter, either from file or programmatically.
We will look at both the methods.
First particle effect
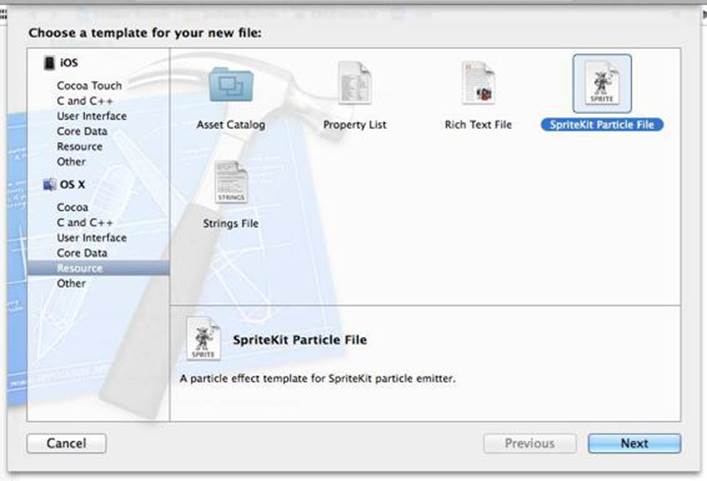
How can we apply particle effects to our project? The first thing that comes to mind is to add nice flames to our jetpack. In order to do that, we need to create a new particle effects file. To do this, we need to navigate to the File menu and then to New
| New File. On the left-hand side table, click on Resource under the iOS section and from the right-hand side of the screen, select SpriteKit Particle File, as shown in the following screenshot:
Creating a new particle effects file
On the next screen, you will be asked what preset type of particle effect you want to create. Pick a Spark type. Name it as jet.
After you have done that, two new files will appear in your project, jet.sks and spark.png. Click on the first one and you will see the particle effect in action, then select SKNode Inspector on the right-hand side of the screen. Make sure the Utilities pane is visible on the right-hand side (the top-right icon in the Xcode window). Next, click on the rightmost icon below the toolbar, which looks like a small cube. You will see Particle Editor, which is a built-in tool to customize particle effects.
Particle effects editor in Xcode
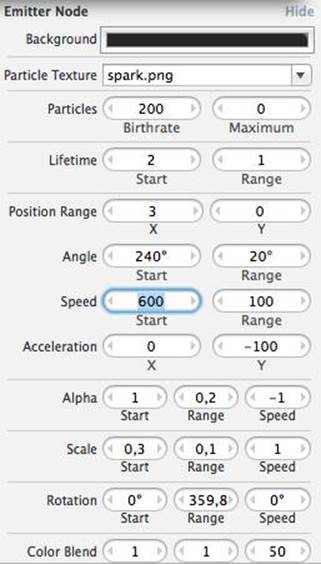
Now you will see the Emitter Node properties. Many of them are cryptic, but try playing with them and you will see that they are not that scary. Let's discuss some of them:
• Birthrate: This is the rate at which the emitter generates particles. The greater the number here, the more intense the effect feels. Try to keep this as low as possible to achieve the same effect for a good frame rate.
• Lifetime: This defines how long a particle will live. This indirectly affects how far away the particles will fly from the emitter. Range here means that the emitter will use a random value from the first value +- range.
• Position Range: This defines how far from the center of SKEmitterNode the particles will appear. In practice, this affects how big you want your emitter to be.
• Angle: This is the direction in which the particles will fly.
• Speed: This is the starting speed of the particle, with the same range variance as in the previous properties.
• Acceleration: This value on x and y axes means where the particles will fly as soon as they appear.
• Alpha: This makes the particles transparent and sets the value and range to your liking.
• Scale: This is the size of the texture used for the effect. Sometimes you will want smaller particles and sometimes you will want bigger ones, and this property allows you to have only one texture for both of them.
• Rotation: This is rarely needed, as each particle lives for so little time that usually rotation is meaningless.
• Color Blend: This is one of the most interesting properties. It allows you to set color change in particle life. Particles can start at one color and slowly arrive to another color.
Set particle effect properties to those shown in the preceding screenshot. This will create a nice jet of flame that looks useful to our game. The next thing that we need to do is add it to our player character.
In order to do that, add a new property to ERGPlayer.h:
@property (strong, nonatomic) SKEmitterNode *engineEmitter;
After that, add the following lines to the init method of ERGPlayer.m: self.engineEmitter = [NSKeyedUnarchiver
unarchiveObjectWithFile:
[[NSBundle mainBundle]
pathForResource:@"jet" ofType:@"sks"]]; self.engineEmitter.position = CGPointMake(-12, 18);
self.engineEmitter.name = @"jetEmitter";
[self addChild:self.engineEmitter];
self.engineEmitter.hidden = YES;
In the first line, we unarchive the emitter from file. Each Sprite Kit node is archivable and serializable, so here we utilize that fact. Next, we set the position of the emitter in our player sprite, give the emitter a name, and hide it since we don't want it to be on always.
If you remember, we have already handled all physics of acceleration and added the property that tells us whether the player is accelerating with the same name. Now that we need extra behavior from that property, add a new setter to it in ERGPlayer.m:
- (void) setAccelerating:(BOOL)accelerating
{
if (accelerating) {
if (self.engineEmitter.hidden) {
self.engineEmitter.hidden = NO;
}
} else {
self.engineEmitter.hidden = YES;
}
_accelerating = accelerating;
}
Here we hide or show jet flames based on our state. If you launch the game now, you will see a nice effect that surely added some spice to our game. If Xcode raises a warning, make sure that the accelerating property in ERGPlayer.h is of non-atomic type.
Advanced physics
Now that we have added the jetpack effect, we should add core gameplay elements.
We will add enemies and power-ups to our game. But we will need to handle collisions somehow. That's where, once again, Sprite Kit and its sophisticated physics engine will save us.
If you remember how we handled collisions before by setting collisionBitMasks, the game checks if two things have the same collision bitmasks and handles their collision. This was the way that worked for player-ground collision for us.
But we would like to handle the collisions ourselves. For example, we want the player to lose if he touches enemy, or we want a shield to appear when he picks a shield power-up. Thankfully, there is a working method for that.
The first thing that we need to do is add our scene as conforming to the SKPhysicsContactDelegate protocol. To do that, open ERGMyScene.h and change the line with @interface in it to this:
@interface ERGMyScene : SKScene <SKPhysicsContactDelegate> This means that we implemented some of the methods needed to correctly handle collisions.
Each time our physics bodies collide, our scene will call (void) didBeginContact: (SKPhysicsContact *) the contact method. Here we handle collisions and do what we need to do with our bodies and nodes.
To make this method work we need to update our knowledge on bitmasks.
The following are the three types of bitmasks used in Sprite Kit physics:
• categoryBitMask: This mask shows us what category this body belongs to. It is used to see what type of collision body this is.
• collisionBitMask: This is used to handle collisions automatically.
Bodies with overlapping masks will collide and the physics engine will handle everything for you.
• contactTestBitMask: This mask is needed for manual collision handling in the didBeginContact method. Each time bodies with overlapping contact masks collide, you will get this method invoked. When the collision ends, didEndContact will get triggered.
Bitmasks in Sprite Kit are 32 bit, the same as integers, and they work by setting individual bits in an integer. Thus, there are only 32 possible masks, and you should use them carefully, since mistakes here lead to a lot of confusion.
As bitmasks use each individual bit, you should use these numbers for masks: 1, 2, 4, 8, 16, 32, and so on.
We will need to create new masks in the Common.h file and add the following code to it:
const static int playerBitmask = 1;
const static int enemyBitmask = 2;
const static int shieldPowerupBitmask = 4;
const static int groundBitmask = 8;
We will use these bitmasks to handle different objects on screen. After this, we need to create actual classes to handle power-ups and enemies.
Create a new ERGEnemy class and make SKNode as its parent.
We will need only one property there, that is, emitter and add it to ERGEnemy.h using @property (strong, nonatomic) SKEmitterNode *emitter.
Now in the .m file, we will need to set up the particle emitter for the job, as follows:
- (instancetype) init
{
self = [super init];
if (self) {
[self setup];
}
return self;
}
- (void) setup
{
self.emitter = [NSKeyedUnarchiver unarchiveObjectWithFile:
[[NSBundle mainBundle] pathForResource:@"enemy"
ofType:@"sks"]];
self.emitter.name = @"enemyEmitter";
self.emitter.zPosition = 50;
[self addChild:self.emitter];
self.physicsBody = [SKPhysicsBody bodyWithCircleOfRadius:20]; self.physicsBody.contactTestBitMask = playerBitmask;
self.physicsBody.categoryBitMask = enemyBitmask;
self.physicsBody.collisionBitMask = 0;
self.physicsBody.affectedByGravity = NO;
}
We override the init method to add the new setup method that creates a new emitter and a new physics body. We set contactBitMask to playerBitmask, since we want to be notified when a player sprite is colliding with the enemy sprite, and we don't want enemies to collide with each other. We set categoryBitMask in order to identify the object, collisionBitMask to zero since we don't want our engine to handle collision for us, and we will do it manually. We also set affectedByGravity to NO as we don't want our enemies to fall off the screen.
The next thing we need is power-ups. Create the ERGPowerup class (we will use this class to represent objects that grant shields to the player character) and set ERGEnemy as its superclass. We need to redefine the setup method in ERGPowerup.m as we want them to do different things:
- (void) setup
{
self.emitter = [NSKeyedUnarchiver unarchiveObjectWithFile:
[[NSBundle mainBundle] pathForResource:@"powerup"
ofType:@"sks"]];
self.emitter.name = @"shieldEmitter";
self.emitter.zPosition = 50;
[self addChild:self.emitter];
self.physicsBody = [SKPhysicsBody bodyWithCircleOfRadius:20]; self.physicsBody.contactTestBitMask = playerBitmask;
self.physicsBody.categoryBitMask = shieldPowerupBitmask;
self.physicsBody.collisionBitMask = 0;
self.physicsBody.affectedByGravity = NO;
}
This is same as the previous thing, but we pick a different particle effect and another categoryBitmask.
After this, we need to add enemies to our scene. First, import the ERGEnemy.h and ERGPowerup.h files at the top of ERGMyScene.m. Second, we will need methods to create enemies:
- (ERGEnemy *) spawnEnemy
{
ERGEnemy *temp = [[ERGEnemy alloc] init];
temp.name = @"enemy";
temp.position = CGPointMake(self.size.width + arc4random() % 800, arc4random() % 240 + 40);
return temp;
}
This method is straightforward, but for the arc4random() function that returns a random number, and if we perform a modulo operation on it with certain numbers, we will get a random number from 0 to the previous number of that number. This is useful, since we want our enemies to spawn somewhat randomly. They spawn off screen. We will need the same method to spawn power-ups:
- (ERGPowerup *) spawnPowerup
{
ERGPowerup *temp = [[ERGPowerup alloc] init];
temp.name = @"shieldPowerup";
temp.position = CGPointMake(self.size.width + arc4random() % 100, arc4random() % 240 + 40);
return temp;
}
In order to move them, add the following code to the update method:
[self enumerateChildNodesWithName:@"enemy" usingBlock:^(SKNode
*node, BOOL *stop) {
ERGEnemy *enemy = (ERGEnemy *)node;
enemy.position = CGPointMake(enemy.position.x -
backgroundMoveSpeed * timeSinceLast, enemy.position.y);
if (enemy.position.x < -200) {
enemy.position = CGPointMake(self.size.width +
arc4random() % 800, arc4random() % 240 + 40);
enemy.hidden = NO;
}
}];
[self enumerateChildNodesWithName:@"shieldPowerup"
usingBlock:^(SKNode *node, BOOL *stop) {
ERGPowerup *shield = (ERGPowerup *)node;
shield.position = CGPointMake(shield.position.x -
backgroundMoveSpeed * timeSinceLast, shield.position.y);
if (shield.position.x < -200) {
shield.position = CGPointMake(self.size.width +
arc4random() % 100, arc4random() % 240 + 40);
shield.hidden = NO;
}
}];
The preceding code will move enemies at the same speed as the background is moved, and will move the enemy to a somewhat random position in front of the screen once it goes off screen. This way we will always use only a certain amount of enemies and won't create any new ones. Re-using things is a good practice, since it saves us memory and processor time. Next, we need to add some constants that handle the number of enemies that spawn and power-ups that can spawn.
We will add these to Common.h:
const static NSInteger maximumEnemies = 3;
const static NSInteger maximumPowerups = 1;
Now back in ERGMyScene.m, we will create new enemies and power-ups in the initWithSize: method:
for (int i = 0; i < maximumEnemies; i++) {
[self addChild:[self spawnEnemy]];
}
for (int i = 0; i < maximumPowerups; i++) {
[self addChild:[self spawnPowerup]];
}
Now it's time to change the appearance of enemies. Create a new particle effects file for them and name it as enemy.sks. You can configure them the way you like, but I used the following properties for enemies:
• Particles: 500
• Lifetime: 0.05
• Position and range: zero
• Angle: 0 with 360 range
• Speed: 400
• Acceleration: Zero on both the axes
• Scale: 0.1 with 0.1 range and 1 speed
• Rotation: At zero and yellow color
And the following properties for power-ups:
• Particles: 400
• Lifetime: 1
• Position range: X at 20 and Y at 0
• Angle: 90 with 0 range
• Speed: 100 with 100 range
• Acceleration: X at 0 and Y at -50
• Scale: 0.1 with 0.1 range and 1 speed
• Rotation: At zero and blue color
This makes a nice yellow ball that looks dangerous enough for enemies and the blue flame for power-ups. In order to use collisions and collision handling, we need to change the masks in ERGPlayer.m and the old values to the following ones: self.physicsBody.contactTestBitMask = shieldPowerupBitmask |
enemyBitmask;
self.physicsBody.collisionBitMask = groundBitmask;
self.physicsBody.categoryBitMask = playerBitmask;
Again, the preceding code should be straightforward. The first line sets masks that we want to register contact events with. The second line sets automatic collisions with the ground, we want these to work as they did before. And the final line is the category to identify us.
Now we need to modify ERGMyScene.m and add methods to handle contacts:
- (void) didBeginContact:(SKPhysicsContact *)contact
{
ERGPlayer *player = nil;
if (contact.bodyA.categoryBitMask == playerBitmask) {
player = (ERGPlayer *) contact.bodyA.node;
if (contact.bodyB.categoryBitMask == shieldPowerupBitmask) {
player.shielded = YES;
contact.bodyB.node.hidden = YES;
}
if (contact.bodyB.categoryBitMask == enemyBitmask) {
[player takeDamage];
contact.bodyB.node.hidden = YES;
}
} else {
player = (ERGPlayer *) contact.bodyB.node;
if (contact.bodyA.categoryBitMask == shieldPowerupBitmask) {
player.shielded = YES;
contact.bodyA.node.hidden = YES;
}
if (contact.bodyA.categoryBitMask == enemyBitmask) {
[player takeDamage];
contact.bodyA.node.hidden = YES;
}
}
}
The preceding method is provided with the contact that has two properties in it, bodyA and bodyB. But these bodies are somewhat randomly selected and we need to check their type before we do anything. Here we check if we picked up the power-up on which we set the shielded property on our player to YES, and if we touch the enemy, we will call the takeDamage method on the player.
We will need to modify ERGPlayer.m by first removing self.shielded = YES and self.shielded = NO from where we put them before. They will be handled by collisions from now on. After this, add a new method to handle taking damages:
- (void) takeDamage
{
if (self.shielded) {
self.shielded = NO;
} else {
self.hidden = YES;
[[NSNotificationCenter defaultCenter] postNotificationName:@"p layerDied" object:nil];
}
}
Since we want the player node to be as decoupled from our scene as possible, we won't call some method on the scene directly, but we will broadcast notifications to everyone who might be interested in it. In our game, we will handle it by presenting a new Game Over scene to the player.
Scene transitions
Only one scene may be present on-screen at any time, and in order to handle different scenes that may hold different content we may need smooth transitioning between them. The following is a code sample that will clear things up for you, add it to ERGMyScene.m:
- (void) gameOver
{
ERGGameOverScene *newScene = [[ERGGameOverScene alloc]
initWithSize:self.size];
SKTransition *transition = [SKTransition
flipHorizontalWithDuration:0.5];
[self.view presentScene:newScene transition:transition];
}
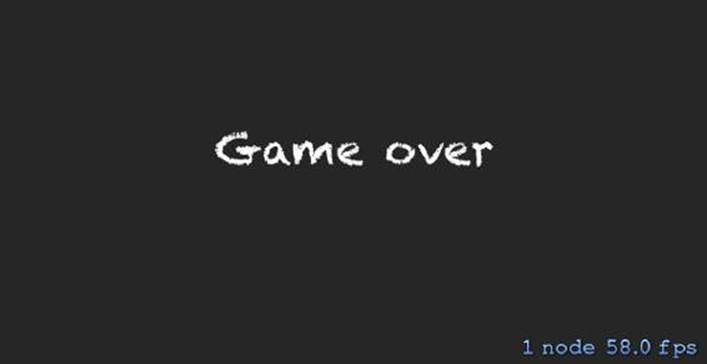
Our Game Over scene
First, we create a new scene as usual. Next, we create a transition object. There are many kinds of transitions with many different effects. On the third line, we ask view to present a new scene. This ends our scene lifecycle. Scenes do not get saved in memory; on each transition the old scheme is destroyed, and if you want to use it again, you have to make it all over, as shown in the preceding screenshot.
There are many different transition types that you can use, check the SKTransition class reference for a list of possible transitions. It is available at https://developer.apple.com/library/IOs/
documentation/SpriteKit/Reference/SKTransition_Ref/
Introduction/Introduction.html or in Xcode search.
In order to call this method, we need to subscribe to notifications and add the following code to the initWithSize: method of ERGMyScene.m:
[[NSNotificationCenter defaultCenter] addObserver:self selector:@
selector(gameOver) name:@"playerDied" object:nil]; Now we need to make a new scene, a Game Over scene, to show to the player each time he fails.
Create a new class, name it as ERGGameOverScene, and make it a subclass of SKScene. Add the following code:
- (instancetype) initWithSize:(CGSize)size
{
self = [super initWithSize:size];
if (self) {
SKLabelNode *node = [[SKLabelNode alloc] initWithFontNamed:@"
Chalkduster"];
node.text = @"Game over";
node.position = CGPointMake(self.size.width / 2, self.size.
height / 2);
node.fontSize = 35;
node.color = [UIColor whiteColor];
[self addChild:node];
}
return self;
}
- (void) didMoveToView:(SKView *)view
{
[super didMoveToView:view];
UITapGestureRecognizer *tapper = [[UITapGestureRecognizer alloc]
initWithTarget:self action:@selector(newGame)];
[view addGestureRecognizer:tapper];
}
- (void) newGame
{
ERGMyScene *newScene = [[ERGMyScene alloc] initWithSize:self.
size];
SKTransition *transition = [SKTransition
flipHorizontalWithDuration:0.5];
[self.view presentScene:newScene transition:transition];
}
In the preceding code, we add a new text label to the new scene as usual and set its properties. Next, we add a tap gesture recognizer so that the player can try again by tapping the screen. Finally, in the newGame method, we create new MyScene and Transition to it, effectively starting a new game.
Summary
In this chapter, we have learned about particle effects and their flexibility in use.
We have created enemies and power-ups only with particle effects. We have found out how we can handle contact events and how to use complex physics and collisions in our game. We handled scene transitions and found out how to decouple a node from the scene if needed. Our game is almost fleshed out, we have enemies, power-ups, and lost conditions.
In the next chapter, we will learn how to add game controllers support to our game.
We will learn how to discover and use various game controllers that are new in iOS 7.