Learning iCloud Data Management (2014)
Part III: Using the Technologies
10. Managing Persistent Storage with Core Data
Synchronizing data successfully and efficiently often means structuring the data. Once the data is structured in some way, software can keep track of changes to the structures within the data and synchronize those instead of the entire data store. That is how you can easily sync thousands (or even hundreds of thousands) of addresses: you sync the relatively few that have changed since the last sync.
iCloud and the Cocoa frameworks use a variety of tools and techniques to structure data. For relatively small amounts of data (<1MB), key-value coding (KVC) fits the bill. Property lists and the user defaults system are built on top of KVC to provide you with abstractions and tools that you need to support the data.
As you will see in Part IV, “Using iCloud Documents and Data,” you have tools on both OS X and iOS to synchronize documents across a user’s iCloud-enabled devices. But first, in this chapter, it is time to look at Core Data, which is perhaps the ultimate data management tool in Cocoa and Cocoa Touch. As such, it is the ultimate iCloud synchronization tool. The structuring of data in Core Data is tightly integrated with iCloud.
This chapter provides you with an overview of Core Data and iCloud integration at a high level. After that, you’ll delve into Core Data itself to see how the runtime Core Data stack is created with its persistent stores, data model, and managed objects. Then, you’ll see how to build your data model in Xcode.
Some developers loudly proclaim that they have no interest whatsoever in Core Data in particular or databases in general. Among developers who work with both databases and code, there is sometimes an anecdotal and informal feeling that the two processes “feel” different. Certainly, it does make sense that looking for patterns and organizing data is, in some ways, a different type of mental process than writing code to implement a process. That said, there is no reason to think that writing code and working with databases are two incompatible skills. Many, many people do both, and there is really no excuse to ignore the fact that both skills are needed in software development. There is room in a large company for compartmentalization, but many app developers work on their own or in very small organizations. If you are not comfortable with databases, this chapter provides an overview of what you need to know to work with Core Data in iCloud.
Understanding the Goals of Core Data
In 1967, Simula 67, generally considered the first object-oriented programming language, was released. It was built on Algol, which itself was made possible (some would say necessary) by the series of Burroughs mainframe computers that started with the Burroughs 5000. Object-oriented programming caught on and today is the programming style of choice for many projects.
In June of 1970, Edgar Codd from IBM’s San Jose Research Laboratory first proposed the relational model of databases. Until that time, there were a number of other database structures in play. Advances in hardware and software (particularly disk access) made new ways of storing and finding data possible at this time. Today, the relational model is used for most major database systems.
From the start, people dreamed of merging the two concepts. There were a number of hardware solutions as well as several software solutions. Why can’t we store and retrieve objects from databases in the same way we can store and retrieve common data? There was no clear answer to that question for some time.
In 1994, NeXT released Enterprise Objects Framework (EOF) in conjunction with its WebObjects application server software. The union of objects and relational databases seemed to be achieved. With Apple’s purchase of NeXT, EOF arrived at Apple and, with a number of revisions (including a complete rewrite in Objective-C), it became Core Data.
Understanding Object Graphs
Core Data is sometimes referred to as an object graph management system. It is not a database, and it is not a query language. As just described, Core Data can be considered in broad terms as the merging of relational databases and object-oriented programming. However, remember that “broad terms” is as far as you can take that point. Fortunately, for most people working with Core Data on iOS and OS X, that is far enough. It provides a high-level overview that is sufficient to get you up and running.
Introducing Faulting
One of the key aspects of Core Data that you should be aware of as a developer is its use of faulting. Core Data can retrieve data from a database in two ways. In the first way, it retrieves only enough information to know what the data will be like in terms of name and data type when it is fully retrieved. When you try to access the incomplete data, a fault is issued, and the object is fully created with its data. Much of the time, you do not worry about the faulting process: it just works. Of course, whenever you are developing a database application in any language or framework, the more you know that performance demands will be high, the deeper you have to go in performance issues.
The journey of EOF from its first Objective-C implementation to its Java version and then back to Objective-C is relevant, because it demonstrates that its basic structure that abstracts database and language access is robust. Core Data is not a database manager itself. In iOS, it can use a binary representation of the stored data, or it can use the built-in SQLite library. (There are other possibilities for the back-end, but they are beyond the scope of this chapter.) In OS X, it can also use an XML representation of the data. From your perspective as a developer, you do not need to worry about the representation of the data. (In its original incarnation, EOF could use other databases such as Oracle and OpenBase.)
The only point that may be relevant to you is that SQLite is a single-user product. For a multiple-user database, you need other technologies. Exploring the FileMaker iOS and OS X options may be useful if you need a multiuser database. (FileMaker is a wholly owned subsidiary of Apple.)
Introducing the Data Model
You use the data modeling tool in Xcode to graphically create your data model. (In today’s world, graphical editors for database designs are very common.) If you are using SQLite to store your data, Core Data routines convert that data model into a SQLite database. Other Core Data routines manage the interaction between your app and the actual SQLite database. You rarely look at the SQLite database itself.
Structuring Data
The relational model for databases is built on tables that contain rows and columns. If this sounds like a spreadsheet, that, indeed, is what it looks like. However, a relational database goes beyond the spreadsheet design by implementing a rigorous metadata structure that helps you define the data you are dealing with. The overall design of the database is specified in a database schema which defines the tables, rows, and columns.
With Core Data, you directly work with the data model, and, as noted, Core Data routines handle the creation and management of the underlying persistent store—Core Data in most cases.
Properties
In a single table, each column represents a data item such as a name or address. Each row within that column represents a single value: Shen, Vincent, or Rex, for example. Together, the rows and columns comprise the table. In the relational model, columns are named and the type of values they can contain is set. (This is not a formatting setting: the data itself must be of the specified types.) Each column is formally called an attribute.
A table contains logically connected data such as names and addresses, inventory items, or topics to be discussed in a meeting. Often, the data is a digital representation of a physical object, but it can also be a digital representation of an idea (such as a discussion topic).
Note
Sometimes, people refer to columns as fields. This is a carry-over from older database models, as is the use of record for row.
Switch over to the terminology of Objective-C and objects. In that world, the object that contains logically connected data is a class. (It also can contain methods, which are instructions for using the data, but right now the focus is on data.)
Within a class, the items the class contains are organized into properties. For a given class, you can have multiple instances; each instance has its own value for each of the properties. You can think of Core Data as the glue that converts tables, rows, and columns back and forth to classes, instances, and properties.
Note
Property is used in an inclusive sense and is meant to include instance variables (ivars) if you use them.
Relationships
Simple two-dimensional tables manage simple sets of data. What makes the relational model so powerful is relationships. A relationship is a declarative statement of how two tables can relate to one another. Instead of a names and addresses table, you might have two tables—a names table and an addresses table. A relationship is defined so that, for example, a name in the names table is related to a row in the addresses table where the name field matches the name in the names table. In modern relational databases, relationships can be complex. In SQL, the most widely used language of relational databases, it is SQL queries that implement relationships. As you will see, in Core Data you can specify relationships in the database schema itself.
This description of relationships is fine as far as it goes. In order to actually use relationships, you need to adhere to some best practices and conventions. Most important, if you relate a name in a names table to a name in an addresses table, precisely how do you do it? Names change for various reasons. What happens to your database?
Records in tables often have a unique identifier, which can be used to retrieve that record. The unique identifier should not only be unique: it also should be meaningless. As soon as meaningful data is used for all or part of an identifier, it is subject to the problems that occur when a supposedly unique identifier changes. Even if you believe you have meaningful data that is unique and will never change, chances are your assumptions are wrong. It is not unheard of for an adult to learn that his or her birthday was actually one day earlier or later than was supposed. You can often spot identifiers that are likely to cause problems. As soon as you spot an identifier such as M-0805-20130224-pink, you should be able to tell that you’re looking at data, not a unique and meaningless identifier.
If you make it a practice to have a unique and meaningless identifier in each record, you can use those identifiers in relationships. The relationship will then be immune to changes in the relationship being changed by data changes. Of course, you do need to decide what the relationship that you desire is. Do you want to relate this object to that object in all cases? Or do you want to relate this object to that object based on a data value (which could be a nonunique name)?
Many database designers make it a practice to include a field in every record for a unique identifier. Sometimes it is called id; sometimes it is called zzID. (The latter convention means that when you look at fields in alphabetical order, maintenance fields such as this one sort at the bottom of the list. Furthermore, using zzID rather than zID means that your unique identifier won’t show up next to a valid field such as zipCode that is not a maintenance field.)
Whatever it is called, your unique and meaningless identifier is also called a key; in fact, it is called a primary key. Any field that is used to retrieve rows from a database table is a key. A primary key is always present and is unique.
When you use this style of database design, it is easy to create a relationship. You relate the primary key in one table (such as names) to a field key in another table (such as addresses). Often, the field that is used in the relationship has a standard name, such as nameID. You relatenameID in addresses to id in names, and the relationship is created. The nameID field in the addresses table is a foreign key: you use it to find which record in the names table you want to find to complete the relationship.
In Core Data, you draw the relationships in the data model editor. Behind the scenes, the primary keys are created and managed for you.
This describes the simplest kind of relationship. A relationship can also have multiple members. For example, one person (a name) can have multiple addresses or telephone numbers. While each name in the names table has a unique value for its primary key, in the addresses table, several rows can have the same value for nameID. That would mean that all of those addresses are related to the same name. This type of relationship is called a one-to-many relationship or a many-to-one relationship, depending on which side you’re looking at.
You can also have many-to-many relationships. Perhaps three members of the same family share two addresses (perhaps one is for weekends and the other for weekdays). In this case, a third table is used to implement the relationship (it’s called a join table). Usually, the join table has two fields (or columns). One is the nameID and the other is the addressID. To find all the addresses for a given name, you retrieve all of the join table records for that name. That will give you all of the addressIDs.
There is much more to relationships, but these basics can get you started with Core Data and iCloud.
Normalizing Data
Relationships are frequently used together with normalization in a database schema. Some people compare normalized data to the old saw, “a place for everything and everything in its place.” The old saw is remarkably applicable to the concept of normalization. For example, if you have a large database, you should be able to find the field in a specific table where a person’s address is stored. There should not be two fields in the database where that data is stored for the same person.
But there is more to normalization than this. There are, in fact, three basic forms of normalization. They are implemented in sequence (in other words, third normal form requires compliance with first and second normal forms), and generally, all three are implemented in well-designed databases.
First Normal Form: Eliminate Repeating Groups
If you have a names table and an addresses table, the relationship between them eliminates a potential normalization problem. In many cases, the first try at a database design might be simply a names table. Within that table, you could have an address for the person. So far, that’s normalized data.
However, if you decide that you want to allow a person to have two addresses (home and work, perhaps), you would add fields such as workAddress and homeAddress. These are both address fields: that’s the repeating group referred to in first normal form. There are many problems with this structure. For starters, if a person has only one address, you’re wasting space for the second address in every record. (Modern databases often have internal code to minimize the waste, but it still is present to one degree or another.) Perhaps more significant is that as soon as you decide you need two addresses, you preclude a third or fourth address.
Thus, the way to achieve first normal form is to split a table into two and use a relationship so that names are in one table and addresses are in a related table.
Second Normal Form: Eliminate Redundant Data
The second normal form is the “place for everything” rule. If you have a names table and an addresses table, you would not store the name in both places . . . usually. Sometimes, normalizing a database involves splitting up tables and using relationships, but sometimes it means modifying the data descriptions themselves.
You might decide not to store a person’s name in both the names and the addresses table, but perhaps you want to store the name to use in the context of an address. For a work address, the name might be Miss Marmelstein, and for a home address it might be Yetta or Tessye. You can make the database compliant with second normal form by changing the name field in the addresses table to something like nameToUseForThisAddress.
Third Normal Form: Eliminate Fields Not Dependent on the Key
The third normal formal is a precise way of saying that you should eliminate fields that can be calculated. For example, if you store a street address, in many environments the postal code is calculable.
Denormalizing Data
Sometimes, you deliberately denormalize data. For purposes of performance, sometimes you want to take a nicely normalized database scheme with separate names and addresses tables and combine them into a nonnormalized table for display purposes.
Understanding How Core Data Works with iCloud
iCloud works differently with Core Data than it does with other technologies. The data is not duplicated on iCloud as well as on the shared devices. Instead, there is a local Core Data store on each device, and the changes made on each device are uploaded to iCloud and then automatically downloaded to each device where they are applied to the local store. This avoids moving large databases back and forth.
Core Data works with a persistent store that is usually a SQLite database. That persistent store can be placed in two types of locations:
![]() Shoebox or central library apps place the database out of user sight. On OS X, they are typically in the user’s /Library/ApplicationSupport/<your app name> directory. A single database stores all of the app’s data on the device. iPhoto is an example.
Shoebox or central library apps place the database out of user sight. On OS X, they are typically in the user’s /Library/ApplicationSupport/<your app name> directory. A single database stores all of the app’s data on the device. iPhoto is an example.
![]() For document-based apps, the database is part of a document’s package.
For document-based apps, the database is part of a document’s package.
iCloud works with shoebox apps on iOS or OS X; it works with document-based apps based on UIManagedDocument in iOS. Apple’s advice on the matter is, “On Mac OS X, there is no built-in support for document-based apps that want to use Core Data with iCloud, and writing such an app will require a non-trivial amount of work.” Accordingly, this book focuses on shoebox apps for both operating systems as well as document-based apps for iOS.
Introducing the Core Data Project
This chapter starts to build the Core Data project. It is the same basic project that has been used in previous chapters, but now it uses Core Data and iCloud syncing. In part because it uses Core Data, it can be much more fleshed out than the previous examples. It does address the same issue. Using this app, you can inspect items in the field, such as swings in a playground or trees in a public garden. You can update their status (OK, needs fixing, needs pruning, and so forth), and you can add notes. This project creates a shoebox app that synchronizes through iCloud with mobile devices and Macs.
Note
As has been pointed out several times, the original implementation of NeXTSTEP did not include document objects in the way in which we think of them today. In part because the NeXT products were geared to higher education and business markets (with a concentration in finance), many users were comfortable with relational databases from their other projects. The model-view-controller (MVC) design pattern fit very well into an implementation with a relational database: for example, Oracle or OpenBase for the model; a view for the view; and a window or view controller for the controller. The contortions necessary to fit a traditional personal computer document into MVC simply aren’t necessary when you’re using a database. So the implementation of a shoebox app in this chapter is historically accurate as well as relatively simple to create.
The simplest way to add Core Data to a project is to build it in from the start. As you can see in Figure 10.1, you create a new Xcode project using the Cocoa Application template for OS X. Do not create a document-based application, and do choose to use Core Data.
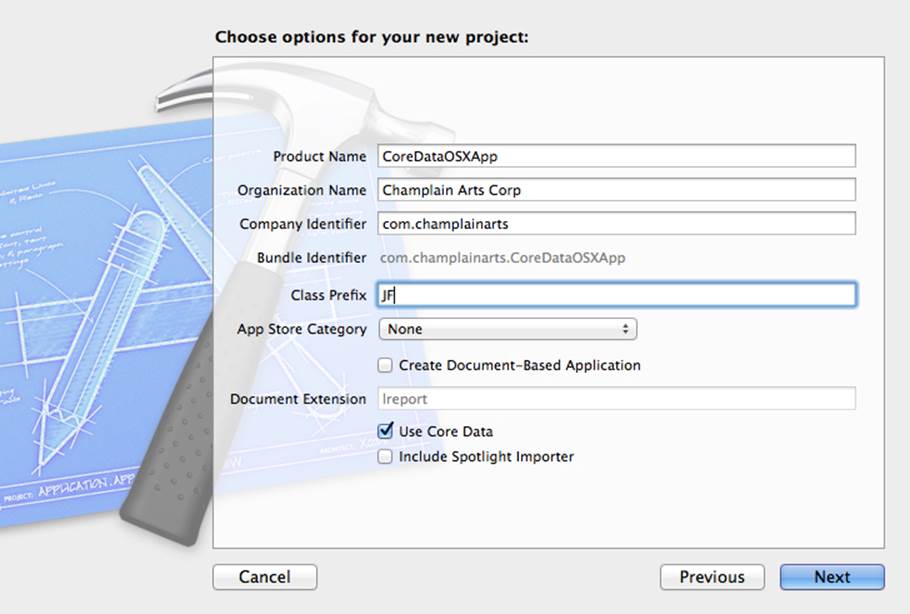
Figure 10.1 Creating the OS X Project
For iOS, choose the Master-Detail Application, make it a universal app, and use Core Data, as shown in Figure 10.2.

Figure 10.2 Creating the iOS Project
In both cases, build and run the project to verify that it works. Figure 10.3 shows the iOS project running on the iPad simulator. When you click + in the master view controller on the left, a new record with a timestamp will be added to the list. When you tap on one of the items in the list, its details (the timestamp) will appear in the detail view controller on the right.
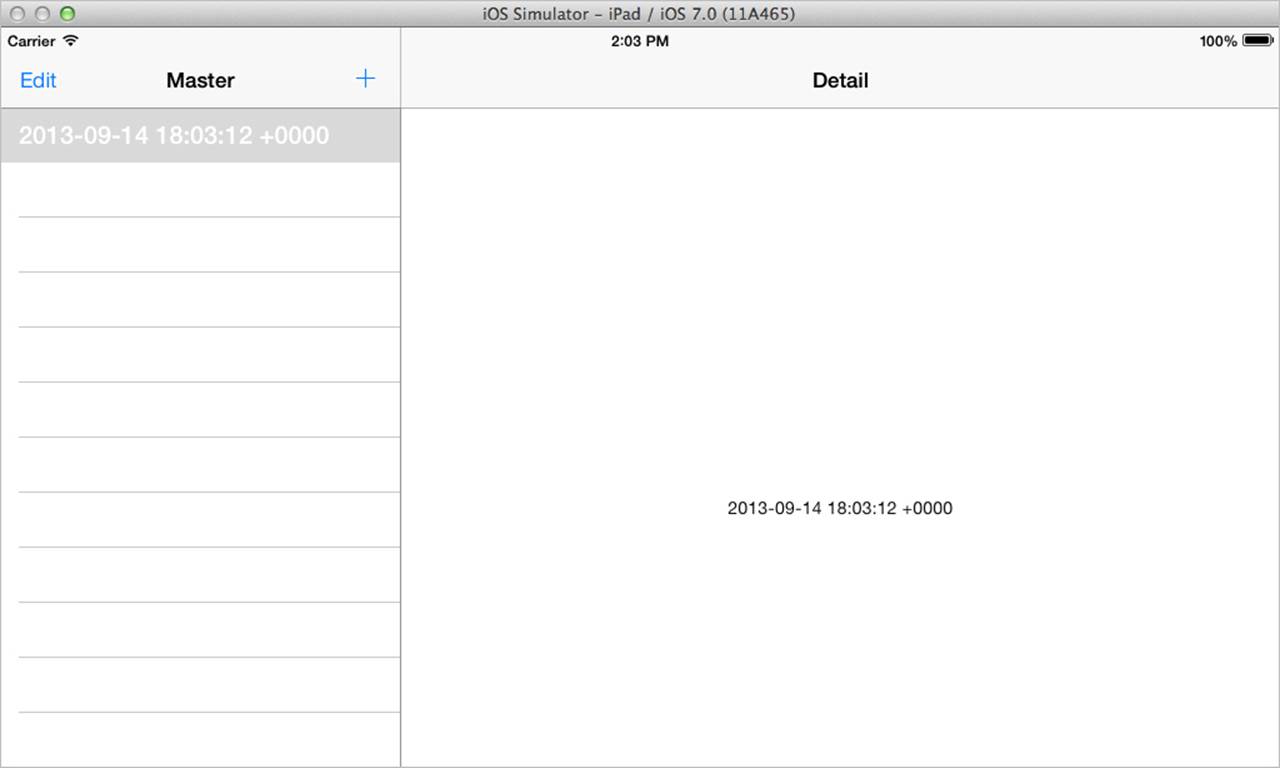
Figure 10.3 Testing the template for the iOS version
Using the Xcode Data Modeling Tool
The remainder of this chapter uses the iOS project shown in Figure 10.3. Open the Xcode project, and locate the data model in the Project navigator. It has the extension xcdatamodeld. Select it, and the Data Model editor will open, as you see in Figure 10.4. Note that if you are building a pair of apps—one for iOS and one for OS X—they will have the same data model.
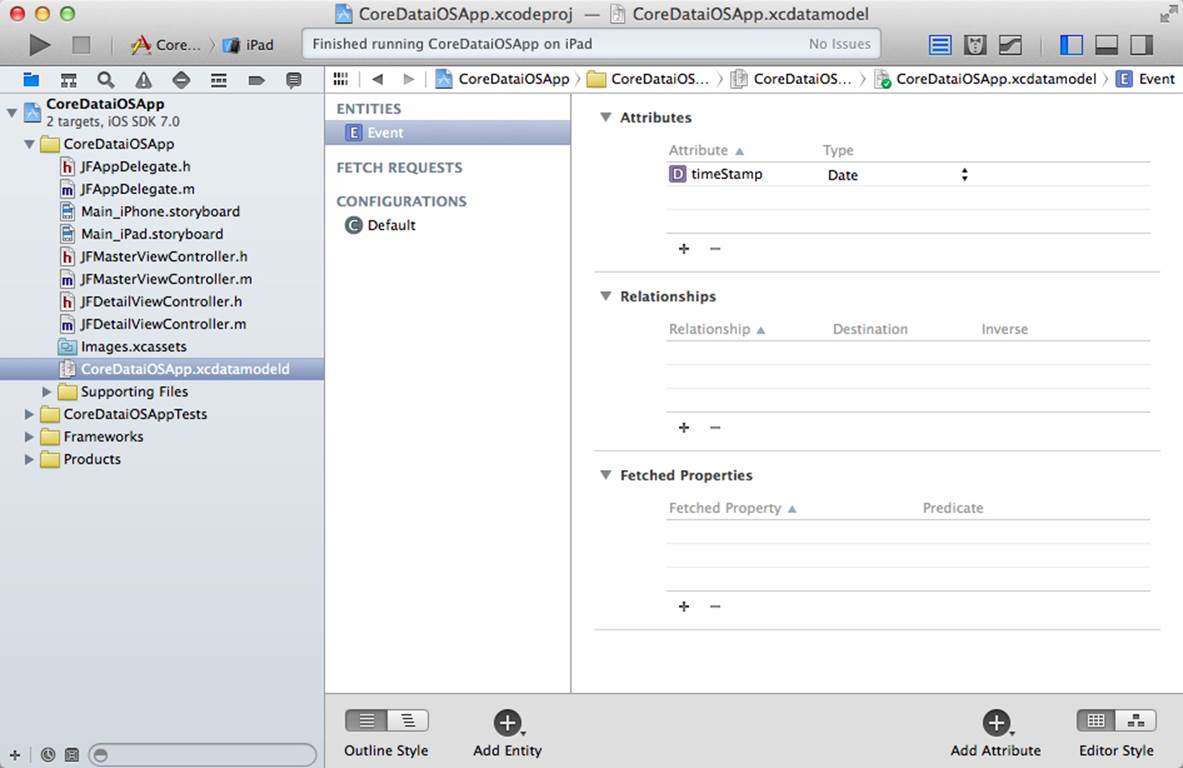
Figure 10.4 Using the Data Model editor
The data model for the Master-Detail App template has one entity—this will become a table in the SQLite database, and it will be a class in your app. The entity in the template is called Event (entities always start with a capital letter).
In the lower right of the Data Model editor, you can choose the editor style. Your choices are table and graph styles. In Figure 10.4, you see the table style. Figure 10.5 shows the graph style. Most people switch back and forth depending on what they’re doing.
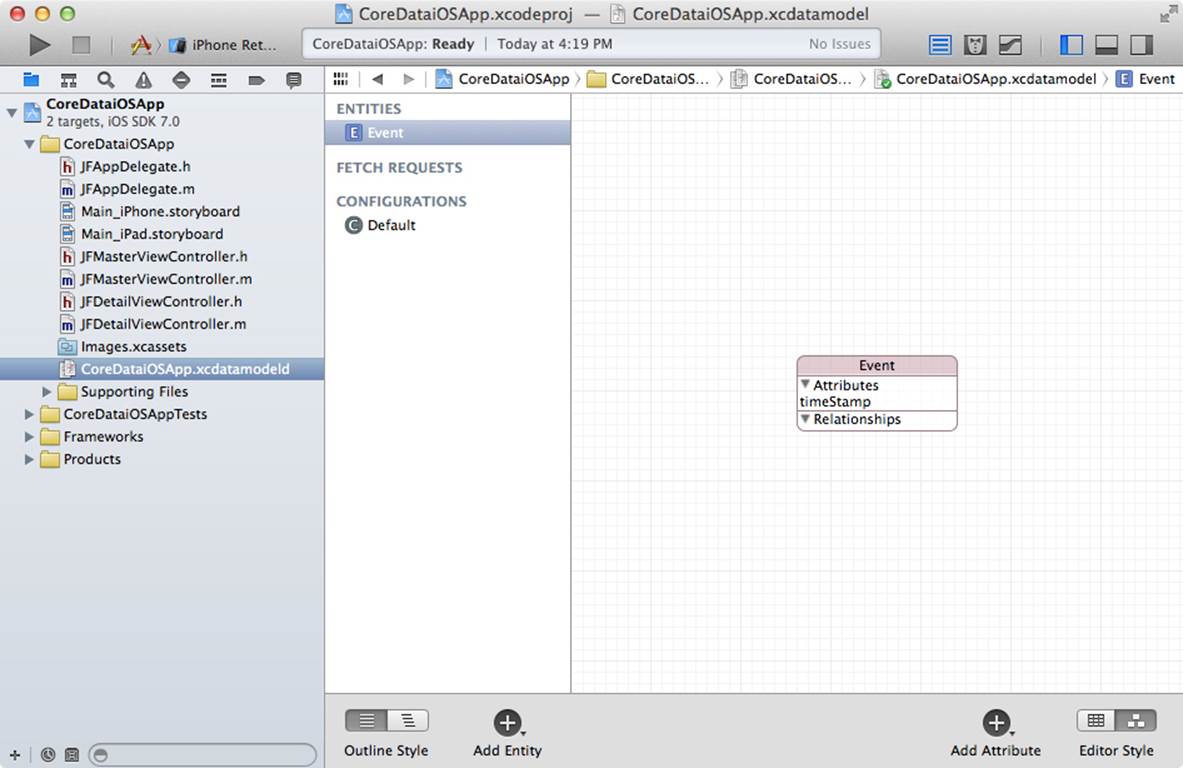
Figure 10.5 Using the graph style
Managing the Data Model
At the left of the Xcode data modeling tool (just to the right of the project navigator) is a list of the items in your data model. They are grouped into three categories:
![]() Entities in your data model will turn into classes in your project and will turn into tables in the actual database.
Entities in your data model will turn into classes in your project and will turn into tables in the actual database.
![]() Fetch requests let you define what can become a SQL query.
Fetch requests let you define what can become a SQL query.
![]() Configurations let you manage the persistent store configurations. Most of the time, you leave the default setting.
Configurations let you manage the persistent store configurations. Most of the time, you leave the default setting.
A button at the bottom of the pane lets you add a new entity, fetch request, or configuration. For this project, you can build on the existing Event entity, or you can create a new one.
Managing Versions
With Core Data, your data model must match the actual database that you open. With the data modeling tool, you can add new versions to your data model. (Note that the icon in the project navigator suggests multiple versions.) Because the data model must match the database, if you make changes to the model, the database must be changed. In the template you are working with, if the database cannot be found, a new one is created from the current data model. Therefore, if you have tested the template, you’ll need to delete the existing database so that the next time you run the app it will create a new one. If you’re working with the simulator, you’ll find the database in /Library/Application Support/iPhone Simulator/<iOS version>/Applications/<app ID>/Documents/<your target>.sqlite. (Remember, to access the Library folder from the Finder, hold down the Option key.) Just delete the sqlite file. On iOS 7 and OS X Mavericks (10.9) there may be two companion files that have the suffix sqlite-shm and sqlitewal. If they are there, delete them as well. If you are testing with an iOS device, just remove the app on the simulator. The next time you build and install it, it will be ready to create a new database when you run it. On OS X, the database, by default, will be in /Library/Application Support/<app name>.
Working with Entities
For this project, a reasonable name for the main entity might be Observation. In the template, the entity is called Event; you can change its name just by clicking and typing Observation over Event.
The following might be useful attributes:
![]() title
title
![]() observation
observation
![]() timestamp
timestamp
![]() note
note
![]() status
status
![]() actionTaken
actionTaken
![]() dateActionTaken
dateActionTaken
![]() personTakingAction
personTakingAction
Note that attributes start with lowercase letters. Remember that attributes in Core Data will become columns (or fields) in the database and will become properties in Objective-C.
Each attribute must have a type chosen from the following list:
![]() Undefined (the initial value; if you leave it, you’ll get an error)
Undefined (the initial value; if you leave it, you’ll get an error)
![]() Integer 16
Integer 16
![]() Integer 32
Integer 32
![]() Integer 64
Integer 64
![]() Decimal
Decimal
![]() Double
Double
![]() Float
Float
![]() String
String
![]() Boolean
Boolean
![]() Date
Date
![]() Binary Data
Binary Data
![]() Transformable
Transformable
Be careful with binary data: you may have issues with iCloud and, in fact, in all databases. For large amounts of binary data including images and sound, you can store them inside the database itself as binary data, or you can store them elsewhere in the app bundle. If you use that second strategy, you store the name of each file in the bundle in the database. This choice is determined by the size and number of the binary objects as well as by how you are using them. Search Apple Developer Talk and the web for discussions on this topic. You also can view Core Data sessions from WWDC online; they usually include performance issues in one session of Core Data each year.
All of the fields can be strings with the exception of the two dates. Add attributes with the button at the lower right of the data modeling tool or the + at the bottom of the attributes list in table style. As you add attributes, each will initially start with the name attribute (orattribute1, etc.). Change the name and change the type from Undefined to your desired type, as shown in Figure 10.6.
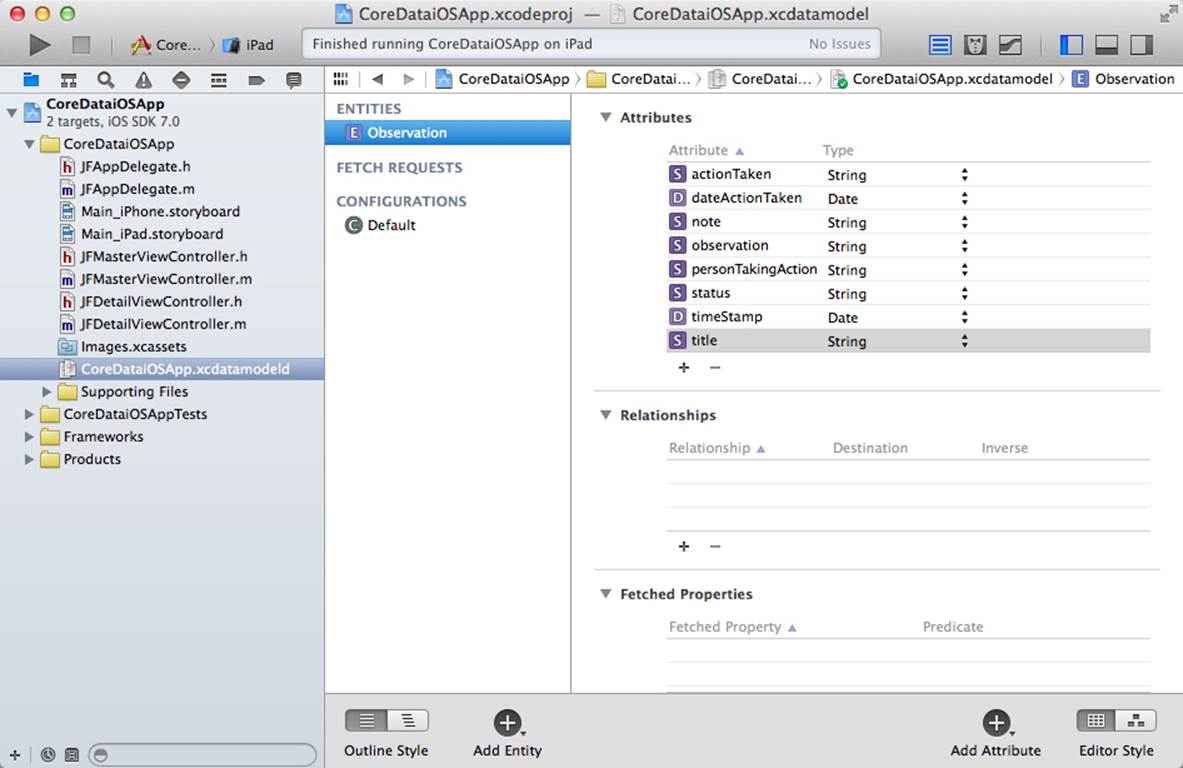
Figure 10.6 Adding attributes
In both table and graph editing styles, the attributes are always shown in alphabetical order. As you can see in Figure 10.7, in graph style, you don’t see the types of the attributes.
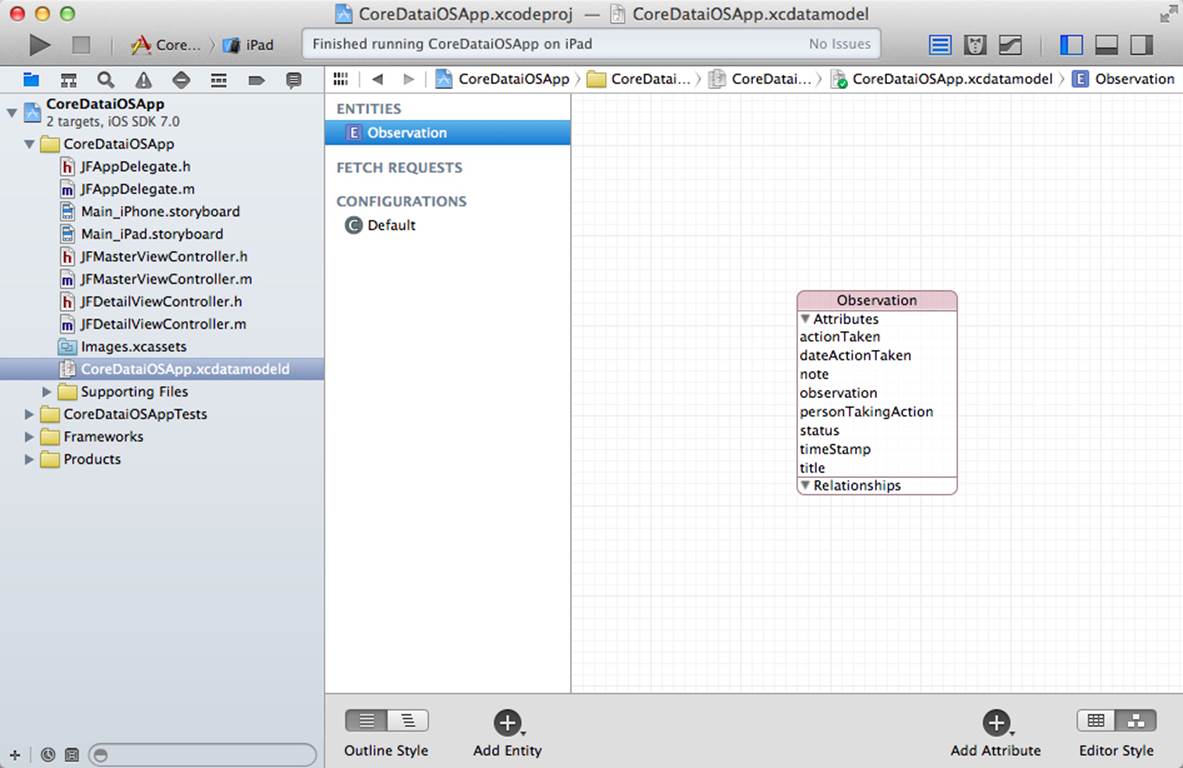
Figure 10.7 Adding attributes in graph style
If you need to change the name or type of an attribute or set other values, open the utility area and use the data model inspector, as shown in Figure 10.8.
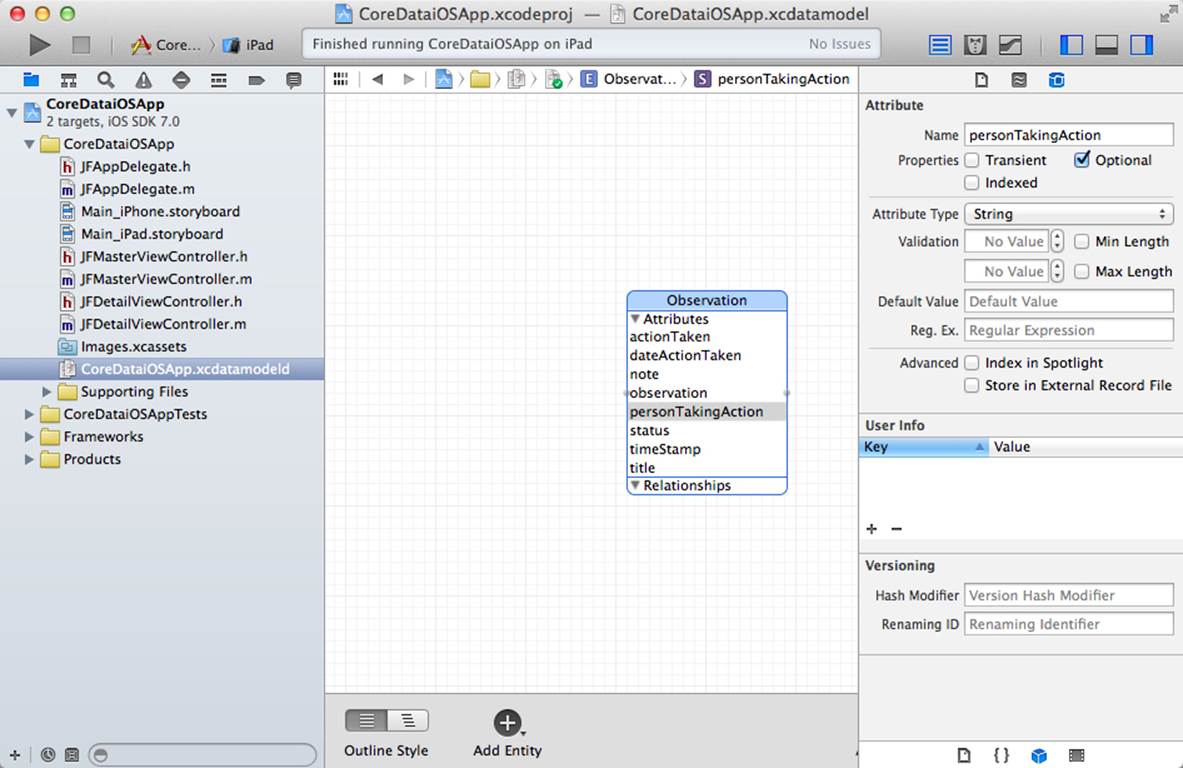
Figure 10.8 Using the data model inspector
If necessary, remove the existing SQLite database from Application Support. If you then try to run the project, you’ll find that it is still looking for the Event entity, which you have renamed Observation. (The timestamp attribute is being reused.) The simplest way to resolve the error that is thrown is to search the project for Event. If you have followed the steps here, there is one occurrence. Here is the code you will locate (it’s in (NSFetchedResultsController *)fetchedResultsController in MasterViewController.m):
// Edit the entity name as appropriate.
NSEntityDescription *entity = [NSEntityDescription
entityForName:@"Event"
inManagedObjectContext:self.managedObjectContext];
You’ll notice that there’s even a helpful comment inviting you to change the entity name. Change Event to Observation, and your project should run properly. (If you have already run it from the template before you changed the data model, remember to delete the sqlite, sqlite-shm, and sqlite-wal files from Application Support in the Library.)
Converting Entities to Objects
As the template is written, you are working with an NSManagedObject for the Observation entity. At runtime, all entities become objects of that class or subclasses of it. The template displays the data from the instances that you create with + in the master view controller by looking up their attributes with KVC. Listing 10.1 shows the relevant code.
Listing 10.1 configureView in DetailViewController.m
- (void)configureView
{
// Update the user interface for the detail item.
if (self.detailItem) {
self.detailDescriptionLabel.text = [[self.detailItem
valueForKey:@"timeStamp"] description];
}
}
When the same data is displayed in the table view in the master view controller, the code shown in Listing 10.2 is used.
Listing 10.2 configureCell in MasterViewController.m
- (void)configureCell:(UITableViewCell *)cell
atIndexPath:(NSIndexPath *)indexPath
{
NSManagedObject *object = [self.fetchedResultsController
objectAtIndexPath:indexPath];
cell.textLabel.text = [[object valueForKey:@"timeStamp"] description];
}
KVC is very useful in these cases, but it is less efficient than accessing properties in a class instance. Both for reasons of efficiency as well as to implement other Core Data features, it makes sense to convert an entity in the data model to a subclass of NSManagedObject.
Select the entity in the data modeling tool (Observation in this case), and then choose Create NSManagedObject Subclass from the Editor menu. You may be asked to select the data model with entities you want to manage, as shown in Figure 10.9.
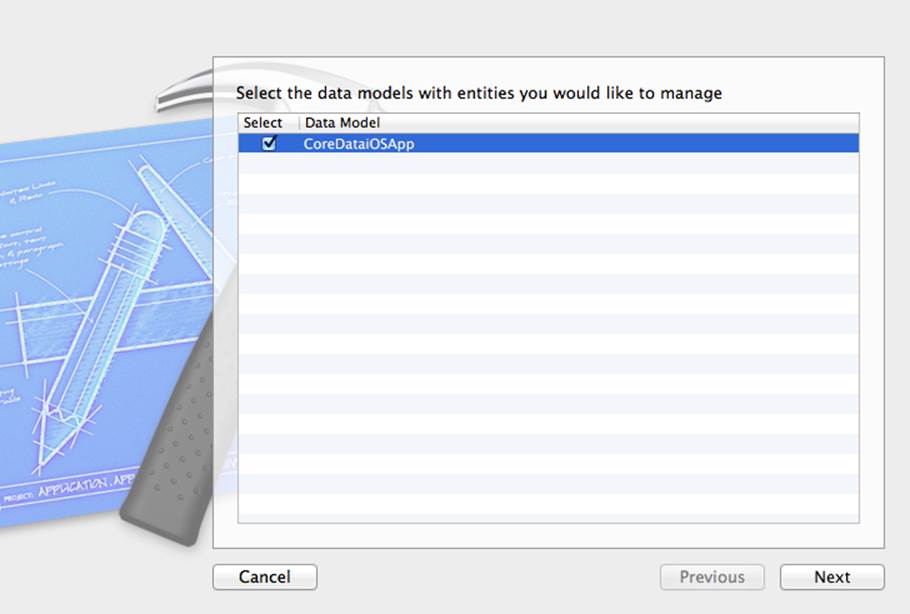
Figure 10.9 Selecting the data model to manage
Next, you can choose the entities within the chosen data model to manage, as shown in Figure 10.10.
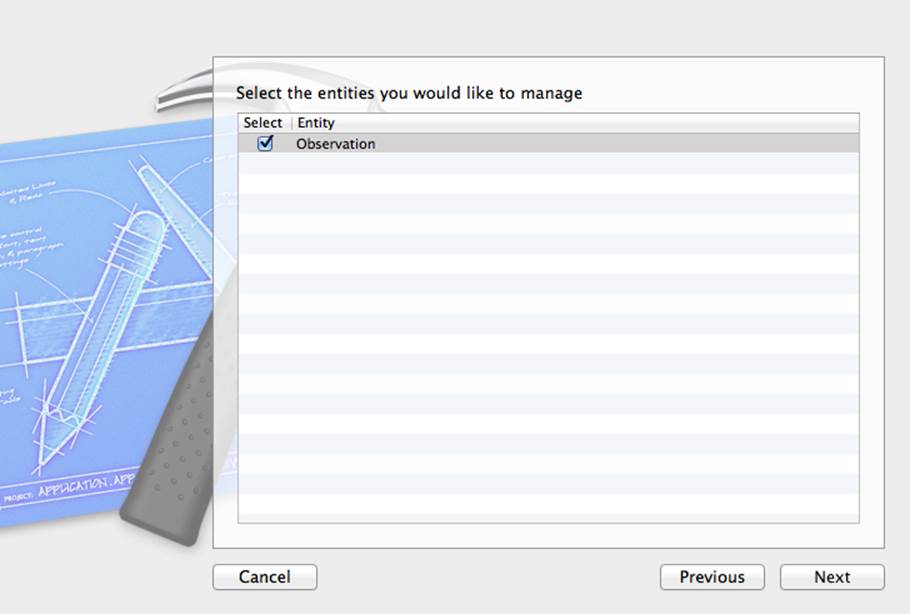
Figure 10.10 Selecting the entities to manage
Finally, select the location to store the new data model file, as shown in Figure 10.11. (The default is usually best.)
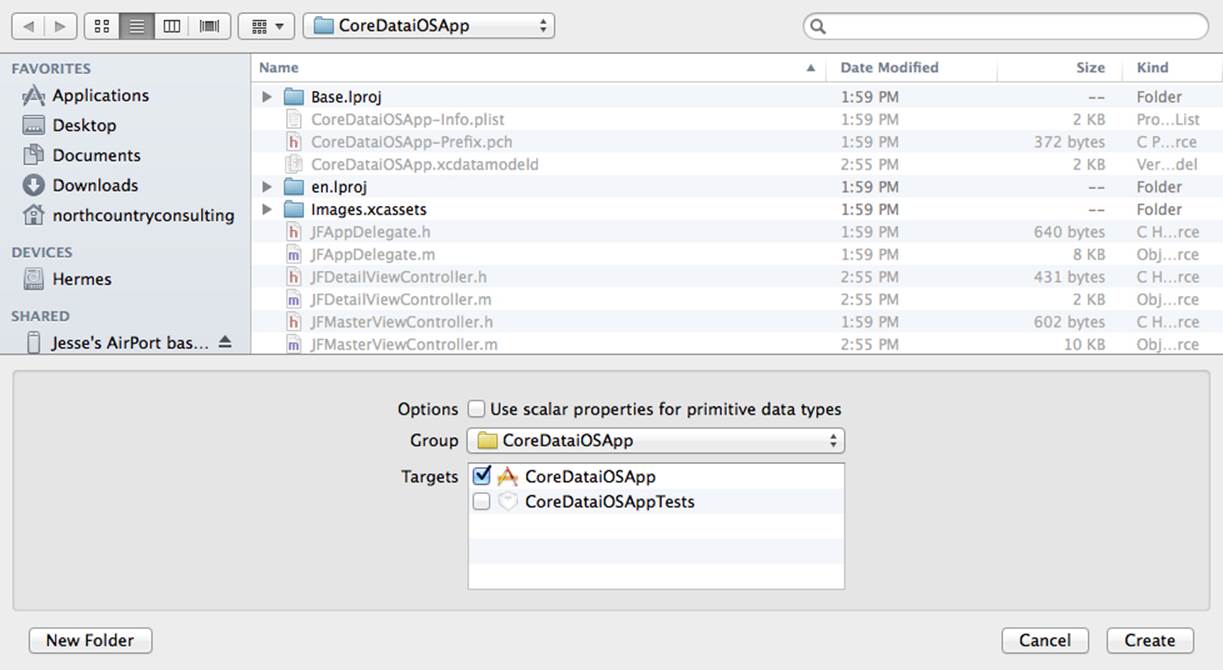
Figure 10.11 Choosing the location for the new file
At the bottom of the window, you have three choices:
![]() You can use scalar instance variables (ivars) instead of instance variables.
You can use scalar instance variables (ivars) instead of instance variables.
![]() You can assign the files that will be created to a group. Often, people create a group called Data Model or a similar name for these files; then you can select it when you create the subclass. You can also create a Data Model group later on when you clean up the Project navigator. This is the setting that you most often change.
You can assign the files that will be created to a group. Often, people create a group called Data Model or a similar name for these files; then you can select it when you create the subclass. You can also create a Data Model group later on when you clean up the Project navigator. This is the setting that you most often change.
![]() You can select which targets to use.
You can select which targets to use.
Click Create, and your subclasses are created for you. Listing 10.3 shows the .h file.
Listing 10.3 Observation.h
//
// Observation.h
// CoreDataiOSApp
//
// Created by Champlain Arts Corp on 11/1/12.
// Copyright (c) 2012 Champlain Arts. All rights reserved.
//
#import <Foundation/Foundation.h>
#import <CoreData/CoreData.h>
@interface Observation : NSManagedObject
@property (nonatomic, retain) NSDate * timeStamp;
@property (nonatomic, retain) NSString * title;
@property (nonatomic, retain) NSString * observation;
@property (nonatomic, retain) NSString * status;
@property (nonatomic, retain) NSString * note;
@property (nonatomic, retain) NSString * actionTaken;
@property (nonatomic, retain) NSDate * dateActionTaken;
@property (nonatomic, retain) NSString * personTakingAction;
@end
The .m file is shown in Listing 10.4. Note that instead of @synthesize commands, you use a @dynamic command. You don’t have to worry about this (or about creating the accessors for your new properties): Xcode has done the work for you.
Listing 10.4 Observation.m
//
// Observation.m
// CoreDataiOSApp
//
// Created by Sams Publishing on 11/1/12.
// Copyright (c) 2012 Champlain Arts. All rights reserved.
//
#import "Observation.h"
@implementation Observation
@dynamic timeStamp;
@dynamic title;
@dynamic observation;
@dynamic status;
@dynamic note;
@dynamic actionTaken;
@dynamic dateActionTaken;
@dynamic personTakingAction;
@end
Using the Object
Now that you have your class set up, you can modify the KVC you used previously. Compare Listing 10.5 to Listing 10.1. The KVC line is replaced by direct access to the property of the object. Note that you have to cast self.detailItem to be an Observation. There are several ways to do this. Because you know that it will be an Observation, you can change its property from id to Observation. Wherever you do it, you’ll need to import Observation.h.
Listing 10.5 Using the Object in configureView in DetailViewController.m
- (void)configureView
{
// Update the user interface for the detail item.
if (self.detailItem) {
self.detailDescriptionLabel.text =
[[self.detailItem timeStamp] description]; //1
}
}
1 This line replaces the KVC from Listing 10.3.
You make a similar change to MasterViewController.m, as shown in Listing 10.6.
Listing 10.6 Using the Object in MasterViewController.m
- (void)configureCell:(UITableViewCell *)cell
atIndexPath:(NSIndexPath *)indexPath
{
Observation *object = [self.fetchedResultsController
objectAtIndexPath:indexPath];
cell.textLabel.text = [[object timeStamp] description]; //1
}
1 This line replaces the KVC from Listing 10.3.
Examining the Core Data Stack
The heart of Core Data is the Core Data stack, which consists of the following:
![]() The data model: In database terms, this is the schema, but remember that Core Data is not a database—you pair it with a persistent store, which itself has a schema.
The data model: In database terms, this is the schema, but remember that Core Data is not a database—you pair it with a persistent store, which itself has a schema.
![]() Persistent stores and persistent store coordinator: The persistent store coordinator coordinates all of your persistent stores. Many Core Data apps have a single persistent store, so the need for coordination is minimal, but they still have a persistent store coordinator. You or your Xcode template instantiate an instance of NSPersistentStoreCoordinator, which is frequently named psc.
Persistent stores and persistent store coordinator: The persistent store coordinator coordinates all of your persistent stores. Many Core Data apps have a single persistent store, so the need for coordination is minimal, but they still have a persistent store coordinator. You or your Xcode template instantiate an instance of NSPersistentStoreCoordinator, which is frequently named psc.
![]() Managed objects: These are the Objective-C objects that are created from a persistent store at runtime in accordance with the data model. You create subclasses of NSManagedObject in the Xcode data model editor.
Managed objects: These are the Objective-C objects that are created from a persistent store at runtime in accordance with the data model. You create subclasses of NSManagedObject in the Xcode data model editor.
![]() Managed objects context: This is often referred to as a scratchpad. It contains the data that has been retrieved from the persistent store and turned into managed objects. You work directly with the objects in the managed objects context. When you make changes, you save the managed object context. You create one or more instances of NSManagedObjectContext. You can use multiple instances so that you can manage two sets of data to be stored. (This is often how undo/redo is implemented.)
Managed objects context: This is often referred to as a scratchpad. It contains the data that has been retrieved from the persistent store and turned into managed objects. You work directly with the objects in the managed objects context. When you make changes, you save the managed object context. You create one or more instances of NSManagedObjectContext. You can use multiple instances so that you can manage two sets of data to be stored. (This is often how undo/redo is implemented.)
When you enable Core Data in the Xcode templates, the components of the Core Data stack and their associated code are generated in your project. Most of the time, you use the code as-is. The only changes that you need to make relate to your data model: you need to identify the file name (and that is done for you by Xcode when you create the project), and you often need to change template entity names and attributes to match your own data model.
There is a great deal of power and flexibility in Core Data, but for many purposes, you can just make these changes as you come to them. They are pointed out in this book so that you can quickly customize the code.
Chapter Summary
Core Data is the most powerful tool on iOS and OS X for data management. In this chapter, you have seen how to work with the data modeling tool in Xcode to manage entities and attributes of the data model. You have also seen how to have the Xcode data modeling tool create a subclass ofNSManagedObject with your attributes automatically converted to properties.
Exercises
1. The only data that is displayed in the sample app is the timeStamp property. Modify DetailViewController.m to show other properties as well on iPad (if that’s what you’ve been testing with). This is ordinary iOS programming, so you don’t have to worry about iCloud.
2. If you chose Universal for the devices, experiment with both iPad and iPhone. With the newest features of iOS, you should only have to change the storyboards to add the other properties.
3. The MasterViewController works by using a table view to display its data. If you aren’t familiar with table views, examine the code and work your way through it to see how the data is displayed in MasterViewController. You really can’t be an iOS developer without knowing about and using table views.
All materials on the site are licensed Creative Commons Attribution-Sharealike 3.0 Unported CC BY-SA 3.0 & GNU Free Documentation License (GFDL)
If you are the copyright holder of any material contained on our site and intend to remove it, please contact our site administrator for approval.
© 2016-2026 All site design rights belong to S.Y.A.