Learning iCloud Data Management (2014)
Part III: Using the Technologies
12. Adding Data to Apps with Bundles and Resources
You have a variety of tools that you can use to manage your app’s data: key-value code (KVC), property lists (plists), Core Data, XML, and even unstructured text files. Your app’s data falls into two broad categories:
![]() There is the data that your users create and manipulate. It may be text, photos, video, music, or structured data. It may be stored in documents, or it may be stored in a shoebox-style library.
There is the data that your users create and manipulate. It may be text, photos, video, music, or structured data. It may be stored in documents, or it may be stored in a shoebox-style library.
![]() There is the data that your app uses. This data includes localized text in your xib files or storyboards as well as a wide variety of graphical data—the images on your buttons, your view backgrounds, and the like.
There is the data that your app uses. This data includes localized text in your xib files or storyboards as well as a wide variety of graphical data—the images on your buttons, your view backgrounds, and the like.
This chapter focuses on the second category of data. This data is typically stored inside the app itself; as a result, distribution of the app includes this data. Sometimes, this data is transformed into user data (for example, a Core Data persistent store in the app itself may be copied to an area where the user can modify it). You can even combine app-included data with user manipulation and then put the resultant data into an iCloud container so that it can be updated from various devices.
Because of the diverse types of data involved as well as the various ways in which it can be included in your app, this chapter will help you choose what types of data to place where, and it will show you how to use Xcode to get that data into your app.
Furthermore, you’ll find an overview of sandboxing on OS X and iOS. You’ve seen some of the sandboxing features in discussions of iCloud entitlements, but because you often need to take data out of your app and put it somewhere on disk, this chapter gives you an idea of what you can put where.
Packages, Bundles, and Resources
Most apps on OS X and iOS are actually bundles—directories with a standard structure that contain executable code and resources that together make up the app. To the user, the app is a simple file that can be moved around on OS X (on iOS, it can be moved around on the Home screen, but its location internally isn’t changeable). In addition to compiling your code, one of the key purposes of Xcode is building the bundles for your app and its targets (there are usually separate app bundles for each target).
Bundles are a type of package—a directory that appears like a single file. (What sets a bundle apart from other types of packages is the specific directory structure and the specific files that it contains.) You can open a package by Control-clicking on a package icon. The contextual menu includes a Show Package Contents command, as shown in Figure 12.1
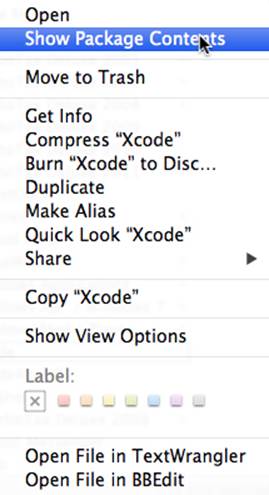
Figure 12.1 Opening a package from the contextual menu
Figure 12.2 shows a typical application bundle structure (this is the bundle for the Automator app that’s part of the standard OS X installation). If you browse the Resources directory (don’t change anything!), you’ll see that it includes image files (generally .icns, .pdf, .tiff, and .png) as well as localization folders (.lproj) that contain .strings and .nib files.
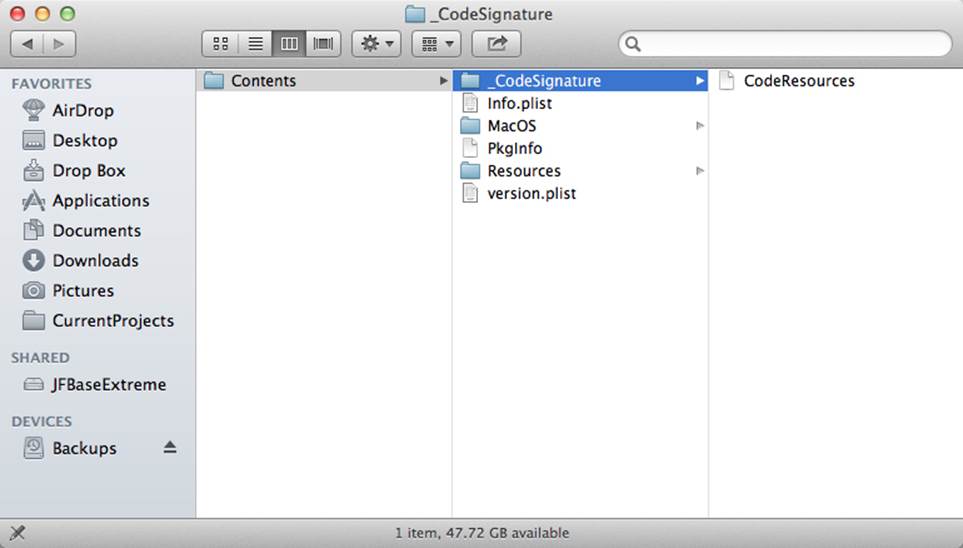
Figure 12.2 Looking inside the Automator bundle
Xcode handles the creation of the bundle almost automatically. If you add files to your project (generally with File, Add File or File, New, New File), they show up in the project navigator. Many of them are automatically included in the bundle, but others need to be added manually in Build Phases.
Adding Files to Your App’s Bundle
Here are the steps to use in adding files to your App’s bundle. Start by creating a new project. For the figures in this section, the iOS Master-Detail Application template is used with the option for Core Data, as shown in Figure 12.3.
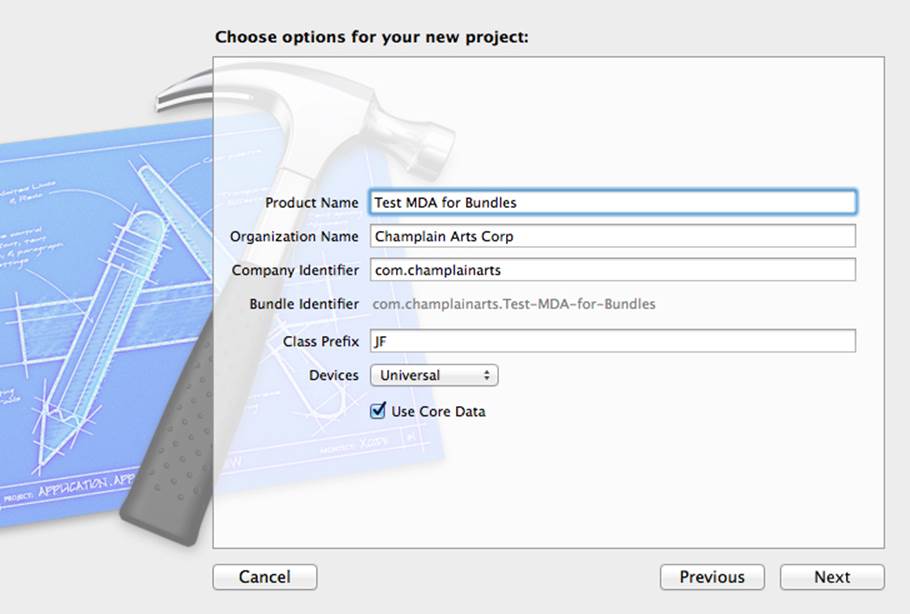
Figure 12.3 Creating a new project
1. Open Copy Bundle Resources in Build Phases, as shown in Figure 12.4. You’ll see that the included files include the storyboards and some of the files in the Supporting Files group. Notice that files such as the precompiled header (.pch) are used during the build process and are not brought into the bundle. Note, too, that although the project has Core Data enabled, the data model is not included in the bundle. Rather, it is among the files to be compiled, as you see in Figure 12.4.
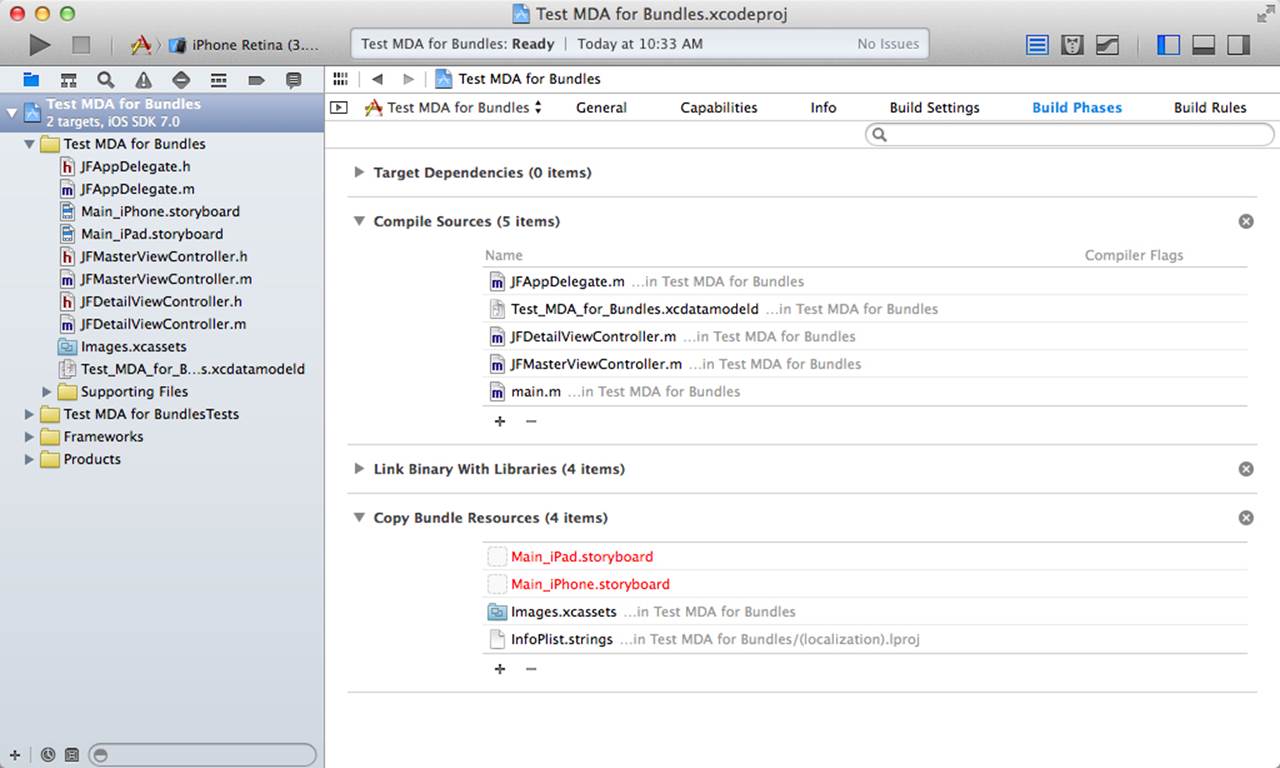
Figure 12.4 Comparing the bundle resources to the project navigator files
2. To add another file to the bundle, click + at the bottom left of Copy Bundle Resources. Choose the file from the project’s files, as shown in Figure 12.5.
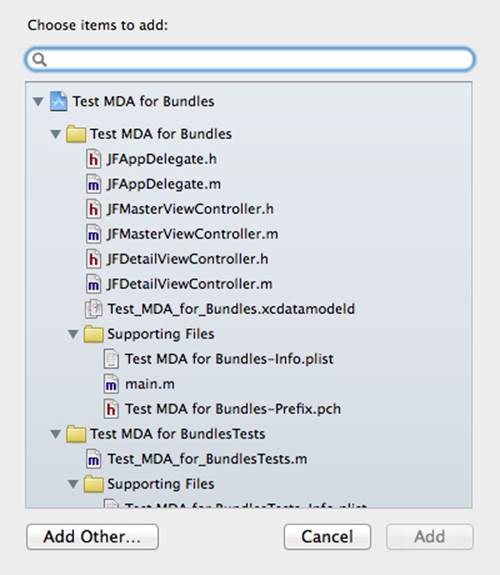
Figure 12.5 Adding another file to the bundle
3. To add a new file to the project and the bundle, click Add Other at the bottom left of Figure 12.5. A standard file open dialog will let you choose the file. After you choose a file, decide whether or not to add it to the project, as shown in Figure 12.6. Normally you do so and copy it into the project.
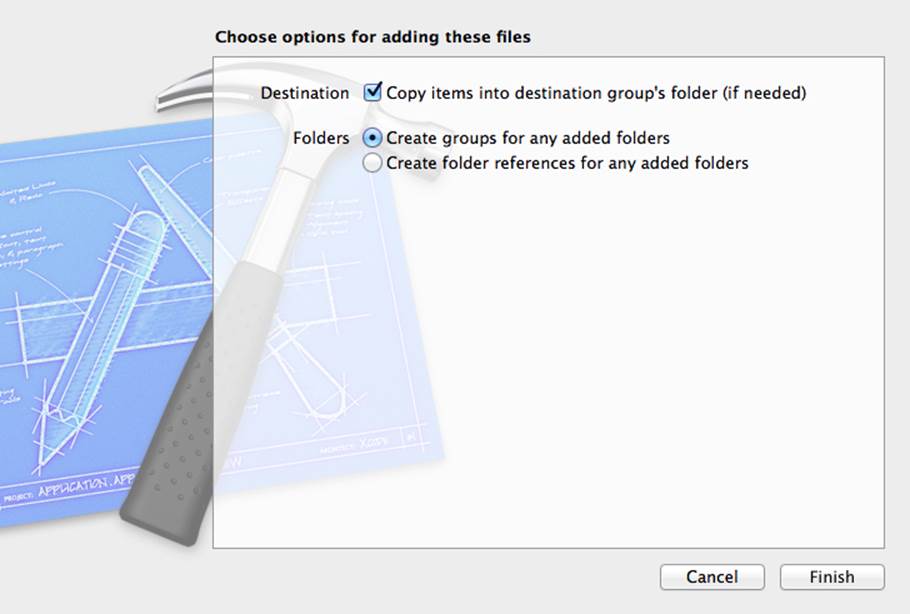
Figure 12.6 Adding a file to the bundle and project
Getting Files Out of the Bundle
Some of the files in the bundle are used in the interface; you typically set the image for a button or other interface element to one of the graphics files in your project using the Attributes inspector for the storyboard. For these files, the Attributes inspector is all you need to worry about.
Other files that add to the bundle may be used to create your app’s environment, and they may need to be extracted from the bundle to be used at runtime. In some cases, they need to be installed on the computer so that the app can use them in the future. Listing 12.1 shows how to get files out of the bundle. This code is part of the Master-Detail Application template: it’s the managedObjectModel getter from AppDelegate.m.
Listing 12.1 AppDelegate managedObjectModel
// Returns the managed object model for the application.
// If the model doesn't already exist, it is created from the application's
// model.
- (NSManagedObjectModel *)managedObjectModel
{
if (_managedObjectModel != nil) {
return _managedObjectModel
}
NSURL *modelURL = [[NSBundle mainBundle] //1
URLForResource:@"Test_MDA_for_Bundles" withExtension:@"momd"]; //2
_managedObjectModel = [[NSManagedObjectModel alloc]
initWithContentsOfURL:modelURL];
return _managedObjectModel;
}
1 The NSBundle class method mainBundle returns the primary bundle’s URL. Most apps only have a main bundle.
2 Complete the construction of the bundle for the managed object model by providing the file name and the extension. By default, Xcode creates a filename with the project’s name that you have provided.
Once you have located a file from the bundle, you can use it, as shown here, or place it somewhere for future use. See the following section for guidance on how to do that.
Looking at Sandboxed Files
If you are a developer experienced with OS X, you are used to an environment that consists of standards and best practices so that your software fits into users’ expectations of how apps, files, and their computer in general behave. Each user has an account (often there is a single account on a given Mac, but there can be many). Applications are normally placed in the Applications folder either at the root of the hard disk (/Macintosh HD/Applications in many cases) or within the user’s home directory (~/Applications). There’s a Library folder at the root of the hard disk that all users share, and there are separate Library folders in each user’s home directory.
Beginning in OS X Lion (10.7) the ~/Library folder is hidden, but it’s easy to get to it. In the Finder, hold down Option and open the Go menu—you’ll see that Library is now enabled and you can open it. You’ll find many standard folders in there that apps can create and use. Advanced users may use them, but they are always cautioned to make certain they know what they’re doing.
Although the hidden user ~/Library folder is the most visible change, other changes on OS X have been implemented in recent versions to tighten security on the Mac. Sandboxing is one of the important tools in that effort. (In its most general form, sandboxing provides an environment in which an app runs and outside of which the app has limited—if any—access.) On the first personal computers, security was not a major concern, but over the decades, as personal computers have moved into the mainstream, it has been necessary to retrofit security onto the major operating systems.
On iOS, this retrofitting was not necessary. Probably because the hardware was so much more powerful than the initial personal computers, as well as because security on a phone is obviously a major concern, even the initial security on iPhone OS (now iOS) was much tighter than on OS X.
Note
It’s not surprising that people at Apple would be sensitive to security on a phone. In the 1960s and 1970s, self-styled “Phone Phreaks” created “blue boxes” to mimic the tones used for long distance dialing. With such boxes, people could make long distance telephone calls for free. (The telephone companies preferred to use the word “steal” in this context.) Among the phone phreaks who made blue boxes were Steve Jobs and Steve Wozniak, founders of Apple.
Setting Up Sandboxing
Sandboxing is optional on OS X but required on iOS where it is set up automatically. Here are the steps for setting up sandboxing on OS X:
1. In the General tab of your project, set up the type of signing and the team to use as a signer, as shown in Figure 12.7.
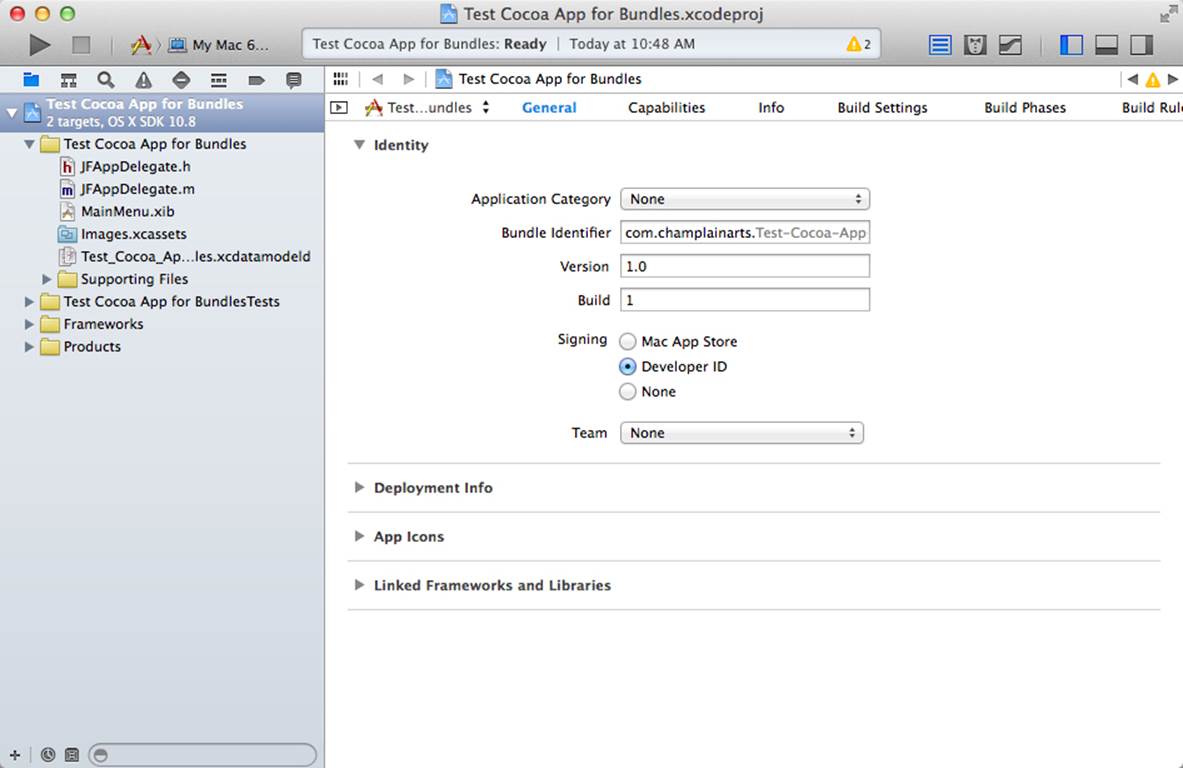
Figure 12.7 Choosing your signing identity
2. From the Capabilities tab, turn on sandboxing, as shown in Figure 12.8.
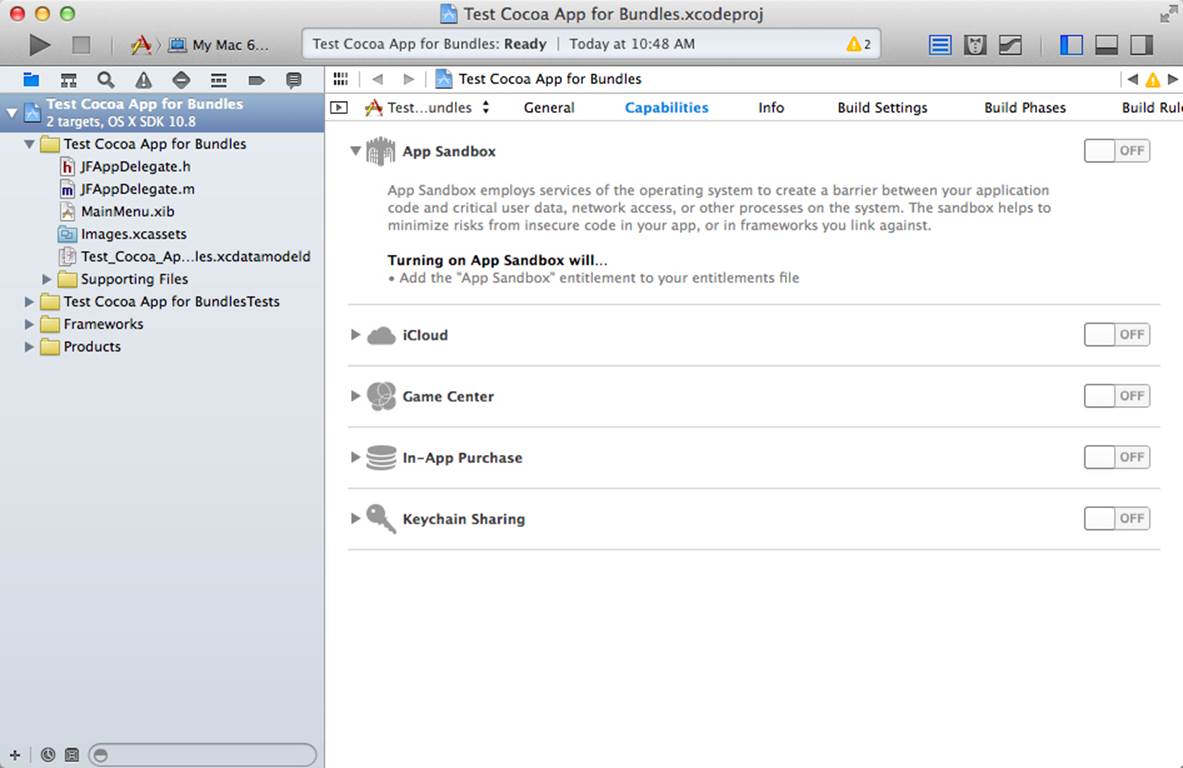
Figure 12.8 Turning on sandboxing in Capabilities
Looking Inside Sandboxing Containers on OS X
In the world of sandboxed apps on OS X, you’ll see that there is now a Containers folder inside the user ~/Library. Subfolders are available for each sandboxed app: they use the bundle identifier, which is typically your reverse domain name followed by the app name. You can see an app’s folders in Figure 12.9.
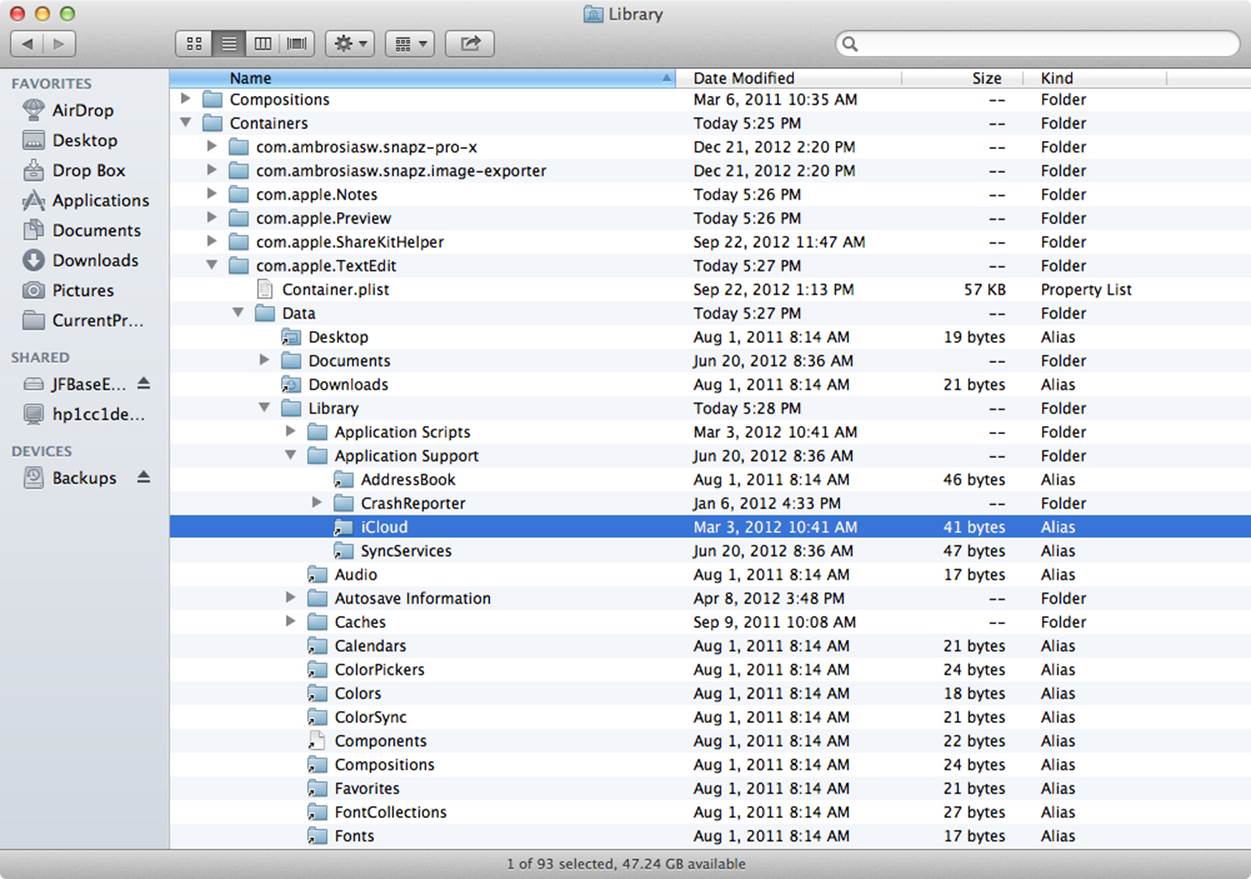
Figure 12.9 A Containers folder in the user ~/Library
Within each app’s container, you have a Container.plist file and then a variety of other folders that are under your control. Many apps have a Data folder next to the plist file; all other folders are within it.
As you can see from the TextEdit container shown in Figure 12.9, there’s a Library folder, which contains a number of folders that are similar to those that are contained in the ~/Library folder. In fact, if you examine some of the aliases shown in Figure 12.9, you’ll see that some of these folders in fact point back to the main ~/Library folder, as shown in Figure 12.10.
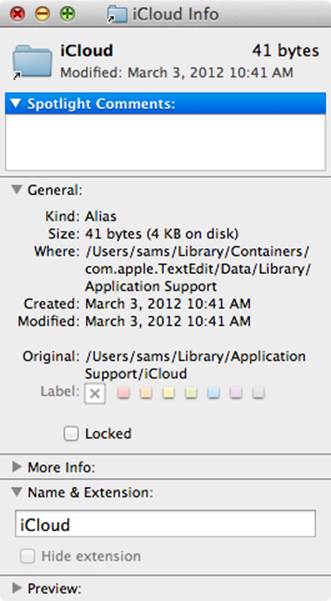
Figure 12.10 Aliases pointing back to ~/Library
If an app saves documents, it’s usual to have a Documents folder. On iOS, the Documents folder is visible in iTunes if you have set the Application Supports iTunes File Sharing target property in the Info section (the info.plist) of your project.
Writing to Your Sandbox
On iOS or for sandboxed apps on OS X, you can use the NSHomeDirectory (void) function to return the path to the sandbox. For non-sandboxed apps on OS X, this function returns the user’s directory as a string.
If you want the URL specifically for the user’s document directory, you can use the following code:
[[[NSFileManager defaultManager] URLsForDirectory:NSDocumentDirectory
inDomains:NSUserDomainMask] lastObject]
Including Property Lists
Now you have all the pieces so that you can put together a property list that’s in your app with your runtime app. One of the most common tasks is to create a property list in your app and then, at runtime, read it into an NSDictionary.
Adding the Property List to Your App
Here are the steps for adding the Property List to your app:
1. Create the property list by using File, New, File.
2. As shown in Figure 12.11, choose the Resource section and then Property List.
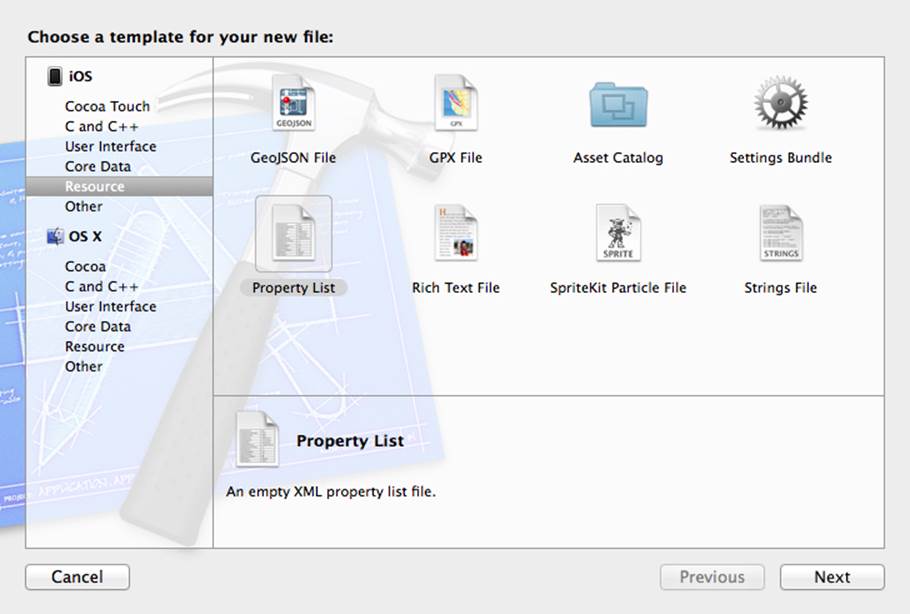
Figure 12.11 Creating a new property list file
3. Click Next and provide a title for the file.
4. Open it from the project navigator, as shown in Figure 12.12. You have the root of the property list; now you use the standard property list editing interface to add more keys and values, as described in “Using Property Lists” in Chapter 9.

Figure 12.12 Adding your property list data
5. Confirm that it has been added to the bundle, as shown previously in Figure 12.4. If it hasn’t been added, add it now.
Reading the Property List into an NSDictionary
Now you need to read the property list into an NSDictionary. This requires standard code. The only customization that you need to make is the name of the property list file.
1. Get the path to the plist in the bundle. Make certain that the name matches the name you saved it as in Step 3 above:
plistPath = [[NSBundle mainBundle] pathForResource:@"TestPropertyList"
ofType:@"plist"];
2. Read the plist into an NSData object:
NSData *myPropertyList = [[NSFileManager defaultManager]
contentsAtPath:plistPath];
3. Convert the NSData object to an NSDictionary:
NSDictionary *temp = (NSDictionary *)[NSPropertyListSerialization
propertyListFromData:plistXML
mutabilityOption:NSPropertyListMutableContainersAndLeaves
format:&format
errorDescription:&errorDesc];
Including a Core Data Store
You can use the same process used above to include a Core Data store with your app. (In fact, just about any file can be included.) The only difference is how you create the included file and where you put it. The Master-Detail Application template puts your compiled data model into the bundle. It will place it in a known location on disk, and if it’s not there, it will create a new persistent store based on the data model, as shown in Listing 12.2. (Note that this process should not be used to seed a Core Data database in iCloud. Instead, you should seed the empty database with transactions that will then be synced through the cloud to other devices. This may be as simple as getting them out of a bundled database and then storing them in the new database. In some cases, using a JSON store turns out to be faster as the data source.)
Listing 12.2 Building a Persistent Store from a Compiled Data Model
- (NSPersistentStoreCoordinator *)persistentStoreCoordinator
{
if (_persistentStoreCoordinator != nil) { //1
return _persistentStoreCoordinator;
}
NSURL *storeURL = [[self applicationDocumentsDirectory]
URLByAppendingPathComponent:@"Test_MDA_for_Bundles.sqlite"]; //2
NSError *error = nil;
_persistentStoreCoordinator = [[NSPersistentStoreCoordinator alloc] //3
initWithManagedObjectModel:[self managedObjectModel]];
if (![_persistentStoreCoordinator
addPersistentStoreWithType:NSSQLiteStoreType
configuration:nil URL:storeURL options:nil error:&error]) { //4
NSLog(@"Unresolved error %@, %@", error, [error userInfo]); //5
abort();
}
return _persistentStoreCoordinator;
}
1 If you’ve already found a persistent store coordinator and set the property to it, just return it.
2 Construct the URL for the store. This is the only line you have to change. It’s placed in the documents directory. You could place it in its own folder inside the sandbox.
3 Create a new persistent store coordinator using the managed object model in the app’s bundle.
4 Add a new persistent store with the URL constructed in Step 2.
5 If an error occurs, provide a more meaningful message (and never use abort() in a shipping application except under very special circumstances). Always provide the user with information.
Chapter Summary
This chapter showed you how to package data into your apps. You learned how to add files to your Xcode project for graphics, interface strings, and data in a variety of the formats described in this part of the book. You have seen how to get the files into your app’s bundle as well as how to remove them from the bundle and store them in a sandboxed area on disk if necessary.
Exercises
1. If you haven’t done so already, test the process for turning the code signing and entitlements on as described in this chapter. Even if you have done this before, do it with Xcode 5 so that you are familiar with the new (and simpler!) way of handling this data.
2. Create a new project (or use the downloadable Test MDA for Bundles project) to experiment with plists and dictionaries as described in this chapter. It’s such a common process that you should be comfortable with the conversions back and forth. Display the contents of the info.plist file in a view based on the dictionary that you create from the plist.