Learning iCloud Data Management (2014)
Part IV: Using iCloud Documents and Data
18. Completing the Round Trip
In this book, you have seen how to work with iCloud in the apps you develop. You’ve explored the technologies you can use for easy integration with iCloud as well as the APIs such as Contacts and Calendar that let you access user data that is stored in iCloud. You’ve also seen how to write apps that store your user’s data in iCloud in various types of documents and on both iOS and OS X. Several times, you have seen references to the Round Trip—the ability for you to use iCloud so that data from an iOS app is synchronized to iCloud and thence to OS X where the Round Trip can continue.
This chapter shows you how to put the previous chapters together in a Round Trip of your own. The major topics are
![]() What the user will see
What the user will see
![]() What you will see
What you will see
![]() Configuring an iOS and OS X app to use a shared iCloud Ubiquity container
Configuring an iOS and OS X app to use a shared iCloud Ubiquity container
Note
Before looking at the figures in this chapter, a word of caution is in order: these figures have been prepared to emphasize what is happening behind the scenes. In an app for the App Store, you would make the different versions of the app look much more alike, but doing that for this chapter’s examples might make it harder for you to follow what’s going on, so in this chapter the differences are highlighted with different fonts and styles. Also note that there are efficiency and operational improvements you can make. For example, you can separate the testing for iCloud (using tokens) from the locating of the ubiquity container. The former is fast and can run on the main thread, while the latter should be fired off on a separate thread.
How the User Sees the Round Trip
First, it’s worthwhile to look at what the Round Trip will look like from the user’s point of view. When you successfully implement a Round Trip, it will seem to the user that it’s another one of those Apple technologies that “just works.” So, paradoxically, your job as a developer is to not have the user notice what you’ve done: it should just work the way the user expects. If a close friend or relative looks at your finished app and says, “What’s so special about that?” you’ve succeeded. Unfortunately, you may have to abandon your friends and relatives temporarily and find a local developers Meetup group or other forum where the participants will understand what is so special about what you’ve done.
This section shows you how the user manages files on the Round Trip. The figures in this section show four files in the shared iCloud ubiquity container for the iOS and OS X apps. They have already been created using the techniques you saw in Chapter 15, “Working with iOS Documents” and Chapter 16, “Working with OS X Documents.” The four files involved are
![]() Note 1 and Note 2: These were created on iOS in Chapter 15.
Note 1 and Note 2: These were created on iOS in Chapter 15.
![]() Colby Test and Test for Colby Shared: These were created on OS X in Chapter 16.
Colby Test and Test for Colby Shared: These were created on OS X in Chapter 16.
As you will see, regardless of where the files were created, they are all visible in the shared ubiquity container in both the iOS and OS X apps.
Three basic types of displays are discussed in this section:
![]() On iOS and OS X, users can see their files in the Open dialog on OS X or a developer-written view such as a master-detail view on iOS. These displays are the most user-centric.
On iOS and OS X, users can see their files in the Open dialog on OS X or a developer-written view such as a master-detail view on iOS. These displays are the most user-centric.
![]() Advanced users can look at and manage their iCloud accounts and storage with System Preferences on OS X and Settings on iOS.
Advanced users can look at and manage their iCloud accounts and storage with System Preferences on OS X and Settings on iOS.
![]() You as a developer have access to two additional iCloud tools through Xcode and through developer.icloud.com.
You as a developer have access to two additional iCloud tools through Xcode and through developer.icloud.com.
Working with the Open Dialog on OS X
On OS X, you start from the Cocoa Application template under OS X in File, New, Project. A great deal of the app is already set up to you. If you build and run the template without making any changes to it, you’ll see that it is a basic document with a functioning menu bar. If you choose File, Open from the menu bar in your new app, you’ll see the Open dialog, as shown in Figure 18.1. (For a brand new app, you will see an empty Open dialog. As noted previously, four files have already been created to demonstrate what the Open dialog looks like once the app has been used.)

Figure 18.1 Looking at documents on OS X in icon view
Using the buttons at the bottom left, you can switch between the icon view in Figure 18.1 and the list view shown in Figure 18.2.

Figure 18.2 Looking at documents on OS X in list view
Provided that you have implemented the code shown in Chapter 16, you’ll see that the New Document button works along with the other buttons in the lower left of the dialog. Table 18.1 shows the commands available in the First Responder in the nib file as well as the actions that they trigger.
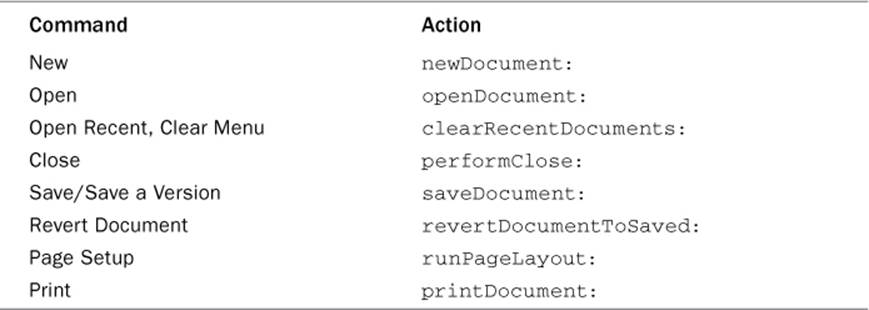
Table 18.1 First Responder Commands and Actions in the Template
You generally do not implement or override these actions: the template takes care of that for you. What you do is implement the subactions. Thus, when the user chooses openDocument (or double-clicks on a document in the Open dialog), lots of work goes on behind the scenes until Cocoa gets around to the code you need to write. Your job is to implement one of the following methods (they’re in WrappedDocument in Chapter 16):
![]() makeWindowControllers
makeWindowControllers
![]() showWindows
showWindows
Also in Chapter 16, you saw how to implement the read/write methods that are needed to support opening and saving of file wrapper documents:
![]() readFromFileWrapperOfType:
readFromFileWrapperOfType:
![]() fileWrapperOfType:error:
fileWrapperOfType:error:
If, instead of using a file wrapper, you use just an NSData object, the methods you implement are
![]() readFromData:ofType:error:
readFromData:ofType:error:
![]() dataOfType:error:
dataOfType:error:
Alternatively, you may be reading and writing from and to a specific URL. In that case, you use
![]() readFromURL:ofType:error:
readFromURL:ofType:error:
![]() writeToURL:ofType:error:
writeToURL:ofType:error:
For further customization of the Open dialog, remember to set your document’s icons in the Info tab of your project in Xcode.
Working with a Split View Controller on iOS
On iOS, there is no Open dialog: you have to create whatever you want to use to play that role. Figure 18.3 shows a split view controller based on the Master-Detail Application on iPad. The master view controller is used to display the same documents shown in Figures 18.1 and 18.2.
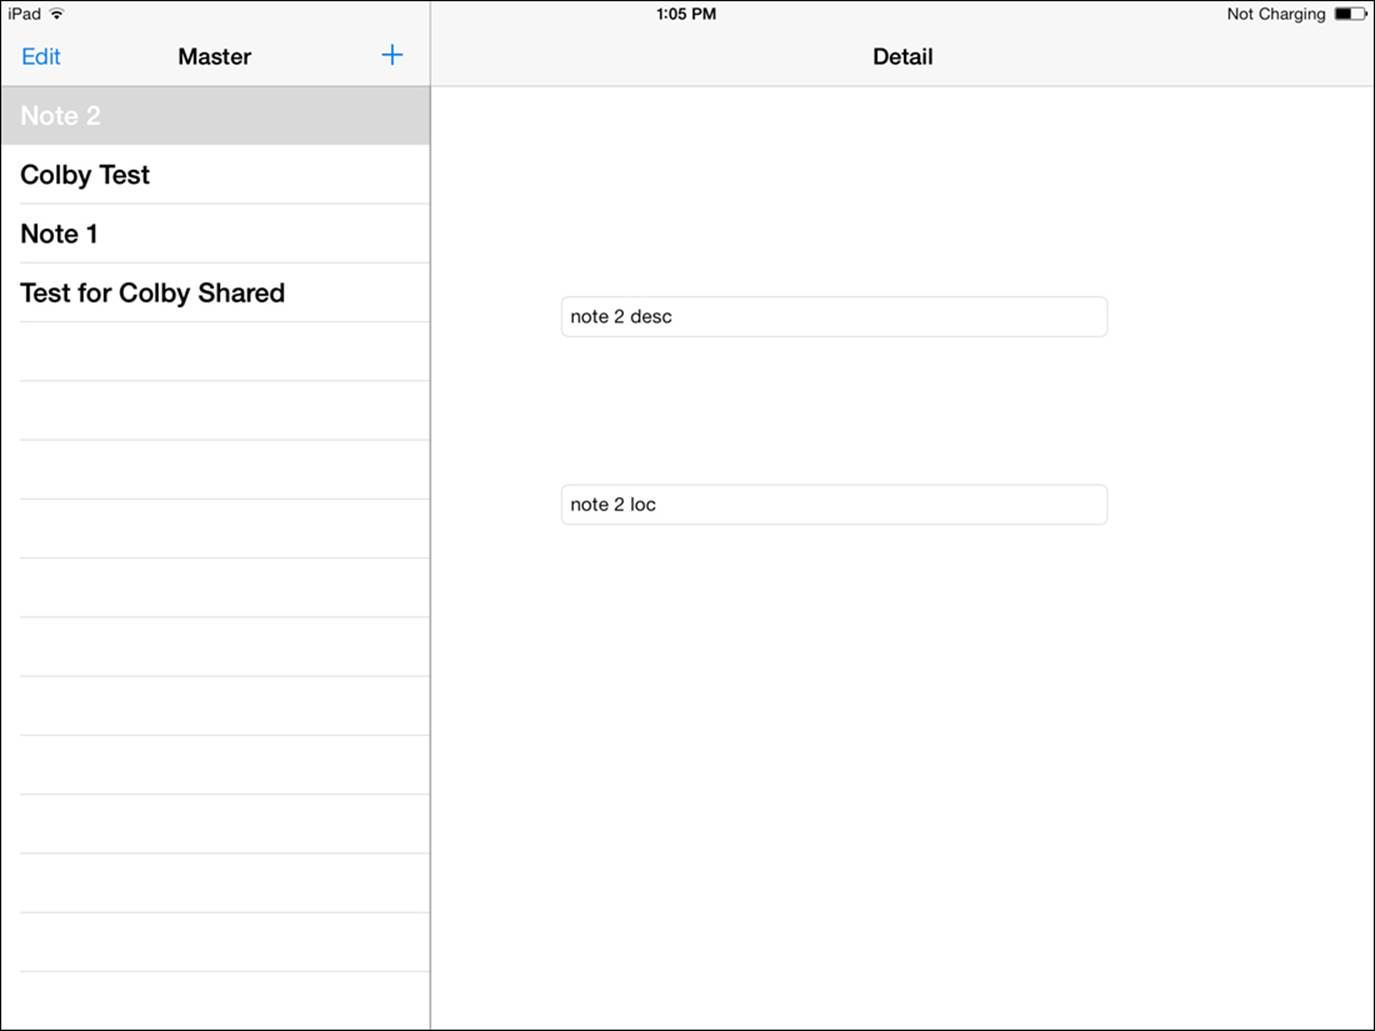
Figure 18.3 Looking at documents on iOS for iPad
In Figure 18.4, you see the same template displaying the same data on iPhone.
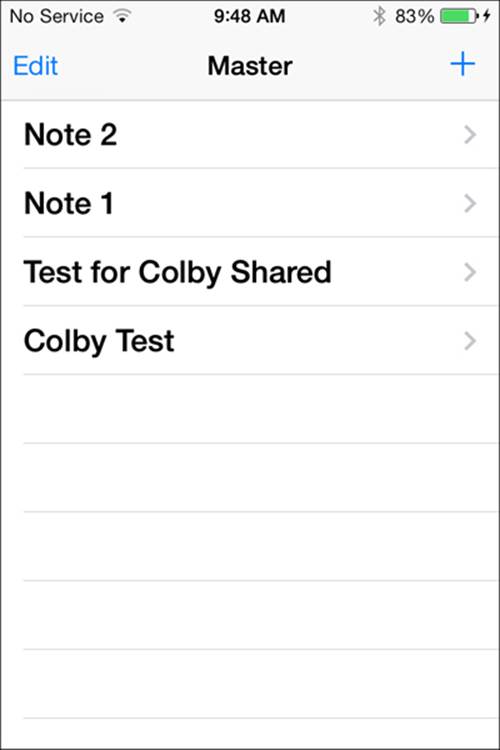
Figure 18.4 Looking at documents on iOS for iPhone
On iOS, the process of discovering the documents is up to you. (On OS X, it’s done as part of the Open dialog processing.) In Chapter 15, the code is in MasterViewController. It consists of these methods:
![]() setupAndStartQuery
setupAndStartQuery
![]() wrappedDocumentQuery
wrappedDocumentQuery
![]() processFiles
processFiles
The code to implement the views in Figures 18.3 and 18.4 was shown in Chapter 15. The critical methods in WrappedDocument are
![]() loadFromContentsOfType:error:
loadFromContentsOfType:error:
![]() contentsForType:error:
contentsForType:error:
Examining iCloud Files in System Preferences on OS X
In addition to the Open dialog, users can see their iCloud files using System Preferences on OS X. (This is the case for files that are in the Documents directory. Files outside of the Documents directory but within the sandbox are invisible to users through System Preferences.) Users can get to the files by using the iCloud pane in System Preferences. They select the ubiquity container (app name to users in most cases) and click Manage in the bottom right to see the files, as shown in Figure 18.5.
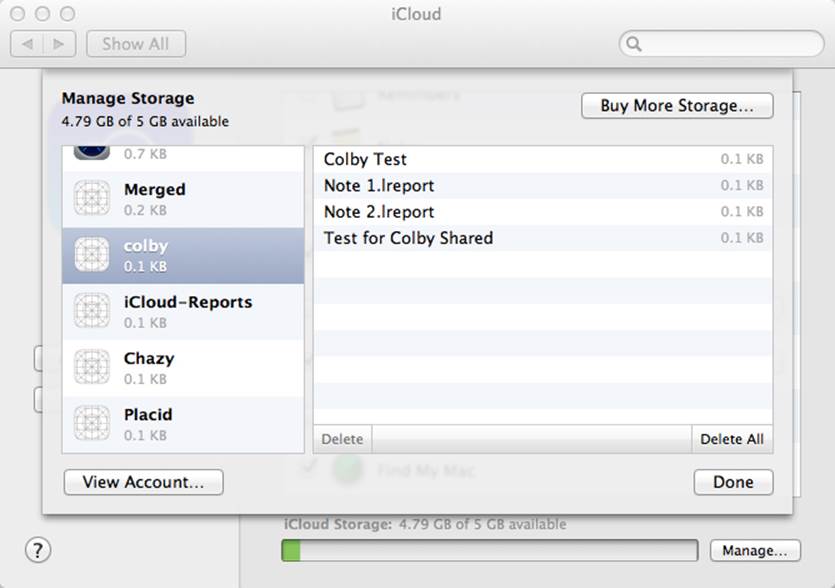
Figure 18.5 Looking at iCloud files in System Preferences
Figure 18.5 actually shows the names of ubiquity containers. It uses a naming convention that some developers adopt. Ubiquity containers under development start with a lowercase letter. When development is done, the initial letter is changed to uppercase, which looks better for users. This enables you to develop and test two versions of your app on the same developer account at the same time.
Notice at the bottom of the list of documents for an application that users can delete one or all of them from the ubiquity container and thus from iCloud.
Examining iCloud Files with Settings on iOS
Similarly, users can examine their iCloud files on iOS using Settings. Here are the steps a user follows to look at the files. You may need to provide this information in your app’s documentation: not all users are adept at configuring iCloud. Note that users can delete files from their ubiquity containers and thus from iCloud using their iOS devices. Not everyone knows this because there are several steps involved, as you will see in the following list. (The steps are the same on iPad.)
1. In Settings, select iCloud, as shown in Figure 18.6. You will see the settings for the major apps. You can turn iCloud on or off from here.
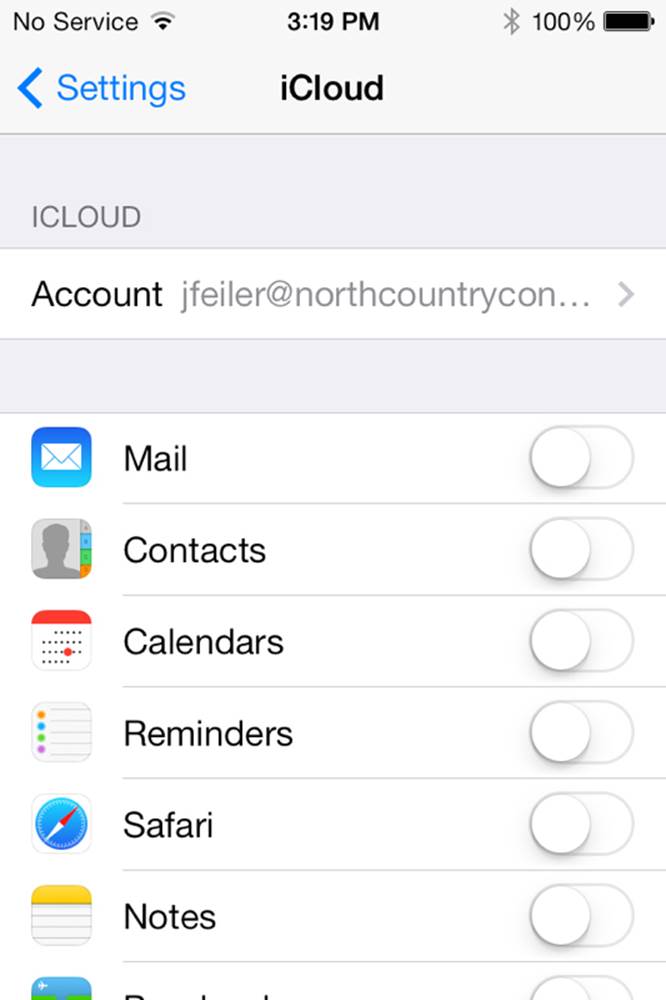
Figure 18.6 Configuring iCloud for apps
2. Scroll down to Documents & Data where you will be able to configure individual apps, such as yours as shown in Figure 18.7.
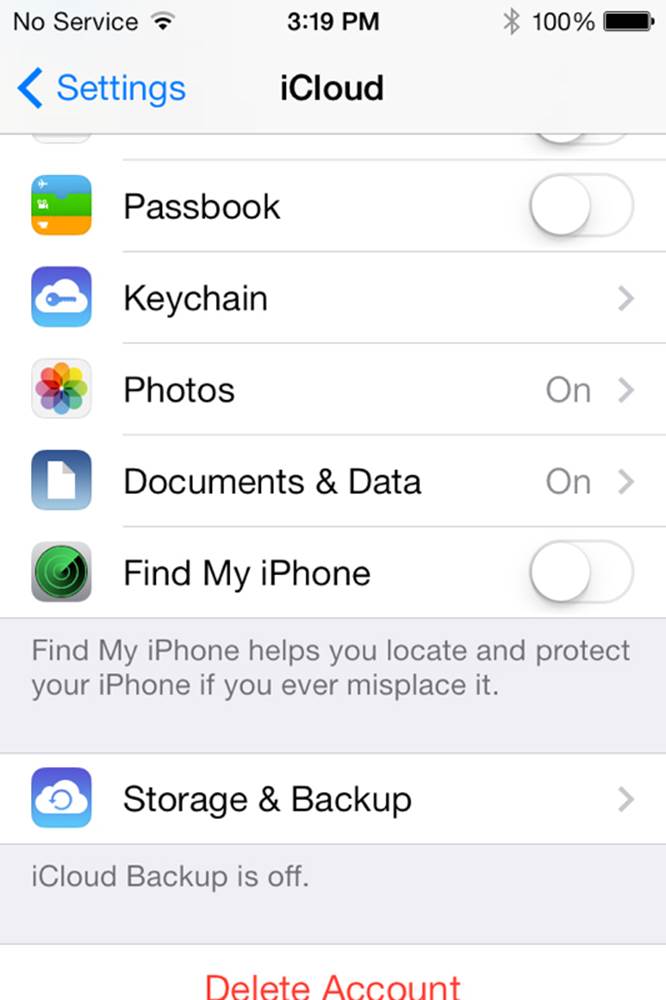
Figure 18.7 Selecting Documents & Data to configure apps
3. Inside Documents & Data, you can turn iCloud on or off for each app. If a user is experiencing problems, you may recommend that these settings be checked. Users report that these settings mysteriously are turned on or off. (These reports are consistent with various other reports from users about mysterious behavior that they absolutely had nothing to do with, such as the infamous two disks jammed into a single slot on a drive.)
Note that the names in Figure 18.8 are the names of the apps (the product names in Xcode).
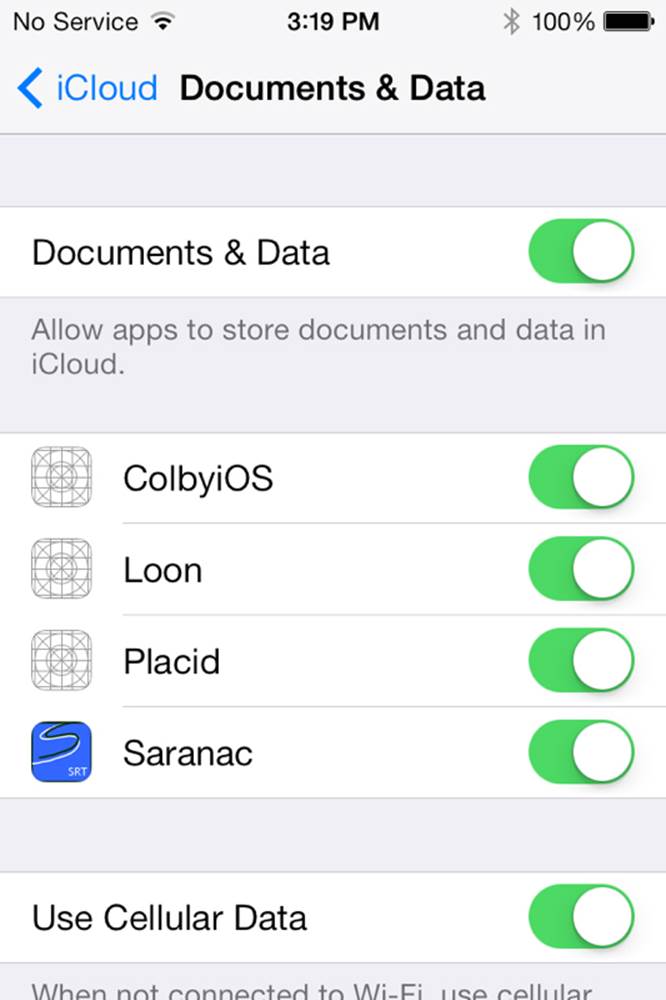
Figure 18.8 Turning iCloud on and off for individual apps
4. Return to iCloud (that is, the screen shown in Figure 18.6), scroll to the bottom, and select Storage & Backup (this was shown previously in Figure 18.7).
5. From Storage & Backup, go to the individual files by tapping Manage Storage, as shown in Figure 18.9.
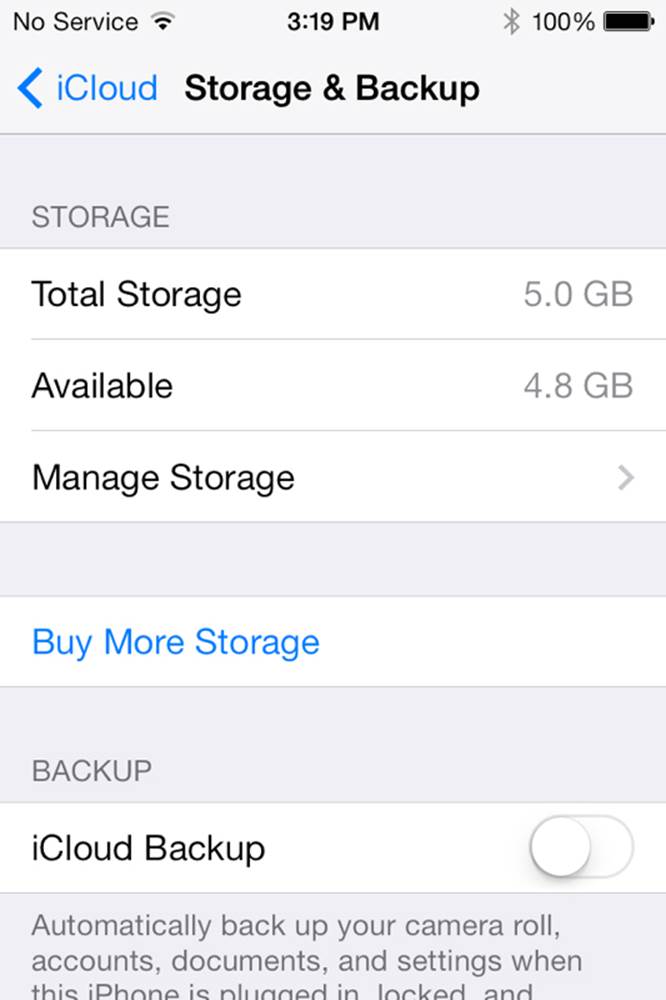
Figure 18.9 Using Manage Storage to see your iCloud storage
6. In Manage Storage, look at the storage you are using, as shown in Figure 18.10.
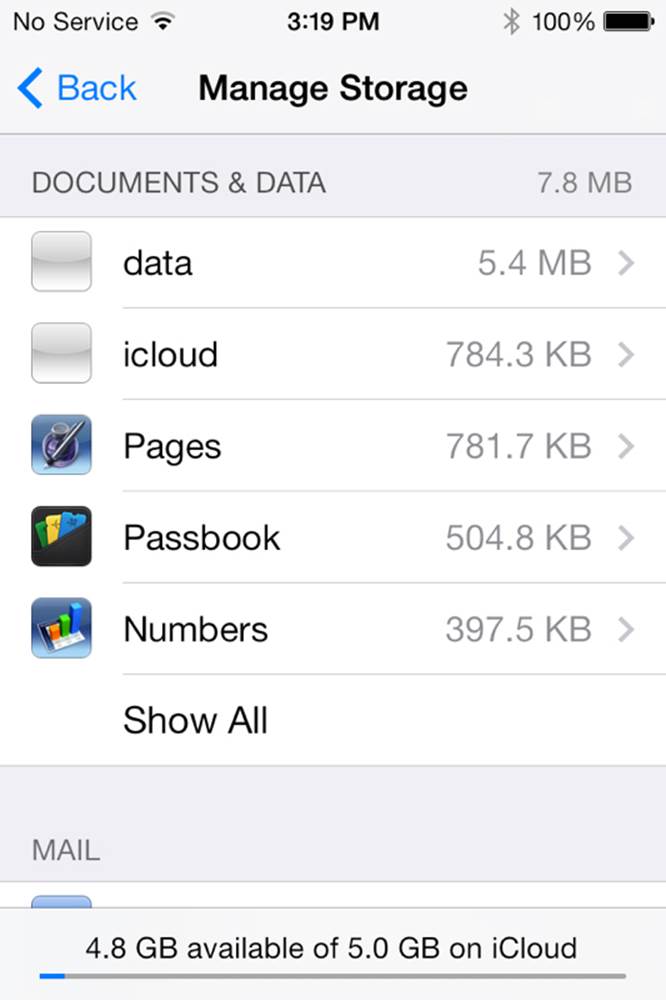
Figure 18.10 Looking at storage for Documents & Data
7. Select Show All to see all of your storage, as shown in Figure 18.11. If you look closely, you’ll see that the items in the list shown in Figure 18.11 are the names of ubiquity containers rather than the app names shown in Figure 18.8.
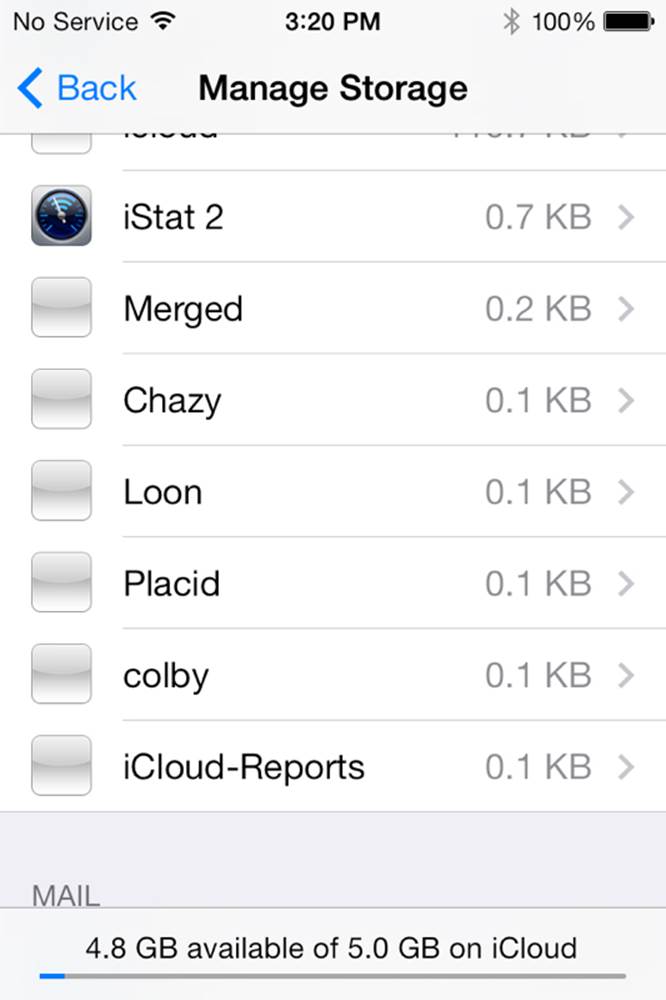
Figure 18.11 Looking at storage for all apps
8. Tap a ubiquity container to see its files, as shown in Figure 18.12.
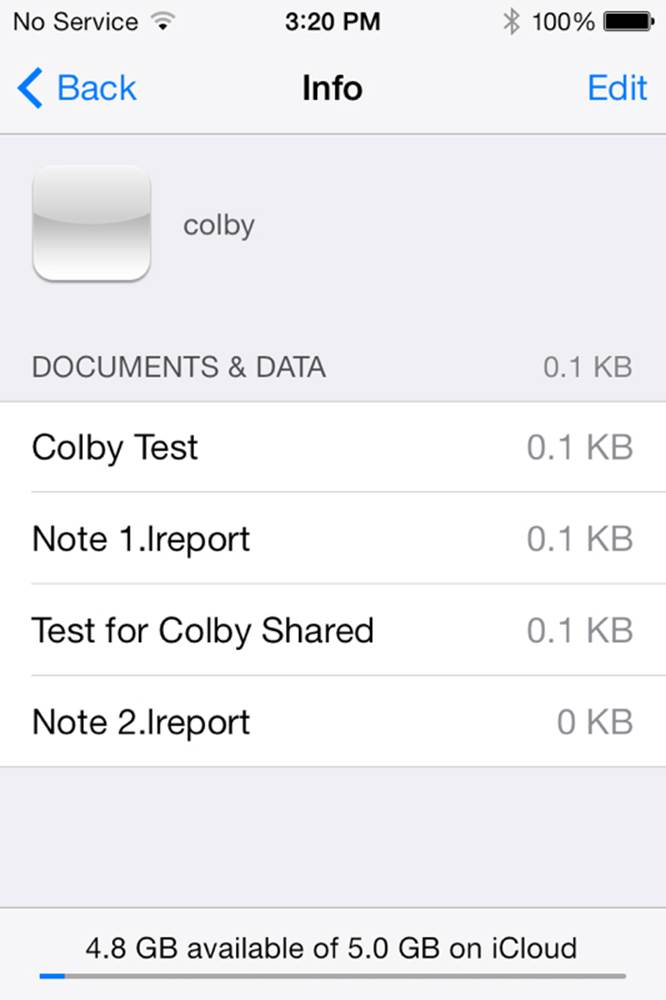
Figure 18.12 Looking inside a ubiquity container
How the Developer Sees the Round Trip
In addition to System Preferences on the Mac and Settings on iOS, there is yet another set of displays that you as a developer can view: developer.icloud.com and the debug gauges in Xcode 5.
Using developer.icloud.com
Log in to developer.icloud.com using the Apple ID for your developer account. This will enable you to see and download the files in your iCloud storage. This feature is not available to users.
Note
Watch out for the address completion in your browser. As soon as you start typing developer, it will probably try to complete it as developer.apple.com when you want developer.icloud.com in this case.
Figure 18.13 shows the interface inside developer.icloud.com. As you can see, you can navigate through the ubiquity containers down to the Documents folder and then, within it, to individual documents. Unlike the user-oriented tools, this tool lets you see folders other than Documents.
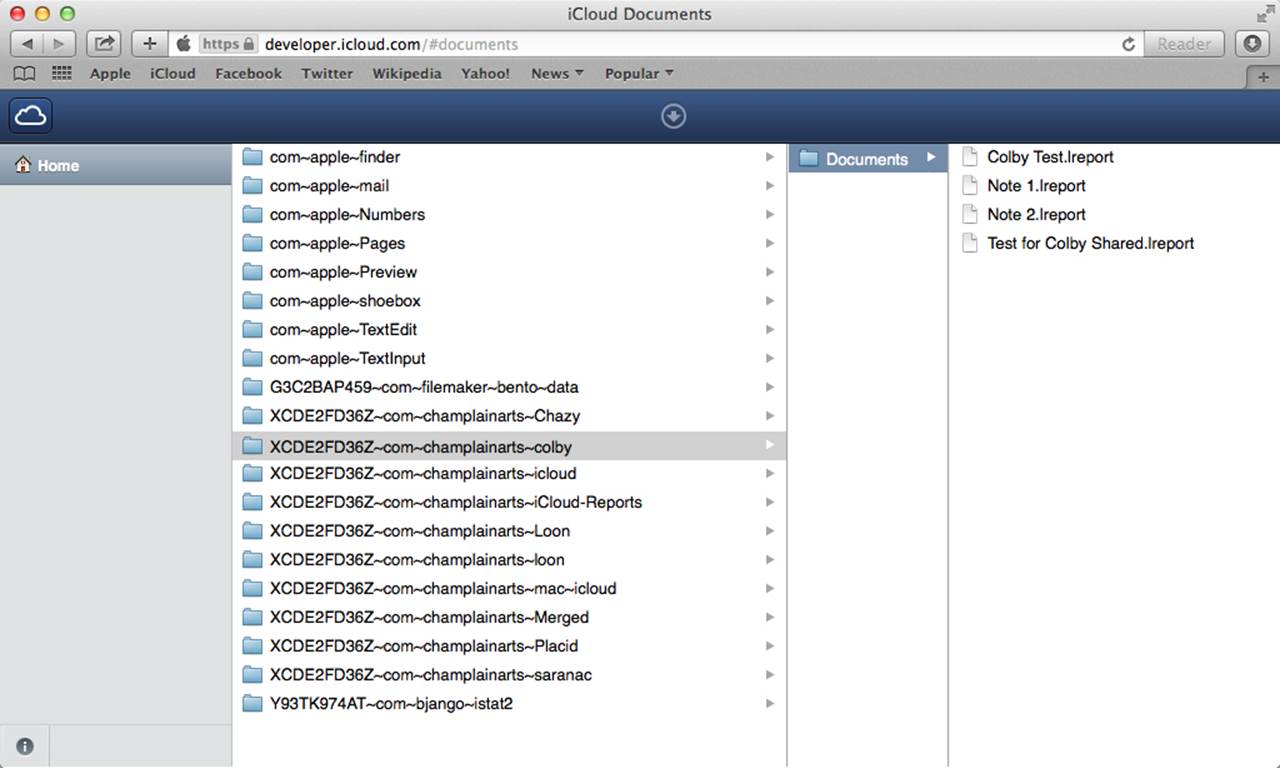
Figure 18.13 Viewing files and folders on developer.icloud.com
In addition, when you select a file, you can download it and inspect its modification date, as shown in Figure 18.14.
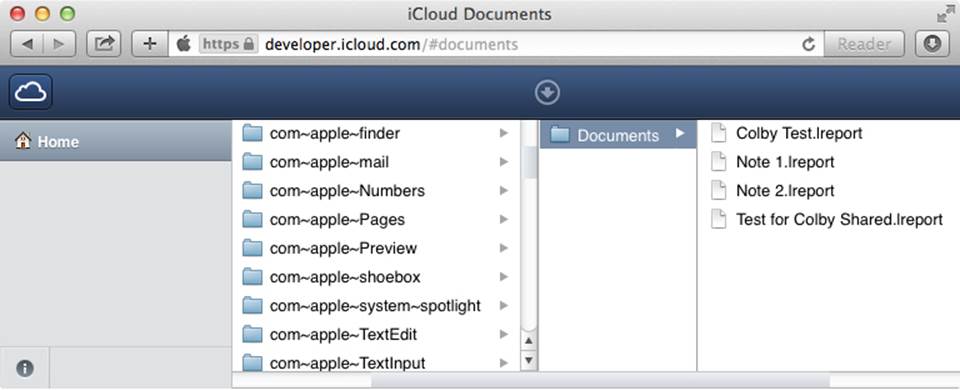
Figure 18.14 Downloading files
As you can imagine, this is very valuable for debugging.
Using Xcode
Xcode 5 brings debug gauges to the Debug navigator as you run an app from Xcode. The gauges are valuable for analyzing performance, but the focus in this book is on iCloud, so the iCloud gauge is the topic of interest. Like developer.icloud.com, it lets you examine what’s going on in the iCloud account. (Remember this is your test account: it’s not for user accounts.)
Avoid the iCloud Debugging Trap
The iCloud debugging tools, some of which are new in Xcode 5, answer many of the questions and address many of the problems developers had with the first releases of iCloud. In particular, now you can see what’s going on inside the iCloud ubiquity containers.
The tools provide instantaneous access so you can actually watch what’s happening and compare it to what you intended to happen.
But be careful.
iCloud is mostly an asynchronous process that generally involves access over the Internet to iCloud resources. The “instantaneous access” just mentioned is instantaneous in the sense that you can see what is happening now. However, the events you are observing are playing out on a different time scale from your desktop as well as being in a different location. All iCloud developers have experienced the frustration of clicking or tapping something that should cause a document to be stored or changed in iCloud, but nothing happens. In the heat of development, it’s easy to notice that whatever should have happened didn’t happen, and off we go tracking down the bug.
It’s hard to break old habits, but it’s important to constantly remind yourself of the time frame for iCloud events. The “bug” may disappear if you just walk the dog, have a cup of coffee, or pass some time with email and messaging.
When you are running an app in Xcode either on a Mac or on a device, by default the Debug navigator is shown at the left (you can control this in Preferences). You have a number of debug gauges: click the iCloud gauge, as shown in Figure 18.15.
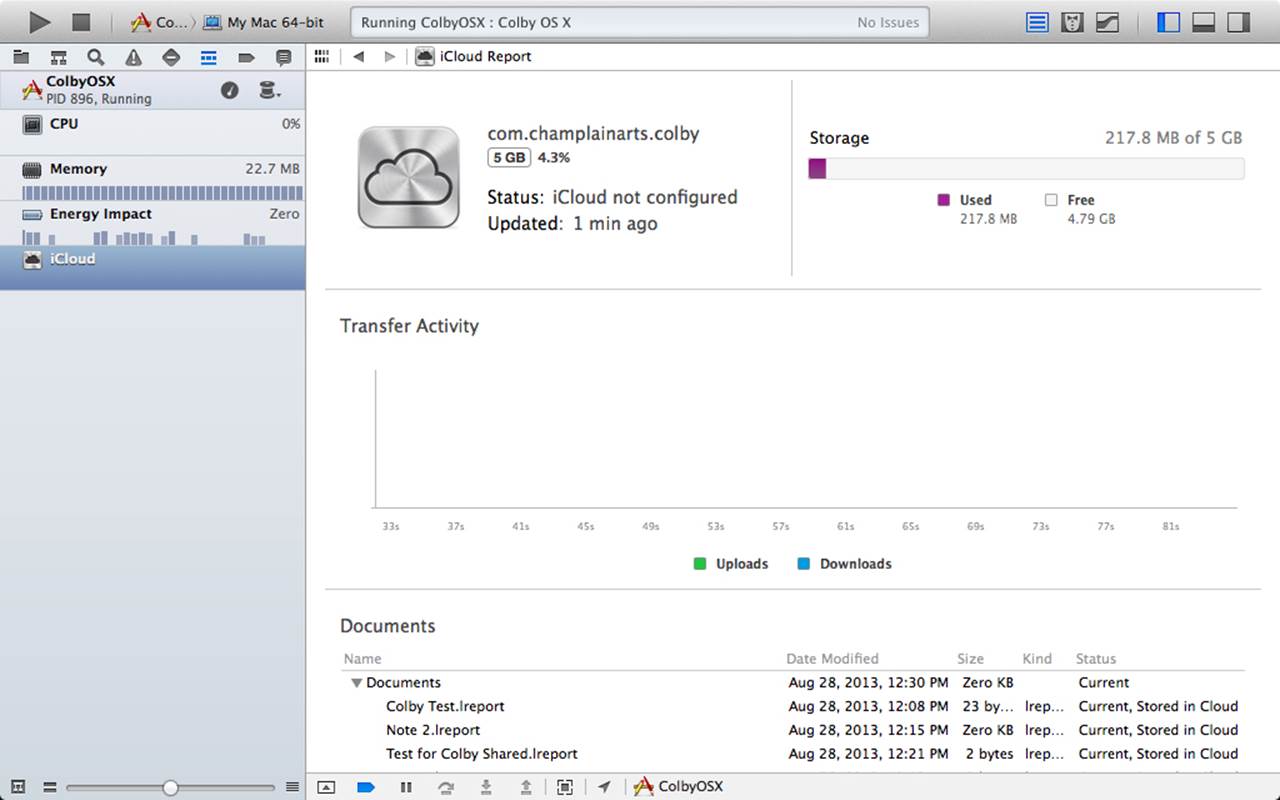
Figure 18.15 Examining iCloud files in the iCloud gauge
At the bottom of Figure 18.15, you can see the same files you saw in the Open dialog for OS X (Figure 18.2), in the master view controller on iPad (Figure 18.3), in the master view controller on iPhone (Figure 18.4), in Settings (Figure 18.12), and in developer.icloud.com (Figures 18.13and 18.14). (In Figure 18.15, the last line is scrolled out of sight but don’t worry: it’s there.)
While the app is running, the top of the iCloud gauge shows you the activity that’s going on as files move up and down, as you can see in Figure 18.16. In the upper left, you can also watch the progress as the app connects to the ubiquity container.
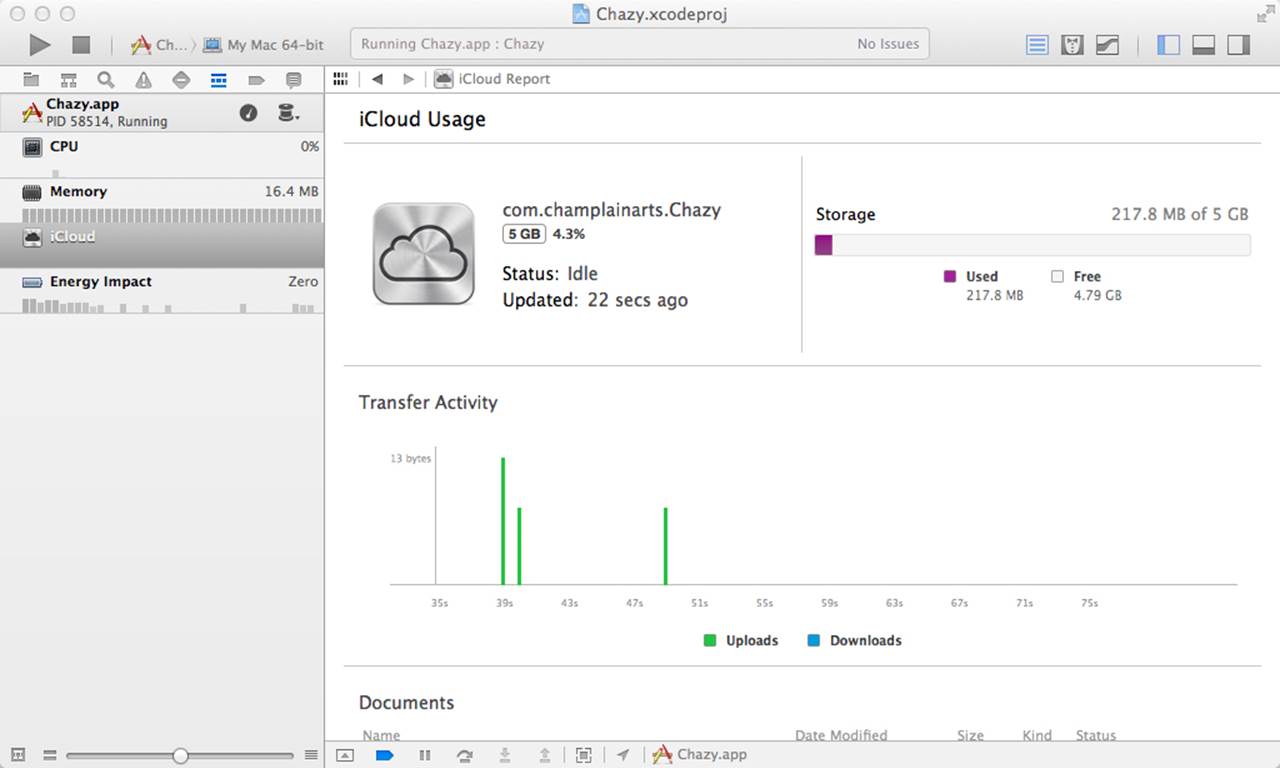
Figure 18.16 Watching uploads and downloads
In particular, pay attention to the Status for each file. Current, Stored in iCloud is generally what you want to see. As the app tries to synchronize files, other status values may appear. During your testing, you can turn Airplane mode on and off on your devices to force iCloud to be available or not available. The statuses should change accordingly—but always allow for the iCloud time lag discussed in the earlier sidebar, “Avoid the iCloud Debugging Trap.”
Configuring the Shared Ubiquity Container
In order to implement a Round Trip, you need an iOS app and an OS X app that share a ubiquity container. The easiest way to do this is to create an Xcode workspace for two apps, as described in Chapter 11, “Using Xcode Workspaces for Shared Development.” That is the technique used in the downloadable code for this chapter.
The workspace is called Colby (yet another Adirondack lake); one app is called ColbyiOS, and the other is called ColbyOSX. Figure 18.17 shows the General tab for one of the projects.
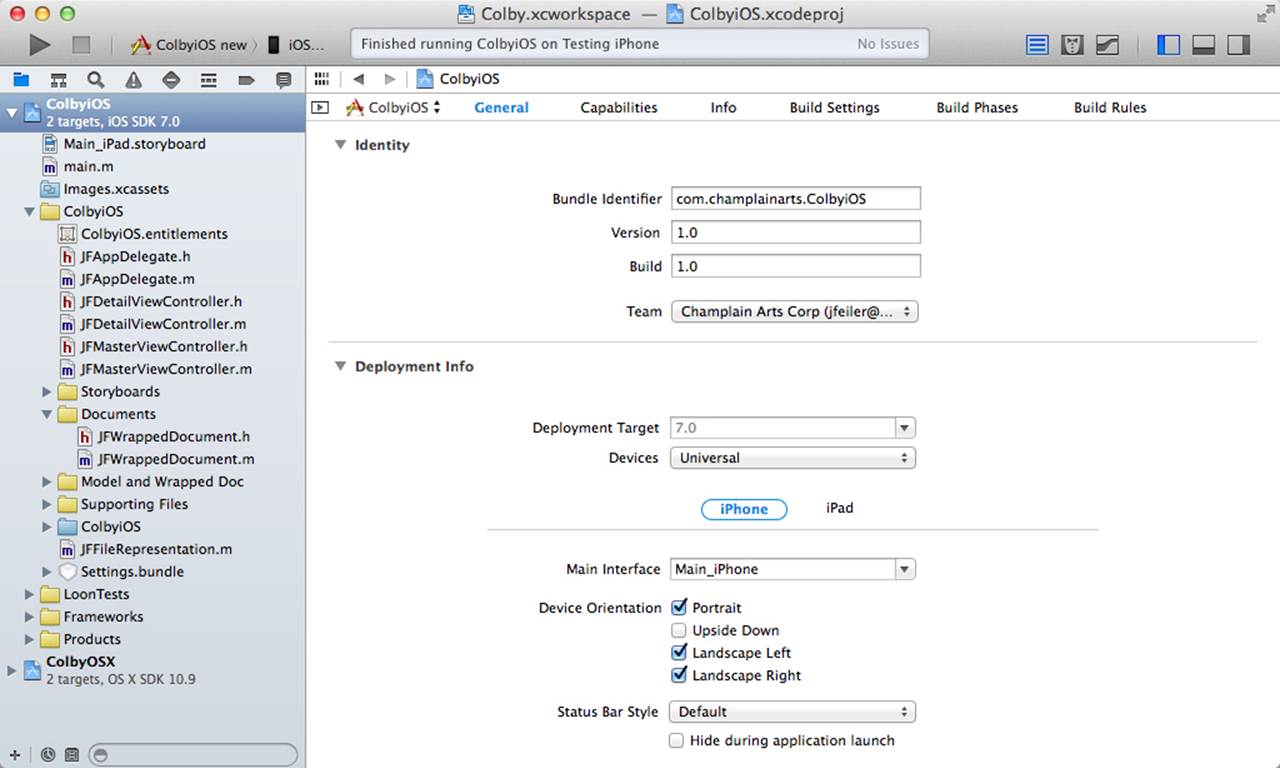
Figure 18.17 Setting up your projects
In the Capabilities tab for both projects, set up a common ubiquity container—colby in this case. (If you follow the naming convention for development mentioned previously, the production version might be Colby.)
Note
Remember that if you change the name of the ubiquity container during development, you should use the Organizer to delete derived data from the Xcode project because that includes the name of the previous ubiquity container.
As you run either app, you should be able to see the ubiquity container in the various debugging tools discussed in this chapter.
Make certain you turn on iCloud in the Capabilities tab for each app, as shown in Figure 18.18.
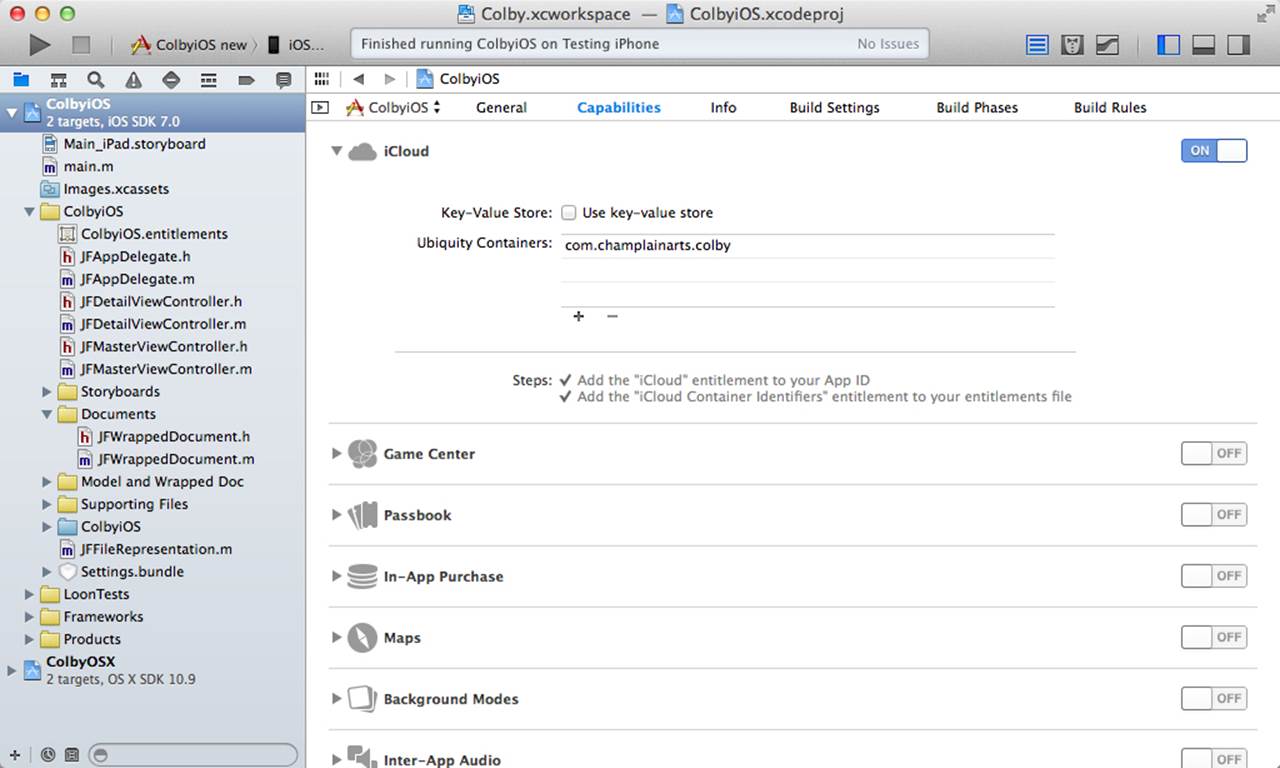
Figure 18.18 Turning on iCloud for each app
The downloadable code puts the two projects in one workspace, but there is no shared code as Chapter 11 implements the concept. One possibility is to place the WrappedDocument class into a shared file. Because loadFromContents:ofType:error: on iOS andreadFromFileWrapper:ofType:error: are so similar, you can easily implement both of them side by side in your shared WrappedDocument file: either will be called as needed. (They are very short.)
More significantly, the write methods contentsForType:error: (iOS) and fileWrapperOfType:error: (OS X) can be rewritten to share a common method that does the processing that is the same for both.
Using a Shared iCloud Controller
In addition to a shared ubiquity container, Round Trip uses a shared iCloud controller. Using the same workspace technique described previously in Chapter 11, “Using Xcode Workspaces for Shared Development,” you can create a class that will be built into both the iOS and OS X apps. (Remember, they are separate apps, so it is only the controller source code that is shared: it is not some runtime shared object.)
Implementing the shared iCloud controller is a matter of refactoring the code you’ve already seen. The new structure is simple: the shared controller contains most of the iCloud code, and the other classes contain the platform-specific code.
Making the App Delegate Link to the Controller
You add a property to the .h file so that the controller is visible. Here is the property for AppDelegate.h:
@property (nonatomic, readonly)
SharediCloudController *iCloudController;
It is visible to other classes, such as the master view controller, with this line of code:
(JFAppDelegate *)[[UIApplication sharedApplication] delegate]
You add an accessor to the app delegate that backs up the property and creates the controller as needed:
- (SharediCloudController *)iCloudController {
if (!_iCloudController) {
_iCloudController = [[SharediCloudController alloc] init];
}
return _iCloudController;
}
Declaring the Shared iCloud Controller
Listing 18.1 shows the header file with the properties and methods of the controller that are exposed to clients. All of these have been described in other contexts earlier in this part of the book.
Listing 18.1 SharediCloudController.h
#import <Foundation/Foundation.h>
@interface SharediCloudController : NSObject
- (NSInteger)numberOfDocuments; //1
- (NSString*)stringForDocumentNameAt: (NSInteger)index; //2
- (id)documentURLAt: (NSInteger)index; //3
- (NSString *)newUntitledDocumentName; //4
- (void)addDocument: (NSURL *)newDocumentURL; //5
- (void)deleteDocument: (NSURL *)deleteDocumentURL; //6
- (void)checkOnQuery; //7
- (void)setupAndStartQuery; //8
@property NSMutableArray *documents; //9
@end
1 You save coding time by using the shared code, but you do need to provide a few extra accessors because the documents array is no longer in the master view controller.
2, 3 The UI methods need to be able to quickly get information about the documents.
4, 5, 6 The UI methods in other classes, such as the master view controller, are still called. However, they call these non-UI methods that manage the documents array in iCloud.
7 This is the optional debugging method.
8 This is the method that manages the query that fills the documents array.
9 The documents array is maintained by the shared controller and is exposed to clients such as the master view controller in the UI classes. The methods in lines 1, 2, and 3 may eliminate the need to expose the array, but it is exposed here as a safety valve in case you are converting code that relies on it and doesn’t use the accessors at lines 1, 2, and 3.
Implementing the Shared iCloud Controller
The shared controller implementation is shown in Listing 18.2. Key lines are identified in the listing, but the details of the implementations have already been covered in Chapters 15 and 16.
Listing 18.2 SharediCloudController.m
#import "SharediCloudController.h"
#import "JFFileRepresentation.h"
#import "Constants.h"
@interface SharediCloudController () //1
@property NSMetadataQuery *query;
@end
@implementation SharediCloudController
#pragma mark - initialization
-(id)init {
if ( self = [super init] ) {
[self initializeiCloudAccess]; //2
if (!_documents)
_documents = [[NSMutableArray alloc] init]; //3
[self setupAndStartQuery]; //4
}
return self;
}
- (void)initializeiCloudAccess { //5
dispatch_async
(dispatch_get_global_queue
(DISPATCH_QUEUE_PRIORITY_DEFAULT, 0),
^{
if ([[NSFileManager defaultManager]
URLForUbiquityContainerIdentifier:nil] != nil)
NSLog (@"Got iCloud with
URLForUbiquityContainerIdentifier %@ \n",
[[NSFileManager defaultManager]
URLForUbiquityContainerIdentifier:nil]);
else
NSLog (@"No iCloud");
});
}
#pragma mark - managing iCloud data
-(NSMetadataQuery *)textDocumentQuery {
NSMetadataQuery *aQuery = [[NSMetadataQuery alloc] init];
if (aQuery) {
// search
[aQuery setSearchScopes: [NSArray arrayWithObject:
NSMetadataQueryUbiquitousDocumentsScope]; //6
// add predicate
NSString * filePattern = [NSString stringWithFormat:@"*.%@",
SharedReportFileExtension]; //7
[aQuery setPredicate:
[NSPredicate predicateWithFormat: @"%K LIKE %@",
NSMetadataItemFSNameKey, filePattern]]; //8
//NSLog (@" %@", aQuery);
return aQuery;
}
- (void)setupAndStartQuery {
// create if needed
if (!_query)
_query = [self textDocumentQuery]; //9
// register for query notifications
[[NSNotificationCenter defaultCenter] addObserver:self
selector:@selector (processFiles:)
name:NSMetadataQueryDidFinishGatheringNotification
object:nil]; //10
[[NSNotificationCenter defaultCenter] addObserver:self //11
selector:@selector (processFiles:)
name:NSMetadataQueryDidUpdateNotification object:nil];
//start the query
[_query startQuery]; //12
}
-(void)processFiles: (NSNotification*)aNotification {
NSMutableArray *discoveredFiles = [NSMutableArray array];
//disable updates
[_query disableUpdates]; //13
NSArray *queryResults = [_query results]; //14
for (NSMetadataItem *result in queryResults) {
NSURL *fileURL = [result valueForAttribute:
NSMetadataItemURLKey];
NSNumber *aBool = nil;
//don't include hidden files
[fileURL getResourceValue: &aBool forKey:NSURLIsHiddenKey
error:nil]; //15
if (aBool && ![aBool boolValue])
[discoveredFiles addObject: fileURL];
JFFileRepresentation *fr = [[JFFileRepresentation alloc]
initWithFileName: [[fileURL
lastPathComponent] stringByDeletingPathExtension]
fileURL:fileURL];
NSLog (@" %@ %@", fileURL, fr);
}
[_documents removeAllObjects]; //16
[_documents addObjectsFromArray: discoveredFiles];
[_query enableUpdates]; //17
[[NSNotificationCenter defaultCenter]
postNotificationName:
SharediCloudControllerDidChangeDataNotification
object:nil userInfo:nil]; //18
}
#pragma mark - managing documents array
-(NSString*)stringForDocumentNameAt: (NSInteger)index { //19
if ([_documents count] > 0)
{
NSURL *theURL = [_documents objectAtIndex: index];
return [[theURL lastPathComponent]
stringByDeletingPathExtension];
}
return nil;
}
-(NSURL *)documentURLAt: (NSInteger)index { //20
if ([_documents count] > 0)
{
NSURL *theURL = [_documents objectAtIndex: index];
return theURL;
}
return nil;
}
- (NSInteger)numberOfDocuments { //21
return [_documents count];
}
- (NSString *)newUntitledDocumentName { //22
NSInteger docCount = 1;
NSString *newDocName = nil;
newDocName = @"new doc";
BOOL done = NO;
while (!done) {
newDocName = [NSString stringWithFormat: @"Note %d.%@",
docCount,
SharedReportFileExtension];
// check for dups
BOOL nameExists = NO;
for (NSURL *aURL in _documents) {
if ([[aURL lastPathComponent] isEqualToString:
newDocName]) {
docCount ++;
nameExists = YES;
break;
}
}
// if not found, exit WHILE
if (!nameExists)
done = YES;
}
return newDocName;
}
- (void)addDocument: (NSURL *)newDocumentURL { //23
[_documents addObject: newDocumentURL];
}
- (void)deleteDocument: (NSURL *)deleteDocumentURL {
dispatch_async (dispatch_get_global_queue //24
(DISPATCH_QUEUE_PRIORITY_DEFAULT, 0), ^{
NSFileCoordinator *fc = [[NSFileCoordinator
alloc] initWithFilePresenter:nil];
[fc
coordinateWritingItemAtURL:deleteDocumentURL
options:NSFileCoordinatorWritingForDeleting error:nil
byAccessor:^(NSURL *newURL) {
NSFileManager *fm = [[NSFileManager alloc] init];
[fm removeItemAtURL: newURL error:nil];
}];
});
[_documents removeObject: deleteDocumentURL]; //25
}
#pragma mark - debugging
- (void)checkOnQuery { //26
if (_query) {
NSLog (@" %lu", (unsigned long)[_query resultCount]);
NSLog (@" %lu", (unsigned long)[_query isStarted]);
NSLog (@" %lu", (unsigned long)[_query isGathering]);
NSLog (@" %lu", (unsigned long)[_query isStopped]);
[_query startQuery];
}
}
@end
1 The class extension declares the query to search for iCloud documents.
2 This method forges the link to iCloud that previously was placed either in the app delegate or in the master view controller.
3 This line creates the mutable array.
4 This line runs the query.
5 Get the ubiquity container off the main thread.
6–12 These lines set up the query.
13–17 These lines disable, run, and re-enable the query.
18 This line posts a notification so that the master view controller can reload its data.
19 This line is the accessor to the nth document’s name.
20 This line is the accessor to the nth document instance. (Remember, the convention is that the document is represented by its URL; it is up to the detail view controller to actually manage the document object.)
21 This line is the accessor to the count of documents.
22 This line is the same method that you used in Chapters 15 and 16 in the master view controller. It is called in the same way you called it from there.
23, 24, 25 These are the lines to implement the iCloud part of document creation and deletion. The master view controller calls them as needed when it is updating the UI.
26 This line is the optional debugging method that can help you track down issues in the query.
Moving Documents to iCloud
In most cases, the preferred way of writing to iCloud is not to do it. You write to your app’s sandbox and then move the written file to iCloud. Because writing directly to iCloud is easier when you are starting out, this book focuses on direct writes to iCloud. (It’s easier because there’s less code and also because if you create a document directly in iCloud it should show up fairly quickly. If you write to the sandbox and then move the document to iCloud, either the writing or the moving can run into trouble, so it’s easier to get basic experience with direct writes.)
The code in Listing 18.3 is based on the common examples on developer.apple.com. The two minor differences are:
![]() This code uses a JFFileRepresentation object to represent the file with its name and URL. Similar light-weight objects are found in many examples.
This code uses a JFFileRepresentation object to represent the file with its name and URL. Similar light-weight objects are found in many examples.
![]() Because this code is envisioned as being part of the shared code, it does not post an error message. You could post a notification or return a value to the calling class.
Because this code is envisioned as being part of the shared code, it does not post an error message. You could post a notification or return a value to the calling class.
Listing 18.3 Moving a Document to iCloud
- (void)moveFileToiCloud:(JFFileRepresentation
*)fileToMove {
NSURL *sourceURL = fileToMove.url;
NSString *destinationFileName = fileToMove.fileName;
NSURL *destinationURL = [self.documentsDir
URLByAppendingPathComponent:destinationFileName];
dispatch_async(dispatch_get_global_queue
(DISPATCH_QUEUE_PRIORITY_DEFAULT, 0), ^(void) {
NSFileManager *fileManager =
[[[NSFileManager alloc] init] autorelease];
NSError *error = nil;
BOOL success = [fileManager setUbiquitous:YES //1
itemAtURL:sourceURL
destinationURL:destinationURL
error:&error];
dispatch_async(dispatch_get_main_queue(), ^(void) {
if (success) {
JFFileRepresentation *fr =
[[JFFileRepresentation alloc]
initWithFileName:fileToMove.fileName
fileURL:destinationURL];
[_documents removeObject:fileToMove];
[_documents addObject:fileRepresentation];
NSLog(@"moved to iCloud: %@", fr);
}
if (!success) {
//log error, return value, or set global error
}
});
});
}
1 This is the line that does the move. Do it on another thread because it can take time.
Moving Documents from iCloud to Local Storage
The reverse of the process to move a document from iCloud is shown in Listing 18.4.
Listing 18.4 Moving a Document from iCloud
- (void)moveFileToLocal:(JFFileRepresentation *)fileToMove {
NSURL *sourceURL = fileToMove.url;
NSString *destinationFileName = fileToMove.fileName;
NSURL *destinationURL = [self.documentsDir
URLByAppendingPathComponent:destinationFileName];
dispatch_async(dispatch_get_global_queue
(DISPATCH_QUEUE_PRIORITY_DEFAULT, 0), ^(void) {
NSFileManager *fileManager = [[[NSFileManager alloc] init]
autorelease];
NSError *error = nil;
BOOL success = [fileManager //1
setUbiquitous:NO
itemAtURL:sourceURL
destinationURL:destinationURL
error:&error];
dispatch_async(dispatch_get_main_queue(), ^(void) {
if (success) {
JFFileRepresentation *fileRepresentation =
[[JFFileRepresentation alloc]
initWithFileName:fileToMove.fileName
url:destinationURL];
[_fileList removeObject:fileToMove];
[_fileList addObject:fileRepresentation];
NSLog(@"moved to local storage: %@",
fileRepresentation);
}
if (!success) {
//log error, return value, or set global error
}
});
});
}
1 This is the line that does the move. Do it on another thread because it can take time.
Chapter Summary
This chapter brought together the components of the Round Trip: an iOS and OS X app that share the same ubiquity container. It is important to note that many of the tools that are available in Xcode 5, iOS 7, and OS X Mavericks (10.9) are new. Users and developers have more control over what is happening and, more important, both can now observe what is happening.
Exercises
1. Rather than writing directly to the iCloud container, you can (and should) write to the sandbox and then move the files to the iCloud ubiquity container. This eliminates the delays involved in writing directly to iCloud. Try that with the code in the two previous sections. Verify that you have truly moved the files—if they wind up in both locations, users will be confused.
2. If you are going to rename a shared ubiquity container as described previously in this chapter, do a dry run now to make certain you understand what you have to do. (Change the name of the ubiquity container in both apps and discard the derived data.)