iOS Programming: The Big Nerd Ranch Guide (2014)
9. Editing UITableView
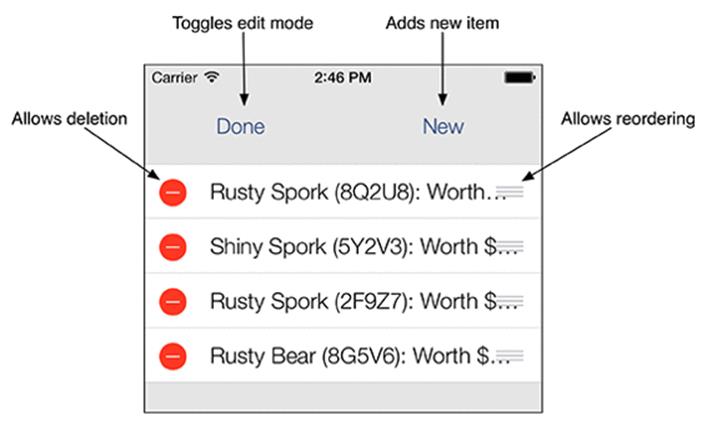
In the last chapter, you created an application that displays a list of BNRItem instances in a UITableView. The next step for Homepwner is allowing the user to interact with the table – to add, delete, and move rows. Figure 9.1 shows what Homepwner will look like by the end of this chapter.
Figure 9.1 Homepwner in editing mode
Editing Mode
UITableView has an editing property, and when this property is set to YES, the UITableView enters editing mode. Once the table view is in editing mode, the rows of the table can be manipulated by the user. Depending on how the table view is configured, the user can change the order of the rows, add rows, or remove rows. Editing mode does not allow the user to edit the content of a row.
But first, the user needs a way to put the UITableView in editing mode. For now, you are going to include a button that toggles editing mode in the header view of the table. A header view appears at the top of a table and is useful for adding section-wide or table-wide titles and controls. It can be any UIView instance.
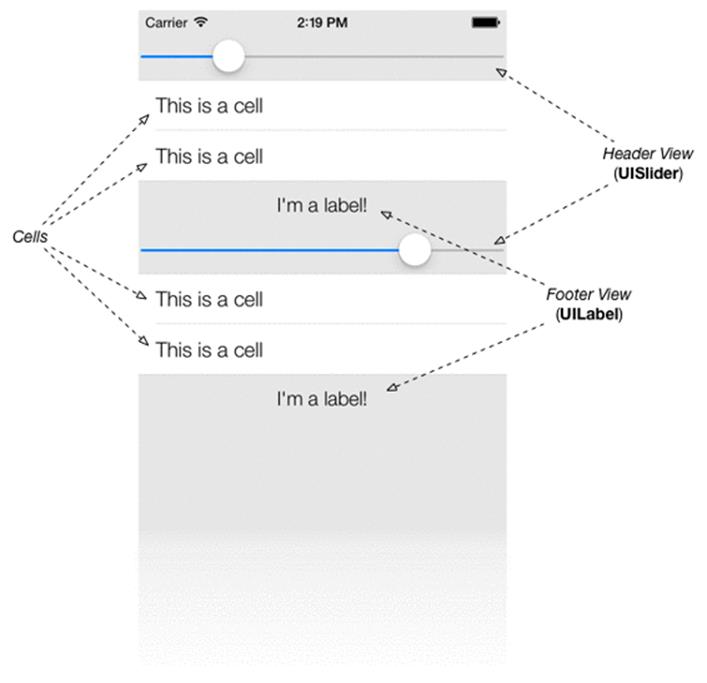
Note that the table view uses the word “header” in two different ways: There can be a table header and there can be section headers. Likewise, there can be a table footer and section footers.
Figure 9.2 Section headers and footers
You are creating a table header view. It will have two subviews that are instances of UIButton: one to toggle editing mode and the other to add a new BNRItem to the table. You could create this view programmatically, but in this case you will create the view and its subviews in a XIB file, andBNRItemsViewController will unarchive that XIB file when it needs to display the header view.
First, let’s set up the necessary code. Reopen Homepwner.xcodeproj. In BNRItemsViewController.m, add a class extension with the following property. Also stub out two methods in the implementation.
@interface BNRItemsViewController ()
@property (nonatomic, strong) IBOutlet UIView *headerView;
@end
@implementation BNRItemsViewController
// Other methods here
- (IBAction)addNewItem:(id)sender
{
}
- (IBAction)toggleEditingMode:(id)sender
{
}
Notice that headerView is a strong property. This is because it will be a top-level object in the XIB file; you use weak references for objects that are owned (directly or indirectly) by the top-level objects.
Now you need to create the new XIB file. Unlike the previous XIB files you created, this XIB file will not deal with the view controller’s view. (As a subclass of UITableViewController, BNRItemsViewController already knows how to create its view.) XIB files are typically used to create the view for a view controller, but they can also be used any time you want to lay out view objects, archive them, and have them loaded at runtime.
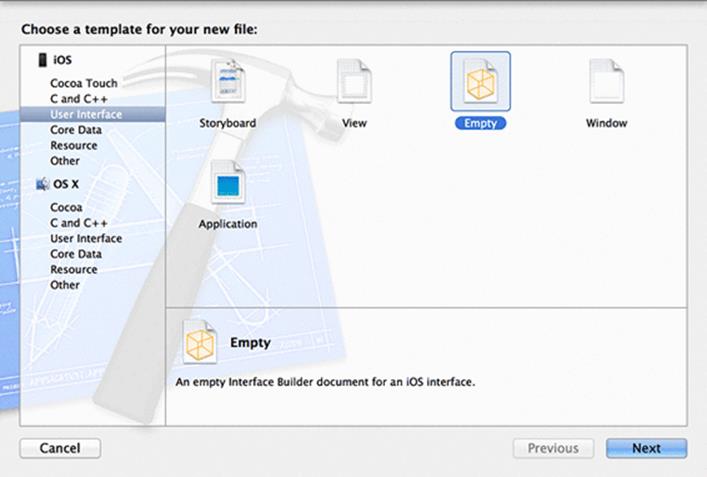
Create a new file (Command-N). From the iOS section, select User Interface, choose the Empty template, and click Next (Figure 9.3).
Figure 9.3 Creating a new XIB file
On the next pane, select iPhone. Save this file as HeaderView.
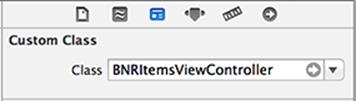
In HeaderView.xib, select the File's Owner object and change its Class to BNRItemsViewController in the identity inspector (Figure 9.4).
Figure 9.4 Changing the File's Owner
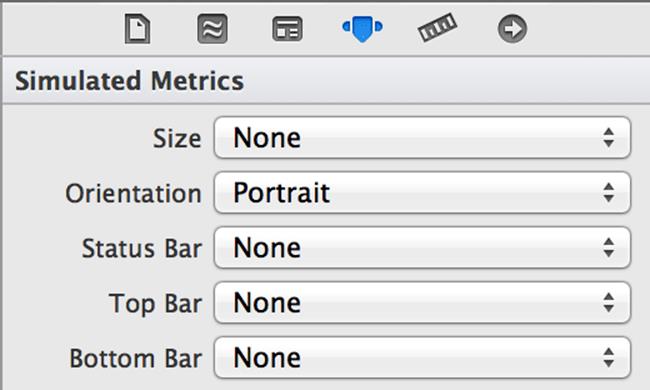
Drag a UIView onto the canvas. Then drag two instances of UIButton onto that view. You will then want to resize the UIView so that it just fits the buttons; however, Xcode will not let you: the size is locked. To unlock the size, select the UIView on the canvas and open the attributes inspector. Under the Simulated Metrics section, select None for the Size option (Figure 9.5).
Figure 9.5 Unlocking a view’s size
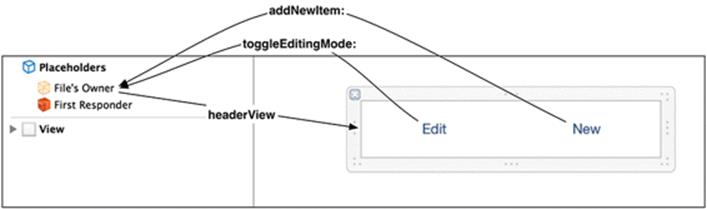
Now that the view can be resized, resize it and make the connections shown in Figure 9.6.
Figure 9.6 HeaderView.xib layout
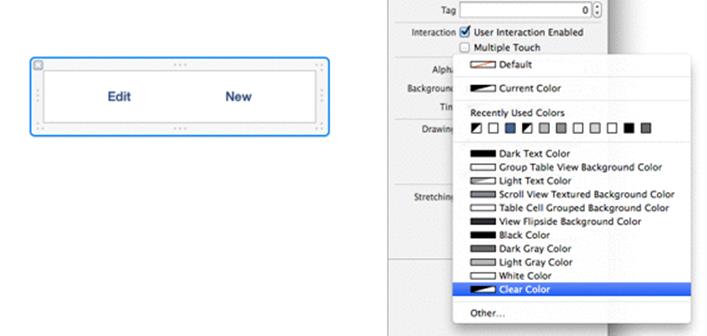
Also, change the background color of the UIView instance to be completely transparent. To do this, select the view and show the attributes inspector. In the pop-up labeled Background, choose Clear Color (Figure 9.7).
Figure 9.7 Setting background color to clear
So far, your XIB files have been loaded automatically by the implementation of UIViewController. For example, BNRReminderViewController in Chapter 6 knew how to load BNRReminderViewController.xib because of code written in its superclass, UIViewController. For HeaderView.xib, you are going to write the code to have the BNRItemsViewController load this XIB file manually.
To load a XIB file manually, you use NSBundle. This class is the interface between an application and the application bundle it lives in. When you want to access a file in the application bundle, you ask NSBundle for it. An instance of NSBundle is created when your application launches, and you can get a pointer to this instance by sending the message mainBundle to NSBundle.
Once you have a pointer to the main bundle object, you can ask it to load a XIB file. In BNRItemsViewController.m, implement headerView.
- (UIView *)headerView
{
// If you have not loaded the headerView yet...
if (!_headerView) {
// Load HeaderView.xib
[[NSBundle mainBundle] loadNibNamed:@"HeaderView"
owner:self
options:nil];
}
return _headerView;
}
Notice that this is a getter method that does more than just get. This is a common pattern: Lazy Instantiation puts off creating the object until it is actually needed. In some cases this approach can significantly lower the normal memory footprint of your app.
You do not have to specify the suffix of the filename; NSBundle will figure it out. Also, notice that you passed self as the owner of the XIB file. This ensures that when the main NSBundle is parsing the resultant NIB file at runtime, any connections to the File's Owner placeholder will be made to that BNRItemsViewController instance.
The first time the headerView message is sent to the BNRItemsViewController, it will load HeaderView.xib and keep a pointer to the view object in the instance variable headerView. The buttons in this view will send messages to the BNRItemsViewController when tapped.
Now you just need to tell the table view about its header view. In BNRItemsViewController.m, add this to the viewDidLoad method:
- (void)viewDidLoad
{
[super viewDidLoad];
[self.tableView registerClass:[UITableViewCell class]
forCellReuseIdentifier:@"UITableViewCell"];
UIView *header = self.headerView;
[self.tableView setTableHeaderView:header];
}
Build and run the application to see the interface.
While XIB files are often used to create the view for a view controller (for example, BNRReminderViewController.xib), you have now seen that a XIB file can be used any time you wish to archive view objects. In addition, any object can load a XIB file manually by sending the messageloadNibNamed:owner:options: to the application bundle.
UIViewController’s default XIB loading behavior uses the same code. The only difference is that it connects its view outlet to the view object in the XIB file. Imagine what the default implementation of loadView for UIViewController probably looks like:
- (void)loadView
{
// Which bundle is the NIB in?
// Was a bundle passed to initWithNibName:bundle:?
NSBundle *bundle = [self nibBundle];
if (!bundle) {
// Use the default
bundle = [NSBundle mainBundle];
}
// What is the NIB named?
// Was a name passed to initWithNibName:bundle:?
NSString *nibName = [self nibName];
if (!nibName) {
// Use the default
nibName = NSStringFromClass([self class]);
}
// Try to find the NIB in the bundle
NSString *nibPath = [bundle pathForResource:nibName
ofType:@"nib"];
// Does it exist?
if (nibPath) {
// Load it (this will set the view outlet as a side-effect
[bundle loadNibNamed:nibName owner:self options:nil];
} else {
// If there is no NIB, just create a blank UIView
self.view = [[UIView alloc] init];
}
}
Now let’s implement the toggleEditingMode: method. You could toggle the editing property of UITableView directly. However, UITableViewController also has an editing property. A UITableViewController instance automatically sets the editing property of its table view to match its own editingproperty.
To set the editing property for a view controller, you send it the message setEditing:animated:. In BNRItemsViewController.m, implement toggleEditingMode:.
- (IBAction)toggleEditingMode:(id)sender
{
// If you are currently in editing mode...
if (self.isEditing) {
// Change text of button to inform user of state
[sender setTitle:@"Edit" forState:UIControlStateNormal];
// Turn off editing mode
[self setEditing:NO animated:YES];
} else {
// Change text of button to inform user of state
[sender setTitle:@"Done" forState:UIControlStateNormal];
// Enter editing mode
[self setEditing:YES animated:YES];
}
}
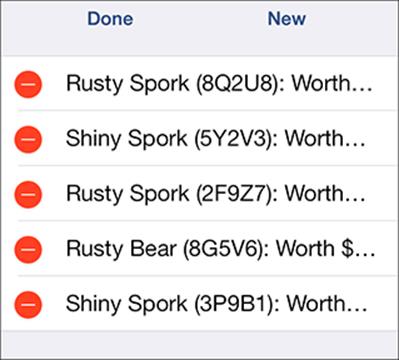
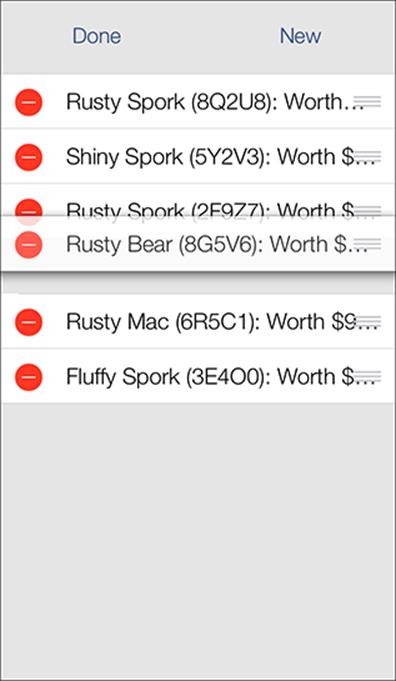
Build and run your application, tap the Edit button, and the UITableView will enter editing mode (Figure 9.8).
Figure 9.8 UITableView in editing mode
Adding Rows
There are two common interfaces for adding rows to a table view at runtime.
· A button above the cells of the table view. This is usually for adding a record for which there is a detail view. For example, in the Contacts app, you tap a button when you meet a new person and want to take down all their information.
· A cell with a green plus sign. This is usually for adding a new field to a record, such as when you want to add a birthday to a person’s record in the Contacts app. In edit mode, you tap the green plus sign next to “add birthday”.
In this exercise, you are using the New button in the header view instead. When this button is tapped, a new row will be added to the UITableView.
In BNRItemsViewController.m, implement addNewItem:.
- (IBAction)addNewItem:(id)sender
{
// Make a new index path for the 0th section, last row
NSInteger lastRow = [self.tableView numberOfRowsInSection:0];
NSIndexPath *indexPath = [NSIndexPath indexPathForRow:lastRow inSection:0];
// Insert this new row into the table.
[self.tableView insertRowsAtIndexPaths:@[indexPath]
withRowAnimation:UITableViewRowAnimationTop];
}
Build and run the application. Tap the New button and… the application crashes. The console tells you that the table view has an internal inconsistency exception.
Remember that, ultimately, it is the dataSource of the UITableView that determines the number of rows the table view should display. After inserting a new row, the table view has six rows (the original five plus the new one). Then, it runs back to its dataSource and asks it for the number of rows it should be displaying. BNRItemsViewController consults the store and returns that there should be five rows. The UITableView then says, “Hey, that is not right!” and throws an exception.
You must make sure that the UITableView and its dataSource agree on the number of rows. Thus, you must add a new BNRItem to the BNRItemStore before you insert the new row.
In BNRItemsViewController.m, update addNewItem:.
- (IBAction)addNewItem:(id)sender
{
NSInteger lastRow = [[self tableView] numberOfRowsInSection:0];
// Create a new BNRItem and add it to the store
BNRItem *newItem = [[BNRItemStore sharedStore] createItem];
// Figure out where that item is in the array
NSInteger lastRow = [[[BNRItemStore sharedStore] allItems] indexOfObject:newItem];
NSIndexPath *indexPath = [NSIndexPath indexPathForRow:lastRow inSection:0];
// Insert this new row into the table
[self.tableView insertRowsAtIndexPaths:@[indexPath]
withRowAnimation:UITableViewRowAnimationTop];
}
Build and run the application. Tap the New button and watch the new row slide into the bottom position of the table. Remember that the role of a view object is to present model objects to the user; updating views without updating the model objects is not very useful.
Also, notice that you are sending the message tableView to the BNRItemsViewController to get at the table view. This method is inherited from UITableViewController, and it returns the controller’s table view. While you can send the message view to an instance of UITableViewController and get a pointer to the same object, using tableView tells the compiler that the object returned will be an instance of class UITableView. Thus, sending a message that is specific to UITableView, like insertRowsAtIndexPaths:withRowAnimation:, will not generate a warning.
Now that you have the ability to add rows and items, remove the code in the init method in BNRItemsViewController.m that puts five random items into the store.
- (instancetype)init
{
// Call the superclass's designated initializer
self = [super initWithStyle:UITableViewStylePlain];
if (self) {
for (int i = 0; i < 5; i++) {
[[BNRItemStore sharedStore] createItem];
}
}
return self;
}
Build and run the application. There will not be any rows when you first fire up the application, but you can add some by tapping the New button.
Deleting Rows
In editing mode, the red circles with the minus sign (shown in Figure 9.8) are deletion controls, and touching one should delete that row. However, at this point, touching a deletion control does not do anything. (Try it and see.) Before the table view will delete a row, it sends its data source a message about the proposed deletion and waits for a confirmation message before pulling the trigger.
When deleting a cell, you must do two things: remove the row from the UITableView and remove the BNRItem associated with it from the BNRItemStore. To pull this off, the BNRItemStore must know how to remove objects from itself.
In BNRItemStore.h, declare a new method.
@interface BNRItemStore : NSObject
+ (BNRItemStore *)sharedStore;
@property (nonatomic, strong, readonly) NSArray *allItems;
- (BNRItem *)createItem;
- (void)removeItem:(BNRItem *)item;
@end
In BNRItemStore.m, implement removeItem:.
- (void)removeItem:(BNRItem *)item
{
[self.privateItems removeObjectIdenticalTo:item];
}
You could use NSMutableArray’s removeObject: method here instead of removeObjectIdenticalTo:, but consider the difference: removeObject: goes to each object in the array and sends it the message isEqual:. A class can implement this method to return YES or NO based on its own determination. For example, two BNRItem objects could be considered equal if they had the same valueInDollars.
The method removeObjectIdenticalTo:, on the other hand, removes an object if and only if it is the exact same object as the one passed in this message. While BNRItem does not currently override isEqual: to do special checking, it could in the future. Therefore, you should useremoveObjectIdenticalTo: when you are specifying a particular instance.
Now you will implement tableView:commitEditingStyle:forRowAtIndexPath:, a method from the UITableViewDataSource protocol. (This message is sent to the BNRItemsViewController. Keep in mind that while the BNRItemStore is the where the data is kept, the BNRItemsViewController is the table view’s dataSource.)
When tableView:commitEditingStyle:forRowAtIndexPath: is sent to the data source, two extra arguments are passed along with it. The first is the UITableViewCellEditingStyle, which, in this case, is UITableViewCellEditingStyleDelete. The other argument is the NSIndexPath of the row in the table.
In BNRItemsViewController.m, implement this method to have the BNRItemStore remove the right object and to confirm the row deletion by sending the message deleteRowsAtIndexPaths:withRowAnimation: back to the table view.
- (void)tableView:(UITableView *)tableView
commitEditingStyle:(UITableViewCellEditingStyle)editingStyle
forRowAtIndexPath:(NSIndexPath *)indexPath
{
// If the table view is asking to commit a delete command...
if (editingStyle == UITableViewCellEditingStyleDelete) {
NSArray *items = [[BNRItemStore sharedStore] allItems];
BNRItem *item = items[indexPath.row];
[[BNRItemStore sharedStore] removeItem:item];
// Also remove that row from the table view with an animation
[tableView deleteRowsAtIndexPaths:@[indexPath]
withRowAnimation:UITableViewRowAnimationFade];
}
}
Build and run your application, create some rows, and then delete a row. It will disappear. Notice that swipe-to-delete works also.
Moving Rows
To change the order of rows in a UITableView, you will use another method from the UITableViewDataSource protocol – tableView:moveRowAtIndexPath:toIndexPath:.
To delete a row, you had to send the message deleteRowsAtIndexPaths:withRowAnimation: to the UITableView to confirm the deletion. Moving a row, however, does not require confirmation; the table view moves the row on its own authority and reports the move to its the data source by sending the message tableView:moveRowAtIndexPath:toIndexPath:. You just have to implement this method to update your data source to match the new order.
But before you can implement the data source method, you need to give the BNRItemStore a method to change the order of items in its allItems array. In BNRItemStore.h, declare this method.
- (void)moveItemAtIndex:(NSUInteger)fromIndex
toIndex:(NSUInteger)toIndex;
In BNRItemStore.m, implement moveItemAtIndex:toIndex:.
- (void)moveItemAtIndex:(NSUInteger)fromIndex
toIndex:(NSUInteger)toIndex
{
if (fromIndex == toIndex) {
return;
}
// Get pointer to object being moved so you can re-insert it
BNRItem *item = self.privateItems[fromIndex];
// Remove item from array
[self.privateItems removeObjectAtIndex:fromIndex];
// Insert item in array at new location
[self.privateItems insertObject:item atIndex:toIndex];
}
In BNRItemsViewController.m, implement tableView:moveRowAtIndexPath:toIndexPath: to update the store.
- (void)tableView:(UITableView *)tableView
moveRowAtIndexPath:(NSIndexPath *)sourceIndexPath
toIndexPath:(NSIndexPath *)destinationIndexPath
{
[[BNRItemStore sharedStore] moveItemAtIndex:sourceIndexPath.row
toIndex:destinationIndexPath.row];
}
Build and run your application. Check out the new reordering controls (the three horizontal lines) on the side of each row. Touch and hold a reordering control and move the row to a new position (Figure 9.9).
Figure 9.9 Moving a row
Note that simply implementing tableView:moveRowAtIndexPath:toIndexPath: caused the reordering controls to appear. The UITableView can ask its data source at runtime whether it implements tableView:moveRowAtIndexPath:toIndexPath:. If it does, the table view says, “Good, you can handle moving rows. I’ll add the re-ordering controls.” If not, it says, “If you aren’t implementing that method, then I won’t put controls there.”
Bronze Challenge: Renaming the Delete Button
When deleting a row, a confirmation button appears labeled Delete. Change the label of this button to Remove.
Silver Challenge: Preventing Reordering
Make it so the table view always shows a final row that says No more items! (this part is the same as a challenge from the last chapter. If you have already done it, great!). Then make it so that this row cannot be moved.
Gold Challenge: Really Preventing Reordering
After completing the silver challenge, you may notice that even though you cannot move the No more items! row itself, you can still drag other rows underneath it. Make it so that no matter what, the No more items! row can never be knocked out of the last position.
All materials on the site are licensed Creative Commons Attribution-Sharealike 3.0 Unported CC BY-SA 3.0 & GNU Free Documentation License (GFDL)
If you are the copyright holder of any material contained on our site and intend to remove it, please contact our site administrator for approval.
© 2016-2026 All site design rights belong to S.Y.A.