iOS Programming: The Big Nerd Ranch Guide (2014)
8. UITableView and UITableViewController
Many iOS applications show the user a list of items and allow the user to select, delete, or reorder items on the list. Whether an application displays a list of people in the user’s address book or a list of bestselling items on the App Store, it is a UITableView doing the work.
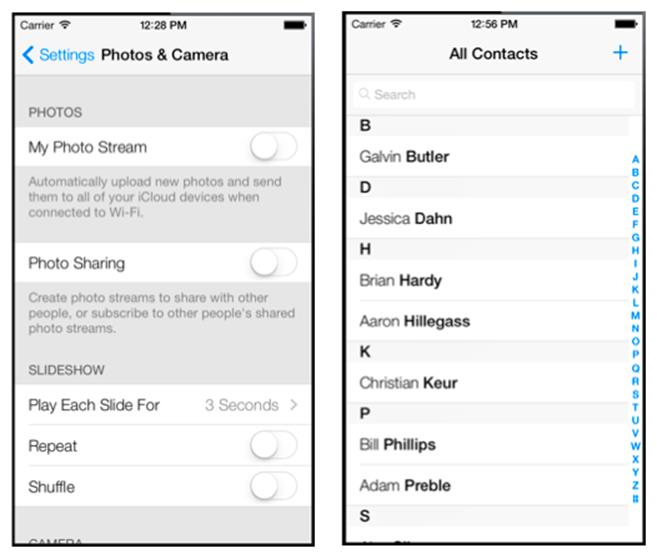
A UITableView displays a single column of data with a variable number of rows. Figure 8.1 shows some examples of UITableView.
Figure 8.1 Examples of UITableView
Beginning the Homepwner Application
In this chapter, you are going to start an application called Homepwner that keeps an inventory of all your possessions. In the case of a fire or other catastrophe, you will have a record for your insurance company. (“Homepwner,” by the way, is not a typo. If you need a definition for the word“pwn,” please visit www.urbandictionary.com.)
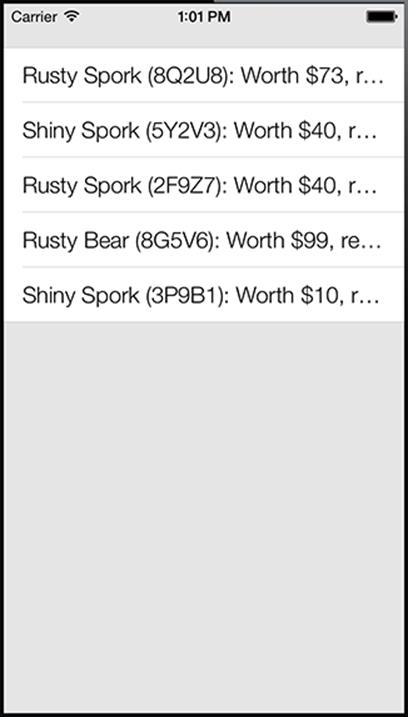
So far, your iOS projects have been small, but Homepwner will grow into a realistically complex application over the course of nine chapters. By the end of this chapter, Homepwner will present a list of BNRItem objects in a UITableView, as shown in Figure 8.2.
Figure 8.2 Homepwner: phase 1
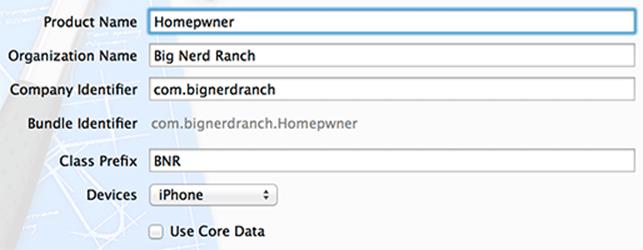
Create a new iOS Empty Application project and configure it as shown in Figure 8.3.
Figure 8.3 Configuring Homepwner
UITableViewController
A UITableView is a view object. Recall in the Model-View-Controller design pattern, which iOS developers do their best to follow, each class is exactly one of the following:
· Model: Holds data and knows nothing about the user interface.
· View: Is visible to the user and knows nothing about the model objects.
· Controller: Keeps the user interface and the model objects in sync. Controls the flow of the application; for example, the controller might be responsible for showing a “Really delete this item?” message before actually deleting some data.
Thus, a UITableView, a view object, does not handle application logic or data. When using a UITableView, you must consider what else is necessary to get the table working in your application:
· A UITableView typically needs a view controller to handle its appearance on the screen.
· A UITableView needs a data source. A UITableView asks its data source for the number of rows to display, the data to be shown in those rows, and other tidbits that make a UITableView a useful user interface. Without a data source, a table view is just an empty container. The dataSource for a UITableView can be any type of Objective-C object as long as it conforms to the UITableViewDataSource protocol.
· A UITableView typically needs a delegate that can inform other objects of events involving the UITableView. The delegate can be any object as long as it conforms to the UITableViewDelegate protocol.
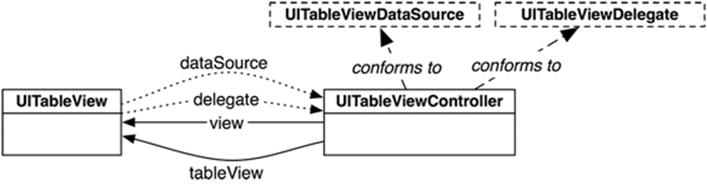
An instance of the class UITableViewController can fill all three roles: view controller, data source, and delegate.
UITableViewController is a subclass of UIViewController, so a UITableViewController has a view. A UITableViewController’s view is always an instance of UITableView, and the UITableViewController handles the preparation and presentation of the UITableView.
When a UITableViewController creates its view, the dataSource and delegate instance variables of the UITableView are automatically set to point at the UITableViewController (Figure 8.4).
Figure 8.4 UITableViewController-UITableView relationship
Subclassing UITableViewController
Now you are going to write a subclass of UITableViewController for Homepwner. For this view controller, you will use the NSObject template. From the File menu, select New and then File.... From the iOS section, select Cocoa Touch, choose Objective-C class, and click Next. Then, select NSObject from the pop-up menu and enter BNRItemsViewController as the name of the new class. Click Next and then click Create on the next sheet to save your class.
Open BNRItemsViewController.h and change its superclass:
#import <Foundation/Foundation.h>
@interface BNRItemsViewController : NSObject
#import <UIKit/UIKit.h>
@interface BNRItemsViewController : UITableViewController
The designated initializer of UITableViewController is initWithStyle:, which takes a constant that determines the style of the table view. There are two options: UITableViewStylePlain and UITableViewStyleGrouped. These looked quite different on iOS 6, but the differences are quite minor as of iOS 7.
You are changing the designated initializer to init. As such, you need to follow the two rules of initializers:
· Call the superclass’s designated initializer from yours
· Override the superclass’s designated initializer to call yours
Do both in BNRItemsViewController.m:
#import "BNRItemsViewController.h"
@implementation BNRItemsViewController
- (instancetype)init
{
// Call the superclass's designated initializer
self = [super initWithStyle:UITableViewStylePlain];
return self;
}
- (instancetype)initWithStyle:(UITableViewStyle)style
{
return [self init];
}
This will ensure that all instances of BNRItemsViewController use the UITableViewStylePlain style, no matter what initialization message is sent to them.
Open BNRAppDelegate.m. In application:didFinishLaunchingWithOptions:, create an instance of BNRItemsViewController and set it as the rootViewController of the window. Make sure to import the header file for BNRItemsViewController at the top of this file.
#import "BNRItemsViewController.h"
@implementation BNRAppDelegate
- (BOOL)application:(UIApplication *)application
didFinishLaunchingWithOptions:(NSDictionary *)launchOptions
{
self.window = [[UIWindow alloc] initWithFrame:[[UIScreen mainScreen] bounds]];
// Override point for customization after application launch
// Create a BNRItemsViewController
BNRItemsViewController *itemsViewController =
[[BNRItemsViewController alloc] init];
// Place BNRItemsViewController's table view in the window hierarchy
self.window.rootViewController = itemsViewController;
self.window.backgroundColor = [UIColor whiteColor];
[self.window makeKeyAndVisible];
return YES;
}
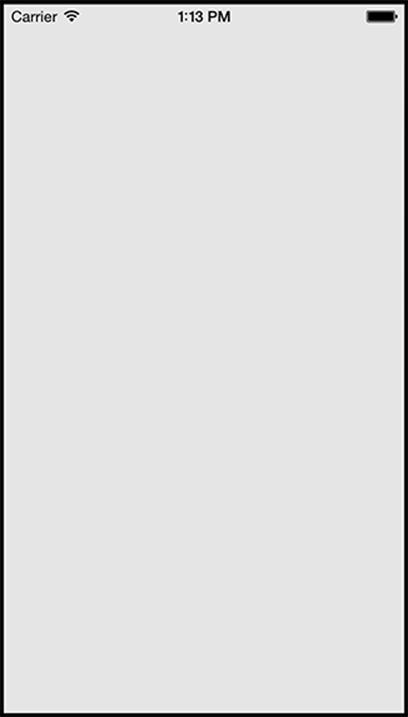
Build and run your application. You should see an empty screen, as shown in Figure 8.5 – but there is an empty table view there. As a subclass of UIViewController, a UITableViewController inherits the view method. This method calls loadView, which creates and loads an empty view object if none exists. A UITableViewController’s view is always an instance of UITableView, so sending view to the UITableViewController gets you a bright, shiny, and empty table view.
Figure 8.5 Empty UITableView
Your table view needs some rows to display. Remember the BNRItem class you wrote in Chapter 2? Now you are going to use that class again: each row of the table view will display an instance of BNRItem.
Locate the header and implementation files for BNRItem (BNRItem.h and BNRItem.m) in Finder and drag them onto Homepwner’s project navigator.
When dragging these files onto your project window, select the checkbox labeled Copy items into destination group’s folder when prompted. This will copy the files from their current directory to your project’s directory on the filesystem and add them to your project.
You will not need the container or containedItem properties ever again (they were just to demonstrate strong reference cycles), so delete them from BNRItem.h:
@property (nonatomic, strong) BNRItem *containedItem;
@property (nonatomic, weak) BNRItem *container;
Also delete the setContainedItem: method in BNRItem.m:
- (void)setContainedItem:(BNRItem *)i
{
_containedItem = i;
// When given an item to contain, the contained
// item will be given a pointer to its container
self.containedItem.container = self;
}
UITableView’s Data Source
The process of providing a UITableView with rows in Cocoa Touch is different from the typical procedural programming task. In a procedural design, you tell the table view what it should display. In Cocoa Touch, the table view asks another object – its dataSource – what it should display. In this case, the BNRItemsViewController is the data source, so it needs a way to store item data.
In Chapter 2, you used an NSMutableArray to store BNRItem instances. You will do the same thing in this chapter, but with a little twist. The NSMutableArray that holds the BNRItem instances will be abstracted into another object – a BNRItemStore (Figure 8.6). Why not just use an array? Eventually, the BNRItemStore object will also take care of the saving and loading of the items.
Figure 8.6 Homepwner object diagram
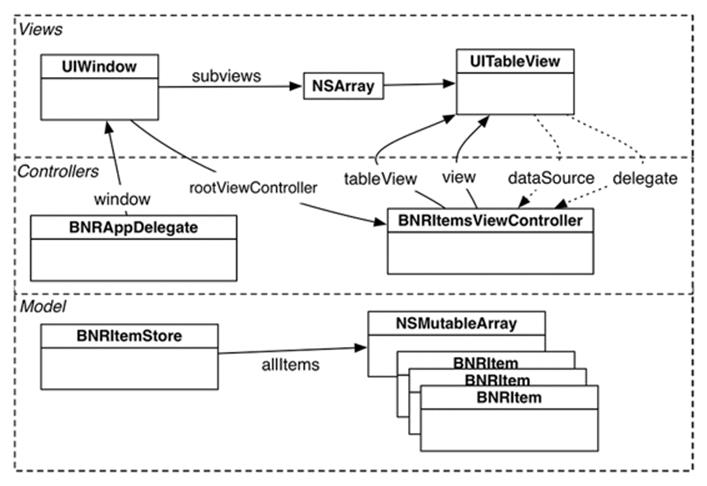
If an object wants to see all of the items, it will ask the BNRItemStore for the array that contains them. In future chapters, you will make the store responsible for performing operations on the array, like reordering, adding, and removing items. It will also be responsible for saving and loading the items from disk.
Creating BNRItemStore
From the File menu, select New and then File.... Create a new NSObject subclass and name it BNRItemStore.
BNRItemStore will be a singleton. This means there will only be one instance of this type in the application; if you try to create another instance, the class will quietly return the existing instance instead. A singleton is useful when you have an object that many objects will talk to. Those objects can ask the singleton class for its one instance.
To get the (single instance of) BNRItemStore, you will send the BNRItemStore class the message sharedStore.
In BNRItemStore.h, declare sharedStore.
#import <Foundation/Foundation.h>
@interface BNRItemStore : NSObject
// Notice that this is a class method and prefixed with a + instead of a -
+ (instancetype)sharedStore;
@end
When this message is sent to the BNRItemStore class, the class will check to see if the single instance of BNRItemStore has already been created. If it has, the class will return the instance. If not, it will create the instance and return it.
In BNRItemStore.m, implement sharedStore, an init method that throws an exception, and a secret designated initializer named initPrivate.
@implementation BNRItemStore
+ (instancetype)sharedStore
{
static BNRItemStore *sharedStore = nil;
// Do I need to create a sharedStore?
if (!sharedStore) {
sharedStore = [[self alloc] initPrivate];
}
return sharedStore;
}
// If a programmer calls [[BNRItemStore alloc] init], let him
// know the error of his ways
- (instancetype)init
{
@throw [NSException exceptionWithName:@"Singleton"
reason:@"Use +[BNRItemStore sharedStore]"
userInfo:nil];
return nil;
{
// Here is the real (secret) initializer
- (instancetype)initPrivate
{
self = [super init];
return self;
}
Notice that the variable sharedStore is declared as static. A static variable is not destroyed when the method is done executing. Like a global variable, it is not kept on the stack.
The initial value of sharedStore is nil. The first time the sharedStored method is called, an instance of BNRItemStore will be created, and sharedStore will be set to point to it. In subsequent calls to this method, sharedStore will still point at that instance of BNRItemStore. This variable has a strong reference to the BNRItemStore and, since this variable will never be destroyed, the object it points to will never be destroyed either.
The BNRItemsViewController controller will send a message to the BNRItemStore when it wants a new BNRItem to be created. The BNRItemStore will oblige, create the object, and add it to an array of instances of BNRItem. The BNRItemsViewController will also ask the BNRItemStore for all of the items in the store when it wants to populate its UITableView.
In BNRItemStore.h, declare a method and property for these purposes.
#import <Foundation/Foundation.h>
@class BNRItem;
@interface BNRItemStore : NSObject
@property (nonatomic, readonly) NSArray *allItems;
+ (instancetype)sharedStore;
- (BNRItem *)createItem;
@end
See the @class directive? That tells the compiler that there is a BNRItem class and that the compiler does not need to know this class’s details in the current file – only that it exists. This allows you to use the BNRItem symbol in the declaration of createItem without importing BNRItem.h. Using the@class directive can speed up compile times considerably because fewer files have to be recompiled when one file changes.
In files that actually send messages to the BNRItem class or instances of it, you must import the file it was declared in so that the compiler will have all of its details. At the top of BNRItemStore.m, import BNRItem.h, since it will have to send messages to BNRItem instances at some point.
#import "BNRItemStore.h"
#import "BNRItem.h"
Here is where things get a little interesting. You have a BNRItemStore that is going to oversee the array of items – this includes adding items to the array and will later include removing them and reordering them. Because the BNRItemStore wants this kind of control over the array, it returns an immutable NSArray to represent the array of items and declares the property as readonly. No other object can change the BNRItemStore’s allItems property, either by giving it a new array or modifying the array it has.
However, internally, the BNRItemStore needs to be able to mutate the array to add new items (and later remove and reorder them). This is a pretty common design for a class that wants strict control over its internal data: an object hangs onto a mutable data structure, but other objects only get access to an immutable version of it.
In BNRItemStore.m, declare a mutable array in the class extension.
#import "BNRItem.h"
@interface BNRItemStore ()
@property (nonatomic) NSMutableArray *privateItems;
@end
@implementation BNRItemStore
Implement initPrivate to immediately instantiate privateItems. Also, override the getter for allItems to return the privateItems.
- (instancetype)initPrivate
{
self = [super init];
if (self) {
_privateItems = [[NSMutableArray alloc] init];
}
return self;
}
- (NSArray *)allItems
{
return self.privateItems;
}
This is possible because NSMutableArray is a subclass of NSArray. Therefore, an NSMutableArray is an NSArray because it can do everything an NSArray can do. (Note that this would not work if the property returned an NSMutableArray, but the instance variable was an NSArray, because an NSArraycannot do everything its mutable counterpart can.)
There is one issue: even though the allItems property says it is returning an NSArray, you know that all Objective-C objects know their type and that the type of a variable or return value does not change that type. Thus, any object that sends allItems to the BNRItemStore will get anNSMutableArray instance back – even though the object may not know that.
When using a class, like BNRItemStore, you can only rely on what the interface file tells you when it comes to interacting with that class. If the interface file tells you that an object is an NSArray, you should treat it like an NSArray. To do otherwise would violate the contract that BNRItemStorespecifies with its public interface. However, if you were being really cautious, you could override allItems to return an immutable copy of its privateItems property. You would write that code like this (but do not do this here, because you are going to rely on convention instead of rigid rules):
- (NSArray *)allItems
{
return [self.privateItems copy];
}
With that discussion out of the way, implement createItem in BNRItemStore.m.
- (BNRItem *)createItem
{
BNRItem *item = [BNRItem randomItem];
[self.privateItems addObject:item];
return item;
}
An interesting quirk of this example: There is no _allItems instance variable at all. You declared an allItems property, but then you implemented your own accessors (well, just the one: allItems was declared readonly). The compiler only auto-synthesizes an instance variable if you let it synthesize at least one accessor.
Implementing data source methods
In BNRItemsViewController.m, import BNRItemStore.h and BNRItem.h and update the designated initializer to add five random items to the BNRItemStore.
#import "BNRItemsViewController.h"
#import "BNRItemStore.h"
#import "BNRItem.h"
@implementation BNRItemsViewController
- (instancetype)init
{
// Call the superclass's designated initializer
self = [super initWithStyle:UITableViewStylePlain];
if (self) {
for (int i = 0; i < 5; i++) {
[[BNRItemStore sharedStore] createItem];
}
}
return self;
}
Now that there are some items in the store, you need to teach BNRItemsViewController how to turn those items into rows that its UITableView can display. When a UITableView wants to know what to display, it sends messages from the set of messages declared in the UITableViewDataSourceprotocol.
From the Help menu, choose Documentation and API Reference. Search for the UITableViewDataSource protocol reference and then select Tasks from the lefthand pane (Figure 8.7).
Figure 8.7 UITableViewDataSource protocol documentation
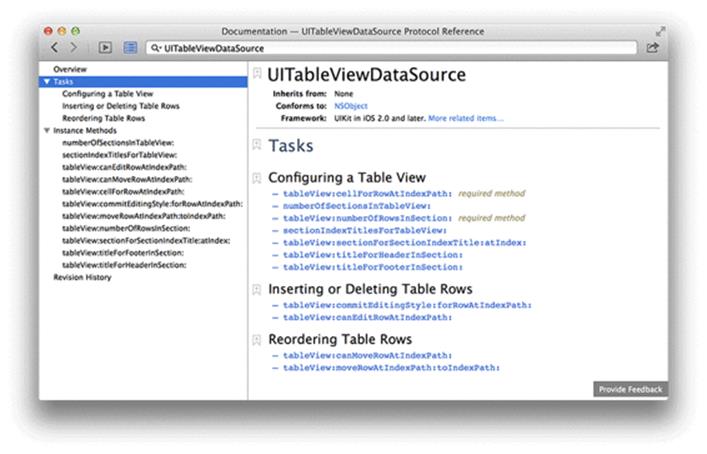
In the Configuring a Table View task, notice the two methods marked required method. For BNRItemsViewController to conform to UITableViewDataSource, it must implement tableView:numberOfRowsInSection: and tableView:cellForRowAtIndexPath:. These methods tell the table view how many rows it should display and what content to display in each row.
Whenever a UITableView needs to display itself, it sends a series of messages (the required methods plus any optional ones that have been implemented) to its dataSource. The required method tableView:numberOfRowsInSection: returns an integer value for the number of rows that the UITableViewshould display. In the table view for Homepwner, there should be a row for each entry in the store.
In BNRItemsViewController.m, implement tableView:numberOfRowsInSection:.
- (NSInteger)tableView:(UITableView *)tableView
numberOfRowsInSection:(NSInteger)section
{
return [[[BNRItemStore sharedStore] allItems] count];
}
Notice that this method returns an NSInteger. When Apple started supporting both 32-bit and 64-bit systems, they needed an integer type that was a 32-bit int in 32-bit applications and a 64-bit int in 64-bit applications. Thus, NSInteger (which is signed) and NSUInteger (which is unsigned) were born. These types are used extensively throughout Apple’s frameworks.
Wondering about the section that this method refers to? Table views can be broken up into sections, and each section has its own set of rows. For example, in the address book, all names beginning with “D” are grouped together in a section. By default, a table view has one section, and in this chapter, you will work with only one. Once you understand how a table view works, it is not hard to use multiple sections. In fact, using sections is the first challenge at the end of this chapter.
The second required method in the UITableViewDataSource protocol is tableView:cellForRowAtIndexPath:. To implement this method, you need to learn about another class – UITableViewCell.
UITableViewCells
Each row of a table view is a view. These views are instances of UITableViewCell. In this section, you will be creating the instances of UITableViewCell to fill the table view. In Chapter 19, you will create a custom subclass of UITableViewCell.
A cell itself has one subview – its contentView (Figure 8.8). The contentView is the superview for the content of the cell. The cell may also draw an accessory indicator. The accessory indicator shows an action-oriented icon, such as a checkmark, a disclosure icon, or a fancy blue dot with a chevron inside. These icons are accessed through pre-defined constants for the appearance of the accessory indicator. The default is UITableViewCellAccessoryNone, and that is what you are going to use in this chapter. But you will see the accessory indicator again in Chapter 19. (Curious now? See the reference page for UITableViewCell for more details.)
Figure 8.8 UITableViewCell layout

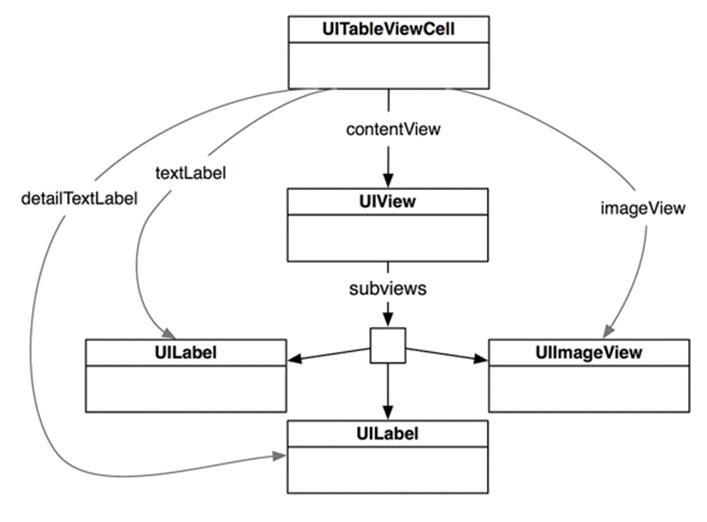
The real meat of a UITableViewCell is the three subviews of the contentView. Two of those subviews are UILabel instances that are properties of UITableViewCell named textLabel and detailTextLabel. The third subview is a UIImageView called imageView (Figure 8.9). In this chapter, you will only use textLabel.
Figure 8.9 UITableViewCell hierarchy
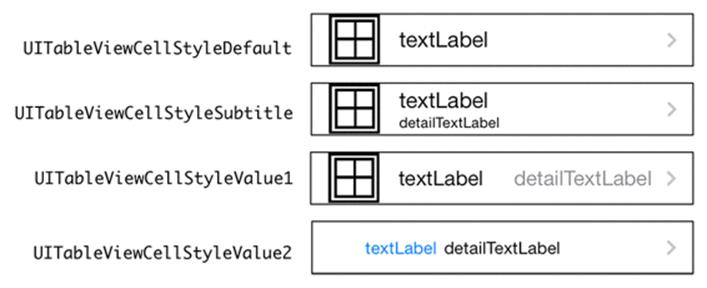
Each cell also has a UITableViewCellStyle that determines which subviews are used and their position within the contentView. Examples of these styles and their constants are shown in Figure 8.10.
Figure 8.10 UITableViewCellStyles
Creating and retrieving UITableViewCells
In this chapter, each cell will display the description of a BNRItem as its textLabel. To make this happen, you need to implement the second required method from the UITableViewDataSource protocol, tableView:cellForRowAtIndexPath:. This method will create a cell, set its textLabel to thedescription of the corresponding BNRItem, and return it to the UITableView (Figure 8.11).
Figure 8.11 UITableViewCell retrieval
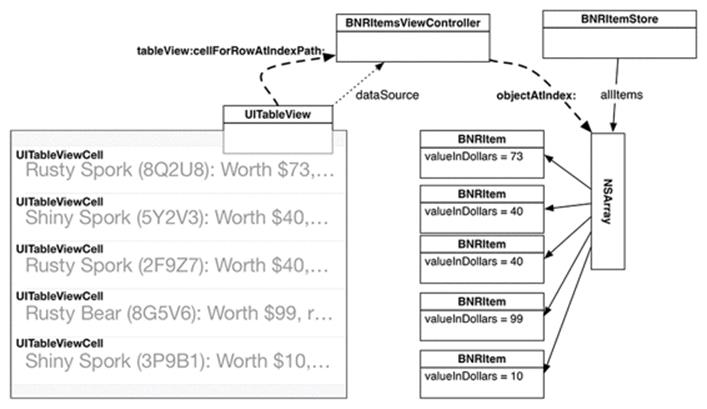
How do you decide which cell a BNRItem corresponds to? One of the parameters sent to tableView:cellForRowAtIndexPath: is an NSIndexPath, which has two properties: section and row. When this message is sent to a data source, the table view is asking, “Can I have a cell to display in section X, row Y?” Because there is only one section in this exercise, your implementation will only be concerned with the row.
In BNRItemsViewController.m, implement tableView:cellForRowAtIndexPath: so that the nth row displays the nth entry in the allItems array.
- (UITableViewCell *)tableView:(UITableView *)tableView
cellForRowAtIndexPath:(NSIndexPath *)indexPath
{
// Create an instance of UITableViewCell, with default appearance
UITableViewCell *cell =
[[UITableViewCell alloc] initWithStyle:UITableViewCellStyleDefault
reuseIdentifier:@"UITableViewCell"];
// Set the text on the cell with the description of the item
// that is at the nth index of items, where n = row this cell
// will appear in on the tableview
NSArray *items = [[BNRItemStore sharedStore] allItems];
BNRItem *item = items[indexPath.row];
cell.textLabel.text = [item description];
return cell;
}
Build and run the application now, and you will see a UITableView populated with a list of random items.
Think back to your RandomItems project from Chapter 3. You created the BNRItem class, created instances of BNRItem (model objects), and printed their data to the console.
Now you are reusing that class with a different controller and having the controller interface with a different view. You did not have to change anything about BNRItem, but you can now show its data in an entirely different way. This is the Model-View-Controller pattern in action. If you design your classes and applications according to MVC, then it is far simpler to reuse those classes in different contexts.
Reusing UITableViewCells
iOS devices have a limited amount of memory. If you were displaying a list with thousands of entries in a UITableView, you would have thousands of instances of UITableViewCell. And your long-suffering iPhone would sputter and die. In its dying breath, it would say “You only needed enough cells to fill the screen!” It would be right.
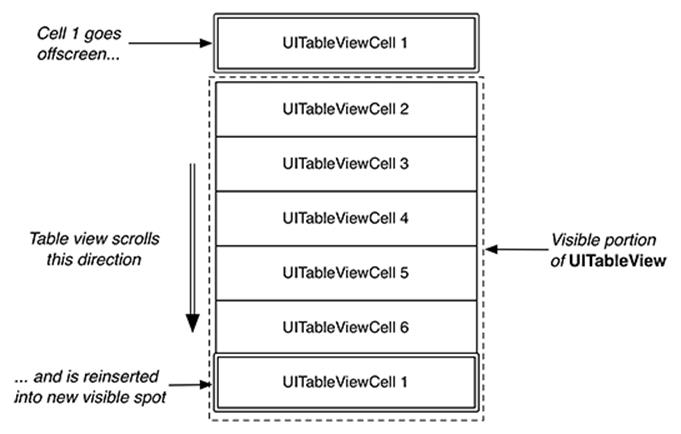
To preserve the lives of iOS devices everywhere, you can reuse table view cells. When the user scrolls the table, some cells move offscreen. Offscreen cells are put into a pool of cells available for reuse. Then, instead of creating a brand new cell for every request, the data source first checks the pool. If there is an unused cell, the data source configures it with new data and returns it to the table view.
Figure 8.12 Reusable instances of UITableViewCell
There is one problem: sometimes a UITableView has different types of cells. Occasionally, you have to subclass UITableViewCell to create a special look or behavior. However, different subclasses floating around the pool of reusable cells create the possibility of getting back a cell of the wrong type. You must be sure of the type of the cell returned to you so that you can be sure of what properties and methods it has.
Note that you do not care about getting any specific cell out of the pool because you are going to change the cell content anyway. What you need is a cell of a specific type. The good news is that every cell has a reuseIdentifier property of type NSString. When a data source asks the table view for a reusable cell, it passes a string and says, “I need a cell with this reuse identifier.” By convention, the reuse identifier is typically the name of the cell class.
In BNRItemsViewController.m, update tableView:cellForRowAtIndexPath: to reuse cells:
- (UITableViewCell *)tableView:(UITableView *)tableView
cellForRowAtIndexPath:(NSIndexPath *)indexPath
{
UITableViewCell *cell =
[[UITableViewCell alloc] initWithStyle:UITableViewCellStyleDefault
reuseIdentifier:@"UITableViewCell"];
// Get a new or recycled cell
UITableViewCell *cell =
[tableView dequeueReusableCellWithIdentifier:@"UITableViewCell"
forIndexPath:indexPath];
NSArray *items = [[BNRItemStore sharedStore] allItems];
BNRItem *item = items[indexPath.row];
cell.textLabel.text = [item description];
return cell;
}
Previously, you created the table view cell explicitly, but now you are giving that control to Apple to get the benefits of the reuse identifier. For this to work, you need to tell the table view which kind of cell it should instantiate if there are no cells in the reuse pool.
In BNRItemsViewController.m, override viewDidLoad to register UITableViewCell class with the table view.
- (void)viewDidLoad
{
[super viewDidLoad];
[self.tableView registerClass:[UITableViewCell class]
forCellReuseIdentifier:@"UITableViewCell"];
}
Reusing cells means that you only have to create a handful of cells, which puts fewer demands on memory. Your application’s users (and their devices) will thank you. Build and run the application. The behavior of the application should remain the same.
Code Snippet Library
You may have noticed that when you start typing the method definition for init in an implementation file, Xcode will automatically add an init implementation in your source file. If you have not noticed this, go ahead and type init in an implementation file and wait for the code-completion to kick in.
The freebie code comes from the code snippet library. You can see the code snippet library by opening the utility area and selecting the ![]() tab in the library selector (Figure 8.13). Alternatively, you can use the shortcut Command-Control-Option-2, which reveals the utility area and the Code Snippet Library. Substituting another number in the shortcut selects the corresponding library.
tab in the library selector (Figure 8.13). Alternatively, you can use the shortcut Command-Control-Option-2, which reveals the utility area and the Code Snippet Library. Substituting another number in the shortcut selects the corresponding library.
Figure 8.13 Code snippet library
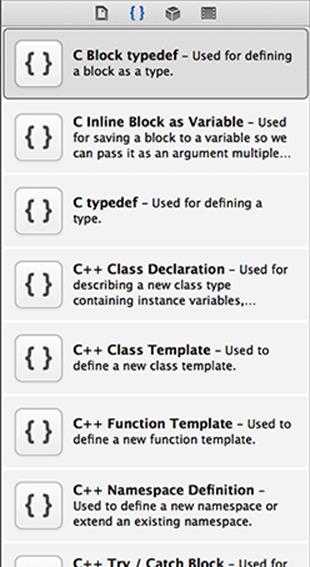
Notice that there are a number of code snippets available (Figure 8.13). Click on one and, in a moment, a window will appear with the details for that snippet. Click the Edit button on the code snippet detail window (Figure 8.14).
Figure 8.14 Snippet editing window
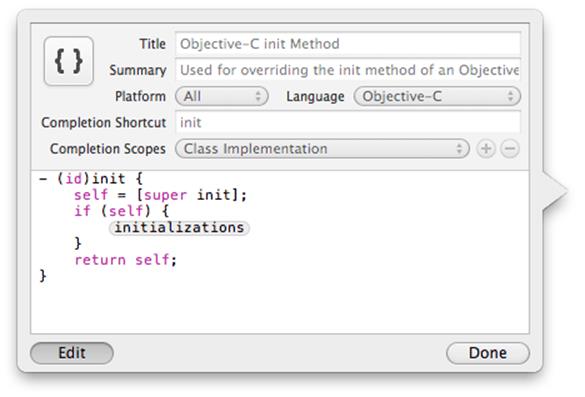
The Completion Shortcut field in the edit window shows you what to type in a source file to have Xcode add the snippet. This window also tells you that this snippet can be used in an Objective-C file as long as you are in the scope of a class implementation.
You cannot edit any of the pre-defined code snippets, but you can create your own. In BNRItemsViewController.m, locate the implementation of tableView:numberOfRowsInSection:. Highlight the entire method:
- (NSInteger)tableView:(UITableView *)tableView
numberOfRowsInSection:(NSInteger)section
{
return [[[BNRItemStore sharedStore] allItems] count];
}
Drag this highlighted code into the code snippet library. The edit window will appear again, allowing you to fill out the details for this snippet.
One issue with this snippet is that the return statement is really specific to this application – it would be much more useful if the value returned was a code completion placeholder that you could fill in easily. In the edit window, modify the code snippet so it looks like this:
- (NSInteger)tableView:(UITableView *)tableView
numberOfRowsInSection:(NSInteger)section
{
return <#number of rows#>;
}
Then fill out the rest of the fields in the edit window as shown in Figure 8.15 and click Done.
Figure 8.15 Creating a new snippet
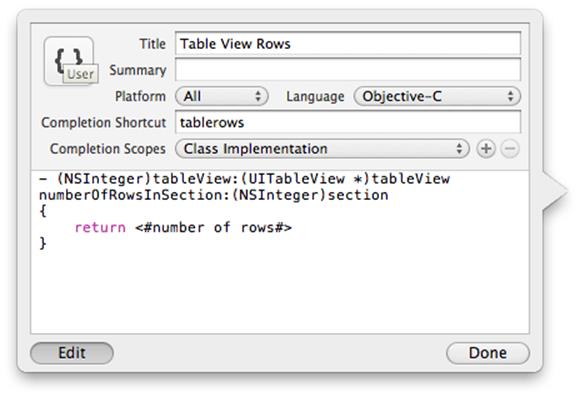
In BNRItemsViewController.m, start typing tablerows. Xcode will recommend this code snippet and pressing the return key will automatically complete it for you – and the number of rows placeholder will be selected. (If there are several placeholders, Control-/ will hop you to the next.)
Before continuing, make sure to remove the code entered by the snippet because you have already defined tableView:numberOfRowsInSection: in BNRItemsViewController.m.
Bronze Challenge: Sections
Have the UITableView display two sections – one for items worth more than $50 and one for the rest. Before you start this challenge, copy the folder containing the project and all of its source files in Finder. Then tackle the challenge in the copied project; you will need the original to build on in the coming chapters.
Silver Challenge: Constant Rows
Make it so the last row of the UITableView always has the text No more items!. Make sure this row appears regardless of the number of items in the store (including 0 items).
Gold Challenge: Customizing the Table
Make each row’s height 60 points except for the last row from the silver challenge, which should remain 44 points. Then, change the font size of every row except the last to 20 points. Finally, make the background of the UITableView display an image. (To make this pixel-perfect, you will need an image of the correct size depending on your device. Refer to the chart in Chapter 1.)
All materials on the site are licensed Creative Commons Attribution-Sharealike 3.0 Unported CC BY-SA 3.0 & GNU Free Documentation License (GFDL)
If you are the copyright holder of any material contained on our site and intend to remove it, please contact our site administrator for approval.
© 2016-2026 All site design rights belong to S.Y.A.