iOS Programming: The Big Nerd Ranch Guide (2014)
28. UIStoryboard
In your projects so far, you have laid out the interfaces of your view controllers in separate XIB files and then instantiated the view controllers programmatically. In this chapter, you will use a storyboard instead. Storyboards are a feature of iOS that allows you to instantiate and lay out all of your view controllers in one XIB-like file. Additionally, you can wire up view controllers in the storyboard to dictate how they get presented to the user.
The purpose of a storyboard is to minimize some of the simple code a programmer has to write to create and set up view controllers and the interactions between them. To see this simplification – and its drawbacks – let’s create an application that uses a storyboard.
Creating a Storyboard
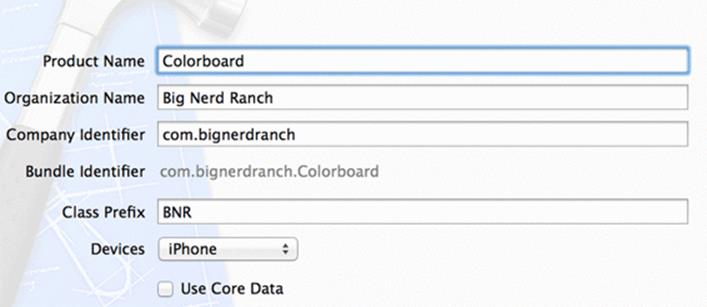
Create a new iOS Empty Application and name it Colorboard (Figure 28.1).
Figure 28.1 Creating Colorboard
Then, select New File... from the New menu. Select User Interface from the iOS section. Then, select the Storyboard template and click Next (Figure 28.2).
Figure 28.2 Creating a storyboard
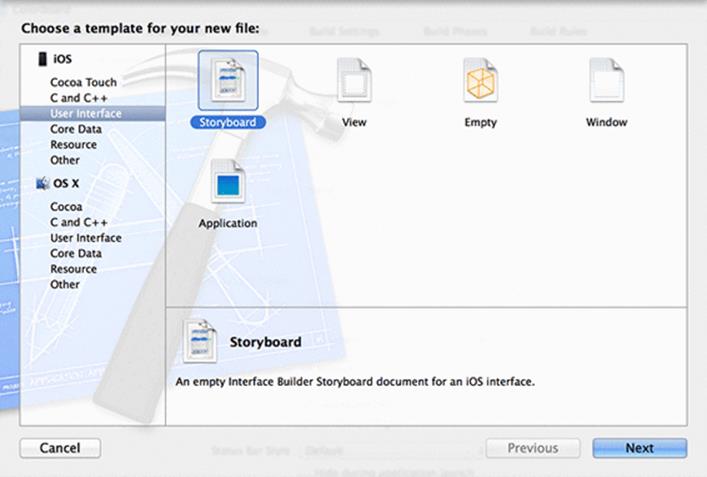
On the next pane, select iPhone from the Device Family pop-up menu and click Next. Then, name this file Colorboard.
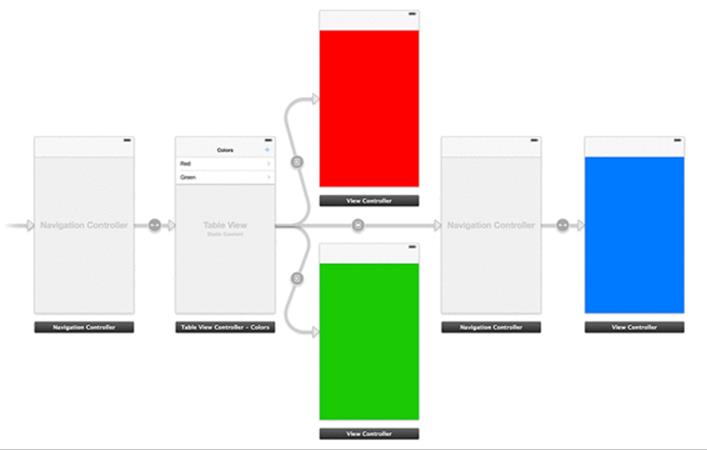
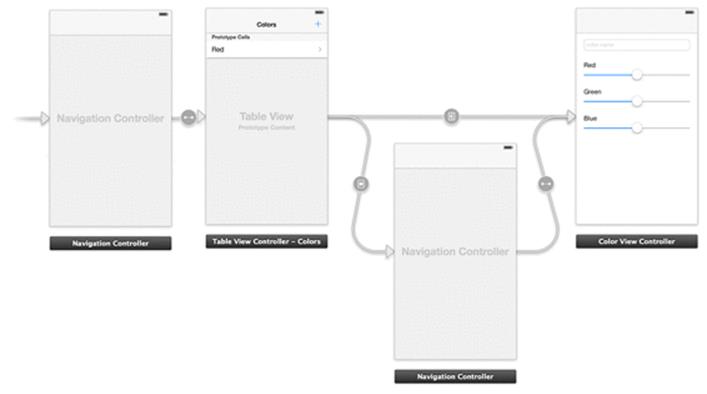
This will create a new file named Colorboard.storyboard and open it in the editor area. A storyboard is a lot like a XIB, except it allows you to lay out the relationships between view controllers in addition to laying out their interfaces. The Colorboard application will have a total of five view controllers, including a UINavigationController and a UITableViewController. Figure 28.3 shows an object diagram for Colorboard.
Figure 28.3 Object diagram for Colorboard
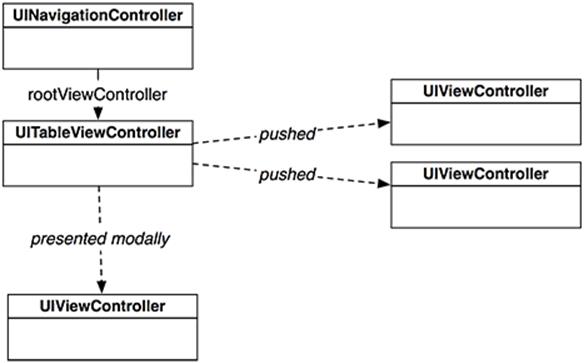
Using a storyboard, you can set up the relationships shown in Figure 28.3 without writing any code.
To get started, open the utility area and the Object Library. Drag a Navigation Controller onto the canvas. The canvas will now look like Figure 28.4.
Figure 28.4 Navigation controller in storyboard
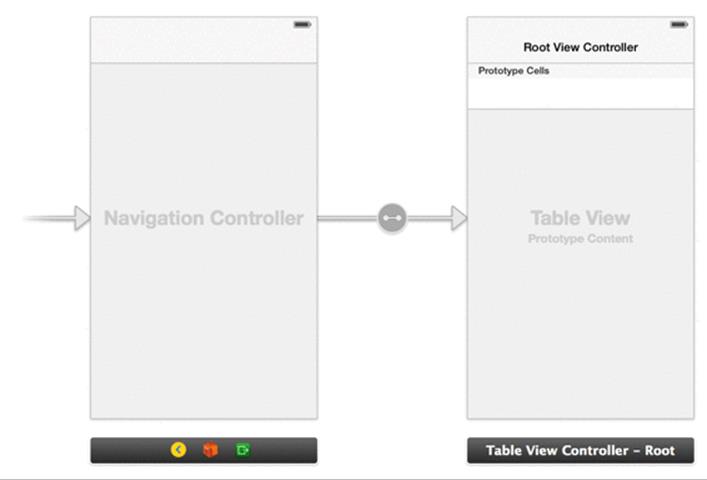
In addition to the UINavigationController object you asked for, the storyboard took the liberty of creating three other objects: the view of the navigation controller, a UITableViewController, and the view of the UITableViewController. In addition, the UITableViewController has been made the root view controller of the navigation controller.
The two view controller instances are represented by the black bars on the canvas, and their views are shown above them. You configure the view the same as you would in a normal XIB file. To configure the view controller itself, you select the black bar.
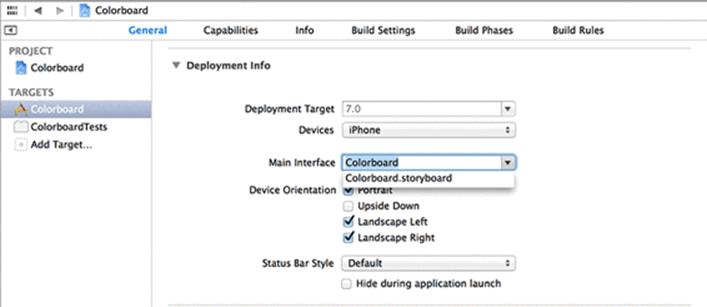
Before you go any further, you need to tell your application about this storyboard file. Select the Colorboard project from the project navigator. Then, select the Colorboard target and the General tab. Locate the Main Interface field and enter Colorboard (Figure 28.5) or select Colorboard.storyboard from the dropdown.
Figure 28.5 Setting the main storyboard
When an application has a main storyboard file, it will automatically load that storyboard when the application launches. In addition to loading the storyboard and its view controllers, it will also create a window and set the initial view controller of the storyboard as the root view controller of the window. You can tell which view controller is the initial view controller by looking at the canvas in the storyboard file – the initial view controller has an arrow that fades in as it points to it.
Since a storyboard file supplies the window for an application, the application delegate does not need to create a window.
In BNRAppDelegate.m, remove the code from application:didFinishLaunchingWithOptions: that creates the window.
- (BOOL)application:(UIApplication *)application
didFinishLaunchingWithOptions:(NSDictionary *)launchOptions
{
self.window = [[UIWindow alloc] initWithFrame:[[UIScreen mainScreen] bounds]];
// Override point for customization after application launch
self.window.backgroundColor = [UIColor whiteColor];
[self.window makeKeyAndVisible];
return YES;
}
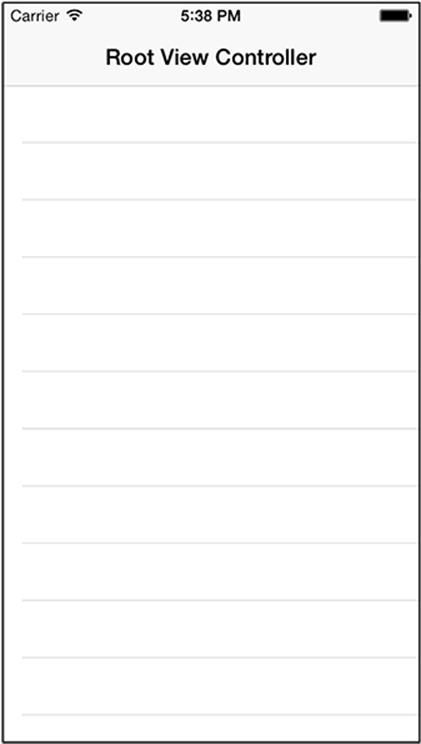
Build and run the application, and you will see a view of a view controller and a navigation bar that says Root View Controller (Figure 28.6). All of this came from the storyboard file – you did not have to write any code.
Figure 28.6 Initial Colorboard screen
UITableViewControllers in Storyboards
When using a UITableViewController, you typically implement the appropriate data source methods to return the content of each cell. This makes sense when you have dynamic content – like a list of items that may change – but it is a lot of work when you have a table whose content never changes. Storyboards allow you to add static content to a table view without having to implement the data source methods.
To see how easy this is, you are going to add a UITableViewController to the storyboard and give it static content. Apple frequently changes the file templates, so it is possible that your UINavigationController’s rootViewController is not already a UITableViewController instance. Either way (practice is good!), let’s go through the steps of adding one.
If there is already a second view controller in your Storyboard next to the navigation controller, select its black bar (the representation of the view controller itself), and delete it.
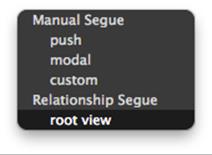
Next, drag a UITableViewController from the library onto the canvas. To set this table view controller as the root view controller of the navigation controller, Control-drag from the navigation controller’s view to the table view controller’s view. Let go, and from the black panel that appears, select root view (Figure 28.7). Remember that despite dragging between views, these properties are being set on the view controllers themselves.
Figure 28.7 Setting a relationship
This establishes the UITableViewController as the root view controller of the UINavigationController. There will now be an arrow from the navigation controller to the table view controller. In the middle of this arrow is an icon that represents the type of relationship between the two view controllers (Figure 28.8).
Figure 28.8 UINavigationController and UITableViewController
(Notice the zoom in and out controls in the bottom right corner of the canvas? You can zoom in and out to see more of the canvas. This is especially useful when you have a lot of view controllers. However, you cannot select the view objects when zoomed out.)
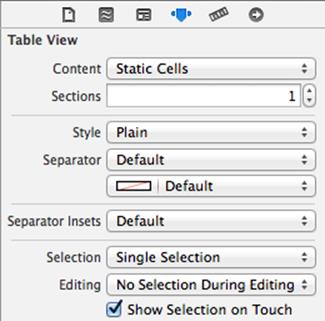
Next, select the Table View of the UITableViewController. In the attributes inspector, change the Content pop-up menu to Static Cells (Figure 28.9).
Figure 28.9 Static cells
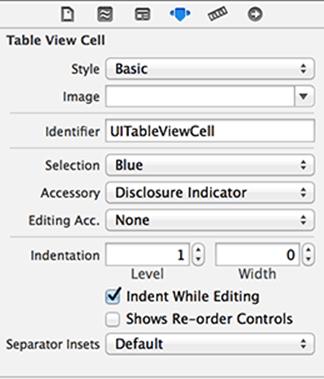
Three cells will appear on the table view. You can now select and configure each one individually. Select the top-most cell and, in the attributes inspector, change its Style to Basic (Figure 28.10).
Figure 28.10 Basic UITableViewCell
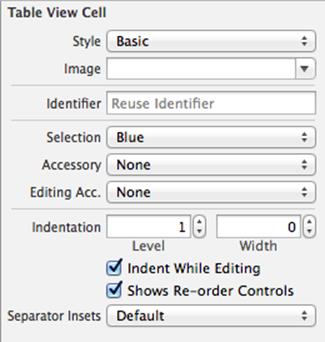
Back on the canvas, the selected cell will now say Title. Double-click on the text and change it to Red.
Repeat the same steps for the second cell, but have the title read Green. Let’s get rid of the third cell; select it and press Delete.
Finally, select the navigation bar – the area above the first cell. This is present because the table view controller is embedded in a navigation controller. In the Attributes Inspector, change its title to Colors. Figure 28.11 shows the updated table view.
Figure 28.11 Configured cells
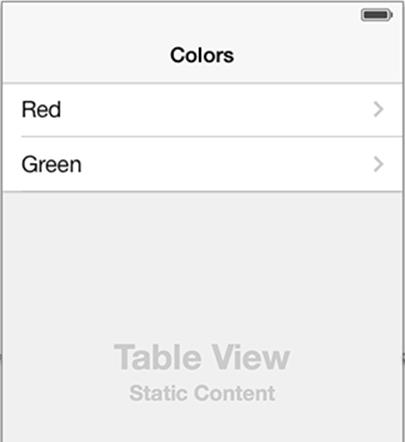
Build and run the application. You will see exactly what you have laid out in the storyboard file – a table view underneath a navigation bar. The table view is titled Colors and has two cells that read Red and Green. And you did not have to write any data source methods or configure a navigation item.
Segues
Most iOS applications have a number of view controllers that users navigate between. Storyboards allow you to set up these interactions as segues without having to write code.
A segue moves another view controller’s view onto the screen when triggered and is represented by an instance of UIStoryboardSegue. Each segue has a style, an action item, and an identifier. The style of a segue determines how the view controller will be presented, such as pushed onto the stack or presented modally. The action item is the view object in the storyboard file that triggers the segue, like a button, a bar button item, or another UIControl. The identifier is used to programmatically access the segue. This is useful when you want to trigger a segue that does not come from an action item, like a shake or some other interface element that cannot be set up in the storyboard file.
Let’s start with two push segues. A push segue pushes a view controller onto the stack of a navigation controller. You will need to set up two more view controllers in your storyboard, one whose view’s background is red, and the other, green. The segues will be between the table view controller and these two new view controllers. The action items will be the table view’s cells; tapping a cell will push the appropriate view controller onto the navigation controller’s stack.
Drag two UIViewController objects onto the canvas. Select the View of one of the view controllers and, in the attributes inspector, change its background color to red. Do the same for the other view controller’s view to set its background color to green.
Next, select the cell titled Red. Control-drag to the view controller whose view has the red background. A black panel titled Storyboard Segues will appear. This panel lists the possible styles for this segue. Select Push.
Then, select the Green cell and Control-drag to the other view controller. Your canvas should look like Figure 28.12.
Figure 28.12 Setting up two segues
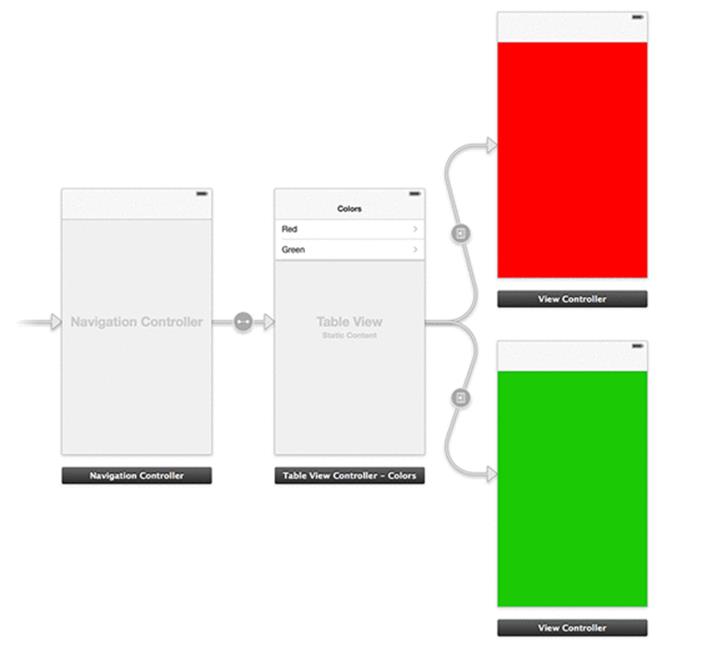
Notice the arrows that come from the table view controller to the other two view controllers. Each of these is a segue. The icon in the circle tells you that these segues are push segues.
Build and run the application. Tap on each row, and you will be taken to the appropriate view controller. You can even move back in the navigation stack to the table view controller like you would expect. The best part about this? You have not written any code yet.
Note that push segues only work if the origin of the segue is inside a navigation controller. Fortunately, the origin of these segues is the table view controller, which meets this requirement.
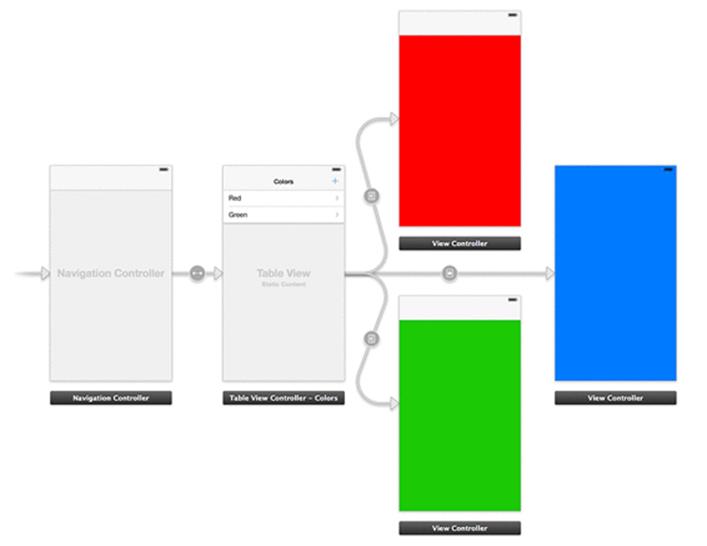
Now let’s look at another style of segue – a Modal segue. Drag a new UIViewController onto the canvas. Set its view’s background color to blue. You want this segue’s action item to be a bar button item on the table view controller’s navigation item.
Drag a Bar Button Item from the library onto the right corner of the navigation bar at the top of the table view controller’s view. In the attributes inspector, change its Identifier to Add. Then, Control-drag from this bar button item to the view controller you just dropped on the canvas. Select Modalfrom the black panel. The storyboard canvas now looks like Figure 28.13. (Notice that the icon for the modal segue is different from the icon for the push segues.)
Figure 28.13 A modal segue
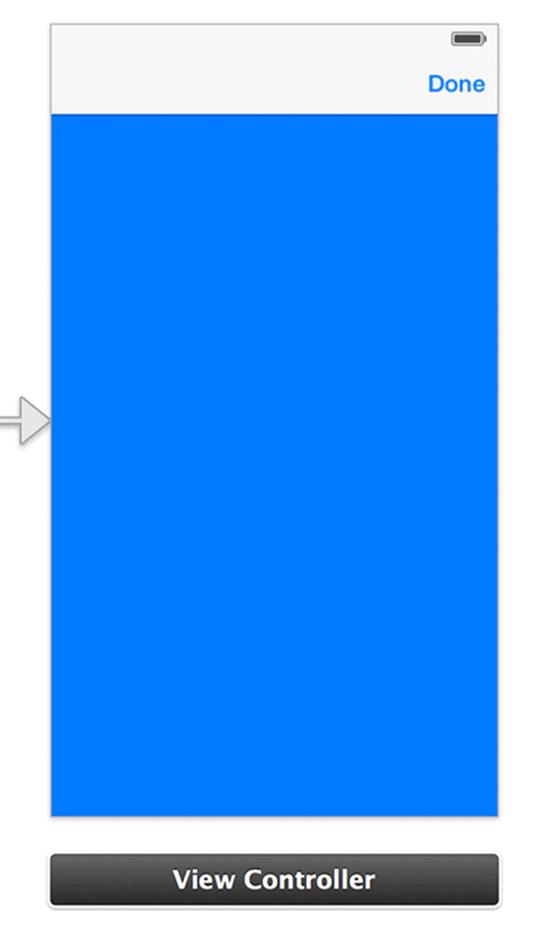
Build and run the application. Tap the bar button item, and a view controller with a blue view will slide onto the screen. All is well – except you cannot dismiss this view controller.
You will dismiss the view controller from a UIBarButtonItem on the navigation bar that says Done. Currently, the modal view controller is being presented by itself, so it has no navigation bar for the bar button item. To fix this, drag a UINavigationController onto the canvas and delete theUITableViewController (or whatever the second view controller was that Apple provided with the navigation controller).
Delete the existing modal segue, and instead have the + item trigger a modal segue to the navigation controller. The existing blue view controller should be the root of the navigation controller. Your storyboard should now look like Figure 28.14.
Figure 28.14 Adding in the navigation controller
Now that the modal view controller is within a navigation controller, it has a navigation bar at its top. Drag a bar button item to the right side of this navigation bar. Within the attributes inspector, change its Identifier to Done. The view controller should look like Figure 28.15.
Figure 28.15 Done button
This is as far as you can get without writing any code. You will need to write a method to dismiss the modal view controller and then connect this method to the Done button.
Right now, every view controller in the storyboard is a standard instance of UIViewController or one of its standard subclasses. You cannot write code for any of these as they are. To write code for a view controller in a storyboard, you have to create a subclass of UIViewController and specify in the storyboard that the view controller is an instance of your subclass.
Let’s create a new UIViewController subclass to see how this works. Create a new NSObject subclass and name it BNRColorViewController.
In BNRColorViewController.h, change the superclass to be UIViewController.
@interface BNRColorViewController : NSObject
@interface BNRColorViewController : UIViewController
@end
Then in BNRColorViewController.m, implement a method to dismiss itself.
- (IBAction)dismiss:(id)sender
{
[self.presentingViewController dismissViewControllerAnimated:YES
completion:nil];
}
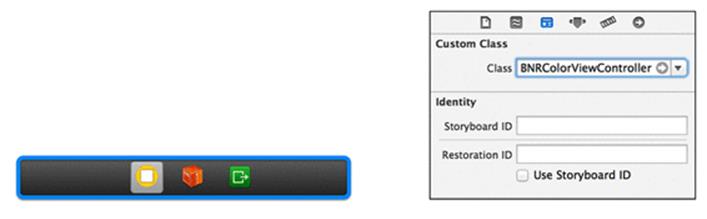
Open Colorboard.storyboard again. Select the black bar underneath the modally presented (blue) view controller. (This is called the scene dock.) In the identity inspector, change the Class to BNRColorViewController (Figure 28.16).
Figure 28.16 Changing view controller to BNRColorViewController
Now, after making sure you are zoomed in, select the Done button. Control-drag from the button to this view controller icon and let go – when the panel appears, select the dismiss: method (Figure 28.17).
Figure 28.17 Setting outlets and actions in a storyboard
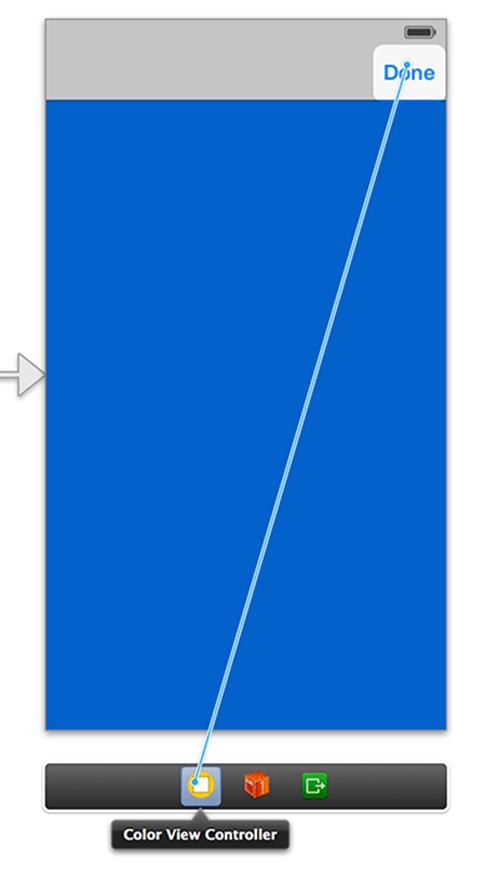
This button is now hooked up to send the message dismiss: to its BNRColorViewController whenever tapped. Build and run the application, present the BNRColorViewController, and then tap on the Done button. Voilà!
Enabling Color Changes
You will now extend the Colorboard application to allow the user to choose a color and save it to a list of favorite colors.
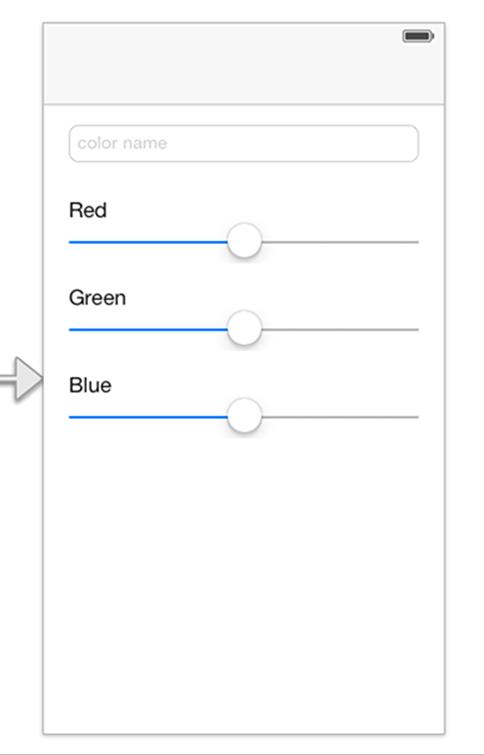
Back in Colorboard.storyboard, add one UITextField, three UILabel objects, and three UISlider objects to the view of BNRColorViewController so it looks like Figure 28.18.
Figure 28.18 Configuring the view for BNRColorViewController
Let’s have the background color of BNRColorViewController’s view match the slider values. In BNRColorViewController.m, add outlets to the text field and three sliders in the class extension.
@interface BNRColorViewController ()
@property (nonatomic, weak) IBOutlet UITextField *textField;
@property (nonatomic, weak) IBOutlet UISlider *redSlider;
@property (nonatomic, weak) IBOutlet UISlider *greenSlider;
@property (nonatomic, weak) IBOutlet UISlider *blueSlider;
@end
@implementation
All three sliders will trigger the same method when their value changes. Implement this method in BNRColorViewController.m.
- (IBAction)changeColor:(id)sender
{
float red = self.redSlider.value;
float green = self.greenSlider.value;
float blue = self.blueSlider.value;
UIColor *newColor = [UIColor colorWithRed:red
green:green
blue:blue
alpha:1.0];
self.view.backgroundColor = newColor;
}
Now open Colorboard.storyboard and connect the outlets from Color View Controller (the first icon in the scene dock below the BNRColorViewController view) to the text field and three sliders. Then Control-drag from each slider to the Color View Controller and connect each to the changeColor: method.
Build and run the application. Moving the sliders will cause the view’s background color to match.
Passing Data Around
As we discussed in Chapter 10, it is often necessary for view controllers to pass data around. To show this off, you will make it so Colorboard has a list of favorite colors that can be edited by drilling down to the BNRColorViewController you just configured.
Instead of using static cells for the UITableView, you will go back to using dynamic prototypes. Because of this, you will have to implement the data source methods for the table view. Prototype cells allow you to configure the various cells you will want to return in the data source methods and assign a reuse identifier to each one.
In Colorboard.storyboard, delete the Red and Green view controllers that are being pushed from the UITableView. Then select the table view and open the attributes inspector. Change its Content type to Dynamic Prototypes and delete the second UITableViewCell. The storyboard should look likeFigure 28.19.
Figure 28.19 Dynamic prototypes storyboard
Then select the UITableViewCell and set its reuse identifier to UITableViewCell (Figure 28.20).
Figure 28.20 UITableViewCell reuse identifier
In order to supply this table view controller with data for its table view, you will need to create a new UITableViewController subclass. Create a new NSObject subclass named BNRPaletteViewController.
In BNRPaletteViewController.h, change the superclass to be UITableViewController.
@interface BNRPaletteViewController : NSObject
@interface BNRPaletteViewController : UITableViewController
@end
In BNRPaletteViewController.m, import BNRColorViewController.h and add an NSMutableArray to the class extension.
#import "BNRPaletteViewController.h"
#import "BNRColorViewController.h"
@interface BNRPaletteViewController ()
@property (nonatomic) NSMutableArray *colors;
@end
@implementation BNRPaletteViewController
Next, implement viewWillAppear: and the table view data source methods in BNRPaletteViewController.m.
- (void)viewWillAppear:(BOOL)animated
{
[super viewWillAppear:animated];
[self.tableView reloadData];
}
- (NSInteger)tableView:(UITableView *)tableView
numberOfRowsInSection:(NSInteger)section
{
return [self.colors count];
}
- (UITableViewCell *)tableView:(UITableView *)tableView
cellForRowAtIndexPath:(NSIndexPath *)indexPath
{
UITableViewCell *cell =
[tableView dequeueReusableCellWithIdentifier:@"UITableViewCell"
forIndexPath:indexPath];
return cell;
}
Next, create a new NSObject subclass named BNRColorDescription that will represent a user-defined color.
In BNRColorDescription.h, add properties for a UIColor and a name.
@interface BNRColorDescription : NSObject
@property (nonatomic) UIColor *color;
@property (nonatomic, copy) NSString *name;
@end
Then, in BNRColorDescription.m, override init to set default values for these properties.
@implementation BNRColorDescription
- (instancetype)init
{
self = [super init];
if (self) {
_color = [UIColor colorWithRed:0
green:0
blue:1
alpha:1];
_name = @"Blue";
}
return self;
}
@end
To test whether the code works, let’s add a new BNRColorDescription to the colors array of BNRPaletteViewController.
At the top of BNRPaletteViewController.m, import BNRColorDescription.h. Then override the colors accessor to lazily instantiate the array and add a new BNRColorDescription to the array.
#import "BNRPaletteViewController.h"
#import "BNRColorDescription.h"
@implementation BNRPaletteViewController
- (NSMutableArray *)colors
{
if (!_colors) {
_colors = [NSMutableArray array];
BNRColorDescription *cd = [[BNRColorDescription alloc] init];
[_colors addObject:cd];
}
return _colors;
}
Also, update the data source method in BNRPaletteViewController.m to display the name of the color.
- (UITableViewCell *)tableView:(UITableView *)tableView
cellForRowAtIndexPath:(NSIndexPath *)indexPath
{
UITableViewCell *cell =
[tableView dequeueReusableCellWithIdentifier:@"UITableViewCell"
forIndexPath:indexPath];
BNRColorDescription *color = self.colors[indexPath.row];
cell.textLabel.text = color.name;
return cell;
}
Build and run the application. You should be able to drill down, but there are two problems. First, the “Blue” color is not being passed down to the BNRColorDescription. Second, the view controller is currently displaying the Done button in addition to the Back button. Ideally, the Done button would only be present if you were creating a new color and presenting this view controller modally. To fix both of these issues, you will need to be able to pass data between view controllers when segues occur.
Before we move on, open BNRColorViewController.h and add two new properties: one that determines whether you are editing a new or existing color, and another that indicates which color you are editing. Do not forget to import BNRColorDescription.h at the top.
#import "BNRColorDescription.h"
@interface BNRColorViewController : UIViewController
@property (nonatomic) BOOL existingColor;
@property (nonatomic) BNRColorDescription *colorDescription;
@end
Whenever a segue is triggered on a view controller, it gets sent the message prepareForSegue:sender:. This method gives you both the UIStoryboardSegue, which gives you information about which segue is happening, and the sender, which is the object that triggered the segue (a UIBarButtonItemor a UITableViewCell, for example).
The segue gives you three pieces of information to use: the source view controller (where the segue is originating from), the destination view controller (where you are segueing to), and the identifier of the segue. The identifier is how you can differentiate the various segues. Let’s give your two segues useful identifiers.
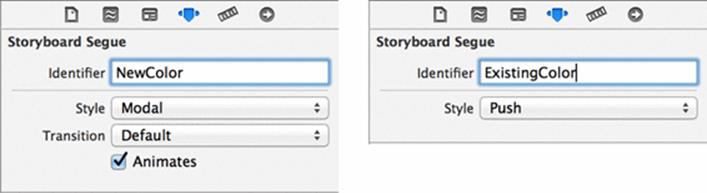
Open Colorboard.storyboard again. Select the modal segue and open its attribute inspector. For the identifier, type in NewColor. Next, select the push segue and give it the identifier ExistingColor. The attributes inspector for both segues is shown in Figure 28.21.
Figure 28.21 Segue identifiers
With your segues identified, you can now pass your color objects around. Open BNRPaletteViewController.m and implement prepareForSegue:sender:.
- (void)prepareForSegue:(UIStoryboardSegue *)segue sender:(id)sender
{
if ([segue.identifier isEqualToString:@"NewColor"]) {
// If we are adding a new color, create an instance
// and add it to the colors array
BNRColorDescription *color = [[BNRColorDescription alloc] init];
[self.colors addObject:color];
// Then use the segue to set the color on the view controller
UINavigationController *nc =
(UINavigationController *)segue.destinationViewController;
BNRColorViewController *mvc =
(BNRColorViewController *)[nc topViewController];
mvc.colorDescription = color;
}
else if ([segue.identifier isEqualToString:@"ExistingColor"]) {
// For the push segue, the sender is the UITableViewCell
NSIndexPath *ip = [self.tableView indexPathForCell:sender];
BNRColorDescription *color = self.colors[ip.row];
// Set the color, and also tell the view controller that this
// is an existing color
BNRColorViewController *cvc =
(BNRColorViewController *)segue.destinationViewController;
cvc.colorDescription = color;
cvc.existingColor = YES;
}
}
First the segue’s identifier is checked to determine which segue is occurring. If the + button was tapped, the “NewColor” segue is triggered, so you create a new BNRColorDescription and give it to the BNRColorViewController.
If you tap an existing color, the “ExistingColor” segue is triggered. Notice that when a UITableViewCell triggers a segue, it is sent as the sender argument, and you can use that to determine which index path was selected. The color that was tapped is then passed to the BNRColorViewController.
(Why is the destinationViewController for “NewColor” a UINavigationController when it is a BNRColorViewController for “ExistingColor”? Take a look back at the storyboard file and you will notice that the modal segue presents a new UINavigationController whereas the push segue is pushing a view controller onto an existing navigation controller stack.)
You need to wrap up a few loose ends for the BNRColorViewController: the Done button should not be there if you are viewing an existing color, the background color and sliders need to be set up appropriately, and you need to save the new values the user has chosen when theBNRColorViewController goes away (either by dismissing the modal view controller or popping from the navigation controller stack).
Open BNRColorViewController.m and override viewWillAppear: to get rid of the Done button if existingColor is YES.
- (void)viewWillAppear:(BOOL)animated
{
[super viewWillAppear:animated];
// Remove the 'Done' button if this is an existing color
if (self.existingColor) {
self.navigationItem.rightBarButtonItem = nil;
}
}
Then, still in BNRColorViewController.m, override viewDidLoad to set the initial background color, slider values, and color name.
- (void)viewDidLoad
{
[super viewDidLoad];
UIColor *color = self.colorDescription.color;
// Get the RGB values out of the UIColor object
float red, green, blue;
[color getRed:&red
green:&green
blue:&blue
alpha:nil];
// Set the initial slider values
self.redSlider.value = red;
self.greenSlider.value = green;
self.blueSlider.value = blue;
// Set the background color and text field value
self.view.backgroundColor = color;
self.textField.text = self.colorDescription.name;
}
Finally, save the values when the view is disappearing.
- (void)viewWillDisappear:(BOOL)animated
{
[super viewWillDisappear:animated];
self.colorDescription.name = self.textField.text;
self.colorDescription.color = self.view.backgroundColor;
}
Build and run the application and the colors should display and save correctly.
More on Storyboards
In this exercise, you created a storyboard, set up a few view controllers, laid out their interfaces, and created some segues between them. This is the basic idea behind storyboards, and while there are a few more flavors of segues and types of view controllers you can set up, you get the idea. A storyboard replaces lines of code.
For example, a push segues replace this code:
- (void)tableView:(UITableView *)tableView
didSelectRowAtIndexPath:(NSIndexPath *)ip
{
UIViewController *vc = [[UIViewController alloc] init];
[self.navigationController pushViewController:vc];
}
While this seems nice, storyboarding, in our opinion, is not very useful. Let’s go through the pros and cons. First, the pros:
· Storyboards can be used to easily show off the flow of an application to a client or a colleague.
· Storyboards remove some simple code from your source files.
· Tables with static content are easy to create.
· Prototype cells replace the need to create separate XIBs for custom table view cells.
· Storyboards sure do look pretty.
The cons, unfortunately, outweigh the pros:
· Storyboards are difficult to work with in a team. Typically, a team of iOS programmers breaks up the work by having each member focus on a particular view controller. With a storyboard, everyone has to do their work in the same storyboard file. This can quickly lead to clutter and difficulties with version control.
· Storyboards disrupt the flow of programming. Let’s say you are writing a view controller and adding the code for a button that presents a view controller modally. You can do that pretty easily in code – alloc and init the view controller, and sendpresentViewController:animated:completion: to self. With storyboards, you have to load up the storyboard file, drag some stuff onto the canvas, set the Class in the identity inspector, connect the segue, and then configure the segue.
· Storyboards sacrifice flexibility and control for ease of use. The work required to add advanced functionality to the basic functionality of a storyboard is often more than the work required to put together the advanced and basic functionality in code.
· Storyboards always create new view controller instances. Each time you perform a segue, a new instance of the destination view controller is created. Sometimes, though, you would like to keep a view controller around instead of destroying it each time it disappears off the screen. Storyboarding does not allow you to do this.
Overall, storyboards make easy code easier and difficult code more difficult. We do not use them in this book, and we do not typically use them when writing our own applications. However, Apple seems to be pushing them harder in each release of Xcode, so you might one day decide that a particular application would benefit from storyboarding.
For the More Curious: State Restoration
We discussed how to work with the state restoration system in Chapter 24, but the Homepwner application did not use storyboards. Let’s take a look at how state restoration works when using storyboards.
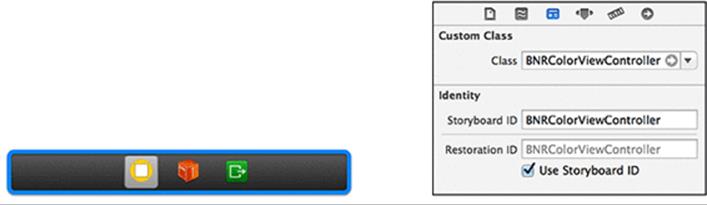
Storyboards handle a lot of the boilerplate state restoration code for you. Within a storyboard file, each view controller’s restoration identifier can be set. Typically, the restoration identifier is set to be the same as the storyboard identifier (which you did not need to use in this chapter). For state restoration to work properly, you will want each view controller to have both a storyboard identifier and a restoration identifier (Figure 28.22).
Figure 28.22 Restoration identifier
Since state restoration is opt-in, you will still need to override the two application delegate methods to tell the system you want states to be saved and restored.
- (BOOL)application:(UIApplication *)application
shouldSaveApplicationState:(NSCoder *)coder
{
return YES;
}
- (BOOL)application:(UIApplication *)application
shouldRestoreApplicationState:(NSCoder *)coder
{
return YES;
}
Finally, your UIViewController subclasses will each need to implement the UIViewControllerRestoration protocol method to return an instance of the appropriate view controller. Since you are working with storyboards, you will let the storyboard instantiate the view controller for you. Here is an example:
+ (UIViewController *)viewControllerWithRestorationIdentifierPath:(NSArray *)path
coder:(NSCoder *)coder
{
BNRColorViewController *vc = nil;
UIStoryboard *storyboard =
[coder decodeObjectForKey:UIStateRestorationViewControllerStoryboardKey];
if (storyboard)
{
vc = (BNRColorViewController *)[storyboard
instantiateViewControllerWithIdentifier:@"BNRColorViewController"];
vc.restorationIdentifier = [identifierComponents lastObject];
vc.restorationClass = [BNRColorViewController class];
}
return vc;
}
The NSCoder automatically encodes a reference to the storyboard that you can pull out using the UIStateRestorationViewControllerStoryboardKey key. You can then use the storyboard to instantiate the appropriate view controller, passing in the correct storyboard identifier.
Other than that, the rest of state restoration implementation is the same. If view controllers need to save out any information, then they will need to implement the encodeRestorableStateWithCoder: and decodeRestorableStateWithCoder: methods.
Whether you are using storyboards or not, state restoration is easy to implement and provides a better experience for your users. Be a stylish developer; implement state restoration in your applications today!