The Core iOS Developer’s Cookbook, Fifth Edition (2014)
Chapter 14. Device-Specific Development
Each iOS device represents a meld of unique, shared, momentary, and persistent properties. These properties include the device’s current physical orientation, its model name, its battery state, and its access to onboard hardware. This chapter looks at devices—from their build configuration to their active onboard sensors. It provides recipes that return a variety of information items about the unit in use. You’ll read about testing for hardware prerequisites at runtime and specifying those prerequisites in the application’s Info.plist file. You’ll discover how to solicit sensor feedback via Core Motion and subscribe to notifications to create callbacks when sensor states change. You’ll read about adding screen mirroring and second-screen output and about soliciting device-specific details for tracking. This chapter covers the hardware, file system, and sensors available on the iPhone, iPad, and iPod touch and helps you programmatically take advantage of those features.
Accessing Basic Device Information
The UIDevice class exposes key device-specific properties, including the iPhone, iPad, or iPod touch model being used, the device name, and the OS name and version. It’s a one-stop solution for pulling out certain system details. Each method is an instance method, which is called using the UIDevice singleton, via [UIDevice currentDevice].
The system information you can retrieve from UIDevice includes these items:
![]() systemName—This property returns the name of the operating system currently in use. For current generations of iOS devices, there is only one OS that runs on the platform: iPhone OS. Apple has not yet updated this name to match the general iOS rebranding.
systemName—This property returns the name of the operating system currently in use. For current generations of iOS devices, there is only one OS that runs on the platform: iPhone OS. Apple has not yet updated this name to match the general iOS rebranding.
![]() systemVersion—This property lists the firmware version currently installed on the unit: for example, 4.3, 5.1.1, 6.0, 7.0.2, and so on.
systemVersion—This property lists the firmware version currently installed on the unit: for example, 4.3, 5.1.1, 6.0, 7.0.2, and so on.
![]() model—This property returns a string that describes the platform—namely iPhone, iPad, and iPod touch. Should iOS be extended to new devices, additional strings will describe those models. localizedModel provides a localized version of this property.
model—This property returns a string that describes the platform—namely iPhone, iPad, and iPod touch. Should iOS be extended to new devices, additional strings will describe those models. localizedModel provides a localized version of this property.
![]() userInterfaceIdiom—This property represents the interface style used on the current device—either iPhone (for iPhone and iPod touch) or iPad. Other idioms may be introduced as Apple offers additional platform styles.
userInterfaceIdiom—This property represents the interface style used on the current device—either iPhone (for iPhone and iPod touch) or iPad. Other idioms may be introduced as Apple offers additional platform styles.
![]() name—This property presents the iPhone name assigned by the user in iTunes, such as “Joe’s iPhone” or “Binky.” This name is also used to create the local hostname for the device.
name—This property presents the iPhone name assigned by the user in iTunes, such as “Joe’s iPhone” or “Binky.” This name is also used to create the local hostname for the device.
Here are a few examples of these properties in use:
UIDevice *device = [UIDevice currentDevice];
NSLog(@"System name: %@", device.systemName);
NSLog(@"Model: %@", device.model);
NSLog(@"Name: %@", device.name);
For current iOS releases, you can use the idiom check with a simple Boolean test. Here’s an example of how you might implement an iPad check:
#define IS_IPAD (UI_USER_INTERFACE_IDIOM() == UIUserInterfaceIdiomPad)
Notice the convenience macro provided by UIKit—UI_USER_INTERFACE_IDIOM(). It tests for selector conformance and then returns [[UIDevice currentDevice] userInterfaceIdiom] if possible, and UIUserInterfaceIdiomPhone otherwise. If this test fails, you can currently assume that you’re working with an iPhone/iPod touch. If and when Apple releases a new family of devices, you’ll need to update your code accordingly for a more nuanced test.
Adding Device Capability Restrictions
An application’s Info.plist property list enables you to specify application requirements when you submit applications to the App Store. These restrictions enable you to tell iTunes and the mobile App Store what device features your application needs.
Each iOS unit provides a unique feature set. Some devices offer cameras and GPS capabilities. Others don’t. Some have onboard gyros, autofocus, and other powerful options. You specify what features are needed to run your application on a device.
When you include the UIRequiredDeviceCapabilities key in your Info.plist file, iTunes and the mobile App Store limit application installation to devices that offer the required capabilities. Provide this list as either an array of strings or a dictionary.
An array specifies each required capability; each item in that array must be present on your device. A dictionary enables you to explicitly require or prohibit a feature. The dictionary keys are the capabilities. The dictionary values set whether the feature must be present (Boolean true) or omitted (Boolean false).
Table 14-1 details the current keys for required device capabilities. Only include those features that your application absolutely requires or cannot support. If your application can provide workarounds, do not add restrictions in this way. Table 14-1 discusses each feature in a positive sense. When using a prohibition rather than a requirement, reverse the meaning—for example, that an autofocus camera or gyro cannot be onboard, or that Game Center access cannot be supported.
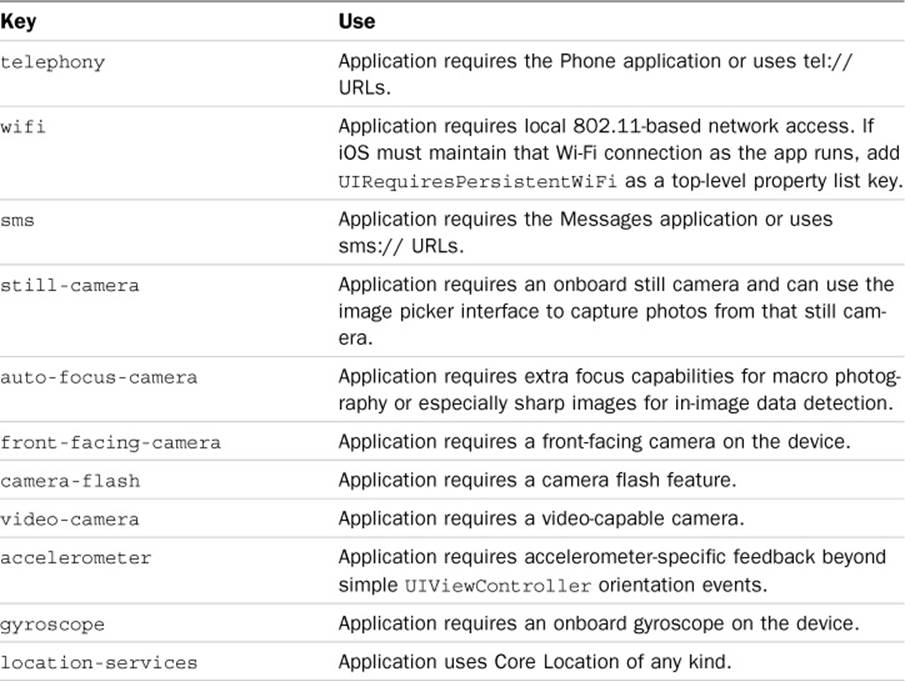
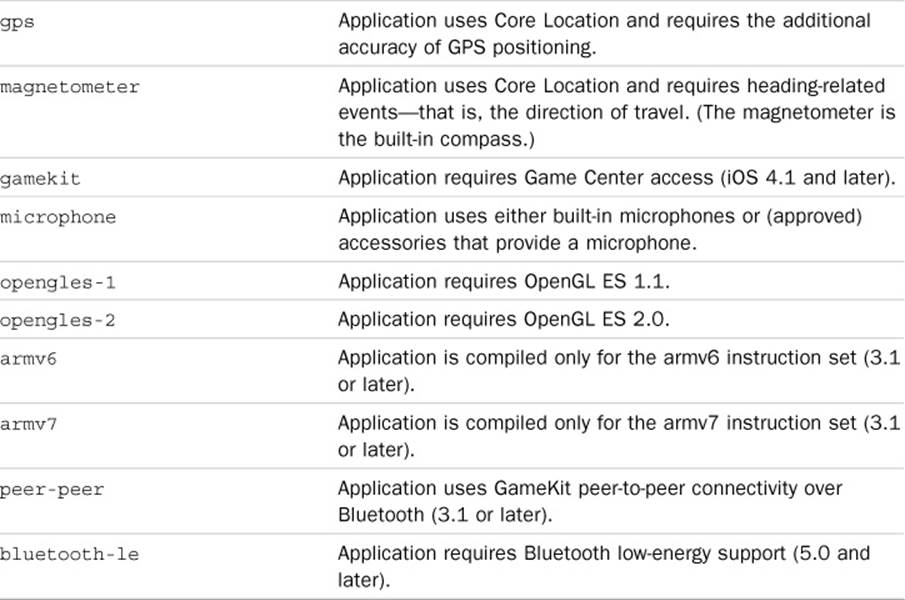
Table 14-1 Required Device Capabilities
For example, consider an application that offers an option for taking pictures when run on a camera-ready device. If the application otherwise works on pre-camera iPod touch units, do not include the still-camera restriction. Instead, check for camera capability from within the application and present the camera option when appropriate. Adding a still-camera restriction eliminates many early iPod touch (first through third generations) and iPad (first generation) owners from your potential customer pool.
User Permission Descriptions
To protect privacy, the end user must explicitly permit your applications to access calendar data, the camera, contacts, photos, location, and other functionality. To convince the user to opt in, it helps to explain how your application can use this data and describe your reason for accessing it. Assign string values to the following keys at the top level of your Info.plist file:
![]() NSBluetoothPeripheralUsageDescription
NSBluetoothPeripheralUsageDescription
![]() NSCalendarsUsageDescription
NSCalendarsUsageDescription
![]() NSCameraUsageDescription
NSCameraUsageDescription
![]() NSContactsUsageDescription
NSContactsUsageDescription
![]() NSLocationUsageDescription
NSLocationUsageDescription
![]() NSMicrophoneUsageDescription
NSMicrophoneUsageDescription
![]() NSMotionUsageDescription
NSMotionUsageDescription
![]() NSPhotoLibraryUsageDescription
NSPhotoLibraryUsageDescription
![]() NSRemindersUsageDescription
NSRemindersUsageDescription
When iOS prompts your user for resource-specific permission, it displays these strings as part of its standard dialog box.
Other Common Info.plist Keys
Here are a few other common keys you may want to assign in your property list, along with descriptions of what they do:
![]() UIFileSharingEnabled (Boolean, defaults to off)—Enables users to access the contents of your app’s Documents folder from iTunes. This folder appears at the top level of your app sandbox.
UIFileSharingEnabled (Boolean, defaults to off)—Enables users to access the contents of your app’s Documents folder from iTunes. This folder appears at the top level of your app sandbox.
![]() UIAppFonts (array, strings of font names including their extension)—Specifies custom TTF fonts that you supply in your bundle. When added, you access them using standard UIFont calls.
UIAppFonts (array, strings of font names including their extension)—Specifies custom TTF fonts that you supply in your bundle. When added, you access them using standard UIFont calls.
![]() UIApplicationExitsOnSuspend (Boolean, defaults to off)—Enables your app to terminate rather than move to the background when the user taps the Home button. When this property is enabled, iOS terminates the app and purges it from memory.
UIApplicationExitsOnSuspend (Boolean, defaults to off)—Enables your app to terminate rather than move to the background when the user taps the Home button. When this property is enabled, iOS terminates the app and purges it from memory.
![]() UIRequiresPersistentWifi (Boolean, defaults to off)—Instructs iOS to maintain a Wi-Fi connection while the app is active.
UIRequiresPersistentWifi (Boolean, defaults to off)—Instructs iOS to maintain a Wi-Fi connection while the app is active.
![]() UIStatusBarHidden (Boolean, defaults to off)—If enabled, hides the status bar as the app launches.
UIStatusBarHidden (Boolean, defaults to off)—If enabled, hides the status bar as the app launches.
![]() UIStatusBarStyle (string, defaults to UIStatusBarStyleDefault)—Specifies the style of the status bar at app launch.
UIStatusBarStyle (string, defaults to UIStatusBarStyleDefault)—Specifies the style of the status bar at app launch.
Recipe: Checking Device Proximity and Battery States
The UIDevice class offers APIs that enable you to keep track of device characteristics including the states of the battery and proximity sensor. Recipe 14-1 demonstrates how you can enable and query monitoring for these two technologies. Both provide updates in the form of notifications, which you can subscribe to so your application is informed of important updates.
Enabling and Disabling the Proximity Sensor
Proximity is an iPhone-specific feature at this time. The iPod touch and iPad do not offer proximity sensors. Unless you have some pressing reason to hold an iPhone against body parts (or vice versa), using the proximity sensor accomplishes little.
When proximity is enabled, it has one primary task: It detects whether there’s a large object right in front of it. If there is, it switches the screen off and sends a general notification. Move the blocking object away, and the screen switches back on. This prevents you from pressing buttons or dialing the phone with your ear when you are on a call. Some poorly designed protective cases keep the iPhone’s proximity sensors from working properly.
Siri uses the proximity feature. When you hold the phone up to your ear, it records your query and sends it to be interpreted. Siri’s voice interface does not depend on a visual GUI to operate.
Recipe 14-1 demonstrates how to work with proximity sensing on the iPhone. Its code uses the UIDevice class to toggle proximity monitoring and subscribes to UIDeviceProximityStateDidChangeNotification to catch state changes. The two states are on and off. When theUIDevice proximityState property returns YES, the proximity sensor has been activated.
Monitoring the Battery State
You can programmatically keep track of the battery and charging state. APIs enable you to know the level to which the battery is charged and whether the device is plugged into a charging source. The battery level is a floating-point value that ranges between 1.0 (fully charged) and 0.0 (fully discharged). It provides an approximate discharge level that you can use to query before performing operations that put unusual strain on the device.
For example, you might want to caution your user about performing a large series of mathematical computations and suggest that the user plug in to a power source. You retrieve the battery level via this UIDevice call, and the value returned is produced in 5% increments:
NSLog(@"Battery level: %0.2f%%",
[UIDevice currentDevice].batteryLevel * 100);
The charge state has four possible values. The unit can be charging (that is, connected to a power source), full, unplugged, and a catchall “unknown.” Recover the state by using the UIDevice batteryState property:
NSArray *stateArray = @[
@"Battery state is unknown",
@"Battery is not plugged into a charging source",
@"Battery is charging",
@"Battery state is full"];
NSLog(@"Battery state: %@",
stateArray[[UIDevice currentDevice].batteryState]);
Don’t think of these choices as persistent states. Instead, think of them as momentary reflections of what is actually happening to the device. They are not flags. They are not OR’ed together to form a general battery description. Instead, these values reflect the most recent state change.
You can easily monitor state changes by responding to notifications that the battery state has changed. In this way, you can catch momentary events, such as when the battery finally recharges fully, when the user has plugged in to a power source to recharge, and when the user disconnects from that power source.
To start monitoring, set the batteryMonitoringEnabled property to YES. During monitoring, the UIDevice class produces notifications when the battery state or level changes. Recipe 14-1 subscribes to both notifications. Note that you can also check these values directly, without waiting for notifications. Apple provides no guarantees about the frequency of level change updates, but as you can tell by testing this recipe, they arrive in a fairly regular fashion.
Recipe 14-1 Monitoring Proximity and Battery
// View the current battery level and state
- (void)peekAtBatteryState
{
NSArray *stateArray = @[@"Battery state is unknown",
@"Battery is not plugged into a charging source",
@"Battery is charging",
@"Battery state is full"];
NSString *status = [NSString stringWithFormat:
@"Battery state: %@, Battery level: %0.2f%%",
stateArray[[UIDevice currentDevice].batteryState],
[UIDevice currentDevice].batteryLevel * 100];
NSLog(@"%@", status);
}
// Show whether proximity is being monitored
- (void)updateTitle
{
self.title = [NSString stringWithFormat:@"Proximity %@",
[UIDevice currentDevice].proximityMonitoringEnabled ? @"On" : @"Off"];
}
// Toggle proximity monitoring off and on
- (void)toggle:(id)sender
{
// Determine the current proximity monitoring and toggle it
BOOL isEnabled = [UIDevice currentDevice].proximityMonitoringEnabled;
[UIDevice currentDevice].proximityMonitoringEnabled = !isEnabled;
[self updateTitle];
}
- (void)loadView
{
self.view = [[UIView alloc] init];
// Enable toggling and initialize title
self.navigationItem.rightBarButtonItem =
BARBUTTON(@"Toggle", @selector(toggle:));
[self updateTitle];
// Add proximity state checker
[[NSNotificationCenter defaultCenter]
addObserverForName:UIDeviceProximityStateDidChangeNotification
object:nil queue:[NSOperationQueue mainQueue]
usingBlock:^(NSNotification *notification) {
// Sensor has triggered either on or off
NSLog(@"The proximity sensor %@",
[UIDevice currentDevice].proximityState ?
@"will now blank the screen" : @"will now restore the screen");
}];
// Enable battery monitoring
[[UIDevice currentDevice] setBatteryMonitoringEnabled:YES];
// Add observers for battery state and level changes
[[NSNotificationCenter defaultCenter]
addObserverForName:UIDeviceBatteryStateDidChangeNotification
object:nil queue:[NSOperationQueue mainQueue]
usingBlock:^(NSNotification *notification) {
// State has changed
NSLog(@"Battery State Change");
[self peekAtBatteryState];
}];
[[NSNotificationCenter defaultCenter]
addObserverForName:UIDeviceBatteryLevelDidChangeNotification
object:nil queue:[NSOperationQueue mainQueue]
usingBlock:^(NSNotification *notification) {
// Level has changed
NSLog(@"Battery Level Change");
[self peekAtBatteryState];
}];
}
Get This Recipe’s Code
To find this recipe’s full sample project, point your browser to https://github.com/erica/iOS-7-Cookbook and go to the folder for Chapter 14.
Detecting Retina Support
In recent years, Apple has converted all but a few lower-cost devices to Retina displays. Pixel density of Retina displays, according to Apple, is high enough that the human eye cannot distinguish individual pixels. Apps shipped with higher-resolution art take advantage of this improved display quality.
The UIScreen class offers an easy way to check whether the current device offers a built-in Retina display. Check the screen scale property, which provides the factor that converts from the logical coordinate space (points, each approximately 1/160 inch) into a device coordinate space (pixels). It is 1.0 for standard displays, so 1 point corresponds to 1 pixel. It is 2.0 for Retina displays (4 pixels per point):
- (BOOL) hasRetinaDisplay
{
return ([UIScreen mainScreen].scale == 2.0f);
}
The UIScreen class also offers two useful display-size properties. bounds returns the screen’s bounding rectangle, measured in points. This gives you the full size of the screen, regardless of any onscreen elements such as status bars, navigation bars, or tab bars. TheapplicationFrame property, also measured in points, excludes the status bar, providing the frame for your application’s initial window size.
Recipe: Recovering Additional Device Information
Both sysctl() and sysctlbyname() enable you to retrieve system information. These standard UNIX functions query the operating system about hardware and OS details. You can get a sense of the kind of scope on offer by glancing at the /usr/include/sys/sysctl.h include file on the Macintosh. There you can find an exhaustive list of constants that can be used as parameters to these functions.
These constants enable you to check for core information such as the system’s CPU count, the amount of available memory, and more. Recipe 14-2 demonstrates this functionality. It introduces a UIDevice category that gathers system information and returns it via a series of method calls.
You might wonder why this category includes a platform method, when the standard UIDevice class returns device models on demand. The answer lies in distinguishing different types of units.
An iPhone 3GS’s model is simply iPhone, as is the model of an iPhone 4S. In contrast, this recipe returns a platform value of iPhone2,1 for the 3GS, iPhone4,1 for the iPhone 4S, and iPhone5,1 for the iPhone 5. This enables you to programmatically differentiate the 3GS unit from a first-generation iPhone (iPhone1,1) or iPhone 3G (iPhone1,2).
Each model offers distinct built-in capabilities. Knowing exactly which iPhone you’re dealing with helps you determine whether that unit likely supports features such as accessibility, GPS, and magnetometers.
Recipe 14-2 Extending Device Information Gathering
@implementation UIDevice (Hardware)
+ (NSString *)getSysInfoByName:(char *)typeSpecifier
{
// Recover sysctl information by name
size_t size;
sysctlbyname(typeSpecifier, NULL, &size, NULL, 0);
char *answer = malloc(size);
sysctlbyname(typeSpecifier, answer, &size, NULL, 0);
NSString *results = [NSString stringWithCString:answer
encoding: NSUTF8StringEncoding];
free(answer);
return results;
}
- (NSString *)platform
{
return [UIDevice getSysInfoByName:"hw.machine"];
}
- (NSUInteger)getSysInfo:(uint)typeSpecifier
{
size_t size = sizeof(int);
int results;
int mib[2] = {CTL_HW, typeSpecifier};
sysctl(mib, 2, &results, &size, NULL, 0);
return (NSUInteger) results;
}
- (NSUInteger)busFrequency
{
return [UIDevice getSysInfo:HW_BUS_FREQ];
}
- (NSUInteger)totalMemory
{
return [UIDevice getSysInfo:HW_PHYSMEM];
}
- (NSUInteger)userMemory
{
return [UIDevice getSysInfo:HW_USERMEM];
}
- (NSUInteger)maxSocketBufferSize
{
return [UIDevice getSysInfo:KIPC_MAXSOCKBUF];
}
@end
Get This Recipe’s Code
To find this recipe’s full sample project, point your browser to https://github.com/erica/iOS-7-Cookbook and go to the folder for Chapter 14.
Core Motion Basics
The Core Motion framework centralizes access to the motion data generated by the iOS hardware. It provides monitoring of three key onboard sensors: the gyroscope, which measures device rotation; the magnetometer, which provides a way to measure compass bearings; and the accelerometer, which detects gravitational changes along three axes. A fourth entry point, called device motion, combines all three of these sensors into a single monitoring system.
Core Motion uses raw values from these sensors to create readable measurements, primarily in the form of force vectors. Measurable items include the following properties:
![]() attitude—Device attitude is the device’s orientation relative to some frame of reference. The attitude is represented as a triplet of roll, pitch, and yaw angles, each measured in radians.
attitude—Device attitude is the device’s orientation relative to some frame of reference. The attitude is represented as a triplet of roll, pitch, and yaw angles, each measured in radians.
![]() rotationRate—The rotation rate is the rate at which the device rotates around each of its three axes. The rotation includes x, y, and z angular velocity values, measured in radians per second.
rotationRate—The rotation rate is the rate at which the device rotates around each of its three axes. The rotation includes x, y, and z angular velocity values, measured in radians per second.
![]() gravity—Gravity is a device’s current acceleration vector, as imparted by the normal gravitational field. Gravity is measured in g’s, along the x-, y-, and z-axes. Each unit represents the standard gravitational force imparted by Earth (namely 32 feet per second per second, or 9.8 meters per second per second).
gravity—Gravity is a device’s current acceleration vector, as imparted by the normal gravitational field. Gravity is measured in g’s, along the x-, y-, and z-axes. Each unit represents the standard gravitational force imparted by Earth (namely 32 feet per second per second, or 9.8 meters per second per second).
![]() userAcceleration—User acceleration is the acceleration vector being imparted by the user. Like gravity, user acceleration is measured in g’s along the x-, y-, and z-axes. When added together, the user vector and the gravity vector represent the total acceleration imparted to the device.
userAcceleration—User acceleration is the acceleration vector being imparted by the user. Like gravity, user acceleration is measured in g’s along the x-, y-, and z-axes. When added together, the user vector and the gravity vector represent the total acceleration imparted to the device.
![]() magneticField—The magnetic field is the vector representing the overall magnetic field values in the device’s vicinity. The field is measured in microteslas along the x-, y-, and z-axes. A calibration accuracy is also provided, to inform your application of the field measurements quality.
magneticField—The magnetic field is the vector representing the overall magnetic field values in the device’s vicinity. The field is measured in microteslas along the x-, y-, and z-axes. A calibration accuracy is also provided, to inform your application of the field measurements quality.
Testing for Sensors
As you read earlier in this chapter, you can use the application’s Info.plist file to require or exclude onboard sensors. You can also test in-app for each kind of sensor support by querying a Core Motion CMMotionManager object:
if (motionManager.gyroAvailable)
[motionManager startGyroUpdates];
if (motionManager.magnetometerAvailable)
[motionManager startMagnetometerUpdates];
if (motionManager.accelerometerAvailable)
[motionManager startAccelerometerUpdates];
if (motionManager.deviceMotionAvailable)
[motionManager startDeviceMotionUpdates];
Accessing Sensor Data
Core Motion provides two mechanisms for accessing sensor data. For periodic, passive access to motion data, activate the appropriate sensor (for example, startAccelerometerUpdates) and then access the data from the corresponding motion data property on theCMMotionManager object (accelerometerData).
In cases where polling is not sufficient, you can use a block-based update mechanism that executes a block that you provide for each sensor update (for example, startAccelerometerUpdatesToQueue:withHandler:). When using the handler methods, be sure to set the update interval for the sensor (accelerometerUpdateInterval). The interval is capped at minimum and maximum values, so if the actual frequency is critical to your app, make sure to check the timestamp associated with the data object passed to the block.
Recipe: Using Acceleration to Locate “Up”
The iPhone and iPad provide three onboard sensors that measure acceleration along the device’s perpendicular axes: left/right (X), up/down (Y), and front/back (Z). These values indicate the forces affecting the device, from both gravity and user movement. You can get some neat force feedback by swinging the iPhone around your head (centripetal force) or dropping it from a tall building (freefall). Unfortunately, you might not recover that data after your iPhone becomes an expensive bit of scrap metal.
To monitor accelerometer updates, create a Core Motion manager object, set the interval for updates, and start the manager, passing in a handler block to be processed:
motionManager = [[CMMotionManager alloc] init];
motionManager.accelerometerUpdateInterval = 0.005;
if (motionManager.isAccelerometerAvailable)
{
[motionManager startAccelerometerUpdatesToQueue:
[NSOperationQueue mainQueue]
withHandler:^(CMAccelerometerData *accelerometerData,
NSError *error) {
// handle the accelerometer update
}];
}
When using Core Motion, always check for the availability of the requested sensor. When started, your handler block receives CMAccelerometerData objects, which you can track and respond to. Each of these objects contains a CMAcceleration structure consisting of floating-point values for the x-, y-, and z-axes, and each value ranges from –1.0 to 1.0.
Recipe 14-3 uses these values to help determine the “up” direction. It calculates the arctangent between the X and Y acceleration vectors and returns the up-offset angle. As new acceleration messages are received, the recipe rotates a UIImageView instance with its picture of an arrow, as shown in Figure 14-1, to point up. The real-time response to user actions ensures that the arrow continues pointing upward, no matter how the user reorients the device.
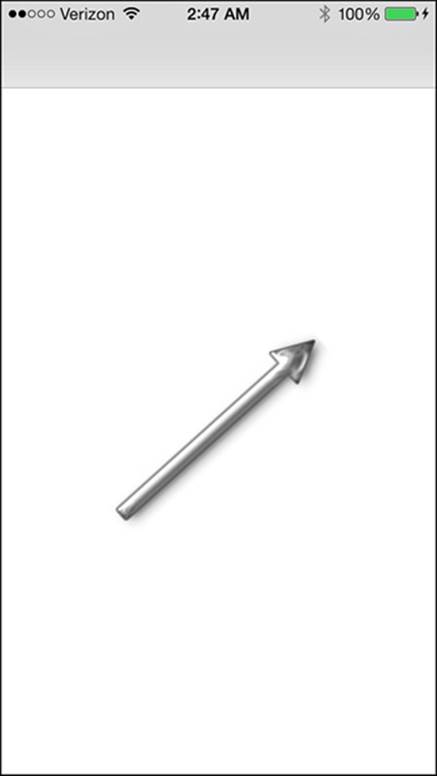
Figure 14-1 A little math recovers the “up” direction by performing an arctan function using the x and y force vectors. In this example, the arrow always points up, no matter how the user reorients the device.
Recipe 14-3 Handling Acceleration Events
- (void)loadView
{
self.view = [[UIView alloc] init];
self.view.backgroundColor = [UIColor whiteColor];
arrow = [[UIImageView alloc]
initWithImage:[UIImage imageNamed:@"arrow"]];
[self.view addSubview:arrow];
PREPCONSTRAINTS(arrow);
CENTER_VIEW(self.view, arrow);
motionManager = [[CMMotionManager alloc] init];
motionManager.accelerometerUpdateInterval = 0.005;
if (motionManager.isAccelerometerAvailable)
{
[motionManager
startAccelerometerUpdatesToQueue:
[NSOperationQueue mainQueue]
withHandler:
^(CMAccelerometerData *accelerometerData,
NSError *error) {
CMAcceleration acceleration =
accelerometerData.acceleration;
// Determine up from the x and y acceleration components
float xx = -acceleration.x;
float yy = acceleration.y;
float angle = atan2(yy, xx);
[arrow setTransform:CGAffineTransformMakeRotation(angle)];
}];
}
}
Get This Recipe’s Code
To find this recipe’s full sample project, point your browser to https://github.com/erica/iOS-7-Cookbook and go to the folder for Chapter 14.
Working with Basic Orientation
The UIDevice class uses the built-in orientation property to provide the physical orientation of a device. iOS devices support seven possible values for this property:
![]() UIDeviceOrientationUnknown—The orientation is currently unknown.
UIDeviceOrientationUnknown—The orientation is currently unknown.
![]() UIDeviceOrientationPortrait—The home button is down.
UIDeviceOrientationPortrait—The home button is down.
![]() UIDeviceOrientationPortraitUpsideDown—The home button is up.
UIDeviceOrientationPortraitUpsideDown—The home button is up.
![]() UIDeviceOrientationLandscapeLeft—The home button is to the right.
UIDeviceOrientationLandscapeLeft—The home button is to the right.
![]() UIDeviceOrientationLandscapeRight—The home button is to the left.
UIDeviceOrientationLandscapeRight—The home button is to the left.
![]() UIDeviceOrientationFaceUp—The screen is face up.
UIDeviceOrientationFaceUp—The screen is face up.
![]() UIDeviceOrientationFaceDown—The screen is face down.
UIDeviceOrientationFaceDown—The screen is face down.
The device can pass through any or all these orientations during a typical application session. Although orientation is created in concert with the onboard accelerometer, these orientations are not tied in any way to a built-in angular value.
iOS offers two built-in macros to help determine whether a device orientation enumerated value is portrait or landscape: UIDeviceOrientationIsPortrait() and UIDeviceOrientationIsLandscape(). It is convenient to extend the UIDevice class to offer these tests as built-in device properties, as shown in the following snippet:
@property (nonatomic, readonly) BOOL isLandscape;
@property (nonatomic, readonly) BOOL isPortrait;
- (BOOL) isLandscape
{
return UIDeviceOrientationIsLandscape(self.orientation);
}
- (BOOL) isPortrait
{
return UIDeviceOrientationIsPortrait(self.orientation);
}
The orientation property returns zero until the orientation notifications have been initiated with beginGeneratingDeviceOrientationNotifications. Once device orientation notifications are enabled, your code can subscribe directly to device reorientation notifications by adding an observer to catch the ensuing UIDeviceOrientationDidChangeNotification updates. As you would expect, you can finish listening by calling endGeneratingDeviceOrientationNotification.
Calculating Orientation from the Accelerometer
The UIDevice class does not report a proper orientation when applications are first launched. It updates the orientation only after the device has moved into a new position or UIViewController methods kick in.
An application launched in portrait orientation may not read as “portrait” until the user moves the device out of and then back into the proper orientation. This condition exists on the simulator and on the iPhone device and is easily tested. (Radars—tickets filed in Apple’s issue tracking system—for this issue have been closed with updates that the features are working as designed.)
For a workaround, consider recovering the angular orientation from the accelerometer via Core Motion. You can then calculate the device angle:
float xx = acceleration.x;
float yy = -acceleration.y;
device_angle = M_PI / 2.0f - atan2(yy, xx);
if (device_angle > M_PI)
device_angle -= 2 * M_PI;
Once this is calculated, convert from the accelerometer-based angle to a device orientation. Here’s how that might work in code:
// Limited to the four portrait/landscape options
- (UIDeviceOrientation)acceleratorBasedOrientation
{
CGFloat baseAngle = self.orientationAngle;
if ((baseAngle > -M_PI_4) && (baseAngle < M_PI_4))
return UIDeviceOrientationPortrait;
if ((baseAngle < -M_PI_4) && (baseAngle > -3 * M_PI_4))
return UIDeviceOrientationLandscapeLeft;
if ((baseAngle > M_PI_4) && (baseAngle < 3 * M_PI_4))
return UIDeviceOrientationLandscapeRight;
return UIDeviceOrientationPortraitUpsideDown;
}
Be aware that this example looks only at the x–y plane, which is where most user interface decisions need to be made. This snippet completely ignores the z-axis, meaning that you’ll end up with vaguely random results for the face-up and face-down orientations. Adapt this code to provide that nuance if needed.
The UIViewController class’s interfaceOrientation instance method reports the orientation of a view controller’s interface. Although this is not a substitute for accelerometer readings, many interface layout issues rest on the underlying view orientation rather than device characteristics.
Be aware that, especially on the iPad, a child view controller may use a layout orientation that’s distinct from a device orientation. For example, an embedded controller may present a portrait layout within a landscape split view controller. Even so, consider whether your orientation-detection code is satisfiable by the underlying interface orientation. It may be more reliable than device orientation, especially as the application launches. Develop accordingly.
Calculating a Relative Angle
Screen reorientation support means that an interface’s relationship to a given device angle must be supported in quarters, one for each possible front-facing screen orientation. As the UIViewController automatically rotates its onscreen view, the math needs to catch up to account for those reorientations.
The following method, which is written for use in a UIDevice category, calculates angles so that the angle remains in synchrony with the device orientation. This creates simple offsets from vertical that match the way the GUI is currently presented:
- (float)orientationAngleRelativeToOrientation:
(UIDeviceOrientation)someOrientation
{
float dOrientation = 0.0f;
switch (someOrientation)
{
case UIDeviceOrientationPortraitUpsideDown:
{dOrientation = M_PI; break;}
case UIDeviceOrientationLandscapeLeft:
{dOrientation = -(M_PI/2.0f); break;}
case UIDeviceOrientationLandscapeRight:
{dOrientation = (M_PI/2.0f); break;}
default: break;
}
float adjustedAngle =
fmod(self.orientationAngle - dOrientation, 2.0f * M_PI);
if (adjustedAngle > (M_PI + 0.01f))
adjustedAngle = (adjustedAngle - 2.0f * M_PI);
return adjustedAngle;
}
This method uses a floating-point modulo to retrieve the difference between the actual screen angle and the interface orientation angular offset to return that all-important vertical angular offset.
Note
Beginning with iOS 6, instead of using shouldAutorotateToInterfaceOrientation:, use supportedInterfaceOrientations on your root view controller and/or your Info.plist file to allow and disallow orientation changes. iOS uses the intersection of these two values to determine whether rotation is allowed.
Recipe: Using Acceleration to Move Onscreen Objects
With a bit of programming, the iPhone’s onboard accelerometer can make objects “move” around the screen, responding in real time to the way the user tilts the phone. Recipe 14-4 builds an animated butterfly that users can slide across the screen.
The secret to making this work lies in adding a “physics timer” to the program. Instead of responding directly to changes in acceleration, the way Recipe 14-3 does, the accelerometer handler measures the current forces. It’s up to the timer routine to apply those forces to the butterfly over time by changing its frame. Here are some key points to keep in mind:
![]() As long as the direction of force remains the same, the butterfly accelerates. Its velocity increases, scaled according to the degree of acceleration force in the x or y direction.
As long as the direction of force remains the same, the butterfly accelerates. Its velocity increases, scaled according to the degree of acceleration force in the x or y direction.
![]() The tick routine, called by the timer, moves the butterfly by adding the velocity vector to the butterfly’s origin.
The tick routine, called by the timer, moves the butterfly by adding the velocity vector to the butterfly’s origin.
![]() The butterfly’s range is bounded. So when it hits an edge, it stops moving in that direction. This keeps the butterfly onscreen at all times. The tick method checks for boundary conditions. For example, if the butterfly hits a vertical edge, it can still move horizontally.
The butterfly’s range is bounded. So when it hits an edge, it stops moving in that direction. This keeps the butterfly onscreen at all times. The tick method checks for boundary conditions. For example, if the butterfly hits a vertical edge, it can still move horizontally.
![]() The butterfly reorients itself so it is always falling “down.” This happens through the application of a simple rotation transform in the tick method. Be careful when using transforms in addition to frame or center offsets. Always reset the math before applying offsets and then reapply any angular changes. Failing to do so may cause your frames to zoom, shrink, or skew unexpectedly.
The butterfly reorients itself so it is always falling “down.” This happens through the application of a simple rotation transform in the tick method. Be careful when using transforms in addition to frame or center offsets. Always reset the math before applying offsets and then reapply any angular changes. Failing to do so may cause your frames to zoom, shrink, or skew unexpectedly.
Setup and Teardown
The establishMotionManager and shutDownMotionManager methods in Recipe 14-4 enable your application to start up and shut down the motion manager on demand. These methods are called from the application delegate when the application becomes active and when it suspends:
- (void)applicationWillResignActive:(UIApplication *)application
{
[tbvc shutDownMotionManager];
}
- (void)applicationDidBecomeActive:(UIApplication *)application
{
[tbvc establishMotionManager];
}
These methods provide a clean way to shut down and resume motion services in response to the current application state.
Note
Timers in their natural state do not use a block-based API. If you’d rather use a block than callbacks with your timers, check GitHub to find an implementation that does this.
Recipe 14-4 Sliding an Onscreen Object Based on Accelerometer Feedback
@implementation TestBedViewController
- (void)tick
{
butterfly.transform = CGAffineTransformIdentity;
// Move the butterfly according to the current velocity vector
CGRect rect = CGRectOffset(butterfly.frame, xVelocity, 0.0f);
if (CGRectContainsRect(self.view.bounds, rect))
butterfly.frame = rect;
rect = CGRectOffset(butterfly.frame, 0.0f, yVelocity);
if (CGRectContainsRect(self.view.bounds, rect))
butterfly.frame = rect;
butterfly.transform =
CGAffineTransformMakeRotation(mostRecentAngle - M_PI_2);
}
- (void)shutDownMotionManager
{
NSLog(@"Shutting down motion manager");
[motionManager stopAccelerometerUpdates];
motionManager = nil;
[timer invalidate];
timer = nil;
}
- (void)establishMotionManager
{
if (motionManager)
[self shutDownMotionManager];
NSLog(@"Establishing motion manager");
// Establish the motion manager
motionManager = [[CMMotionManager alloc] init];
if (motionManager.accelerometerAvailable)
[motionManager
startAccelerometerUpdatesToQueue:
[[NSOperationQueue alloc] init]
withHandler:^(CMAccelerometerData *data, NSError *error)
{
// Extract the acceleration components
float xx = -data.acceleration.x;
float yy = data.acceleration.y;
mostRecentAngle = atan2(yy, xx);
// Has the direction changed?
float accelDirX = SIGN(xVelocity) * -1.0f;
float newDirX = SIGN(xx);
float accelDirY = SIGN(yVelocity) * -1.0f;
float newDirY = SIGN(yy);
// Accelerate. To increase viscosity,
// lower the additive value
if (accelDirX == newDirX)
xAccel = (abs(xAccel) + 0.85f) * SIGN(xAccel);
if (accelDirY == newDirY)
yAccel = (abs(yAccel) + 0.85f) * SIGN(yAccel);
// Apply acceleration changes to the current velocity
xVelocity = -xAccel * xx;
yVelocity = -yAccel * yy;
}];
// Start the physics timer
timer = [NSTimer scheduledTimerWithTimeInterval: 0.03f
target:self selector:@selector(tick)
userInfo:nil repeats:YES];
}
- (void)initButterfly
{
CGSize size;
// Load the animation cells
NSMutableArray *butterflies = [NSMutableArray array];
for (int i = 1; i <= 17; i++)
{
NSString *fileName =
[NSString stringWithFormat:@"bf_%d.png", i];
UIImage *image = [UIImage imageNamed:fileName];
size = image.size;
[butterflies addObject:image];
}
// Begin the animation
butterfly = [[UIImageView alloc]
initWithFrame:(CGRect){.size=size}];
[butterfly setAnimationImages:butterflies];
butterfly.animationDuration = 0.75f;
[butterfly startAnimating];
// Set the butterfly's initial speed and acceleration
xAccel = 2.0f;
yAccel = 2.0f;
xVelocity = 0.0f;
yVelocity = 0.0f;
// Add the butterfly
[self.view addSubview:butterfly];
}
- (void)viewDidAppear:(BOOL)animated
{
[super viewDidAppear:animated];
// Get our butterfly centered
butterfly.center = RECTCENTER(self.view.bounds);
}
- (void)loadView
{
self.view = [[UIView alloc] init];
self.view.backgroundColor = [UIColor whiteColor];
[self initButterfly];
}
Get This Recipe’s Code
To find this recipe’s full sample project, point your browser to https://github.com/erica/iOS-7-Cookbook and go to the folder for Chapter 14.
Recipe: Accelerometer-Based Scroll View
Several readers asked that we include a tilt scroller recipe in this edition. A tilt scroller uses a device’s built-in accelerometer to control movement around a UIScrollView’s content. As the user adjusts the device, the material “falls down” accordingly. Instead of a view being positioned onscreen, the content view scrolls to a new offset.
The challenge in creating this interface lies in determining where the device should have its resting axis. Most people would initially suggest that the display should stabilize when lying on its back, with the z-direction pointed straight up in the air. It turns out that’s actually a fairly bad design choice. To use that axis means the screen must actually tilt away from the viewer during navigation. With the device rotated away from view, the user cannot fully see what is happening onscreen, especially when using the device in a seated position and somewhat when looking at the device while standing overhead.
Instead, Recipe 14-5 assumes that the stable position is created by the z-axis pointing at approximately 45 degrees, the natural position at which users hold an iPhone or iPad in their hands. This is halfway between a face-up and a face-forward position. The math in Recipe 14-5 is adjusted accordingly. Tilting back and forward from this slanting position leaves the screen with maximal visibility during adjustments.
The other change in this recipe compared to Recipe 14-4 is the much lower acceleration constant. This enables onscreen movement to happen more slowly, letting users more easily slow down and resume navigation.
Recipe 14-5 Tilt Scroller
- (void)tick
{
xOff += xVelocity;
xOff = MIN(xOff, 1.0f);
xOff = MAX(xOff, 0.0f);
yOff += yVelocity;
yOff = MIN(yOff, 1.0f);
yOff = MAX(yOff, 0.0f);
// update the content offset based on the current velocities
UIScrollView *sv = (UIScrollView *) self.view;
CGFloat xSize = sv.contentSize.width - sv.frame.size.width;
CGFloat ySize = sv.contentSize.height - sv.frame.size.height;
sv.contentOffset = CGPointMake(xOff * xSize, yOff * ySize);
}
- (void) viewDidAppear:(BOOL)animated
{
[super viewDidAppear:animated];
NSString *map = @"http://maps.weather.com/images/\
maps/current/curwx_720x486.jpg";
NSOperationQueue *queue = [[NSOperationQueue alloc] init];
[queue addOperationWithBlock:
^{
// Load the weather data
NSURL *weatherURL = [NSURL URLWithString:map];
NSData *imageData = [NSData dataWithContentsOfURL:weatherURL];
// Update the image on the main thread using the main queue
[[NSOperationQueue mainQueue] addOperationWithBlock:^{
UIImage *weatherImage = [UIImage imageWithData:imageData];
UIImageView *imageView =
[[UIImageView alloc] initWithImage:weatherImage];
CGSize initSize = weatherImage.size;
CGSize destSize = weatherImage.size;
// Ensure that the content size is significantly bigger
// than the screen can show at once
while ((destSize.width < (self.view.frame.size.width * 4)) ||
(destSize.height < (self.view.frame.size.height * 4)))
{
destSize.width += initSize.width;
destSize.height += initSize.height;
}
imageView.frame = (CGRect){.size = destSize};
UIScrollView *sv = (UIScrollView *) self.view;
sv.contentSize = destSize;
[sv addSubview:imageView];
// only allowing accelerometer-based scrolling
scrollView.userInteractionEnabled = NO;
// Activate the accelerometer
[motionManager startAccelerometerUpdatesToQueue:
[NSOperationQueue mainQueue] withHandler:
^(CMAccelerometerData *accelerometerData,
NSError *error) {
// extract the acceleration components
CMAcceleration acceleration =
accelerometerData.acceleration;
float xx = -acceleration.x;
// between face-up and face-forward
float yy = (acceleration.z + 0.5f) * 2.0f;
// Has the direction changed?
float accelDirX = SIGN(xVelocity) * -1.0f;
float newDirX = SIGN(xx);
float accelDirY = SIGN(yVelocity) * -1.0f;
float newDirY = SIGN(yy);
// Accelerate. To increase viscosity lower the additive value
if (accelDirX == newDirX)
xAccel = (abs(xAccel) + 0.005f) * SIGN(xAccel);
if (accelDirY == newDirY)
yAccel = (abs(yAccel) + 0.005f) * SIGN(yAccel);
// Apply acceleration changes to the current velocity
xVelocity = -xAccel * xx;
yVelocity = -yAccel * yy;
}];
// Start the physics timer
[NSTimer scheduledTimerWithTimeInterval:0.03f
target:self selector:@selector(tick)
userInfo:nil repeats:YES];
}];
}];
}
Get This Recipe’s Code
To find this recipe’s full sample project, point your browser to https://github.com/erica/iOS-7-Cookbook and go to the folder for Chapter 14.
Recipe: Retrieving and Using Device Attitude
Imagine an iPad sitting on a desk. There’s an image displayed on the iPad, which you can bend over and look at. Now imagine rotating that iPad as it lays flat on the desk, but as the iPad moves, the image appears to stay fixed in place, retaining the same alignment with the world around it. Regardless of how you spin the iPad, the image doesn’t “move” with the device as the image view updates to balance the physical movement. That’s how Recipe 14-6 works, taking advantage of a device’s onboard gyroscope—a necessary requirement to make this recipe work.
The image adjusts however you hold the device. In addition to that flat manipulation, you can pick up the device and orient it in space. If you flip the device and look at it over your head, you see the reversed “bottom” of the image. As you manipulate the device, the image responds to create a virtual still world within that iPad.
Recipe 14-6 shows how to do this with just a few simple geometric transformations. It establishes a motion manager, subscribes to device motion updates, and then applies image transforms based on the roll, pitch, and yaw returned by the motion manager.
Recipe 14-6 Using Device Motion Updates to Fix an Image in Space
- (void)shutDownMotionManager
{
NSLog(@"Shutting down motion manager");
[motionManager stopDeviceMotionUpdates];
motionManager = nil;
}
- (void)establishMotionManager
{
if (motionManager)
[self shutDownMotionManager];
NSLog(@"Establishing motion manager");
// Establish the motion manager
motionManager = [[CMMotionManager alloc] init];
if (motionManager.deviceMotionAvailable)
[motionManager
startDeviceMotionUpdatesToQueue:
[NSOperationQueue currentQueue]
withHandler: ^(CMDeviceMotion *motion, NSError *error) {
CATransform3D transform;
transform = CATransform3DMakeRotation(
motion.attitude.pitch, 1, 0, 0);
transform = CATransform3DRotate(transform,
motion.attitude.roll, 0, 1, 0);
transform = CATransform3DRotate(transform,
motion.attitude.yaw, 0, 0, 1);
imageView.layer.transform = transform;
}];
}
Get This Recipe’s Code
To find this recipe’s full sample project, point your browser to https://github.com/erica/iOS-7-Cookbook and go to the folder for Chapter 14.
Detecting Shakes Using Motion Events
When the iPhone detects a motion event, such as a shake, it passes that event to the current first responder, the primary object in the responder chain. Responders are objects that can handle events. All views and windows are responders, and so is the application object.
The responder chain provides a hierarchy of objects, all of which can respond to events. When an object toward the start of the chain handles an event, that event does not get passed further down. If it cannot handle it, that event can move on to the next responder.
An object may become the first responder by declaring itself to be so, via becomeFirst-Responder. In this snippet, UIViewController ensures that it becomes the first responder whenever its view appears onscreen, and upon disappearing, it resigns the first responder position:
- (BOOL)canBecomeFirstResponder {
return YES;
}
// Become first responder whenever the view appears
- (void)viewDidAppear:(BOOL)animated {
[super viewDidAppear:animated];
[self becomeFirstResponder];
}
// Resign first responder whenever the view disappears
- (void)viewWillDisappear:(BOOL)animated {
[super viewWillDisappear:animated];
[self resignFirstResponder];
}
First responders receive all touch and motion events. The motion callbacks mirror UIView touch callback stages. The callback methods are as follows:
![]() motionBegan:withEvent:—This callback indicates the start of a motion event. At this writing, only one kind of motion event is recognized: a shake. This may not hold true in the future, so you might want to check the motion type in your code.
motionBegan:withEvent:—This callback indicates the start of a motion event. At this writing, only one kind of motion event is recognized: a shake. This may not hold true in the future, so you might want to check the motion type in your code.
![]() motionEnded:withEvent:—The first responder receives this callback at the end of the motion event.
motionEnded:withEvent:—The first responder receives this callback at the end of the motion event.
![]() motionCancelled:withEvent:—As with touches, motions can be cancelled by incoming phone calls and other system events. Apple recommends that you implement all three motion event callbacks (and, similarly, all four touch event callbacks) in production code.
motionCancelled:withEvent:—As with touches, motions can be cancelled by incoming phone calls and other system events. Apple recommends that you implement all three motion event callbacks (and, similarly, all four touch event callbacks) in production code.
The following snippet shows a pair of motion callback examples:
- (void)motionBegan:(UIEventSubtype)motion
withEvent:(UIEvent *)event {
// Play a sound whenever a shake motion starts
if (motion != UIEventSubtypeMotionShake) return;
[self playSound:startSound];
}
- (void)motionEnded:(UIEventSubtype)motion withEvent:(UIEvent *)event
{
// Play a sound whenever a shake motion ends
if (motion != UIEventSubtypeMotionShake) return;
[self playSound:endSound];
}
If you test this on a device, notice several things. First, from a user perspective, the began and ended events happen almost simultaneously. Playing sounds for both types is overkill. Second, there is a bias toward side-to-side shake detection. The iPhone is better at detecting side-to-side shakes than the front-to-back and up-and-down versions. Finally, Apple’s motion implementation uses a slight lockout approach. You cannot generate a new motion event until a second or so after the previous one was processed. This is the same lockout used by shake-to-shuffle and shake-to-undo events.
Recipe: Using External Screens
There are many ways to use external screens. Take the newest iPads, for example. The second-, third-, and fourth-generation models offer built-in screen mirroring. Attach a VGA or HDMI cable, and your content can be shown on external displays and on the built-in screen. Certain devices enable you to mirror screens wirelessly to Apple TV using AirPlay, Apple’s proprietary cable-free over-the-air video solution. These mirroring features are extremely handy, but you’re not limited to simply copying content from one screen to another in iOS.
The UIScreen class enables you to detect and write to external screens independently. You can treat any connected display as a new window and create content for that display separate from any view you show on the primary device screen. You can do this for any wired screen, and with the iPad 2 and later, the iPhone 4S and later, and the iPod touch fifth generation and later, you can do so wirelessly using AirPlay to Apple TV 2 and later. A third-party app called Reflector enables you to mirror your display to Mac or Windows computers using AirPlay.
Geometry is important. Here’s why: iOS devices currently include the 320×480 old-style iPhone displays, the 640×960-pixel Retina display units, the 1024×768-pixel iPads, and the 2048×1536-pixel Retina display units. Typical composite/component output is produced at 720×480 pixels (480i and 480p) and VGA at 1024×768 and 1280×720 (720p), and then there’s the higher-quality HDMI output as well. Add to this the issues of overscan and other target display limitations, and Video Out quickly becomes a geometric challenge.
Fortunately, Apple has responded to this challenge with some handy real-world adaptations. Instead of trying to create one-to-one correspondences with the output screen and your built-in device screen, you can build content based on the available properties of your output display. You just create a window, populate it, and display it.
If you intend to develop Video Out applications, don’t assume that your users are strictly using AirPlay. Many users still connect to monitors and projectors using old-style cable connections. Make sure you have at least one of each type of cable on hand (composite, component, VGA, and HDMI) and an AirPlay-ready iPhone and iPad, so you can thoroughly test on each output configuration. Third-party cables (not branded with Made for iPhone/iPad) won’t work, so make sure you purchase Apple-branded items.
Detecting Screens
The UIScreen class reports how many screens are connected:
#define SCREEN_CONNECTED ([UIScreen screens].count > 1)
You know that an external screen is connected whenever this count goes above 1. The first item in the screens array is always your primary device screen.
Each screen can report its bounds (that is, its physical dimensions in points) and its screen scale (relating the points to pixels). Two standard notifications enable you to observe when screens have been connected to and disconnected from the device:
// Register for connect/disconnect notifications
[[NSNotificationCenter defaultCenter]
addObserver:self selector:@selector(screenDidConnect:)
name:UIScreenDidConnectNotification object:nil];
[[NSNotificationCenter defaultCenter]
addObserver:self selector:@selector(screenDidDisconnect:)
name:UIScreenDidDisconnectNotification object:nil];
Connection means any kind of connection, whether by cable or via AirPlay. Whenever you receive an update of this type, make sure you count your screens and adjust your user interface to match the new conditions.
It’s your responsibility to set up windows whenever new screens are attached and tear them down when detach events occur. Each screen should have its own window to manage content for that output display. Don’t hold onto windows upon detaching screens. Let them release and then re-create them when new screens appear.
Note
Mirrored screens are not represented in the screens array. Instead, the mirror is stored in the main screen’s mirroredScreen property. This property is nil when mirroring is disabled, unconnected, or simply not supported by the device’s abilities.
Creating a new screen and using it for independent external display always overrides mirroring. So even if a user has enabled mirroring, when your application begins writing to and creating an external display, it takes priority.
Retrieving Screen Resolutions
Each screen provides an availableModes property. This is an array of resolution objects ordered from lowest to highest resolution. Each mode has a size property that indicates a target pixel-size resolution. Many screens support multiple modes. For example, a VGA display might offer as many as one-half dozen or more different resolutions. The number of supported resolutions varies by hardware. There will always be at least one resolution available, but you should offer choices to users when there are more.
Setting Up Video Out
After retrieving an external screen object from the [UIScreens screens] array, query the available modes and select a size to use. As a rule, you can get away with selecting the last mode in the list to always use the highest possible resolution or the first mode for the lowest resolution.
To start a Video Out stream, create a new UIWindow and size it to the selected mode. Add a new view to that window for drawing. Then assign the window to the external screen and make it key and visible. This orders the window to display and prepares it for use. After you do that, make the original window key again. This allows the user to continue interacting with the primary screen. Don’t skip this step. Nothing makes end users crankier than discovering their expensive device no longer responds to their touches. The following snippet implements all of these necessary steps to set up the secondary screen for use:
self.outputWindow = [[UIWindow alloc] initWithFrame:theFrame];
outputWindow.screen = secondaryScreen;
[outputWindow makeKeyAndVisible];
[delegate.view.window makeKeyAndVisible];
Adding a Display Link
Display links are a kind of timer that synchronizes drawing to a display’s refresh rate. You can adjust this frame refresh time by changing the display link’s frameInterval property. It defaults to 1. A higher number slows down the refresh rate. Setting it to 2 halves your frame rate. Create the display link when a screen connects to your device. The UIScreen class implements a method that returns a display link object for its screen. You specify the target for the display link and a selector to call.
The display link fires on a regular basis, letting you know when to update the Video Out screen. You can adjust the interval up for less of a CPU load, but you get a lower frame rate in return. This is an important trade-off, especially for direct manipulation interfaces that require a high level of CPU response on the device side.
The code in Recipe 14-7 uses common modes for the run loop, providing the least latency. You invalidate your display link when you are done with it, removing it from the run loop.
Overscanning Compensation
The UIScreen class enables you to compensate for pixel loss at the edge of display screens by assigning a value to the overscanCompensation property. The techniques you can assign are described in Apple’s documentation; they basically correspond to whether you want to clip content or pad it with black space.
VIDEOkit
Recipe 14-7 introduces VIDEOkit, a basic external screen client. It demonstrates all the features needed to get up and going with wired and wireless external screens. You establish screen monitoring by calling startupWithDelegate:. Pass it the primary view controller whose job it will be to create external content.
The internal init method starts listening for screen attach and detach events and builds and tears down windows as needed. An informal delegate method (updateExternalView:) is called each time the display link fires. It passes a view that lives on the external window that the delegate can draw onto as needed.
In the sample code that accompanies this recipe, the view controller delegate stores a local color value and uses it to color the external display:
- (void)updateExternalView:(UIImageView *)aView
{
aView.backgroundColor = color;
}
- (void)action:(id)sender
{
color = [UIColor randomColor];
}
Each time the action button is pressed, the view controller generates a new color. When VIDEOkit queries the controller to update the external view, it sets this as the background color. You can see the external screen instantly update to a new random color.
Note
Reflector App ($12.99/single license, $54.99/5-computer license, http://reflectorapp.com) provides an excellent debugging companion for AirPlay, offering a no-wires/no-Apple TV solution that works on Mac and Windows computers. It mimics an Apple TV AirPlay receiver, letting you broadcast from iOS direct to your desktop and record that output.
Recipe 14-7 VIDEOkit
@protocol VIDEOkitDelegate <NSObject>
- (void)updateExternalView:(UIView *)view;
@end
@interface VIDEOkit : NSObject
@property (nonatomic, weak) UIViewController<VIDEOkitDelegate> *delegate;
@property (nonatomic, strong) UIWindow *outputWindow;
@property (nonatomic, strong) CADisplayLink *displayLink;
+ (void)startupWithDelegate:
(UIViewController<VIDEOkitDelegate> *)aDelegate;
@end
@implementation VIDEOkit
{
UIImageView *baseView;
}
- (void)setupExternalScreen
{
// Check for missing screen
if (!SCREEN_CONNECTED) return;
// Set up external screen
UIScreen *secondaryScreen = [UIScreen screens][1];
UIScreenMode *screenMode =
[[secondaryScreen availableModes] lastObject];
CGRect rect = (CGRect){.size = screenMode.size};
NSLog(@"Extscreen size: %@", NSStringFromCGSize(rect.size));
// Create new outputWindow
self.outputWindow = [[UIWindow alloc] initWithFrame:CGRectZero];
_outputWindow.screen = secondaryScreen;
_outputWindow.screen.currentMode = screenMode;
[_outputWindow makeKeyAndVisible];
_outputWindow.frame = rect;
// Add base video view to outputWindow
baseView = [[UIImageView alloc] initWithFrame:rect];
baseView.backgroundColor = [UIColor darkGrayColor];
[_outputWindow addSubview:baseView];
// Restore primacy of main window
[_delegate.view.window makeKeyAndVisible];
}
- (void)updateScreen
{
// Abort if the screen has been disconnected
if (!SCREEN_CONNECTED && _outputWindow)
self.outputWindow = nil;
// (Re)initialize if there's no output window
if (SCREEN_CONNECTED && !_outputWindow)
[self setupExternalScreen];
// Abort if encounter some weird error
if (!self.outputWindow) return;
// Go ahead and update
SAFE_PERFORM_WITH_ARG(_delegate,
@selector(updateExternalView:), baseView);
}
- (void)screenDidConnect:(NSNotification *)notification
{
NSLog(@"Screen connected");
UIScreen *screen = [[UIScreen screens] lastObject];
if (_displayLink)
{
[_displayLink removeFromRunLoop:[NSRunLoop currentRunLoop]
forMode:NSRunLoopCommonModes];
[_displayLink invalidate];
_displayLink = nil;
}
self.displayLink = [screen displayLinkWithTarget:self
selector:@selector(updateScreen)];
[_displayLink addToRunLoop:[NSRunLoop currentRunLoop]
forMode:NSRunLoopCommonModes];
}
- (void)screenDidDisconnect:(NSNotification *)notification
{
NSLog(@"Screen disconnected.");
if (_displayLink)
{
[_displayLink removeFromRunLoop:[NSRunLoop currentRunLoop]
forMode:NSRunLoopCommonModes];
[_displayLink invalidate];
self.displayLink = nil;
}
}
- (instancetype)init
{
self = [super init];
if (self)
{
// Handle output window creation
if (SCREEN_CONNECTED)
[self screenDidConnect:nil];
// Register for connect/disconnect notifications
[[NSNotificationCenter defaultCenter]
addObserver:self selector:@selector(screenDidConnect:)
name:UIScreenDidConnectNotification object:nil];
[[NSNotificationCenter defaultCenter] addObserver:self
selector:@selector(screenDidDisconnect:)
name:UIScreenDidDisconnectNotification object:nil];
}
return self;
}
- (void)dealloc
{
[self screenDidDisconnect:nil];
}
+ (VIDEOkit *)sharedInstance
{
static dispatch_once_t predicate;
static VIDEOkit *sharedInstance = nil;
dispatch_once(&predicate, ^{
sharedInstance = [[VIDEOkit alloc] init];
});
return sharedInstance;
}
+ (void)startupWithDelegate:
(UIViewController <VIDEOkitDelegate> *)aDelegate
{
[[self sharedInstance] setDelegate:aDelegate];
}
@end
Get This Recipe’s Code
To find this recipe’s full sample project, point your browser to https://github.com/erica/iOS-7-Cookbook and go to the folder for Chapter 14.
Tracking Users
Tracking is an unfortunate reality of developer life. Apple deprecated the UIDevice property that provided a unique identifier tied to device hardware. It replaced it with two identifier properties. Use advertisingIdentifier in the ASIdentifierManager class to return a device-specific identifier unique to the current device for advertising purposes. The identifierForVendor property on UIDevice supplies an identifier that’s tied to each app vendor. This should return the same unique identifier, regardless of which of your apps is in use. This is not a customer ID. The same app on a different device can return a different identifier, as can an app from a different vendor.
These identifiers are built using the new NSUUID class. You can use this class outside the tracking scenario to create UUID strings that are guaranteed to be globally unique. Apple writes, “UUIDs (Universally Unique Identifiers), also known as GUIDs (Globally Unique Identifiers) or IIDs (Interface Identifiers), are 128-bit values. A UUID is made unique over both space and time by combining a value unique to the computer on which it was generated and a value representing the number of 100-nanosecond intervals since October 15, 1582 at 00:00:00.”
The UUID class method can generate a new RFC 4122v4 UUID on demand. Use [NSUUID UUID] to return a new instance. (Bonus: It’s all in uppercase!) From there, you can retrieve the UUIDString representation or request the bytes directly via getUUIDBytes:.
One More Thing: Checking for Available Disk Space
The NSFileManager class enables you to determine how much space is free on the iPhone and how much space is provided on the device as a whole. Listing 14-1 demonstrates how to check for these values and show the results using a friendly comma-formatted string. The values returned represent the total and free space in bytes.
Listing 14-1 Recovering File System Size and File System Free Size
- (void)logFileSystemAttributes
{
NSFileManager *fm = [NSFileManager defaultManager];
NSDictionary *fsAttr =
[fm attributesOfFileSystemForPath:NSHomeDirectory()
error:nil];
NSNumberFormatter *numberFormatter =
[[NSNumberFormatter alloc] init];
numberFormatter.numberStyle = NSNumberFormatterDecimalStyle;
NSNumber *fileSystemSize =
[fsAttr objectForKey:NSFileSystemSize];
NSLog(@"System space: %@ bytes",
[numberFormatter stringFromNumber:fileSystemSize]);
NSNumber *fileSystemFreeSize =
[fsAttr objectForKey:NSFileSystemFreeSize];
NSLog(@"System free space: %@ bytes",
[numberFormatter stringFromNumber:fileSystemFreeSize]);
}
Summary
This chapter introduces core ways to interact with an iOS device. You have seen how to recover device info, check the battery state, and subscribe to proximity events. You have learned how to differentiate the iPod touch from the iPhone and iPad and determine which model you’re working with. You have discovered the accelerometer and have seen it in use in several examples, from the simple “finding up” to moving onscreen objects and shake detection. You have jumped into Core Motion and learned how to create update blocks to respond to device events in real time. You have also seen how to add external screen support to your applications. Here are a few parting thoughts about the recipes you just encountered:
![]() Low-level calls can be App Store–friendly. They don’t depend on Apple APIs that may change based on the current firmware release. UNIX system calls may seem daunting, but many are fully supported by the iOS device family.
Low-level calls can be App Store–friendly. They don’t depend on Apple APIs that may change based on the current firmware release. UNIX system calls may seem daunting, but many are fully supported by the iOS device family.
![]() When submitting to iTunes, use the Info.plist file to specify which device capabilities are required. iTunes uses this list of required capabilities to determine whether an application can be downloaded to a given device and run properly on that device.
When submitting to iTunes, use the Info.plist file to specify which device capabilities are required. iTunes uses this list of required capabilities to determine whether an application can be downloaded to a given device and run properly on that device.
![]() Remember device limitations. You might want to check for free disk space before performing file-intensive work and for battery charge before running the CPU at full steam.
Remember device limitations. You might want to check for free disk space before performing file-intensive work and for battery charge before running the CPU at full steam.
![]() Dive into Core Motion. The real-time device feedback it provides is the foundation for integrating iOS devices into real-world experiences.
Dive into Core Motion. The real-time device feedback it provides is the foundation for integrating iOS devices into real-world experiences.
![]() The iPhone and iPad accelerometer provides a novel way to complement the touch-based interface. Use acceleration data to expand user interactions beyond the “touch here” basics and to introduce tilt-aware feedback.
The iPhone and iPad accelerometer provides a novel way to complement the touch-based interface. Use acceleration data to expand user interactions beyond the “touch here” basics and to introduce tilt-aware feedback.
![]() Now that AirPlay has cut the cord for external display tethering, you can use Video Out for many more exciting projects than you might have previously imagined. AirPlay and external video screens mean you can transform your iOS device into a remote control for games and utilities that display on big screens and are controlled on small ones.
Now that AirPlay has cut the cord for external display tethering, you can use Video Out for many more exciting projects than you might have previously imagined. AirPlay and external video screens mean you can transform your iOS device into a remote control for games and utilities that display on big screens and are controlled on small ones.
All materials on the site are licensed Creative Commons Attribution-Sharealike 3.0 Unported CC BY-SA 3.0 & GNU Free Documentation License (GFDL)
If you are the copyright holder of any material contained on our site and intend to remove it, please contact our site administrator for approval.
© 2016-2026 All site design rights belong to S.Y.A.