The Core iOS Developer’s Cookbook, Fifth Edition (2014)
Chapter 15. Accessibility
Accessibility enhancements open up iOS to users with disabilities. General Settings features enable users to magnify (or “zoom”) displays, invert colors, and more. For a developer, accessibility enhancement centers on VoiceOver, which enables visually impaired users to “listen” to their GUI. VoiceOver converts an application’s visual presentation into an audio description.
Don’t confuse VoiceOver with Voice Control, or the Siri assistant. The former is a method for presenting an audio description of a UI and is highly gesture-based. The latter refers to Apple’s proprietary voice-recognition technology for hands-free interaction.
This chapter briefly overviews VoiceOver accessibility. You’ll read about adding accessibility labels and hints to your applications and testing those features in the simulator and on the iOS device. Accessibility is available and can be tested on third-generation or later devices, including all iPads, the iPhone 3GS and later, and the third-generation iPod touch and later.
Accessibility 101
Create accessibility by adding descriptive attributes to your UI elements. This programming interface is defined by the informal UIAccessibility protocol and consists of a set of properties including labels, hints, and values. Together, they act to supply information to VoiceOver to present an audible presentation of your interface.
Either assign these properties in code or add them through Interface Builder (IB). Listing 15-1 shows how you could set a button’s accessibilityHint property. This property describes how this control reacts to a user action. In this example, the button’s hint updates when a user types a username into a related text field. The hint changes to match the context of the current UI. Instead of giving a general hint about placing a call, the updated version directly names its target.
Listing 15-1 Programmatically Updating Accessibility Information
- (BOOL)textField:(UITextField *)textField
shouldChangeCharactersInRange:(NSRange)range
replacementString:(NSString *)string
{
// Catch the change to the username field and update
// the accessibility hint to mirror that
NSString *username = textField.text;
if (username && username.length > 1)
callbutton.accessibilityHint = [NSString
stringWithFormat:@"Places a call to %@", username];
else
callbutton.accessibilityHint =
@"Places a call to the person named in the text field.";
return YES;
}
The UIAccessibility protocol includes the following properties:
![]() accessibilityTraits—A set of flags that describe a UI element. These flags specify how items behave or how the interpretive system should treat them. For example, these traits include state, such as selected or enabled, and behavior, such as behaving like a button.
accessibilityTraits—A set of flags that describe a UI element. These flags specify how items behave or how the interpretive system should treat them. For example, these traits include state, such as selected or enabled, and behavior, such as behaving like a button.
![]() accessibilityLabel—A short phrase or word that describes the view’s role or the control’s action (for example, Pause or Delete). Labels can be localized.
accessibilityLabel—A short phrase or word that describes the view’s role or the control’s action (for example, Pause or Delete). Labels can be localized.
![]() accessibilityHint—A short phrase that describes what user actions do with this element (for example, Navigates to the home page). Hints can also be localized.
accessibilityHint—A short phrase that describes what user actions do with this element (for example, Navigates to the home page). Hints can also be localized.
![]() accessibilityFrame—A rectangle specifically for non-view elements, which describes how the object should be represented onscreen. Views use their normal UIView frame property.
accessibilityFrame—A rectangle specifically for non-view elements, which describes how the object should be represented onscreen. Views use their normal UIView frame property.
![]() accessibilityPath—A UIBezierPath that can be used instead of the accessibility frame for elements that are non-rectangular.
accessibilityPath—A UIBezierPath that can be used instead of the accessibility frame for elements that are non-rectangular.
![]() accessibilityValue—The value associated with an object, such as a slider’s current level (for example, 75%) or a switch’s on/off setting (for example, ON).
accessibilityValue—The value associated with an object, such as a slider’s current level (for example, 75%) or a switch’s on/off setting (for example, ON).
Accessibility in IB
The IB Identity Inspector > Accessibility pane (see Figure 15-1) enables you to add accessibility details to UIKit elements in your interface. These fields and the text they contain play different roles in the accessibility picture. There’s a one-to-one correlation with the UIAccessibilityprotocol and the inspector elements presented in IB. As with direct code access, labels identify views; hints describe them. In addition to these fields, you’ll find a general Accessibility Enabled check box and a number of Traits check boxes.

Figure 15-1 IB’s Identity Inspector lets you specify object accessibility information.
Enabling Accessibility
The Enabled check box controls whether a UIKit view works with VoiceOver. To declare an element’s accessibility support, set the isAccessibilityElement property to YES in code or check the Accessibility Enabled box in IB (see Figure 15-1). This Boolean property allows GUI elements to participate in the accessibility system. By default, all UIControl instances inherit the value YES.
As a rule, enable accessibility unless the view is a container whose subviews need to be accessible. Enable only the items at the most direct level of interaction or presentation. Views that organize other views don’t play a meaningful role in the voice presentation. Exclude them.
Table view cells offer a good example of accessibility containers (that is, objects that contain other objects). The rules for table view cells are as follows:
![]() A table view cell without embedded controls should be accessible.
A table view cell without embedded controls should be accessible.
![]() A table view cell with embedded controls should not be accessible. Its child controls should be.
A table view cell with embedded controls should not be accessible. Its child controls should be.
Nonaccessible containers are responsible for reporting how many accessible children they contain and which child views those are. See Apple’s Accessibility Programming Guide for iOS for further details about programming containers for accessibility. Custom container views need to declare and implement the UIAccessibilityContainer protocol.
Traits
Traits characterize UIKit item behaviors. VoiceOver uses these traits while describing interfaces. As Figure 15-1 shows, there are numerous possible traits you can assign to views. Select the traits that apply to the selected view, keeping in mind that you can always update these choices programmatically.
Traits help characterize the elements in your interface to the VoiceOver system. They specify how items behave and how VoiceOver should treat them. You set them via the accessibilityTraits property, by selecting a single flag or OR’ing two or more flags. You can also set them in IB, as you saw in Figure 15-1. These traits vary in how they operate and how VoiceOver uses them.
At the most basic, default level, there’s the “no trait” flag:
![]() UIAccessibilityTraitNone—The element has no traits.
UIAccessibilityTraitNone—The element has no traits.
There are also flags that describe what the user element is. These include the following:
![]() UIAccessibilityTraitButton—The element is a button.
UIAccessibilityTraitButton—The element is a button.
![]() UIAccessibilityTraitLink—The element is a hyperlink.
UIAccessibilityTraitLink—The element is a hyperlink.
![]() UIAccessibilityTraitStaticText—The element is unchanging text.
UIAccessibilityTraitStaticText—The element is unchanging text.
![]() UIAccessibilityTraitSearchField—The element is a search field.
UIAccessibilityTraitSearchField—The element is a search field.
![]() UIAccessibilityTraitImage—The element is a picture.
UIAccessibilityTraitImage—The element is a picture.
![]() UIAccessibilityTraitKeyboardKey—The element acts as a keyboard key.
UIAccessibilityTraitKeyboardKey—The element acts as a keyboard key.
![]() UIAccessibilityTraitHeader—The element is a content header.
UIAccessibilityTraitHeader—The element is a content header.
Apple’s accessibility documents request that you only check one of the following four mutually exclusive items at any time: Button, Link, Static Text, or Search Field. If a button works as a link as well, choose either the button trait or the link trait but not both. You choose which best characterizes how that button is used. At the same time, a button might show an image and play a sound when tapped, and you can freely add those traits.
There are a few basic state flags, which discuss the selection, adjustability, and interactive state of the object:
![]() UIAccessibilityTraitSelected—The element is currently selected, such as in a segmented control or the selected row in a table.
UIAccessibilityTraitSelected—The element is currently selected, such as in a segmented control or the selected row in a table.
![]() UIAccessibilityTraitNotEnabled—The element is disabled, disallowing user interaction.
UIAccessibilityTraitNotEnabled—The element is disabled, disallowing user interaction.
![]() UIAccessibilityTraitAdjustable—The element can be set to multiple values, as with a slider or picker. You specify how much each interaction adjusts the current value by implementing the accessibilityIncrement and accessibilityDecrement methods.
UIAccessibilityTraitAdjustable—The element can be set to multiple values, as with a slider or picker. You specify how much each interaction adjusts the current value by implementing the accessibilityIncrement and accessibilityDecrement methods.
![]() UIAccessibilityTraitAllowsDirectInteraction—The user can touch and interact with the element.
UIAccessibilityTraitAllowsDirectInteraction—The user can touch and interact with the element.
If an element plays a sound when interacted with, there’s a flag for that as well:
![]() UIAccessibilityTraitPlaysSound—The element will play a sound when activated.
UIAccessibilityTraitPlaysSound—The element will play a sound when activated.
Finally, a handful of states caution and describe how an element behaves and interacts with the larger world:
![]() UIAccessibilityTraitUpdatesFrequently—The element changes often enough that you won’t want to overburden the user with its state changes, such as the readout of a stopwatch.
UIAccessibilityTraitUpdatesFrequently—The element changes often enough that you won’t want to overburden the user with its state changes, such as the readout of a stopwatch.
![]() UIAccessibilityTraitStartsMediaSession—The element begins a media session. Use this to limit VoiceOver interruptions when playing back or recording audio or video.
UIAccessibilityTraitStartsMediaSession—The element begins a media session. Use this to limit VoiceOver interruptions when playing back or recording audio or video.
![]() UIAccessibilityTraitSummaryElement—The element provides summary information when the application starts, such as the current settings or state.
UIAccessibilityTraitSummaryElement—The element provides summary information when the application starts, such as the current settings or state.
![]() UIAccessibilityTraitCausesPageTurn—The element should automatically turn the page when VoiceOver finishes reading its text.
UIAccessibilityTraitCausesPageTurn—The element should automatically turn the page when VoiceOver finishes reading its text.
As Figure 15-1 demonstrates, most of these traits (but not all) can be toggled off or on through the IB Identity Inspector pane. If you need finer-grained control, set the flags in code.
Labels
Set an element’s label by assigning its accessibilityLabel property. A good label tells the user what an item is, often with a single word. Label an accessible GUI the same way you’d label a button with text. Edit, Delete, and Add all describe what objects do. They’re excellent button text and accessibility label text.
But accessibility isn’t just about buttons. Feedback, User Photo, and User Name might describe the contents and function of a text view, an image view, and a text label. If an object plays a visual role in your interface, it should play an auditory role in VoiceOver. Here are a few tips for designing your labels:
![]() Do not add the view type into the label. For example, don’t use “Delete button,” “Feedback text view,” or “User Name text field.” VoiceOver adds this information automatically, so “Delete button” in the identity pane becomes “Delete button button” in the VoiceOver playback.
Do not add the view type into the label. For example, don’t use “Delete button,” “Feedback text view,” or “User Name text field.” VoiceOver adds this information automatically, so “Delete button” in the identity pane becomes “Delete button button” in the VoiceOver playback.
![]() Capitalize the label but don’t add a period. VoiceOver uses your capitalization to properly inflect the label when it speaks. Adding a period typically causes VoiceOver to end the label with a downward tone, which does not blend well into the object-type that follows. “Delete. button” sounds wrong. “Delete button” does not.
Capitalize the label but don’t add a period. VoiceOver uses your capitalization to properly inflect the label when it speaks. Adding a period typically causes VoiceOver to end the label with a downward tone, which does not blend well into the object-type that follows. “Delete. button” sounds wrong. “Delete button” does not.
![]() Aggregate information. When working with complex views that function as a single unit, build all the information in that view into a single descriptive label and attach it to that parent view. For example, in a table view cell with several subviews but without individual controls, you might aggregate all the text information into a single label that describes the entire cell.
Aggregate information. When working with complex views that function as a single unit, build all the information in that view into a single descriptive label and attach it to that parent view. For example, in a table view cell with several subviews but without individual controls, you might aggregate all the text information into a single label that describes the entire cell.
![]() Label only at the lowest interaction level. When users need to interact with subviews, label at that level. Parent views, whose children are accessible, do not need labels.
Label only at the lowest interaction level. When users need to interact with subviews, label at that level. Parent views, whose children are accessible, do not need labels.
![]() Localize. Localizing your accessibility strings opens them up to the widest audience of users.
Localize. Localizing your accessibility strings opens them up to the widest audience of users.
Hints
Assign the accessibilityHint property to set an element’s hint. Hints tell users what to expect from interaction. In particular, they describe any nonobvious results. For example, consider an interface where tapping on a name—for example, John Smith—attempts to call that person by telephone. The name itself offers no information about the interaction outcome, so offer a hint telling the user about it—for example, “Places a phone call to this person,” or, even better, “Places a phone call to John Smith.” Here are tips for building better hints:
![]() Use sentence form. Start with a capital letter and end with a period. Do this even though each hint has a missing, implied subject. For example, in “Clears text in the form,” the implied subject is “This button.” Using sentence format ensures that VoiceOver speaks the hint with proper inflection.
Use sentence form. Start with a capital letter and end with a period. Do this even though each hint has a missing, implied subject. For example, in “Clears text in the form,” the implied subject is “This button.” Using sentence format ensures that VoiceOver speaks the hint with proper inflection.
![]() Use verbs that describe what the element does, not what the user does. “[This text label] Places a phone call to this person.” provides the right context for the user. “[You will] Place a phone call to this person.” does not.
Use verbs that describe what the element does, not what the user does. “[This text label] Places a phone call to this person.” provides the right context for the user. “[You will] Place a phone call to this person.” does not.
![]() Do not say the name or type of the GUI element. Avoid hints that refer to the UI item being manipulated. Skip the GUI name (its label, such as “Delete”) and type (its class, such as “button”). VoiceOver adds that information where needed, preventing any overly redundant playback, such as the confusing “Delete button [label] button [VoiceOver description] button [hint] removes item from screen.” Use the succinct “Removes item from screen.” instead.
Do not say the name or type of the GUI element. Avoid hints that refer to the UI item being manipulated. Skip the GUI name (its label, such as “Delete”) and type (its class, such as “button”). VoiceOver adds that information where needed, preventing any overly redundant playback, such as the confusing “Delete button [label] button [VoiceOver description] button [hint] removes item from screen.” Use the succinct “Removes item from screen.” instead.
![]() Avoid the action. Do not describe the action that the user takes. Do not say “Swiping places a phone call to this person” or “Tapping places a phone call to this person.” VoiceOver uses its own set of gestures to activate GUI elements. Never refer to gestures directly.
Avoid the action. Do not describe the action that the user takes. Do not say “Swiping places a phone call to this person” or “Tapping places a phone call to this person.” VoiceOver uses its own set of gestures to activate GUI elements. Never refer to gestures directly.
![]() Be verbose. “Places call” does not describe the outcome as well as “Places a call to this person,” or, even better, “Places a call to John Smith.” A short but thorough explanation better helps the user than one that is so terse that the user has to guess about details. Avoid hints that require the user to listen again before proceeding.
Be verbose. “Places call” does not describe the outcome as well as “Places a call to this person,” or, even better, “Places a call to John Smith.” A short but thorough explanation better helps the user than one that is so terse that the user has to guess about details. Avoid hints that require the user to listen again before proceeding.
![]() Localize. As with labels, localizing your accessibility hints works with the widest user base.
Localize. As with labels, localizing your accessibility hints works with the widest user base.
Testing with the Simulator
The iOS simulator’s Accessibility Inspector is designed for testing accessible applications before deploying them to the iOS device. The simulator’s inspector simulates VoiceOver interaction with your application, providing immediate visual feedback via a floating pane (there is no actual voice produced) without requiring the use of the VoiceOver gesture interface directly. Because you cannot replicate many VoiceOver gestures with the simulator (such as triple-swipes and sequential hold-then-tap gestures), the inspector focuses on describing interface items rather than responding to VoiceOver gestures.
Enable this feature by opening Settings > General > Accessibility. Switch the Accessibility Inspector to On. The inspector, shown in Figure 15-2, immediately appears. It lists the current settings for the currently selected accessible element.
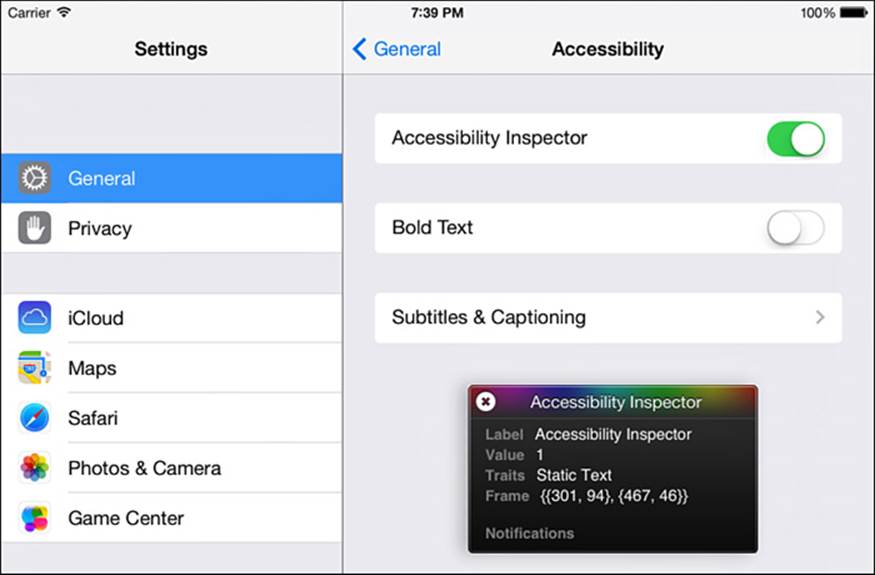
Figure 15-2 The iPad simulator’s Accessibility Inspector highlights the currently selected GUI feature, revealing its label, hint, and other accessibility properties.
Note
Unfortunately, Apple’s current Xcode 5 development tools do not properly support the simulator’s Accessibility Inspector. Apple should remedy this in a future update. The screen shots presented here are edited compositions based on the current presentation in Xcode 5 along with the valid inspector content provided with Xcode 4.6. The fully functional screens should be similar to those provided.
Know how to enable and disable the inspector: The circled X in the top-left corner of the inspector controls that behavior. Click it once to shrink the inspector to a disabled single line. Click again to restore the inspector to active mode. For the most part, keep the inspector disabled until you actually need to inspect a GUI item. Figure 15-3 shows a button interface as described in the Accessibility Inspector.
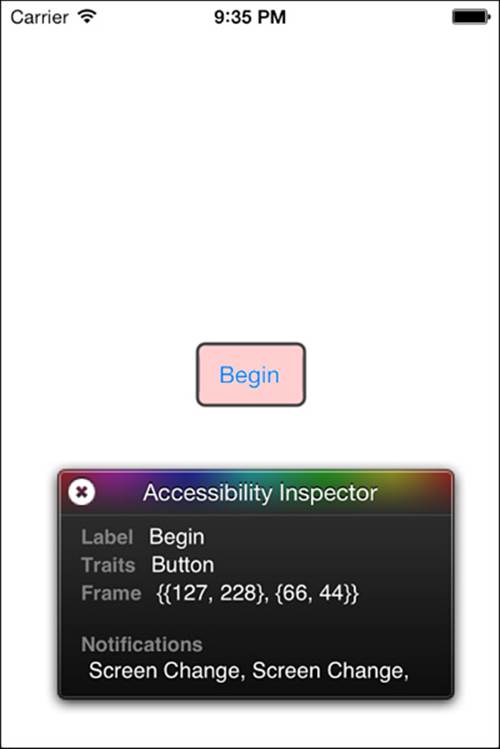
Figure 15-3 The Accessibility Inspector reflects the values set either in IB or in code that describe the currently selected item.
Like VoiceOver, the inspector interferes with normal application gestures. It will slow down your work, so use it sparingly (normally when you are ready to test). Launch your application with the inspector disabled but available. Navigate to the screen you want to work with and then enable the inspector.
When you update accessibility hints in code, the inspector updates in real time to match those changes. Activating the inspector allows you to view the current hint as those changes happen, ensuring that the onscreen hints and labels reflect the up-to-date interface.
Broadcasting Updates
Your application should post notifications to let the VoiceOver accessibility system know about onscreen element changes outside direct user interaction:
![]() When you add or remove a GUI element the UIAccessibilityLayoutChanged-Notification gives the VoiceOver accessibility system a heads-up about those changes.
When you add or remove a GUI element the UIAccessibilityLayoutChanged-Notification gives the VoiceOver accessibility system a heads-up about those changes.
![]() Applications can post a UIAccessibilityPageScrolledNotification after completing a scroll action. The notification’s object should contain a description of the new scroll position (for example, “Page 5 of 17” or “Tab 2 of 4”).
Applications can post a UIAccessibilityPageScrolledNotification after completing a scroll action. The notification’s object should contain a description of the new scroll position (for example, “Page 5 of 17” or “Tab 2 of 4”).
![]() When the zoomed frame changes, send a UIAccessibilityZoomFocusChanged notification. Include a user dictionary with type, frame, and view parameters. These parameters specify the type of zoom that has taken place, the currently zoomed frame (in screen coordinates), and the view that contains the zoomed frame.
When the zoomed frame changes, send a UIAccessibilityZoomFocusChanged notification. Include a user dictionary with type, frame, and view parameters. These parameters specify the type of zoom that has taken place, the currently zoomed frame (in screen coordinates), and the view that contains the zoomed frame.
In addition to these change updates, you can broadcast general announcements through the accessibility VoiceOver system. UIAccessibilityAnnouncementNotification takes one parameter, a string, which contains an announcement. Use this to notify users when tiny GUI changes take place, or for changes that only briefly appear on screen, or for changes that don’t affect the UI directly.
Testing Accessibility on iOS
Testing on the iPhone or iPad is a critical part of accessibility development. The device enables you to work with the actual VoiceOver utility rather than a window-based inspector. You hear what your users will hear and can test your GUI with your fingers and ears rather than with your eyes.
Like the simulator, the iPhone provides a way to enable and disable VoiceOver on-the-fly. Although you can enable VoiceOver in Settings and then test your application with VoiceOver running, you’ll find that it’s much easier to use a special toggle. The toggle lets you avoid the hassle of navigating out of Settings and over to your application by using VoiceOver gestures. You can switch VoiceOver off, use normal iOS interactions to get your application started, and then switch VoiceOver back on when you’re ready to test.
To enable that toggle, follow these steps:
1. Go to the Accessibility settings pane. Navigate to Settings > General > Accessibility.
2. Locate and tap Accessibility Shortcut to display a list of possible accessibility actions for when you triple-click the hardware Home button.
3. Choose VoiceOver to set it as your triple-click action. When it is selected (a check appears to its right), enable and disable VoiceOver by triple-clicking the physical Home button at the bottom of your iOS device. A spoken prompt confirms the current VoiceOver setting.
This VoiceOver toggle offers you the ability to skip many of the laborious details involved in navigating to your application using triple-fingered drags and multistage button clicks. At the same time, you should be conversant with VoiceOver gestures and interactions. Table 15-1 summarizes the VoiceOver gestures that you need to know to test your application.
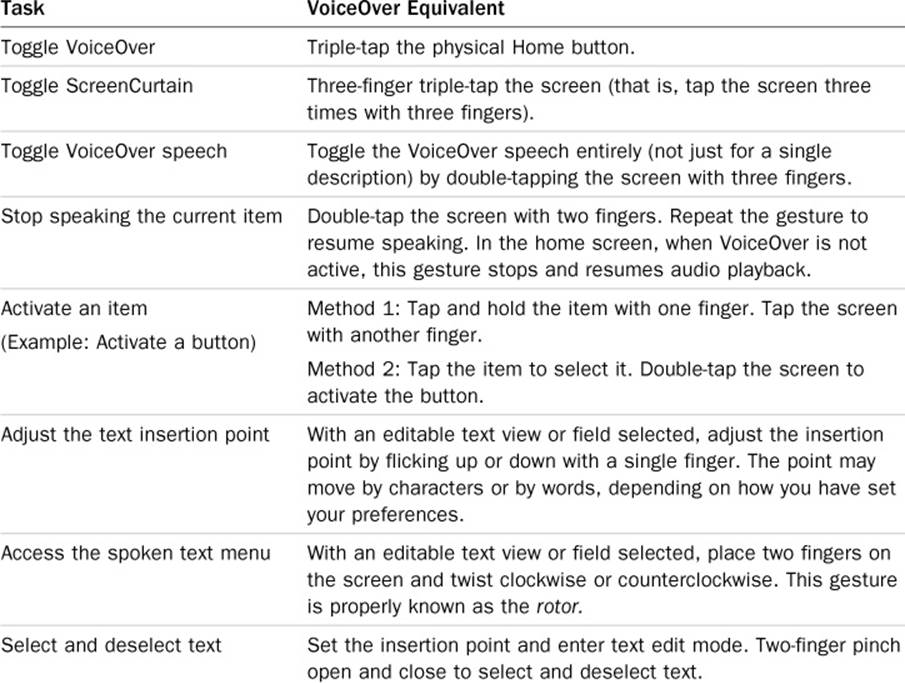
Table 15-1 Common VoiceOver Gestures for Applications
Take special note of Screen Curtain, which enables you to blank your device display, offering a true test of your application as an audio-based interface. Try the iPhone calculator application with Screen Curtain enabled to gain a true sense of the challenge of using an iPhone application without sight.
Speech Synthesis
In iOS 7, Apple added text-to-speech capability, providing another handy tool for both accessibility and other tasks, including navigation and general fun. Use the AVSpeechSynthesizer and AVSpeechUtterance classes to speak any string you would like. This can be handy for long-form speech and provides a greater level of programmatic control than VoiceOver, including voice selection, pitch, rate, and timing. In addition, this functionality is available even when the user is not utilizing Accessibility.
Listing 15-2 demonstrates the utterance of a simple string with the added twist of randomizing the voice from all currently available English-speaking voices. You can easily change this to other languages and locales. Use AVSpeechSynthesisVoice to select a specific language or to iterate through all available voices.
Listing 15-2 Utilizing Text-to-Speech in iOS 7
- (void)action
{
// Establish a new utterance
AVSpeechUtterance *utterance =
[AVSpeechUtterance speechUtteranceWithString:
@"Hello there you beautiful world!"];
// Slow down the rate
utterance.rate = AVSpeechUtteranceMinimumSpeechRate +
(AVSpeechUtteranceMaximumSpeechRate –
AVSpeechUtteranceMinimumSpeechRate) * 0.2f;
// Set the language
utterance.voice = [self anotherVoiceForLanguage:@"en"];
// Speak
AVSpeechSynthesizer *synthesizer =
[[AVSpeechSynthesizer alloc] init];
[synthesizer speakUtterance:utterance];
}
- (AVSpeechSynthesisVoice *)anotherVoiceForLanguage:
NSString *)lang
{
srand(time(NULL));
NSArray *voices = [AVSpeechSynthesisVoice speechVoices];
NSMutableArray *voicesForLanguage =
[[NSMutableArray alloc] init];
for (AVSpeechSynthesisVoice * voice in voices)
{
if ([voice.language hasPrefix:lang])
[voicesForLanguage addObject:voice];
}
NSUInteger voiceIndex =
rand() % voicesForLanguage.count;
return voicesForLanguage[voiceIndex];
}
Dynamic Type
iOS has long supported accessibility features to adapt apps for a wide range of abilities and limitations. Now, under iOS 7, that philosophy has entered the mainstream of day-to-day app use. Users may adjust display settings throughout all their installed apps that opt in.
A single setting in General > Text Size (see Figure 15-4) globally adjusts reading size—including font weight, line height, and spacing. Younger users with strong eyes can dial back on font sizes, displaying more text on each screen. Older folks with weaker vision can push out bigger font requests with a simple drag.
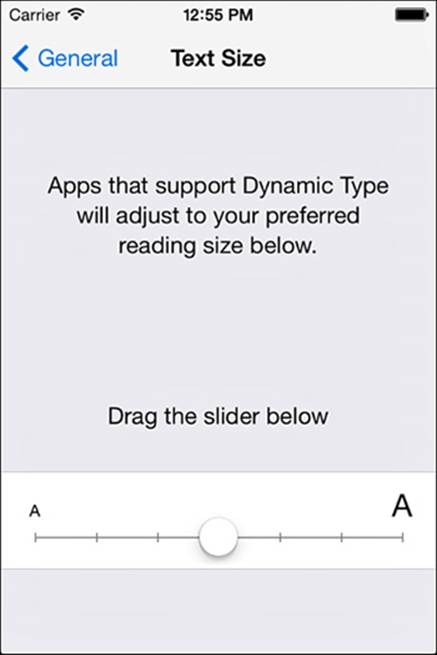
Figure 15-4 Changing text size globally involves a simple slider in the General system preferences in iOS 7.
To use Dynamic Type in your app, you must select fonts via the preferredFontForTextStyle method and pass in one of the following styles: UIFontTextStyleHeadline, UIFontTextStyleSubheadline, UIFontTextStyleBody, UIFontTextStyleFootnote,UIFontTextStyleCaption1, or UIFontTextStyleCaption2. If you use the preconfigured text styles instead of specifying a font name and size directly, iOS will style and size your fonts appropriately, based on the General settings.
To respond to user changes in text size, add an observer for UIContentSizeCategoryDidChangeNotification and update your UI appropriately:
UIViewController __weak *weakself = self;
[[NSNotificationCenter defaultCenter]
addObserverForName:UIContentSizeCategoryDidChangeNotification
object:nil
queue:[NSOperationQueue mainQueue]
usingBlock:^(NSNotification *note) {
UIViewController *strongSelf = weakself;
[strongSelf performSelector:@selector(updateLayout)];
}];
Using Auto Layout and standard UIKit text elements, much of the work will be handled for you. Generally, resetting the font on the UILabel or UITextView will invalidate the intrinsic content size and force a re-layout. For manual, frame-based layout, you need to callsetNeedsLayout to trigger a re-layout.
Summary
When an iOS application opens itself to Accessibility, it becomes an active participant in a wider ecosystem, with a larger potential user base. Here are a few thoughts to take with you:
![]() Including accessibility labels and hints creates new audiences for your application, just as language localizations do. Adding these takes relatively little work to achieve and offers excellent payoffs to your users.
Including accessibility labels and hints creates new audiences for your application, just as language localizations do. Adding these takes relatively little work to achieve and offers excellent payoffs to your users.
![]() Keep the role of labels and hints in mind as you prepare an auditory description of your application in IB.
Keep the role of labels and hints in mind as you prepare an auditory description of your application in IB.
![]() Don’t be afraid to change hints programmatically. Let your interface descriptions update as your interface does, to provide the best possible experience for visually impaired users.
Don’t be afraid to change hints programmatically. Let your interface descriptions update as your interface does, to provide the best possible experience for visually impaired users.
![]() iOS’s accessibility system is an evolving system. Keep on top of Apple’s documentation to find the latest updates and changes.
iOS’s accessibility system is an evolving system. Keep on top of Apple’s documentation to find the latest updates and changes.
![]() Test with Screen Curtain. A blank screen provides the best approximation of the VoiceOver user experience.
Test with Screen Curtain. A blank screen provides the best approximation of the VoiceOver user experience.
A. Objective-C Literals
Think about how often you type cookie-cutter templates like [NSNumber numberWith-Integer:5] to produce number objects in your code. Perhaps you’ve defined macros to simplify your coding. Beginning in Xcode 4.4 (and LLVM 4.0), Objective-C literals introduce features that transform awkward constructs such as NSNumber and NSArray creation instances into easy-to-read parsimonious expressions.
Speaking as those who long created/used macro definitions for the NSNumber declarations, we love the way these literals provide more readable, succinct code. These literals save an enormous amount of typing and provide a natural, coherent presentation.
Now, instead of establishing an endless series of those declarations, you can use a simple literal like @5. This number literal is just like the string literals you’ve used for years. With strings, follow the at sign with a string constant (for example, @"hello"); with numbers, use an at sign followed by a number value. Similar literals simplify the creation and indexing of NSDictionarys and NSArrays.
This new advance squeezes together previously wordy constructs to create simpler, more succinct representations.
Numbers
Through the magic of its LLVM Clang compiler, Xcode’s number literals allow you to wrap scalar values like integers and floating-point numbers into object containers. Just add an @ prefix to a scalar. For example, you can transform 2.7182818 to a conforming NSNumber object as follows:
NSNumber *eDouble = @2.7182818;
This number literal is functionally equivalent to the following:
NSNumber *eDouble = [NSNumber numberWithDouble: 2.7182818];
The difference is that the compiler takes care of the heavy lifting for you. You don’t have to use a class call, and you don’t have to write out a full method, brackets and all. Instead, you prefix the number with @ and let Clang do the rest of the work.
Standard suffixes allow you to specify whether a number is a float (F), long (L), longlong (LL), or unsigned (U). Here are some examples of how you would use them. Notice how simple each declaration is, not requiring you to use numerous specialized method calls:
NSNumber *two = @2; // [NSNumber numberWithInt:2];
NSNumber *twoUnsigned = @2U; // [NSNumber numberWithUnsignedInt:2U];
NSNumber *twoLong = @2L; // [NSNumber numberWithLong:2L];
NSNumber *twoLongLong = @2LL; // [NSNumber numberWithLongLong:2LL];
NSNumber *eDouble = @2.7182818; // [NSNumber numberWithDouble: 2.7182818];
NSNumber *eFloat = @2.7182818F; // [NSNumber numberWithFloat: 2.7182818F];
Unfortunately, according to the Clang specification, you cannot wrap long double numbers. (Apple’s runtime doesn’t support long doubles either.) Be aware that the following statement causes the compiler to complain:
NSNumber *eLongDouble = @2.7182818L; // Will not compile
The Boolean constants @YES and @NO produce number objects equivalent to [NSNumber numberWithBool:YES] and [NSNumber numberWithBool:NO].
Finally, note that @-5 works in Xcode 4.5 and later. You don’t have to enclose the value in parentheses.
Boxing
Xcode 4.4 supports only literal scalar constants after the @. If you want to interpret a value and then convert it to a number object, you have to use the traditional method call:
NSNumber *two = [NSNumber numberWithInt:(1+1)];
Xcode 4.5 introduced boxed expression support, avoiding this awkward approach. Boxed expressions are values that are interpreted and then converted to number objects. A boxed expression is enclosed in parentheses, and it tells the compiler to evaluate and then convert to an object. For example:
NSNumber *two = @(1+1);
and
int foo = ...; // some value
NSNumber *another = @(foo);
Boxed expressions are not limited to numbers. They work for strings as well. The following assignment evaluates the results of strstr() and forms an NSString from the results (that is, @"World!"):
NSString *results = @(strstr("Hello World!", "W"));
Enums
When working with boxing, you need to think of other considerations as well. Take enums, for example. Although you might think that you should be able to define an enum and then use it directly, allowing user-defined sequences that start with @ and continue with text could cause issues. Observe the following poorly chosen enum:
enum {interface, implementation, protocol};
You might imagine that you could create an NSNumber with the value 2 by defining the following:
NSNumber *which = @protocol;
This would, quite obviously, be bad. Boxing prevents any conflict with current and future @-delimited literals:
NSNumber *which = @(protocol); // [NSNumber numberWithInt:2];
Container Literals
Container literals add another great language feature to the LLVM Clang compiler. Prior to its addition, you had to create dictionaries and arrays as shown in the following snippet, which creates a three-item array and a three-key dictionary:
NSArray *array = [NSArray arrayWithObjects: @"one", @"two", @"three", nil];
NSDictionary *dict = [NSDictionary dictionaryWithObjectsAndKeys:
@"value 1", @"key 1",
@"value 2", @"key 2",
@"value 3", @"key 3",
nil];
These forms are wordy and require a nil terminator. That’s not always a bad thing, but certainly it’s a thing that’s easy to forget and that’s bitten nearly every developer at some point along the line. What’s more, the dictionary declaration requires value followed by key. That’s the opposite of how most people conceptualize and express dictionary entries, even though the method name indicates the proper order.
Container literals address both concerns by introducing a new, simpler syntax. These examples declare an array and a dictionary with the same contents as the manual example you saw detailed earlier:
NSArray *array = @[@"one", @"two", @"three"];
NSDictionary *dict = @{
@"key 1":@"value 1",
@"key 2":@"value 2",
@"key 3":@"value 3"
};
Array literals consist of square brackets with a comma-delimited list of items. Dictionaries are formed with a list enclosed in curly braces, where comma-delimited key/value pairs are associated by colons. In neither case do you need to add a nil terminator. Notice that the key/value ordering has switched to a far more sensible key-then-value definition versus the older object-then-key layout.
When evaluated, these expressions produce the same results as the previous two assignments declared with the traditional approach. The standard container rules still apply:
![]() Don’t add keys or values that evaluate to nil.
Don’t add keys or values that evaluate to nil.
![]() Make sure that each item is typed as an object pointer.
Make sure that each item is typed as an object pointer.
![]() Keys must conform to <NSCopying>.
Keys must conform to <NSCopying>.
Subscripting
Clang introduces container access using standard subscripting, via square brackets. In other words, you can now access an NSArray just as you would a C array. You can do the same with an NSDictionary, although indexed by key rather than number. Here are a couple examples of doing so, using the array and dictionary declared earlier:
NSLog(@"%@", array[1]); // @"two"
NSLog(@"%@", dictionary[@"key 2"]); // @"value 2"
But you’re not just limited to value look-ups. Using this new syntax, you can also perform assignments for mutable instances. Here’s how you might use the new subscripting features in simple assignments:
mutableArray[0] = @"first!";
mutableDictionary[@"some key"] = @"new value";
You still have to watch out for the index. Reading and writing an index outside the array range raises an exception.
Best of all, you can extend this subscripted behavior to custom classes by implementing support for a few core methods. So, if you want an element of a custom class to offer indexed access, you can provide that support by implementing one or more of the following methods:
![]() -(id) objectAtIndexedSubscript: anIndex
-(id) objectAtIndexedSubscript: anIndex
![]() -(void) setObject: newValue atIndexedSubscript: anIndex
-(void) setObject: newValue atIndexedSubscript: anIndex
![]() -(id) objectForKeyedSubscript: aKey
-(id) objectForKeyedSubscript: aKey
![]() -(void) setObject: newValue forKeyedSubscript: aKey
-(void) setObject: newValue forKeyedSubscript: aKey
You choose whether you want access by order (array-style index) or keyword (dictionary-style key) and whether that access can update values (mutable style). Simply implement the methods you want to support and let the compiler handle the rest for you.
Feature Tests
As a final note, be aware that you can create feature-dependent coding. Just use Clang’s __has_feature test to see whether literals are available in the current compiler. Feature tests include array literals (objc_array_literals), dictionary literals (objc_dictionary_literals), object subscripting (objc_subscripting), numeric literals (objc_bool), and boxed expressions (objc_boxed_expressions):
#if __has_feature(objc_array_literals)
// ...
#else
// ...
#endif
All materials on the site are licensed Creative Commons Attribution-Sharealike 3.0 Unported CC BY-SA 3.0 & GNU Free Documentation License (GFDL)
If you are the copyright holder of any material contained on our site and intend to remove it, please contact our site administrator for approval.
© 2016-2026 All site design rights belong to S.Y.A.