iOS Auto Layout Demystified, Second Edition (2014)
Chapter 5. Debugging Constraints
So, you have taken the plunge and added constraints to your project. Now, things either don’t work the way you expect or you are seeing dreaded errors about conflicting constraints. Constraints can be maddeningly opaque. The code and interface files you create them with don’t lend themselves to easy perusal. It takes only a few “helpful” Xcode log messages to make some developers start pulling out their hair. This chapter is dedicated to shining light upon the lowly constraint.
You’re about to dive into varied and exhaustive ways to read logs and explore constraints more manageably. Helper functions make your code more debugger friendly and minimize time spent diagnosing layout issues. You’ll find ideas that will help reduce the pain of reviewing, understanding, and debugging your layout. Read on to learn how to simplify Auto Layout debugging.
Xcode Feedback
Xcode 5 provides constraint feedback throughout the creation of your interfaces. You receive important status updates during development, at compilation, and at runtime. Use them to diagnose and fix layout issues.
Development Feedback
During development, Interface Builder (IB) provides immediate updates on the state of your storyboard and xib layout. As you see in Figure 5-1, constraint colors in the canvas and view outlines express how your layout is functioning. When you see orange (ambiguous) and red (conflicting) items, you know you need to fix problematic layout. The overall color you’re aiming for is blue. An interface drawn entirely with blue constraint lines is fully satisfied.
At the top right of the jump bar, the Issue Stepper pop-up details immediate Auto Layout issues. In Figure 5-1, the list warns about problems with frames and conflicting constraints for this storyboard.
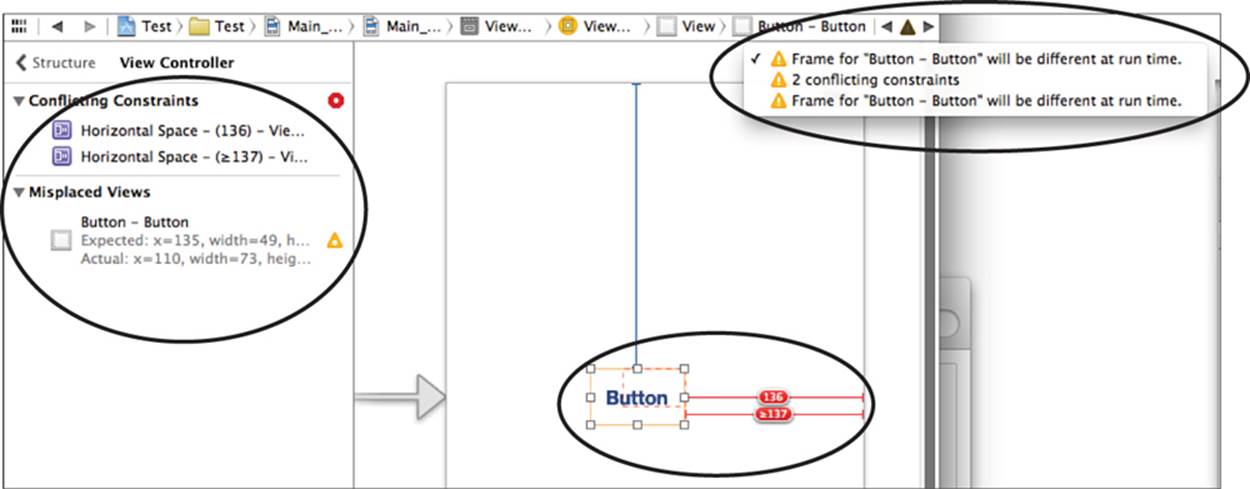
Figure 5-1 Xcode 5 provides cues about the state of your views and constraints under Auto Layout.
An issues pane for each storyboard scene appears in the outline view. You can reach it by clicking the circled arrow associated with problematic scenes. Here, IB lists problems such as conflicting constraints and misplaced views on an issue-by-issue basis.
Compiler Feedback
The Issue Navigator (see Figure 5-2) lists errors and warnings created at compile time. Here, you find items that raise warnings about your layout. These mirror the design-time warnings you see in the Issue Stepper at the top-right of Figure 5-1.
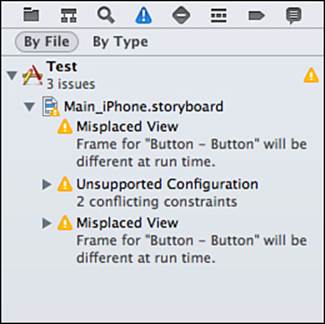
Figure 5-2 Xcode’s Issue Navigator lists compile-time interface defects.
Select a warning to open the associated file—in this case the storyboard—and for most warnings, Xcode highlights the problematic item within the file.
Runtime
At runtime, the debugging console at the bottom of the Xcode workspace (see Figure 5-3) offers real-time feedback about the state of Auto Layout issues. Here you find updates that highlight problems sourced from storyboard, xib, and code-based constraint management. You use these messages to diagnose and resolve layout problems in your app.
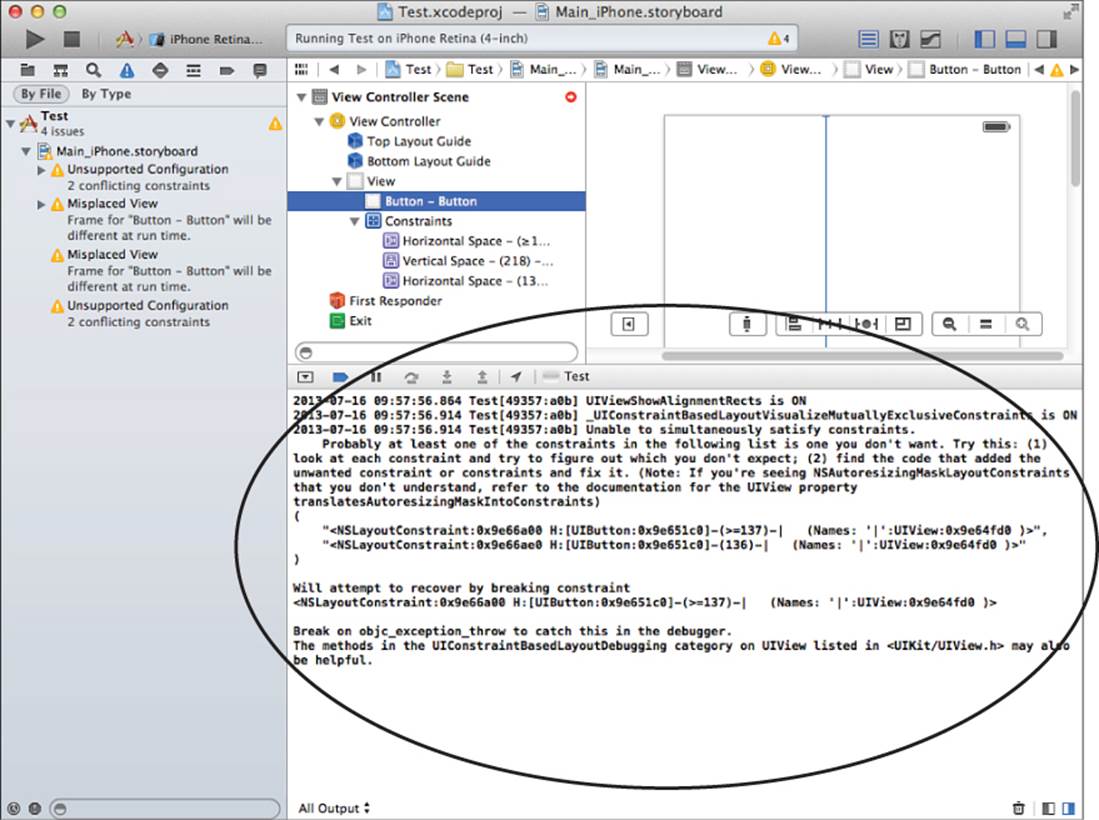
Figure 5-3 The debugging console shows Auto Layout feedback at runtime.
Reading Console Logs
The most common problems you encounter when adding constraints programmatically are ambiguous and unsatisfiable layouts. Expect to spend time at the Xcode debugging console, and don’t be surprised when you see a large dump of information that starts with the phrase “Unable to simultaneously satisfy constraints.”
Auto Layout does its best during runtime to let you know which constraints could not be satisfied and which constraints it has to break in order to proceed. Often, it suggests a list of constraints that you should evaluate to see which item is causing the problem.
This section introduces two common conflict scenarios and explains the console information provided to you.
Autosizing Issues Example
The console output in Example 5-1 is typical of what you should expect to see in the debugger console. It shows a common Auto Layout message. I have bolded the pertinent parts.
Example 5-1 Autosizing Console Output
2013-01-31 08:57:42.184 HelloWorld[81805:c07] Unable to simultaneously satisfy
constraints.
Probably at least one of the constraints in the following list is one you
don't want. Try this: (1) look at each constraint and try to figure out which you
don't expect; (2) find the code that added the unwanted constraint or constraints
and fix it. (Note: If you're seeing NSAutoresizingMaskLayoutConstraints that you
don't understand, refer to the documentation for the UIView property
translatesAutoresizingMaskIntoConstraints)
(
"<NSAutoresizingMaskLayoutConstraint:0x750f280 h=--& v=--&
H:[UIView:0x7507860(320)]>",
"<NSAutoresizingMaskLayoutConstraint:0x750d860 h=--& v=--& UILabel:0x7507c70.midX
== + 50>",
"<NSLayoutConstraint:0x7509c20 UILabel:0x7507c70.centerX == UIView:0x7507860.
centerX>"
)
Will attempt to recover by breaking constraint
<NSLayoutConstraint:0x7509c20 UILabel:0x7507c70.centerX == UIView:0x7507860.centerX>
Break on objc_exception_throw to catch this in the debugger.
The methods in the UIConstraintBasedLayoutDebugging category on UIView listed in
<UIKit/UIView.h> may also be helpful.
Here’s a breakdown of the message this output displays:
![]() Logs start with a complaint. In this example, the problem is unsatisfiability. Auto Layout cannot simultaneously satisfy all the constraints currently added to the system.
Logs start with a complaint. In this example, the problem is unsatisfiability. Auto Layout cannot simultaneously satisfy all the constraints currently added to the system.
![]() An informative message explains what you should do to resolve this issue. Here, you’re told to examine a list of constraints and determine which one may be causing your issue.
An informative message explains what you should do to resolve this issue. Here, you’re told to examine a list of constraints and determine which one may be causing your issue.
![]() Next, you see the list of problem candidates. Each constraint’s full description explains the item’s role in the interface.
Next, you see the list of problem candidates. Each constraint’s full description explains the item’s role in the interface.
![]() Sometimes, the Auto Layout system takes action. The next section explains what that action is. In this example, Auto Layout attempts to recover by breaking one of the constraints. It tells you which constraint was affected. Here, it’s a centering constraint.
Sometimes, the Auto Layout system takes action. The next section explains what that action is. In this example, Auto Layout attempts to recover by breaking one of the constraints. It tells you which constraint was affected. Here, it’s a centering constraint.
![]() Finally, you’re referred to any further documentation or APIs that may assist you.
Finally, you’re referred to any further documentation or APIs that may assist you.
Solution: Switch Off Autosizing Translation
Always look carefully at the list of problematic constraints. In Example 5-1, there are three. I highlighted the start of each item, which specifies the item’s class. Two of these constraints belong to the NSAutoresizingMaskLayoutConstraint class, and one belongs toNSLayoutConstraint. This is where Auto Layout Debugging Rule 1 may apply.
Auto Layout Debugging Rule 1
When you see autoresizing constraints listed in your console output, check your translatesAutoresizingMaskIntoConstraints properties. You may have forgotten to switch this setting off for one or more of your views.
In Example 5-1, in fact, I had added a UILabel instance to my view and centered it using Auto Layout constraints, like this:
UILabel *label = [self createLabel]; // Create label
[self.view addSubview:label]; // Add to view
centerView(label, 1000); // Add Auto Layout centering
I did not, however, prepare it for Auto Layout by switching off the translation property. The translation property defaulted to YES. Auto Layout saw that and created Autosizing constraints on my label’s behalf. This was expressed as a pair of layout constraints (0x750f280 and0x750d860).
These constraints conflicted with the Auto Layout constraint (0x7509c20) that I created and added. The view was attempting to live in both the Autosizing world and the Auto Layout world at the same time. That’s where the problem was born. To fix this situation, I just switched the translate property off:
label.translatesAutoresizingMaskIntoConstraints = NO
Once I did this, my app recovered and worked as I intended.
You may find it helpful to use an Auto Layout preparation macro so that you don’t have to remember the long property name each time you build a new view:
#define PREPCONSTRAINTS(VIEW) \
[VIEW setTranslatesAutoresizingMaskIntoConstraints:NO]
Auto Layout Conflicts Example
Rule conflicts represent another common Auto Layout scenario. Your required constraints may contradict each other, as shown in Example 5-2. This console output shows a mismatch between two layout constraints, with Auto Layout breaking one of the two in order to continue.
Example 5-2 Conflicting Constraint Rules
2013-01-31 09:35:26.157 HelloWorld[82130:c07] Unable to simultaneously satisfy
constraints.
Probably at least one of the constraints in the following list is one you
don't want. Try this: (1) look at each constraint and try to figure out which you
don't expect; (2) find the code that added the unwanted constraint or constraints
and fix it. (Note: If you're seeing NSAutoresizingMaskLayoutConstraints that you
don't understand, refer to the documentation for the UIView property
translatesAutoresizingMaskIntoConstraints)
(
"<NSLayoutConstraint:0x714e500 H:|-(80)-[UILabel:0x714bf30] (Names:
'|':UIView:0x714bb20 )>",
"<NSLayoutConstraint:0x714e200 H:|-(50)-[UILabel:0x714bf30] (Names:
'|':UIView:0x714bb20 )>"
)
Will attempt to recover by breaking constraint
<NSLayoutConstraint:0x714e500 H:|-(80)-[UILabel:0x714bf30] (Names:
'|':UIView:0x714bb20 )>
Break on objc_exception_throw to catch this in the debugger.
The methods in the UIConstraintBasedLayoutDebugging category on UIView listed in
<UIKit/UIView.h> may also be helpful.
Solution: Adjusting Priorities
Auto Layout often makes choices. When two constraints come into conflict, it may recover by breaking one of the constraints. Here is where Auto Layout Debugging Rule 2 comes into play.
Auto Layout Debugging Rule 2
Constraints must not contradict each other. Two required constraints cannot ask Auto Layout to do inconsistent things at the same time. Try removing constraints or adjusting priorities to resolve the conflict.
The bolded items in Example 5-2 hint at the underlying problem. In this scenario, I added a label and then told the label to move both 50 and 80 points away from its parent’s leading edge:
UILabel *label = [self createLabel]; // create label
[self.view addSubview:label]; // add it
pin(label, @"H:|-50-[view]"); // Place it 50 points in
pin(label, @"H:|-80-[view]"); // Place it 80 points in
My pin function added each constraint at a required (1,000) priority. This created an unsatisfiable system. Both rules are required, but they contradict each other. You can satisfy this kind of conflict by using either of two approaches: going nuclear or balancing the rules.
The Nuclear Approach
The nuclear approach is the simpler of the two. When two constraints conflict, you can kill one of them. (I mentally imagine a rather juicy “splat” sound.) Deleting either constraint immediately resolves the inconsistency.
This is the best solution for any interface where you didn’t intend the two constraints to contradict. For example, you may experience this scenario when your code goes up against a layout introduced by IB. Or you may have forgotten to remove older layout requests when tweaking your code. In both cases, extraneous constraints are throwing off your layout.
Constraints should always express your immediate design intent. You should review the constraints being applied and remove any stray items you find. There’s nothing sacred about IB-generated items. You can assertively and confidently trim away any rules that stand between you and a great interface.
The Balance Approach
The second approach, the balance approach, involves more nuance. When two rules run counter to each other and both are required, remove the requirement instead of the rule. Adjust the priority of one or both rules until Auto Layout can be satisfied (or, as the great Mick Jagger might say, you “can get satisfaction”).
In this example, I actually intended the 50-point offset to act as a fallback priority. Its job was to ensure that my label would have a set position to move to if the 80-point offset went away. Lowering the priority of the 50-point offset allows both rules to coexist and resolves the conflict.
If I have both constraints in place simultaneously, I can animate my button by removing the rule that pins it at the 80-point offset. When the required constraint goes away, Auto Layout expresses the other rule, and the button can move to a well-defined secondary layout position.
Tracing Ambiguity
Auto Layout offers an undocumented tracing feature for iOS that scans an entire view hierarchy for ambiguous layout issues. The _autolayoutTrace method descends the view tree and marks any items of concern. You call it on the key window (although it works just as well on nearly any view in the hierarchy), and it reports a complete ambiguity trace.
You can execute the trace in code, although for obvious reasons, you shouldn’t ship code that references this method:
NSLog(@"%@", [[[UIApplication sharedApplication] keyWindow]
performSelector:@selector(_autolayoutTrace)]);
Or at the debug console, you can use this:
(lldb) po [[UIWindow keyWindow] _autolayoutTrace];
$0 = 0x075795f0
*<UIWindow:0x7684a60>
| *<UILayoutContainerView:0x8ab6300>
| | *<UINavigationTransitionView:0x8ab8bb0>
| | | *<UIViewControllerWrapperView:0x719cd90>
| | | | *<UIView:0x7197c50>
| | | | | *<UILabel:0x71980b0> - AMBIGUOUS LAYOUT
| | <UINavigationBar:0x8ab6590>
| | | <_UINavigationBarBackground:0x8ab6250>
| | | | <UIImageView:0x8ab7110>
| | | <UINavigationItemView:0x8ab96e0>
| | | <UINavigationButton:0x719b0b0>
| | | | <UIImageView:0xea82380>
| | | | <UIButtonLabel:0x719bae0>
This trace easily finds the troublesome label underlying Example 5-2.
Examining Constraint Logs
Auto Layout console output is self-documenting when you know what to look for. This is the basis of another debugging rule.
Auto Layout Debugging Rule 3
Every logged constraint tells you what it does. The better you understand your logs, the more easily you can identify constraints and connect them to your coding.
The following sections provide examples of constraint logs and explain the items you typically encounter.
Alignment Constraint Example
Example 5-3 shows a basic alignment constraint. It is typical of the kind you may encounter in your logs.
Example 5-3 A Constraint Log
<NSLayoutConstraint:0x8a64de0 V:|-(0)-[UIView:0x8a64300]
(Names: '|':UIView:0x8a422f0 )>
Here are a few points to consider as you look at this console output:
![]() Every constraint listing starts with its class. All constraints you create directly belong to the NSLayoutConstraint class, although you may see other classes mentioned in the console output. When that happens, try to figure out why those constraints were created and why your constraints conflict with them.
Every constraint listing starts with its class. All constraints you create directly belong to the NSLayoutConstraint class, although you may see other classes mentioned in the console output. When that happens, try to figure out why those constraints were created and why your constraints conflict with them.
![]() The memory addresses matter. Memory addresses help distinguish instances, acting as built-in names for otherwise similar objects. The address for the constraint in Example 5-3 is 0x8a64de0.
The memory addresses matter. Memory addresses help distinguish instances, acting as built-in names for otherwise similar objects. The address for the constraint in Example 5-3 is 0x8a64de0.
![]() Every constraint offers a self-description. This particular example uses a visual format to explain its role, which I boldfaced. This format reveals that the constraint flush-aligns the top of a view instance (0x8a64300) with its superview (0x8a422f0). Some self-descriptions are based on constraint equations instead.
Every constraint offers a self-description. This particular example uses a visual format to explain its role, which I boldfaced. This format reveals that the constraint flush-aligns the top of a view instance (0x8a64300) with its superview (0x8a422f0). Some self-descriptions are based on constraint equations instead.
![]() The Names section of the log appears in parentheses just after the visual format. You’ll see this for superview-to-view visual descriptions. This example expresses a binding between the superview (0x8a422f0) and its mention in the visual format ('|').
The Names section of the log appears in parentheses just after the visual format. You’ll see this for superview-to-view visual descriptions. This example expresses a binding between the superview (0x8a422f0) and its mention in the visual format ('|').
![]() This Names dictionary may be confusing for developers new to Auto Layout. It’s there because the single pipe character in the visual format can’t associate the superview with a specific instance and its memory reference. Adding the dictionary after the format expresses that binding.
This Names dictionary may be confusing for developers new to Auto Layout. It’s there because the single pipe character in the visual format can’t associate the superview with a specific instance and its memory reference. Adding the dictionary after the format expresses that binding.
Standard Spacers Example
NSSpace entries (as in Example 5-4) refer to “standard” spaces, specifically 20-point insets from superviews and 8-point boundaries between views. You create this by using hyphen spacers in your formats or when checking the standard constants in IB. You may see this for yourself by generating layouts from hyphen-powered formats, such as "H:|-[view]" and "V:[view1]-[view2]" and then logging the returned constraints.
Example 5-4 An IB-Sourced Constraint
<NSLayoutConstraint:0x10c3fbf0 H:[UIRoundedRectButton:0x10c3d530]-
(NSSpace(20))-|(Names: '|':UIView:0x10c3bc20 )>
Equation-Based Constraint Example
Not all constraints provide a visual format when logged. Consider Example 5-5. This constraint vertically aligns a button’s and a label’s centers. This relationship cannot be expressed as a visual format, and the log output uses a mathematical presentation instead. Equation-based constraint listings don’t use a Names binding dictionary.
Example 5-5 A Constraint Equation
<NSLayoutConstraint:0x10c3fc30
UIRoundedRectButton:0x10c3d530.centerY ==
UILabel:0x10c3e830.centerY>
Complex Equation Example
Example 5-6 shows the console output for a constraint that limits a view’s width to half the width of its superview. As you can see, its description includes a little extra math, using a multiplier in the equation.
Example 5-6 A Constraint with a Multiplier
<NSLayoutConstraint:0x7534dc0 UIView:0x7533780.width ==
0.5*UIView:0x75334e0.width>
You can create this constraint in code but you cannot build the equivalent in IB. IB does not offer multipliers. This is an example of the kind of expressiveness that code-sourced layout offers.
You encounter multipliers whenever you work with aspect ratios and proportional sizes. Example 5-5’s constraint derives from a function I built to add grid backsplashes to a view, as shown in Figure 5-4. These consist of two views, each colored light gray. One view covers the vertical left half of the parent, and the other covers the horizontal bottom half. The darker gray portion shows where the two views overlap.
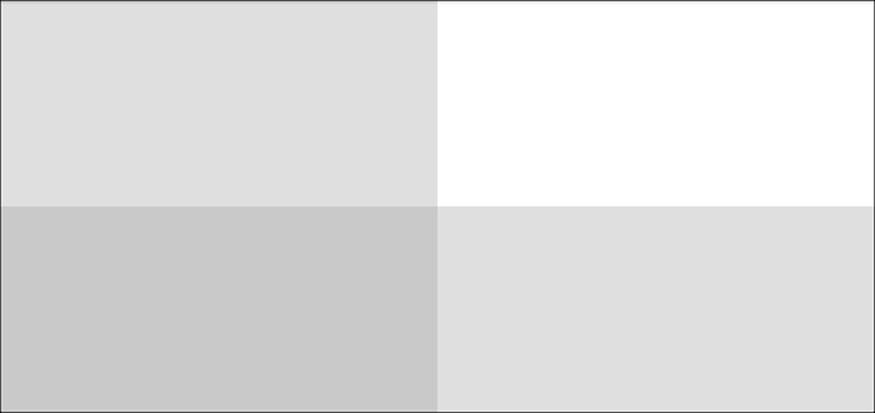
Figure 5-4 The constraint math shown in Example 5-5 allows two overlapping backdrop views to form a grid. The subviews reach halfway across and halfway up their parent. One view appears on the left half of the screen and the other on the bottom half. The section where they overlap appears as the darkest gray.
Each backdrop view is set to hug its parent’s edge (respectively, left and bottom), stretch fully in one direction (respectively, vertically and horizontally), and stretch just halfway in the other direction. Multipliers, also called coefficients in some documentation, limit the aspect in relation to other views.
Multiplier and Constant Example
I didn’t want to finish up this section without showing you an example of a constant as part of a logged equation. I tweaked Example 5-6’s constraint to create Example 5-7’s console output. I added a 20-point spacer to the rule that created the proportional sizes. There’s no real difference to see between these results and those in Figure 5-4, except the width on the left backdrop extends ever so slightly more to the right.
Example 5-7 A Constraint with a Multiplier and a Constant
<NSLayoutConstraint:0x754d2c0 UIView:0x754cd10.width ==
0.5*UIView:0x754b390.width + 20>
To be fair, I should mention that the times you need to include both a multiplier and a constant to your constraints are exceedingly rare. You will have to think long and hard to come up with physical layout examples best described in this way. This is particularly true because the constant cannot be described in respect to the parent’s attributes. So, although you may want to place a half-size view one-quarter of the way across its parent, you need to do so with two constraints: one that sets its size and the other that positions its edge.
If you think of a rational use (the best I could come up with is multiple subviews with a fixed leading padding between them and the superview), drop me a note and let me know.
A Note About Layout Math
There’s a reason Apple recommends using visual formats whenever possible. Here’s an example that demonstrates why. Consider this visual constraint: @"V:[view1]-50-[view2]". Now, quick, which of the following four rules correctly describes the equivalent constraint?
Candidate 1:
[NSLayoutConstraint
constraintWithItem:view1
attribute:NSLayoutAttributeBottom
relatedBy:NSLayoutRelationEqual
toItem:view2
attribute:NSLayoutAttributeTop
multiplier:1 constant:50]
Candidate 2:
[NSLayoutConstraint
constraintWithItem:view1
attribute:NSLayoutAttributeBottom
relatedBy:NSLayoutRelationEqual
toItem:view2
attribute:NSLayoutAttributeTop
multiplier:1 constant:-50]
Candidate 3:
[NSLayoutConstraint
constraintWithItem:view2
attribute:NSLayoutAttributeTop
relatedBy:NSLayoutRelationEqual
toItem:view1
attribute:NSLayoutAttributeBottom
multiplier:1 constant:50]
Candidate 4:
[NSLayoutConstraint
constraintWithItem:view2
attribute:NSLayoutAttributeTop
relatedBy:NSLayoutRelationEqual
toItem:view1
attribute:NSLayoutAttributeBottom
multiplier:1 constant:-50]
Answers 2 and 3 are correct. Both describe View 2’s top as starting 50 points after View 1’s bottom ends. As discussed in Chapter 2, “Constraints,” if you want to keep the constant positive, you need to make the leading, left, or top attribute item the firstItem and the trailing, right, or bottom attribute item the secondItem.
Sign errors are a common issue when you’re working directly with items because of this unintuitive flow. Whenever possible, use visual formats for view layout. If you must use items, develop and debug a reusable function, method, or macro to implement that layout. This leads to another debugging rule.
Auto Layout Debugging Rule 4
When creating layouts using items instead of formats, rigorously check your math. It’s way too easy to flip the sign of your constant. And, if you can, just use formats.
Constraint Equation Strings
To improve the clarity of my personal logs, I like to be able to produce a string representation of any constraint on demand. I prefer a description that is not tied to each constraint’s description or debugDescription, and one that I can repurpose as needed.
Listing 5-1 transforms constraint instances into simple and clean mathematical representations. Its stringValue method describes the algebra stored in each constraint instance to produce a descriptive string. Here are a few examples:
<UIView:0x987a640>.leading == <UIButton:0x987a530>.trailing + 8.0
<UIButton:0x987a530>.centerY <= <UIView:0x987a640>.centerY
<UIView:0x714a040>.height == 20.0
<UIView:0x8b50f80>.width == <UIView:0x8b50ce0>.width * 0.5
These descriptions are built mechanically. Class methods transform attribute and relation properties into string equivalents. The stringValue method uses these, appending any multiplier and constant. In the end, you retrieve an easy-to-read on-demand description for each constraint.
Listing 5-1 Describing Constraint Relations as Strings
// Transform the attribute to a string
+ (NSString *) nameForLayoutAttribute: (NSLayoutAttribute) anAttribute
{
switch (anAttribute)
{
case NSLayoutAttributeLeft: return @"left";
case NSLayoutAttributeRight: return @"right";
case NSLayoutAttributeTop: return @"top";
case NSLayoutAttributeBottom: return @"bottom";
case NSLayoutAttributeLeading: return @"leading";
case NSLayoutAttributeTrailing: return @"trailing";
case NSLayoutAttributeWidth: return @"width";
case NSLayoutAttributeHeight: return @"height";
case NSLayoutAttributeCenterX: return @"centerX";
case NSLayoutAttributeCenterY: return @"centerY";
case NSLayoutAttributeBaseline: return @"baseline";
case NSLayoutAttributeNotAnAttribute:
default: return @"not-an-attribute";
}
}
// Transform the relation to a string
+ (NSString *) nameForLayoutRelation: (NSLayoutRelation) aRelation
{
switch (aRelation)
{
case NSLayoutRelationLessThanOrEqual: return @"<=";
case NSLayoutRelationEqual: return @"==";
case NSLayoutRelationGreaterThanOrEqual: return @">=";
default: return @"not-a-relation";
}
}
// Represent the constraint as a string
- (NSString *) stringValue
{
if (!self.firstItem)
return nil;
// Establish firstView.firstAttribute
NSString *firstView = self.firstView.objectName;
NSString *firstAttribute = [NSLayoutConstraint
nameForLayoutAttribute:self.firstAttribute];
NSString *firstString = [NSString stringWithFormat:@"<%@>.%@",
firstView, firstAttribute];
// Relation
NSString *relationString =
[NSLayoutConstraint nameForLayoutRelation:self.relation];
// Handle Unary Constraints
if (self.isUnary)
return [NSString stringWithFormat: @"%@ %@ %0.01f",
firstString, relationString, self.constant];
// Establish secondView.secondAttribute
NSString *secondView = self.secondView.objectName;
NSString *secondAttribute = [NSLayoutConstraint
nameForLayoutAttribute:self.secondAttribute];
NSString *secondString = [NSString stringWithFormat:
@"<%@>.%@", secondView, secondAttribute];
// Initialize right-hand side string
NSString *rhsRepresentation = secondString;
// Add multiplier
if (self.multiplier != 1.0f)
rhsRepresentation = [NSString stringWithFormat:
@"%@ * %0.1f", rhsRepresentation, self.multiplier];
// Initialize constant
NSString *constantString = @"";
// Positive constant
if (self.constant > 0.0f)
constantString =
[NSString stringWithFormat:@"+ %0.1f", self.constant];
// Negative constant
if (self.constant < 0.0f)
constantString =
[NSString stringWithFormat:@"- %0.1f", fabs(self.constant)];
// Append constant
if (self.constant != 0.0f)
rhsRepresentation = [NSString stringWithFormat:@"%@ %@",
rhsRepresentation, constantString];
return [NSString stringWithFormat:@"%@ %@ %@",
firstString, relationString, rhsRepresentation];
}
Adding Names
Working with memory addresses grows very old very fast, especially when they’re the only way to identify what object you’re working with. Sadly, iOS does not support the NSUserInterfaceItemIdentification protocol. This is an OS X–only feature that adds a custom identity property to any object. It enables you to tag your objects from code or IB and, as discussed in Chapter 3, “Interface Builder Layout,” enhances Auto Layout console feedback.
Custom-built object nametags provide another way to annotate objects for easier tracking and viewing, and they do so cross-platform. Listing 5-2 shows an NSObject category that adds simple string-based developer-provided names. It’s built around associative references, a feature first introduced in OS X 10.6/iOS 5. Associated objects add key–value storage to an existing class without modifying that class’s original declaration. They work by building an association between an Objective-C object and a unique void pointer key. You specify a storage policy such as retain, copy, or assign, and establish whether the assignments are atomic (that is, thread-safe but with a slight performance hit) or not.
Adding these methods to a custom category (Nametags) allows Listing 5-2 to essentially extend all NSObject behavior.
Listing 5-2 Adding Object Nametags
@implementation NSObject (Nametags)
// Nametag getter
- (id) nametag
{
return objc_getAssociatedObject(self, @selector(nametag));
}
// Nametag setter
- (void)setNametag:(NSString *) theNametag
{
objc_setAssociatedObject(self, @selector(nametag),
theNametag, OBJC_ASSOCIATION_RETAIN_NONATOMIC);
}
// Return 'Class description : hex memory address'
- (NSString *) objectIdentifier
{
return [NSString stringWithFormat:@"%@:0x%0x",
self.class.description, (int) self];
}
Using Nametags
I use nametags in ways that push well beyond OS X’s identifier properties when I label constraints. Instead of providing individual identities, I create categories that use nametags to group related items by task, such as establishing a view’s size or setting its position.
For many tasks, multiple rules express a single design goal. A fully specified view size defines both width and height. Constraining a view to its superview involves no fewer than four rules that limit a view’s position and reach. When grouping constraints, nametags treat them as coherent units for the purpose of reference, retrieval, removal, and updating.
Here is an example of this philosophy in action. This method retrieves all position constraints that match a view parameter. It then updates each constant value to the specified point offsets. Nametags allow this code to fetch and update with a minimum of fuss and bother:
- (void) repositionView: (UIView *) view atPoint: (CGPoint) point
{
NSArray *constraints = [self.view
constraintsNamed:@"Position Constraint" matchingView:view];
for (NSLayoutConstraint *constraint in constraints)
{
if (constraintIsHorizontal(constraint))
constraint.constant = point.x;
else
constraint.constant = point.y;
}
}
Retrieval by name typically follows three patterns:
![]() You modify constant values on the retrieved collection, as is done here. This constraint update approach is especially friendly for animation and direct manipulation tasks, where you want to tweak views in place so views move or resize as needed. You’ll see more of this in Chapter 6, “Building with Auto Layout,” and Chapter 7, “Layout Solutions.”
You modify constant values on the retrieved collection, as is done here. This constraint update approach is especially friendly for animation and direct manipulation tasks, where you want to tweak views in place so views move or resize as needed. You’ll see more of this in Chapter 6, “Building with Auto Layout,” and Chapter 7, “Layout Solutions.”
![]() You remove an entire constraint group that’s no longer needed. This allows an interface to return to a fallback layout, so you can “close” a drawer view or collapse a spring-loaded folder’s icons.
You remove an entire constraint group that’s no longer needed. This allows an interface to return to a fallback layout, so you can “close” a drawer view or collapse a spring-loaded folder’s icons.
![]() You remove a constraint group and replace it with a fresh set of new constraints. This is important for any modification that involves properties other than constant. When working with installed constraints (that is, constraints that have been added to the Auto Layout system and expressed on live views), you cannot update other properties. I hope the irony of the modifiable property being called constant isn’t lost on you.
You remove a constraint group and replace it with a fresh set of new constraints. This is important for any modification that involves properties other than constant. When working with installed constraints (that is, constraints that have been added to the Auto Layout system and expressed on live views), you cannot update other properties. I hope the irony of the modifiable property being called constant isn’t lost on you.
Naming Views
Nametags are not limited to constraints. They also enable you to label views meaningfully—certainly more meaningfully than the default descriptions produced by constraint logs (for example, UIButton:0x987a530 or UIView:0x714a040). These identifiers are produced from the view class and the view memory location.
To use nametags with views, you simply assign a string to a property. Here’s a simple example:
self.view.nametag = @"RootView"
This assignment gives your primary view controller an easy-to-recognize identity for you to use in custom descriptions. The following constraint output better identifies the views involved—in this case the root view and a “contrast view,” which was loaded to provide a visual backsplash:
<RootView:0x7534660>.bottom >= <ContrastView:0x7534a50>.bottom
You can add custom nametags in IB as easily as you would in code. The Identity Inspector (View > Utilities > Show Identity Inspector) provides a User Defined Runtime Attributes tool (see Figure 5-5). Add a nametag key path, set its type to String, and set any value you’d like to use.
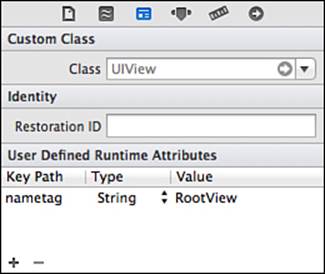
Figure 5-5 Runtime attributes provide an easy solution for adding custom nametags to IB-designed views.
Describing Views
Your interface’s layout isn’t limited to NSLayoutConstraint instances. Each view may generate its own constraints via its hugging priority, compression resistance priority, and intrinsic content size. Therefore, describing views is just as important as describing constraints. Listing 5-3details a report-generation method that creates a view description and that lists that view’s constraints.
I use this approach to describe views I’ve built in code. It’s even better at helping me understand the layouts I’ve established in IB than in code. Just load a storyboard or xib and ask for a view report:
UIViewController *c = [[UIStoryboard storyboardWithName:@"Storyboard"
bundle:[NSBundle mainBundle]] instantiateInitialViewController];
NSLog(@"%@", [c.view viewLayoutDescription];
Listing 5-3 shows the main report method. It skips several helper items, such as the readableFrame method and the platform-sensitive SIZESTRING, hug, and resistance macros. (You can find these in the examples in this chapter.) You’ll also discover a few more view descriptions that I omitted for space reasons (for example, readable alignment rectangles and view ancestry). Even after these cuts, Listing 5-3 is a big, ugly method.
Here are a couple final notes on this subject:
![]() Content modes only affect UIView instances; they are not part of OS X. Content modes flag how a view lays out content with respect to the view bounds. For example, views can use content mode to stretch their content either proportionally or not, or center it, pin it to the top, left, and so forth. Compiler directives guard the call that displays a view’s content model, limiting it to iOS deployment.
Content modes only affect UIView instances; they are not part of OS X. Content modes flag how a view lays out content with respect to the view bounds. For example, views can use content mode to stretch their content either proportionally or not, or center it, pin it to the top, left, and so forth. Compiler directives guard the call that displays a view’s content model, limiting it to iOS deployment.
![]() Intrinsic content size defaults to (–1, –1). When you see a pair of -1s, you know the view does not express a natural size.
Intrinsic content size defaults to (–1, –1). When you see a pair of -1s, you know the view does not express a natural size.
Listing 5-3 View Reports
// Create view layout description
- (NSString *) viewLayoutDescription
{
NSMutableString *description = [NSMutableString string];
// Specify view address, class, and superclass
[description appendFormat:@"<%@> %@ : %@",
self.objectName, self.class.description,
self.superclass.description];
// Test for Autosizing and Ambiguous Layout
if (self.translatesAutoresizingMaskIntoConstraints)
[description appendFormat:@" [Autosizes]"];
if (self.hasAmbiguousLayout)
[description appendFormat:@" [Caution: Ambiguous Layout!]"];
[description appendString:@"\n"];
// Show description for autoresizing views
if (self.translatesAutoresizingMaskIntoConstraints &&
(self.autoresizingMask != 0))
[description appendFormat:@"Mask...........%@\n",
[self maskDescription]];
// Frame and content size
[description appendFormat:@"Frame:.........%@\n",
self.readableFrame];
[description appendFormat:@"Content size...%@",
SIZESTRING(self.intrinsicContentSize)];
// Add content mode, but only for iOS
#if TARGET_OS_IPHONE
if ((self.intrinsicContentSize.width > 0) ||
(self.intrinsicContentSize.height > 0))
[description appendFormat:@" [Content Mode: %@]",
[UIView nameForContentMode:self.contentMode]];
#endif
[description appendFormat:@"\n"];
// Content Hugging
[description appendFormat:@"Hugging........[H %d] [V %d]\n",
(int) HUG_VALUE_H(self), (int) HUG_VALUE_V(self)];
// Compression Resistance
[description appendFormat:@"Resistance.....[H %d] [V %d]\n",
(int) RESIST_VALUE_H(self), (int) RESIST_VALUE_V(self)];
// Constraint count
[description appendFormat:@"Constraints....%d\n",
(int) self.constraints.count];
// Constraint listings
int i = 1;
for (NSLayoutConstraint *constraint in self.constraints)
{
BOOL isLayoutConstraint = [constraint.class isEqual:
[NSLayoutConstraint class]];
// List each constraint
[description appendFormat:@"%2d. ", i++];
// Display priority only for layout constraints
if (isLayoutConstraint)
[description appendFormat:@"@%4d ", (int) constraint.priority];
// Show constraint
[description appendFormat:@"%@", constraint.stringValue];
// Add non-standard classes
if (!isLayoutConstraint)
[description appendFormat:@" (%@)",
constraint.class.description];
[description appendFormat:@"\n"];
}
return description;
}
Unexpected Padding Example
Consider the view report shown in Example 5-8. Generated by the report code in Listing 5-3, it provides much of the information you usually need to know about a view and its constraints. This particular report describes the view shown in Figure 5-6. It tells a story about the view and why it presents the way it does.
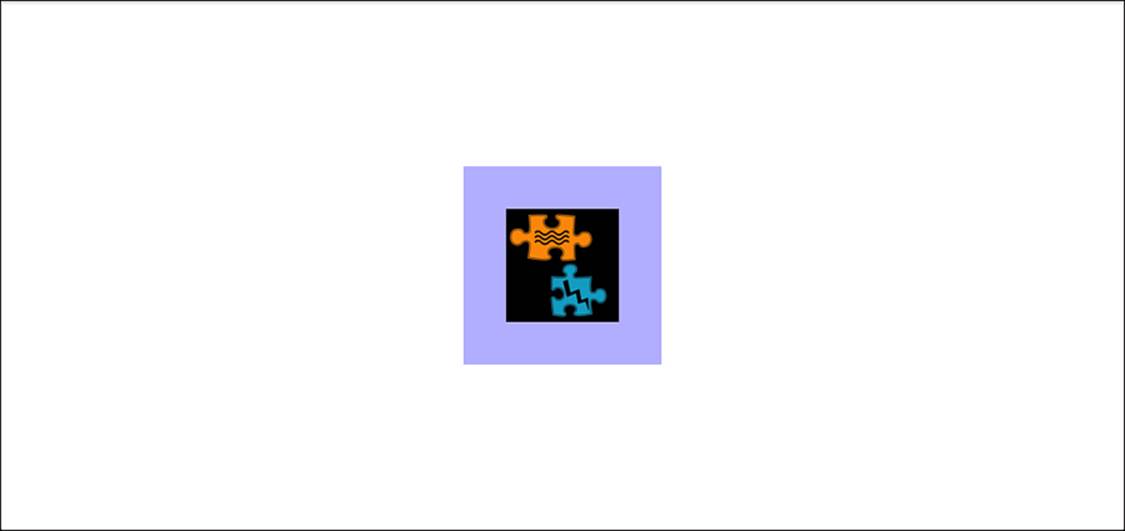
Figure 5-6 An image view with unexpected padding.
Example 5-8 An Image View Report
<UIImageView:0x8c33c20> UIImageView : UIView
Frame:.........(110 202; 100 100)
Content size...{64, 64} [Content Mode: Center]
Hugging........[H 50] [V 50]
Resistance.....[H 750] [V 750]
Constraints....4
1. @ 250 <UIImageView:0x8c33c20>.width == 100.0
2. @ 250 <UIImageView:0x8c33c20>.height == 100.0
3. <UIImageView:0x8c33c20>.width == 64.0 (NSContentSizeLayoutConstraint)
4. <UIImageView:0x8c33c20>.height == 64.0 (NSContentSizeLayoutConstraint)
The view’s class and superclass are listed in the first line of the report. This particular view is a member of the UIImageView class. Its frame is (110 202; 100 100), and it has a 64×64-point content size. Now turn your attention to the image view’s light background splash, which indicates the full extent of its frame. This splash reaches well beyond the image it presents. What’s going on in this view to create that difference?
The frame is sized 100 points in both directions. This contrasts with the view’s intrinsic content size, which is just 64 points on each side. Why doesn’t this image occupy the entire frame? The view’s content mode tells you why. It uses a center mode, specificallyUIViewContentModeCenter. This mode centers content in the view bounds, restricting proportions to match the native data. The 64×64 source cannot reach the view’s edges.
Constraints tell the rest of the story. The content hugging priority is just 50 along both axes. Thus, the view’s desire to limit padding is outweighed by constraints 1 and 2. Prioritized at a higher value (250), these two constraints expand the width and height of the view beyond the intrinsic content.
Even the two system-generated size constraints (3 and 4) cannot overrule the layout. These two constraints list no specific priorities because the class implementation is internal to Apple, and the exposed values are generally nonsense. The actual priorities are set by any hugging and resistance numbers you assign to each axis.
These priorities are expressed internally by NSContentSizeLayoutConstraint instances and factored into the linear algebra satisfaction system that powers Auto Layout.
The Hugged Image Example
This example considers the opposite problem just examined. Figure 5-7 shows an image view whose size was constrained to 100×100 points and whose content mode allows it to scale to fill available space. The problem? As both the screenshot and the report in Example 5-9 reveal, the view is still just 64×64 points in size. Why?

Figure 5-7 This image view is much smaller than its requested size.
Example 5-9 A Small Image View Report
<UIImageView:0x8d3bd80> UIImageView : UIView
Frame:.........(131 223; 64 64)
Content size...{64, 64} [Content Mode: Scale Aspect Fill]
Hugging........[H 750] [V 750]
Resistance.....[H 750] [V 750]
Constraints....4
1. @ 500 <UIImageView:0x8d3bd80>.width == 100.0
2. @ 500 <UIImageView:0x8d3bd80>.height == 100.0
3. <UIImageView:0x8d3bd80>.width == 64.0 (NSContentSizeLayoutConstraint)
4. <UIImageView:0x8d3bd80>.height == 64.0 (NSContentSizeLayoutConstraint)
The answer lies, again, with relative priorities. In this example, I ramped up the hugging priorities for both axes to 750. Constraints 1 and 2, with their 500 priorities, are overruled by constraints 3 and 4.
The frame wants to be exactly 100 points along each dimension, but it only wants this at a 500 priority. It also wants to hug the intrinsic content, which is just 64×64 points in size. And it wants this more. The 750 priorities of the hugging request win out over the 500 priority size requests. The resulting frame is expressed with just a 64×64 point size.
There’s an important lesson to pay attention to here, and Auto Layout Debugging Rule 5 spells it out.
Auto Layout Debugging Rule 5
Content compression resistance and content hugging are first-class players in Auto Layout. Their priorities can and will overrule layout constraints. Don’t forget to review these values when debugging your layouts.
View Centering Example
There is a big story missing from the previous two reports. Nowhere in those listings do the reports describe how their image view is centered in its superview. None of the constraints listed in this report mention the view’s position, and yet the ambiguity warning in Listing 5-3 does not trigger. That’s because position constraints are always installed higher up the view hierarchy. Looking at the parent view’s report, which is shown in Example 5-10, immediately clears up this mystery. Its parent owns two constraints that reference this image view, assigning its center position.
Positioning constraints are always added to superviews. You cannot describe a view’s location by using constraints installed directly to that view.
Example 5-10 Looking at the Parent’s Constraints
<RootView:0x8c33970> UIView : UIResponder
Frame:.........(0 0; 320 504)
Hugging........[H 250] [V 250]
Resistance.....[H 750] [V 750]
Constraints....2
1. @1000 <UIImageView:0x8c33c20>.centerX == <RootView:0x8c33970>.centerX
2. @1000 <UIImageView:0x8c33c20>.centerY == <RootView:0x8c33970>.centerY
Retrieving Referencing Constraints
Constraints that reference a view can occur in nearly any view ancestor, from the view itself all the way up to the root of the hierarchy. This leads to Auto Layout Debugging Rule 6.
Auto Layout Debugging Rule 6
When debugging, you must consider all constraints your view participates in, not just the ones installed directly to the view itself. Constraint references may reside in any ancestor view and positioning references will always reside in ancestor views.
With this rule in mind, consider the methods in Listing 5-4. They retrieve an exhaustive array of constraints that reference any given view:
![]() The first method is refersToView:. It’s a constraint method that returns a Boolean value. It indicates whether the passed view is mentioned as the constraint’s first or second item.
The first method is refersToView:. It’s a constraint method that returns a Boolean value. It indicates whether the passed view is mentioned as the constraint’s first or second item.
![]() The second method is referencingConstraintsInSuperviews. A view method, it ascends the view tree to find all constraints in superviews that contain a reference to the given view, either as firstItem or secondItem. When applied to Example 5-9’s image view, it would easily find the two constraints installed to its superview.
The second method is referencingConstraintsInSuperviews. A view method, it ascends the view tree to find all constraints in superviews that contain a reference to the given view, either as firstItem or secondItem. When applied to Example 5-9’s image view, it would easily find the two constraints installed to its superview.
![]() The third method is referencingConstraints. Another view method, it combines any references from the superviews with any references it finds in its own constraints. Don’t forget that you install sibling constraints to a parent. A view may contain constraints that don’t reference itself at all. Testing each constraint allows you to select just those items that provide concrete references.
The third method is referencingConstraints. Another view method, it combines any references from the superviews with any references it finds in its own constraints. Don’t forget that you install sibling constraints to a parent. A view may contain constraints that don’t reference itself at all. Testing each constraint allows you to select just those items that provide concrete references.
This combined array returned from referencingConstraints equates to the one you find in IB’s Size Inspector for any selected view. It offers a full list of installed constraints that mention the view in question.
Both methods reject any constraints that don’t directly belong to the NSLayoutConstraint class. This excludes Autosizing constraints and system-generated hugging and resistance size constraints.
Listing 5-4 Exhaustively Finding Referencing Constraints
// (NSLayoutConstraint) Test for view reference
- (BOOL) refersToView: (VIEW_CLASS *) theView
{
if (!theView)
return NO;
if (!self.firstItem) // shouldn't happen. Illegal
return NO;
if (self.firstItem == theView)
return YES;
if (!self.secondItem)
return NO;
return (self.secondItem == theView);
}
// (View) Return referencing constraints from superviews
// The superviews property is a custom class extension and does not
// ship with UIView/NSView by default
- (NSArray *) referencingConstraintsInSuperviews
{
NSMutableArray *array = [NSMutableArray array];
for (VIEW_CLASS *view in self.superviews)
{
for (NSLayoutConstraint *constraint in view.constraints)
{
if (![constraint.class isEqual:
[NSLayoutConstraint class]])
continue;
if ([constraint refersToView:self])
[array addObject:constraint];
}
}
return array;
}
// (View) Return all constraints that reference this view
- (NSArray *) referencingConstraints
{
NSMutableArray *array =
[self.referencingConstraintsInSuperviews mutableCopy];
for (NSLayoutConstraint *constraint in self.constraints)
{
if (![constraint.class isEqual:
[NSLayoutConstraint class]])
continue;
if ([constraint refersToView:self])
[array addObject:constraint];
}
return array;
}
Descent Reports
Generally, you’ll want to provide reports for every view that participates in a given hierarchy. This allows you to see a full overview of the interface and enables you to inspect your layout and search for any potential issues.
Listing 5-5 offers an example of how you might approach this problem. This method descends the view hierarchy, creating reports for each view in the tree.
Listing 5-5 Iterating Through View Subviews
- (void) showViewReport: (BOOL) descend
{
// Print view layout description for this view
printf("%s\n", self.viewLayoutDescription.UTF8String);
if (!descend) return;
// Continue down the hierarchy?
// This is described for Listing 5-6, which follows
for (Class class in [self skippableClasses])
if ([self isKindOfClass:class])
return;
// Recurse on children
for (VIEW_CLASS *view in self.subviews)
[view showViewReport: descend];
}
There’s a problem, however, in performing an exhaustive descent. You don’t want to descend into the custom subviews Apple uses to create system-supplied view classes like buttons, switches, and navigation bars. These classes are complex and detailed. They’re also, mostly, not your concern as a developer.
Listing 5-6 offers a workaround. It stops the descent wherever it finds a “do not continue” class. This provides a way for you to concentrate on your views and your implementation details, without having to keep track of any system-created interface classes.
The classes listed in the skippableClasses method are absolutely arbitrary. Feel free to edit, tweak, or just replace the entire list. You can throw in new items as needed when your logs descend too low. You can also remove items that you really don’t want in there. There’s nothing magical about the list. If you have any specific improvement suggestions, please contact me and let me know.
Sadly, checking for UI and NS prefixes doesn’t work here. There are good reasons you add subviews to standard class instances. To take the most obvious example, you do want to descend into UIView instances rather than treat them as atomic endpoints.
Listing 5-6 Avoiding Exhaustive Descent While Inspecting Views
- (NSArray *) skippableClasses
{
#if TARGET_OS_IPHONE
return @[
[UIButton class], [UILabel class], [UISwitch class],
[UIStepper class], [UITextField class],
[UIScrollView class], // Includes tables & collections
[UIActivityIndicatorView class], [UIAlertView class],
[UIPickerView class], [UIProgressView class],
[UIToolbar class], [UINavigationBar class],
[UISearchBar class], [UITabBar class],
];
#elif TARGET_OS_MAC
// Left as an exercise for the reader
return @[];
#endif
}
- (void) displayViewReports
{
printf("%s\n", self.viewLayoutDescription.UTF8String);
for (Class class in [self skippableClasses])
if ([self isKindOfClass:class])
return;
for (VIEW_CLASS *view in self.subviews)
[view displayViewReports];
}
Ambiguity Example
Example 5-11 examines the issue of ambiguity. Figure 5-8 shows the interface in question. This screenshot consists of a parent view with a single square child view. The fact that the view appears to be partially offscreen offers a hint of the underlying problem.

Figure 5-8 The child view in this example is underconstrained. Its vertical position is unknown.
This is where Auto Layout Debugging Rule 7 comes into play.
Auto Layout Debugging Rule 7
Common visual indications of underconstrained layout include missing views, partially displayed views, and random positions.
In this example, the child’s vertical position is, in fact, unspecified. Because of this, the child has ambiguous layout. Just one constraint describes the view’s position in its superview. In this case, it’s the left edge offset. To fix this problem, add a centering or edge-positioning constraint to fix the vertical position.
Note
Views with undefined intrinsic content size report {-1, -1} as their intrinsicContentSize property. UIKit provides the corresponding UIViewNoIntrinsicMetric constant.
Apple writes, “Note that not all views have an intrinsicContentSize. UIView's default implementation is to return (UIViewNoIntrinsicMetric, UIViewNoIntrinsicMetric). The intrinsic content size is concerned only with data that is in the view itself, not in other views.”
Example 5-11 Looking at the Parent’s Constraints
<RootView:0x71331c0> UIView : UIResponder
Frame:.........(0 0; 320 504)
Content size...{-1, -1}
Hugging........[H 250] [V 250]
Resistance.....[H 750] [V 750]
Constraints....1
1. @1000 <V0:0x7133370>.left == <RootView:0x71331c0>.left + 211.0
<V0:0x7133370> UIView : UIResponder [Caution: Ambiguous Layout!]
Frame:.........(211 -25; 50 50)
Content size...{-1, -1}
Hugging........[H 250] [V 250]
Resistance.....[H 750] [V 750]
Constraints....2
1. @1000 <V0:0x7133370>.width == 50.0
2. @1000 <V0:0x7133370>.height == 50.0
Expanding on Console Dumps Example
Imagine that you’re in the middle of developing an application. You run a test, and Xcode complains about conflicting constraints, producing the following console output (where I boldfaced the parts that matter):
2013-01-29 12:14:23.336 HelloWorld[54631:c07] Unable to simultaneously satisfy
constraints.
Probably at least one of the constraints in the following list is one you
don't want. Try this: (1) look at each constraint and try to figure out which you
don't expect; (2) find the code that added the unwanted constraint or constraints
and fix it. (Note: If you're seeing NSAutoresizingMaskLayoutConstraints that you
don't understand, refer to the documentation for the UIView property
translatesAutoresizingMaskIntoConstraints)
(
"<NSLayoutConstraint:0x755f2a0 H:|-(100)-[UIView:0x755e510](LTR) (Names:
'|':UIView:0x755e260 )>",
"<NSLayoutConstraint:0x755ef70 H:|-(118)-[UIView:0x755e510](LTR) (Names:
'|':UIView:0x755e260 )>"
)
Will attempt to recover by breaking constraint
<NSLayoutConstraint:0x755ef70 H:|-(118)-[UIView:0x755e510](LTR) (Names:
'|':UIView:0x755e260 )>
Break on objc_exception_throw to catch this in the debugger.
The methods in the UIConstraintBasedLayoutDebugging category on UIView listed in
<UIKit/UIView.h> may also be helpful.
The dump contains a lot of information, but it’s clear that a view (0x755e510) wants to be both 100 and 118 points away from its parent’s left edge. (The LTR acronym refers to left-to-right layout.) Which view is it?
You can try to track back the view using the standard debugging tools, or you can quickly peruse the report in Example 5-12 to connect the address with the name you assigned. The report provides additional detail, showing where the conflicting constraints have been installed (specifically, the root view) and which view (v0) is causing the problem.
Note that the v0 view does not warn about ambiguity in Example 5-12. This report was generated after Auto Layout had automatically broken Constraint 1. The constraint remains attached to the parent, but it no longer has an effect over layout.
Example 5-12 Expanding on Console Dumps
<RootView:0x755e260> UIView : UIResponder
Frame:.........(0 0; 320 504)
Content size...{-1, -1}
Hugging........[H 250] [V 250]
Resistance.....[H 750] [V 750]
Constraints....3
1. @1000 <V0:0x755e510>.left == <RootView:0x755e260>.left + 118.0
2. @1000 <V0:0x755e510>.top == <RootView:0x755e260>.top + 124.0
3. @1000 <V0:0x755e510>.left == <RootView:0x755e260>.left + 100.0
<V0:0x755e510> UIView : UIResponder
Frame:.........(100 124; 50 50)
Content size...{-1, -1}
Hugging........[H 250] [V 250]
Resistance.....[H 750] [V 750]
Constraints....2
1. @1000 <V0:0x755e510>.width == 50.0
2. @1000 <V0:0x755e510>.height == 50.0
Visualizing Constraints
When developing for OS X, you can visualize constraints on demand. You pass a request to any window, adding a list of constraints you want to see. Figure 5-9 shows a display that might result from doing this.
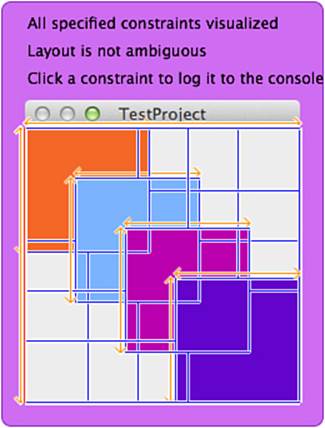
Figure 5-9 When visualized, clickable constraint lines appear over a window.
Click any constraint to log it to the console. When many constraints are shown in the same area, Xcode lists whatever constraints might apply to your click. As Example 5-13 shows, OS X constraint feedback differs slightly from iOS feedback. AppKit output can often be a little more detailed.
Example 5-13 Output from Visualized Constraints
2013-01-31 13:01:24.997 TestProject[85253:303] Clicked on overlapping
visualized constraints: (
"<NSLayoutConstraint:0x100138980 H:[TestView:0x1001379d0(100)]>
(Actual Distance - pixels):100",
"<NSLayoutConstraint:0x100139570 V:|-(>=0)-[TestView:0x1001379d0]
(Names: '|':NSView:0x100510800 )> (Actual Distance - pixels):80",
"<NSLayoutConstraint:0x10013a6b0 V:|-(80@501)-[TestView:0x1001379d0]
priority:501 (Names: '|':NSView:0x100510800 )>
(Actual Distance - pixels):80"
)
Automating Visualization
In OS X, you can easily tie constraint visualization to a menu item during your development process. Listing 5-7 offers an example of an IB-friendly method that toggles constraints on and off. Hook it up to a menu item, and you’re ready to switch constraint visualization at will.
Listing 5-7 Toggling Constraints
// Toggle constraint view on and off
- (IBAction)toggleConstraintView:(id)sender
{
// allConstraints returns an exhaustive recursive collection
// of constraints from self and subviews
[_window visualizeConstraints:
alreadyShowingConstraints ? nil : [self.view allConstraints]];
alreadyShowingConstraints = !alreadyShowingConstraints;
}
In Figure 5-9, the layout is unambiguous, and all the constraints live happily with each other. You more generally want to view constraints when the layout can’t be satisfied. An interesting alternative exists to showing the overlay on each run or using a menu item to toggle the presentation. Instead, you can tell your OS X application to automatically display whenever there is a conflict. A simple launch argument called NSConstraintBasedLayoutVisualizeMutuallyExclusiveConstraints brings up the constraint overlay for conflicted debug builds.
Launch Arguments
Xcode’s scheme editor enables you to add launch arguments, which are passed to your app as default settings. These are undocumented and typically specific to debug builds. In addition, they are subject to change, and Apple can remove them at any time.
Launch arguments enable you to add runtime conditions or visualize onscreen items, which means they provide valuable ways to customize your testing environment. Here’s the basic process you use to add them to a project:
1. Select Product > Scheme > Edit Scheme. (Alternatively, use the pop-up at the top left of the editor to the right of the stop button. Make sure to pull down on the project name and not on the selected platform.)
2. When the scheme editor opens, select your Run scheme and open the Arguments tab.
3. Add a new argument by clicking Arguments Passed on Launch > + or delete one by selecting it and clicking –. Note that an argument starts with a hyphen, followed by the argument name (for example, AppleTextDirection) followed by a value, typically YES or NO.
4. Make your changes and then click OK to close the scheme editor.
Figure 5-10 shows an example of the kinds of items you might add. Checked boxes are applied at launch, and unchecked items are skipped. When the app launches, especially on iOS, you may see console confirmation for arguments that have “taken.” Here’s an example:
2013-01-29 12:41:53.467 HelloWorld[55067:c07] UIViewShowAlignmentRects is ON
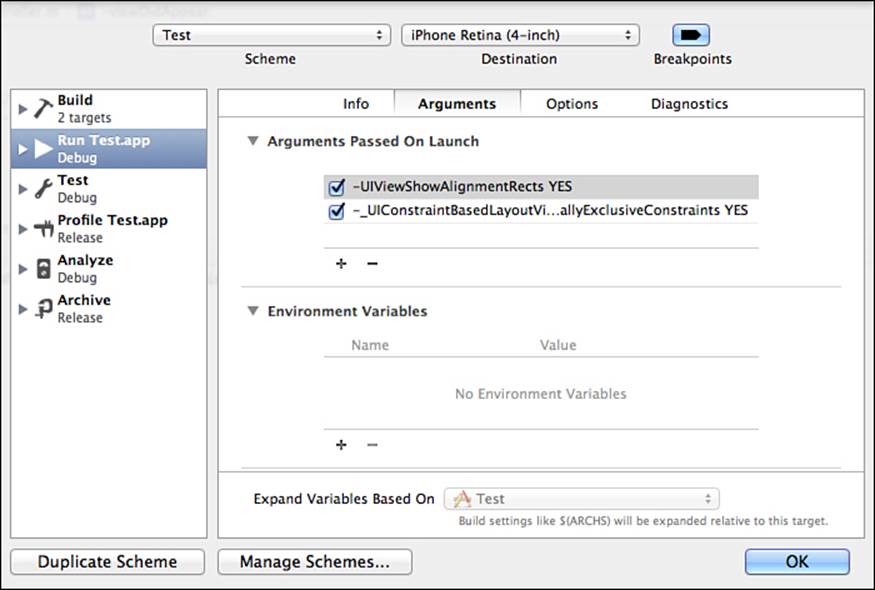
Figure 5-10 You add custom runtime arguments in Xcode’s scheme editor.
When you add the “visualize automatically” launch option on OS X, you’re assured that if any constraint conflicts arise, the purple overlay will automatically appear. Other helpful launch arguments enable you to visualize alignment rectangles for your views and to test internationalization.Table 5-1 offers a highly unscientific list of launch arguments and their effects.
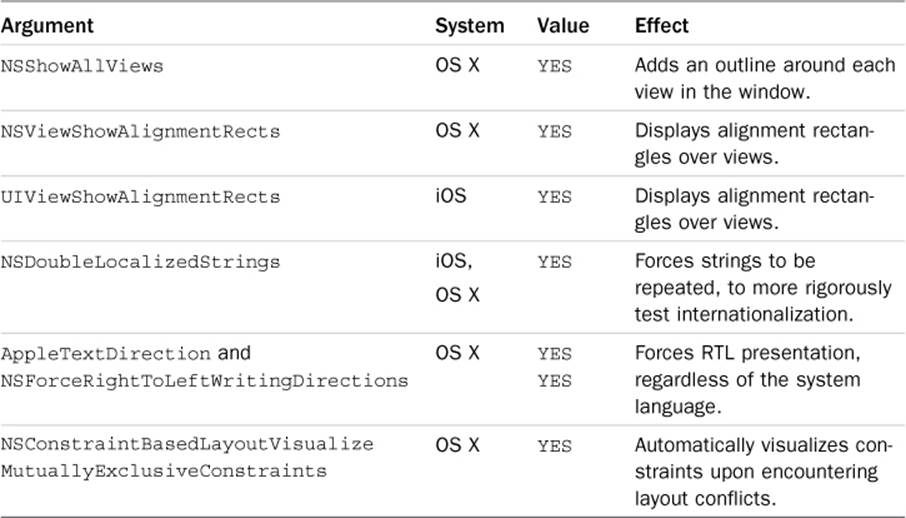
Table 5-1 Launch Arguments
Other items that are mentioned in frameworks that do not seem to be implemented (at least not in any meaningful way for developers) include the following:
![]() UIConstraintBasedLayoutEngageNonLazily and NSConstraintBasedLayoutEngageNonLazily
UIConstraintBasedLayoutEngageNonLazily and NSConstraintBasedLayoutEngageNonLazily
These are likely tied to the requiresConstraintBasedLayout calls that force a view to use constraint-based layout.
In the header file for this method, Apple writes, “Constraint-based layout engages lazily when someone tries to use it (e.g., adds a constraint to a view). If you do all of your constraint set up in updateConstraints, you might never even receive updateConstraints if no one makes a constraint. To fix this chicken and egg problem, override this method to return YES if your view needs the window to use constraint-based layout.”
![]() UIConstraintBasedLayoutPlaySoundWhenEngaged,
UIConstraintBasedLayoutPlaySoundWhenEngaged,
UIConstraintBasedLayoutPlaySoundOnUnsatisfiable,
NSConstraintBasedLayoutPlaySoundWhenEngaged, and
NSConstraintBasedLayoutPlaySoundOnUnsatisfiable
![]() UIConstraintBasedLayoutVisualizeMutuallyExclusiveConstraints
UIConstraintBasedLayoutVisualizeMutuallyExclusiveConstraints
This may turn out to be the iOS counterpart of the working OS X argument.
![]() UIConstraintBasedLayoutLogUnsatisfiable and NSConstraintBasedLayoutLogUnsatisfiable
UIConstraintBasedLayoutLogUnsatisfiable and NSConstraintBasedLayoutLogUnsatisfiable
Note that some of these options seem to be “engagable” when prefixed with underscores, but nothing much otherwise happens. This console output shows that Xcode has responded to at least a couple of options:
2013-01-26 21:41:48.844 HelloWorld[13704:c07]
_UIConstraintBasedLayoutVisualizeMutuallyExclusiveConstraints is ON
2013-01-26 21:45:25.100 HelloWorld[13806:c07]
_UIConstraintBasedLayoutPlaySoundWhenEngaged is ON
Internationalization
You can use two sets of launch arguments to stress test your apps for worldwide deployment. These are string doubling and interface flipping. The first is available for both iOS and OS X. The second works only with OS X, but you’ll learn a way around that in the sections that follow.
Doubled Strings (iOS/OS X)
Adding NSDoubleLocalizedStrings to your debug scheme doubles the text shown in any localized project. This is most useful in early development, when you have not yet translated your strings.
Doubling strings helps you plan for locales where phrases tend to run long. The English “Car Info” may become the German “Information zum Auto.” Those strings may not arrive with enough advance time to calculate your largest extents. String doubling comes to the rescue in such a case, offering immediate ways to check size outliers.
You internationalize your text normally when using this feature using NSLocalizedString() to load localized text, as in this example:
[button setTitle:NSLocalizedString(@"changelabel", nil)
forState:UIControlStateNormal];
The launch argument takes care of the rest, doubling each localized string in place. Figure 5-11 shows a simple interface without and with string doubling, respectively.
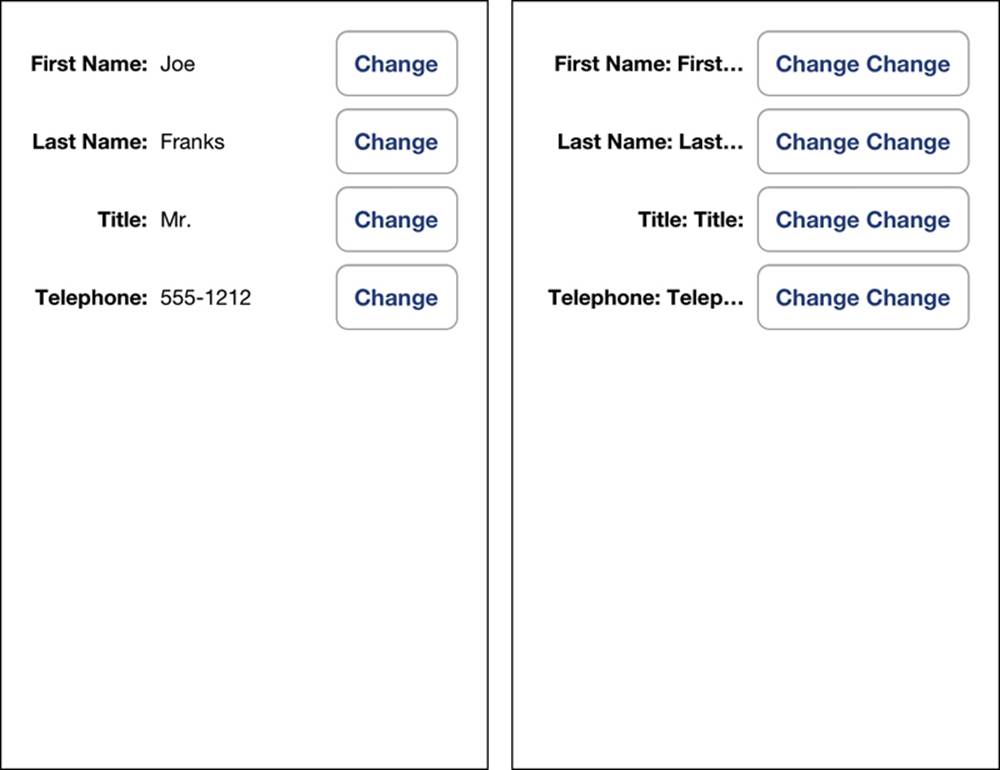
Figure 5-11 String doubling stress tests your interfaces, enabling you to test layout before receiving translation files.
The “good enough” interface in the left image in Figure 5-11 quickly breaks down under doubled text, as shown in the right image. The buttons are enormous, the labels are badly clipped, and the value field has disappeared entirely. This graphical user interface (GUI) is ripe for reevaluation.
Doubled text offers a valuable tool for finding weak points by stressing the entire interface at once. You disable the argument by either unchecking it in the scheme editor or deleting the argument entry.
Flipped Interfaces (OS X)
Under OS X, you can easily flip your interface to test right-to-left layout without changing system languages. Set both AppleTextDirection and NSForceRightToLeftWritingDirection to YES in your scheme’s launch arguments (see Figure 5-12).
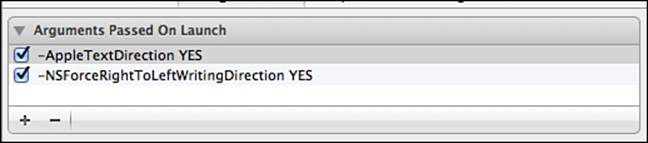
Figure 5-12 Flipping text directions tests deployment for right-to-left language locales.
These arguments leave your development language intact; they don’t change the locale. Instead, they allow you to see how your interface reacts to left/right flipping for deployment to locations like Saudi Arabia or Israel.
Here is where you find any problems with left/leading or right/trailing confusion. Left and right always refer to the physical left and right edges of the screen. You use those constraints to place items users have physically dragged into place. Leading and trailing refer to logical interface flow. You use them to place views in a way that a user’s eyes naturally scans. A right-to-left writing direction only affects leading and trailing constraints. Right and left constraints remain unaffected.
Flipped Interfaces (iOS)
iOS supports two right-to-left languages at this time: Arabic and Hebrew. If you want to test interface flipping, add either an ar.lproj or He.lproj localization to your project and test the interface under that language.
The following instructions walk you through the language selection process. These steps are designed to work in iOS 7, regardless of the currently selected language so that you don’t get stuck in Japanese or French, unable to find your way back to English. Please note these steps have changed since iOS 6.
This walkthrough assumes that you’re testing on the simulator, but the same steps apply to device testing:
1. If you are running an application, press Command+Shift+H (Hardware > Home) or press the Home button.
2. Choose Settings (a silver icon with a series of geared wheels that usually appears on the first page of simulator icons).
3. Choose General. This is on the main settings page on iPhones, and it is in the left column on tablets. It shows a smaller version of the geared icon and should be easy to spot when you’re scrolling up and down the main page.
4. Choose International. This one can be difficult to spot. In iOS 7, it usually appears in the third group from the bottom. From the bottom of the screen, going up, you find a single item section with Reset. Above that you find iTunes Wi-Fi Sync, VPN, and Profiles. (If you’re on the simulator, this group may not appear.) The final item in the group above that is International. Select it. (On iOS 6, this is the third item from the top in General settings. It appears in the middle of the second group of options.)
Figure 5-13 shows the location of International in iOS 7.
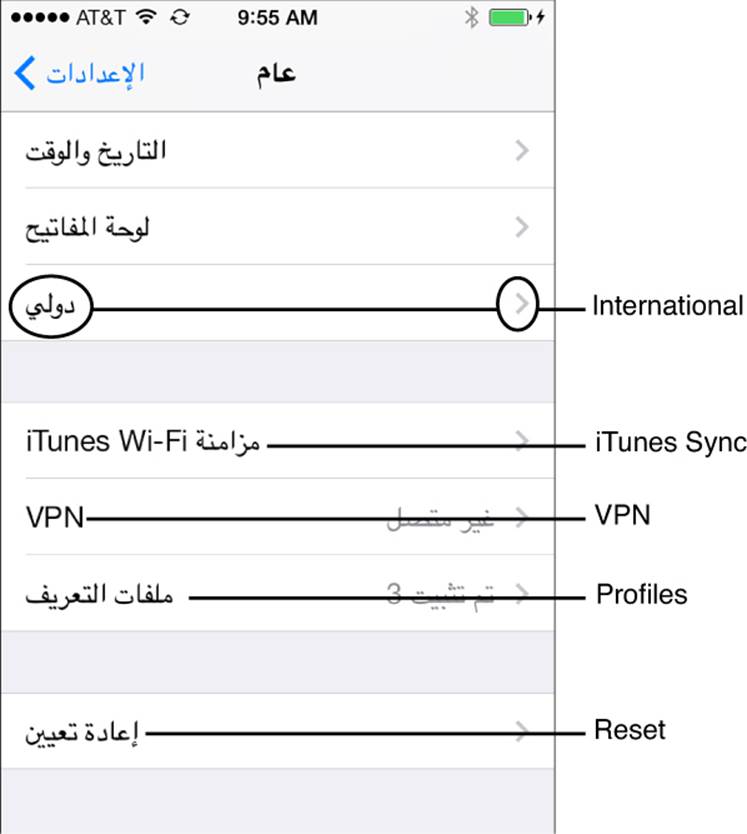
Figure 5-13 Locate the International option in the General settings.
5. In International settings, choose the first item in the first group (see Figure 5-14). This option enables you to choose a specific language.
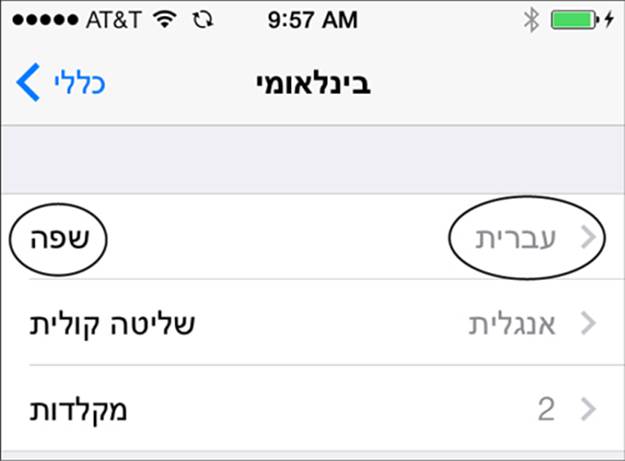
Figure 5-14 Choose the first item to pick a new language.
6. Choose any language from the pop-up. Each language appears in its localized format, so you’ll easily be able to spot English. Tap the top-right button (see Figure 5-15) to confirm your change. The screen goes black, and the device updates to match your choice. Click the top-left button to cancel.
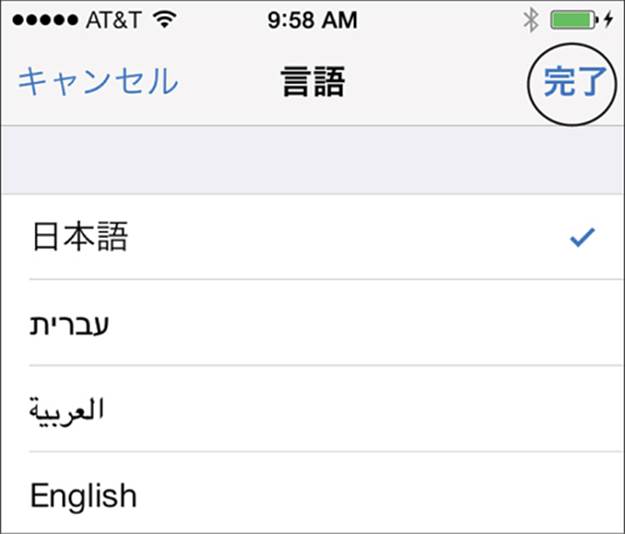
Figure 5-15 The top-right button is Done. Cancel is at the top left.
Once you apply a right-to-left language in iOS settings, you can test left/leading or right/trailing constraints and ensure that they work as designed.
Note
If you do not include a language-approriate lproj for your application, the app reverts to English layout regardless of system settings.
Profiling Cocoa Layout
Instruments offers an OS X–only Cocoa Layout profiling tool. You attach it just as you would any other tool, like leak monitoring or memory allocation tracing. Chose Product > Profile and select the Cocoa Layout template (see Figure 5-16).
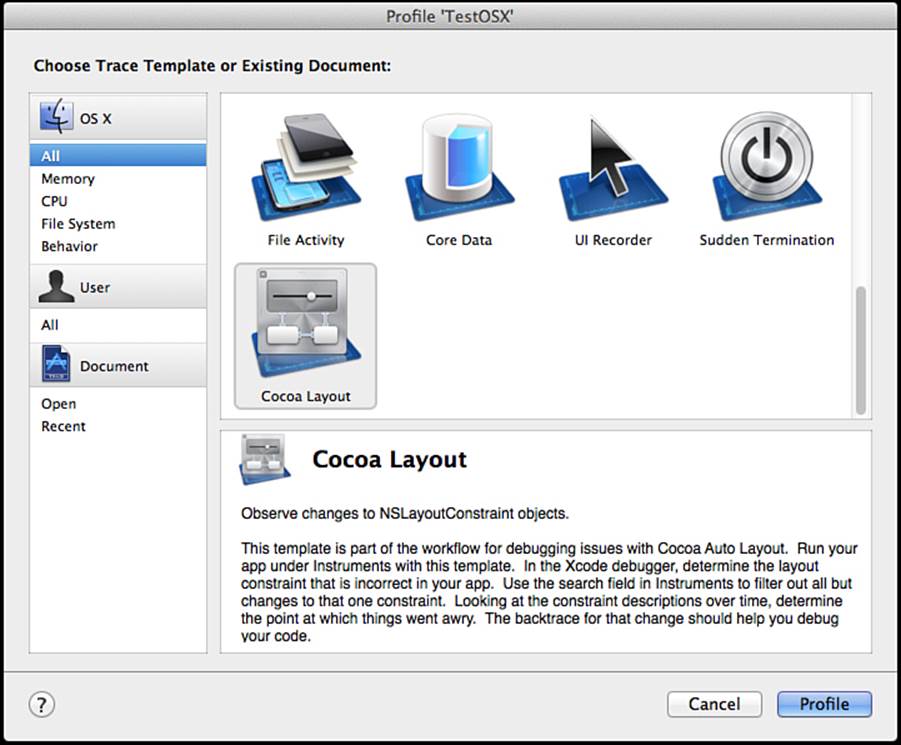
Figure 5-16 The Cocoa Layout template profiles Auto Layout.
Instruments tracks your layout, showing where and when constraints are added to or removed from views and when constants are modified. You can see this in Figure 5-17, which shows an ongoing session.
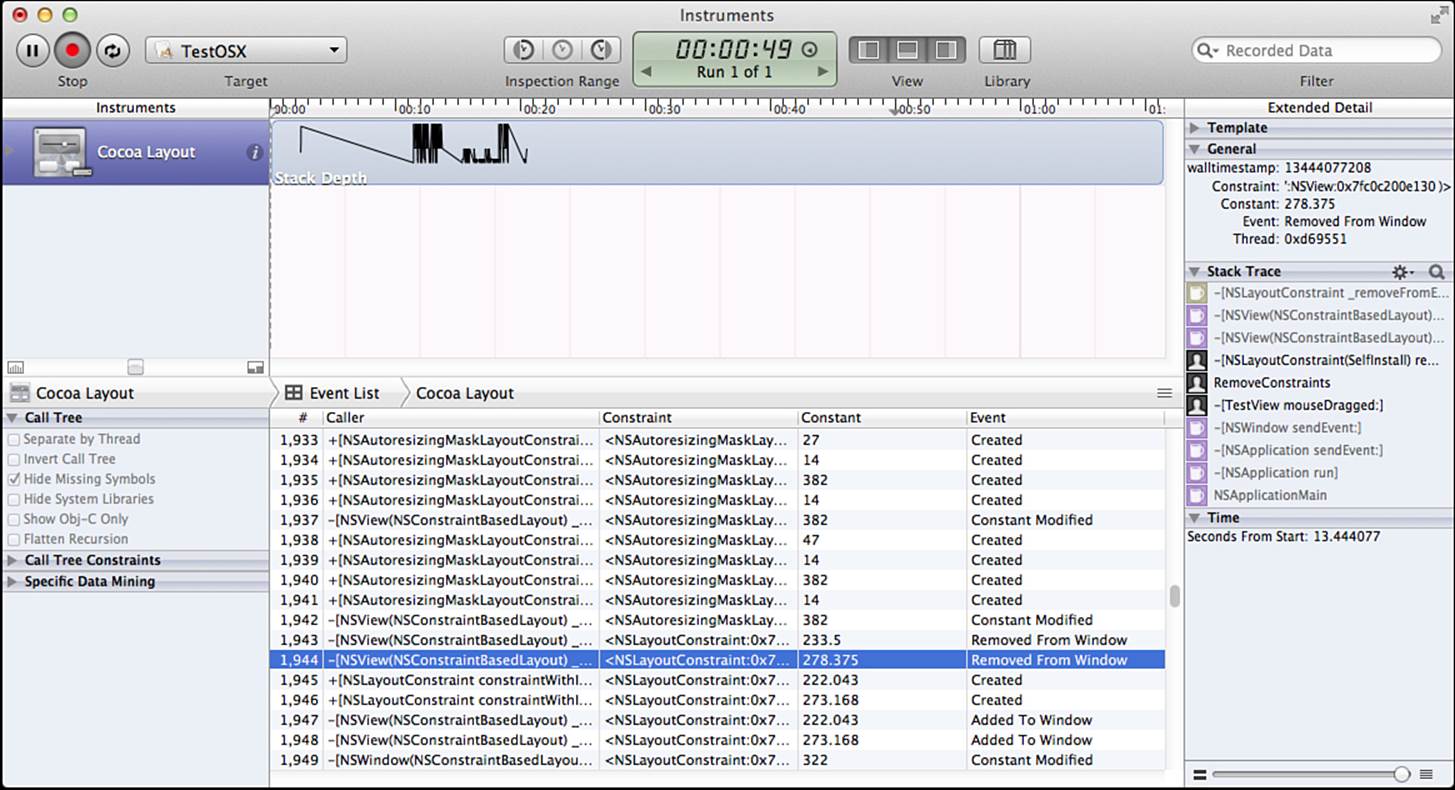
Figure 5-17 A Cocoa Layout session monitors constraint changes within your interface.
Several constraints were affected when I rapidly moved items around and resized the window, forcing the interface to update. You see this reflected in the trace. Constraint-related events appear in the stack trace on the right-hand side. These are instances of my self-install utilities removing my constraints from the system during drags. The profiler tracks all constraints participating in Auto Layout, including Autosizing and content size items.
To be honest, this tool has limited utility, at least in its current incarnation. I’m curious to see where Apple goes with it, especially if and when it makes the leap to iOS.
Auto Layout Rules of Debugging
Here’s a summary of the debugging rules mentioned earlier in this chapter. This list is by no means exhaustive:
![]() When you see autoresizing constraints listed in your console output, check your translatesAutoresizingMaskIntoConstraints properties. You may have forgotten to switch this setting off for one or more of your views.
When you see autoresizing constraints listed in your console output, check your translatesAutoresizingMaskIntoConstraints properties. You may have forgotten to switch this setting off for one or more of your views.
![]() Required constraints must not contradict each other. Two required constraints cannot ask Auto Layout to do inconsistent things at the same time. Try removing constraints or adjusting priorities to resolve a conflict.
Required constraints must not contradict each other. Two required constraints cannot ask Auto Layout to do inconsistent things at the same time. Try removing constraints or adjusting priorities to resolve a conflict.
![]() Every logged constraint tells you what it does. The better you understand your logs, the more easily you can identify constraints and connect them to your coding.
Every logged constraint tells you what it does. The better you understand your logs, the more easily you can identify constraints and connect them to your coding.
![]() When creating layouts using items instead of formats, rigorously check your math. It’s way too easy to flip the sign of your constant. And, if you can, just use formats.
When creating layouts using items instead of formats, rigorously check your math. It’s way too easy to flip the sign of your constant. And, if you can, just use formats.
![]() Content compression resistance and content hugging are first-class players in Auto Layout. Their priorities can and will overrule layout constraints. Don’t forget to review these values when debugging your layouts.
Content compression resistance and content hugging are first-class players in Auto Layout. Their priorities can and will overrule layout constraints. Don’t forget to review these values when debugging your layouts.
![]() When debugging, you must consider all constraints that your view participates in, not just the ones installed directly to the view itself. Constraint references may reside in any ancestor view and positioning references will always reside in ancestor views.
When debugging, you must consider all constraints that your view participates in, not just the ones installed directly to the view itself. Constraint references may reside in any ancestor view and positioning references will always reside in ancestor views.
![]() Common indications of underconstrained layout include missing views, partially displayed views, and random positions.
Common indications of underconstrained layout include missing views, partially displayed views, and random positions.
Exercises
After reading this chapter, test your knowledge with these exercises:
1. IB finds Auto Layout issues at design time and compile time. Why worry about runtime and the console?
2. What role do multipliers play in constraints?
3. An image view appears clipped, showing only about half its vertical content. What might be wrong?
4. A visual constraint leaves 20 vertical points between item1 and item2 (V:[item1]-20-[item2]). What sign is the constant in the constraint produced by this format? Why? If you multiply the constant by –1, what happens to the layout?
5. IB reports a fully satisfied, unambiguous layout. At runtime, one or more views express ambiguity. Why might this be?
6. A view appears properly placed until you test your application using an Arabic localization. In Arabic, the view placement is flipped horizontally. Why might this be?
Conclusions
This chapter introduces many ways you can inspect, understand, and correct the constraints that shape your interface. Here are a few final thoughts:
![]() Tags and identifiers are your friends, not your enemies. Use whatever resources you can to help understand and label each view and constraint. The more you understand your interface, the better you will debug it. As you will discover in Chapter 6, tagging constraint groups can bewicked useful.
Tags and identifiers are your friends, not your enemies. Use whatever resources you can to help understand and label each view and constraint. The more you understand your interface, the better you will debug it. As you will discover in Chapter 6, tagging constraint groups can bewicked useful.
![]() Just because IB adds a constraint at your request doesn’t make that layout right. Unambiguous does not necessarily equate to correct. Trim away any constraint that doesn’t fit your interface vision and adjust the ones that remain to match your design goals. The largest part of the debugging process is tracking down what items are standing between you and a well-functioning app.
Just because IB adds a constraint at your request doesn’t make that layout right. Unambiguous does not necessarily equate to correct. Trim away any constraint that doesn’t fit your interface vision and adjust the ones that remain to match your design goals. The largest part of the debugging process is tracking down what items are standing between you and a well-functioning app.
![]() Design incrementally. You’ll get a lot less grief at the console when fewer things are breaking at any time.
Design incrementally. You’ll get a lot less grief at the console when fewer things are breaking at any time.
![]() Don’t be afraid of conflicting constraints. Adding multiple rules that cover the same ground is fine. Just adjust the priorities so that your interfaces express the behaviors you want without killing Auto Layout.
Don’t be afraid of conflicting constraints. Adding multiple rules that cover the same ground is fine. Just adjust the priorities so that your interfaces express the behaviors you want without killing Auto Layout.