iOS Auto Layout Demystified, Second Edition (2014)
Chapter 6. Building with Auto Layout
Designing for Auto Layout changes the way you build interfaces. It’s a descriptive system that steps away from exact metrics like frames and centers. You focus on expressing relationships between views, describing how items follow one another onscreen. You uncover the natural relationships in your design and detail them through constraint-based rules.
In return, your interfaces gain flexibility. Auto Layout articulates many more conditions than “allow this view to stretch” and “pin this edge.” Its design vocabulary leapfrogs past Autosizing’s springs and struts to provide a more nimble and serious visual construction language.
This chapter introduces the expressiveness of Auto Layout design, spotlighting its underlying philosophy and offering examples that showcase its features.
Basic Principles of Auto Layout
Exact measures, such as widths, heights, origins, and centers, are the hallmark of traditional layout. Before Auto Layout, you’d create a view, set its frame, tweak its resizing mask, and add it to a parent. Under Auto Layout, the focus shifts toward relationships. You build in a new way, describing the way views relate to each other. Here are a few points to keep in mind about Auto Layout:
![]() Auto Layout is declarative—You add rules to the system to express interface layout. The runtime system implements those rules on your behalf.
Auto Layout is declarative—You add rules to the system to express interface layout. The runtime system implements those rules on your behalf.
![]() Auto Layout minimizes calculation—You specify the layout, not the points and pixels.
Auto Layout minimizes calculation—You specify the layout, not the points and pixels.
![]() Auto Layout design is indirect, but it’s also very flexible—Views require fewer updates for changed window geometries, and they decompose more readily into maintainable layout components.
Auto Layout design is indirect, but it’s also very flexible—Views require fewer updates for changed window geometries, and they decompose more readily into maintainable layout components.
![]() Auto Layout is driven by geometry—Its basic language terms are natural geometric properties such as edges, centers, and sizes.
Auto Layout is driven by geometry—Its basic language terms are natural geometric properties such as edges, centers, and sizes.
![]() Auto Layout focuses on relationships—You relate view layouts to each other using geometric equalities and inequalities, shifting from absolute terms to relative ones.
Auto Layout focuses on relationships—You relate view layouts to each other using geometric equalities and inequalities, shifting from absolute terms to relative ones.
![]() Auto Layout allows and even encourages conflicting rules—Prioritized rules are an essential component of Auto Layout. They enable you to add low-priority fallback conditions and high-priority boundary limits to build sophisticated interfaces.
Auto Layout allows and even encourages conflicting rules—Prioritized rules are an essential component of Auto Layout. They enable you to add low-priority fallback conditions and high-priority boundary limits to build sophisticated interfaces.
![]() Auto Layout expresses natural content—Intrinsic view content drives sizing and alignment, offering content a key role in layout.
Auto Layout expresses natural content—Intrinsic view content drives sizing and alignment, offering content a key role in layout.
![]() Auto Layout seeks optimal solutions—It determines the best layout it can, given the rules you supply and variably sized contents and containers.
Auto Layout seeks optimal solutions—It determines the best layout it can, given the rules you supply and variably sized contents and containers.
![]() Auto Layout is distributed—Its naturally decomposed layouts support clean implementation, with few dependencies between components.
Auto Layout is distributed—Its naturally decomposed layouts support clean implementation, with few dependencies between components.
Layout Libraries
Two common challenges in day-to-day development are addressed by building layout libraries: redundancy and density. By creating libraries of reusable code, you help fight these two natural obstacles.
Auto Layout is redundant—exceedingly so. You often perform the same tasks over and over again: Center this view, stretch that view to its parent, or lay out these views in a row or column. Layouts you create for one app often apply to others. There’s no reason you shouldn’t reuse code you’ve already debugged and refined in multiple projects.
Auto Layout code in its most natural form is dense, verbose bordering on illegible. Consider the code in Example 6-1. These method calls do little more than create a view, size it (100×80 points), and center it in its superview. This snippet highlights common frustrations in working directly with constraint calls: difficulties with inspection, validation, and self-documentation. That’s an awful lot of code for doing so little, especially for such simple layout.
Example 6-1 Auto Layout Code Density
UIView *childView = [[UIView alloc] initWithFrame:CGRectZero];
[parentView addSubview:childView];
// Prepare for Auto Layout
childView.translatesAutoresizingMaskIntoConstraints = NO;
// Width is 100
constraint = [NSLayoutConstraint
constraintWithItem:childView
attribute:NSLayoutAttributeWidth
relatedBy:NSLayoutRelationEqual
toItem:nil
attribute:NSLayoutAttributeNotAnAttribute
multiplier:1
constant:100];
[parentView addConstraint:constraint];
// Height is 80
constraint = [NSLayoutConstraint
constraintWithItem:childView
attribute:NSLayoutAttributeHeight
relatedBy:NSLayoutRelationEqual
toItem:nil
attribute:NSLayoutAttributeNotAnAttribute
multiplier:1
constant:80];
[parentView addConstraint:constraint];
// Center X
constraint = [NSLayoutConstraint
constraintWithItem:childView
attribute:NSLayoutAttributeCenterX
relatedBy:NSLayoutRelationEqual
toItem:parentView
attribute:NSLayoutAttributeCenterX
multiplier:1
constant:0];
[parentView addConstraint:constraint];
// Center Y
constraint = [NSLayoutConstraint
constraintWithItem:childView
attribute:NSLayoutAttributeCenterY
relatedBy:NSLayoutRelationEqual
toItem:parentView
attribute:NSLayoutAttributeCenterY
multiplier:1
constant:0];
[parentView addConstraint:constraint];
Building Libraries
Many developers build libraries of constraint actions. These libraries transform Auto Layout from impenetrable to an essential development tool. Contrast Example 6-1 with Example 6-2. The two are functionally equivalent, performing exactly the same tasks, but the latter leverages a library of macro definitions. It’s short, it’s easy to follow, and it’s essentially self-documenting.
Example 6-2 Simple Macros
UIView *childView = [[UIView alloc] initWithFrame:CGRectZero];
[parentView addSubview:childView];
PREPCONSTRAINTS(childView);
CONSTRAIN_SIZE(childView, 100, 80);
CENTER(childView);
Many constraint expressions are just one-line calls. Macros provide a good match to these. Often, constraints simply relate a view to its superview, or two views to each other, lining up centers or edges with optional offsets. These requests are easily encapsulated, exposing a simple parameter or two.
Although Example 6-2 is much simpler to read and understand than Example 6-1, it’s also more limited. These macros install constraints at a single priority and don’t expose those constraints for any form of annotation or grouping. In other words, these macros best provide a solution for super-simple layouts. The approach quickly shows its limitations for any sophisticated design.
Example 6-3 may not be as readable as Example 6-2, but it adds priority and annotation features for controlled layout. The macro calls in this example enable finer design expression.
Example 6-3 Nuanced Macros
UIView *childView = [[UIView alloc] initWithFrame:CGRectZero];
[parentView addSubview:childView];
PREPCONSTRAINTS(childView);
INSTALL_CONSTRAINTS(1000, @"Centering",
CONSTRAINTS_CENTERING(childView));
INSTALL_CONSTRAINTS(750, @"Sizing",
CONSTRAINTS_SETTING_SIZE(childView, 100, 80));
Macros aren’t mandatory. If macros aren’t your thing, use Objective-C. Example 6-4 shifts away from macros, implementing layout through functions. Like the examples that precede it, these calls create a view, size it to 100×80, and center it in its parent. This example falls somewhere between Examples 6-2 and 6-3 in terms of complexity and readability. These particular functions support priorities but not annotation—although you could easily build calls that do.
Example 6-4 Functions
UIView *childView = [[UIView alloc] initWithFrame:CGRectZero];
[parentView addSubview:childView];
childView.translatesAutoresizingMaskIntoConstraints = NO;
CenterViewInParent(childView, 100);
ConstrainViewSize(childView, CGSizeMake(100, 80), 750);
Functions offer clear advantages over macros, especially when tasks become more complex than a single line or two. They combine standard programming with portability. They can be called from any class. This enables you to develop a layout library independent of any specific view or app implementations.
Example 6-5 implements the same sizing and centering features you’ve seen so far, but this time with methods. Because methods are less portable than functions, the methods in Example 6-5 have been added to a view class category, allowing calls from any view subclass. Method calls are far more self-documenting than function calls. They fit in better with day-to-day Objective-C best practices. They offer the standard go-to for most development.
On the negative side, this particular solution carries with it all the standard risks for implementing categories. You must namespace your categories and their members carefully to guard against future development by Apple. A too-obvious method or category name may eventually conflict with Apple-supplied libraries.
Note
The examples in this book do not use developer-specific prefixes, but I encourage you to do so in your own code. I’ve chosen readability over practicality for my book examples.
Example 6-5 Methods
UIView *childView = [[UIView alloc] initWithFrame:CGRectZero];
[parentView addSubview:childView];
childView.translatesAutoresizingMaskIntoConstraints = NO;
NSArray *constraints;
constraints = [UIView constraintsCenteringViewInParent:childView
withPriority:1000];
[parentView addConstraints:constraints];
constraints = [UIView constraintsSettingSize:CGSizeMake(100, 80)
forView:childView withPriority:750];
[parentView addConstraints:constraints];
I have bundled up many common layout tasks into various sets of functions, methods, and macros for my own development work. You will likely want to do the same. Building constraint utility libraries offers several advantages:
![]() Library calls greatly improve readability, transforming boilerplate layout into instantly recognizable components.
Library calls greatly improve readability, transforming boilerplate layout into instantly recognizable components.
![]() Library calls expose streamlined parameters. You can tell at a glance what the layout is supposed to do, and you can tweak arguments as needed.
Library calls expose streamlined parameters. You can tell at a glance what the layout is supposed to do, and you can tweak arguments as needed.
![]() Libraries minimize complexity. You leverage already-established relationships such as view-to-superview parenting or leading-to-trailing edge placement to reduce the information you need to supply.
Libraries minimize complexity. You leverage already-established relationships such as view-to-superview parenting or leading-to-trailing edge placement to reduce the information you need to supply.
![]() Libraries enable you to debug once and use the fruits of that labor as often as needed.
Libraries enable you to debug once and use the fruits of that labor as often as needed.
You decide what kind of libraries you want to build: macros, functions, methods, class categories, or a hybrid that leverages some or all of these. Regardless of your implementation approach, consider your answers to the following questions before you build your solutions:
![]() Should your libraries return constraint instances? If so, how will you install them? If not, how will you handle priorities?
Should your libraries return constraint instances? If so, how will you install them? If not, how will you handle priorities?
![]() Do you need to set priorities directly (recommended), or can you live with convenience calls that handle that for you? Ask yourself if you’ll encounter any critical edge conditions that need priorities? If not, it’s perfectly okay to let your library place items in rows and columns or center your views using standard, fixed priorities.
Do you need to set priorities directly (recommended), or can you live with convenience calls that handle that for you? Ask yourself if you’ll encounter any critical edge conditions that need priorities? If not, it’s perfectly okay to let your library place items in rows and columns or center your views using standard, fixed priorities.
![]() Will you need to group or annotate the constraints you build? If you have constraints specific to landscape or portrait layout, or if you want to tag constraints for easy retrieval and updating, how will your library support building these groups?
Will you need to group or annotate the constraints you build? If you have constraints specific to landscape or portrait layout, or if you want to tag constraints for easy retrieval and updating, how will your library support building these groups?
When programming, I find myself using all the approaches shown in these examples. There are times you need to build constraints by hand, times you can rely on cookie-cutter layout for quick and reliable solutions, and times you need a little more finesse. No matter what approach you use, and no matter how you build your libraries, you will benefit. Investing time in layout libraries means shifting your attention from implementation details to the greater design story when it comes to building apps.
Planning Interfaces
When laying out interfaces, you should always be evaluating design requirements. Consider the following topics. The answers to the questions these raise help establish the rules you build in Auto Layout:
![]() Evaluate your geometry—Will your app geometry change? If so, when will it change, and why? For example, on OS X, you can create user-resizable windows. On iOS, geometry varies by device, including tablets and 3.5-inch and 4-inch handsets. Does your app support multiple orientations? On iOS in particular, interfaces regularly flip from landscape to portrait and back. Enumerate your geometries before strategizing your interface.
Evaluate your geometry—Will your app geometry change? If so, when will it change, and why? For example, on OS X, you can create user-resizable windows. On iOS, geometry varies by device, including tablets and 3.5-inch and 4-inch handsets. Does your app support multiple orientations? On iOS in particular, interfaces regularly flip from landscape to portrait and back. Enumerate your geometries before strategizing your interface.
![]() Detail your edge conditions—What edge conditions will your views encounter? Edge conditions include extremes of permitted size or location, multiple views competing for the same space, and literal edge conditions where, for example, a view hits the edge of a superview or window. Do user interactions cause these conditions, or are they due to device or window limitations? Brainstorm as many edge conditions as you can.
Detail your edge conditions—What edge conditions will your views encounter? Edge conditions include extremes of permitted size or location, multiple views competing for the same space, and literal edge conditions where, for example, a view hits the edge of a superview or window. Do user interactions cause these conditions, or are they due to device or window limitations? Brainstorm as many edge conditions as you can.
![]() Explore your conflicts—Use edge conditions as a basis for exploring conflicting rules. When a view hits its superview’s edge, should the parent resize? Or should it resist the view, forcing it to stay inside its current bounds? Are there natural boundaries that views should not cross? If so, what should happen? List these conflicts and explain why they could occur. Then focus on how you plan to resolve them, specifying which views should win and why.
Explore your conflicts—Use edge conditions as a basis for exploring conflicting rules. When a view hits its superview’s edge, should the parent resize? Or should it resist the view, forcing it to stay inside its current bounds? Are there natural boundaries that views should not cross? If so, what should happen? List these conflicts and explain why they could occur. Then focus on how you plan to resolve them, specifying which views should win and why.
![]() Enumerate fallbacks—Fallbacks establish the minimum ways your interface should behave in the absence of highly prioritized rules. What kind of backup system can you develop to support your primary graphical user interface (GUI) so that items have a natural place to return to? List as many fallback rules as you can. “My view should always be at least this big” and “all views should at a minimum appear within their parent’s bounds” and “if there’s no other rule controlling this view, it should return to this position” all describe robust defaults you can implement at low priorities.
Enumerate fallbacks—Fallbacks establish the minimum ways your interface should behave in the absence of highly prioritized rules. What kind of backup system can you develop to support your primary graphical user interface (GUI) so that items have a natural place to return to? List as many fallback rules as you can. “My view should always be at least this big” and “all views should at a minimum appear within their parent’s bounds” and “if there’s no other rule controlling this view, it should return to this position” all describe robust defaults you can implement at low priorities.
![]() Find natural groupings—The more you cluster your interface, the better you can transform your app into modules. Natural groupings allow you to divide interface elements into fixed low-maintenance components. Find elements with tightly coupled layout requirements and encapsulate them wherever possible.
Find natural groupings—The more you cluster your interface, the better you can transform your app into modules. Natural groupings allow you to divide interface elements into fixed low-maintenance components. Find elements with tightly coupled layout requirements and encapsulate them wherever possible.
![]() Explore grouped layouts—Groups enable you to perform more holistic layouts than individual views. Consider possible geometries with respect to your groupings. Does a side-by-side landscape layout translate to a top-down portrait layout? Or would you need to decompose further to accommodate the layout’s geometry? Reevaluate your edge conditions and your conflicts, using the groups as primary actors instead of views. Do the rules need to change?
Explore grouped layouts—Groups enable you to perform more holistic layouts than individual views. Consider possible geometries with respect to your groupings. Does a side-by-side landscape layout translate to a top-down portrait layout? Or would you need to decompose further to accommodate the layout’s geometry? Reevaluate your edge conditions and your conflicts, using the groups as primary actors instead of views. Do the rules need to change?
![]() Prioritize your rules—When surveying your layout, what rules are most important in your interface? Categorize the interface rules you’ve developed to describe which ones have the most sway. What are things that must happen? And what are just things you’d like to happen? What rules can “break”? And when will they do so? Understanding the deep story of your interface helps you translate the importance of rules into constraint priorities.
Prioritize your rules—When surveying your layout, what rules are most important in your interface? Categorize the interface rules you’ve developed to describe which ones have the most sway. What are things that must happen? And what are just things you’d like to happen? What rules can “break”? And when will they do so? Understanding the deep story of your interface helps you translate the importance of rules into constraint priorities.
![]() Consider content—Don’t forget that rules aren’t limited to layout constraints. Consider the contribution of content hugging and compression resistance, as discussed in Chapter 2, “Constraints.” For example, descriptive labels often have high resistance priorities, enabling your interface to remain understandable. Review the features that influence content sizes, such as font choices and image assets, and bring them into your design consideration.
Consider content—Don’t forget that rules aren’t limited to layout constraints. Consider the contribution of content hugging and compression resistance, as discussed in Chapter 2, “Constraints.” For example, descriptive labels often have high resistance priorities, enabling your interface to remain understandable. Review the features that influence content sizes, such as font choices and image assets, and bring them into your design consideration.
Building for Modularity
The more modular your interface, the more easily it integrates with Auto Layout. Figure 6-1 shows an interface screen consisting of a pair of simple panes: a settings pane and a credits pane. These panes display in a variety of device orientations and geometries. Both panes were created in Interface Builder (IB) and are instantiated by the primary view controller.
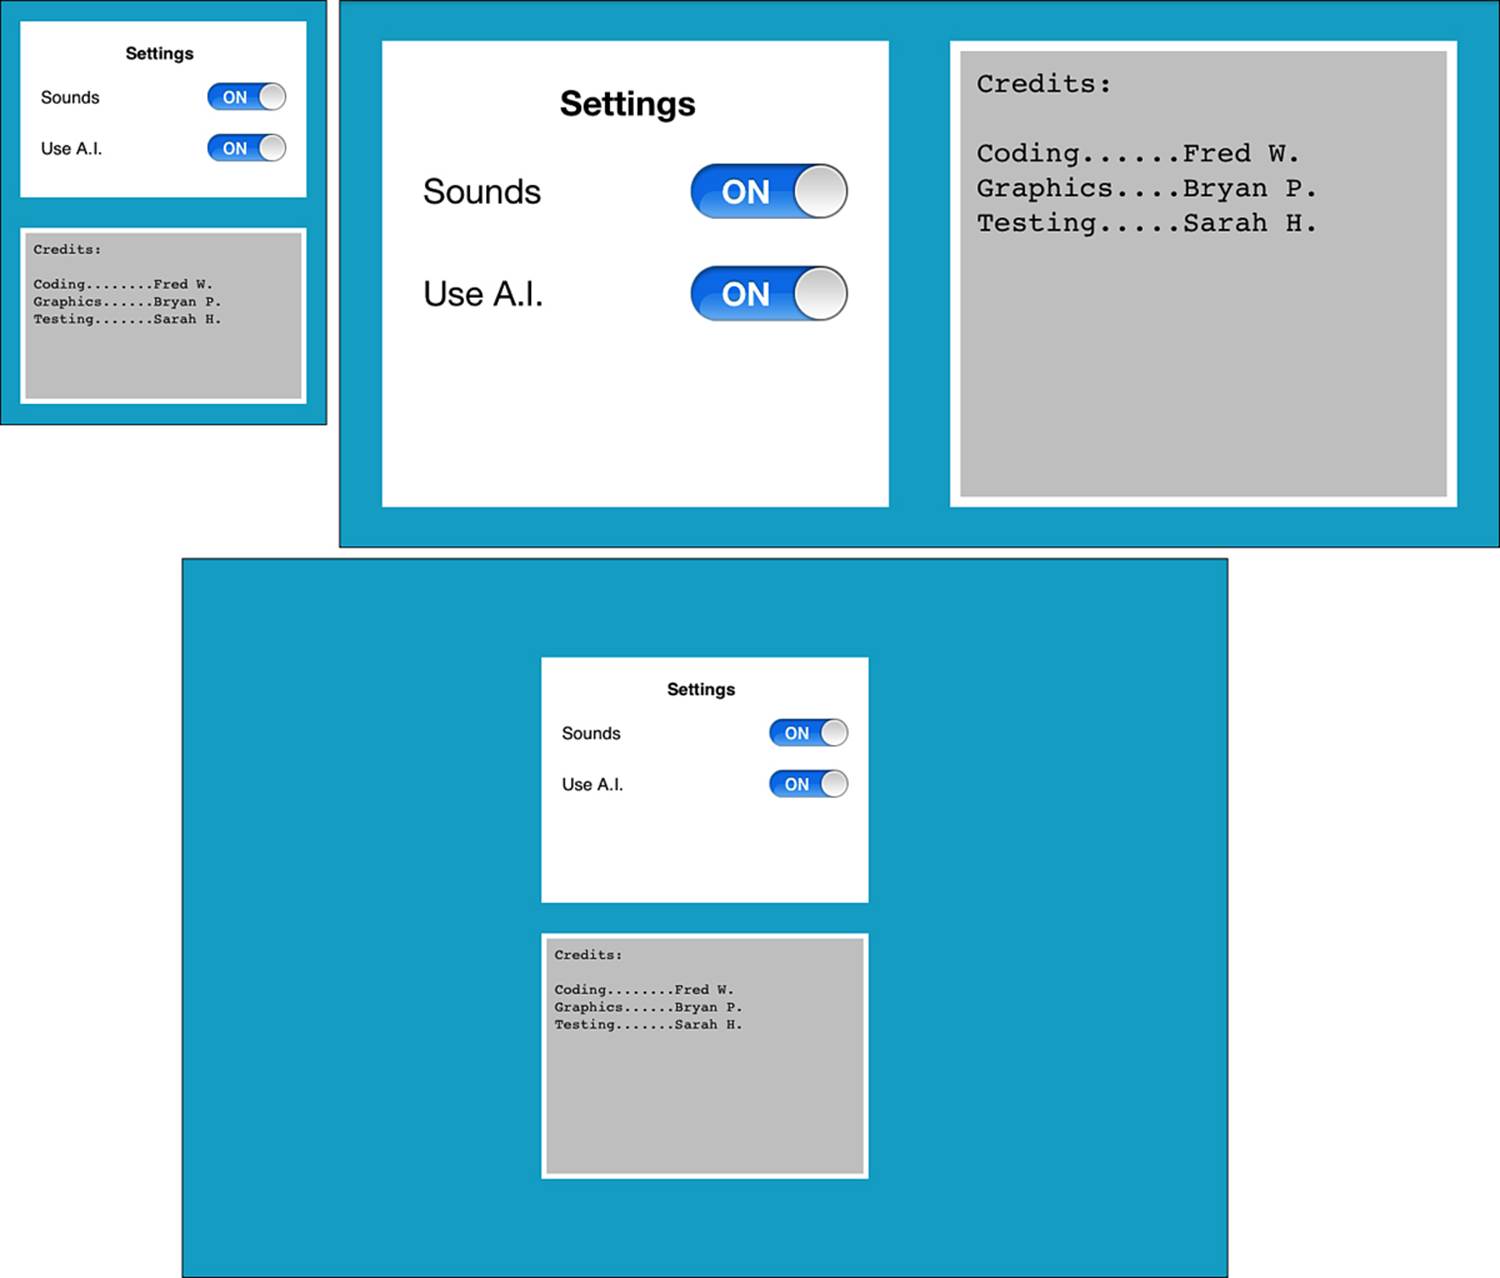
Figure 6-1 Designing modular interfaces pays off in Auto Layout. This app supports iPhone 3.5-inch (top left), iPhone 4-inch (top right), and iPad (bottom) using component-based layout. This sample does not use separate nibs for iPad and iPhone families, although it easily could.
Here’s the code that loads the two views from their nib files:
// Load Settings View
settingsView = [[[UINib nibWithNibName:@"Settings"
bundle:[NSBundle mainBundle]]
instantiateWithOwner:self options:0] lastObject];
// Load Credits View
creditsView = [[[UINib nibWithNibName:@"Credits"
bundle:[NSBundle mainBundle]]
instantiateWithOwner:self options:0] lastObject];
// Add to the view controller
for (UIView *view in @[settingsView, creditsView])
{
[self.view addSubview:view];
view.translatesAutoresizingMaskIntoConstraints = NO;
}
Assigning the owner, as this example does, allows IB-assigned outlets and actions to properly connect. The two switches in the settings view are live; they call back to the view controller when toggled.
This sample interface needs to work in at least six scenarios, specifically landscape and portrait orientations on 3.5-inch iPhones, 4-inch iPhones, and iPads. Apple’s iOS device family might grow even further in the future.
The modular design and loading used for this example provide layout flexibility. Instead of concentrating on the minutia of switches, labels, and text, Listing 6-1 handles each pane as a coherent component. Depending on the view geometry, it builds left/right or top/down placement. This greatly simplifies the design task.
Listing 6-1 Geometry-Driven Layout
if (IS_IPAD)
{
// Align centers horizontally
for (UIView *view in @[settingsView, creditsView])
CENTER_H(view);
// Build column
CONSTRAIN(@"V:|-[spacerTop(==spacerBottom)]\
[settingsView(==creditsView)]-30-[creditsView][spacerBottom]-|",
settingsView, creditsView, spacerTop, spacerBottom);
// Constrain widths
CONSTRAIN_WIDTH(settingsView, 320);
MATCH_WIDTH(settingsView, creditsView);
CONSTRAIN_HEIGHT(settingsView, 240);
MATCH_HEIGHT(settingsView, creditsView);
}
else if (layoutIsPortrait)
{
// Stretch horizontally
for (UIView *view in @[settingsView, creditsView])
STRETCH_H(view, AQUA_INDENT);
// Build column
CONSTRAIN(@"V:|-[spacerTop(==spacerBottom)]\
[settingsView(==creditsView)]-30-[creditsView][spacerBottom]-|",
settingsView, creditsView, spacerTop, spacerBottom);
}
else
{
// Stretch vertically
for (UIView *view in @[settingsView, creditsView])
STRETCH_V(view, AQUA_INDENT);
// Build row
CONSTRAIN(@"H:|-[spacerLeft(==spacerRight)]\
[settingsView(==creditsView)]-30-[creditsView][spacerRight]-|",
settingsView, creditsView, spacerLeft, spacerRight);
}
This example considers just three scenarios: iPad, portrait iPhone family, and horizontal iPhone family. For the iPad, it builds a column, squeezes its size, and centers it all horizontally. The portrait layout is much the same, except instead of squeezing views, it stretches them toward each edge. The landscape layout builds a row and stretches vertically.
As you can see in the code, there’s relatively little design to consider because the settings and credits views hide the details of their internals. The more you decompose your views into modular elements, the simpler and cleaner your layout becomes.
Note
Several examples in this chapter, including the code you just saw, use spacer padding, which enables you to float complex layouts into the center of views. You’ll read more about this trick in Chapter 7, “Layout Solutions.”
Updating Constraints
When devices rotate and windows resize, view constraints may become invalid. You update constraints in the updateConstraints (UIView and NSView) and/or updateViewConstraints (UIViewController) methods. The code you saw in Listing 6-1 properly belongs in anupdateViewConstraints implementation. These implementations follow a certain flow:
1. Call super (for example, [super updateViewConstraints]). Never forget this step.
2. Clean away any invalid constraints. You may also remove valid constraints entangled with the invalid ones in order to start off with a clean slate for your updated layout.
3. Add constraints to express your fresh layout.
Listing 6-2 shows an incredibly trivial example of this. It expresses an interface with a single view that’s aligned center-top for portrait orientation and center-right for landscape. It enumerates each of the required steps, starting by calling the superclass implementation ofupdateViewConstraints.
Next, it removes constraints that reference the sample view from its superview ancestry. This catches any constraints that set the view’s position. It leaves alone any constraints installed directly onto the view, so its size remains unaffected by the updated layout. If this view had been loaded from IB, the way the ones in Listing 6-1 were, limiting the constraint search to superviews would have similarly preserved the layout of each view’s children.
Finally, it reestablishes the view layout, aligning the view in accordance with the current device orientation—portrait or landscape.
Listing 6-2 Updating View Constraints
- (void) updateViewConstraints
{
// Always call super
[super updateViewConstraints];
// Remove constraints referencing exampleView
// These methods were introduced in Chapters 2 and 5
for (NSLayoutConstraint *constraint in
exampleView.referencingConstraintsInSuperviews) // C05
[constraint remove]; // C02
// Re-establish position constraints using
// self-explanatory layout macros
BOOL layoutIsPortrait =
UIDeviceOrientationIsPortrait(self.interfaceOrientation);
if (layoutIsPortrait)
{
ALIGN_CENTERTOP(exampleView, AQUA_INDENT);
}
else
{
ALIGN_CENTERRIGHT(exampleView, AQUA_INDENT);
}
}
Calling Updates and Animating Changes
When working with views, you call setNeedsUpdateConstraints (setNeedsUpdate Constraints: on OS X) to indicate that a view needs attention at the next layout pass. With view controllers, you call the updateViewConstraints method directly, generally when setting up (viewWillAppear:) and responding to rotation callbacks.
Listing 6-3 demonstrates how you might do this in iOS, using an approach that does not transfer to OS X. This solution animates the layout update during reorientation, using the reorientation animation timing. This coordinates the two updates, so they finish simultaneously and draw little attention to the updates. The views slide around a bit onscreen, but the entire view is rotating already, so the updates don’t really draw much attention.
On iOS, you animate constraint updates by embedding a call to layoutIfNeeded inside an animation block, as in Listing 6-3. Always make sure to call layoutIfNeeded on the parent, as is done in this example. This call forces subview layouts and enables the animation to include those updates. If you skip the call, the changes will jump from the before values to the after ones without a smooth transition.
Listing 6-3 Animating Constraint Updates During Rotation
- (void) willAnimateRotationToInterfaceOrientation:
(UIInterfaceOrientation)toInterfaceOrientation
duration:(NSTimeInterval)duration
{
[UIView animateWithDuration:duration animations:^{
[self updateViewConstraints];
[self.view layoutIfNeeded];
}];
}
Animating Constraint Changes on OS X
OS X constraint animation uses a slightly different approach, based on the NSAnimatablePropertyContainer protocol. Instead of directly changing a constraint’s constant, you perform the change on the animator proxy. The animator proxy executes the animation steps for the updated property. Here’s an example of an OS X method that collects views into a vertical stack, demonstrating a basic constraint animation approach:
- (IBAction)stackViews:(id)sender
{
[NSAnimationContext beginGrouping];
NSAnimationContext.currentContext.duration = 0.3f;
for (int i = 0; i < views.count; i++)
{
// Retrieve position constraints
NSArray *constraints = [self.view
constraintsNamed:@"Dragging Position Constraint"
matchingView:views[i]];
// Find the horizontal one, and update its constant
for (NSLayoutConstraint *constraint in constraints)
{
CGFloat c = IS_HORIZONTAL_ATTRIBUTE(
constraint.firstAttribute) ? 0 : 100 * i;
[constraint.animator setConstant:c];
}
}
[NSAnimationContext endGrouping];
}
Fading Changes
Listing 6-4 offers a distinct approach to the challenge of updating constraints during device rotation. It fades away the old layout, updates constraints during the rotation, and fades the new layout back in afterward.
I have reservations about this solution. First, it tends to flash. Second, it takes approximately twice as long to execute as Listing 6-3. However, it provides a strong visual approach. You fade out, reorganize content, and then fade back in. The advantage is that you don’t see views scrabbling around the screen either jumping (without animation) or sliding (with animation) to their new position. The fades provide natural bookends to the update process.
Listing 6-4 Fading Constraint Updates In and Out
- (void)willRotateToInterfaceOrientation:
(UIInterfaceOrientation)toInterfaceOrientation
duration:(NSTimeInterval)duration
{
// Fade away old layout
[UIView animateWithDuration:duration animations:^{
for (UIView *view in @[settingsView, creditsView])
view.alpha = 0.0f;
}];
}
- (void) didRotateFromInterfaceOrientation:
(UIInterfaceOrientation)fromInterfaceOrientation
{
// Update the layout for the new orientation
[self updateViewConstraints];
[self.view layoutIfNeeded];
// Fade in the new layout
[UIView animateWithDuration:0.3f animations:^{
for (UIView *view in @[settingsView, creditsView])
view.alpha = 1.0f;
}];
}
Note
I removed the discussion of orientation-specific text layout that appeared here in the first edition of this book. Under iOS 7, labels reflow without specific layout widths. Further, labels now support dynamic text updates to respond to user-generated setting changes.
Designing for Edge Conditions
Figure 6-2 shows a custom control used for locking and unlocking the interface. Users drag the slider thumb from the left to the right in order to open the lock. If the thumb goes past the 75% mark, the unlock succeeds, sending out delegate notifications and removing itself from the screen.
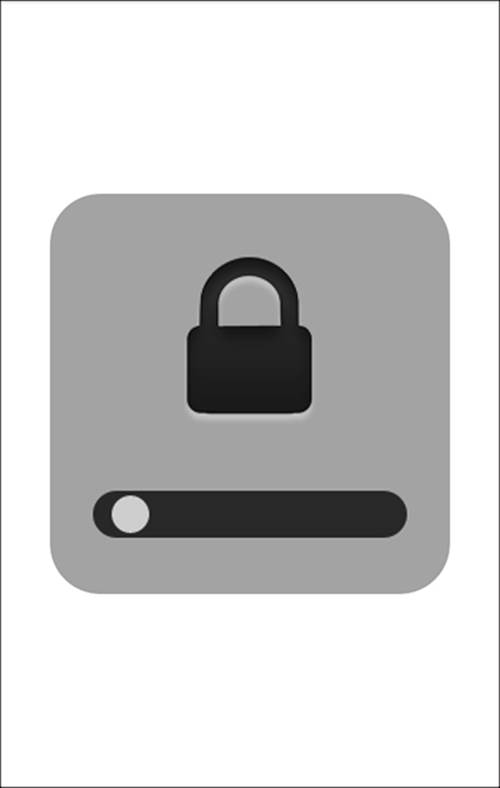
Figure 6-2 Constraints limit the thumb’s travel to within its parent track.
This view consists of four items: a gray backsplash, a lock image, a track image (the horizontal rounded rectangle), and a thumb image (the light circle in the track). This control is built entirely with constraints, both for layout and user interaction. Because constraint constants are easily updated and animated, they provide an excellent solution for many direct manipulation elements.
Listing 6-5 implements rules that constrain the user-maneuverable thumb. The rules it establishes are as follows:
![]() The thumb lies vertically inside its parent. This rule is mandated with a required (1,000) priority, so nothing is going to change that placement without breaking the interface.
The thumb lies vertically inside its parent. This rule is mandated with a required (1,000) priority, so nothing is going to change that placement without breaking the interface.
![]() The thumb must not reach the horizontal edges of its parent. Constraints impose a forced gap between the thumb and the start and end of its superview. The gap amounts to half the thumb image width. These rules form absolute boundaries and are required with a 1,000 priority.
The thumb must not reach the horizontal edges of its parent. Constraints impose a forced gap between the thumb and the start and end of its superview. The gap amounts to half the thumb image width. These rules form absolute boundaries and are required with a 1,000 priority.
![]() Rules place the thumb at the leading edge of its parent with a 500 priority. Because of the edge constraints already described, it cannot reach that edge, so it just gets as close as it can. This placement constraint is named (via the THUMB_POSITION_TAG) for easy reference and updating during user interaction.
Rules place the thumb at the leading edge of its parent with a 500 priority. Because of the edge constraints already described, it cannot reach that edge, so it just gets as close as it can. This placement constraint is named (via the THUMB_POSITION_TAG) for easy reference and updating during user interaction.
Listing 6-5 Building Edge Conditions
// Layout Thumb Constraints
// Center the thumb vertically on its parent
centerViewY(thumbView, 1000);
// Do not allow the thumb to reach the horizontal edges
CGFloat thumbInset = thumbView.image.size.width / 2;
for (NSString *format in @[
@"H:|-(>=inset)-[view]",
@"H:[view]-(>=inset)-|",
])
{
NSArray *constraints = [NSLayoutConstraint
constraintsWithVisualFormat:format
options:NSLayoutFormatAlignAllCenterY
metrics:@{@"inset":@(thumbInset)}
views:@{@"view":thumbView}];
for (NSLayoutConstraint *constraint in constraints)
[constraint install:1000];
}
// Add an initial position constraint
constraint = CONSTRAINT_POSITION_LEADING(thumbView, 0);
constraint.nametag = THUMB_POSITION_TAG;
[constraint install:500];
Because these initial constraints clearly define edge rules, there’s little left to implement in the control tracking methods. Listing 6-6 shows how simply the constraints respond to user touches.
In Listing 6-6, the tracking method first checks the touch to see if it has strayed. If so, it resets the thumb position back to 0 and cancels tracking. With its low priority, the thumb position constraint cannot reach 0, but the thumb returns as close as is allowed. The animation block gracefully moves the thumb back into place.
If the tracking continues, the thumb’s position updates to match the user’s touch in the parent view. This code doesn’t worry whether that touch reaches the ends of the parent, nor does it consider the touch’s Y-position. Higher-priority constraints take care of those details. The “don’t go too far left/right” constraints overrule the “slide left and right as you will” constraint, so the thumb position accommodates both the user’s touch and the boundary conditions.
Make sure you test the sample project in this chapter’s repository to get a sense of this behavior using real-world touches.
Listing 6-6 Balancing Touches with Constraints
- (BOOL)continueTrackingWithTouch:(UITouch *)touch
withEvent:(UIEvent *)event
{
// Strayed too far out?
CGPoint touchPoint = [touch locationInView:self];
CGRect largeTrack = CGRectInset(trackView.frame, -20.0f, -20.0f);
if (!CGRectContainsPoint(largeTrack, touchPoint))
{
// Reset on failed attempt
[UIView animateWithDuration:0.2f animations:^(){
NSLayoutConstraint *constraint =
[trackView constraintNamed:THUMB_POSITION_TAG];
constraint.constant = 0;
[trackView layoutIfNeeded];
}];
return NO;
}
// Track the user movement by updating the thumb
touchPoint = [touch locationInView:trackView];
[UIView animateWithDuration:0.1f animations:^(){
NSLayoutConstraint *constraint =
[trackView constraintNamed:THUMB_POSITION_TAG];
constraint.constant = touchPoint.x;
[trackView layoutIfNeeded];
}];
return YES;
}
Building a View Drawer
Figure 6-3 shows a drawer that users can drag open and closed. In its basic implementation, it provides another example of edge conditions. In this case, the drawer cannot rise any higher than the position shown in the left image or any lower than the position shown on the right. The handle remains visible at all times.
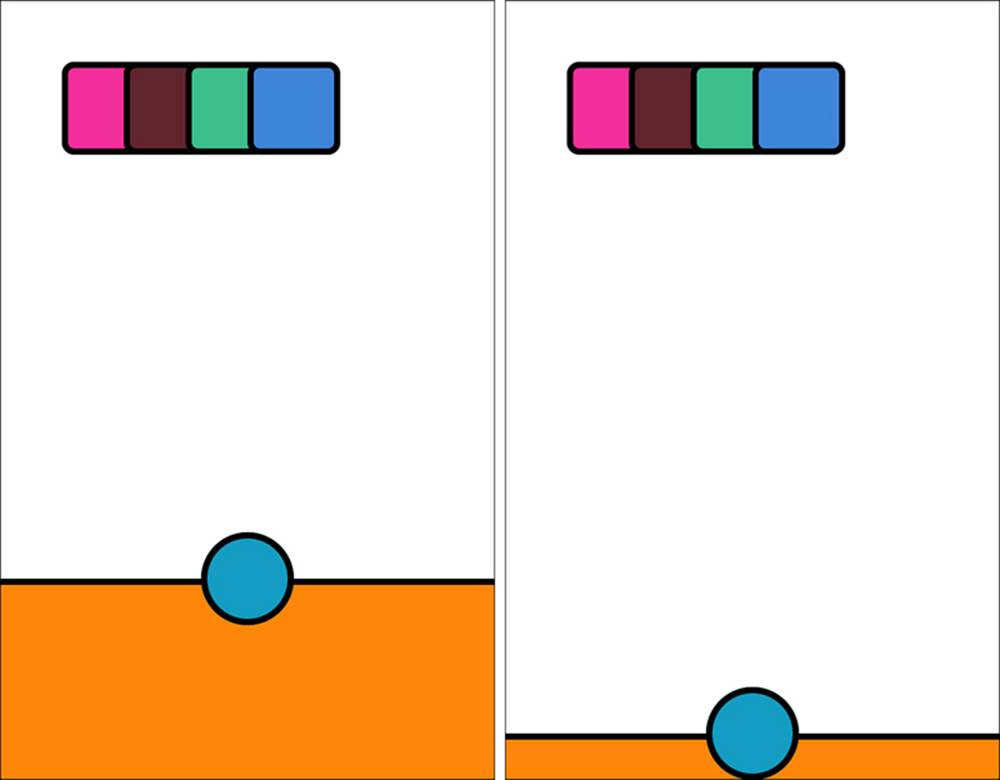
Figure 6-3 Users drag the bottom drawer open (left) and closed (right) by manipulating the circular handle. The drawer cannot open any farther or close beyond the minimum position that shows the entire handle.
As with the lock control, this behavior is set through a pair of constraints that establish the minimum and maximum positions of the drawer’s top edge. The handle view manages a lower-priority constraint that matches the drawer’s offset to the user’s touch. So far, this implementation is not very different from the lock.
The more interesting situation involves the draggable items shown at the top of the view. There are four of them in this implementation. Users can move them anywhere onscreen, including into the drawer. They are subviews of the view controller’s view.
Once they’re moved “into” the drawer, however, the drawer view takes over their management. As Figure 6-4 shows, items in the drawer are always uniformly placed from left to right. Users can drag them back to the main area or can slide the drawer shut to hide them. Their placement remains fixed to the drawer.

Figure 6-4 The drawer controls the placement of the views it manages (left), creating a fixed layout that moves with the drawer (right).
This behavior is implemented through a trio of methods. Items dragged to or out of the drawer are added to and removed from its set of managed views. Other classes can query the drawer to ask if it currently takes responsibility for a given view:
- (void) removeView: (UIView *) view;
- (void) addView: (UIView *) view;
- (BOOL) managesViewLayout: (UIView *) view;
Critically, the drawer needs a way to reference any external constraints that set the view’s position. When the drawer takes over, it must remove these constraints and replace them with its own. It does so using an array of competing constraint names:
@property (nonatomic, retain) NSArray *competingPositionNames;
In turn, it publishes the names it uses to position its views so other classes can take over management when the drawer relinquishes them:
+ (NSArray *) originatedPositionNames;
Listing 6-7 shows the implementation of the three management methods. As you can see, these involve nothing more than adding to and removing items from a view array and then calling setNeedsUpdateConstraints. The actual layout work takes place in theupdateConstraints method.
Listing 6-7 Adding and Relinquishing View Management
// Is the view's layout managed by the drawer?
- (BOOL) managesViewLayout: (UIView *) view
{
return [views containsObject:view];
}
// Remove view from drawer management
- (void) removeView: (UIView *) view
{
[views removeObject:view];
// Animate any changes
[UIView animateWithDuration:0.3f animations:^{
[self setNeedsUpdateConstraints];
[self.window layoutIfNeeded];
}];
}
// Add view to drawer management
- (void) addView: (UIView *) view
{
if (!views)
views = [NSMutableArray array];
[views removeObject:view];
[views addObject:view];
// Animate any changes
[UIView animateWithDuration:0.3f animations:^{
[self setNeedsUpdateConstraints];
[self.window layoutIfNeeded];
}];
}
Building the Drawer Layout
The updateConstraints method is where you evaluate and update constraint setup. You call setNeedsUpdateConstraints whenever your current layout becomes invalid, as happens in the drawer’s addView: and removeView: methods. Listing 6-8 shows the actual method that implements the drawer’s layout.
It consists of two layout sections, which lay out the entire drawer. The first section establishes maximum and minimum boundaries that limit the drawer’s travel both up and down in its parent. Notice that the drawer does not “squish.” Its bottom edge is not tied to any point, so the entire drawer travels up and down, ensuring that any view shown inside it remains a fixed distance from its top and bottom.
The second section lays out the managed views. This section starts by removing existing position constraints as well as any constraints managed externally for each of the drawer’s items. This creates a fresh palette for new constraints.
The layout itself consists of pinning the first item to the leading edge, centering the views vertically in the drawer, and creating a row spacing each item out. These rules create a well-behaved layout.
Note that these items are the drawer’s siblings and not its children. The views still belong to the main view controller’s view. This allows the views to be dragged back out without having to be reparented. It’s only the view layout that the drawer manages. The handle, incidentally, is also a sibling, allowing it to accept touches on its entire extent without clipping. Touches on the handle outside the drawer’s primary frame are recognized. Constraints tie the handle to the drawer, allowing the two to act in concert as a single unit.
Listing 6-8 Laying Out the Drawer
- (void) updateConstraints
{
[super updateConstraints];
NSLayoutConstraint *constraint;
// MinMax Layout
// Remove prior constraints
for (NSLayoutConstraint *constraint in
[self constraintsNamed:MINMAX_NAME])
[constraint remove];
// Maximum Ascent
constraint = [NSLayoutConstraint
constraintWithItem:self
attribute:NSLayoutAttributeBottom
relatedBy:NSLayoutRelationGreaterThanOrEqual
toItem:self.superview
attribute:NSLayoutAttributeBottom
multiplier:1 constant:0];
constraint.nametag = MINMAX_NAME;
[constraint install:750];
// Minimum Ascent
constraint = [NSLayoutConstraint
constraintWithItem:self
attribute:NSLayoutAttributeTop
relatedBy:NSLayoutRelationLessThanOrEqual
toItem:self.superview
attribute:NSLayoutAttributeBottom
multiplier:1
constant: - _handle.bounds.size.height / 2.0f];
constraint.nametag = MINMAX_NAME;
[constraint install:1000];
// View layout
for (UIView *view in views)
{
// Remove prior constraints
for (NSLayoutConstraint *constraint in
[view constraintsNamed:LINE_BUILDING_NAME
matchingView:view])
[constraint remove];
// Remove competing constraints
for (NSString *name in _competingPositionNames)
for (NSLayoutConstraint *constraint in
[view constraintsNamed:name matchingView:view])
[constraint remove];
}
if (views.count)
{
// Pin the first view to the drawer's leading edge
UIView *view = views[0];
constraint = [NSLayoutConstraint
constraintWithItem:view
attribute:NSLayoutAttributeLeading
relatedBy:NSLayoutRelationEqual
toItem:self
attribute:NSLayoutAttributeLeading multiplier:1
constant:AQUA_INDENT];
constraint.nametag = LINE_BUILDING_NAME;
[constraint install:LayoutPriorityFixedWindowSize + 2];
}
for (UIView *view in views)
{
// Center each view vertically in the holder drawer
constraint = [NSLayoutConstraint
constraintWithItem:view
attribute:NSLayoutAttributeCenterY
relatedBy:NSLayoutRelationEqual
toItem:self
attribute:NSLayoutAttributeCenterY
multiplier:1 constant:0];
[constraint install:LayoutPriorityFixedWindowSize + 2];
constraint.nametag = LINE_BUILDING_NAME;
}
// Layout the views as a line
buildLine(views, NSLayoutFormatAlignAllCenterY,
LayoutPriorityFixedWindowSize + 2);
}
Managing Layout for Dragged Views
Listing 6-8’s layout intentionally “breaks” whenever a user drags any item, forcing an update. If a view is dragged out of the middle of the drawer, any views to its right will animate to fill that space as the view moves away. Notifications produced by the dragged objects enable this behavior.Listing 6-9 shows the updates for the start and end of the drag.
Views that leave the drawer return to external layout management. Views that remain in the drawer by the end, however, are re-added. Because dragged views always lose their position in line, they animate to the trailing end when placed back into the drawer.
Listing 6-9 Updating Drawer Layout
// Check the start of drag
[[NSNotificationCenter defaultCenter]
addObserverForName:DRAG_START_NOTIFICATION_NAME
object:nil queue:[NSOperationQueue mainQueue]
usingBlock:^(NSNotification *note)
{
// Remove dragged objects from the drawer
UIView *view = note.object;
[holder removeView:view];
}];
// Check the end of drag
[[NSNotificationCenter defaultCenter]
addObserverForName:DRAG_END_NOTIFICATION_NAME
object:nil queue:[NSOperationQueue mainQueue]
usingBlock:^(NSNotification *note)
{
// Test dragged objects for position, adding
// to the drawer when overlapped
UIView *view = note.object;
if (CGRectIntersectsRect(view.frame, holder.frame))
[holder addView:view];
else
[holder removeView:view];
}];
Dragged Views
The final piece of this implementation lies in the views that users drag around the screen. These consist of standard UIView instances. They host a pan gesture recognizer and a well-defined set of constraints. Listing 6-10 shows the methods that power view movement.
The moveToPosition: method acts like a position-dependent updateConstraints implementation. It removes previous location constraints and establishes ones that match the new position. Unlike updateConstraints, it’s called far more often, specifically whenever the pan gesture recognizer updates. Instead of handling an entire layout, it just updates the view’s position.
Listing 6-10 reveals the notifications that powered Listing 6-9. The gesture recognizer sends off notifications when the recognizer begins (UIGestureRecognizerStateBegan) and ends (UIGestureRecognizerStateEnded). These notifications enable the checks used in Listing 6-9, allowing views to enter and leave the drawer’s management.
Listing 6-10 Moving Views via Gesture Recognizers
- (void) moveToPosition: (CGPoint) position
{
NSArray *array;
// Remove previous location constraints for view
array = [self.superview constraintsNamed:POSITIONING_NAME
matchingView:self];
for (NSLayoutConstraint *constraint in array)
[constraint remove];
// Remove participation from competing position groups
for (NSString *name in _competingPositionNames)
{
array = [self.superview constraintsNamed:name
matchingView:self];
for (NSLayoutConstraint *constraint in array)
[constraint remove];
}
// Create new constraints and add them
array = constraintsPositioningView(self, position);
for (NSLayoutConstraint *constraint in array)
{
constraint.nametag = POSITIONING_NAME;
[constraint install:LayoutPriorityFixedWindowSize + 1];
}
}
- (void) handlePan: (UIPanGestureRecognizer *) uigr
{
// Store offset and announce drag
if (uigr.state == UIGestureRecognizerStateBegan)
{
origin = self.frame.origin;
[self notify:DRAG_START_NOTIFICATION_NAME];
}
// Perform movement
CGPoint translation =
[uigr translationInView:self.superview];
CGPoint destination = CGPointMake(origin.x + translation.x,
origin.y + translation.y);
[self moveToPosition:destination];
// Check for end / announcement
if (uigr.state == UIGestureRecognizerStateEnded)
[self notify:DRAG_END_NOTIFICATION_NAME];
}
Window Boundaries
To wrap up this chapter, I wanted to add an OS X-specific example because window sizing offers a good match to both edge conditions and rule balancing. Figure 6-5 shows an app whose window size depends on the placement of the views within it.
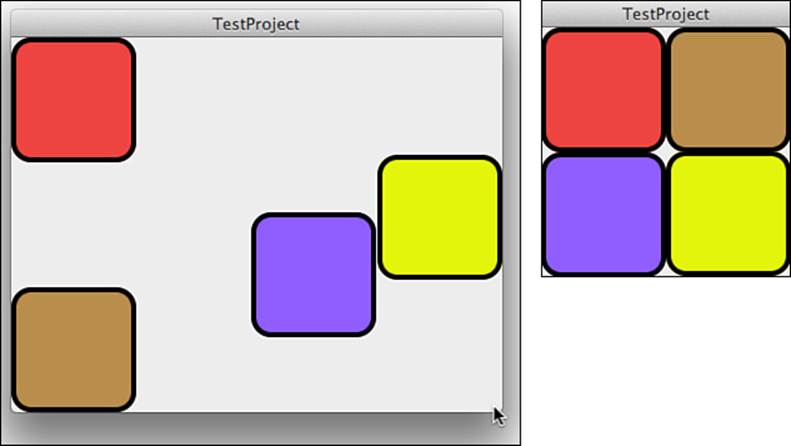
Figure 6-5 In this application, the window’s size is set by the draggable views that inhabit it.
Note the cursor at the bottom right of the image on the left. It is not a window-sizing cursor (a double-headed arrow) because you cannot directly resize this window. Instead, sizing follows subview placement due to the app’s limiting constraints.
This content view expresses competing constraints. It must fully show all the views that lie within it. It also wants to shrink as small as possible. The result is a window that “hugs” its content’s subviews, no matter how they’re positioned.
Listing 6-11 shows the hugging part of the rules. Its constraints attempt to scale the window down to nothing, to a size of (0,0). These rules use a fixed window size priority, using the standard NSLayoutPriorityWindowSizeStayPut constraint level. Unless this is overruled, the window wants to get as small as possible.
Listing 6-11 Window Constraints Limiting Its Size
// Request zero content size at a fixed window priority
_view = _window.contentView;
constrainViewSize(_view, CGSizeMake(0, 0),
NSLayoutPriorityWindowSizeStayPut);
On the other side of things are the views themselves, which are created in Listing 6-12. They consist of user-draggable squares with a size fixed at a required priority (1,000). The constrainToSuperview method first introduced in Chapter 4, “Visual Formats,” establishes that the views must stay within the superview. Together, the methods mandate fixed-sized views that lie entirely within their parent.
Listing 6-12 Constraints Preventing View Clipping
TestView *view = [TestView randomView];
[self.view addSubview:view];
constrainToSuperview(view, 100, LayoutPriorityRequired);
[view enableDragging:YES];
Listing 6-13 explains the rest of the story. In it, you see the methods that implement view dragging. Each time the view moves, position constraints set the new position at a priority of NSLayoutPriorityWindowSizeStayPut + 1. Between the fixed size, the need to stay within the parent view, and the priority level for the position, view-specific rules will always win out over the parent’s “size to (0,0)” constraints. Although the parent shrinks as far as it possibly can, the content views always win out, forcing the edges further and further away as the views move out. The result is a window that hugs its content but allows that content to resize it as needed.
Listing 6-13 Draggable Views Overruling Window Sizing
- (void) mouseDragged:(NSEvent *) event
{
if (!allowDragging) return;
CGPoint pt = [event locationInWindow];
CGFloat dx = pt.x - touchPoint.x;
CGFloat dy = pt.y - touchPoint.y;
// Find the destination point and move to it
CGPoint destination = CGPointMake(origin.x + dx,
(self.superview.frame.size.height - self.frame.size.height)
- (origin.y + dy));
[self moveToPosition:destination];
}
- (void) moveToPosition: (CGPoint) position
{
NSArray *array;
// Remove previous location for view
array = [self.superview
constraintsNamed:@"Dragging Position Constraint"
matchingView:self];
for (NSLayoutConstraint *constraint in array)
[constraint remove];
// Create new constraints and add them
array = constraintsPositioningView(self, position);
// The increased priority enables window resizing
// If you want a different result, e.g. no resizing,
// adjust the priority downwards
for (NSLayoutConstraint *constraint in array)
{
constraint.nametag = @"Dragging Position Constraint";
[constraint install: NSLayoutPriorityWindowSizeStayPut + 1];
}
}
Exercises
After reading this chapter, test your knowledge with these exercises:
1. A view has two constraints. One, at a priority of 300, says the view should hug the superview’s top edge. Another, at a priority of 301, says the view should center vertically within the superview. What is the outcome of these two rules?
2. A view has two constraints. One, at a priority of 300, says to place the view’s vertical center at the superview’s top edge. Another, at a priority of 301, says the view must be at least 50 points away from the superview’s top edge. What is the likely outcome of these two rules?
3. Figure 6-1 demonstrated modular layout, where the view was decomposed into two children. If you used Autosizing to place content into the child views, would you disable translatesAutoresizingMaskIntoConstraints? If so, when? If not, why not?
4. When might you add Auto Layout rules between siblings instead of using parent–child relationships? Why does the drawer example in this chapter use a sibling handle?
5. How do the window-sizing examples in Figure 6-5 relate to iOS?
6. When can you skip implementing updateViewConstraints and updateConstraints?
Conclusions
Success with Auto Layout design often depends on how hard you think about the problem before coding your solutions. You can save yourself headaches by carefully evaluating edge conditions, conflicts, and priorities on paper before you open Xcode. Here are a few final thoughts to carry out of this chapter:
![]() I cannot overstate the utility of building and using constraint libraries. The nature of Auto Layout means you can build these once and reuse them a lot. Although you can’t (and shouldn’t) pre-guess all the constraints you will use in your development, you can certainly cover the bases for many common layout elements.
I cannot overstate the utility of building and using constraint libraries. The nature of Auto Layout means you can build these once and reuse them a lot. Although you can’t (and shouldn’t) pre-guess all the constraints you will use in your development, you can certainly cover the bases for many common layout elements.
![]() Concision is the hallmark of a well-designed interface. If your code is growing large and complicated, step back and try to find the fundamental principles that should be guiding your layout and express them via constraints. When you let higher-priority edge conditions rule over your lower-priority general behavior, lines of code shrink dramatically.
Concision is the hallmark of a well-designed interface. If your code is growing large and complicated, step back and try to find the fundamental principles that should be guiding your layout and express them via constraints. When you let higher-priority edge conditions rule over your lower-priority general behavior, lines of code shrink dramatically.
![]() As you can tell in this chapter, I am a fan of labeling constraints. This practice enables you to find, tweak, remove, or replace constraints with a minimum of coding and fuss. It is also a form of self-annotation, explaining the constraint’s role within the interface. If this approach doesn’t work for you, consider building outlet collections or array properties that group functionally related constraints.
As you can tell in this chapter, I am a fan of labeling constraints. This practice enables you to find, tweak, remove, or replace constraints with a minimum of coding and fuss. It is also a form of self-annotation, explaining the constraint’s role within the interface. If this approach doesn’t work for you, consider building outlet collections or array properties that group functionally related constraints.
![]() Auto Layout benefits from early planning in a way you don’t encounter with springs and struts. If you are used to quick IB prototyping, you should schedule in extra time for layout analysis. Although Auto Layout requires an extra investment in strategy, the interfaces you create can be stronger, more nimble, and more reliable.
Auto Layout benefits from early planning in a way you don’t encounter with springs and struts. If you are used to quick IB prototyping, you should schedule in extra time for layout analysis. Although Auto Layout requires an extra investment in strategy, the interfaces you create can be stronger, more nimble, and more reliable.
![]() Whenever possible, decompose your interface. Don’t forget that any self-contained view that lays out its subviews with Auto Layout should implement the requiresConstraintBasedLayout class method and return YES.
Whenever possible, decompose your interface. Don’t forget that any self-contained view that lays out its subviews with Auto Layout should implement the requiresConstraintBasedLayout class method and return YES.