iOS Auto Layout Demystified, Second Edition (2014)
A. Answers to Exercises
Chapter 1
1. A label is constrained with 8-point offsets from its superview’s leading and trailing edges. It is 22 points high. Is this label’s layout ambiguous? If so, how can you remove the ambiguity?
The layout is ambiguous. The label is missing a vertical position. Remove the ambiguity by setting a y position, such as by centering the label vertically in its superview or offsetting it a fixed amount from its superview’s top edge.
2. You create a system-style button and assign it the title Continue. The button’s center is constrained to a point (150, 150) from its superview’s top and leading edges. Is this view’s layout ambiguous? If so, how can you remove the ambiguity?
The layout is not ambiguous. The view’s height and width are established by the button’s title. The button expresses an intrinsic content size, based on the words in its title and the system font settings.
3. In viewWillAppear: you create a new test view and add it to your view controller:
UIView *testView = [[UIView alloc]
initWithFrame:CGRectMake(50, 50, 100, 30)];
view.backgroundColor = [UIColor blueColor];
[self.view addSubview:view];
view.translatesAutoresizingMaskIntoConstraints = NO;
After these lines, you add constraints that center the test view within its superview. What size will the view be when the app runs? Why?
The view will probably be zero sized at runtime. Although you established an initial frame, Auto Layout does not use the frame property for layout. It has no rules beyond the one that performs the centering to lay out the view. Since UIView instances do not express an intrinsic content size, this view will likely default to zero.
4. A 54-by-54-point image consists of a 50-by-50-point square, with a drop shadow offset 4 points to the right and 4 points down. (a) Show code that assigns alignment insets to this image. (b) When the image is added to an image view and center-aligned to its superview on both axes, what geometric point within the image lies at the center of the superview?
UIImage *image = [[UIImage imageNamed:@"sample.png"]
imageWithAlignmentRectInsets:UIEdgeInsetsMake(0, 0, 4, 4)];
The center point should correspond to (25, 25) on the adjusted image.
5. You add a button to your view and constrain it to stretch from side to side at a priority of 500. Will it stretch? Why or why not?
The button will stretch. The button’s default content hugging priority is 250. The constraint that stretches it has a priority of 500. The higher priority wins, and the button stretches at runtime.
Chapter 2
1. Can you build an NSContentSizeLayoutConstraint by hand? How and why do these constraints appear in Auto Layout?
You cannot build this by hand. This is not a public class, and you should not interact with it directly from code. This constraint derives from a view’s intrinsic content size. Most system-supplied controls and image views express intrinsic content sizes. You can build your own methods to define a content size for your custom views.
2. What happens at runtime when two conflicting rules have exactly the same priority?
Auto Layout automatically breaks one rule or the other at runtime. This almost never ends in a visually pleasing interface layout.
3. Why use layout priorities like 251 and 249 in preference to ones like 257 and 243?
You rarely if ever need to express a cascade of priorities. A single-digit offset from standard values (250 is Auto Layout’s predefined “low” priority) indicates a priority that’s set with respect to that standard. Using one-off values makes your code more understandable at a glance. In the (rare) event that you need a second reference priority, use 252 or 248. This maintains the relative distance rule and ties that number to the standard priority it’s set with relation to.
4. Why might you use views without intrinsic content size?
Many views without intrinsic content size play roles in your interface. From backdrops to content spacers, unadorned or invisible views help establish important areas within your layout, even without direct content of their own.
5. What happens if you install a constraint between a view and its superview on the child view?
The application terminates with an uncaught exception: “Unable to install constraint on view. Does the constraint reference something from outside the subtree of the view? That’s illegal.” This is not the user experience you should be aiming for. Make sure you install constraints to the nearest common ancestor between the two views.
6. What is the difference between constraining View A’s width to twice the size of View B’s width and constraining View B’s width to half of View A’s width? What happens if you install both constraints?
The two constraint rules produce identical results. Since the constraints do not contradict each other, you may safely install both. Auto Layout is not sensitive to redundant rules.
7. In Figure 2-6, where would you install a constraint between (a) View 1 and View 3? (b) Between View 1 and View 2? (c) Between View 2 and View 3? (d) Between View 2 and View 4? (e) If you add a button as a subview to View 2, where do you install a constraint between that button and View 1? (f) Between that button and View 2?
(a) View 3. (b) View 3. (c) View 3. (d) You cannot install a constraint because View 4 is in a different window from View 2, and they do not share a hierarchy. (e) View 3. (f) View 2.
8. You create View A and add a subview, View B. You add constraints that center View B in its superview and size View B to 100 points by 100 points. (a) Is View B’s layout ambiguous? (b) How many items are stored in View A’s constraints array? (c) How many items are stored in View B’s constraints array?
You remove View B from its superview. (d) After this, how many constraints are stored in View A’s constraints array? (e) How many constraints are stored in View B’s array?
(a) The layout is not ambiguous. View B has a fixed position and size. (b) View A stores two constraints, specifically the center position constraints. (c) View B stores two constraints, specifically the height and width constraints. This follows the principle of installing to the closest common ancestor. Constraints that affect only one view install to the view itself. (d) After you remove View B, View A’s two constraints are automatically removed. View A stores zero constraints in its array. (e) View B continues to store both size constraints, so the answer is two.
Chapter 3
1. Add three buttons to your view. Add constraints so the three buttons remain centered within the view, regardless of orientation and platform, with fixed offsets (see Figure 3-39).
Follow these steps to add the three buttons and keep them centered in the view:
a. Select Button 2. In the Align pop-up, check Horizontal Center in Container and Vertical Center in Container. Click Add and Update Frames.
b. Select Button 1 and then Button 2. In the Pin pop-up, check Vertical Spacing and set the constant to 8. Click Add and Update Frames.
c. Select Button 2 and then Button 3. In the Pin pop-up, check Vertical Spacing and set the constant to 8. Click Add and Update Frames. Alternately, use the Editor > Pin > Vertical Spacing option.
d. Select all three buttons. In the Align pop-up, check Horizontal Centers. Click Add and Update Frames.
2. Add a view with a colorful background color to a view controller. Constrain it so it’s inset on each side by 40 points, regardless of orientation (see Figure 3-40).
Select the view. In the Pin pop-up, enable all four bars at the top and set each spacing value to 40 (see Figure A-1). Click Add and Update Frames. The top bar sets a constraint between the view and the top layout guide, which is where the 40-point inset starts.
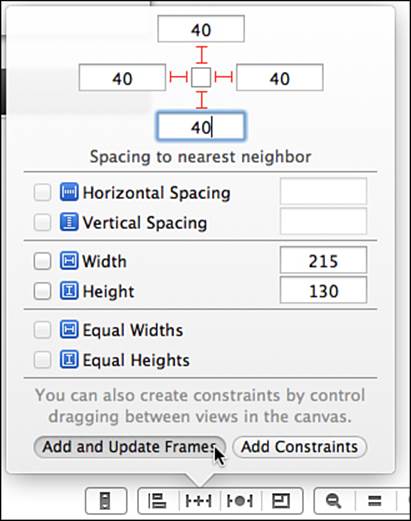
Figure A-1 Stretch a view with an inset.
3. Add three views to a new view controller (see the top image in Figure 3-41). Using IB alone, create a constraint system, as in the middle image in Figure 3-41, that when applied by updating frames produces the equally sized results you see in the bottom image in Figure 3-41.
Follow these steps to add the three views and apply the constraints specified:
a. Select all three views. Choose Editor > Pin > Widths Equally.
b. Select all three views. Choose Editor > Pin > Heights Equally.
c. Select all three views. Choose Editor > Align > Horizontal Center in Container.
d. Select View 1 and View 2. Choose Editor > Pin > Vertical Spacing.
e. Select the new constraint and edit its constant to 0.
f. Repeat steps d and e for Views 2 and 3.
g. Select View 1. Pin Leading Space, Trailing Space, and Top Space to the superview. Edit each constant to 0.
h. Select View 3. Pin Bottom Space to the superview. Edit the constant to 0.
i. Update the frames in the controller and save and use a preview pane to test the view.
4. Create a table that consists of left-aligned labels and two buttons in a row on the right (see Figure 3-42). Add constraints so the label and buttons remain properly aligned in every orientation, with all three items centered vertically.
Follow these steps to create this table, with three items centered vertically:
a. Select the label. Pin it to the left with a standard offset and align it vertically in the container.
b. Select the info button. Pin it to the right with a standard offset and align it vertically in the container.
c. Select the add button. Align it vertically in the container.
d. Ctrl+drag from the Add button to the Info button. Set the horizontal offset. Edit the offset to use standard spacing.
e. Update the frames in the cell. Save and test the view.
Chapter 4
1. How many constraints does the format @"H:[view1]-[view2]" produce? How many constraints does it produce if the options parameter is NSLayoutFormatAlignAllBaseline?
The format produces at least one constraint, relating the trailing edge of View 1 to the leading edge of View 2. It may produce more constraints if you pass a nonzero option to the options parameter. If you pass NSLayoutFormatAlignAllBaseline, the format produces two constraints. The second constraint aligns the two baselines.
2. How many constraints does the format @"H:[view1]" produce? How many constraints does it produce if the options parameter is NSLayoutFormatAlignAllTop?
The format produces no constraints, whether you pass 0 or any other options parameters. Although this format mentions view1, it does not request that any constraints be built.
3. Your format string is @"H:[view1]-[view2]". (a) You pass NSDictionaryOf VariableBindings(view1, view2, view3, view4, view5) to the views parameter. What happens? (b) You pass NSDictionaryOfVariableBindings(view1, view3)to the views parameter. What happens?
a. You produce the same constraint or constraints you did in question 2. The extra items in the bindings dictionary do not affect the result.
b. You raise an exception: "view2 is not a key in the views dictionary".
4. How do you request a set of views to align both on the top and on the bottom?
Pass an OR’ed mask of NSLayoutFormatAlignAllTop | NSLayoutFormatAlignAllBottom to the options parameter for a horizontal format.
5. How do you request a bottom alignment for a vertical format string, such as @"V:[view1][view2]"?
You do not. Alignment requests must be orthogonal to the layout axis.
6. What result does the visual format @"H:|-(50@100)-[view1(==320@200)]-(50@300)-|" produce on a screen that is 320 points wide? On a screen 480 points wide?
On a screen that is 320 points wide, the view stretches flush from the left side and goes 270 points to the right. It stops 50 points before the right side. The space to the right has a higher priority (300) than either the view sizing request (200) or the left spacing request (100). See the left image in Figure A-2.
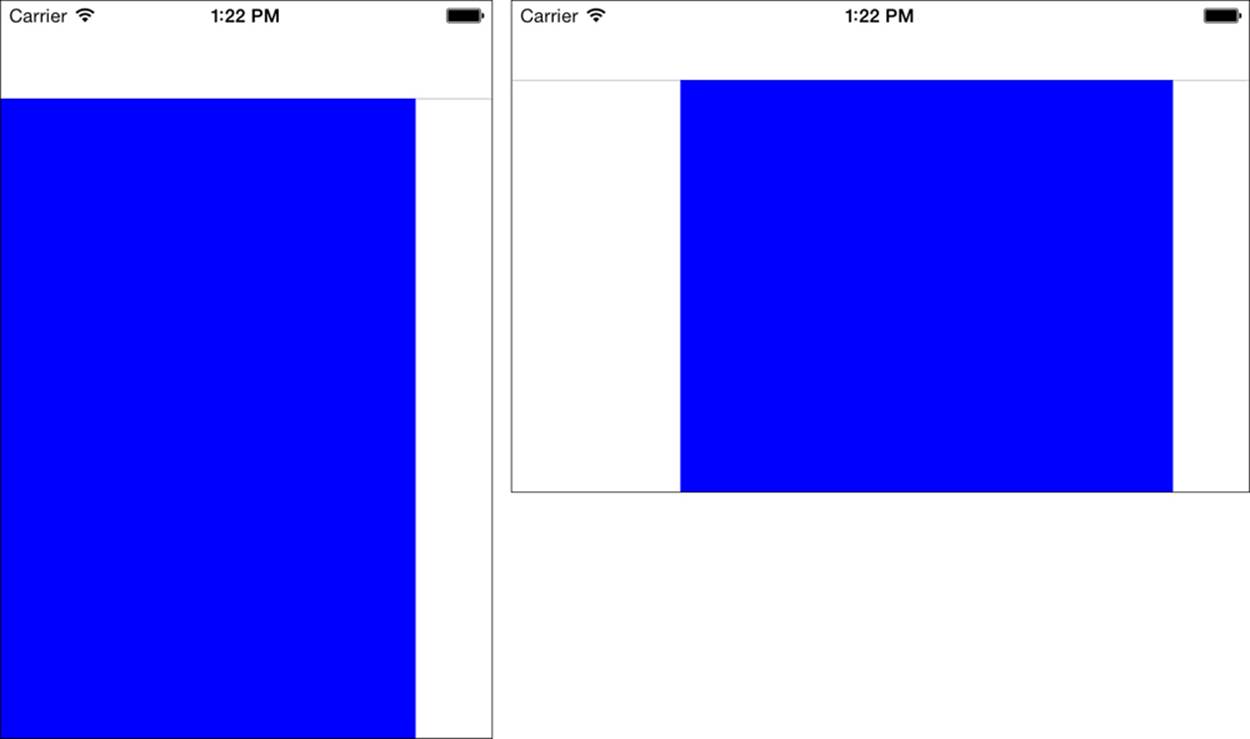
Figure A-2 Balancing priorities.
On a 480-point-wide screen, the view starts at an inset of 110 points from the left. The 320-point spacing request, prioritized at 200, overrules the left inset request, prioritized at 100. See the right image in Figure A-2.
7. How wide will this view be: @"H:[view(>=20,<=10)]"?
Auto Layout will be unable to satisfy both constraint requests at once. It will randomly break one of these rules. The only thing you can say with some confidence is that the view will not be between 10 and 20 points wide.
8. Describe the results the constraint @"H:|-(-20)-[view1(==50)]" produces.
The view’s height is constrained to 50 points. It’s placed 20 points above the top of the view. Only the bottom 30 points of the view extend within its superview.
Chapter 5
1. IB finds Auto Layout issues at design time and compile time. Why worry about runtime and the console?
The console plays its most important role for constraints built in code and constraints that implement edge conditions and rule prioritization. For simple interfaces, you can often fully debug your GUI before runtime.
2. What role do multipliers play in constraints?
Multipliers are not included in IB. In code, multipliers provide a way to describe a portion of a view’s extent. Use them to describe a view that covers only part of its superview or to place a view with respect to a proportion of its superview’s leading or bottom edge. For example, you might place a view one-third of the way along its superview and extending half its width using multipliers.
3. An image view appears clipped, showing only about half its vertical content. What might be wrong?
Most likely, the view’s compression resistance is low, allowing the clip to occur. Check the view’s content mode, intrinsic size, and any developer-applied size constraints to see how to work around this limitation.
4. A visual constraint leaves 20 vertical points between item1 and item2 (V:[item1]-20-[item2]). What sign is the constant in the constraint produced by this format? Why? If you multiply the constant by –1, what happens to the layout?
The sign depends on how Auto Layout creates the constraints from this format. If the first item is item1 and the second is item2, the sign is negative. If the two are assigned in the opposite order, the sign is positive. It really doesn’t matter since the constraint describes the same condition: 20 points between the bottom edge of item1 and the top edge of item2.
If you multiply the constant by –1, the two views will overlap by 20 points instead of space by 20 points. Auto Layout allows you to modify constants, even in installed constraints.
5. IB reports a fully satisfied, unambiguous layout. At runtime, one or more views express ambiguity. Why might this be?
If you mark any IB constraint as a placeholder, it is automatically removed on your behalf at runtime. This leaves an ambiguous set of constraints. This feature is meant for you to supply your own custom constraints. If you forget to do so, your views will be underconstrained.
6. A view appears properly placed until you test your application using an Arabic localization. In Arabic, the view placement is flipped horizontally. Why might this be?
Right-to-left (RTL) localizations only affect leading and trailing attributes. If you use left and right attributes, their positions do not flip.
Chapter 6
1. A view has two constraints. One, at a priority of 300, says the view should hug the superview’s top edge. Another, at a priority of 301, says the view should center vertically within the superview. What is the likely outcome of these two rules?
The view will stretch from top to bottom to fulfill both rules.
2. A view has two constraints. One, at a priority of 300, says to place the view’s vertical center at the superview’s top edge. Another, at a priority of 301, says the view must be at least 50 points away from the superview’s top edge. What is the likely outcome of these two rules?
The view will move as close as it can to the top but approach no closer than 50 points away.
3. Figure 6-1 demonstrated modular layout, where the view was decomposed into two children. If you used Autosizing to place content into the child views, would you disable translatesAutoresizingMaskIntoConstraints? If so, when? If not, why not?
Any view that participates directly (that is, is referenced as a firstItem or secondItem of a constraint) in Auto Layout must disable its translation property. Since the two child views are positioned using Auto Layout, their translation property must be disabled.
Within the two children, each content subview is laid out using Autosizing. translatesAutoresizingMaskIntoConstraints remains enabled for these.
4. When might you add Auto Layout rules between siblings instead of using parent–child relationships? Why does the drawer example in this chapter use a sibling handle?
Sibling relationships enable you to provide touch responses for all items, without worrying about view clipping or the edge of the responder area of the superview. In the drawer example, the handle was tied to the drawer by constraints but independently managed its presentation and touch responses.
5. How do the window-sizing examples in Figure 6-5 relate to iOS?
For the most part, they do not. NSLayoutPriorityDragThatCanResizeWindow and the other window-specific layout priorities are not defined on iOS. That said, you can use this approach on tablets to divide screen areas between two competing sections. Tablet space splitting is about as close as iOS currently gets to windowing.
6. When can you skip implementing updateViewConstraints and updateConstraints?
If there are no circumstances where your layout will change and invalidate the current constraint set, you do not need to implement these update methods. You see this with simple layouts that easily adapt to portrait and landscape presentation. For example, a view with three centered buttons (for example, Load Game, New Game, and Credits) does not require orientation-specific design tweaks.
Chapter 7
1. How can you duplicate Listing 7-7’s spacer solution in IB?
Add two spacer views and, for convenience, give them a background color. Constrain them to the left and right (or top and bottom) and match their widths (or heights) to each other. Pin the horizontal (vertical) spaces between the first spacer and the first view and between the last view and the last spacer. Edit the constants to zero. Finish by reverting the two views’ background colors to clear.
2. How do you set view aspect in IB?
You cannot perform any multiplier-dependent tasks, including setting aspect, in IB. Use code instead.
3. Can you use the keyboard spacer from Listing 7-10 in IB?
Yes, but you have to modify the code a little bit. Follow these steps:
a. In Listing 7-10, the height constraint is an instance variable. Adjust this to a class property so you can assign a constraint from IB and update code references from heightConstraint to _heightConstraint.
b. Add a plain view to the IB editor. Set its class to KeyboardSpacingView by using the Identity Inspector.
c. Pin it to the bottom of the superview and stretch it horizontally. Add a text view above it and pin the vertical space between the two, adjusting the constant to 0. Add a new height constraint to the view and set its constant to 0. Assign the constraint to the class property.
d. Make sure you call establishNotificationHandlers in viewDidLoad so the view responds to keyboard events.
4. How do you use the hybrid scroller strategy from Listing 7-5 in IB?
The easiest way is to create a separate xib file and lay out the scroll view contents there. Create the scroll view in your normal storyboard and set its class to AutoLayoutScrollView. At runtime, load the content view from the xib file and add it to the scroll view’scustomContentView.