iOS Auto Layout Demystified, Second Edition (2014)
Chapter 7. Layout Solutions
The previous chapters in this book have focused on know-how and philosophy. This chapter introduces solutions. You’ll read about a variety of real-world challenges and how Auto Layout provides practical answers for day-to-day development work. The topics are a grab bag, showcasing requests developers commonly make.
Table Cells
Despite rumors to the contrary, Auto Layout isn’t the enemy of table cells. Figure 7-1 shows an application built around a constraint-based table. Each cell item, including the track title, album art, price button, and playback indicator, is positioned and sized using Auto Layout rules. You see an example of the playback indicator on the fourth row of the table. The cell layout design was built in code using a custom table view cell subclass.
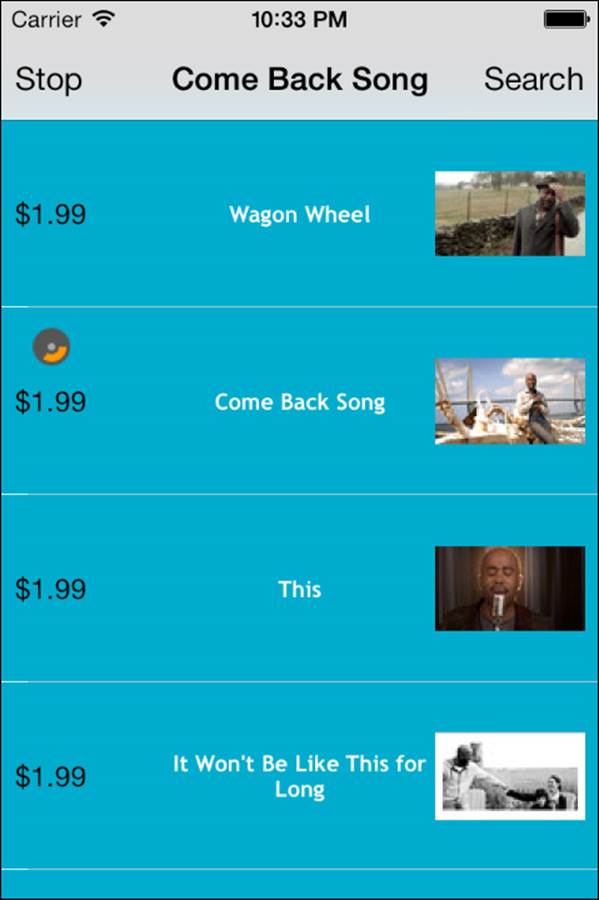
Figure 7-1 This table’s cells were built using Auto Layout.
Developers who are new to Auto Layout often encounter issues attempting to combine constraints with table view cells. If you’re experiencing assertion failures related to Auto Layout, like the following, step back and reevaluate your approach:
2013-02-01 18:55:49.125 HelloWorld[506:c07] *** Assertion failure in -[CustomCell
layoutSublayersOfLayer:], /SourceCache/UIKit_Sim/UIKit-2380.17/UIView.m:5776
2013-02-01 18:55:49.126 HelloWorld[506:c07] *** Terminating app due to uncaught
exception 'NSInternalInconsistencyException', reason: 'Auto Layout still required
after executing -layoutSubviews. CustomCell's implementation of -layoutSubviews needs
to call super.'
The success of constraint-based cells depends on two things. First, follow standard Auto Layout best practices for constraint layout and updates. Second, you need to limit your custom subviews to the cell’s contentView; don’t add the subviews directly to the cell itself. Otherwise, treat Auto Layout cells as you would those built with Autosizing.
Listing 7-1 shows the key methods behind the table in Figure 7-1. Here are several points to keep in mind for your own implementations:
![]() Create a custom cell class—It works best when you start fresh. It is better to subclass UITableViewCell than to add Auto Layout–based subviews to standard cells.
Create a custom cell class—It works best when you start fresh. It is better to subclass UITableViewCell than to add Auto Layout–based subviews to standard cells.
![]() Implement requiresConstraintBasedLayout:—Return YES from this class method, as your cell depends on Auto Layout.
Implement requiresConstraintBasedLayout:—Return YES from this class method, as your cell depends on Auto Layout.
![]() Add subviews—Listing 7-1 creates and adds its subviews in the class initializer, ending a method by calling setNeedsUpdateConstraints. It performs no layout; it just returns the newly initialized cell instance.
Add subviews—Listing 7-1 creates and adds its subviews in the class initializer, ending a method by calling setNeedsUpdateConstraints. It performs no layout; it just returns the newly initialized cell instance.
![]() Centralize your layout—Establish updateConstraints in the usual manner. Start by calling the superclass’s implementation. Remove any stale or invalid constraints. Finally, lay out the view.
Centralize your layout—Establish updateConstraints in the usual manner. Start by calling the superclass’s implementation. Remove any stale or invalid constraints. Finally, lay out the view.
Listing 7-1 Building Auto Layout Cells
// Require Auto Layout
+ (BOOL) requiresConstraintBasedLayout
{
return YES;
}
// Lay out the view
- (void) updateConstraints
{
// Always call super
[super updateConstraints];
// Clean up stale or invalid constraints
for (UIView *view in self.contentView.subviews)
{
NSArray *constraints = [self.contentView
constraintsReferencingView:view];
for (NSLayoutConstraint *constraint in constraints)
[constraint remove];
}
// Lay out Track Label
HUG(customLabel, 750);
ALIGN_CENTER(customLabel);
// Lay out Album Image
HUG(customImageView, 750);
ALIGN_CENTERRIGHT(customImageView, 8);
// Lay out Buy Button
HUG(_buyButton, 750);
ALIGN_CENTERLEFT(_buyButton, AQUA_SPACE);
// Lay out Playback Progress
LAYOUT_V(progressImageView, 4, _buyButton);
CONSTRAIN_SIZE(progressImageView, 20, 20);
}
// Initialize a new cell instance
- (instancetype) initWithStyle:(UITableViewCellStyle)style
reuseIdentifier:(NSString *)reuseIdentifier
{
self = [super initWithStyle:style
reuseIdentifier:reuseIdentifier];
if (!self) return self;
// Add general styling
self.contentView.backgroundColor = AQUA_COLOR;
self.selectionStyle = UITableViewCellSelectionStyleNone;
// Add Track Label
customLabel = [[UILabel alloc] init];
customLabel.numberOfLines = 0; // Enable wrapping
customLabel.textAlignment = NSTextAlignmentCenter;
customLabel.preferredMaxLayoutWidth = 150;
[self.contentView addSubview:customLabel];
PREPCONSTRAINTS(customLabel);
// Add Album Image View
customImageView = [[UIImageView alloc] init];
[self.contentView addSubview:customImageView];
PREPCONSTRAINTS(customImageView);
// Add Buy Button
_buyButton = [UIButton buttonWithType:UIButtonTypeRoundedRect];
[self.contentView addSubview:_buyButton];
PREPCONSTRAINTS(_buyButton);
// Add Progress Image View
progressImageView = [[UIImageView alloc] init];
[self.contentView addSubview:progressImageView];
PREPCONSTRAINTS(progressImageView);
// Mark for refresh
[self setNeedsUpdateConstraints];
return self;
}
Auto Layout and Multiple-Height Table Cells
Tables with multiple-height cells, as in Figure 7-2, present an Auto Layout challenge. That’s because cells generally live outside a parent view until the very last second. The common trick that enables you to calculate layout size (systemLayoutSizeFittingSize:) doesn’t necessarily work with cell views.
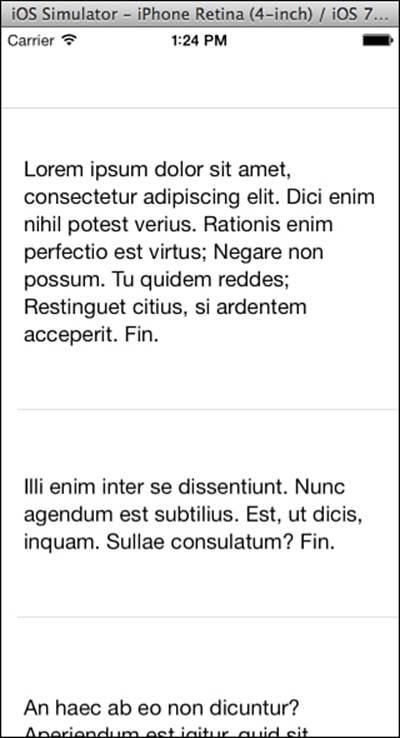
Figure 7-2 Constraint-based cells with varying heights.
Consider calculating cell heights more traditionally, as in Listing 7-2, even when your cells are built using Auto Layout. While there are many approaches that get you to the same place, sadly the fitting size typically causes internal consistency errors.
Listing 7-2 Calculating Cell Heights
+ (CGFloat) heightForString: (NSAttributedString *) aString
inTableView: (UITableView *) tableView
{
CGRect r = [aString boundingRectWithSize:
CGSizeMake(tableView.bounds.size.width –
4 * AQUA_INDENT, CGFLOAT_MAX)
options:NSStringDrawingUsesLineFragmentOrigin
context:nil];
r.size.height += 4 * AQUA_INDENT;
aString.nametag = @(r.size.height).stringValue;
return r.size.height;
}
- (CGFloat) tableView:(UITableView *)tableView
heightForRowAtIndexPath:(NSIndexPath *)indexPath
{
NSAttributedString *aString = array[indexPath.row];
if (aString.nametag)
return [aString.nametag floatValue];
return [CustomTableViewCell heightForString:aString inTableView:tableView];
}
Preserving Image Aspect
A view’s content mode may not preserve its natural image aspect. That’s because content modes control the way a view presents its content when the view’s size changes. A content mode, such as UIViewContentModeScaleToFill, allows content to completely fill a view but offers no guarantees about how that content gets scaled.
Auto Layout offers an easy way to mandate a natural image aspect. Install a constraint that relates a view’s width to its height, using the native aspect as the multiplier. Listing 7-3 demonstrates this approach.
In Listing 7-3, the addImageView: method loads a UIImage instance. It uses the image’s size property to build a natural aspect by dividing its width by its height. The method builds a constraint to preserve this aspect and installs it at a high priority. This is one of the rare instances where a legal constraint relates items in one axis (width, which is horizontal) to items in the other axis (height, which is vertical).
The method then lowers the compression resistance priority, enabling the image view to resize more readily. It finishes by adding an arbitrary scaling mode, enabling the content to fill whatever space is available.
All together, the rules work to establish image views that are readily resized by Auto Layout but that maintain their view’s intrinsic aspect. The left image in Figure 7-3 shows the results built by Listing 7-3.

Figure 7-3 Left: Despite scaling, each view maintains the natural aspect of the image it presents. Right: View extent isn’t affected by applying an aspect-fitting content mode.
Public domain images courtesy of the National Park Service
You might wonder why Listing 7-3 doesn’t just use UIViewContentModeScaleAspectFit. This content mode displays an entire image, scaling it to fit the size of the view and maintaining the intrinsic aspect ratio. The right image in Figure 7-3 demonstrates the answer.
Unlike the constrained aspects built by Listing 7-3, content modes don’t affect view layout. The true extents of each view, highlighted here by the solid backsplash (in blue if you’re reading this book in a color e-reader), do not naturally follow the intrinsic content. Adding an aspect-limiting constraint forces the view size to match its content, regardless of its scale.
Listing 7-3 Using Constraints to Mandate Aspect
- (void) addImageView: (NSString *) source
{
NSLayoutConstraint *constraint;
// Load the image into a new image view
UIImage *image = [UIImage imageNamed:source];
UIImageView *imageView = [[UIImageView alloc] initWithImage:image];
[self.view addSubview:imageView];
PREPCONSTRAINTS(imageView);
// Limit aspect at high priority
CGFloat naturalAspect =
image.size.width / image.size.height;
constraint = [NSLayoutConstraint
constraintWithItem:imageView
attribute:NSLayoutAttributeWidth
relatedBy:NSLayoutRelationEqual
toItem:imageView
attribute:NSLayoutAttributeHeight
multiplier:naturalAspect
constant:0];
[constraint install:1000];
// Lower down compression resistance priority
RESIST(imageView, 250);
// Enable arbitrary image scaling
imageView.contentMode = UIViewContentModeScaleToFill;
[views addObject:imageView];
}
Accordion Sizing
Figure 7-4 demonstrates a common layout pattern. You create a line of views that stretch from one edge to the other, vertically or horizontally. Each view occupies the same extent percentage, regardless of the amount of available space. To fit, the views must stretch or contract in unison, much as the folds of an accordion do, to provide consistent sizing for each element.
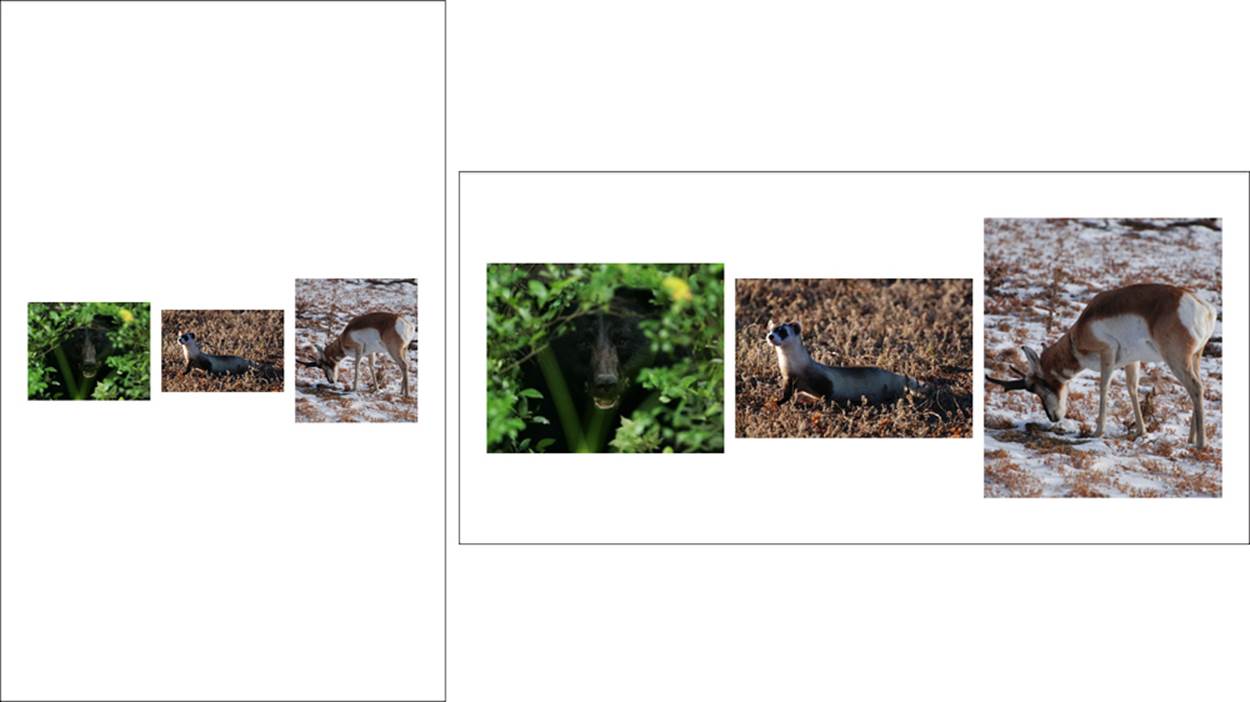
Figure 7-4 Accordion-style constraints allow the images to stretch proportionally while ensuring that each view occupies the same horizontal space. Although the portrait orientation on the left offers less room to work with than the landscape orientation on the right, the relationships between each image remain constant.
Public domain images courtesvy of the National Park Service
It is remarkably easy to implement this pattern using visual formats. Listing 7-4 shows that all you have to do is create a format that places one item after another and that matches each successive view to the first.
All the remaining space is fixed: between the superview and the first and last items and between each pair of views. These spacing rules remove any ambiguity and allow the views to resize in concert.
Listing 7-4 Matching Multiple View Widths
- (void) loadView
{
self.view = [[UIView alloc] init];
self.view.backgroundColor = [UIColor whiteColor];
views = [NSMutableArray array];
[self addImageView:@"bear.jpg"]; // Listing 7-3
[self addImageView:@"ferret.jpg"];
[self addImageView:@"pronghorn.jpg"];
NSArray *constraints = [NSLayoutConstraint
constraintsWithVisualFormat:
@"H:|-[view1]-[view2(==view1)]-[view3(==view2)]-|"
options:NSLayoutFormatAlignAllCenterY
metrics:nil
views:@{
@"view1":views[0],
@"view2":views[1],
@"view3":views[2]}];
for (NSLayoutConstraint *constraint in constraints)
[constraint install:750];
// Align first view to remove placement ambiguity
CENTER_V(views[0]);
}
Scroll Views
In an ideal world, scroll views would integrate seamlessly with Auto Layout. They’d provide a public ready-to-use contentView, whose children could be laid out using standard Auto Layout rules. In this utopia, contentView would tightly couple to the scroll view’s contentSize, enabling you to tie that size to constraints.
In such a scenario, you’d be able to express rules like the following:
contentView.width = scrollView.width * views.count
contentView.height = scrollView.height
These rules request a content size expressed as multiples of the parent scroll view’s width. They also match the content to the parent’s height. This setup would be perfect for creating a paged layout for some N number of views, such as in a scrolling album of photographs.
If this were to be implemented, changes in the scroll view’s geometry would automatically update the content view and its size. Sadly, this scenario doesn’t exist. Apple provides no public UIScrollView content views. You can’t set a scroll view’s contentSize property in constraints. Nor can you directly tie a child view’s sizing to the parent’s bounds.
Apple’s May 2013 Technical Note TN2154 discusses these limits and offers two solutions. First, you can use a pure Auto Layout approach, but there are a couple special rules you must follow. Second, you can mix and match Auto Layout with Autosizing to bypass those limitations.
Scroll Views and Pure Auto Layout
Although scroll views work directly with Auto Layout, they do so in a frustrating and counterintuitive way. Your subviews must stretch to all four edges of the scroll view parent and create sizing that does not rely on the scroll view parent.
The following examples showcase the difficulty of the pure Auto Layout approach:
![]() Say you want to add a grid backsplash similar to the one introduced in Chapter 5, “Debugging Constraints,” (refer to Figure 5-4). Although these child views stretch to all four parent edges, they rely on sizing themselves by multiplying the parent’s width and height. You cannot do that. You end up with zero-sized subviews.
Say you want to add a grid backsplash similar to the one introduced in Chapter 5, “Debugging Constraints,” (refer to Figure 5-4). Although these child views stretch to all four parent edges, they rely on sizing themselves by multiplying the parent’s width and height. You cannot do that. You end up with zero-sized subviews.
![]() You build a small image view and center it in the parent. The image view provides an intrinsic content size, so it does not rely on the scroll view for its sizing. However, your layout does not reach from edge to edge. You end up with a “frozen” scroll view that fails to respond to user touches.
You build a small image view and center it in the parent. The image view provides an intrinsic content size, so it does not rely on the scroll view for its sizing. However, your layout does not reach from edge to edge. You end up with a “frozen” scroll view that fails to respond to user touches.
Although scroll views technically work with pure Auto Layout, a hybrid approach is much more practical.
Hybrid Solution
Fortunately, it’s relatively easy to bypass the pure Auto Layout issues by creating a custom content view. Table 7-1 examines the layout tree for a content view solution, showcasing the Auto Layout gap that you fill with this solution.
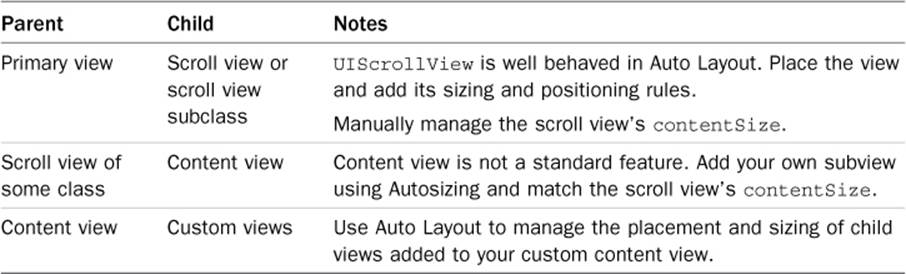
Table 7-1 Locating the Scroll View Layout Gap
Although you can add your own content view to a UIScrollView instance—for example, in loadView or viewDidLoad—it’s easier to build a compliant subclass, as in Listing 7-5. This AutoLayoutScrollView class is constraint ready, automatically passing along subviews to its custom content view. This way, when the content size changes, the content view updates its frame, allowing the subviews to respond accordingly.
Listing 7-5 An Auto Layout–Ready Scroll View Subclass
@interface AutoLayoutScrollView : UIScrollView
@property (nonatomic, readonly) UIView *customContentView;
@end
@implementation AutoLayoutScrollView
- (instancetype) initWithFrame:(CGRect)frame
{
if (!(self = [super initWithFrame:frame])) return self;
// Create custom content view using Autosizing
_customContentView = [[UIView alloc]
initWithFrame: (CGRect){.size=frame.size}];
[self addSubview:_customContentView];
return self;
}
// Override addSubview: so new views are added
// to the content view
- (void) addSubview:(UIView *)view
{
if (view != _customContentView)
[_customContentView addSubview:view];
else
[super addSubview:_customContentView];
}
// When the content size changes, adjust the
// custom content view as well
- (void) setContentSize:(CGSize)contentSize
{
_customContentView.frame =
(CGRect){.size = contentSize};
[super setContentSize:contentSize];
}
@end
Building a Paged Image Scroll View
Listing 7-5 shows a way to incorporate Auto Layout into scroll views, allowing layout to update as the content size changes. A more interesting challenge for developers is a scroll view whose content size updates with respect to the scroll view’s frame. Although it may sound wacky to couple content size with the parent’s frame size, there’s a compelling use case for this approach.
Figure 7-5 shows a scroll view whose paged content is laid out using Auto Layout. This particular example consists of five picture pages. A page view indicator, powered by the scroll view’s delegate, keeps track of the current image. The size of the scroll view, and thus the size of each image, is determined by the device characteristics and orientation.

Figure 7-5 Auto Layout controls the paged scroll view layout.
Public domain image courtesy of the National Park Service
When its frame changes (you can key-value observe the scroll view’s bounds), the scroll view adjusts its content size. Since this class inherits from Listing 7-5, the constraints guiding the layout of the child views adjust, matching each view to the scroll view’s new width.
When you add new content, the scroll view updates its constraints, invalidating the old layout. Listing 7-6 introduces the updateConstraints method that does this. It lays out the new row of views and adjusts the paged content offset.
Paged scroll views may suffer from Auto Layout’s best approximations, although this issue seems to be greatly diminished in iOS 7. With Auto Layout, a view that is 200.5 points across is very close to one that is 200 points across. You don’t sweat the difference. Unfortunately, scroll viewsrequire layout precision. When paging, each set of data must be exactly the same width, or you will see artifacts near the page edges. Auto Layout cannot guarantee such precision.
Listing 7-6 Building a Scroll View’s Contents with Auto Layout
// Update view layout and adjust content view
- (void) updateConstraints
{
[super updateConstraints];
if (!views.count)
return;
// Clean up previous constraints
for (UIView *view in views)
{
NSArray *constraints =
[view referencingConstraintsInSuperviews];
for (NSLayoutConstraint *constraint in constraints)
[constraint remove];
}
for (UIView *view in views)
{
// Center each view vertically
CENTER_V(view);
// Match each to the scroll view width
INSTALL_CONSTRAINTS(500, nil,
CONSTRAINT_MATCHING_WIDTH(view, self));
}
// Lay out the views in a horizontal row with flush alignment
// These use routines from Chapter 4
BuildLineWithSpacing(views,
NSLayoutFormatAlignAllCenterY, @"", 750);
Pin(views[0], @"H:|[view]");
Pin([views lastObject], @"H:[view]|");
// Update content size and page offset
[self updateContentSize];
[self setContentOffset:CGPointMake(
(CGFloat) _pageNumber * self.frame.size.width, 0)];
}
// Update layout after adding a new child view
- (void) addView:(UIView *)view
{
if (!views)
views = [NSMutableArray array];
[views addObject:view];
// Add new child to the content view
[self.pagedContentView addSubview:view];
PREPCONSTRAINTS(view);
// Request fresh layout
[self setNeedsUpdateConstraints];
}
Centering View Groups
You might assume that with Auto Layout, you must anchor your content to a side when laying out views. That’s because Auto Layout does not directly offer buffering to enable your content to float to the middle. You can work around this limitation to achieve the effect you want, as Figure 7-6 demonstrates. The secret lies in adding managed spacers around your content.

Figure 7-6 Buffering enables complex content to float to the middle of views.
You create spacers by adding generic views to your content. Spacers enable you to establish Auto Layout rules that create buffers and mandate floating layouts. This approach targets groups of views; it’s meaningless for single views. You can always center a single view in its parent by equating centerX attributes.
Views, by default, are invisible. With clear backgrounds, you don’t need to explicitly hide a view or apply a zeroed alpha level. Newly created views are otherwise nonfunctional and will not track user interaction. They provide an efficient, lightweight layout solution that’s invisible to users and that doesn’t interfere with application functionality.
These buffers push content to the center by adding rules that state “leave an equal amount of space above and below (or to the left and right) of these items.” To make this approach work, you add two spacer views per axis for each group of views you want to float. Listing 7-7 shows an example of this.
In Figure 7-6, there are four spacers to manage. For more complex layouts, the spacer count grows accordingly. Make sure you consider ways to refer to your spacers for possible layout updates. You might tag them, collect them into outlet collections (yes, this approach works in Interface Builder [IB]), add them to arrays, and so forth.
You’ll find a more general discussion of using spacers in Chapter 4, “Visual Formats.”
Listing 7-7 Adding Spacer Views
// Create equal-sized spacers to float the view vertically
void FloatViewsV(VIEW_CLASS *firstView,
VIEW_CLASS *lastView, NSUInteger priority)
{
if (!firstView.superview) return;
if (!lastView.superview) return;
VIEW_CLASS *nca =
[firstView nearestCommonAncestor:lastView];
if (!nca) return;
// If the common ancestor is the first view,
// move one level up to accommodate the spacer
if (nca == firstView)
nca = firstView.superview;
// Create and install spacers
VIEW_CLASS *spacer1 = [[VIEW_CLASS alloc] init];
VIEW_CLASS *spacer2 = [[VIEW_CLASS alloc] init];
[nca addSubview:spacer1];
[nca addSubview:spacer2];
PREPCONSTRAINTS(spacer1);
PREPCONSTRAINTS(spacer2);
for (VIEW_CLASS *view in @[spacer1, spacer2])
view.nametag = @"SpacerView";
// Add spacers to leading and trailing
// See the layout functions from Chapter 4
BuildLineWithSpacing(@[spacer1, firstView],
NSLayoutFormatAlignAllCenterX, @"", priority);
BuildLineWithSpacing(@[lastView, spacer2],
NSLayoutFormatAlignAllCenterX, @"", priority);
// Hug edges, match sizes
AlignView(spacer1, NSLayoutAttributeTop, 0, priority);
AlignView(spacer2, NSLayoutAttributeBottom, 0, priority);
MatchSizeV(spacer1, spacer2, priority);
}
Custom Multipliers and Random Positions
Constants are the only constraint property that you can update after you create and install a layout constraint. Here’s what Apple has to say on the matter:
Unlike the other properties, the constant may be modified after constraint creation. Setting the constant on an existing constraint performs much better than removing the constraint and adding a new one that’s just like the old but for having a new constant.
Some constraints, however, depend on custom multipliers. Unlike constants, which refer specifically to exact point offsets, multipliers enable you to create relational attributes more in keeping with Auto Layout philosophy. For example, you can position a view a certain percentage across its parent without knowing that parent’s size. Or you can size a view to be some factor of its parent’s size, such as half as big or one-third as big. These relations enable you to avoid specific points and pixels.
Listing 7-8 demonstrates a multiplier-based layout. It establishes a (somewhat) random view position, as shown in Figure 7-7. This method places the view’s center for each axis at a random location from 0% to 100% along its parent. To implement this placement, you need to remove any previous placement constraint entirely rather than update it in place, the way you would with constants.
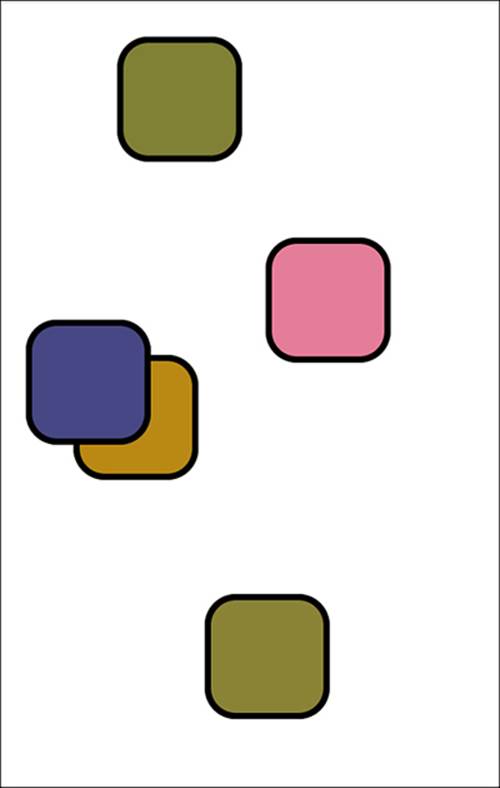
Figure 7-7 These views were positioned using random values for constraint multipliers.
This approach doesn’t force views to remain onscreen. A placement at 0% would leave the left or top half of the view beyond the parent’s edge. The same happens at 100% for the right or bottom half. To counteract this, you can use some sort of layout limiter, such as thelimitToSuperview: method, to constrain the view inward. This has a somewhat negative effect on your random distribution near the edges.
As an alternative that doesn’t suffer from parent edge cases, you could use buffers above and below or to the left and right of each view, adjusting their sizes proportionally to random values. I don’t recommend this approach. It requires four extra views per placement, and the math is ugly.
Listing 7-8 Establishing Random Positions Using Constraints
- (void) setRandomPosition: (UIView *) view
{
CGFloat randomX = (double) random() / (double) LONG_MAX;
CGFloat randomY = (double) random() / (double) LONG_MAX;
// Remove previous position entirely
NSArray *constraints =
[view constraintsNamed:@"View Position"
matchingView:view];
[self.view removeConstraints:constraints];
// Establish new constraints
NSLayoutConstraint *constraint;
// Horizontal
constraint = [NSLayoutConstraint
constraintWithItem:view
attribute:NSLayoutAttributeCenterX
relatedBy:NSLayoutRelationEqual
toItem:view.superview
attribute:NSLayoutAttributeTrailing
multiplier:randomX
constant:0];
constraint.nametag = @"View Position";
[constraint install:500];
// Vertical
constraint = [NSLayoutConstraint
constraintWithItem:view
attribute:NSLayoutAttributeCenterY
relatedBy:NSLayoutRelationEqual
toItem:view.superview
attribute:NSLayoutAttributeBottom
multiplier:randomY
constant:0];
constraint.nametag = @"View Position";
[constraint install:500];
}
- (void) limitToSuperview: (UIView *) view withInset: (CGFloat) inset
{
if (!view || !view.superview)
return;
NSDictionary *bindings =
NSDictionaryOfVariableBindings(view);
NSDictionary *metrics = @{@"inset":@(inset)};
for (NSString *format in @[
@"H:|->=inset-[view]",
@"H:[view]->=inset-|",
@"V:|->=inset-[view]",
@"V:[view]->=inset-|"])
{
NSArray *constraints = [NSLayoutConstraint
constraintsWithVisualFormat:format options:0
metrics:metrics views:bindings];
[self.view addConstraints:constraints];
}
}
Building Grids
Figure 7-8 shows a simple grid pattern that is common in Auto Layout projects. It’s built from rows made up of labels, switches, and buttons. You can easily build similar layouts in your own projects. You generate arrays of views (in this case, labels, switches, and buttons) and apply rules that establish a proper grid. Listing 7-9 demonstrates how this layout was built.
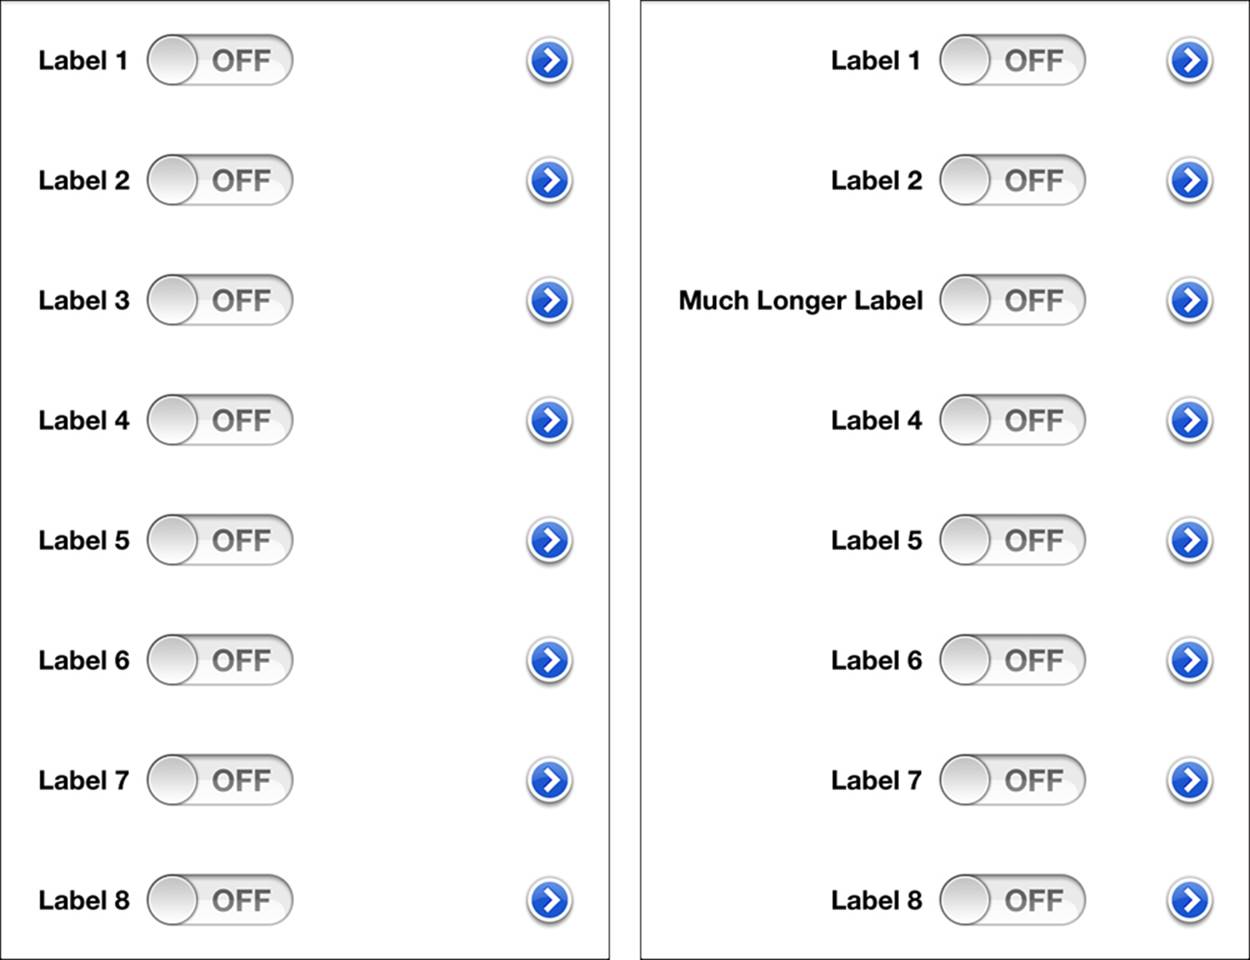
Figure 7-8 Auto Layout simplifies the building of view grids. Both of these layouts were built using the code in Listing 7-9. In the right image, the string "Much Longer Label" was manually assigned to the third label.
For vertical designs, start by considering how rows should be built. In this example, each label sits a fixed distance from a switch, and a disclosure button lies a fixed distance from the trailing edge. The behavior of Label 3 demonstrates the flexibility inherent in this layout.
Choose a row alignment. On the whole, the centerY spacing used in Figure 7-8 produces good-looking results, but you are not limited to this. If you prefer to align the tops, the bottoms, or (if on OS X, since the option is not yet supported on iOS) baselines, you may do so.
As Listing 7-9 demonstrates, it’s easiest to build each row in the loop that creates your views. After establishing and storing views, you create the row that lays out those items. Every iteration adds a new row.
Each row in Figure 7-8 was built using two formats. The first of these installs at a high priority. It creates the two fixed relationships: between the label and the switch and between the button and the parent’s edge. The second format installs at a low priority. It attempts to move the labels as close to the leading edge as possible:
@"H:|-(>=20)-[label]-[switch]-(>=0)-[button]-|"
@"H:|-[label]"
The second format explains where the label wants to be, even though the first set of rules prevents it from getting too close (it must stay 20 points away). Without this second rule, the label and switch placements are ambiguous. They tend to float away from the left edge.
So why do the labels and switches line up, even when the third label drastically changes its size? Strong constraints keep the switches aligned, matching their leading edges to each other.
Always identify the tallest items in each row. In the case of Figure 7-8, the tallest items are the switches. The tallest objects should always command your vertical layout, forming the basis for how each row follows the next. Listing 7-9 builds an aligned column of switches, pinning the first and last items to the top and bottom of the parent view.
This approach forms a reliable basis for most of the grid layout you’ll encounter. You should separate the row creation from the column placement and stitch them together in a way that respects the physical height of each view.
Listing 7-9 Establishing Grids Using Auto Layout
- (void) loadView
{
self.view = [[UIView alloc] init];
self.view.backgroundColor = [UIColor whiteColor];
buttons = [NSMutableArray array];
switches = [NSMutableArray array];
labels = [NSMutableArray array];
for (int i = 0; i < 8; i++)
{
UILabel *l = [self createLabel];
l.text = [NSString stringWithFormat:@"Label %d", i+1];
l.translatesAutoresizingMaskIntoConstraints = NO;
l.tag = i;
[self.view addSubview:l];
[labels addObject:l];
UISwitch *s = [[UISwitch alloc] init];
s.tag = i;
s.translatesAutoresizingMaskIntoConstraints = NO;
[self.view addSubview:s];
[switches addObject:s];
UIButton *b = [UIButton buttonWithType:
UIButtonTypeDetailDisclosure];
b.tag = i;
b.translatesAutoresizingMaskIntoConstraints = NO;
[self.view addSubview:b];
[buttons addObject:b];
// Layout each row
NSArray *constraints = [NSLayoutConstraint
constraintsWithVisualFormat:
@"H:|-(>=20)-[l]-[s]-(>=0)-[b]-|"
options:NSLayoutFormatAlignAllCenterY
metrics:nil
views:NSDictionaryOfVariableBindings(l, s, b)];
[self.view addConstraints:constraints];
// Pin each label to the left using a low priority
pinWithPriority(l, @"H:|-[view]", nil, 300);
}
// [labels[2] setText:@"Much Longer Label"];
// Build vertical column of switches
pseudoDistributeWithSpacers(self.view, switches,
NSLayoutFormatAlignAllLeading, 500);
pin(buttons[0], @"V:|-[view]");
pin([buttons lastObject], @"V:[view]-|");
}
Making Room for the Keyboard
Constraints offer the perfect match to keyboards, enabling you to use constants and animation to adjust text views around their appearance and disappearance. Developer Steven Hepting first introduced me to the idea of adding a dedicated keyboard spacing view rather than using other approaches, like content insets. This is a clever idea, as you see in Listing 7-10. It enables you to add to the bottom of your layout a view whose sole purpose is to listen for and manage keyboard events. This implementation is fully hardware aware and properly adjusts for optional input accessory views.
The installToView: class method offers the preferred entry point. The following snippet demonstrates how you might create and use a spacer in your own application.
// Create a spacer
KeyboardSpacingView *spacer =
[KeyboardSpacingView installToView:self.view];
// Place the spacer under the text view.
CONSTRAIN(@"V:|[textView][spacer]|", textView, spacer);
Listing 7-10 Creating a Dedicated Keyboard Spacer
@implementation KeyboardSpacingView
{
NSLayoutConstraint *heightConstraint;
}
// Listen for keyboard
- (void) establishNotificationHandlers
{
// Listen for keyboard appearance
[[NSNotificationCenter defaultCenter]
addObserverForName:UIKeyboardWillShowNotification
object:nil queue:[NSOperationQueue mainQueue]
usingBlock:^(NSNotification *note)
{
// Fetch keyboard frame
NSDictionary *userInfo = note.userInfo;
CGFloat duration =
[userInfo[UIKeyboardAnimationDurationUserInfoKey]
floatValue];
CGRect keyboardEndFrame = [self.superview
convertRect:[userInfo[UIKeyboardFrameEndUserInfoKey]
CGRectValue] fromView:self.window];
// Adjust to window
CGRect windowFrame = [self.superview
convertRect:self.window.frame fromView:self.window];
CGFloat heightOffset =
(windowFrame.size.height - keyboardEndFrame.origin.y) –
self.superview.frame.origin.y;
// Update and animate height constraint
heightConstraint.constant = heightOffset;
[UIView animateWithDuration:duration animations:^{
[self.superview layoutIfNeeded];}];
}];
// Listen for keyboard exit
[[NSNotificationCenter defaultCenter]
addObserverForName:UIKeyboardWillHideNotification
object:nil queue:[NSOperationQueue mainQueue]
usingBlock:^(NSNotification *note)
{
// Reset to zero
NSDictionary *userInfo = note.userInfo;
CGFloat duration =
[userInfo[UIKeyboardAnimationDurationUserInfoKey]
floatValue];
heightConstraint.constant = 0;
[UIView animateWithDuration:duration animations:^{
[self.superview layoutIfNeeded];}];
}];
}
// Stretch sides and bottom to superview
- (void) layoutView
{
self.translatesAutoresizingMaskIntoConstraints = NO;
if (!self.superview) return;
for (NSString *constraintString in
@[@"H:|[view]|", @"V:[view]|"])
{
NSArray *constraints = [NSLayoutConstraint
constraintsWithVisualFormat:constraintString
options:0 metrics:nil views:@{@"view":self}];
[self.superview addConstraints:constraints];
}
heightConstraint = [NSLayoutConstraint
constraintWithItem:self attribute:NSLayoutAttributeHeight
relatedBy:NSLayoutRelationEqual toItem:nil
attribute:NSLayoutAttributeNotAnAttribute
multiplier:1.0f constant:0.0f];
[self addConstraint:heightConstraint];
}
+ (instancetype) installToView: (UIView *) parent
{
if (!parent) return nil;
KeyboardSpacingView *view = [[self alloc] init];
[parent addSubview:view];
[view layoutView];
[view establishNotificationHandlers];
return view;
}
@end
Inserting Views at Runtime
Updating a layout to insert views can prove challenging. Consider Figure 7-9. It shows a line of views before and after a new view is inserted in the middle. To add that new view, you must replace the existing constraints between the left and right views. The lines in the figure represent the current constraint set.
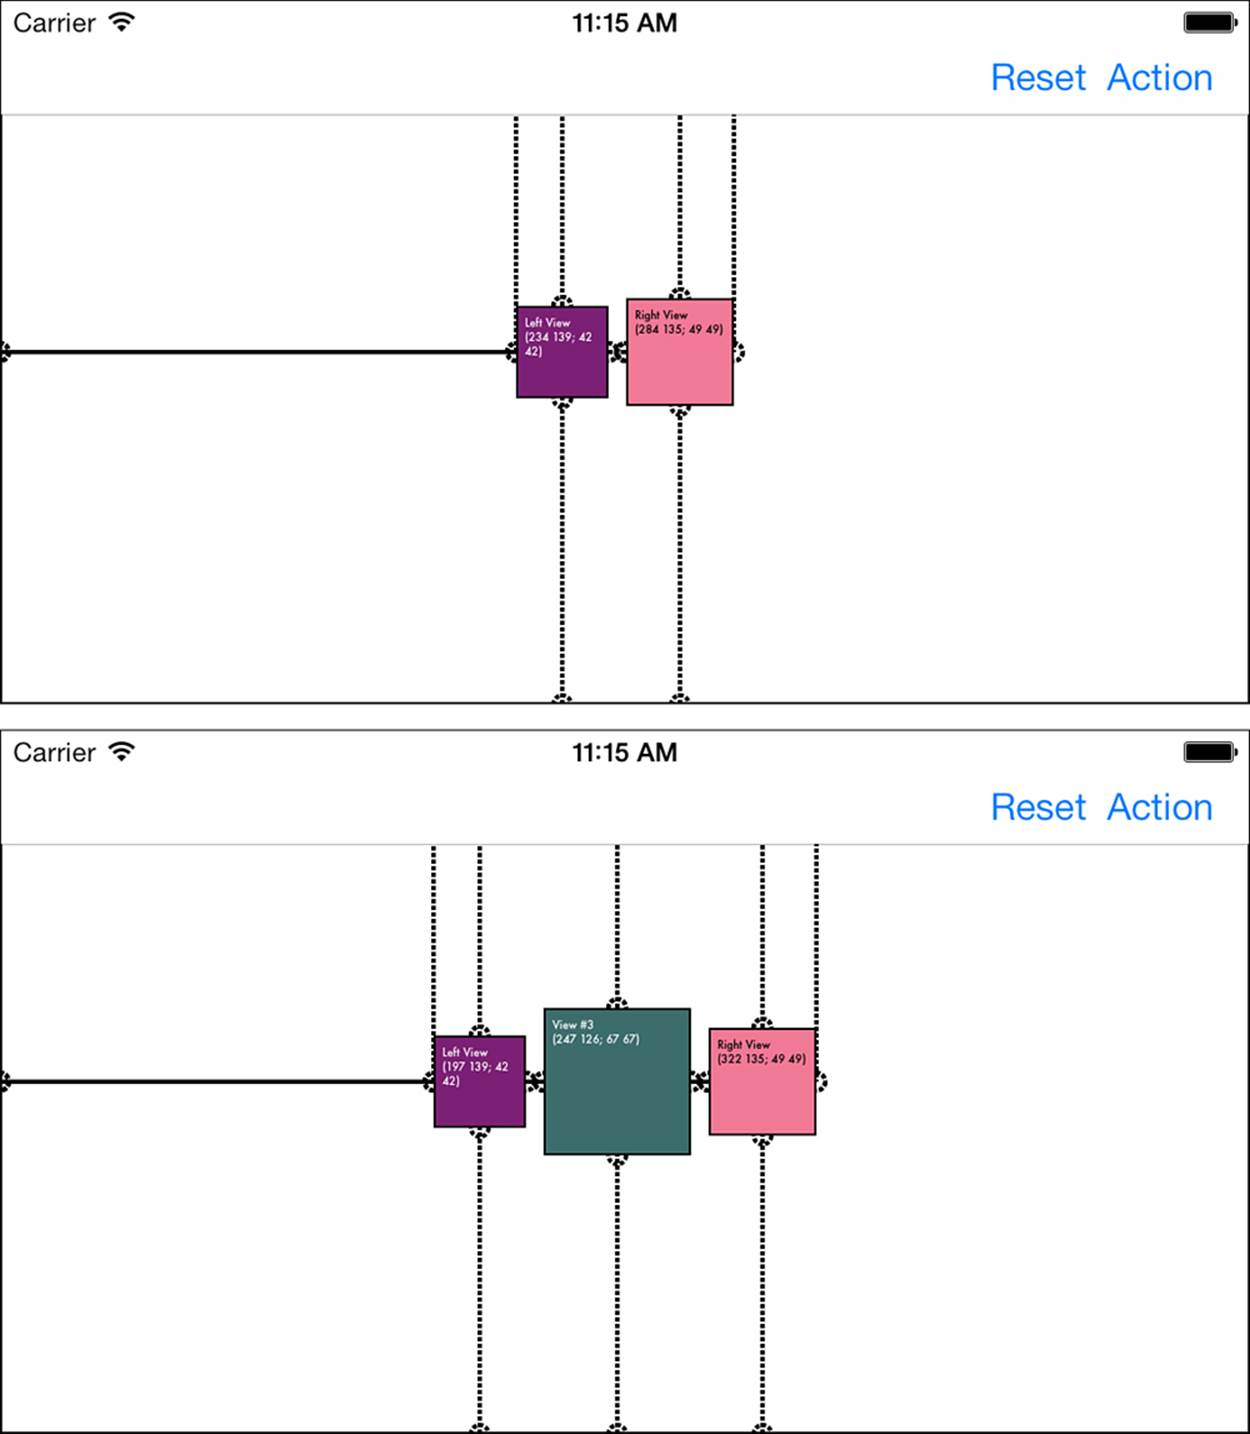
Figure 7-9 Adding new views requires that you locate and replace existing constraints.
Listing 7-11 extends the constraint matching approach first introduced in Chapter 2, “Constraints,” to return an array of view-to-view constraints. Each item in the array references both views passed to the method.
Listing 7-11 View-to-View Constraint Matching
- (NSArray *) constraintsReferencingView: (VIEW_CLASS *) firstView
andView: (VIEW_CLASS *) secondView
{
NSArray *firstArray = [self constraintsReferencingView:firstView];
NSMutableArray *array = [NSMutableArray array];
for (NSLayoutConstraint *constraint in firstArray)
{
if ([constraint refersToView:secondView])
[array addObject:constraint];
}
return array;
}
Fetching this array enables you to remove view-to-view constraint items and assign a new layout. Here’s how the layout in Figure 7-9 transitions from the first screen shot to the second:
// Remove view-to-view constraints
NSArray *constraints =
[self.view constraintsReferencingView:v1 andView:v2];
RemoveConstraints(constraints);
// Establish new layout rules
BuildLine(@[v1, newView, v2],
NSLayoutFormatAlignAllCenterY, 500);
// Animate the results into place
[UIView animateWithDuration:0.3f animations:^{
[self.view layoutIfNeeded];}];
To provide the smoothest animation, I set newView’s initial frame to match either the left (v1) or right (v2) view’s frame.
Adding iOS Frame and Constraint Overlays
Although OS X offers a way to visualize frames and overlays (as you saw in Chapter 5, in Figure 5-9), iOS provides no equivalent functionality. As I found this an extremely valuable debugging tool, I built my own solution, which you saw illustrating the example in Figure 7-9. This implementation appears in the ConstraintUtilities-Description file in the book’s github repository, as the VisualLayoutHint category for UIView. It involves nothing more than drawing onto view layers and consists of a lot of tedious drawing tasks that relate little (if at all) to actual constraint development.
When this implementation is enabled, a display link timer updates the constraint and view drawings, so you can use this implementation in direct manipulation interfaces as well as static layouts. To enable the functionality, call toggleVisualLayoutHints on your main view controller view in viewDidAppear:, making sure to toggle again as the view disappears.
Motion Effects, Dynamic Text, and Containers
Before concluding this chapter, I want to offer a few final notes about iOS technologies and Auto Layout.
Auto Layout views work seamlessly with iOS 7’s new motion effects and dynamic text. For motion effects, you can add behaviors to your views without worrying about any frame tweaking. iOS implements motion effects using layer transforms. They happily coexist with constraint-based layout.
With dynamic text, add an observer for UIContentSizeCategoryDidChangeNotification. In your handler, update layouts for top-level views, typically with layoutIfNeeded. Support for text updates is already built right into UITextView and UILabel for you. If all you’re doing is updating these elements, let iOS do the work on your behalf.
When using Auto Layout with container views, be sure to reestablish view-to-parent constraints in didMoveToParentViewController:. iOS 7 automatically disposes layout constraints when you remove a view from its parent. When you add the view back to a parent, if you’re using Auto Layout rather than Autosizing, you need to add those constraints back in.
Adding test colors to your view controller backgrounds can help you spot re-parenting errors, where child controllers have not fully and properly laid out with respect to their containers. Most typically, you’ll see the background still laid out for a previous orientation.
Exercises
After reading this chapter, test your knowledge with these exercises:
1. How can you duplicate Listing 7-7’s spacer solution in IB?
2. How do you set view aspect in IB?
3. Can you use the keyboard spacer from Listing 7-10 in IB?
4. How do you use the hybrid scroller strategy from Listing 7-5 in IB?
Conclusions
This chapter presents solutions for many Auto Layout challenges that commonly come up in forums, chat rooms, and e-mail lists. It provides concrete examples of implementing practical answers to those challenges. Here are a few final thoughts to take from this chapter:
![]() Leverage Auto Layout’s power whenever you can. But be aware that not every technology is ready for it. When you’re working with scroll views, use hybrid layout. With table cells, consider traditional content calculation for cell heights.
Leverage Auto Layout’s power whenever you can. But be aware that not every technology is ready for it. When you’re working with scroll views, use hybrid layout. With table cells, consider traditional content calculation for cell heights.
![]() Any design feature offered through IB, such as the layout of table view cells, has a code-based equivalent. On the whole, code-based solutions always offer at least as much expressiveness as IB.
Any design feature offered through IB, such as the layout of table view cells, has a code-based equivalent. On the whole, code-based solutions always offer at least as much expressiveness as IB.
![]() Let geometry guide the way as you build your constraints. As several of the solutions in this chapter show, finding relatable properties within your views can greatly simplify your final layout. Whether you’re matching view sizes for accordion-style layout or equating negative spaces for view buffering, Auto Layout offers many more solutions than you might think.
Let geometry guide the way as you build your constraints. As several of the solutions in this chapter show, finding relatable properties within your views can greatly simplify your final layout. Whether you’re matching view sizes for accordion-style layout or equating negative spaces for view buffering, Auto Layout offers many more solutions than you might think.
![]() Even though these features are not emphasized in documentation, Auto Layout works beautifully with direct manipulation and animation. Any adjustment you make to a constraint constant can be performed in an animation block with layoutIfNeeded. Note that Auto Layout does not respond to UIView transforms. If you scale a view using transforms rather than constraint rules, other views will not move out of the way.
Even though these features are not emphasized in documentation, Auto Layout works beautifully with direct manipulation and animation. Any adjustment you make to a constraint constant can be performed in an animation block with layoutIfNeeded. Note that Auto Layout does not respond to UIView transforms. If you scale a view using transforms rather than constraint rules, other views will not move out of the way.