FREE Guru Level Training For Beginners (2014)
Chapter 4: Applying What You Have Learned So Far
“Apple has long been a leading innovator of mobile technology; I myself own an iPhone”. Al Franken

In this chapter, you will learn about applying what you have learned so far, including:
· Adding some dust in the background
· Making the background move
· Adding stars to the game
· Using the accelerometer to move the ship
· How to position the ship
· Adding asteroids to the game
· How to add laser guns to the ship
· Collision detection
· Detecting when you win/lose
By now you would be able to make an app on your own. You learned to make a Hello World app previously and in this chapter, you will be taught to apply what you have learned so that you can make a Space Shooter app using your Mac and Xcode.
Don’t be intimidated because you won’t be taught to do anything you don’t already know by now.
Let’s start!
1. Launch Xcode. Choose Application under iOS and then, click on SpriteKit Game.
2. Type in SpaceShooter in front of Product Name; ABC in front of the Organization Name namespace; net.fullmoonmanor in front of Company Identifier; XYZ in front of Class Prefix and choose iPhone because that’s the Device you would be using.
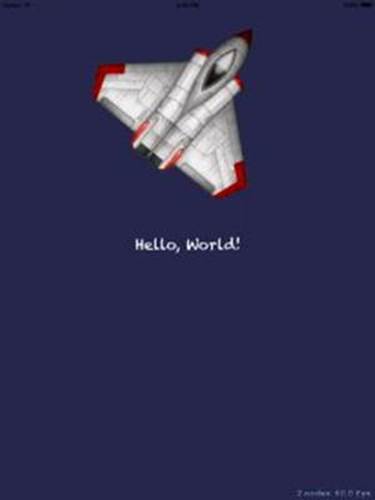
3. Here’s what you would see on the Hello World screen:
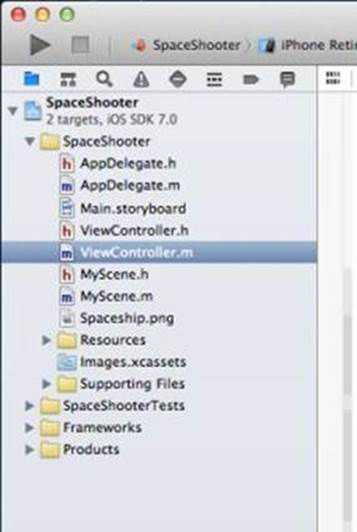
4. Download space game resources for visual and sound effects. Unzip the file.
5. Drag this to the SpaceShooter file in Xcode. Check the Copy items into destination group’s folder (if needed) box and hit Finish.
6. This is what should appear on your screen:
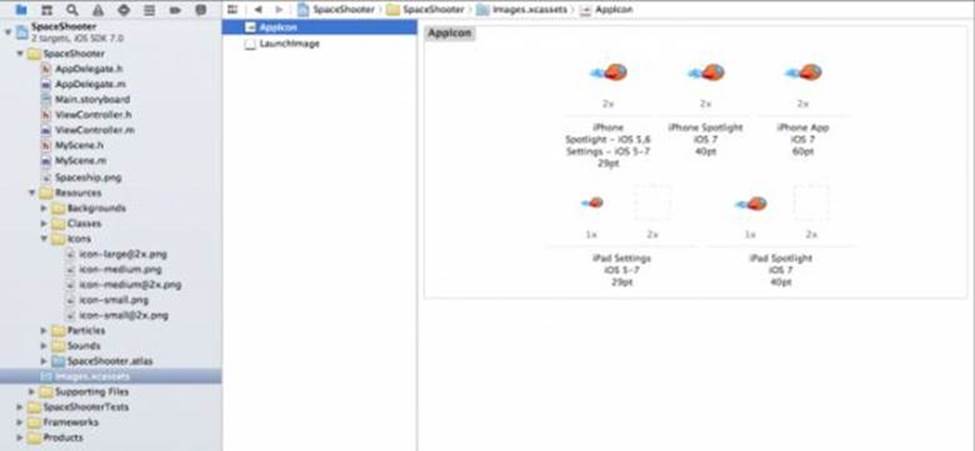
7. Click on Icons under Resources and select images.xcassets. Then, click on AppIcon. This is where you’d be making an Icon to launch the app.
8. Drag the png files into the window entitled AppIcon. This is what the window would look like once you have done so:
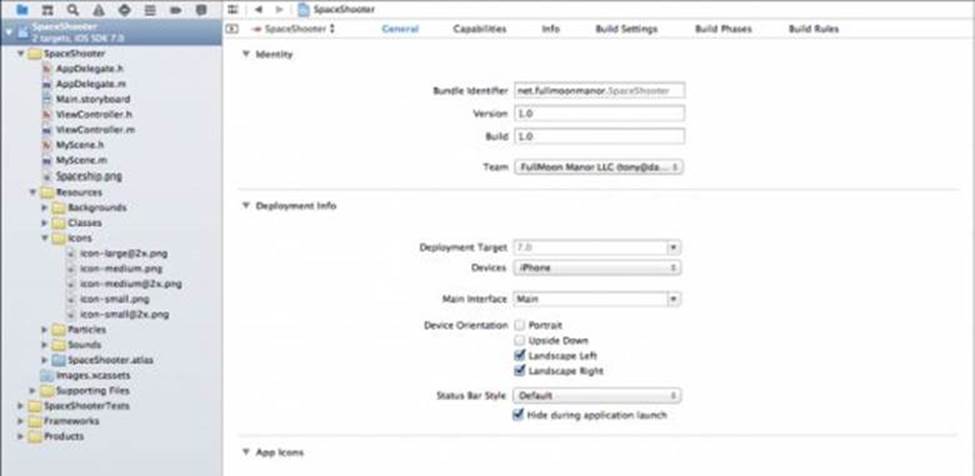
9. Click on SpaceShoot in the Project Navigator and the select SpaceShooter Target. Check General and uncheck Portrait. In the Device Orientation area the Landscape Left and Landscape Right boxes should be checked.
10. Click on MyScene.m and type in the following under #import “MyScene.h”
|
@implementation MyScene |
|
{ |
|
SKSpriteNode *_ship; //1 |
|
} |
|
-(id)initWithSize:(CGSize)size { |
|
if (self = [super initWithSize:size]) { |
|
/* Setup your scene here */ |
|
//2 |
|
NSLog(@"SKScene:initWithSize %f x %f",size.width,size.height); |
|
//3 |
|
self.backgroundColor = [SKColor blackColor]; |
|
#pragma mark - TBD - Game Backgrounds |
|
#pragma mark - Setup Sprite for the ship |
|
//Create space sprite, setup position on left edge centered on the screen, and add to Scene |
|
//4 |
|
_ship = [SKSpriteNode spriteNodeWithImageNamed:@"SpaceFlier_sm_1.png"]; |
|
_ship.position = CGPointMake(self.frame.size.width * 0.1, CGRectGetMidY(self.frame)); |
|
[self addChild:_ship]; |
|
#pragma mark - TBD - Setup the asteroids |
|
#pragma mark - TBD - Setup the lasers |
|
#pragma mark - TBD - Setup the Accelerometer to move the ship |
|
#pragma mark - TBD - Setup the stars to appear as particles |
|
#pragma mark - TBD - Start the actual game |
|
} |
|
return self; |
|
} |
|
-(void)update:(NSTimeInterval)currentTime { |
|
/* Called before each frame is rendered */ |
|
} |
|
@end |
Let’s review what you just did here.
You added a variable that would enable you to keep track of the ship. You filled out the background with some color with the backgroundColor property.
The spriteNodeWithImageNamed method was added in to set in the image name. The addchild command was used so you can fix the position of the sprite.
Apart from this the pragma marks are going to help you make the rest of the game. These marks have another advantage- you will be able to jump through various locations in your source file.
11. Use the iPhone Retina (4-inch) to run the app. You would notice that the ship is bigger than you need it to be. To correct this open the file entitled ViewController.m and then, replace ViewDidLoad method with this:
|
- (void)viewDidLoad |
|
{ |
|
[super viewDidLoad]; |
|
// Configure the view. |
|
SKView * skView = (SKView *)self.view; |
|
skView.showsFPS = YES; |
|
skView.showsNodeCount = YES; |
|
// Create and configure the scene. |
|
SKScene * scene = [MyScene sceneWithSize:skView.bounds.size]; |
|
scene.scaleMode = SKSceneScaleModeAspectFill; |
|
// Present the scene. |
|
[skView presentScene:scene]; |
|
} |
The viewDidLoad was added in but it will not respond to the layout just yet. Don’t panic- this is simply because you haven’t yet added the view hierarchy. So what you’re going to do now is to ‘shift’ the start up code to another, later point in the whole process.
Here’s the code you will need to replace viewDidLoad:
|
- (void)viewDidLoad |
|
{ |
|
[super viewDidLoad]; |
|
} |
|
- (void)viewWillLayoutSubviews |
|
{ |
|
[super viewWillLayoutSubviews]; |
|
// Configure the view. |
|
// Configure the view after it has been sized for the correct orientation. |
|
SKView *skView = (SKView *)self.view; |
|
if (!skView.scene) { |
|
skView.showsFPS = YES; |
|
skView.showsNodeCount = YES; |
|
// Create and configure the scene. |
|
MyScene *theScene = [MyScene sceneWithSize:skView.bounds.size]; |
|
theScene.scaleMode = SKSceneScaleModeAspectFill; |
|
// Present the scene. |
|
[skView presentScene:theScene]; |
|
} |
The ship’s size will be right for your device’s screen and the coordinates have been fixed too.
Adding some dust in the background
12. Now you want to add in some dust in the background. Click on Resources/Classes and then, select a speed. This is the speed at which the background would move.
13. Select MyScene.m. Once you have done so, add #import "FMMParallaxNode.h" under #import "MyScene.h".
14. You will see the @implementation block under the SKSpriteNode *_ship; declaration. Here you must add
|
FMMParallaxNode *_parallaxNodeBackgrounds; |
|
FMMParallaxNode *_parallaxSpaceDust; |
Find the -(id)initWithSize:(CGSize) size method under under the #pragma mark- TBD Game Backgrounds command. Add this code here:
|
#pragma mark - Game Backgrounds |
|
//1 |
|
NSArray *parallaxBackgroundNames = @[@"bg_galaxy.png", @"bg_planetsunrise.png", |
|
@"bg_spacialanomaly.png", @"bg_spacialanomaly2.png"]; |
|
CGSize planetSizes = CGSizeMake(200.0, 200.0); |
|
//2 |
|
_parallaxNodeBackgrounds = [[FMMParallaxNode alloc] initWithBackgrounds:parallaxBackgroundNames |
|
size:planetSizes |
|
pointsPerSecondSpeed:10.0]; |
|
//3 |
|
_parallaxNodeBackgrounds.position = CGPointMake(size.width/2.0, size.height/2.0); |
|
//4 |
|
[_parallaxNodeBackgrounds randomizeNodesPositions]; |
|
//5 |
|
[self addChild:_parallaxNodeBackgrounds]; |
|
//6 |
|
NSArray *parallaxBackground2Names = @[@"bg_front_spacedust.png",@"bg_front_spacedust.png"]; |
|
_parallaxSpaceDust = [[FMMParallaxNode alloc] initWithBackgrounds:parallaxBackground2Names |
|
size:size |
|
pointsPerSecondSpeed:25.0]; |
|
_parallaxSpaceDust.position = CGPointMake(0, 0); |
|
[self addChild:_parallaxSpaceDust]; |
|
#pragma mark - Setup Sprite for the ship |
By doing this you have added in various planets, passed the names of different files to change and set the speed and to adjust the size of the ship. You have also fixed the coordinates so you could place the planets and finally, you have added dust to the game too.
Making the background move
15. The Sprite Kit update method needs to be modified for the dust and planets to move by. Enter the following class in the Update method for this:
|
-(void)update:(NSTimeInterval)currentTime { |
|
/* Called before each frame is rendered */ |
|
//Update background (parallax) position |
|
[_parallaxSpaceDust update:currentTime]; |
|
[_parallaxNodeBackgrounds update:currentTime]; |
|
} |
By adding this you will allow Sprite Kit to call upon the update method so that the screen could move.
16. Switch to your device now. Remember that we are developing the game for your device and for everything to move, you need a screen that can be tilted.
Adding Stars to the Game
17. Though you can add in a number of objects into the game, this tutorial introduces users to certain codes that they can use to get the hang of app development. Add this code under the pragma mark - Setup the stars to appear as particles command:
|
[self addChild:[self loadEmitterNode:@"stars1"]]; |
|
[self addChild:[self loadEmitterNode:@"stars2"]]; |
|
[self addChild:[self loadEmitterNode:@"stars3"]]; |
Also add this code under initWithSize:
|
- (SKEmitterNode *)loadEmitterNode:(NSString *)emitterFileName |
|
{ |
|
NSString *emitterPath = [[NSBundle mainBundle] pathForResource:emitterFileName ofType:@"sks"]; |
|
SKEmitterNode *emitterNode = [NSKeyedUnarchiver unarchiveObjectWithFile:emitterPath]; |
|
//do some view specific tweaks |
|
emitterNode.particlePosition = CGPointMake(self.size.width/2.0, self.size.height/2.0); |
|
emitterNode.particlePositionRange = CGVectorMake(self.size.width+100, self.size.height); |
|
return emitterNode; |
|
} |
This is a utility method and it prepares your Sprite Kit without relying on any Class.
Using the Accelerometer to move the Ship
You want to be able to move the ship by tilting the screen and for that you need to introduce a few new codes. This is going to be simple and once you are done you would see that it is possible for you to maneuver your ship by tilting the screen.
First you must call on the CMMotionManager. This way you can use data in the CMMotionManager as and when you need it. The accelerometer would be adjust so that you can move the data 60 times/ second. Lag is not going to be an issue here. For this you will use XCode 5 modules which is a feature that would automatically set in the framework for you.
Go to the MyScene.m file and then, add the following class above #import "MyScene.h":
@import CoreMotion;
Then use an instance of the CMMotionManager to get reliable data.
18. Next, add the following class in the @implementation block under
|
FMMParallaxNode *_parallaxSpaceDust; : |
|
CMMotionManager *_motionManager; |
19. Add the following under #pragma mark - Setup the Accelerometer to move the ship:
|
_motionManager = [[CMMotionManager alloc] init]; |
20. The next class would enable you to start your game via a new method. Add this under the #pragma mark - Start the actual game line:
|
[self startTheGame]; |
21. Add the following under LoadEmitterNode so that you can tilt you screen to make the ship move:
|
- (void)startTheGame |
|
{ |
|
_ship.hidden = NO; |
|
//reset ship position for new game |
|
_ship.position = CGPointMake(self.frame.size.width * 0.1, CGRectGetMidY(self.frame)); |
|
//setup to handle accelerometer readings using CoreMotion Framework |
|
[self startMonitoringAcceleration]; |
|
} |
|
- (void)startMonitoringAcceleration |
|
{ |
|
if (_motionManager.accelerometerAvailable) { |
|
[_motionManager startAccelerometerUpdates]; |
|
NSLog(@"accelerometer updates on..."); |
|
} |
|
} |
|
- (void)stopMonitoringAcceleration |
|
{ |
|
if (_motionManager.accelerometerAvailable && _motionManager.accelerometerActive) { |
|
[_motionManager stopAccelerometerUpdates]; |
|
NSLog(@"accelerometer updates off..."); |
|
} |
|
} |
|
- (void)updateShipPositionFromMotionManager |
|
{ |
|
CMAccelerometerData* data = _motionManager.accelerometerData; |
|
if (fabs(data.acceleration.x) > 0.2) { |
|
NSLog(@"acceleration value = %f",data.acceleration.x); |
|
} |
22. Add the following under [_parallaxNodeBackgrounds update:currentTime]; :
|
[self updateShipPositionFromMotionManager]; |
When you run the game, tilt the screen to the left or right to maneuver the ship.
How to Position the ship
Now you want to make the ship move too. You would find a built in 2D physics system in Sprite Kit. This can be used to rotate and collide the ship and for much more. To make the game functional and workable you need to use this kit. Every SKNode has a SKPhysicsBody that is attached to it. The SKNode itself is inclusive of SKScenes and SKSpriteNodes.
After the _ship.position = CGPointMake(self.frame.size.width * 0.1, CGRectGetMidY(self.frame));line you add the following in the initWithSize method:
|
//move the ship using Sprite Kit's Physics Engine |
|
//1 |
|
_ship.physicsBody = [SKPhysicsBody bodyWithRectangleOfSize:_ship.frame.size]; |
|
//2 |
|
_ship.physicsBody.dynamic = YES; |
|
//3 |
|
_ship.physicsBody.affectedByGravity = NO; |
|
//4 |
|
_ship.physicsBody.mass = 0.02; |
What these codes do is that they create a physics body that is equivalent to the ship’s size; subject the ship to collisions and enable the ship itself to move.
Next, you want to prevent the ship from falling off of the screen. For this you need to add in an edge loop. The edge loop will define the boundaries of the screen and confine your ship so that it cannot move beyond these boundaries.
So, at the top of the initWithSize method and under the self.backgroundColor =
[SKColor blackColor]line, add the following:
|
//Define your physics body around the screen - used by your ship to not bounce off the screen |
|
self.physicsBody = [SKPhysicsBody bodyWithEdgeLoopFromRect:self.frame]; |
Lastly, you want the ship to move. Go into the updateShipPositionFromMotionManager method so you can replace the NSLog statement with the following:
|
[_ship.physicsBody applyForce:CGVectorMake(0.0 |
40.0 * data.acceleration.x)]; |
This will enable the ship to move and the movement would seem/feel more natural. You can play around with this number and see how it works for you.
Adding asteroids to the game
Now you want to add some asteroids to make the game more challenging. Go to the MyScene.m file and add the following under the imports:
|
#define kNumAsteroids 15 |
23. Inside @implementation find the _motionmanager variable and insert the following code:
|
NSMutableArray *_asteroids; |
|
int _nextAsteroid; |
|
double _nextAsteroidSpawn; |
24. Next, find the initWithSize method and add the following code under #pragma mark - TBD - Setup the asteroids:
|
_asteroids = [[NSMutableArray alloc] initWithCapacity:kNumAsteroids]; |
|
for (int i = 0; i < kNumAsteroids; ++i) { |
|
SKSpriteNode *asteroid = [SKSpriteNode spriteNodeWithImageNamed:@"asteroid"]; |
|
asteroid.hidden = YES; |
|
[asteroid setXScale:0.5]; |
|
[asteroid setYScale:0.5]; |
|
[_asteroids addObject:asteroid]; |
|
[self addChild:asteroid]; |
|
} |
At this point you cannot see the asteroids.
25. Add the following under the update method:
|
- (float)randomValueBetween:(float)low andValue:(float)high { |
|
return (((float) arc4random() / 0xFFFFFFFFu) * (high - low)) + low; |
|
} |
26. Then, at the very of the update method add this code under [self updateShipPositionFromMotionManager:
|
double curTime = CACurrentMediaTime(); |
|
if (curTime > _nextAsteroidSpawn) { |
|
//NSLog(@"spawning new asteroid"); |
|
float randSecs = [self randomValueBetween:0.21 andValue:1.3]; |
|
_nextAsteroidSpawn = randSecs + curTime; |
|
float randY = [self randomValueBetween:0.0 andValue:self.frame.size.height]; |
|
float randDuration = [self randomValueBetween:2.4 andValue:11.0]; |
|
SKSpriteNode *asteroid = [_asteroids objectAtIndex:_nextAsteroid]; |
|
_nextAsteroid++; |
|
if (_nextAsteroid >= _asteroids.count) { |
|
_nextAsteroid = 0; |
|
} |
|
[asteroid removeAllActions]; |
|
asteroid.position = CGPointMake(self.frame.size.width+asteroid.size.width/2, randY); |
|
asteroid.hidden = NO; |
|
CGPoint location = CGPointMake(-self.frame.size.width-asteroid.size.width, randY); |
|
SKAction *moveAction = [SKAction moveTo:location duration:randDuration]; |
|
SKAction *doneAction = [SKAction runBlock:(dispatch_block_t)^() { |
|
//NSLog(@"Animation Completed"); |
|
asteroid.hidden = YES; |
|
}]; |
|
SKAction *moveAsteroidActionWithDone = [SKAction sequence:@[moveAction, doneAction ]]; |
|
[asteroid runAction:moveAsteroidActionWithDone withKey:@"asteroidMoving"]; |
|
} |
27. Lastly add this code under StartTheGame method:
|
_nextAsteroidSpawn = 0; |
|
for (SKSpriteNode *asteroid in _asteroids) { |
|
asteroid.hidden = YES; |
|
} |
The _nextAsteroidSpawn variable will enable the device to spawn the next asteroid. Always check the update loop for this.
How to add laser guns to the ship
28. You can’t call it SpaceShooter if you have no laser guns. Now let’s add these to the app. Add the following under the #define KNumLasers:
|
#define kNumLasers 5 |

29. Then, add this under other variables in the @implementation block:
|
NSMutableArray *_shipLasers; |
|
int _nextShipLaser; |
30. In the initWithSize method add the following under #pragma mark - TBD - Setup the lasers:
|
_shipLasers = [[NSMutableArray alloc] initWithCapacity:kNumLasers]; |
|
for (int i = 0; i < kNumLasers; ++i) { |
|
SKSpriteNode *shipLaser = [SKSpriteNode spriteNodeWithImageNamed:@"laserbeam_blue"]; |
|
shipLaser.hidden = YES; |
|
[_shipLasers addObject:shipLaser]; |
|
[self addChild:shipLaser]; |
|
} |
31. In the StartTheGame method add the following under before [self startmotionaccelerator]:
|
for (SKSpriteNode *laser in _shipLasers) { |
|
laser.hidden = YES; |
|
} |
32. Lastly, add the following under the touchesBegin method:
|
- (void)touchesBegan:(NSSet *)touches withEvent:(UIEvent *)event { |
|
/* Called when a touch begins */ |
|
//1 |
|
SKSpriteNode *shipLaser = [_shipLasers objectAtIndex:_nextShipLaser]; |
|
_nextShipLaser++; |
|
if (_nextShipLaser >= _shipLasers.count) { |
|
_nextShipLaser = 0; |
|
} |
|
//2 |
|
shipLaser.position = CGPointMake(_ship.position.x+shipLaser.size.width/2,_ship.position.y+0); |
|
shipLaser.hidden = NO; |
|
[shipLaser removeAllActions]; |
|
//3 |
|
CGPoint location = CGPointMake(self.frame.size.width, _ship.position.y); |
|
SKAction *laserMoveAction = [SKAction moveTo:location duration:0.5]; |
|
//4 |
|
SKAction *laserDoneAction = [SKAction runBlock:(dispatch_block_t)^() { |
|
//NSLog(@"Animation Completed"); |
|
shipLaser.hidden = YES; |
|
}]; |
|
//5 |
|
SKAction *moveLaserActionWithDone = [SKAction sequence:@[laserMoveAction,laserDoneAction]]; |
|
//6 |
|
[shipLaser runAction:moveLaserActionWithDone withKey:@"laserFired"]; |
|
} |
Collision Detection
Add in the collision detection.
In the @implementation variable add this under _nextShipLaser:
int _lives;
33. Then add the following under the Update method:
|
//check for laser collision with asteroid |
|
for (SKSpriteNode *asteroid in _asteroids) { |
|
if (asteroid.hidden) { |
|
continue; |
|
} |
|
for (SKSpriteNode *shipLaser in _shipLasers) { |
|
if (shipLaser.hidden) { |
|
continue; |
|
} |
|
if ([shipLaser intersectsNode:asteroid]) { |
|
shipLaser.hidden = YES; |
|
asteroid.hidden = YES; |
|
NSLog(@"you just destroyed an asteroid"); |
|
continue; |
|
} |
|
} |
|
if ([_ship intersectsNode:asteroid]) { |
|
asteroid.hidden = YES; |
|
SKAction *blink = [SKAction sequence:@[[SKAction fadeOutWithDuration:0.1], |
|
[SKAction fadeInWithDuration:0.1]]]; |
|
SKAction *blinkForTime = [SKAction repeatAction:blink count:4]; |
|
[_ship runAction:blinkForTime]; |
|
_lives--; |
|
NSLog(@"your ship has been hit!"); |
|
} |
|
} |
Detecting when you win/lose
34. Finally, we will add the Win/Lose Detection. Go to MyScene.m and add the following below #defines which is right under the @implementation block:
|
typedef enum { |
|
kEndReasonWin, |
|
kEndReasonLose |
|
} EndReason; |
35. Then, add the following under the _lives variable detection:
|
double _gameOverTime; |
|
bool _gameOver; |
36. Now you need to add the following under the startTheGame method:
|
_lives = 3; |
|
double curTime = CACurrentMediaTime(); |
|
_gameOverTime = curTime + 30.0; |
|
_gameOver = NO; |
37. And this at the very end of the update method:
|
// Add at end of update loop |
|
if (_lives <= 0) { |
|
NSLog(@"you lose..."); |
|
[self endTheScene:kEndReasonLose]; |
|
} else if (curTime >= _gameOverTime) { |
|
NSLog(@"you won..."); |
|
[self endTheScene:kEndReasonWin]; |
|
} |
38. We’re almost there. Add this new method under the method entitled update:
|
// Add at end of update loop |
|
if (_lives <= 0) { |
|
NSLog(@"you lose..."); |
|
[self endTheScene:kEndReasonLose]; |
|
} else if (curTime >= _gameOverTime) { |
|
NSLog(@"you won..."); |
|
[self endTheScene:kEndReasonWin]; |
|
} |
39. Add the following code under thetouchesBeganmethod:
|
- (void)endTheScene:(EndReason)endReason { |
|
if (_gameOver) { |
|
return; |
|
} |
|
[self removeAllActions]; |
|
[self stopMonitoringAcceleration]; |
|
_ship.hidden = YES; |
|
_gameOver = YES; |
|
NSString *message; |
|
if (endReason == kEndReasonWin) { |
|
message = @"You win!"; |
|
} else if (endReason == kEndReasonLose) { |
|
message = @"You lost!"; |
|
} |
|
SKLabelNode *label; |
|
label = [[SKLabelNode alloc] initWithFontNamed:@"Futura-CondensedMedium"]; |
|
label.name = @"winLoseLabel"; |
|
label.text = message; |
|
label.scale = 0.1; |
|
label.position = CGPointMake(self.frame.size.width/2, self.frame.size.height * 0.6); |
|
label.fontColor = [SKColor yellowColor]; |
|
[self addChild:label]; |
|
SKLabelNode *restartLabel; |
|
restartLabel = [[SKLabelNode alloc] initWithFontNamed:@"Futura-CondensedMedium"]; |
|
restartLabel.name = @"restartLabel"; |
|
restartLabel.text = @"Play Again?"; |
|
restartLabel.scale = 0.5; |
|
restartLabel.position = CGPointMake(self.frame.size.width/2, self.frame.size.height * 0.4); |
|
restartLabel.fontColor = [SKColor yellowColor]; |
|
[self addChild:restartLabel]; |
|
SKAction *labelScaleAction = [SKAction scaleTo:1.0 duration:0.5]; |
|
[restartLabel runAction:labelScaleAction]; |
|
[label runAction:labelScaleAction]; |
|
} |
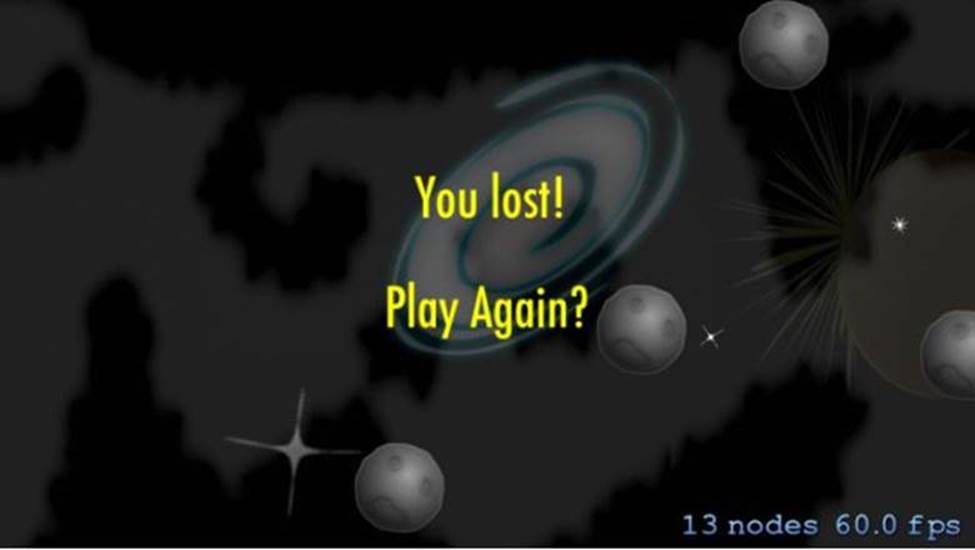
The code might seem complicated but it’s really just used for quick win/lose options that use the Sprite Kit SKLabelNode. The Sprite Kit SKLabelNode allow you to display text on the device’s screen.
Next add the following code at the top of the touchesBegan method
|
//check if they touched your Restart Label |
|
for (UITouch *touch in touches) { |
|
SKNode *n = [self nodeAtPoint:[touch locationInNode:self]]; |
|
if (n != self && [n.name isEqual: @"restartLabel"]) { |
|
[[self childNodeWithName:@"restartLabel"] removeFromParent]; |
|
[[self childNodeWithName:@"winLoseLabel"] removeFromParent]; |
|
[self startTheGame]; |
|
return; |
|
} |
|
} |
|
//do not process anymore touches since it's game over |
|
if (_gameOver) { |
|
return; |
|
} |