Introducing iOS 8 (2015)
Chapter 11. Submitting to the App Store
In this chapter, you will learn how to submit an app to the App Store. You will also learn how to use iTunes Connect, Apple’s App Store management software (Figure 11-1). These lessons will give you the skills to submit your apps to the App Store. This chapter will walk you through iTunes Connect, so have your Mac nearby.
WARNING
This app will be submitted to the App Store for educational purposes only. It is not possible to guarantee approval into the App Store. Be sure to use a unique app name and bundle ID while submitting this app.
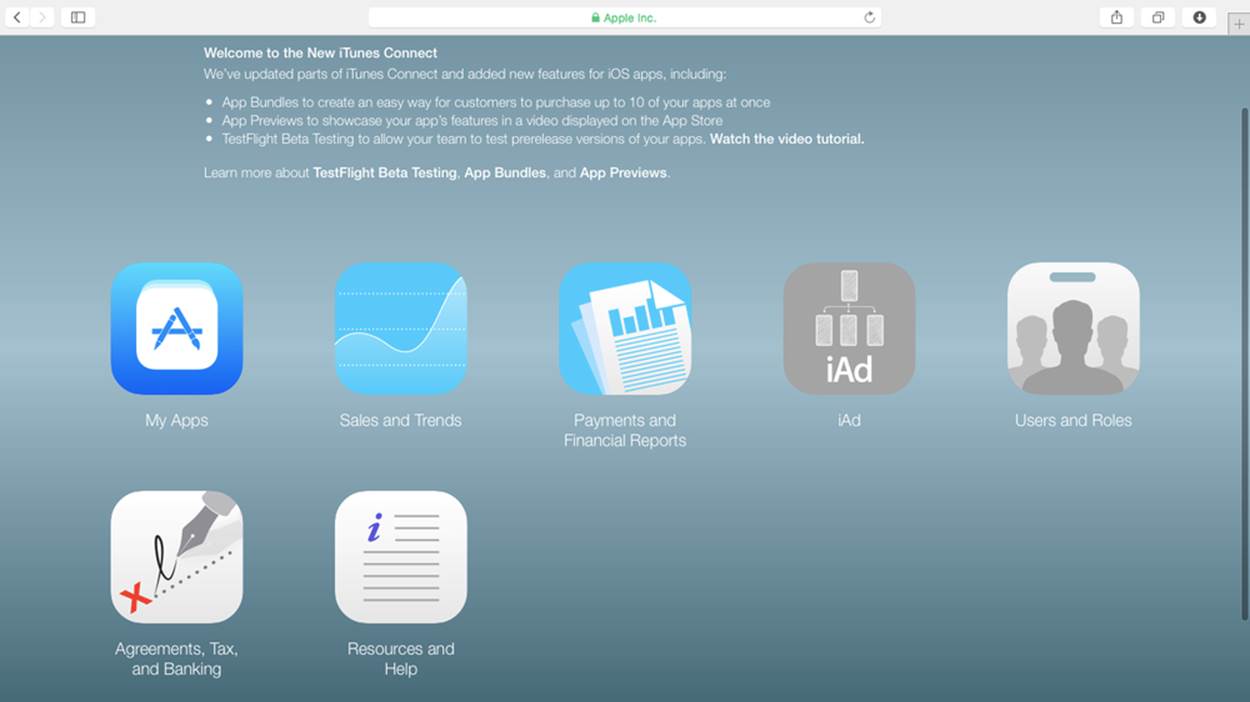
Figure 11-1. iTunes Connect
iTunes Connect is a website used to manage apps for the App Store. This is where all marketing, reporting, and contract details are entered. You can log in to iTunes Connect using your Apple Developer ID at http://itunesconnect.apple.com. iTunes Connect offers a companion app callediTunes Connect Mobile available on the App Store.
Agreements, Tax, and Banking
Before an app can be submitted to the App Store, you must first complete the “Agreements, Tax, and Banking” section (Figure 11-2). This section manages the contracts between Apple and the developer. It records the developer’s banking information for payment.

Figure 11-2. Agreements, Tax, and Banking
By default, the iOS Developer Program allows all developers to release free apps worldwide on the App Store. However, if you would like to sell your apps on the App Store, a separate contract is required. The iOS Paid Applications contract allows developers to sell their app on the App Store.
To agree to the additional contract, click the “Agreements, Tax, and Banking” section from the iTunes Connect homepage. Inside the Request Contracts section, click the Request button on the Paid Applications line. Read and review the terms of the contract; then decide if you agree. If you agree, click Submit and then Done.
Click the Setup Contact Info button to create a company contact. Enter the full name, address, email address, and phone number for your company contact. Set this company contact to the “Senior Management, Financial, Technical, Legal, and Marketing” sections and then click Done.
Click the Setup Bank Info button to add your banking information. Click Add Bank Account and enter your country. Then enter the ABA routing number for your bank. If you do not know this information, click the lookup tool below. Finally, select the bank and enter your bank account number. Your gross earnings minus any returns will be direct-deposited to this bank account each month.
Finally, click the “Setup Banking and Tax Info” button and then click U.S. Tax forms. Enter your legal name and legal entity if this is a business account. Select the type of beneficial owner. Consult with your accountant if you are an exempt payee. Provide your legal address and name. Then provide your Social Security number or EIN in the Taxpayer Identification Number field. Carefully read and review the certification section. You will be unable to change this information once it is submitted. Be sure to verify that the information provided is correct before proceeding.
Now that the “Agreements, Tax, and Banking” section is complete, it is time to create the app listing for the App Store. The app listing holds all the marketing information for an app, including the app name, app description, app icon, keywords, screenshots, and more.
Create App Listing
The My Apps section manages app listings. From the iTunes Connect home screen, click My Apps. Click the plus button in the upper left, followed by New iOS App. The first screen shown will ask for some basic details about the app (Figure 11-3):
Name
Spell this exactly as you would like to it appear on the App Store.
Version
Enter the app version number here, typically 1.0 for a new app.
Primary Language
This will be used for the app listing language.
Bundle ID
Select an available App ID from the drop-down menu. This cannot be undone once the app listing is created.
SKU
This can be anything you like; these are used to identify your apps for your own records.
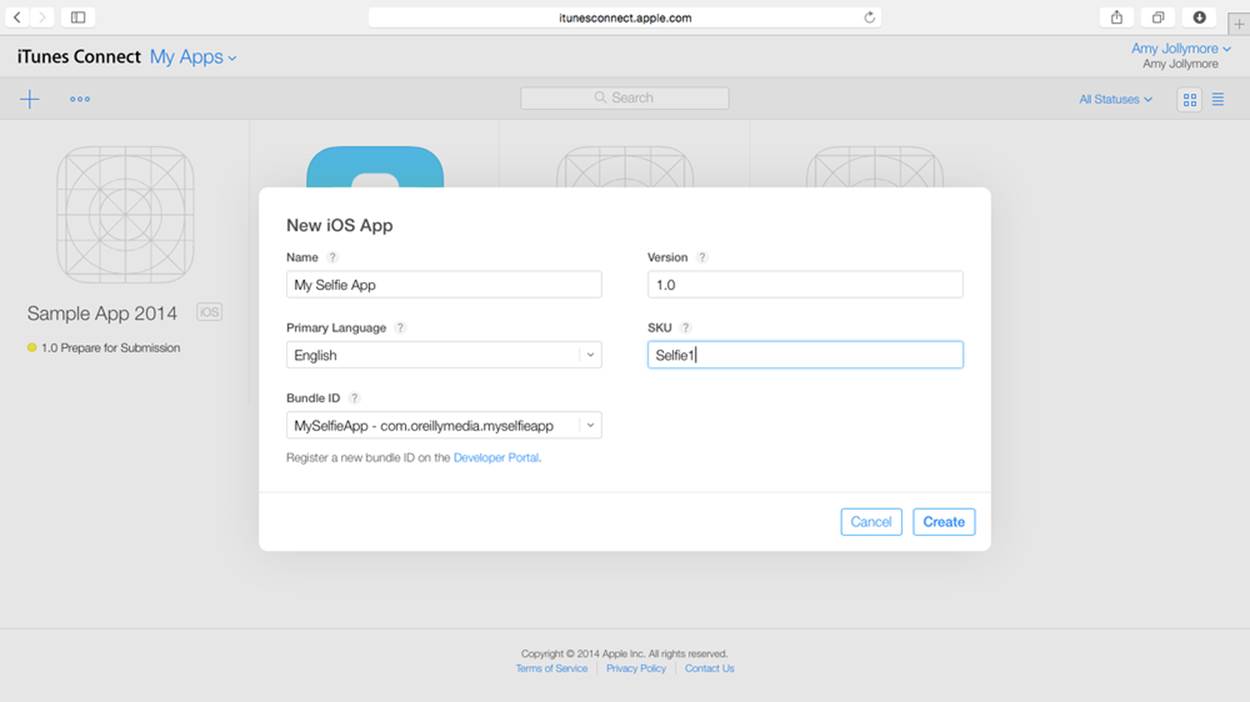
Figure 11-3. New iOS app
Each version of the app will have its own specific App Store data. Most of the information will not be editable once the app has been approved. A new version of the app will be required to make changes to the app listing after it is approved.
Enter your own app name; make sure it is not Selfie. The App Store will not allow apps with the exact same name to be posted. One example name might be something like:
Selfie - Take and Share Selfie Photos
For the SKU number, enter a unique code to identify your app. This can be your first and last name pushed together with a number after it. For example:
JOHNSMITH001
Then select the Selfie Bundle ID created in the previous chapter from the drop-down menu. Click Continue.
Version Information
Next, the app listing page will appear. Scroll down, and you will the notice that the first section is called Version Information (Figure 11-4). The version information is specific to each version of your app. This means most information can only be changed when the app is updated.
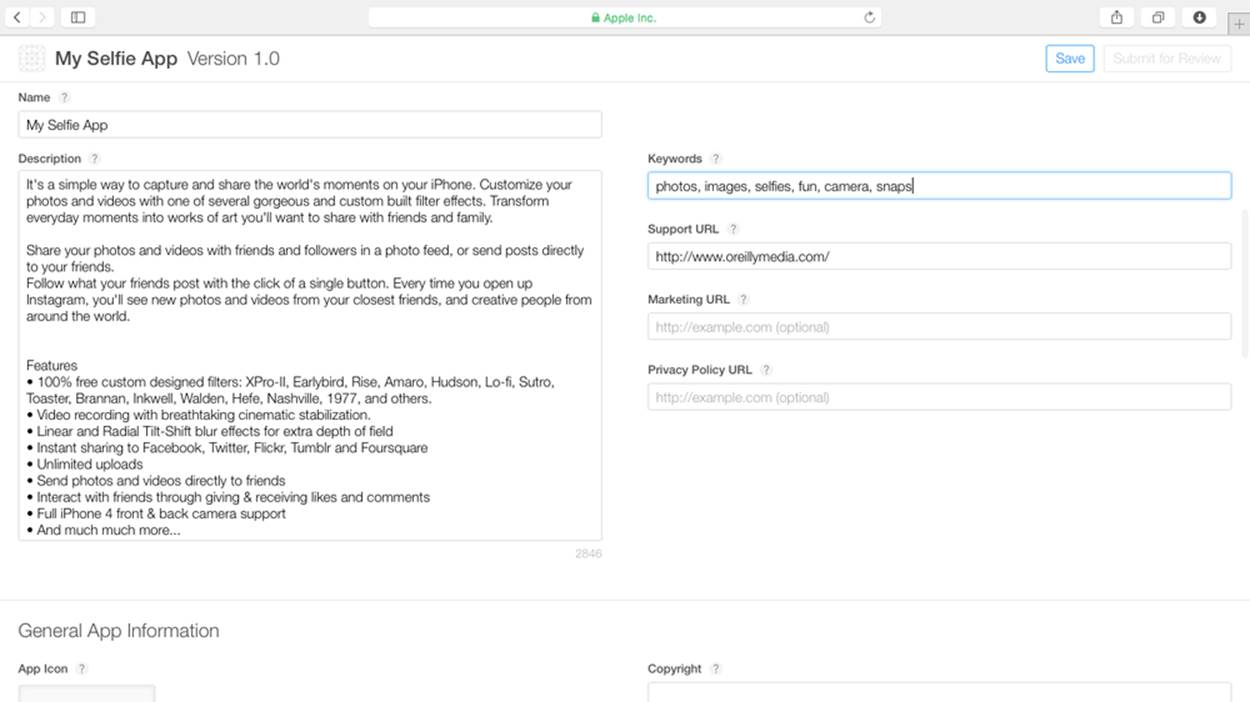
Figure 11-4. Version Information section
The Version Information section collects the following information:
App Name
App name as it should appear in the App Store.
Description
This is a where you provide details and an explanation of why users should download your app.
Keywords
These keywords are used to help users find your app via search on the App Store.
Support URL
A website where users can go to file issues and provide feedback.
Marketing URL
Optional website providing more information about the app.
Privacy Policy URL
Optional website stating the app’s privacy policy. This is required for apps with autorenewing subscriptions and apps for kids.
Keywords
The keywords listed will be used to help users find your app via search on the App Store. Keywords should be separated by a comma, with no spaces. The keyword input is limited to 100 characters total, including commas. These keywords cannot use names of other apps or brand names. Good keywords are descriptive of the app and what problem it solves. For example:
photos,image,snapshot,pictures,photograph,text,label,portrait
Enter your own keywords to the list and put them into the keyword input box.
Support URL
The support URL should be a place where users can go to submit questions and troubleshoot problems. It helps to have a website with a contact form or support email address listed. You can create a free website at http://www.tumblr.com.
Enter a support URL into the Support URL input box.
Description
The description should provide a brief outline of the app’s features and how the app works. Write your own custom description here; review similar apps’ descriptions to get a better idea of what is working. Here is the description for a popular photo-sharing app, Instagram:
Over 200 million users love Instagram! It’s a simple way to capture and share the world’s moments on your iPhone. Customize your photos and videos with one of several gorgeous and custom-built filter effects. Transform everyday moments into works of art you’ll want to share with friends and family. Share your photos and videos with friends and followers in a photo feed, or send posts directly to your friends. Follow what your friends post with the click of a single button. Every time you open up Instagram, you’ll see new photos and videos from your closest friends and creative people from around the world. Features • 100% free custom designed filters: XPro-II, Earlybird, Rise, Amaro, Hudson, Lo-fi, Sutro, Toaster, Brannan, Inkwell, Walden, Hefe, Nashville, 1977, and others. • Video recording with breathtaking cinematic stabilization. • Linear and Radial Tilt-Shift blur effects for extra depth of field • Instant sharing to Facebook, Twitter, Flickr, Tumblr and Foursquare • Unlimited uploads • Send photos and videos directly to friends • Interact with friends through giving & receiving likes and comments • Full iPhone 4 front & back camera support • And much much more…
Enter your own app description and make sure it highlights the core features of the app. Why is this app helpful? What does it do? Who is it for?
Screenshots
The screenshots are arguably the most important piece of the marketing for your app (Figure 11-5). Studies have shown that most iOS users scroll directly to the screenshots to determine if they will download an app. Your screenshots should be bright, colorful, and engaging. At least one screenshot must be provided for 4.7-inch, 5.5-inch, 4-inch, and 3.5-inch formats. If an app is set to Universal, iPad screenshots are also required. If an app is set to iPad-only, then no iPhone-sized screenshots will be required.
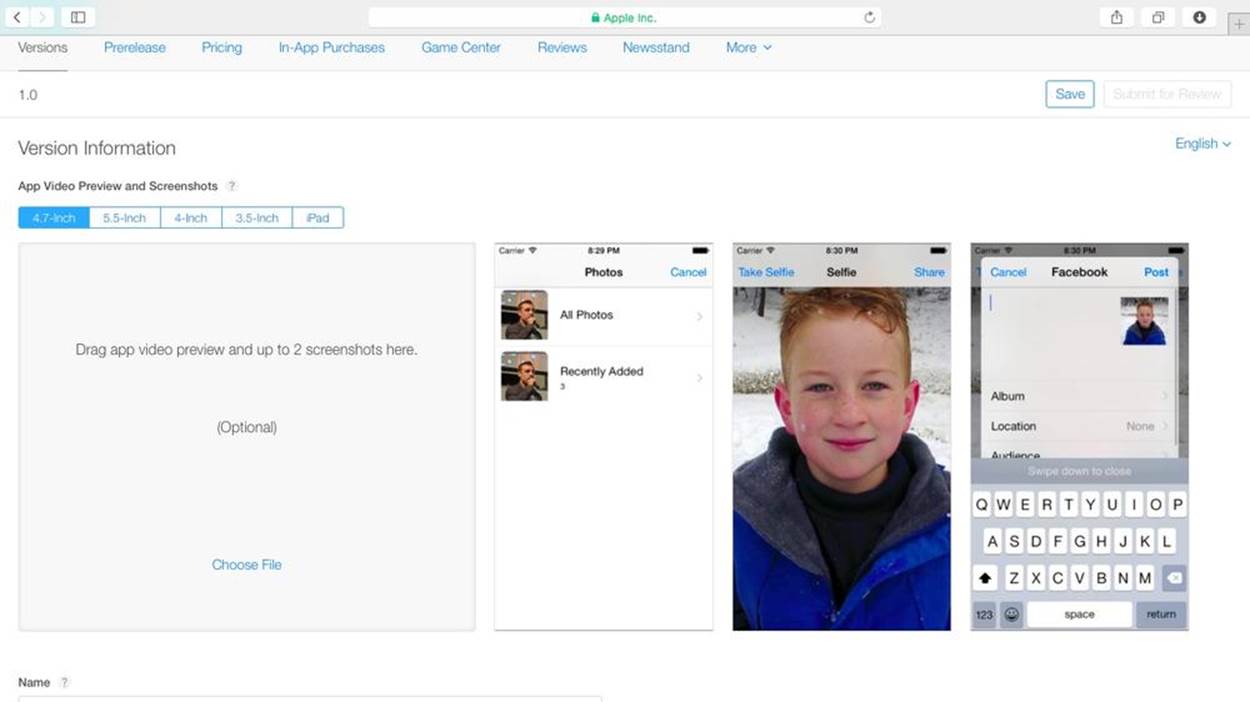
Figure 11-5. Screenshots
To create a screenshot in the iOS Simulator, launch an app and press Command+S and a screenshot will be placed on the desktop.
Go through and take screenshots for an iPhone 4s, iPhone 5s, iPhone 6, and iPhone 6 Plus. Then go back to iTunes Connect.
Verify that 4.7-inch is selected, and from the desktop, drag the iPhone 6 screenshots into the iTunes Connect page. Once all the screenshots are uploaded, you can drag them left and right to place them in a particular order. The first screenshot is showcased in the app search in the App Store.
Select 5.5-inch and drag in the iPhone 6 Plus screenshots, select 4-inch and drag in the iPhone 5s screenshots, and select 3.5-inch and drag in the iPhone 4s screenshots.
Once this is complete, click Save in the upper-right corner of iTunes Connect.
General App Information
The next section, titled General App Information, collects the following information (Figure 11-6):
App Icon
App icon used for App Store listing. Provide a 1024x1024 px image in JPG, TIFF, or PNG format. No transparency allowed. Do not round corners.
Category
Primary and secondary category best suited for your app.
Rating
Select the appropriate maturity level for your app.
Trade Rep Info
This App Store contact information is used in the Korean App Store.
Routing App Coverage File
Optional, used to specify a geographic region supported by the app.
Version Number
Identifier for each version, follow pattern 1.0, 1.1, 1.2, etc.
Copyright
Year and person or entity that owns the rights to the app.
License Agreement
By default, the standard End User License Agreement will be applied to your app. If you want to change this, click the Edit button next to License Agreement at the bottom of the app listing.
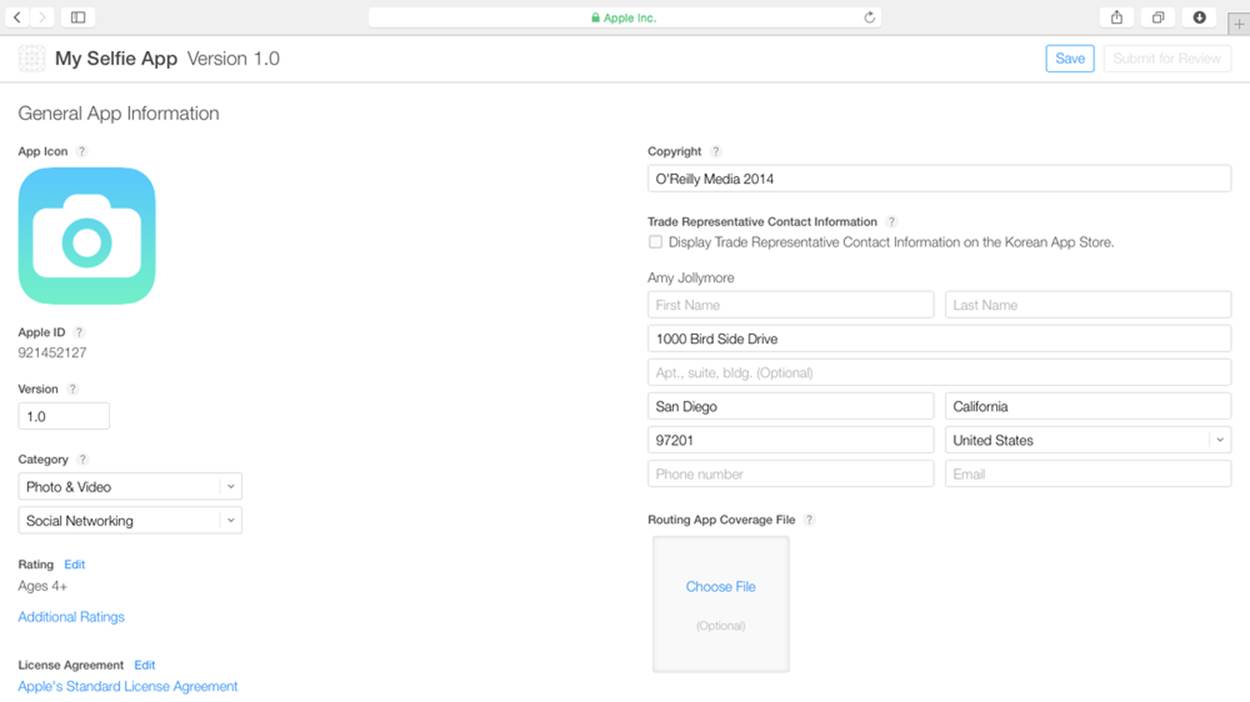
Figure 11-6. General App Information
Tips
There are a few key tips and tricks to remember when creating marketing content:
1. Put as much effort into the App Store marketing as you did the development of your app.
2. Apps with engaging and compelling app icons and screenshots sell more than average-looking apps.
3. Check the Top Charts for examples of compelling and engaging app icons and screenshots.
4. Create an app description that is concise and to-the-point. Explain to consumers what problem your app solves and why it does the best job solving it. Make clear statements about your app’s core features and how the app will benefit the consumer.
5. Another great tip is to try new names, categories, and keywords for your apps. This simple change can result in more downloads overnight.
6. Follow the Top Charts and track the trends on the App Store.
7. Read the reviews written for your app and make improvements that consumers want.
App Icon
The app icon is the most powerful tool in your marketing tool belt. A great app icon can be the deciding factor between a user downloading your app or looking for another. Download the app icons available at AppSchool.com/book. Then click the Choose File button.
Select the iTunesArtwork.png icon file. This icon is 1024x1024 px and will be used on the App Store.
Category
Selecting the correct App Store category is a very important piece of your app’s marketing plan. Placing your app in the proper category will expose it to more users interested in your app.
Since this is a camera-based app, set the Primary Category to Photo & Video. Then review the options in the Secondary Category drop-down menu and select another category.
Rating
Rating information is used to guide parents and users toward content that is safe and encouraging. Apple asks for the level of different types of content. For example, Apple asks for the level of realistic violence inside your app. The Selfie app does not have any violence and should be set to None.
Click the Edit button next to Rating and evaluate the content qustions. Select None, Infrequent, or Frequent.
Trade Representative Contact Information
The App Store trade representative contact information is used in the Korean App Store. By Korean law, apps available for download must have a contact publicly associated with them. The following information is required and will be displayed only in Korea.
Enter the following representative information:
§ First name
§ Last name
§ Address
§ City
§ State
§ Postal code
§ Country
§ Phone number
Copyright
The copyright information is the year and person or entity that owns the rights to the app.
Enter your name followed by the year in the copyright input box.
App Review Information
The app review information is only sent to the App Review team (Figure 11-7). The App Review team may need to contact you about a particular feature or piece of your app. List your contact information inside the provided boxes.
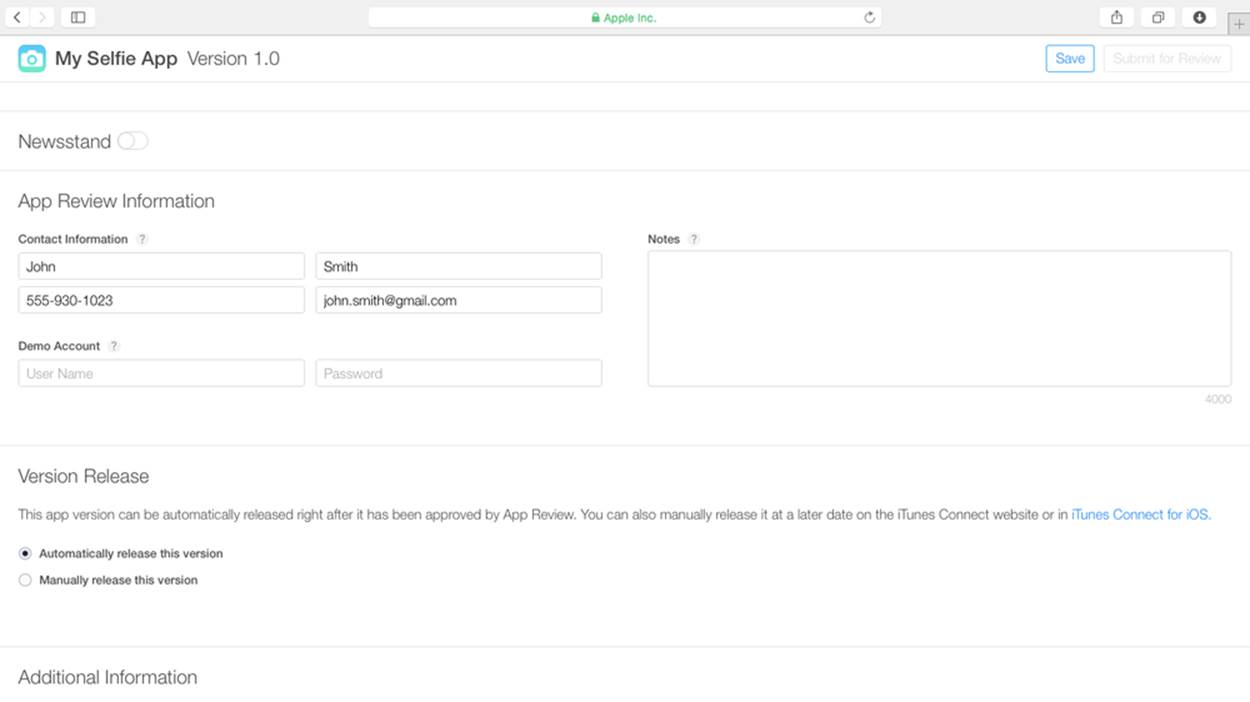
Figure 11-7. App Review Information section
Enter the following information:
§ First name
§ Last name
§ Phone number
§ Email address
Demo account
In some cases, a demo account may be required for the app review. If there is any type of login or authentication inside your app, it is a good idea to provide a test account to the App Review team. This will ensure that they can see all of your app and will increase the chances of your app being approved.
Leave the demo account boxes empty for this app.
Notes
The notes section is used to tell the App Review team about certain things they might not notice or should know when using the app. This is a good place to provide additional details outside the description.
Leave the notes box empty for this app.
Version Release
The next section, titled Version Release, asks if the app version should be released to the App Store immediately after the app is approved. If not, the app can be manually released or scheduled for a specific day.
Mark “Automatically Release this Version” under the Version Release checkbox.
Languages
The App Store is available in 28 languages. The information provided should be adjusted to each language if possible. Otherwise, consumers will not see the app listing in their native language. Instead, they will see their app in English, a language they may or may not understand.
Scroll to the top and click English to see a drop-down menu of the other available languages.
Pricing
Scroll back to the top and open the Pricing tab. The next screen will ask for pricing and availability information (Figure 11-8):
Availability Date
Set this to a date in the future if you would like your app to appear on the App Store on a specific day.
Price Tier
Select the price for your app. Apple will take a 30% commission on all paid app sales.
Price Tier Effective Date
Use the effective date to set a temporary price change.
Price Tier End Date
End date for price change.
Discount for Education Institutions
Offer education institution discounts with the Apple Volume Purchase Program.
Custom B2B App
This is an option for Business to Business apps. The app will not be available publicly on the App Store if this option is enabled.
Territories
Control which countries and territories will receive the app in their respective App Store.
iCloud Download Settings
Control versions of the app that are available to download from iCloud.
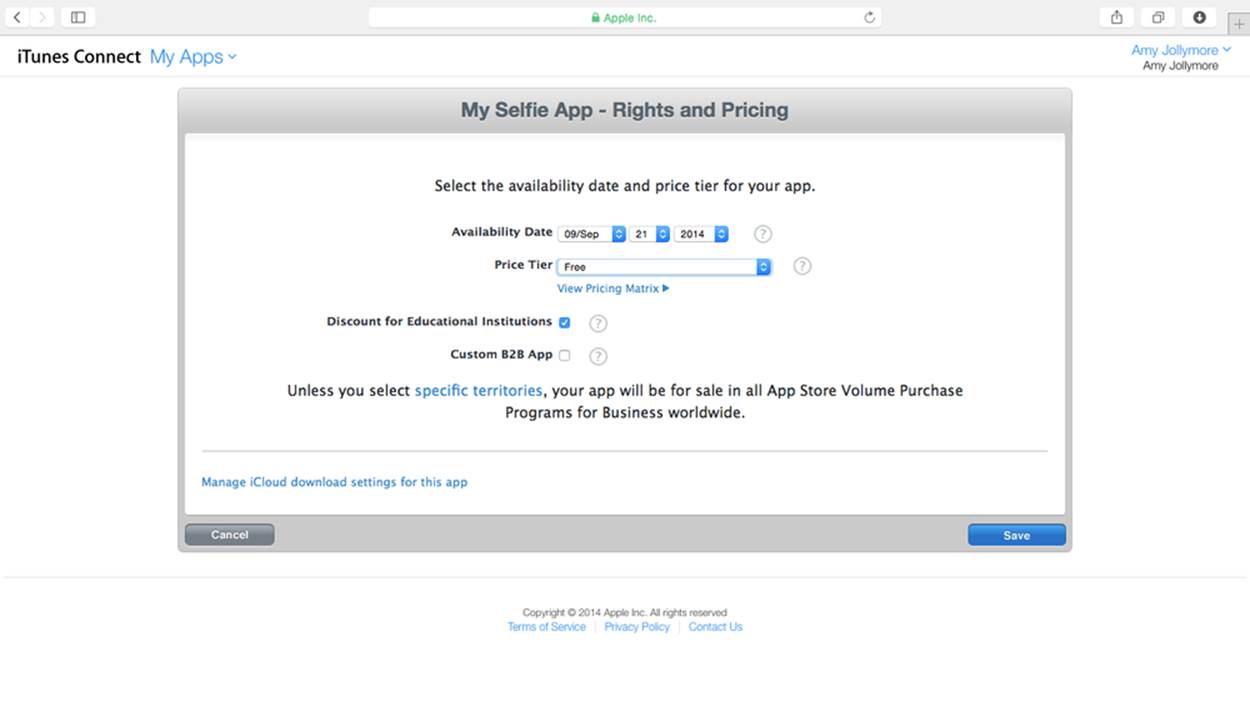
Figure 11-8. Pricing
The availability date can be set to the future if you would like your app released on a particular date. For example, you may want to match your app’s release with a marketing campaign beginning on a specific date.
Leave the availability date set to today, and the app will be released as soon as it is approved.
The Price Tier option manages the price charged to download your app. Price tiers are based on the US Dollar. Tier 1 is $0.99, Tier 2 is $1.99, and Tier 3 is $2.99. The equivalent amount will be charged in foreign countries.
Select Tier 0 and make this app free.
Discounts can be provided for education institutions since they typically buy in bulk. Check the box if you would like to enable discounts for education institutions. A Custom B2B App will be available only to Volume Purchase Program customers and not on the App Store.
Since this app is free, leave this box unselected.
Your app will be available in over 150 countries worldwide. If you would like to select which countries, click the Specific Territories link at the bottom of the page.
Leave the countries as they are and click Save then Cancel.
Uploading Your Binary
Once your app listing has been completed, click Save. Next, you upload your binary, also known as your app, to iTunes Connect.
Open your Xcode project file. In the toolbar at the top, click the device simulator drop-down menu and select iOS Device. This will ensure that the application is built for an actual device and not for the simulator. Next, from the top menu bar, click Product→Archive. The application will be built using the certificates and provisioning profiles specified. Once the application is done building, the Organizer will appear. The Organizer is available by clicking Window→Organizer from the top menu bar. With the Archives tab selected, a list of app archives will be shown.
Click the archived app and then click the Submit button at the top of the window. You may be prompted to provide your Apple ID and password. Select the app name and the App Store provisioning profile. Then click Submit. The application will then be analyzed and uploaded to iTunes Connect (Figure 11-9).
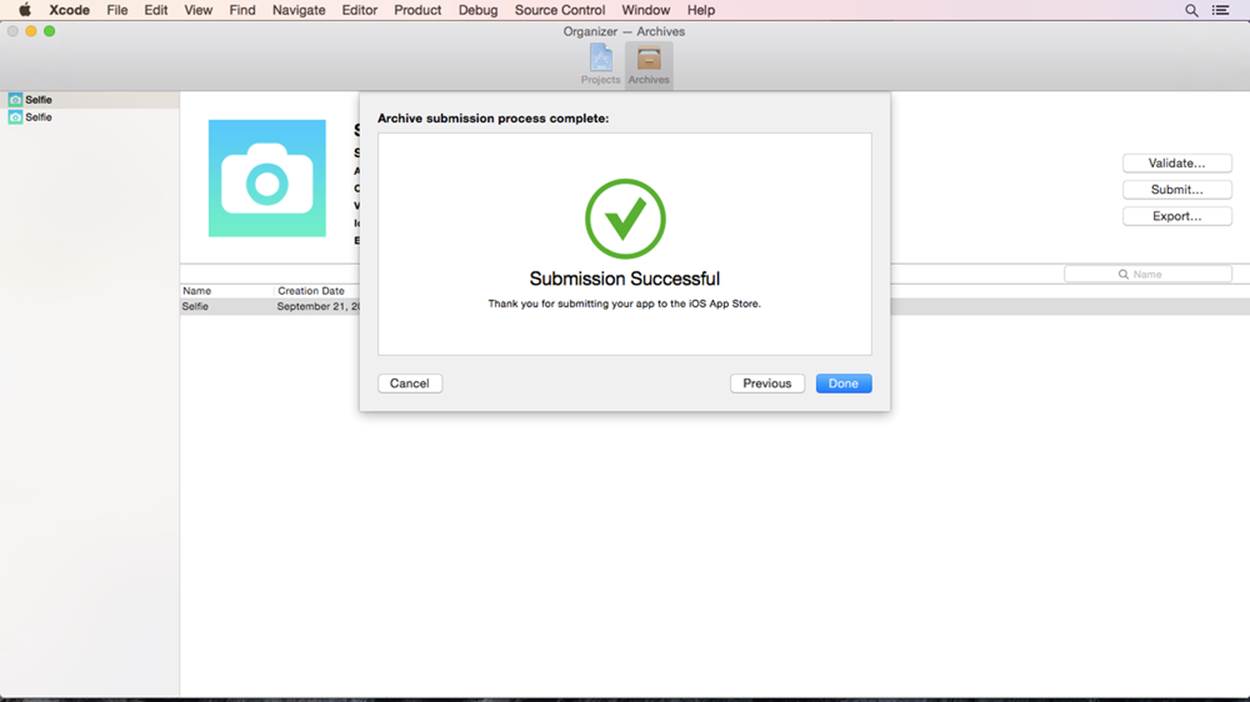
Figure 11-9. Uploading
The Build Section
The Build section is where you match applications you have uploaded to your app listing.
Open up the app listing inside iTunes Connect. Then scroll down to the Build section. Click the plus sign, then select the uploaded binary (Figure 11-10). If you don’t see a plus sign and a message that reads “Click + to add a build before you submit your app,” wait three to five minutes and refresh your listing. The Build section can be slow to update. Click Done, then scroll to the top and click Save.

Figure 11-10. Build
Ready for Submit
Your app listing is now complete. Scroll to the top and click Save then Submit for Review.
A set of questions will be displayed (Figure 11-11). Answer each question according to your app. The Selfie app is not designed to use cryptography or incorporate cryptography. The Selfie app does not contain third-party content. Finally, the Selfie app does not use the Advertising Identifier. Answer each question and click Save.
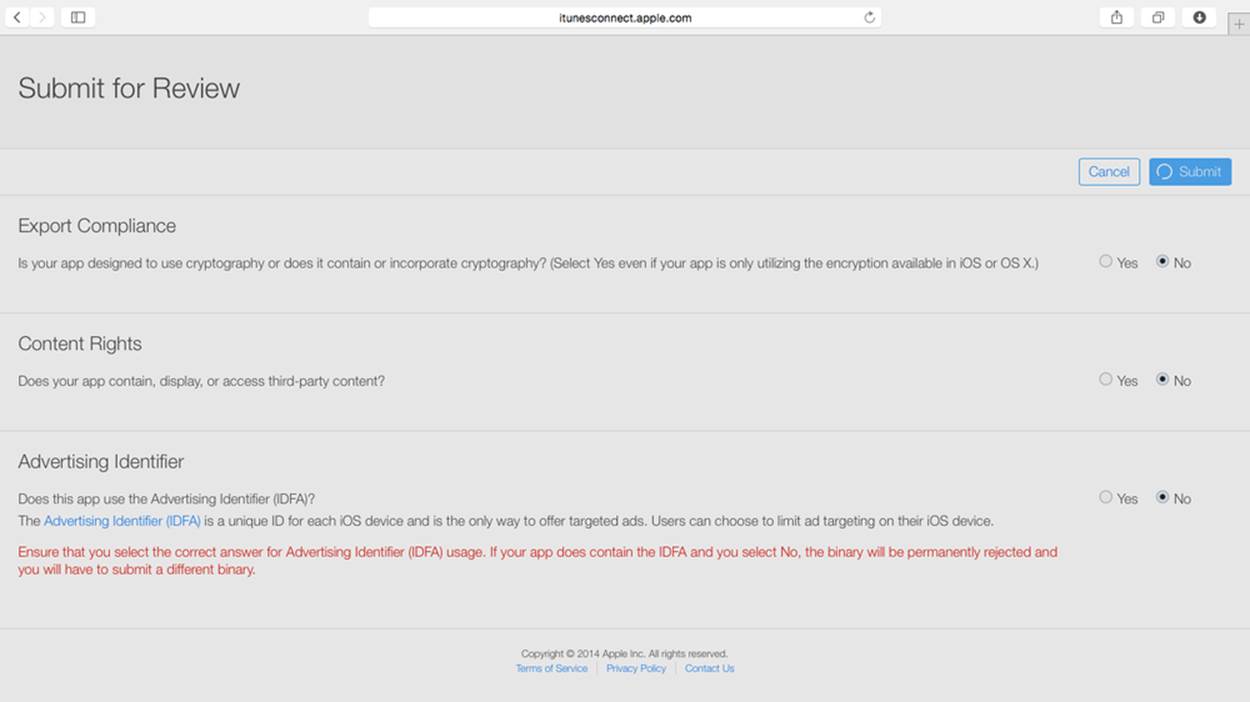
Figure 11-11. Submit
Statuses
Once the app listing has been submitted, your app’s status will change to “Waiting for Review.” Here is a list of all the possible app statuses. It is not necessary for your app to go through all these statuses. In most cases, an app will go from “Prepare for Submission” to “Waiting for Review” to “In Review” to “Processing for App Store” or “Rejected.” You can view the entire status history for your application on the Status History page located at the bottom of the app listing page:
Prepare for Submission
App created in iTunes Connect, but not yet ready to be submitted for app review. Your app listing is still editable in this status.
Waiting for Review
App is waiting for review from the App Review team. There is no guaranteed timeframe for this status. Your app listing is still editable in this status.
In Review
App is currently being reviewed. There is no guaranteed timeframe for this status. Your app listing is not editable in this status.
Pending Contract
App has passed review, but contracts are not yet completed. Your app listing is not editable in this status.
Pending Developer Release
App has passed review, but is waiting on the developer to release it.Your app listing is not editable in this status.
Processing for App Store
App is being released to the App Store and will be available within 24 hours. Your app listing is not editable in this status.
Pending Apple Release
Apple is holding your app until a new iOS version. Verify that your application’s target platform is available. Your app listing is not editable in this status.
Ready for Sale
App is approved and available on the App Store. Your app listing is not editable in this status.
Rejected
Apple has rejected the app; open the Resolution Center for more details. Your app listing is still editable in this status.
Metadata Rejected
The app listing items didn’t pass the review. Correct your app listing info and re-submit. Your app listing is still editable in this status.
Removed from Sale
The app has been removed from sale by Apple. Apple will first contact you before removing your app from sale. Your app listing is not editable in this status.
Developer Rejected
You, the developer, have rejected the app. Your app listing is still editable in this status.
Developer Removed from Sale
You, the developer, have removed the app from the store. Your app listing is not editable in this status.
Invalid Binary
App provided didn’t meet the upload requirements. Your app listing is still editable in this status.
App Review
Once your app has changed to In Review, your app will be reviewed by an Apple app reviewer. The review process can take anywhere from a few hours to a few days. The app reviewer will look to make sure your app is free of crashing and bugs. The app reviewer will also make sure the app matches the features listed in the app description. Finally, the app reviewer will make sure the app follows the Human Interface Guidelines and App Store Guidelines.
App Rejection
Having an app rejected is part of learning to develop apps for the App Store. Do not think of rejection as a bad thing, but more as a learning opportunity. You can speak directly with the app reviewer inside the Resolution Center. Inside the Resolution Center, the app reviewer will explain which rule was broken. You can ask questions and get more specifics on how to fix the issues. Unfortunately, your app will go to the back of the line after a rejection, and you will have to wait again for your app to be reviewed.
App Approval
You will receive an email when your app changes to In Review. While most reviews are done the same day they start, this is not always the case. Most developers estimate around one week from the time they submit their app until app review is complete. If approved, your app will change to Processing for App Store. It can take up to 24 hours for your app to appear on the store. You will receive an email from iTunes Connect when your app is Ready for Sale.
All materials on the site are licensed Creative Commons Attribution-Sharealike 3.0 Unported CC BY-SA 3.0 & GNU Free Documentation License (GFDL)
If you are the copyright holder of any material contained on our site and intend to remove it, please contact our site administrator for approval.
© 2016-2025 All site design rights belong to S.Y.A.