Introducing iOS 8 (2015)
Chapter 10. Running on a Device
In this chapter, you will learn how to run your newly developed apps on a device. You will also walk through how to create certificates, register your device for testing, and set up your App IDs and provisioning profiles. This chapter will combine the lecture and the exercise section; be sure to have Xcode open as you read.
Testing your apps on your own iOS device requires a registered Apple Developer account. A registered Apple Developer account is also required to release your app to the App Store. The Apple Developer Program provides developers with early release access to new versions of iOS and OSX. Registered Apple Developers are eligible to review sessions from WWDC. WWDC is Apple’s Worldwide Developer Conference held every year in San Francisco. WWDC is used as a launching point for new Apple products and software. Apple Developers receive their own private telephone support number. Registering as an Apple Developer costs $99 per year. This is the best investment you can make toward learning to develop apps.
NOTE
The rest of the content inside this book will require an Apple Developer Program account. You can sign up at http://developer.apple.com/programs/ios.
If you are a college student, Apple provides a free Apple Developer Program called iOS Developer University Program. More details can be found at http://developer.apple.com/programs/ios/university.
Your Apple Developer Program account can be registered to your legal name or your legal business entity. Registering under your legal name is known as an individual account. Registering under your legal business entity requires a D-U-N-S number and the proper legal documents to verify your business. A D-U-N-S number is an unique identifier for your business; you can learn more at https://developer.apple.com/support/ios/D-U-N-S.php. In most cases, it is easier to just register as an individual and transition the account to a business account when needed. For more information, visit https://developer.apple.com/programs/.
Once you have registered with the Apple Developer Program, you will receive access to the Member Center. The Member Center is the hub for all Apple Developer tools and updates. You can log in to the Member Center at https://developer.apple.com/membercenter/. Inside the Member Center is a section called Certifications, Identifiers, and Profiles. This section is commonly known as the Provisioning Portal. This portal will control the devices and profiles used in your development.
Open your browser to http://developer.apple.com (Figure 10-1).
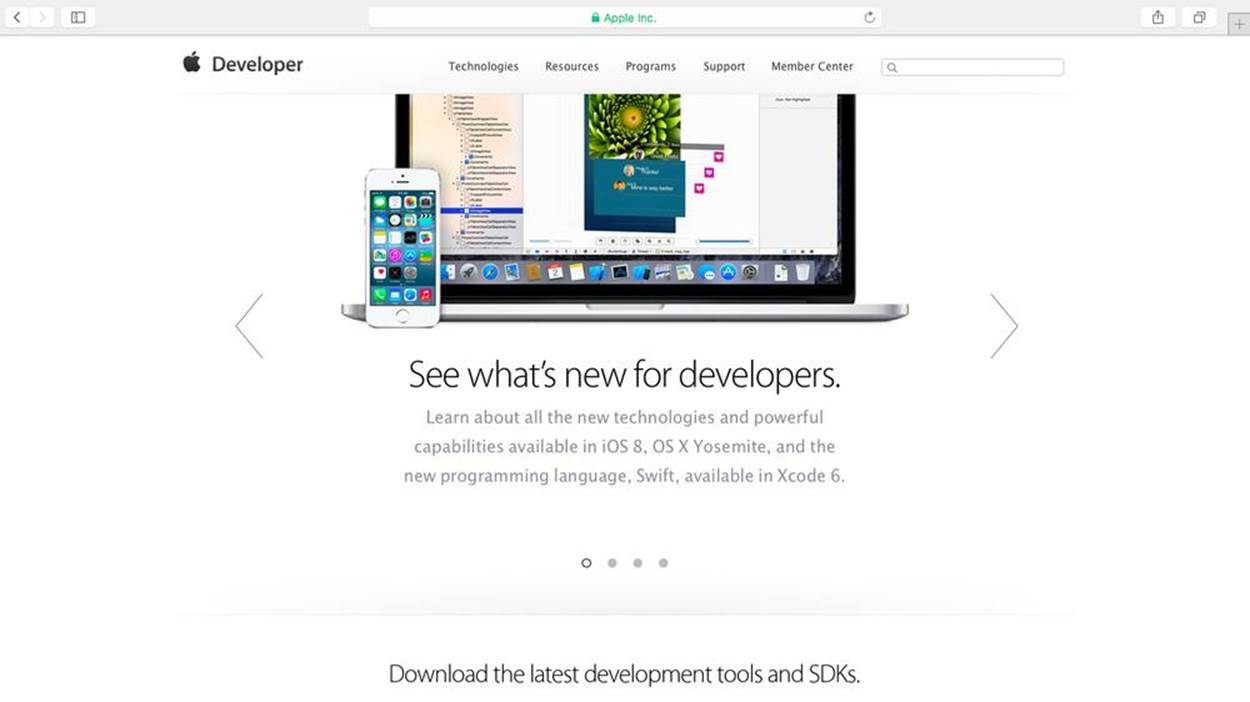
Figure 10-1. developer.apple.com
Click the Member Center link in the upper right and sign in with your Apple Developer Account (Figure 10-2).
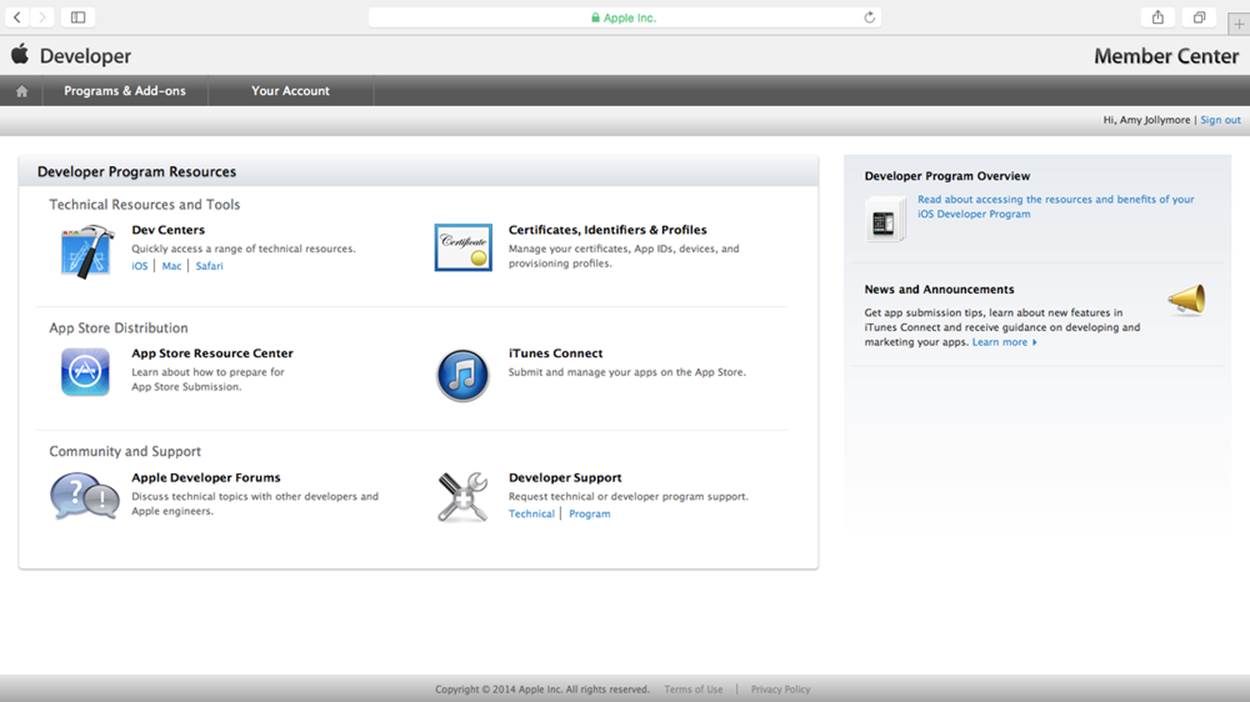
Figure 10-2. Developer Portal
Click the link that says “Certifications, Identifiers, and Profiles.” Then click the Certificates link.
The Provisioning Portal has four main sections. Bookmark this site in your web browser, since it will be used fairly often.
Certificates
The first section is named Certificates. Certificates are used to verify your identity when building an app. A unique certificate is created and is used as your signature. This limits outsiders from submitting apps to the App Store without your permission.
Open the Certificates section, and you will see a silver portal (Figure 10-3). On the left side, each section is outlined in the sidebar. The Pending section is reserved for certificates that are currently being processed. Development certificates are used for local development on your own computer. Finally, Production certificates are used for the App Store.
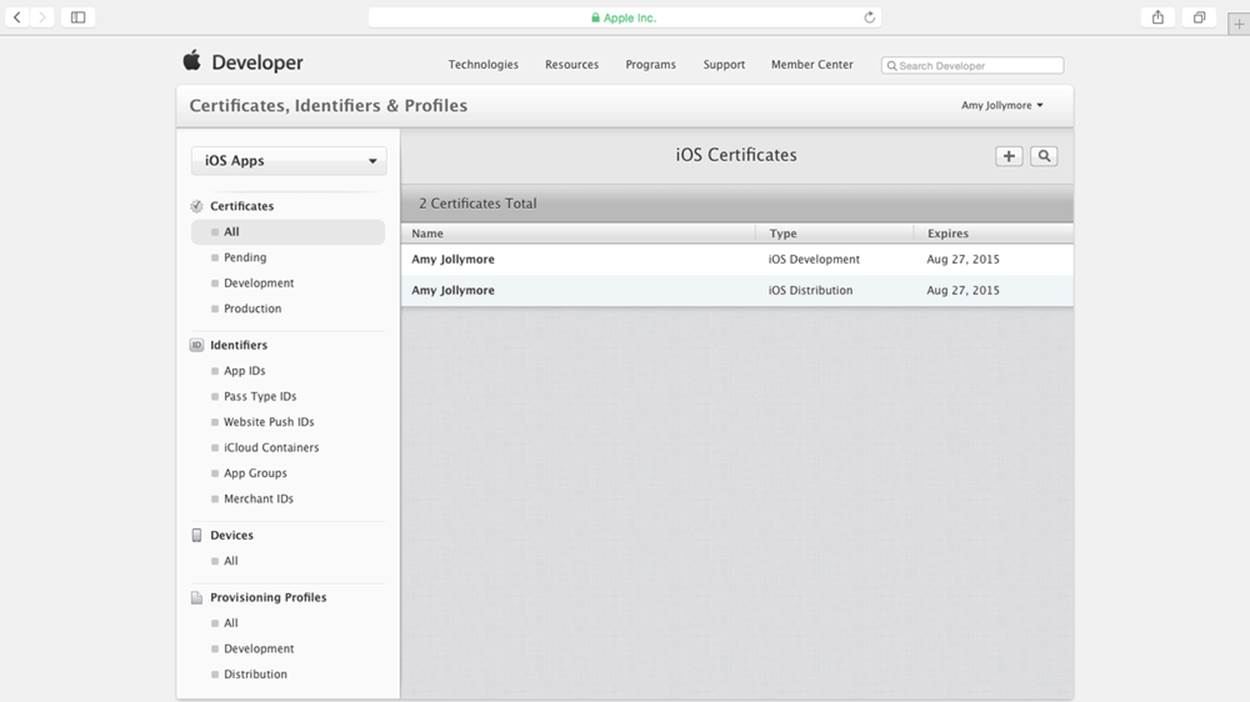
Figure 10-3. Certificates
Click the plus button in the upper-right corner. Select iOS App Development and then Continue. A wizard will appear asking you to select which type of certificate you would like to create (Figure 10-4). Click the iOS App Development box and click Continue. The wizard will now ask you to create a Certificate Signing Request (CSR). The CSR will be used as one of the ingredients for creating your certificate.
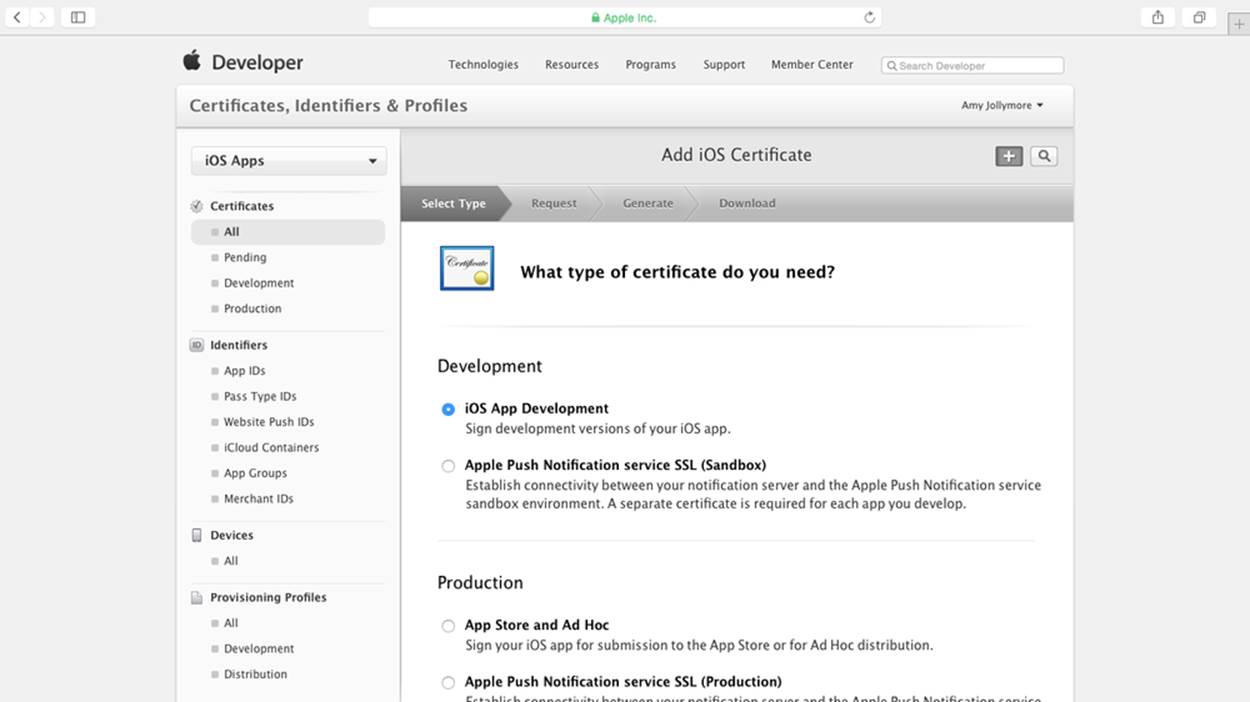
Figure 10-4. New certificate
To create a CSR, open the Keychain Access application on your Mac. Click the Spotlight search icon in the top right of your screen. Type in Keychain Access and select the Top Hit. Keychain Access will launch and show a list of all the certificates currently on your computer. Click Keychain Access in the top menu bar and then select Certificate Assistant→Request a Certificate From a Certificate Authority (Figure 10-5).
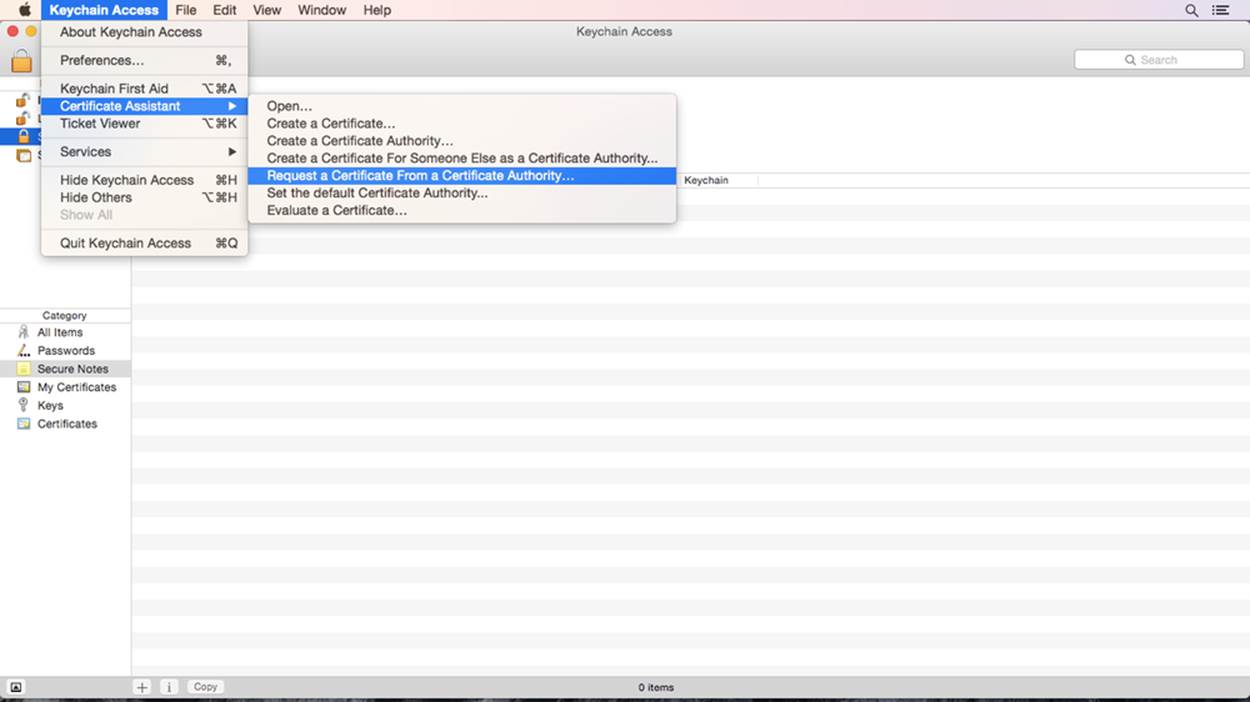
Figure 10-5. Keychain Access App
A wizard will appear on the screen (Figure 10-6). Fill out the email and common name fields, but leave the CA Email address field empty. Finally, check “Saved to disk” and click Continue. Choose where to save the file and click Save. Go back to the Provisioning Portal in your web browser.
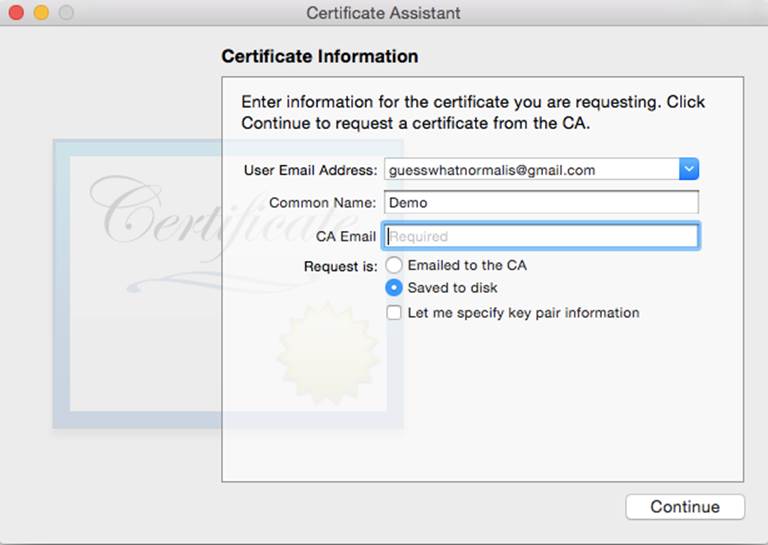
Figure 10-6. Wizard
Once you have created a CSR, click the Continue button on the Provisioning Portal wizard (Figure 10-7). The Provisioning Portal will then ask you to upload the CSR file. Click the Choose File button and then browse to the .certSigningRequest file (Figure 10-8).
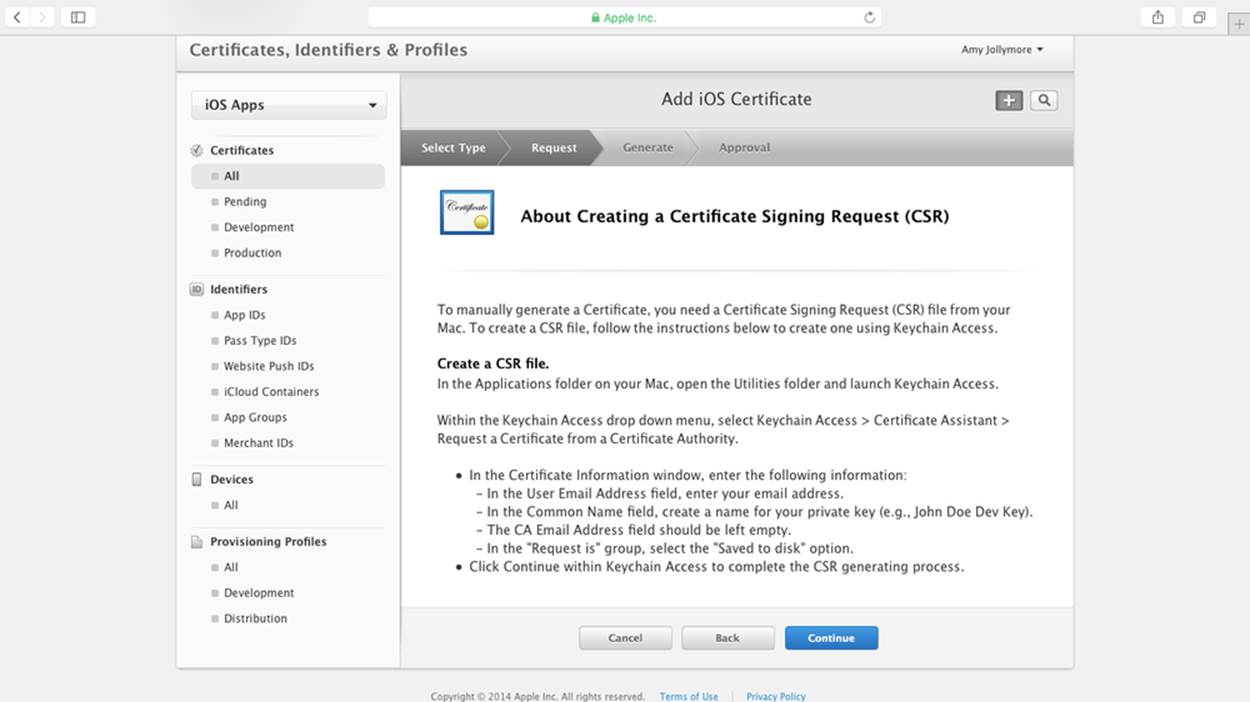
Figure 10-7. Web browser
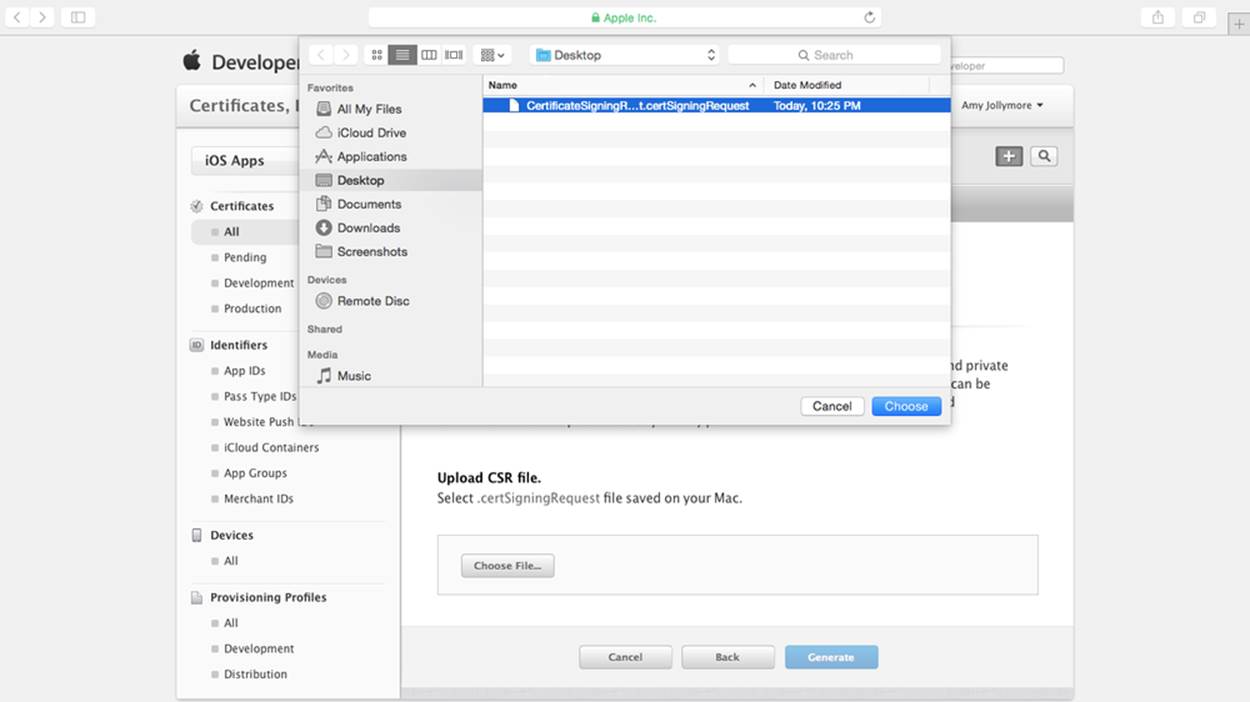
Figure 10-8. CSR
Then click Generate, and the wizard will begin to create the certificate. Once the certificate is ready, a Download button will appear (Figure 10-9). Download the certificate and open your Downloads folder in Finder. Double-click the new ios_development.cer file to add it to your keychain.
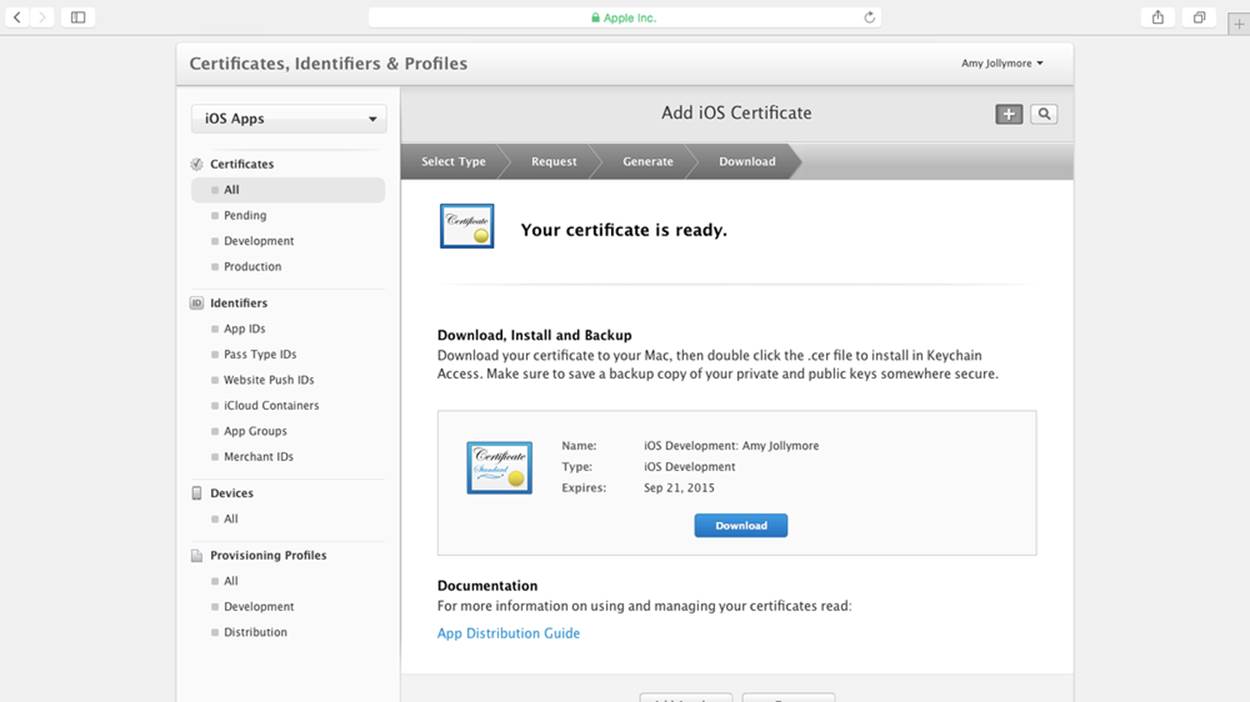
Figure 10-9. Download certificate
Reopen your web browser and click All under Certificates on the left side. A list of all your new certificates will be shown. A second certificate, for the App Store, must also be created. Click the plus button in the upper-right corner again. Choose “App Store and Ad Hoc” and then click Continue (Figure 10-10). The CSR creation screen will be shown, but you will use the CSR from last time. Click Continue.

Figure 10-10. Choosing the “App Store and Ad Hoc” option
Click the Choose File button and select the .certSigningRequest created previously. Then click Generate. The Download button will appear; download the new certificate (Figure 10-11). Double-click the ios_distribution.cer file to add it into your keychain. Reopen the Provisioning Portal website.
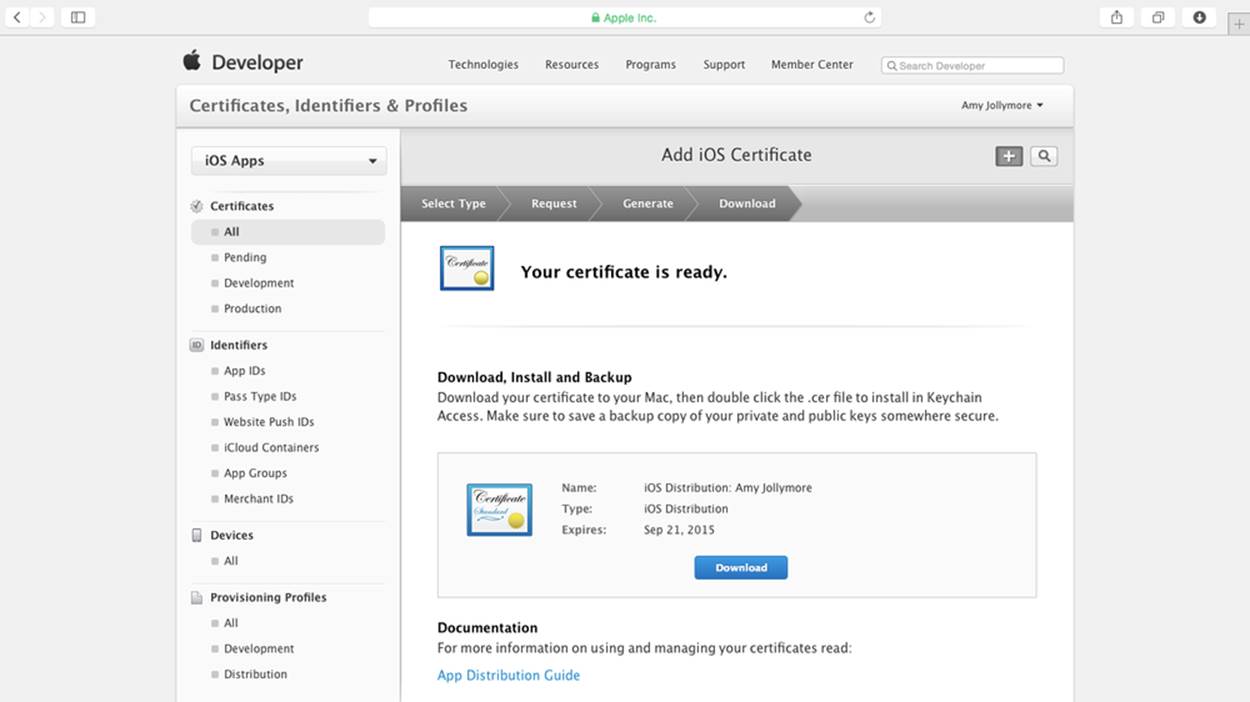
Figure 10-11. Download certificate
Identifiers
Below the Certificates section is another section called Identifiers. The Identifiers section is where the App IDs are managed. In the same way that each citizen of the United States has his or her own unique Social Security number, every app in the App Store has its own unique App ID.
To create an App ID, select App IDs from the sidebar and then click the plus button in the upper right-hand corner of the screen. The create App ID screen will be presented (Figure 10-12). Name your App ID Selfie without the quotes. Leave the App ID Prefix as is and select Explicit App ID. The Bundle ID is written using a reverse-domain style, similar to entering a web address into a web browser, except in reverse. You must come up with your own unique Bundle ID. Do not use the Bundle ID shown in the examples or screenshots, as they will not work. Enter your own Bundle ID into the Bundle ID input box. Be sure to use the following format: com.domain.app (for example, com.johnsmith.selfieapp).
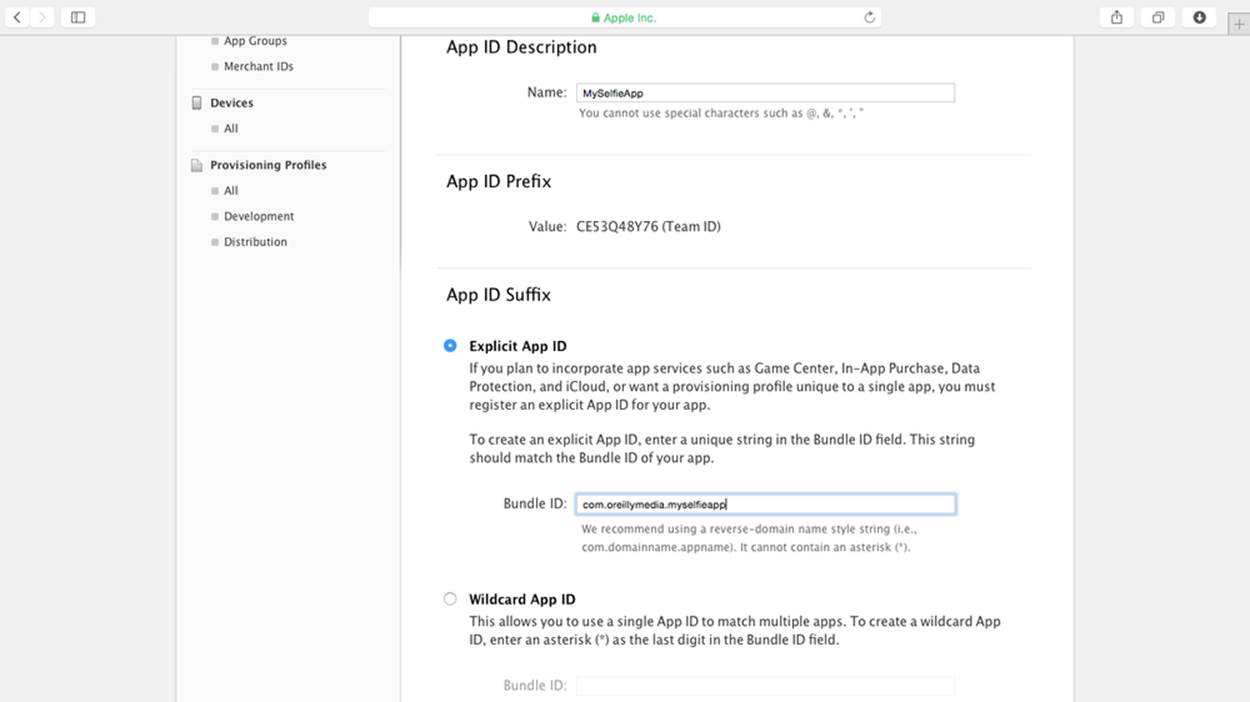
Figure 10-12. Register App ID
This Bundle ID will be entered into Xcode and matched when the app is submitted to the App Store. Finally, the App Services section is where you can enable additional services for your application. Click Continue. You will be asked to confirm your App ID; click Submit if everything is correct. Your App ID and Bundle ID have been created (Figure 10-13).
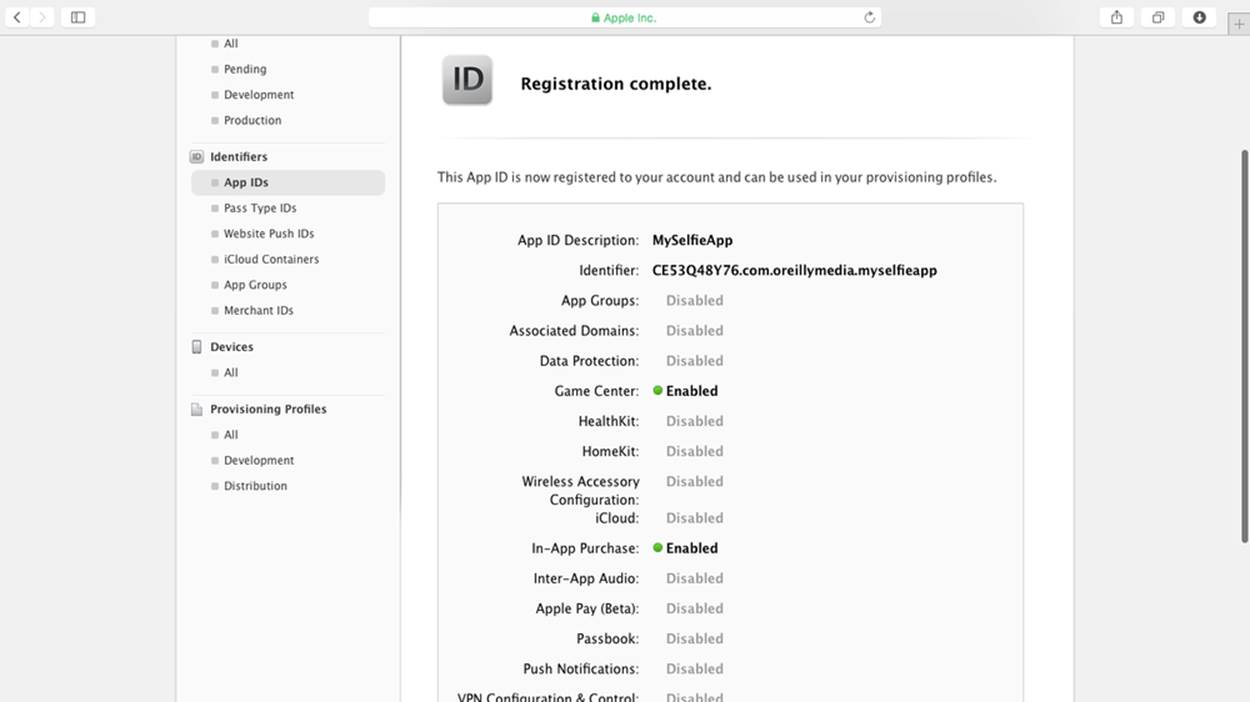
Figure 10-13. Confirmed App ID
Devices
You cannot run your app for testing on just any device. The devices used for testing and development must be declared with Apple. Developers are allowed to register up to 100 devices per year. If a device is removed, the slot is not reopened. The Devices section holds all the devices enabled for an Apple Developer Account. Devices are tracked using a unique serial number called a UDID attached to each device.
Click the All link under Devices and then click the plus button in the upper-right corner.
To register a device, you will need its UDID (Figure 10-14). To gather the UDID for a device, connect the device to a Mac running Xcode. When the device is connected, open Xcode and select Window→Devices from the top menu bar. The Devices window will appear; select the iOS device from the left sidebar. The iOS device will prompt you to Trust This Computer; tap Trust on your iOS device. The UDID will appear in the device details next to the word “Identifier.” Copy it to your clipboard and reopen the Provisioning Portal.
Paste the identifier inside the UDID input box and give the device a name (Figure 10-14). Then click Continue.
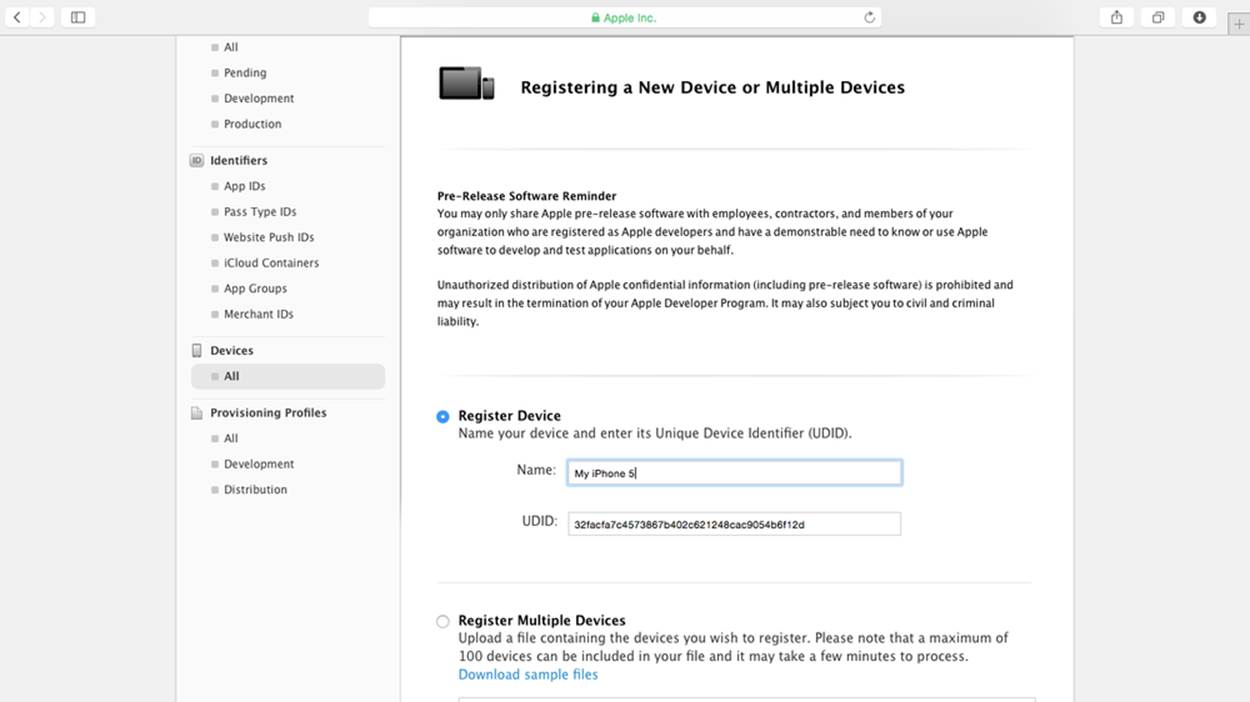
Figure 10-14. Register Device
Profiles
Once your devices are activated for development and are added to the Devices section, you are ready to create a provisioning profile. A provisioning profile is a small file that specifies which devices can run your app. Provisioning profiles commonly list a set of test devices or beta tester’s devices. The provisioning profile is added into Xcode, and the app checks to make sure the device running the app is authorized. Provisioning profiles are used for local development and for the App Store. However, the App Store provisioning profiles are not limited to a specific set of devices.
Click the All link under Provisioning Profiles. Then click the plus button in the upper-right corner.
Select iOS App Development and click Continue (Figure 10-15). Development is used for working and building your application on your computer. Distribution is reserved for sending your app to the App Store or a group of beta testers.
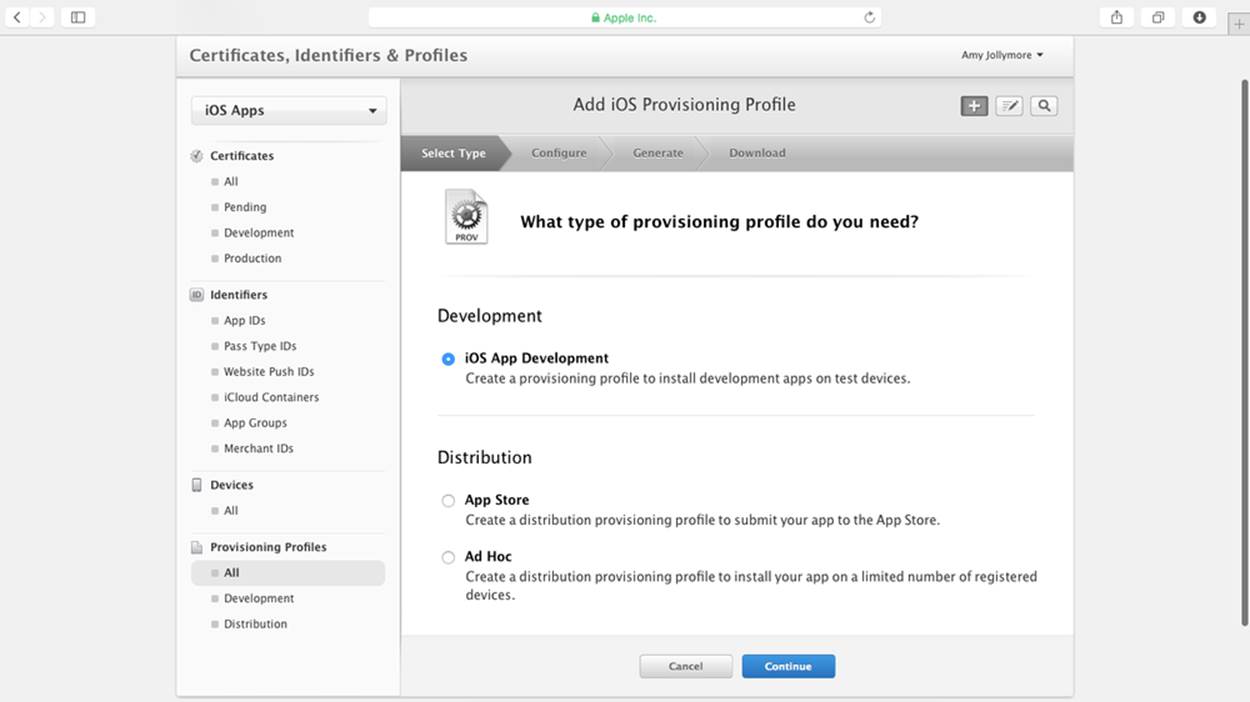
Figure 10-15. Select type
Next, select the Selfie App ID from the drop-down menu and then click Continue (Figure 10-16). You are asked to specify the certificate to use with this provisioning profile. In most cases, you will only have one certificate available. Select your certificate and click Continue.
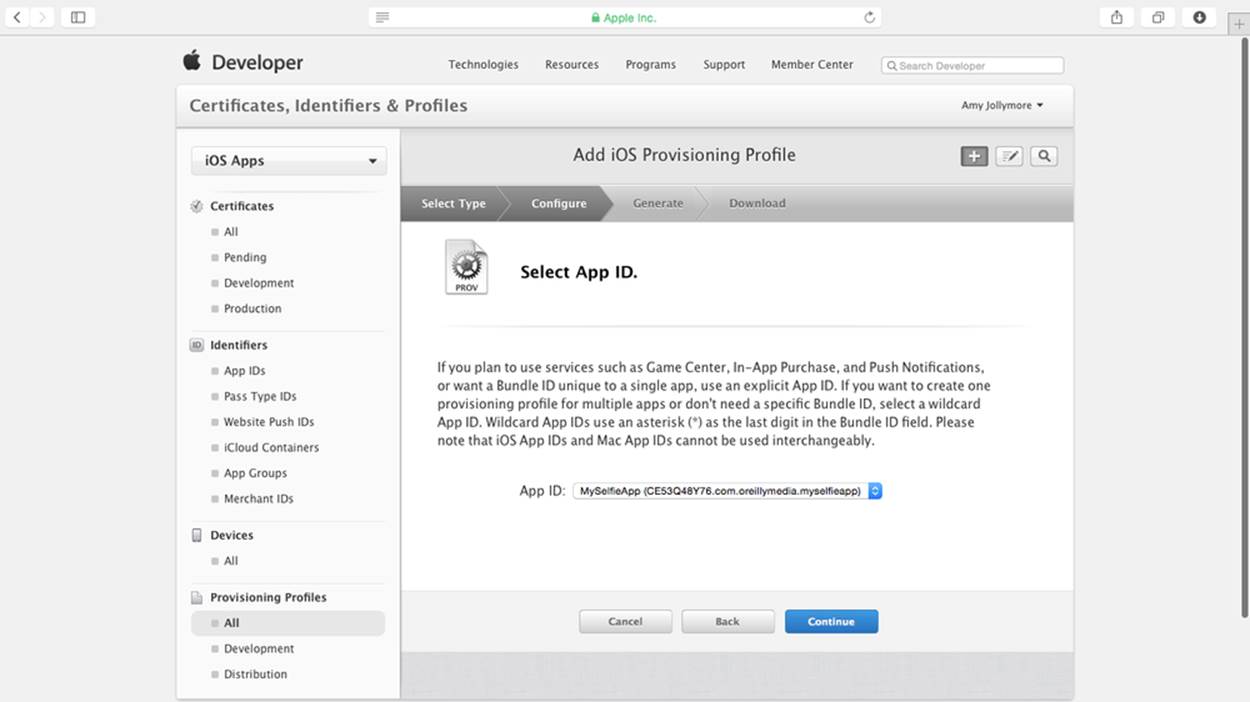
Figure 10-16. Select App ID
Next, a list of the authorized devices for your developer account will be presented (Figure 10-17). Select the devices you would like to use to test Selfie.
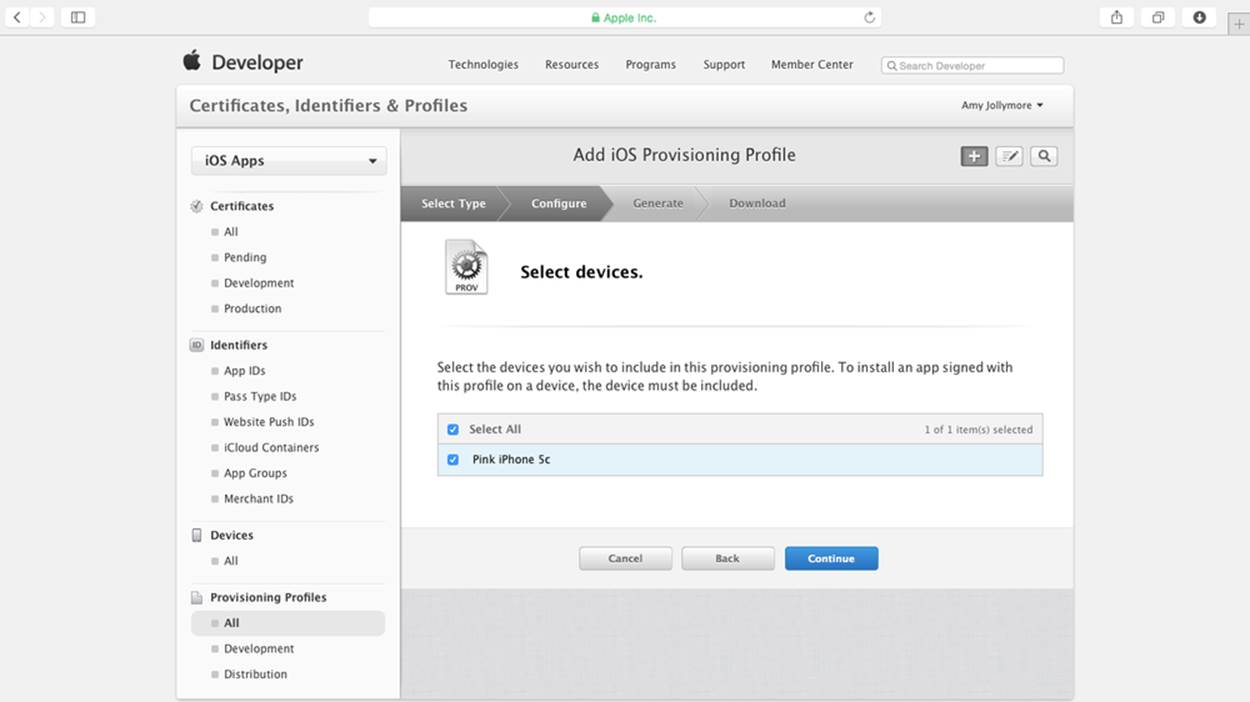
Figure 10-17. Devices
Finally, name the profile using the format projectNameDev or projectNameAppStore (Figure 10-18). Setting the name to this format will make finding the provisioning profile in Xcode much easier. Name the profile MySelfieAppDev. Click Generate and download the profile.

Figure 10-18. Name
Reopen the provisioning profile and click the All link in the Provisioning Profile section again. Then click the plus button in the upper-right corner.
Select App Store and click Continue. Select the Selfie App ID from the drop-down. Click Continue. Select the certificate and click Continue. Name the profile SelfieAppStore and then click Generate.
Download the profile and open your Downloads folder to the newly created provisioning profiles. They will be named MySelfieAppDev.mobileprovision and MySelfieAppStore.mobileprovision (Figure 10-19). With the Downloads folder open, double-click each provisioning profile to add it to Xcode. Once the provisioning profiles are added to Xcode, you must set them inside the project.
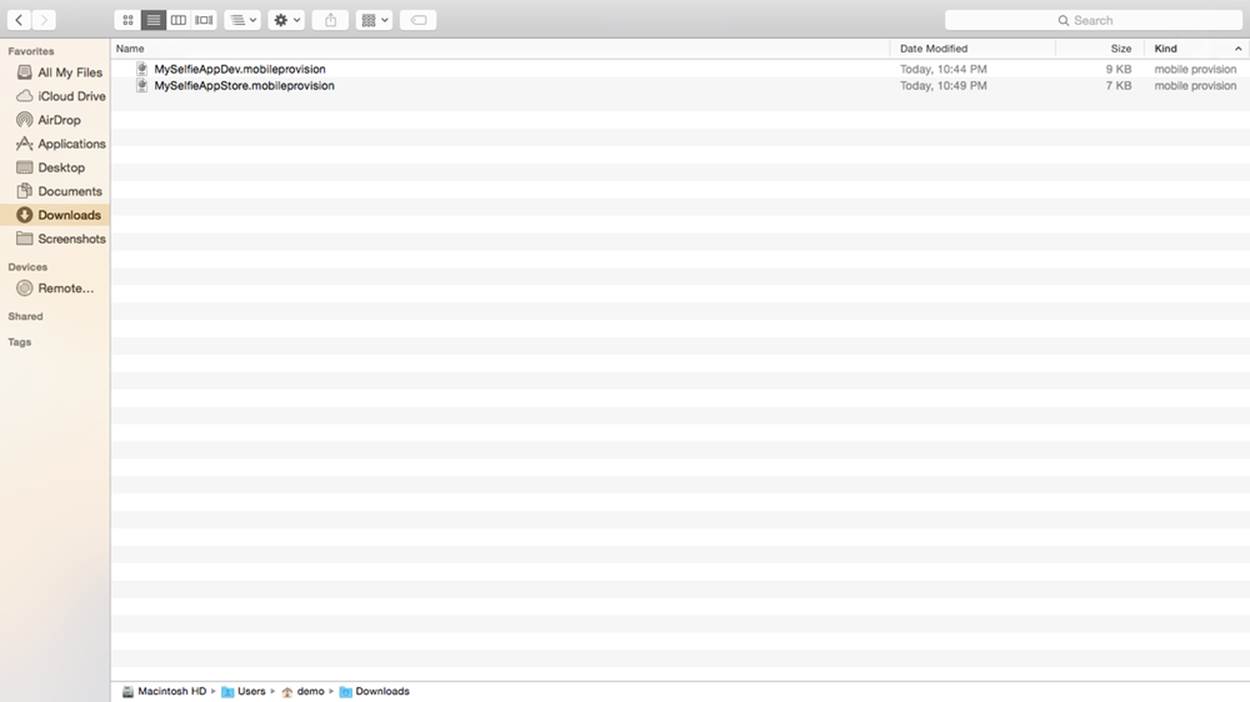
Figure 10-19. Downloads
Open the Xcode project and select the project name inside the Project Navigator. The project details will be displayed inside the Editor. From the Team drop-down menu, select Add an Account. Enter your Apple Developer Program login and password; then click Add (Figure 10-20).
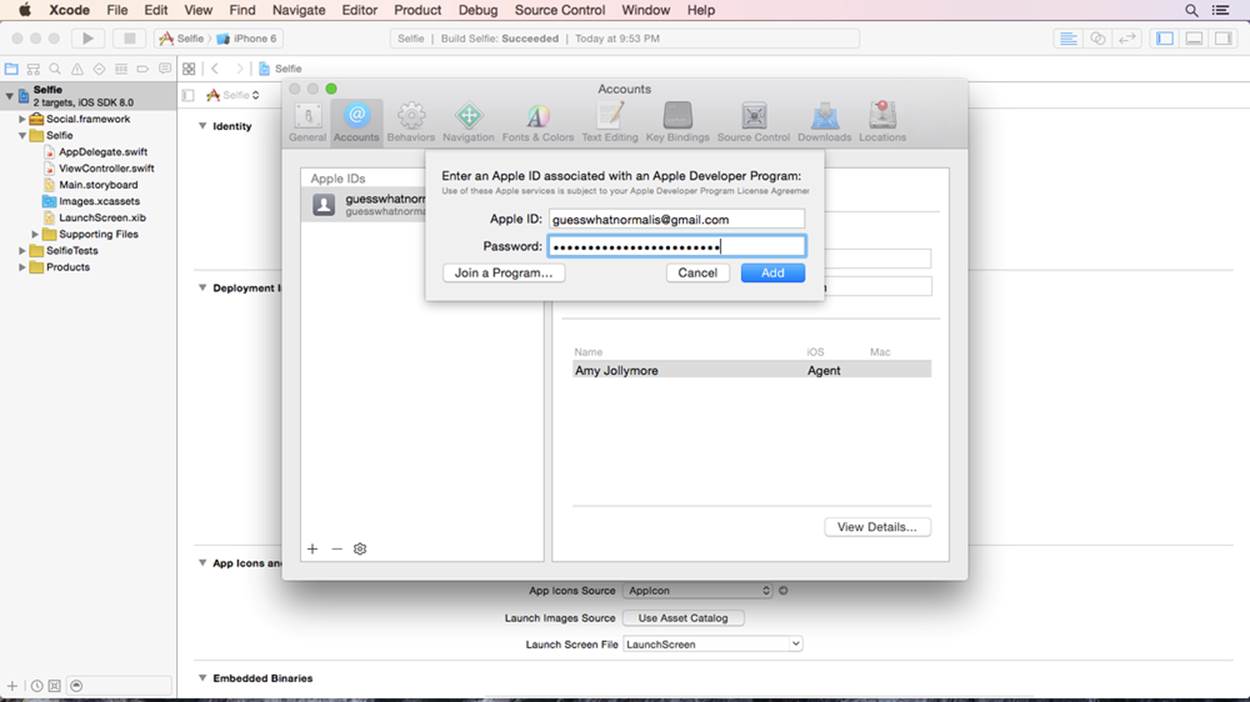
Figure 10-20. Add account window
Close the Accounts dialog and return to the project details. Click the Info tab at the top and clear the Bundle Identifier field. Then set the Bundle Identifier to the reverse-domain name entered when creating the App ID (for example, com.johnsmith.selfieapp).
Then select Build Settings and scroll down to the Code Signing section. Under Code Signing Identity, go to Debug and select iPhone Developer: YOUR NAME. Verify that the Any iOS SDK row below is the same. Under Release, select iPhone Distribution: YOUR NAME. Verify that the Any iOS SDK line is the same (Figure 10-21).
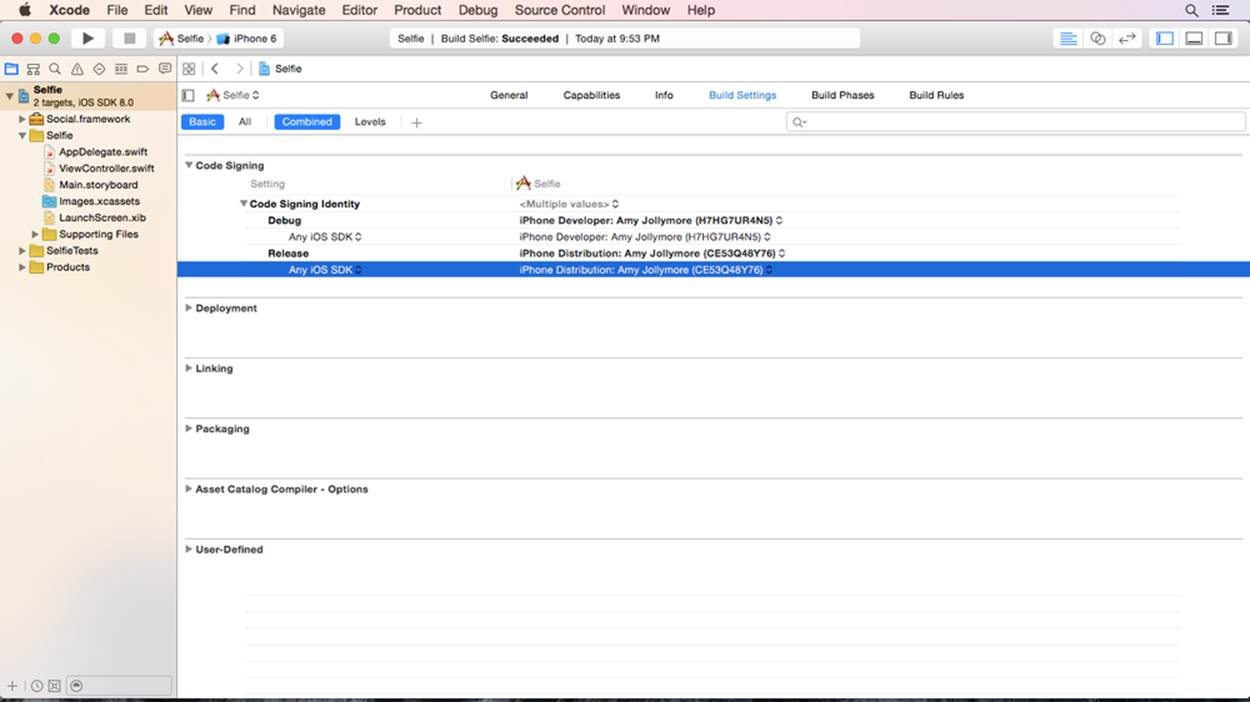
Figure 10-21. Build Settings tab
Click the General tab at the top and verify that the bundle and team information is correct.
Open your browser to AppSchool.com/book and download the provided app icons (Figure 10-22).
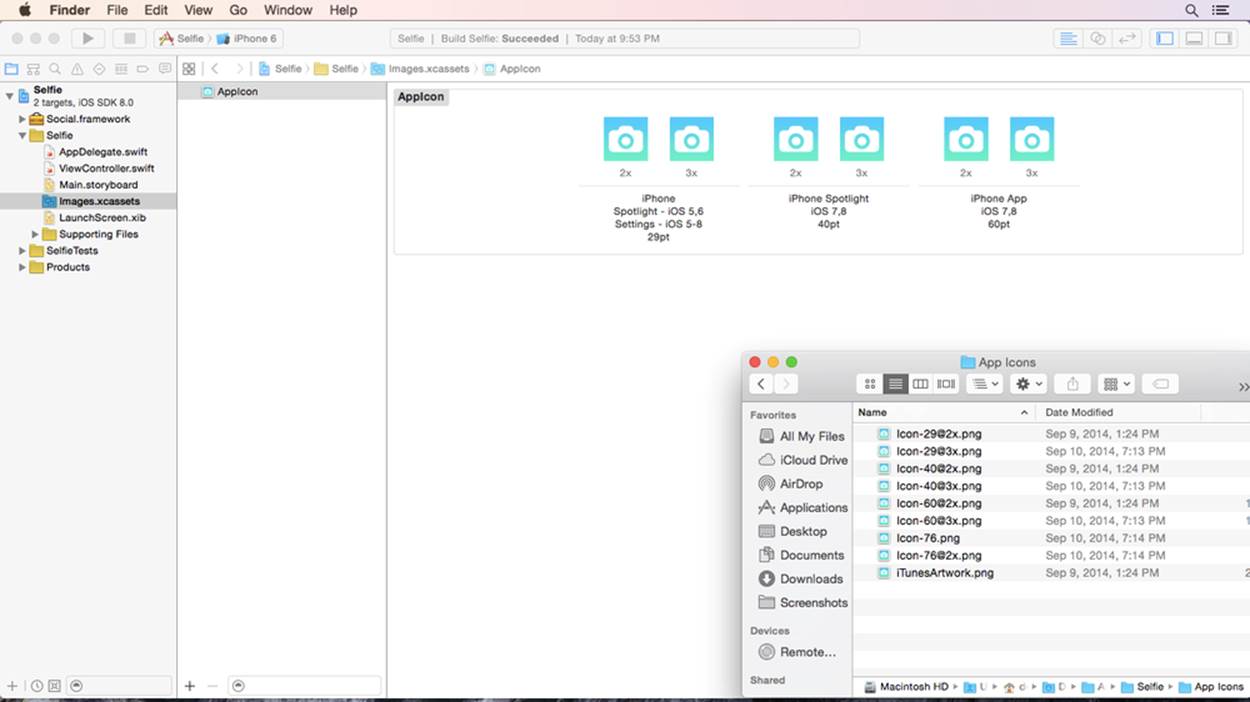
Figure 10-22. App icons
Open Finder to the new files. Open Xcode alongside the Finder window. Select Images.xcassets inside of the Project Navigator.
The application is now ready to run on a device. Connect your iOS device to your Mac and then click the iOS Simulator drop-down menu at the top of Xcode. Select your iOS device from the top of the menu and click the Play button.
You may see an alert from Xcode that reads “process launch failed: Security.” This is simply a first-time warning. Tap the app on your device and select Trust from the App Developer prompt. The app will launch and ask for permission to use the camera. Use the app and share a selfie to Facebook. Then tap the home button to verify the new app icon is shown on the Home Screen. Congratulations! You are now running your own apps on a device.
Don’t worry if you received an error, a warning, or your app did not run as expected. The best way to learn is to make mistakes. Practice makes perfect. A sample version of the project is available on AppSchool.com/book. Download it, compare it, and try, try again. Don’t be afraid to start the exercise over and walk through it until you get it right.
All materials on the site are licensed Creative Commons Attribution-Sharealike 3.0 Unported CC BY-SA 3.0 & GNU Free Documentation License (GFDL)
If you are the copyright holder of any material contained on our site and intend to remove it, please contact our site administrator for approval.
© 2016-2026 All site design rights belong to S.Y.A.