Introducing iOS 8 (2015)
Appendix A. Objective-C
NOTE
The material in this appendix is not required learning. However, since Swift is a new language, you are likely to see Objective-C code when building iOS Apps. This chapter provides some guidance on how to interact with Objective-C code.
In this appendix, you will learn about Objective-C. You will learn why should you know Objective-C and how to read Objective-C. These skills will prepare you for working with older code and guides.
Why Objective-C Still Matters
This book has taught you how to successfully go from idea to App Store, using Apple’s newest programming language, Swift. Before Swift, Apple only had one official programming language, Objective-C. The Objective-C language was created by a team of software engineers at NEXT, a software and hardware company created by Steve Jobs after he was excused from Apple in the 1980s. Fortunately, in the 1990s Apple acquired NEXT along with Objective-C. The Objective-C language has served as the primary programming language for over 20 years. This language has been used for iOS programming since the first iOS SDK was released in 2008.
The iOS Stack
When an application is developed, it does not send messages directly to the hardware. Instead, Apple provides a series of layers that work together to translate the message to the hardware (Figure A-1).
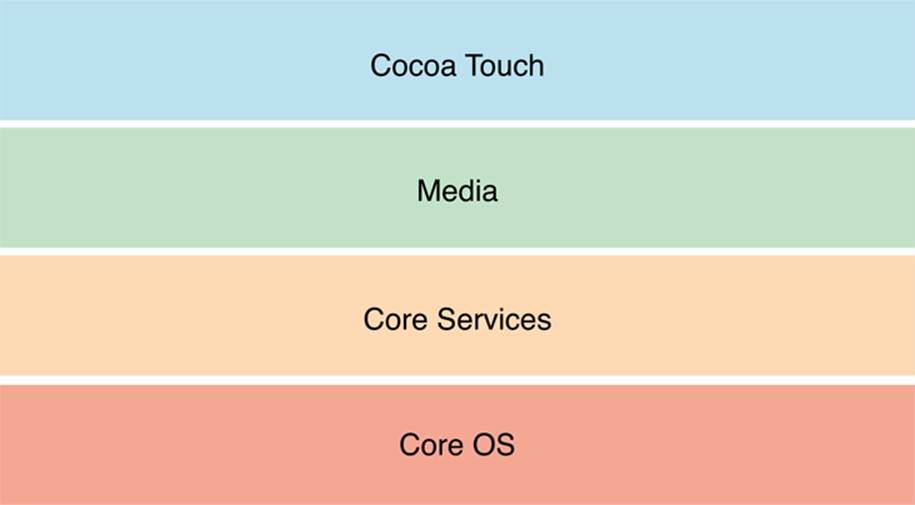
Figure A-1. Layers
The closest layer to the application is called Cocoa Touch. This means the application language, Swift, sends messages to the Cocoa Touch layer. The Cocoa Touch layer contains a series of frameworks and classes designed for development. The higher-level frameworks are simpler versions of the lower-level layers. The lower the layer, the more complex the source code. Remember, Swift talks directly to the Cocoa Touch layer. The Cocoa Touch layer provides the same classes and frameworks available in Objective-C.
How to Read Objective-C
It’s important to understand how to read Objective-C, because most iOS classes, frameworks, and documentation are still written in Objective-C. Initializing an object in Objective-C looks like this:
UIViewController *myViewController = [[UIViewController alloc] init];
Initializing an object in Swift looks like this:
var myViewController = UIViewController()
The Objective-C language is accomplishing the same task, but with more code. The Objective-C version uses brackets. These brackets act like parentheses in a math equation. The innermost set of brackets executes first and then the result is used as part of the next statement. In Objective-C, variables are created with a specific type. For example:
UIViewController *myViewController
This line creates a variable using a pointer, but the variable name is the same.
In Objective-C, brackets are used to send a message; a message tells a particular class or object to do something. Message syntax looks like this:
[subject verb]
The brackets are used at the beginning and end of the message. The first item in the message is the subject. The subject is the object or class that will receive the message. The subject is followed by a space and then a verb. This verb is usually a method or function. The method can also take parameters like this:
[subject verb:parameter]
A colon is used to delineate between the method and parameter. Review the following line of Objective-C:
UIViewController *myViewController = [[UIViewController alloc] init];
From left to right, a UIViewController variable is created named myViewController. The variable is then set to the output from the right side of the statement. The right side of the statement starts with [UIViewController alloc]. This alloc method is used to allocate memory for the newly formed object. Next, the newly formed memory is passed to init. The init method initializes the memory and creates a new UIViewController object. Finally, the myViewController variable is set to the newly created UIViewController object.
This syntax may not feel natural at first, but you don’t have to master it. The semicolon at the end of each line works like a period at the end of a sentence and declares the end of the statement.
Properties in Objective-C work in a very similar manner as Swift. Instead of using a message, you can get and set a property using a dot, just like in Swift:
Objective-C
myLabel.text = @"Steve"
Swift
myLabel.text = "Steve"
Both languages follow the same pattern, subject dot property and then equals sign. The only difference in this example is the @ sign used before a string in Objective-C. Otherwise, the two languages are very similar.
You may have noticed another difference when working with Objective-C files. Objective-C classes are made up of two separate files. The two files work together as a pair: .h and .m. The .h file is known as the header. The header file lists all the public methods and properties for the class. The .m file contains the code that executes the methods and properties displayed in the header. Think of the .h like the menu at a restaurant and the .m like the kitchen. You can see what is available in the .h file, and you don’t have to go back to the kitchen to see how it’s made.
Aside from a few syntax differences, Swift and Objective-C are very similar. They both talk to Cocoa and Cocoa Touch, so their underlying interfaces are the same. With a little practice, you can learn to read and write Objective-C from your Swift experience. Stick with Swift and learn Objective-C if you have a legitimate reason. Keep practicing and pushing your limits each and every day.
All materials on the site are licensed Creative Commons Attribution-Sharealike 3.0 Unported CC BY-SA 3.0 & GNU Free Documentation License (GFDL)
If you are the copyright holder of any material contained on our site and intend to remove it, please contact our site administrator for approval.
© 2016-2026 All site design rights belong to S.Y.A.