Introducing iOS 8 (2015)
Chapter 8. Maps and Location
In this chapter, you will learn how to harness the power of the iPhone’s Global Positioning System (GPS) inside your app. You will learn how to access the user’s location and plot it on a map. This chapter will also cover Map Kit, Apple’s framework for mapping and directions. With the information in this chapter, you will be able to tackle a location-based app in no time.
Providing information based on the user’s location is one of the most exciting features available while developing with an iOS device. Displaying the user’s location on a map is a two-step process. The first step is to gather the user’s location using Core Location. Core Location is a set of classes designed to work with the device’s GPS, cellular antenna, and WiFi antenna to provide the user’s location. Core Location is one of many optional frameworks provided by Apple. Frameworks are a set of classes and tools designed for a specific task. Let’s take Core Location as an example. It is a framework designed to work with location. Core Data is a framework designed to work with databases. These frameworks are optional, so they must be imported into the project to work properly.
The second step is to plot the user’s location on a map. Apple provides a framework called Map Kit to help draw and manage maps. Xcode 6 makes importing frameworks easy. To import Map Kit, click a project name in the Project Navigator. Then select the Capabilities tab and scroll down to Maps. Toggle the Maps switch to On and notice that MapKit.framework has been added to the Project Navigator. The framework is now available in the project, but the import process is not complete. The framework must be imported into the controller file as well. To import a framework in Swift, use the import keyword followed by the proper name of the framework:
import MapKit
This process will import the Map Kit classes and protocols into the controller. Now Autocomplete will also show Map Kit classes and protocols. Map Kit classes and protocols start with MK.
Core Location
As you just learned, Core Location is a set of classes and tools designed to find the user’s location. There are three methods of location detection via Core Location. The first method is Significant-Change Location. This method saves battery usage by only providing updates when the user’s location has changed significantly. The second method is Location Services, offering a highly customizable way to locate the user and receive updates. Finally, the Regional Monitoring method uses nearby boundaries defined by geographic regions or Bluetooth beacons. This book will work with the second option, Location Services, since it is most commonly used.
More information is available in Apple’s Location and Maps Programming Guide.
Accessing a user’s location requires the Core Location framework. The Core Location framework is not automatically imported when the Maps capabilities switch is toggled to on. The framework must be manually imported. To import the Core Location framework:
1. Click the blue project icon in the Project Navigator.
2. Scroll down to the bottom of the project details.
3. Under Link Binary with Libraries, click Add.
4. Select Core Location and click Add.
The framework will be added to the Project Navigator. To access the framework, be sure to add the following import statement in the controller:
import CoreLocation
WARNING
Collecting the user’s location is a power-intensive task. This means it requires more battery life and antenna power than other tasks. It is important that your app only uses Location Services as needed. As soon as the information needed is gathered Location Services should be turned off. In the case that more information is needed in the future, periodic updates are available.
Finally, before requesting the user’s location, it is important to check if Location Services are available; Location Services may be unavailable if:
§ The user has disabled Location Services in the Settings app.
§ The user has denied Location Services access for your app.
§ The device is in airplane mode or unable to connect externally.
Core Location provides a simple method called locationServicesEnabled to determine if Location Services are available. The locationServicesEnabled method returns a Boolean variable with the availability of Location Services.
Requesting User Location
Requesting the user’s location is done via a class named CLLocationManager. The prefix, CL, stands for Core Location. The location manager is used to collect parameters and trigger Location Services. Creating a CLLocationManager object is similar to creating any other object. For example:
var locationManager: CLLocationManager = CLLocationManager()
CLLocationManager has a few properties that must be set for it to operate.
The desiredAccuracy property is an enumeration value. An enumeration value, or enum, is a keyword that represents a number. Enums are similar to multiple choice tests: you must pick one value from a list. The desiredAccuracy property accepts the following values:
kCLLocationAccuracyBest
Most accurate and most power-intensive option
kCLLocationAccuracyNearestTenMeters
Accurate within 10 meters
kCLLocationAccuracyHundredMeters
Accurate within 100 meters
kCLLocationAccuracyKilometer
Accurate within 1 kilometer
kCLLocationAccuracyThreeKilometers
Accurate within 3 kilometers
With more accuracy comes more power usage; choose the accuracy level that meets the minimum required level of information. If the app tracks the user on a map, like Google Maps, kCLLocationAccuracyNearestTenMeters or kCLLocationAccuracyHundredMeters will work well. However, if the app states the name of the city, like Twitter, kCLLocationAccuracyKilometer, or kCLLocationAccuracyThreeKilometers would be a great fit. For most situations, kCLLocationAccuracyBest is not required.
Setting the desiredAccurracy is similar to setting a property on any other object:
locationManager.desiredAccuracy = kCLLocationAccuracyHundredMeters
CLLocationManager also requires a delegate property. The CLLocationManager delegate follows the CLLocationManagerDelegate protocol. The delegate will receive alerts whenever there is a location update, or there is an error. To receive these alerts, the delegate must communicate via the CLLocationManagerDelegate protocol. The controller must declare it is following, or conforming, to the CLLocationManagerDelegate. To declare the conformation to the protocol, add CLLocationManagerDelegate to the top of the class:
class ViewController: UIViewController, CLLocationManagerDelegate
To receive location alerts, you must implement the locationManager(_:, didUpdateLocations:) method. This method will be called each time the location information is changed:
func locationManger(manager: CLLocationManager!,
didUpdateLocations locations: [AnyObject]!){
println("Location found")
}
To receive updates whenever there is an error with Core Location, implement the locationManager(_: didFailWithError:) method:
func locationManager(manager: CLLocationManager!, didFailWithError error:
NSError!){
println("Error!")
}
Once the new methods are implemented and the protocol conformation is complete, the delegate property must be set:
locationManager.delegate = self
Before Location Services are activated, the user must approve location sharing with the app. There are two types of Location Services approvals. The first is requestWhenInUseAuthorization; this authorization asks only for location information while the application is running in the foreground. The second authorization is requestAlwaysAuthorization. This authorization will provide the app with the ability to track the user’s location if the app is in the foreground or the background. Calling these authorizations is a simple as calling a method:
locationManager.requestWhenInUseAuthorization()
or:
locationManager.requestAlwaysAuthorization()
Finally, after the authorization is requested, Location Services can be enabled by calling startUpdatingLocation():
locationManager.startUpdatingLocation()
The locationManager will then begin tracking and returning the user’s location based on the information provided.
The locationManager(_:, didUpdateLocations:) method will provide an array of CLLocations in the order they occurred. There will always be at least one object in the array. Each object in the array is a CLLocation. CLLocation is a simple class that organizes aCLLocationManager’s location data for a specific location. CLLocation keeps track of geographical coordinates, altitude, speed, heading, and even the level of accuracy used for detection. CLLocation has some very helpful properties:
coordinate
CLLocationCoordinate2D, latitude and longitude coordinates
altitude
Altitude measured in meters
timestamp
The time and date when the data was captured
description
Returns the CLLocation in String format, great for println()
Remember, once you have the information needed, it is very important to stop Location Services. To stop the services, call stopUpdatingLocation() on the CLLocationManager:
manager.stopUpdatingLocation()
For example, it is very common to stop Location Services after the location has been detected inside the locationManager(manager:, didUpdateLocations:) method. The manager variable points to the CLLocationManager created earlier and is a perfect variable to use for this situation.
GOTCHAS
The iOS 8 Simulator has shown some inconsistent behavior with Core Location. If Location Services are not being called, add the following three keys to the Info.plist file:
§ NSLocationWhenInUsageDescription
§ NSLocationAlwaysUsageDescription
§ NSLocationUsageDescription
Set Always or When in Use as the value for each. These keys will help to enable and trigger Location Services.
Map Kit
Map Kit is a framework designed to provide maps and directions. These maps can display street-level information, 3D buildings, satellite imagery, or a combination of both. The maps also automatically respond to pinch, zoom, pan, and tilt. Points can be plotted on the map using annotations.
MKMapView
To display a map, Map Kit provides a simple view class called MKMapView. The MKMapView class displays a map, manages input from the user, and even shows custom annotations.
MKMapView also has a delegate property. Much like the delegate property on CLLocationManager, MKMapView’s delegate will receive updates as they happen. The MKMapView delegate must conform to the MKMapViewDelegate protocol. To set the delegate, Control-drag from the Map View in the Storyboard Editor over to the words “View Controller” in the Document Outline. A small pop-up menu will be shown. Click delegate, and the delegate will be set to the view controller associated with that interface.
MKMapView has many convenient properties and methods. For example, MKMapView comes with the ability to display a user’s location on the map without adding any additional code. To enable the user’s location on the map, set the showsUserLocation property to true:
myMapView.showsUserLocation = true
The user’s location will now be displayed via a blue dot on the map.
It is common to set the user’s location to the center of the map. To move and recenter the map to a new point, set the centerCoordinate property. The centerCoordinate property requires a CLLocationCoordinate2D. A CLLocationCoordinate2D is just the latitude and longitude coordinates wrapped into a single variable. You can create a CLLocationCoordinate2D using the CLLocationCoordinate2DMake method:
var coordinates: CLLocationCoordinate2D = CLLocationCoordinate2DMake(100,100)
Finally, it is common to zoom in on a location on a map. The zoom level is automatically adjusted when the region property is set. The region property requires a MKCoordinateRegion object. However, in most cases, editing the current region object is easier than creating a new one:
var updatedRegion: MKCoordinateRegion = myMapView.region
updatedRegion.span.longitudeDelta = updatedRegion.span.longitudeDelta * 2.0
updatedRegion.span.latitudeDelta = updatedRegion.span.latitudeDelta * 2.0
myMapView.region = updatedRegion
The longitudeDelta and latitudeDelta values are part of the span. The span is how much area or width and height around the centerCoordinate to shown.
Directions
Map Kit also provides the ability to add turn-by-turn directions inside any app. The MKDirections API provides directions calculated by Apple’s servers. These directions can provide walking or driving directions, travel time, and alternate routes. Each point on the map is represented by aMKMapItem. A MKMapItem contains all the information about a specific location on a map. This information includes map location, coordinates, and data like the name of the location. These MKMapItems can also be passed to the Maps app for more advanced features.
The easiest way to create a MKMapItem is to use the mapItemForCurrentLocation method. This method will take the user’s location and create a MKMapItem from it:
var mapItem: MKMapItem = MKMapItem.mapItemForCurrentLocation()
The MKMapItem class has a few convenient properties. The name property is a string that provides a descriptive name. The phoneNumber property is a string that holds the phone number for the location. The URL property holds the website URL for a particular location.
Once the MKMapItems are created, it is very simple to share them with the Maps app and to provide turn-by-turn directions. The openMapsWithItems:launchOptions: method accepts an array containing one or more MKMapItems. These items will be mapped according to thelaunchOptions. The MKLaunchOptionsDirectionsModeKey tells the Maps app to provide directions between the two points.
Plotting Points
Apple provides a method to plot points on a map called annotations. Annotations are designed to define a single place or point. Annotations are often used to highlight points of interest and provide more detail. An annotation can also have an optional callout bubble. This bubble can present information like the location’s name and address. Bubbles can also be actionable and serve as a button to receive user action.
Annotations are made up of two parts, the annotation object and the annotation view. The annotation object is a lightweight object that manages the data for the annotation. This annotation object is created from the MKPointAnnotation class. The annotation view is an object created from the MKPinAnnotationView class. The annotation view is used to draw the pin on the map.
There are three steps to adding an annotation to an MKMapView. The first step is to create a MKPointAnnotation for the point of interest:
var point = MKPointAnnotation()
point.coordinate = CLLocationCoordinate2DMake(37.7756, -122.4193)
point.title = "San Francisco"
Next, conform to the MKMapView protocol and respond to the mapView(_: viewForAnnotation:) method. This method manages the recycling of annotation views, much like in a table view:
func mapView(mapView: MKMapView!, viewForAnnotation annotation: MKAnnotation!)
-> MKAnnotationView!{
var pin = MKPinAnnotationView(annotation: annotation, reuseIdentifier:
"pinIdentifier")
return pin
}
Finally, call the addAnnotation method. This will add the annotation to the map:
mapView.addAnnotation(point)
You are now ready to tackle your first location-based app.
Exercise: Adding Maps to the Passport App
In this exercise, you will expand on the Passport app from previous chapters. You will add a new Map View, displaying a pin in each country visited (Figure 8-1). The Map View will be shown when the user taps the new Map button in the upper right of the Countries Visited screen.
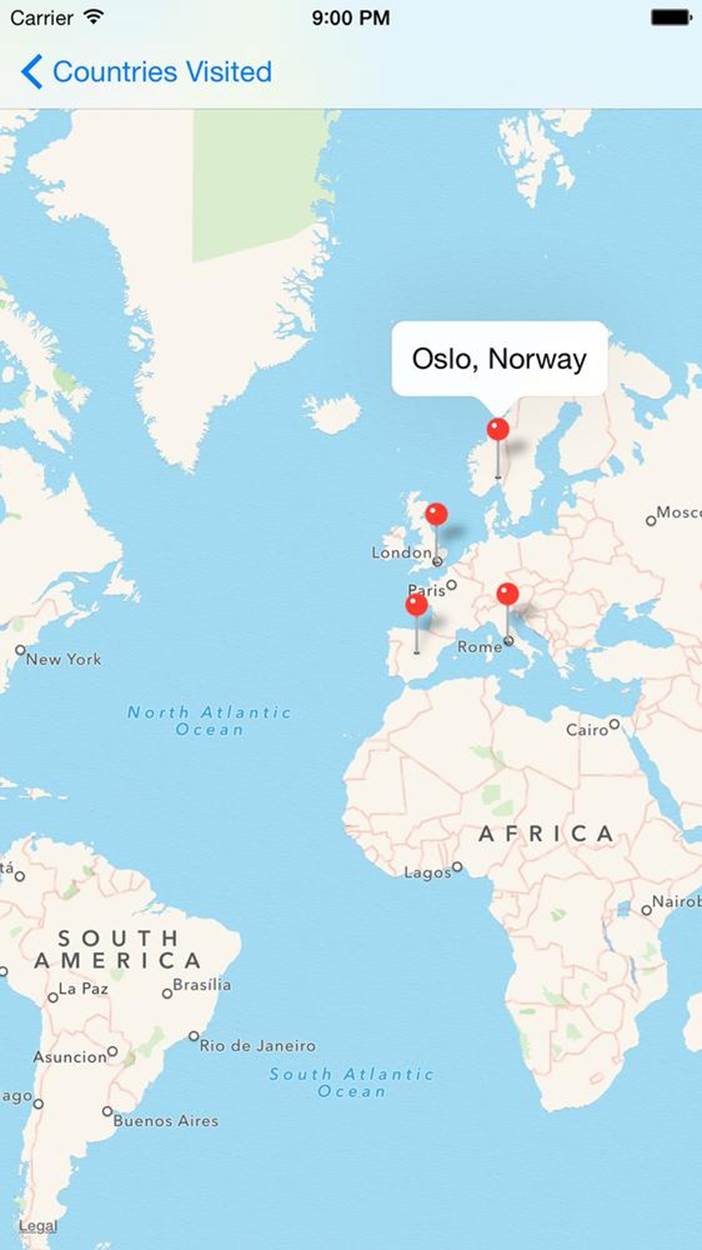
Figure 8-1. Finished exercise screenshot
To get started, open the Passport.xcodeproj file. Click the project name in the Project Navigator. Then click Capabilities. Scroll down to Maps and turn it On (Figure 8-2).
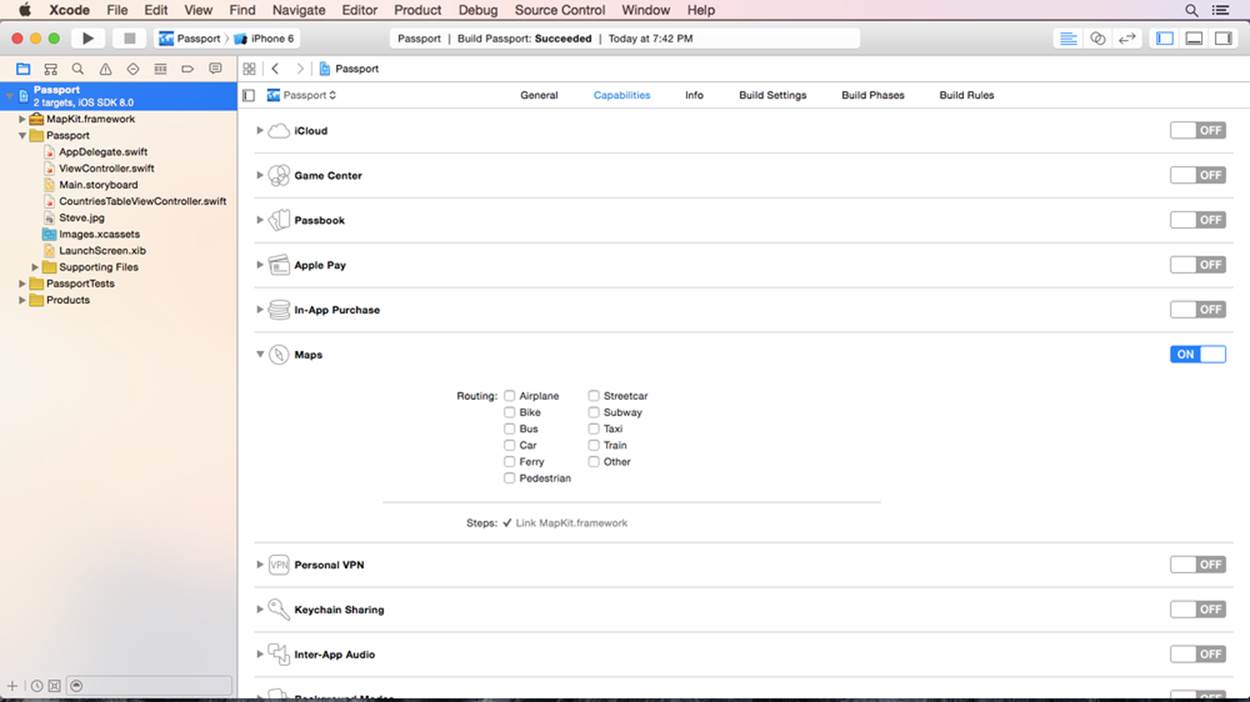
Figure 8-2. Capabilities tab
A new MapKit.framework item will appear in the Project Navigator. Next, select File→New→File from the top menu bar. Select Cocoa Touch Class and click Next.
Select UIViewController in the “Subclass of” drop-down menu and then name the class MapViewController (Figure 8-3). Verify the language is set to Swift and click Next. Save the file inside the Passport folder and click Create. A new MapViewController.swift file will be opened.
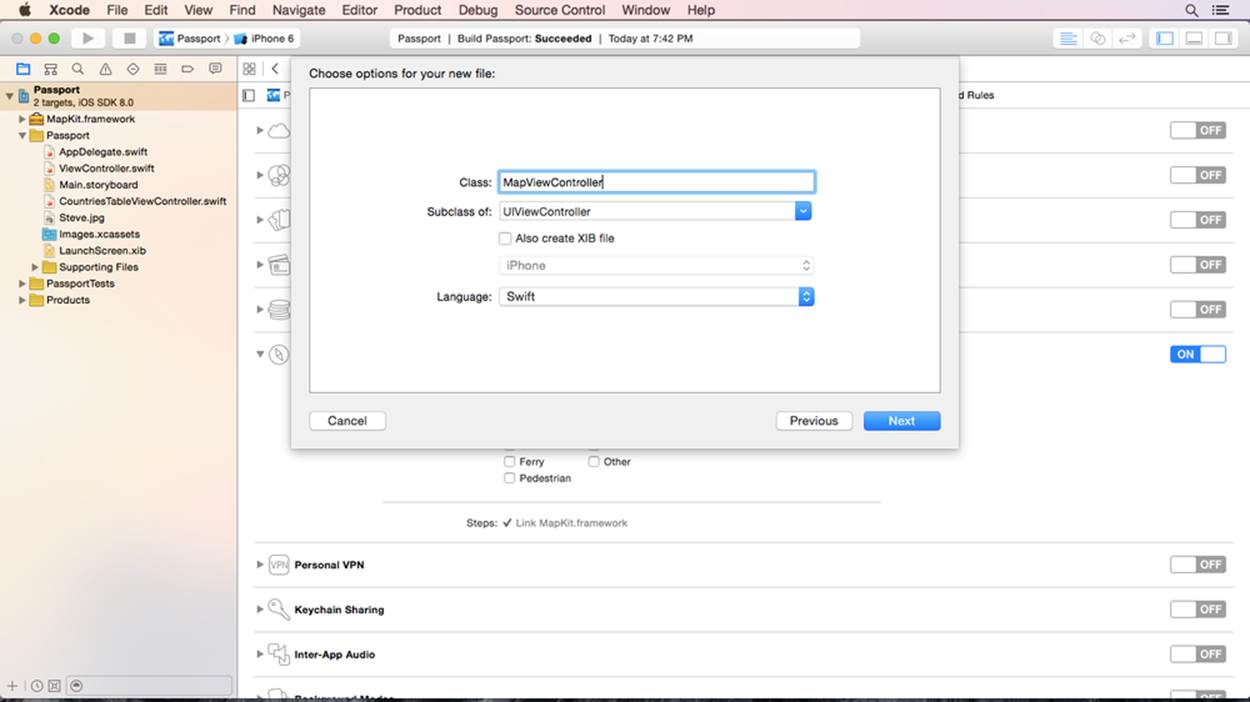
Figure 8-3. Naming class file
Highlight the green methods at the bottom of the file and delete them. Be sure not to remove the closing brace at the very bottom of the file. Delete the didReceiveMemoryWarning method as well.
Open Main.storyboard (Figure 8-4). Verify the size class is “Any, Any.” If it is not, click the size class link at the bottom, and a small pop-up box will appear. Select the middle box in the middle row (Figure 8-5).
Figure 8-4. Open Main.storyboard

Figure 8-5. Grid
The interface will change size, but do not worry because the constraints are still in place. Hide the Project Navigator and the Document Outline. Open the Inspector. Then scroll to the right of the Table View Controller Scene (Figure 8-6).
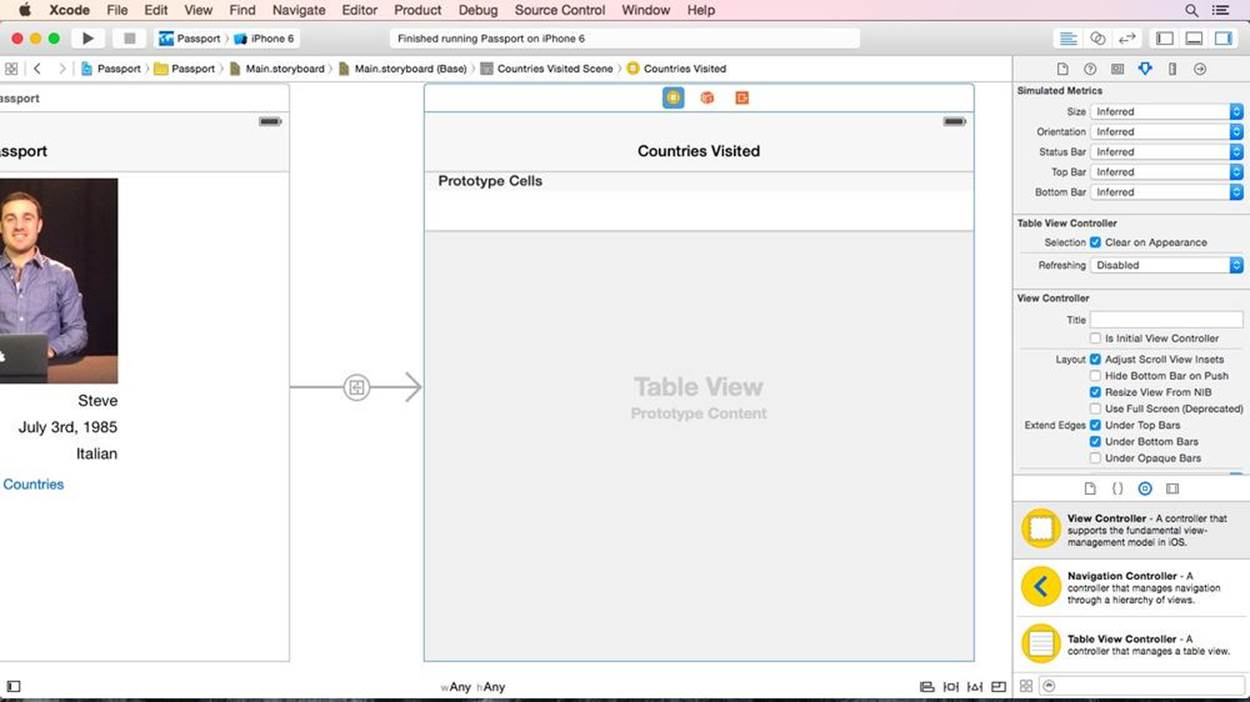
Figure 8-6. Countries Visited table view
In the Object Library, drag out a View Controller and place it to the right of the Table View Controller Scene. Then inside the Object Library, type Map and drag a Map View onto the new scene (Figure 8-7). Stretch the map until each edge snaps to the edge of the scene.
Select the Map View. From the top menu bar, select Editor→Pin→Leading Space to Superview. Select the Map View again and select Editor→Pin→Trailing Space to Superview. Select the Map View again and select Editor→Pin→Top Space to Superview. Select the Map View again and select Editor→Pin→Bottom Space to Superview. This will ensure the Map View fits the screen for any size device.
Clear the Object Library search box and type BarButton. Select the Bar Button Item from the Object Library and drag it to the upper-right corner of the Table View Controller Scene. Double-click the new Bar Button Item and type Map. Control-drag from the Map button to the new Map scene. A small pop-up box will appear. Select the show option (Figure 8-8).
A navigation bar will appear on top of the Map scene.
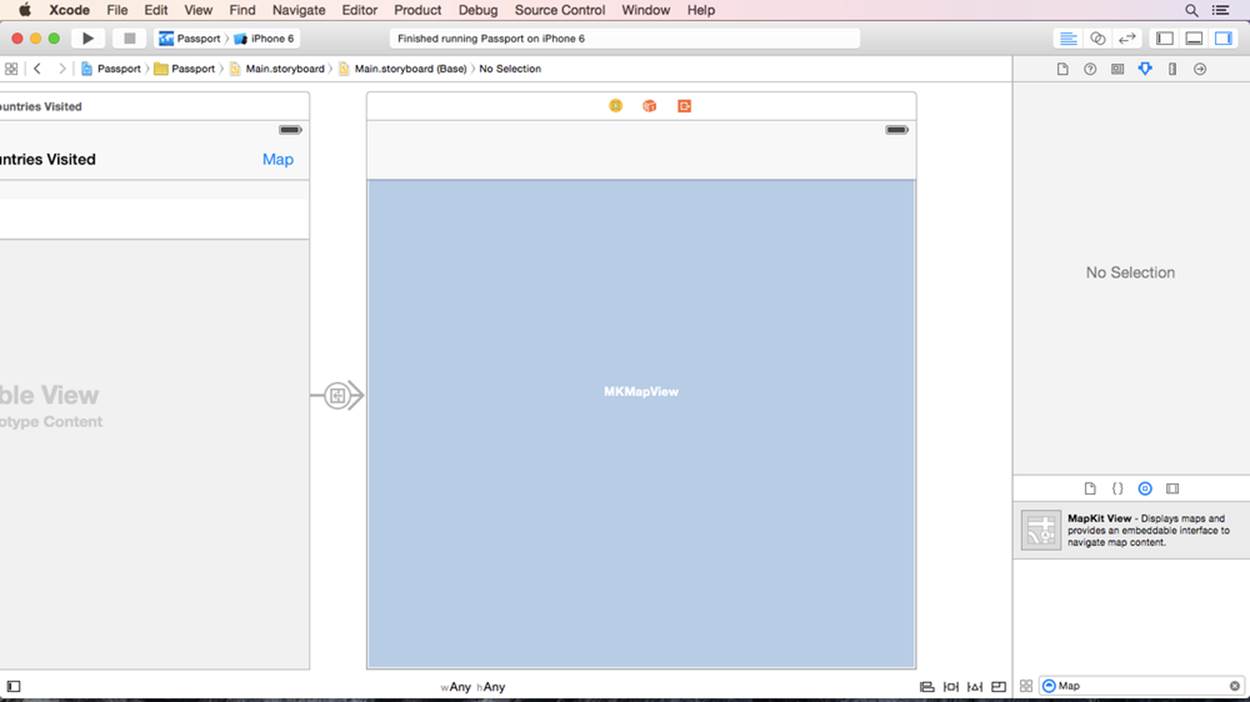
Figure 8-7. Map View Controller Scene

Figure 8-8. Action segue dialog
Click the blue MKMapView item inside the scene (Figure 8-9). Then Control-drag to the yellow circle at the top of the scene. This yellow circle represents the view controller for the scene.
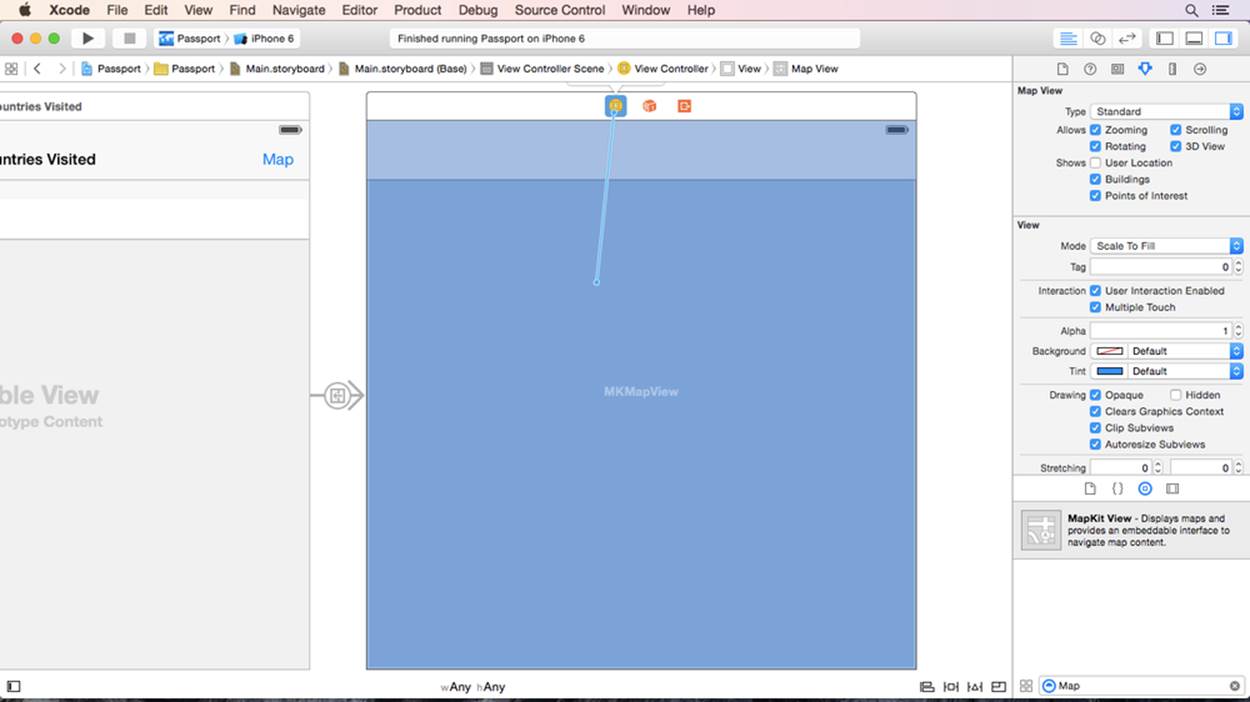
Figure 8-9. Connection
A small menu will appear; select the delegate option (Figure 8-10). This will ensure the MapViewController.swift file will receive delegate updates from the MKMapView.
![]()
Figure 8-10. Delegate pop-up menu
The storyboard is nearly complete, but you must connect the new Map scene to the MapViewController.swift file you created earlier. First, click the small yellow circle at the top of the scene. Next, open the Identity Inspector. The Identity Inspector manages the custom class for a scene. Select the third icon from the left on the top toolbar inside the Inspector to open the Identity Inspector. Inside the class input box, type MapViewController (Figure 8-11). This ensures the connection of the MapViewController.swift file and your newly created scene.
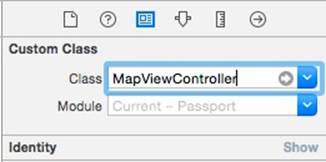
Figure 8-11. MapViewController class
Next, hide the Inspector and open the Assistant Editor. Click the Preview item at the top of the Assistant Editor and then select Automatic. Then Control-drag from the MKMapView to MapViewController.swift (Figure 8-12). A pop-up menu will appear (Figure 8-13).
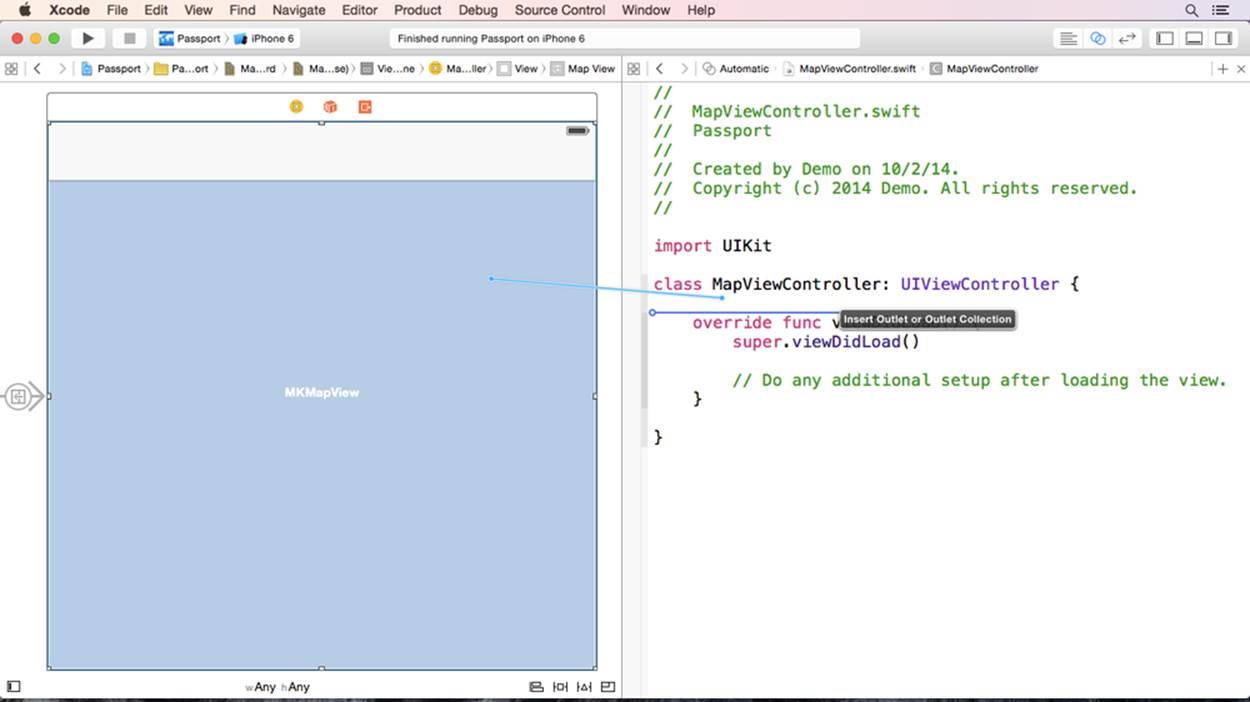
Figure 8-12. Blue line connection
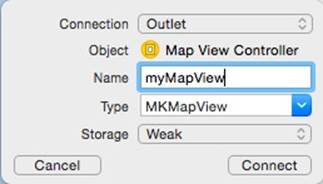
Figure 8-13. MKMapView connection dialog
Type myMapView into the Name input box. Then click Connect. An IBOutlet will be created. But there will be a few red lines and errors displayed as well. These errors are because the Map Kit framework has not been imported into the MapViewController class. To import Map Kit, just below the line that reads import UIKit, type import Map Kit (Figure 8-14).
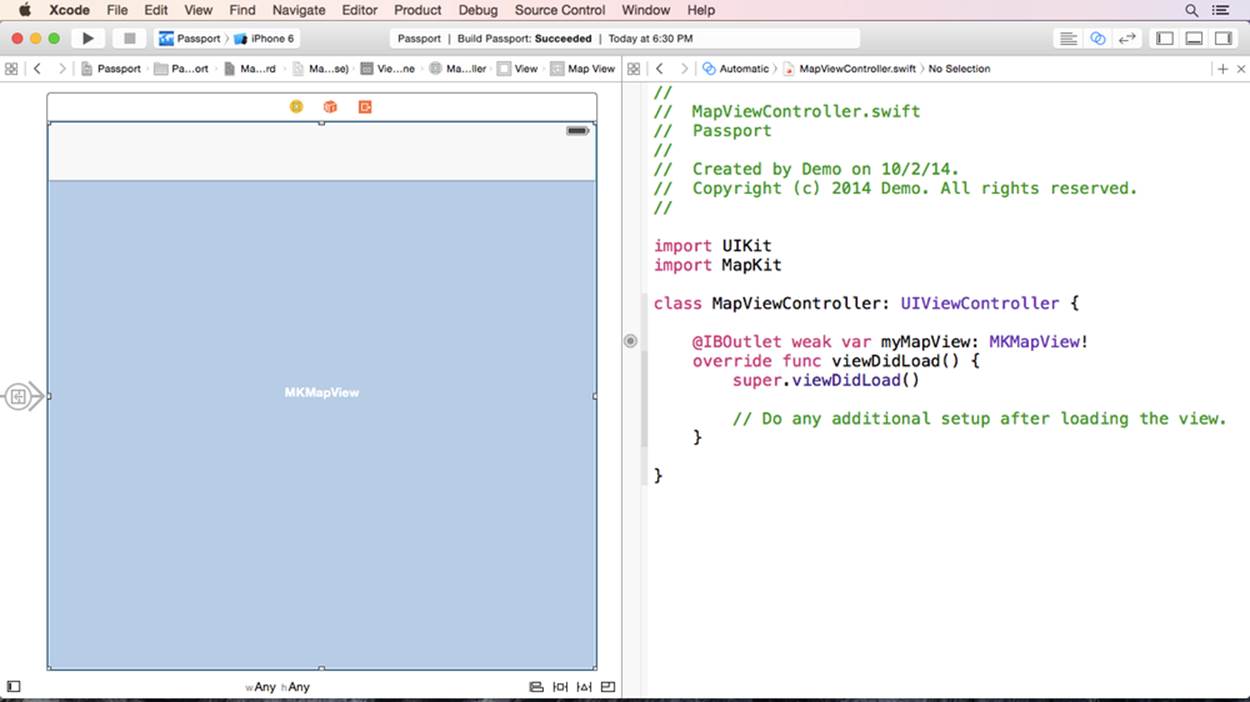
Figure 8-14. Imported Map Kit
The errors will be resolved, and the code warnings will be dismissed. The MapViewController will receive delegate updates whenever an event is triggered by the map. To receive these updates, the MapViewController must subscribe to the MKMapViewDelegate protocol. To do this, add the bolded code:
class MapViewController: UIViewController, MKMapViewDelegate {
This will declare that the MapViewController is subscribed to the MKMapViewDelegate protocol’s list of events. Place your cursor in the viewDidLoad method under the line super.viewDidLoad().
Inside the viewDidLoad method, you will create four MKPointAnnotation objects. These objects will hold the position and title information for the pins placed on the map. Add the following code to the viewDidLoad() method:
let italy = MKPointAnnotation()
italy.coordinate = CLLocationCoordinate2DMake(41.8947400,12.4839000)
italy.title = "Rome, Italy"
let england = MKPointAnnotation()
england.coordinate = CLLocationCoordinate2DMake(51.5085300, -0.1257400)
england.title = "London, England"
let norway = MKPointAnnotation()
norway.coordinate = CLLocationCoordinate2DMake(59.914225, 10.75256)
norway.title = "Oslo, Norway"
let spain = MKPointAnnotation()
spain.coordinate = CLLocationCoordinate2DMake(40.41694, -3.70081)
spain.title = "Madrid, Spain"
This code creates the MKPointAnnotations. The first line sets a constant named italy to a new MKPointAnnotation. The coordinate property is then set to a specific location. The CLLocationCoordinate2DMake method takes the latitude and longitude of a location and creates a set of coordinates. Finally, the title property is set to the name of the city and country. This title will be displayed when the pin is tapped.
The four MKPointAnnotations must be added to the map, but first they need to be added to an array. Create an array holding the four new locations like this. Add this code just below the spain MKPointAnnotation:
let locations = [italy, england, norway, spain]
This creates a constant array named locations and adds the four MKPointAnnotations. These annotations can all be added to the map using the addAnnotations() method provided by MKMapView. Add the following code just below the previous line:
myMapView.addAnnotations(locations)
This line will send a message to myMapView and tell it to add the italy, england, spain, and norway points to the map. However, there is still one more step to the process. All MKPointAnnotations must be paired with a MKPinAnnotationView. This matching takes place inside themapView(_: viewForAnnotation:) method. Place your cursor just outside the closing brace of viewDidLoad and type the following:
func mapView(mapView: MKMapView!, viewForAnnotation annotation: MKAnnotation!)
-> MKAnnotationView! {
}
This method responds to the MKMapViewDelegate event triggered when an annotation is added to the map. This is where the matching between MKPointAnnotations and MKPinAnnotationViews takes place. Inside the new mapView(_: viewForAnnotation:) method, add the following code (Figure 8-15):
func mapView(mapView: MKMapView!, viewForAnnotation annotation: MKAnnotation!)
-> MKAnnotationView! {
var pin = MKPinAnnotationView(annotation: annotation,
reuseIdentifier: "pinIdentifier")
pin.canShowCallout = true
return pin
}
Figure 8-15. viewForAnnotation method
This method is called once for each annotation added to the map. The first line sets a variable named pin to a new MKPinAnnotationView. That MKPinAnnotationView is created, and the annotation property is set to the annotation parameter.
The current MKPointAnnotation is provided inside a parameter called annotation. This can be confusing; however, it is not uncommon to see the same word used twice to represent two different variables. It is important to realize the difference between the annotation property and the annotation parameter. The annotation property, available on MKPinAnnotationView, is used to position the pin on the map. The annotation parameter is the MKPointAnnotation currently being matched to an MKPinAnnotationView (i.e., italy, england, spain, ornorway).
The reuseIdentifier for the newly created MKPinAnnotationView is set to pinIdentifier; this identifier is used to find and recycle MKPinAnnotationViews when there are large amounts of pins on a map. Finally, the new MKPinAnnotationView’s canShowCallout property is set to true. This enables the callout bubble to be shown when the pin is tapped on the map.
Place your cursor below the line myMapView.addAnnotations(locations) and then add the following lines of code:
var myRegion = MKCoordinateRegionMakeWithDistance(italy.coordinate,
5500000,5500000)
myMapView.setRegion(myRegion, animated: true)
The first line creates a variable named myRegion and sets it to a new MKCoordinateRegion. The MKCoordinateRegion is created using the MKCoordinateRegionMakeWithDistance() method. This method take a point and creates a region around it, based on the distance provided.
The second line sends a message to the map and tells it to set its region to the newly created myRegion. The zoom is animated because of the true parameter. Run the application, but this time set the test device to iPhone 6 Plus (Figure 8-16).
Figure 8-16. Completed on iPhone 6 Plus
The pins are now automatically shown when the app is launched. Stop the app and test it on an iPad Air (Figure 8-17).
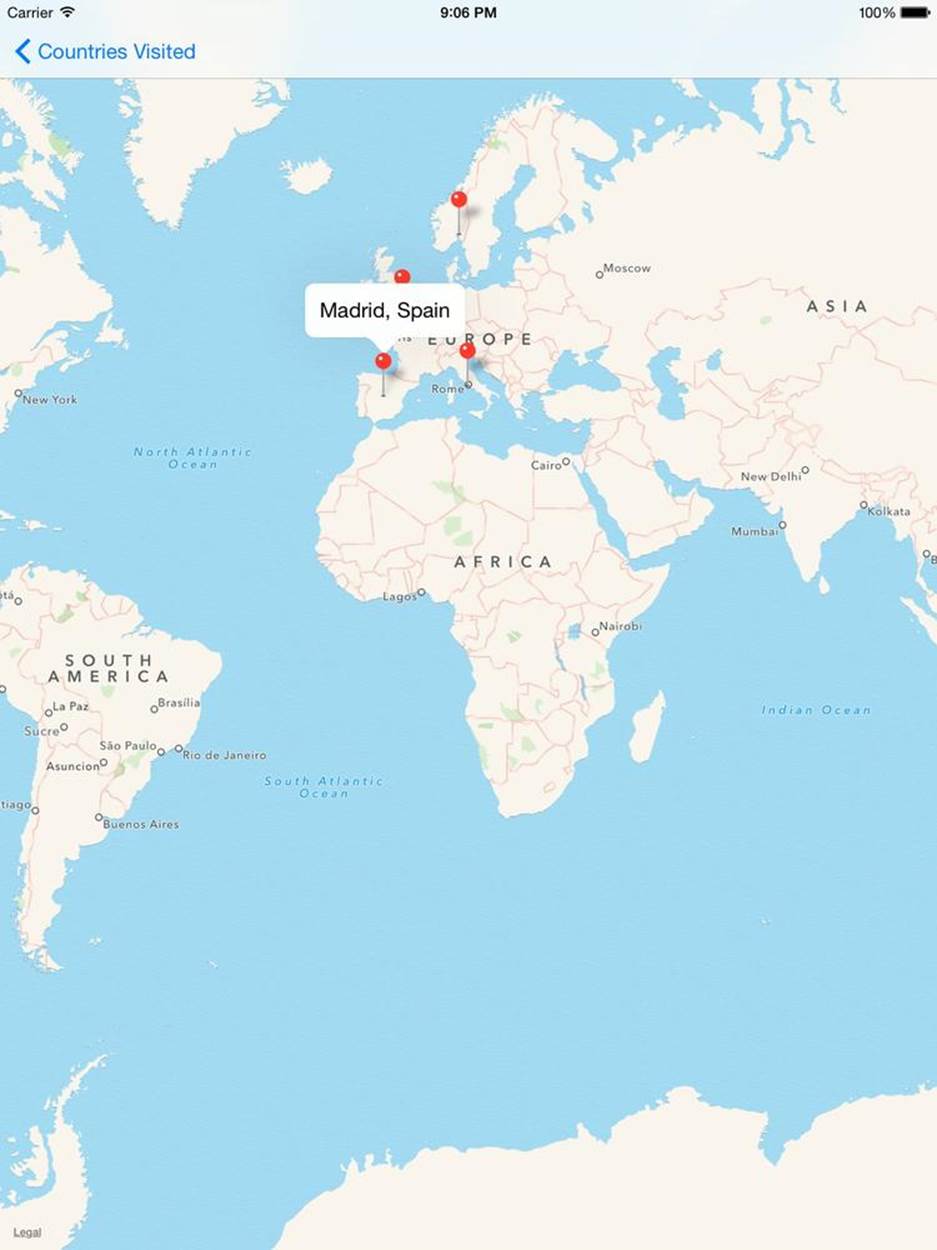
Figure 8-17. iPad Air
Notice the pins are placed in the center of the iPad’s screen. Rotate the iPad, and the map view rotates as well.
Don’t worry if you received an error, a warning, or your app did not run as expected. The best way to learn is to make mistakes. Practice makes perfect. A sample version of the project is available on AppSchool.com/book. Download it, compare it, and try, try again. Don’t be afraid to start the exercise over and walk through it until you get it right.
All materials on the site are licensed Creative Commons Attribution-Sharealike 3.0 Unported CC BY-SA 3.0 & GNU Free Documentation License (GFDL)
If you are the copyright holder of any material contained on our site and intend to remove it, please contact our site administrator for approval.
© 2016-2026 All site design rights belong to S.Y.A.