Introducing iOS 8 (2015)
Chapter 9. Camera, Photos, and Social Networks
In this chapter, you will learn how to incorporate camera functionality into your apps. You will also learn how to access photos and videos from the Photo Library. Finally, you will learn how to integrate your app with popular social networks like Facebook and Twitter. This chapter will teach you the most important pieces of the Swift language, so you can start building apps faster. These pieces were created by Apple to provide a quick and easy way to integrate the camera and connect to social networks.
UIImagePickerController
Apple provides a simple class to take and view photos or video. UIImagePickerController, shown in Figure 9-1, may look familiar because it is used in many iOS system-wide apps. UIImagePickerController can be configured to show the front or back camera’s live image right inside your app. It can also be configured to display the Photo Library and allow users to select photos or videos.
UIImagePickerController is a simple interface that is presented modally above another view controller. A modal view controller is displayed above the current view controller, like a pop-up window. The modal view controller will slide up from the bottom of the screen and must be closed by the user when complete. Modal view controllers should only be used for temporary or short-term interactions.

Figure 9-1. UIImagePickerController
A UIImagePickerController object is created like any other object. Create a variable and call the initializer:
var imagePicker = UIImagePickerController()
Cameras
Before using the UIImagePickerController, it is important to detect if and what cameras are available on the device. In some cases, a device may have a camera, but it could be unavailable. Detect a camera on the device with the following example code:
if UIImagePickerController.isSourceTypeAvailable(.Camera) {
//Camera is Available
}else{
//Camera not Available
}
If a camera is available on the device, then you can set the UIImagePickerController to use that camera to take photos and videos. To set the UIImagePickerController to camera mode, set the sourceType property to .Camera:
imagePicker.sourceType = .Camera
Many iOS devices have multiple cameras, both front and rear. To check if there is a front or rear camera available, use the isCameraDeviceAvailable method. Provide the camera location to isCameraDeviceAvailable, and the method will return a true or false response:
if UIImagePickerController.isCameraDeviceAvailable(.Front) {
//Front Camera Available
} else {
//Front Camera Not Available
}
if UIImagePickerController.isCameraDeviceAvailable(.Rear) {
//Rear Camera Available
} else {
//Rear Camera Not Available
}
If there are no cameras available on the device, the UIImagePickerController can ask the user to pick a photo or video from the Photo Library. Set the sourceType property to .PhotoLibrary to show the Photo Library picker:
imagePicker.sourceType = .PhotoLibrary
Testing on the iOS Simulator can be limited at times since it will not have a camera. It is important to never assume a device will have a camera and always check using the provided methods. To properly test the camera functionality, you must run your app on an actual iOS device. Running your app on a device will be covered in depth in Chapter 10.
Media Types
The type of media can be set to photos, video, or both. By default, both photos and videos will be available. To change this, you must import the Mobile Core Services framework.
To add the Mobile Core Services framework to your project, click the project’s name inside the Project Navigator. The project details will appear; scroll to the bottom and find the Linked Frameworks and Libraries section. Click the plus button in the bottom-left corner. TypeMobileCoreServices into the search box, select MobileCoreServices.framework, and click Add.
The MobileCoreServices.framework file will be added to your Project Navigator. Then you must add the following to the top of your view controller:
import MobileCoreServices
This line will import the Mobile Core Services framework’s classes into the view controller and make them available. There is a keyword for each media type:
kUTTypeImage
Photos and images
kUTTypeMovie
Movies and videos
Set the mediaTypes property with an array holding the appropriate values. For example:
imagePicker.mediaTypes = [kUTTypeImage]
//Only Images will be created or selected
imagePicker.mediaTypes = [kUTTypeMovie]
//Only Videos will be created or selected
Editing
Apple even provides a set of controls for scaling a photo or trimming a video. These are called editing controls. Set the allowsEditing property to true to enable them. For example:
imagePicker.allowsEditing = true
An editing screen will be added to the capture or selection workflow. You will be able to access both the edited and unedited media.
Delegates
UIImagePickerController provides delegate updates for typical user interaction. For example, a delegate update is sent when the user saves a new piece of media. To receive these updates, set the UIImagePickerController’s delegate to the current view controller. Use the selfkeyword to represent the current view controller. For example:
imagePicker.delegate = self
Also, ensure the delegate view controller conforms to the UIImagePickerControllerDelegate protocol. You can conform to the protocol by adding the following code to your view controller. For example:
class ViewController: UIViewController, UIImagePickerControllerDelegate {
Since the UIImagePickerController inherits from UINavigatonController, its delegate must also conform to UINavigatonControllerDelegate protocol. This protocol provides updates for UINavigationController events like pushes and pops. Your view controller must conform to the protocol, but the methods are optional. To conform, add the following code to your view controller:
class ViewController: UIViewController, UIImagePickerControllerDelegate,
UINavigationControllerDelegate {
Working with Images
UIImagePickerControllerDelegate has two methods for dealing with media. The first method available is called imagePickerController(_: didFinishPickingImage). This method will alert the delegate when an image has been taken by the camera or selected from the Photo Library. It will not be called if the user creates or selects a video. This method also provides a convenient UIImage parameter containing the newly formed image. To be alerted of this event, add the following code to your view controller:
func imagePickerController(picker: UIImagePickerController!,
didFinishPickingImage image: UIImage!, editingInfo: [NSObject : AnyObject]!){
}
Working with Multiple Media Types
The second, and more advanced method, is imagePickerController(_:, didFinishPickingMediaWithInfo _:). This method will alert the delegate when the user has created or selected a photo or video. If the sourceType is set to .PhotoLibrary, the method will be called after a photo or video has been selected. If the sourceType is set to .Camera, the method will be called after a photo or video has been taken and confirmed. The info parameter provides additional details about the new photo or video.
To be alerted for this event, add the following code to your view controller:
func imagePickerController(picker:UIImagePickerController,
didFinishPickingMediaWithInfo info: [NSObject : AnyObject]){
//media selected
}
The info parameter also includes a variable with its mediaType. It is very important to check the mediaType before accessing the new photo or video. Check the mediaType by accessing the UIImagePickerControllerMediaType key inside the info parameter:
var mediaType = info[UIImagePickerControllerMediaType]
The info dictionary parameter has many pieces of information about the newly created or selected content. The following keys will provide values describing the selected content:
UIImagePickerControllerMediaType
Media type such as kUTTypeImage or kUTTypeMovie
UIImagePickerControllerOriginalImage
Original uncropped image
UIImagePickerControllerEditedImage
Edited image, only if allowsEditing is set to true
UIImagePickerControllerCropRect
The cropping rectangle applied to the original image
UIImagePickerControllerMediaURL
Path on local filesystem to video file (video only)
UIImagePickerControllerReferenceURL
URL used with advanced video framework
UIImagePickerControllerMediaMetadata
Photos only, dictionary full of metadata for image
All of these keys can be accessed for additional information about the media. The most popular keys are UIImagePickerControllerMediaType, UIImagePickerControllerOriginalImage, and UIImagePickerControllerMediaURL.
Once the mediaType has been recovered, run it through an if statement to detect if it is a video or a photo. For example:
var mediaType = info[UIImagePickerControllerMediaType! as NSString]
if mediaType == kUTTypeImage as NSString {
//photo
}else if mediaType == kUTTypeMovie {
//video
}else {
//error/missing
}
Images with didFinishPickingMediaWithInfo
If the mediaType is an image, the image will be provided directly inside the info parameter. The new image can be pulled out of the dictionary and placed directly into a UIImage. A UIImage is a class used for holding an image. UIImages are commonly passed to UIImageViews.UIImageViews are like picture frames; they hold an image and the image can be changed at any time. The UIImageView displays the UIImage on the user interface. The image is available with the UIImagePickerControllerOriginalImage key. For example:
var myImage = info[UIImagePickerControllerOriginalImage] as UIImage
Setting an image to a UIImageView is straightforward. Set the UIImageView’s image property to the UIImage provided by the UIImagePickerControllerOriginalImage key:
imageView.image = myImage
Video in didFinishPickingMediaWithInfo
If the mediaType is a video, the video will not be provided inside the dictionary. Instead, a path to the video file will be provided using the UIImagePickerControllerMediaURL key. This process of using a path to the video instead of the actual video saves on memory and processing power. The path to the video can be passed to an MPMoviePlayerViewController and be played back on the user’s screen. To access the video, add the following code to your view controller:
var videoPath = info[UIImagePickerControllerMediaURL as NSURL]
MPMoviePlayerController is a class dedicated to making video playback easy. The entire video playback process is handled for you. Provide the MPMoviePlayerController the path to a video, and it will play the video and display playback controls. TheMPMoviePlayerViewController requires the Media Player framework.
To add the Media Player framework to your project, click the project’s name inside the Project Navigator. The project details will appear; scroll to the bottom and find the Linked Frameworks and Libraries section. Click the plus button in the bottom-left corner. Type MediaPlayer into the search box, select MediaPlayer.framework, and click Add.
The MediaPlayer.framework will be added to your Project Navigator. Open the view controller and place your cursor at the top under the line import UIKit. Add the following:
import MediaPlayer
This line will import the Media Player framework’s classes into the view controller and make them available. MPMoviePlayerViewController is included in this set of classes.
Next, create an MPMoviePlayerViewController like you would any other object. Then set its contentURL property:
var videoPath = info[UIImagePickerControllerMediaURL as NSURL]
var myMoviePlayerViewController = MPMoviePlayerViewController()
myMoviePlayerViewController.moviePlayer.contentURL = videoPath
Presenting UIImagePickerController
To present a new view controller, use the presentViewController method available in each UIViewController:
self.presentViewController(imagePicker, animated: true, completion: nil)
Integrating with Social Networks
Sharing to social networks has become a core feature in many a mobile app. However, integrating with each social network can be time consuming. Apple has created the Social framework to make sharing to social networks simple. Inside the Social framework isSLComposeViewController. This class provides the user with the ability to post to Twitter or Facebook. SLComposeViewController uses the Twitter and Facebook login information from the iOS Settings app. This means developers do not have to write code to authenticate with Twitter or Facebook. The interface allows the user to share text, links, and even images.
Before creating an SLComposeViewController, the Social framework must be imported into the project. Click the project’s name in the Project Navigator; the project details will be shown. Scroll to the bottom next to Linked Frameworks and Libraries. Then click the plus button in the lower-left corner and type Social into the search box. Select Social.framework and click Add. The Social.framework file will be added to the Project Navigator. Finally, open the view controller file and place your cursor under the line import UIKit. Add the following code:
import Social
Setting the Social Network
This line will import the Social framework into the view controller and make SLComposeViewController available in your code. A SLComposeViewController must have a serviceType provided when it is created. The serviceType property accepts two different options:
SLServiceTypeFacebook
SLServiceTypeTwitter
It is important to first verify that the desired service is available. To find out which service types are available on the device, use the isAvailableForServiceType(_:) method:
if (SLComposeViewController.isAvailableForServiceType(SLServiceTypeFacebook)) {
//Facebook available
}
You can create the SLComposeViewController using the _(forServiceType:) method. This method creates an SLComposeViewController for the social network provided in the forServiceType parameter:
if (SLComposeViewController.isAvailableForServiceType(SLServiceTypeFacebook)) {
//Facebook available
var myComposeViewController = SLComposeViewController
(forServiceType: SLServiceTypeFacebook)
}
Setting the Initial Text
You can also set the initial text for an SLComposeViewController. The initial text is a prewritten message that can be erased or shared by the user. To create the initial text, use the setInitialText(_:) method:
var myComposeViewController = SLComposeViewController
(forServiceType: SLServiceTypeFacebook)
myComposeViewController.setInitialText("I love this app!")
Adding Images
SLComposeViewControllers can also support images. To add an image to the user’s post, use the addImage(_:) method. This method asks for a UIImage as a parameter and attaches it to the newly composed message:
myComposeViewController.addImage(myImage)
Adding URLs
A social media post would be helpless without a link. SLComposeViewController supports adding a URL to the message as well. To add a URL, use the addURL(_:) method. This method accepts an NSURL as a parameter. An NSURL is very similar to a string; however, it is specifically used for URLs and file paths. For example:
var myURL = NSURL(string: "http://www.google.com")
myComposeViewController.addURL(myURL)
Presenting SLComposeViewController
Finally, once the SLComposeViewController is created and configured, it is time to modally present it to the user. To present a view controller modally, use the presentViewController(_: animated: completion:) method. For example:
self.presentViewController(myComposeViewController,
animated: true, completion: nil)
The SLComposeViewController will be displayed, and the user can compose and then send their social network post. If a user is not logged in to the desired social network, iOS will prompt him to log in using the Settings app.
Now it is time to put your knowledge to the test. Keep up the momentum and build your very own Selfie app.
Exercise: A Selfie App
Throughout the remaining chapters of this book, you will build an app and submit it to the App Store. The app you will build is called Selfie. Selfie allows users to snap a photo using the camera and share it to Facebook (Figure 9-2). This app will be for iPhone only and will use the newUIImagePickerController lessons from this chapter.
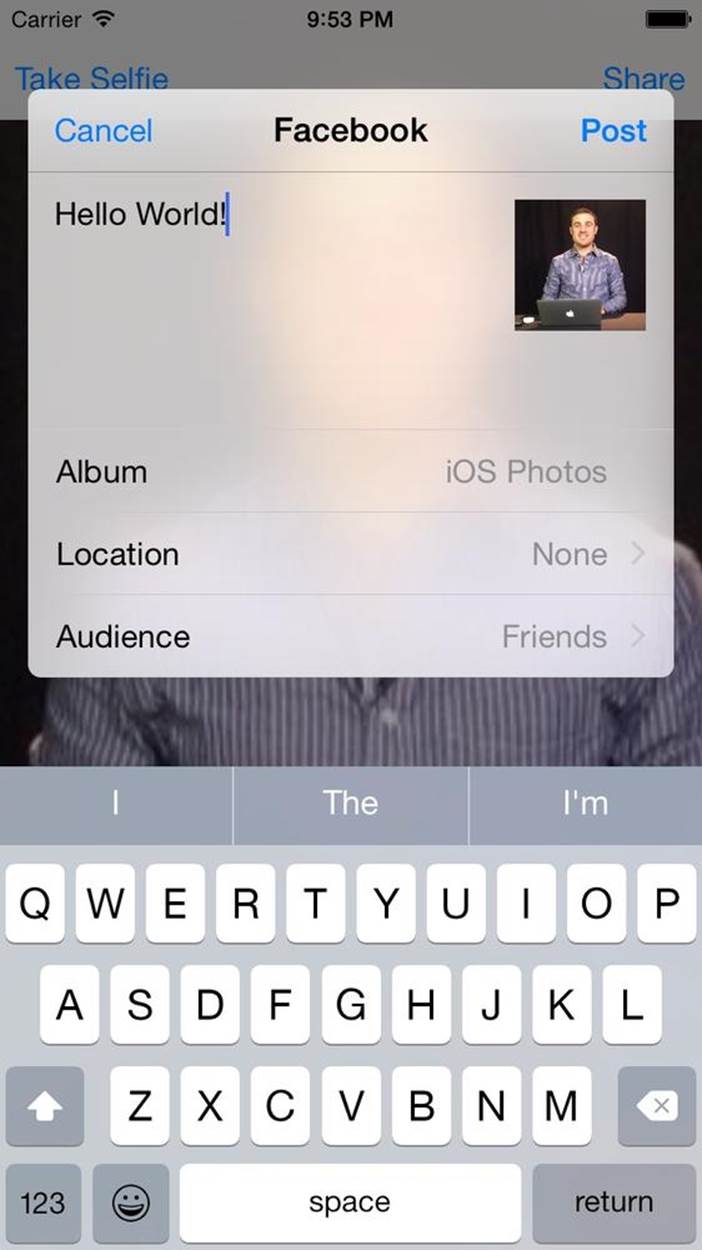
Figure 9-2. Selfie Facebook share
To begin, open Xcode from your Dock. Then select File→New Project. Select Single View Application and then click Next.
Name the product Selfie and set the Organization Name and Organization Identifier to your first and last name with no spaces (Figure 9-3). Verify that the Language is set to Swift and select iPhone from the Devices drop-down menu. Click Next. Save the project inside your Programming folder and click Create.
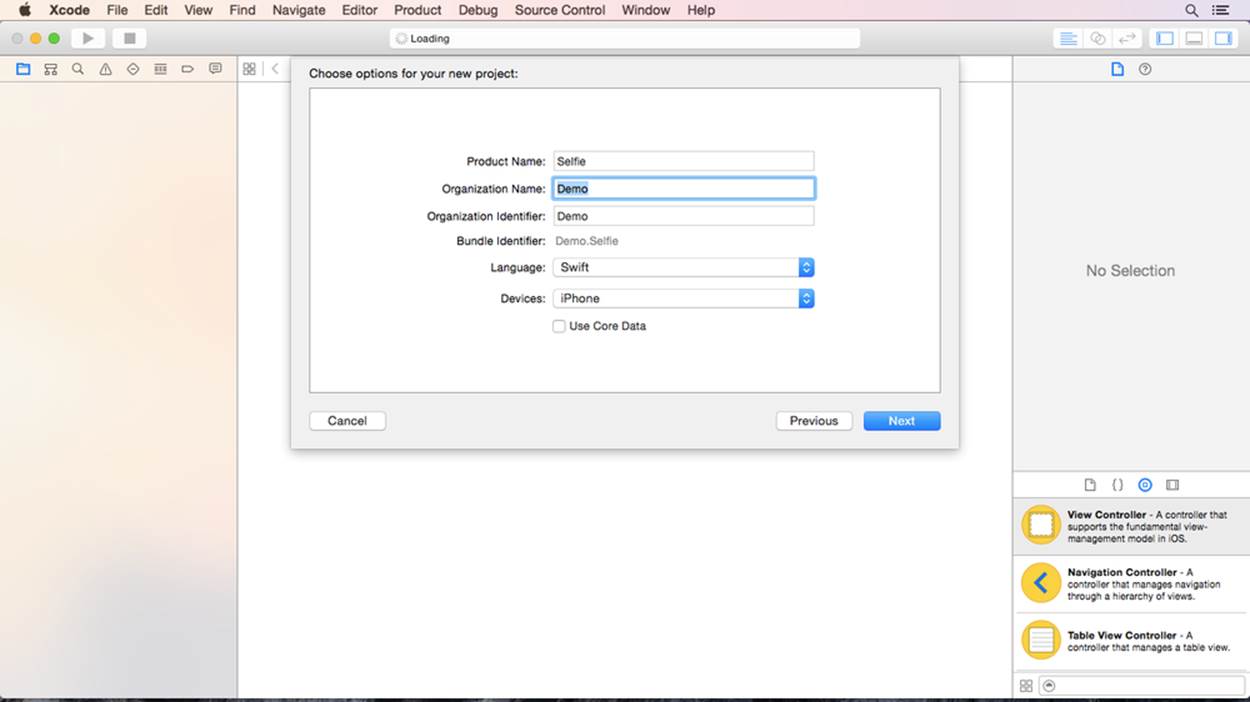
Figure 9-3. Product options
The project details will be displayed; under the Device Orientation section, deselect the Landscape Left and Landscape Right checkboxes (Figure 9-4).
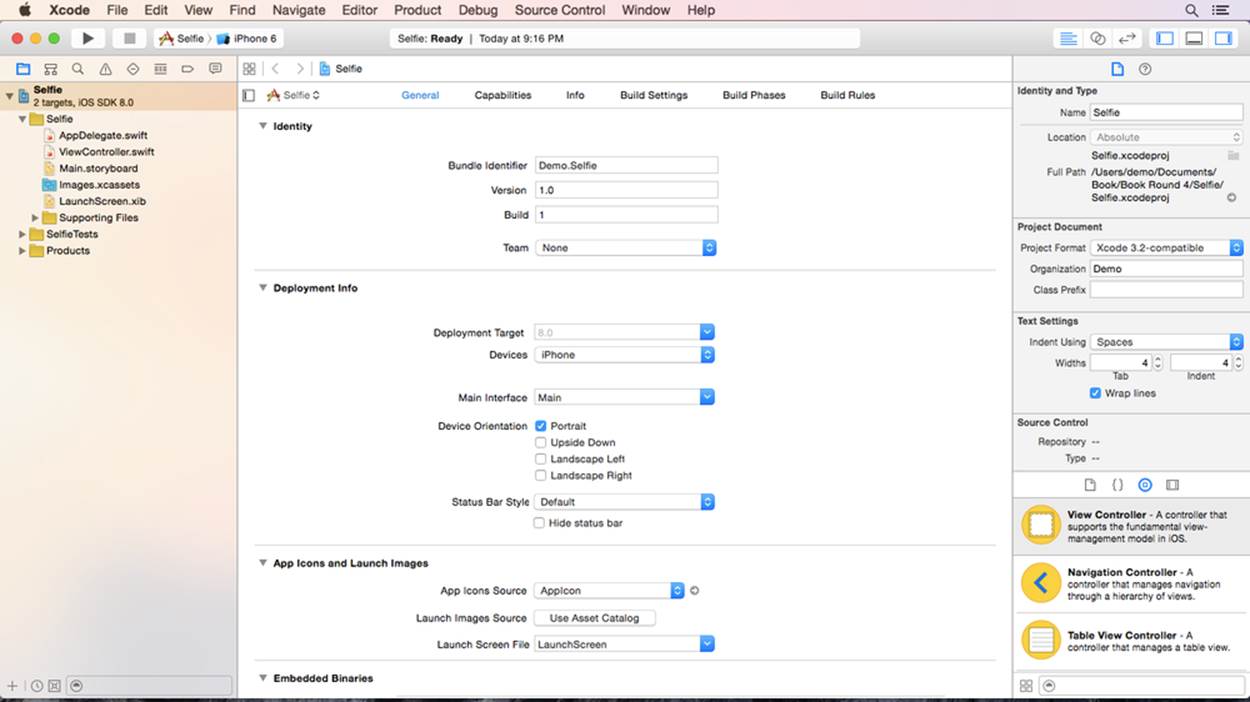
Figure 9-4. Project details
Scroll to the bottom of the project details to the Linked Frameworks and Libraries section (Figure 9-5). Click the small plus button in the bottom-left corner. Type Social into the search box, select the Social.framework file, and click Add. The framework will appear in the Project Navigator. Drag it into the Supporting Files folder if you want to hide it.
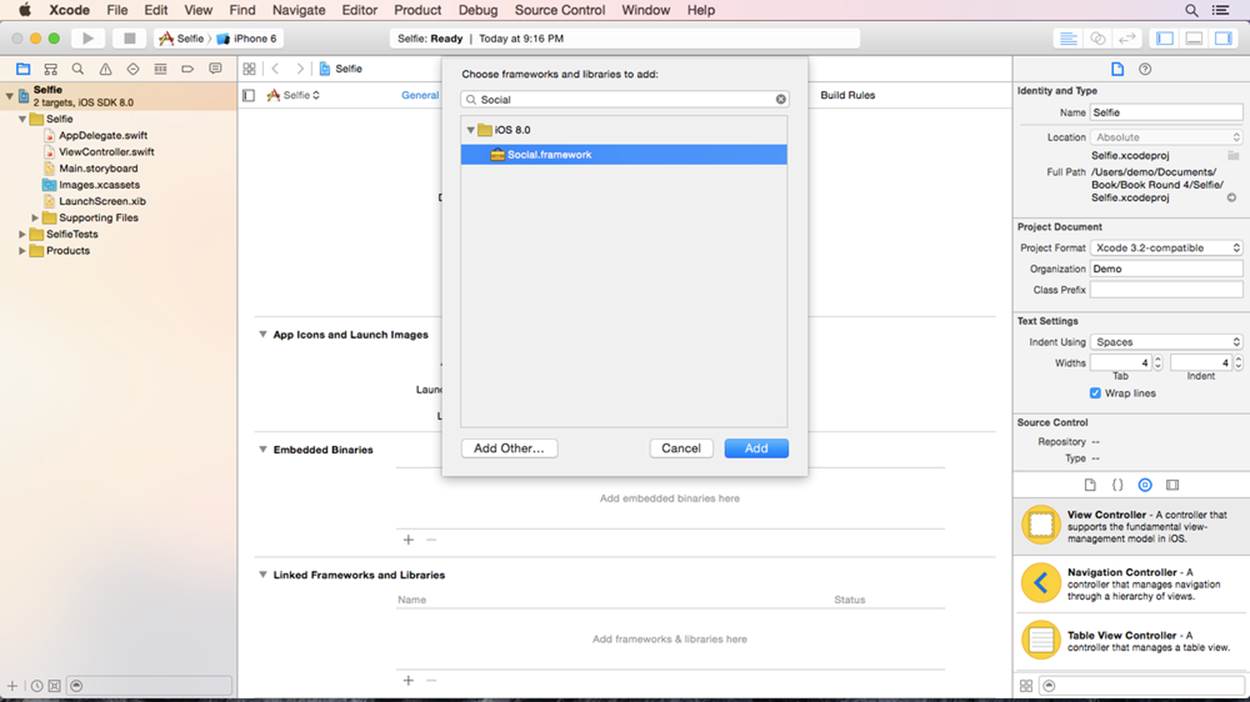
Figure 9-5. Libraries
Open the Main.storyboard file (Figure 9-6). Drag an Image View from the Object Library in the bottom right of your screen. Expand the Image View to cover the entire interface. Drag the Image View until it snaps with each edge of the interface. Select the Image View and open the Attributes Inspector. Change the mode to Aspect Fill.
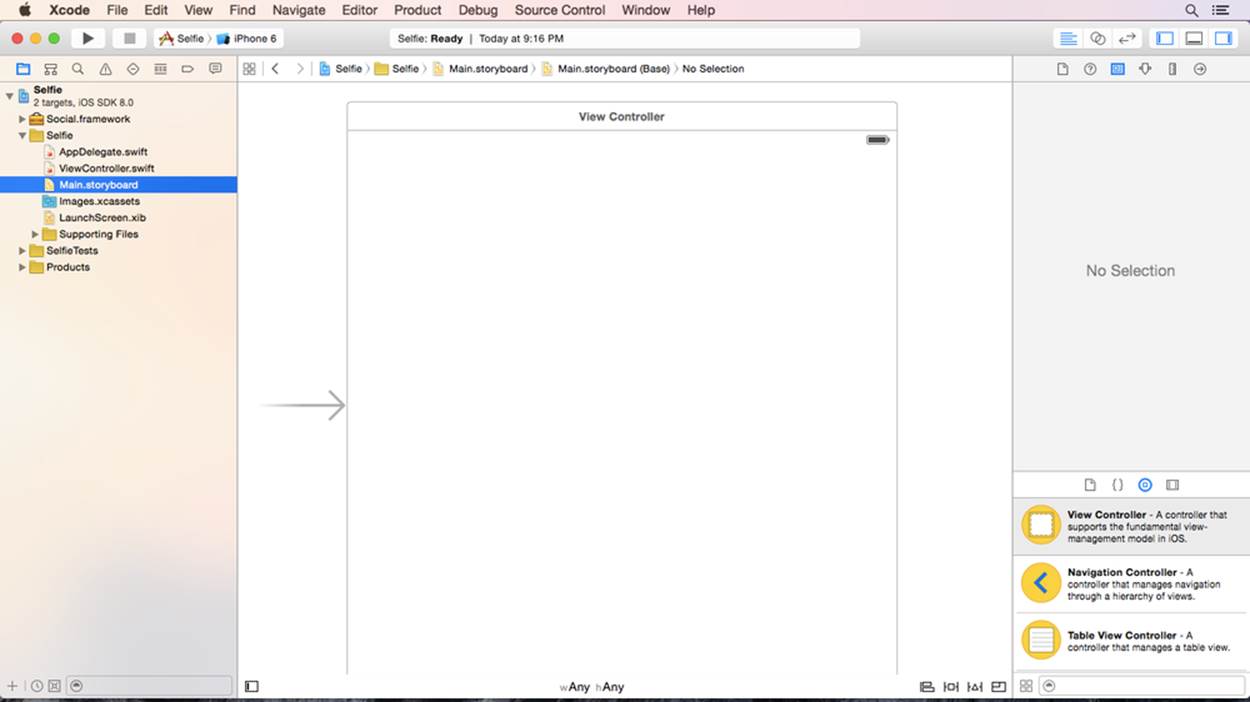
Figure 9-6. Blank storyboard
Next, select Editor→Pin→Leading Space to Superview. Then select the Image View again and click Editor→Pin→Trailing Space to Superview. Then select the Image View again and click Editor→Pin→Top Space to Superview. Finally, select the Image View again and click Editor→Pin→Bottom Space to Superview. This will ensure that the Image View fits the screen for any iPhone size (Figure 9-7).
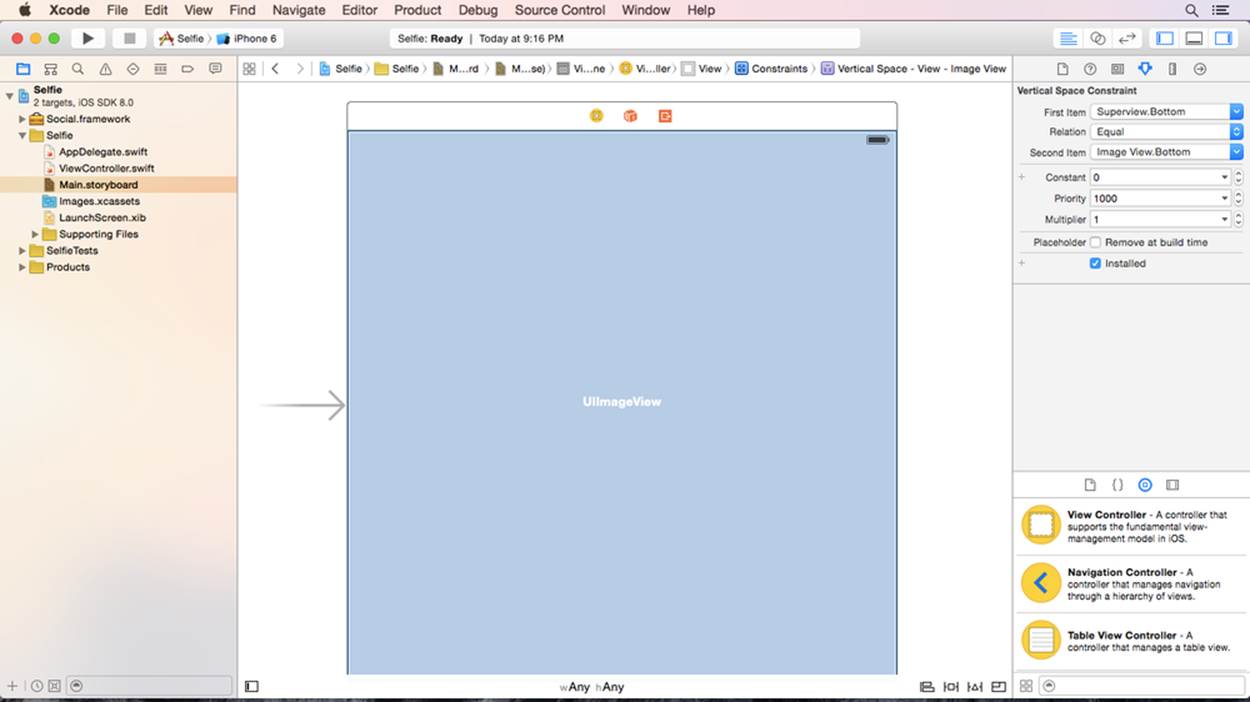
Figure 9-7. Add constraints
Next, you will add a navigation bar and two buttons to the top of the interface (Figure 9-8). Click the white bar at the top of the scene and then click the yellow circle. Next, from the top menu bar, select Editor→Embed In→Navigation Controller. A navigation bar will appear in the interface. Double-click the middle of the navigation bar and type Selfie.
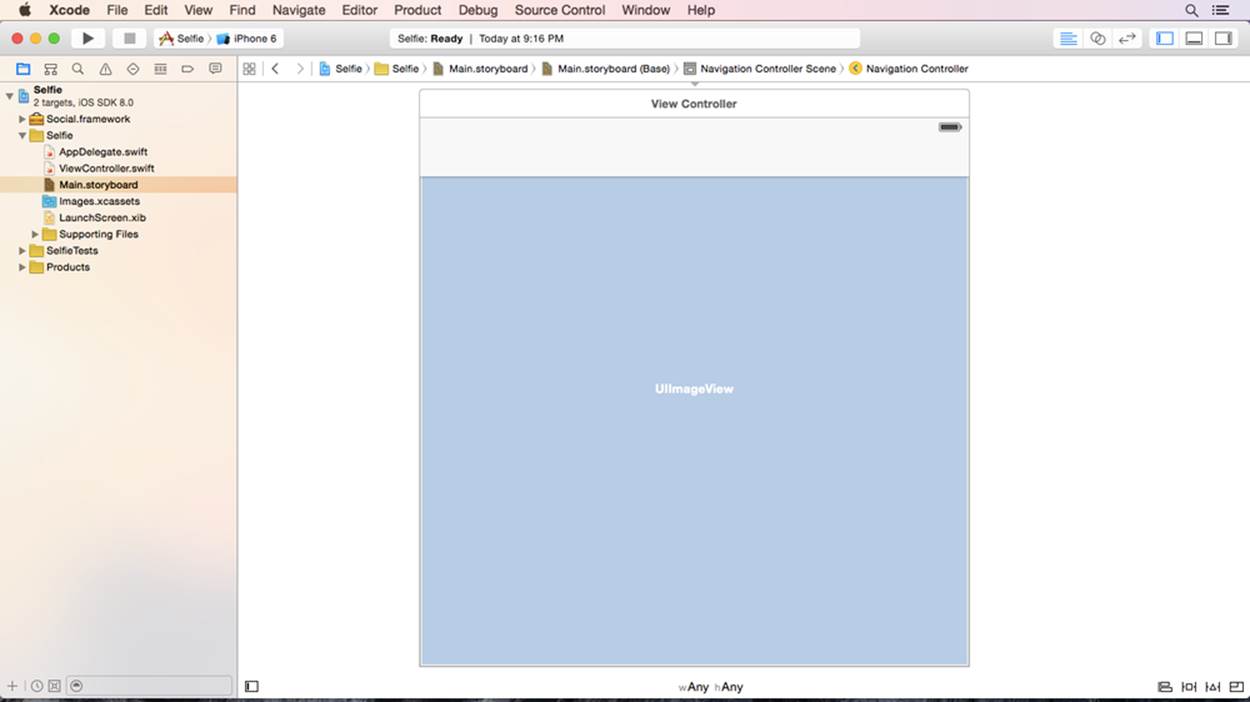
Figure 9-8. Navigation bar
Scroll back to the main view controller and drag a Bar Button Item from the Object Library. Release the Bar Button Item on the left side of the navigation bar. Double-click the Bar Button Item and change the name to Take Selfie. Pull out another Bar Button Item from the Object Library and release the Bar Button Item on the right side of the navigation bar. Double-click the Bar Button Item and change the name to Share (Figure 9-9).
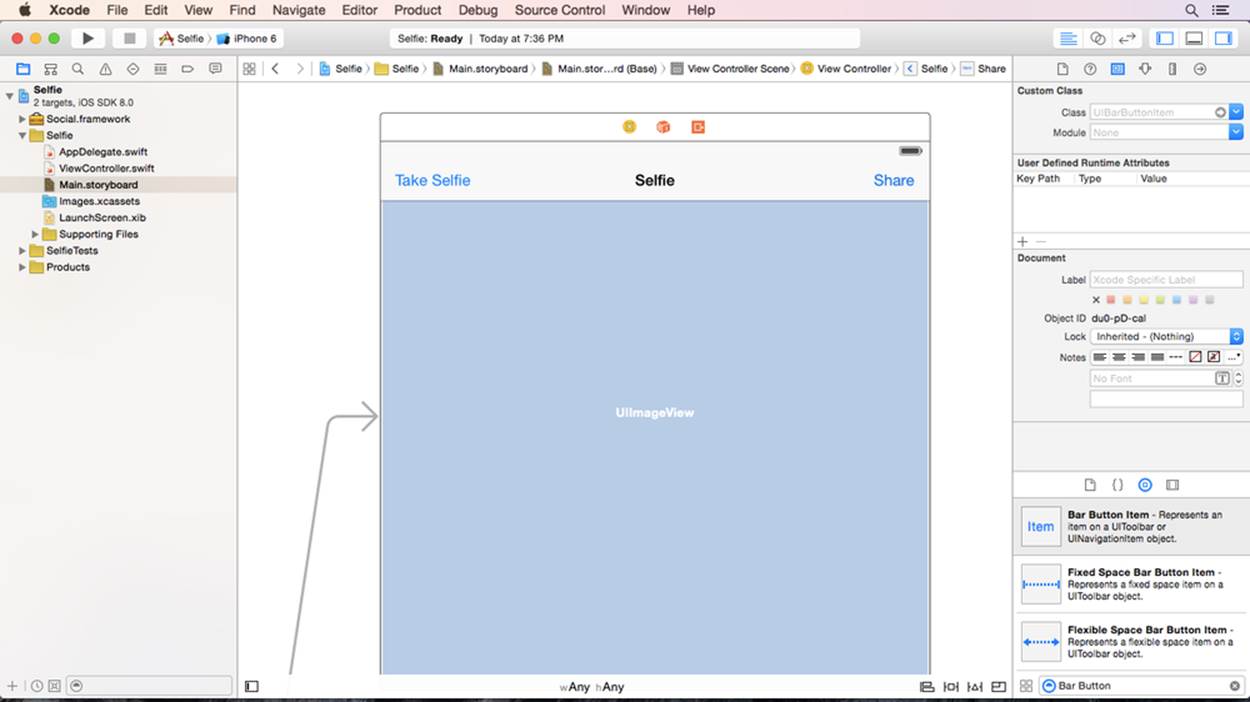
Figure 9-9. Navigation bar buttons
Now that each interface element has been positioned on the screen, it is time to connect the elements to the ViewController.swift file. Open the Assistant Editor; then hide the Inspector and Document Outline. Remove the viewDidLoad and didReceiveMemoryWarning methods.
Then, while holding the Control button, click and drag from the Image View to the Assistant Editor. Release your drag just under the line that reads class ViewController: UIViewController (Figure 9-10). A small pop-up box will appear (Figure 9-11).

Figure 9-10. Image View connection
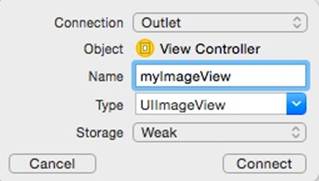
Figure 9-11. Pop-up
Verify the Outlet option is selected in the Connection drop-down menu. Name the outlet myImageView and click Connect.
While holding Control, drag from the Take Selfie button to the ViewController.swift file. Release the drag just below the line that starts with @IBOutlet (Figure 9-12). A small pop-up box will appear (Figure 9-13).
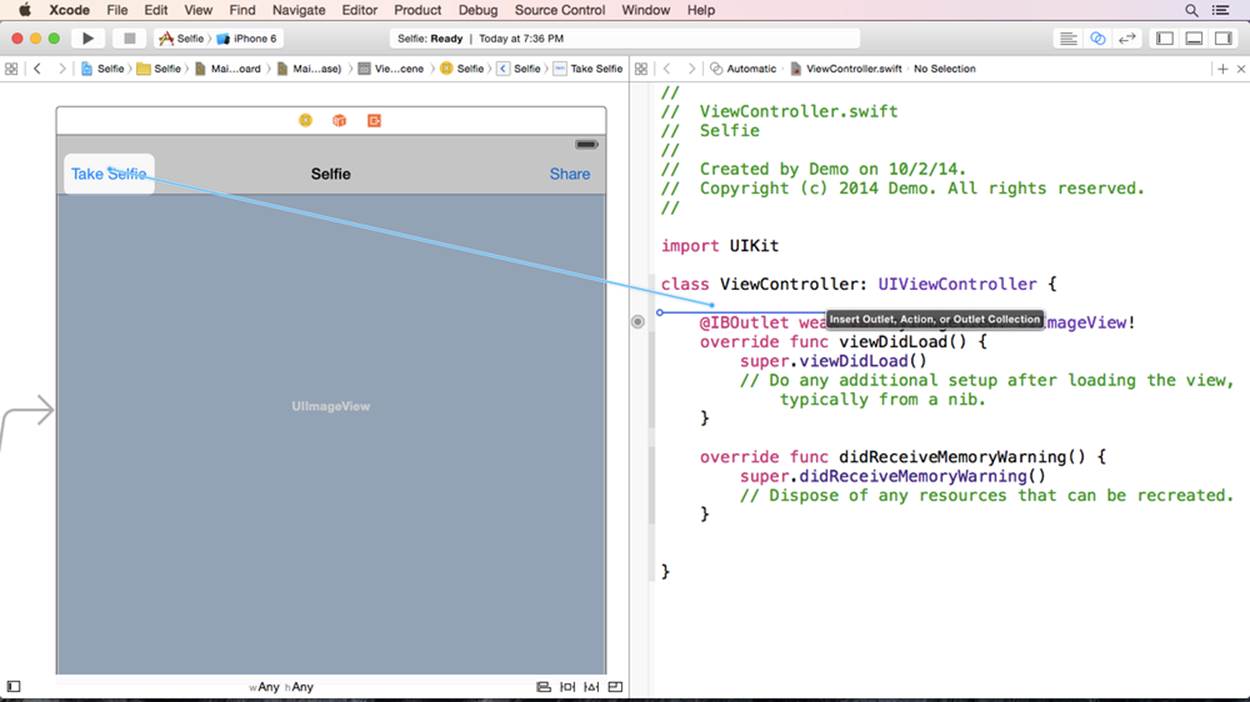
Figure 9-12. Take Selfie connection
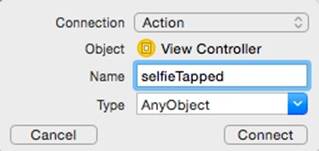
Figure 9-13. Pop-up
Change the Connection type to Action, name it selfieTapped, and then click Connect. A selfieTapped method will automatically be created inside the ViewController.swift file.
Then Control-drag from the Share button to ViewController.swift file. Release the drag just below the line that starts with @IBOutlet (Figure 9-14). A small pop-up box will appear (Figure 9-15).
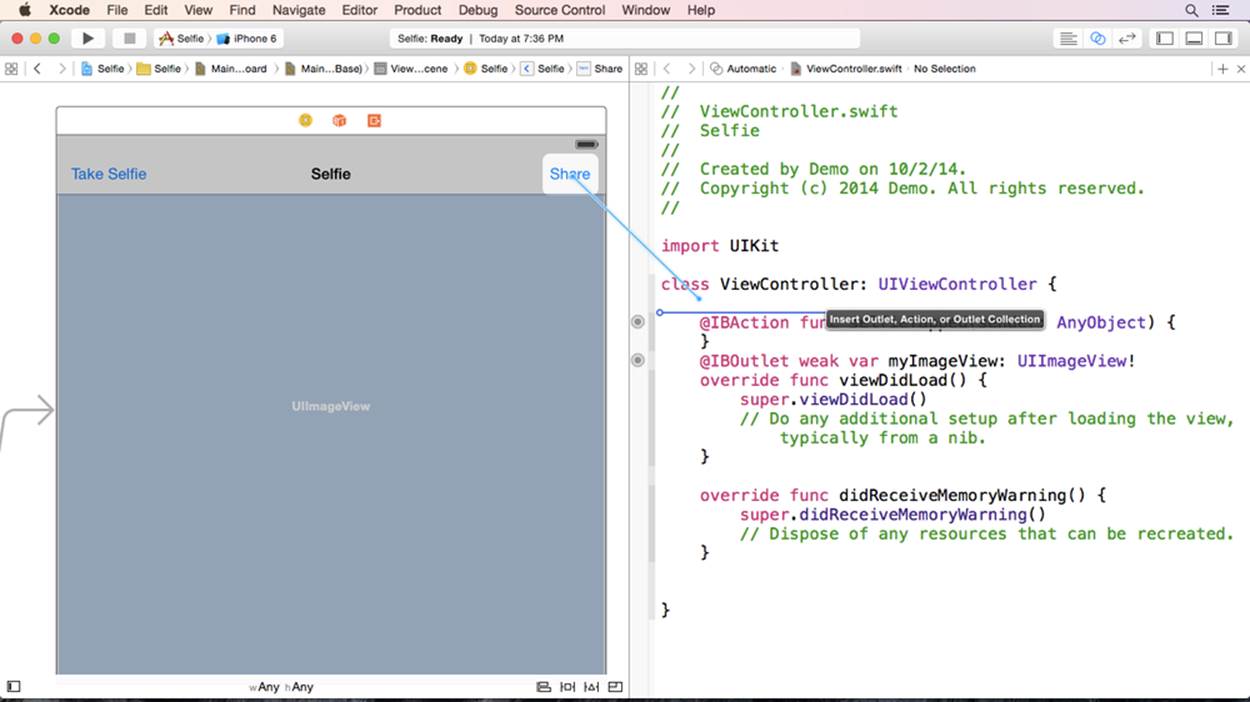
Figure 9-14. Share connection
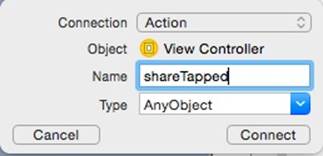
Figure 9-15. Po-up
Set the Connection type to Action. Set the name to shareTapped and click Connect. A shareTapped method will automatically be created inside the ViewController.swift file.
The interface elements are now connected to the controller. Hide the Assistant Editor and open the ViewController.swift file.
Add the following code to the selfieTapped method:
@IBAction func selfieTapped(sender: AnyObject){
var imagePicker = UIImagePickerController()
imagePicker.delegate = self
self.presentViewController(imagePicker, animated: true, completion: nil)
}
The first line of code creates a new UIImagePickerController and sets it to the imagePicker variable. The next line sets the imagePicker’s delegate property to the current view controller, also known as self. Finally, the last line presents the imagePicker modally, sliding it up from the bottom of the screen, and it animates the transition.
This new method has an error. The imagePicker.delegate line is the problem. Click the red dot, and the error message says:
Type “ViewController” does not conform to protocol ‘UIImagePickerControllerDelegate
This is Xcode letting you know the ViewController instance must conform to the UIImagePickerControllerDelegate protocol. Remember, the delegate must conform to both UIImagePickerControllerDelegate and UINavigationControllerDelegate. Add the bolded code to the top of ViewController.swift:
class ViewController: UIViewController, UIImagePickerControllerDelegate
, UINavigationControllerDelegate {
Press Command+B on your keyboard to rebuild the project. Rebuilding the project will compile and analyze all of the lines of code, but does not start the simulator. This can be a helpful tool when fixing issues.
Then place your cursor below the line imagePicker.delegate = self and add the following code:
if UIImagePickerController.isSourceTypeAvailable(.Camera) {
} else {
}
The if statement will check and see if a camera is available on the device. If so, the top portion will execute; if not, the bottom section will execute. Add the following lines of code to the top portion of the if statement:
if UIImagePickerController.isSourceTypeAvailable(.Camera) {
imagePicker.sourceType = .Camera
if (UIImagePickerController.isCameraDeviceAvailable(.Front)) {
imagePicker.cameraDevice = .Front
} else {
imagePicker.cameraDevice = .Rear
}
}
The first line inside the top portion sets the imagePicker’s sourceType property to .Camera. The next line is an if statement checking if a front camera is available. If so, the imagePicker’s cameraDevice property is set to .Front. This will enable the front camera as the default camera. If a front camera is not available, the rear camera will be used.
Add the following line of code to the bottom portion of the isSourceTypeAvailable if statement:
} else {
imagePicker.sourceType = .PhotoLibrary
}
The bottom portion of the if statement will be executed if there is not a camera available. In this case, the Photo Library should be shown. The line of code above sets the sourceType property to .PhotoLibrary (Figure 9-16). This ensures that the Photo Library will be shown if no camera is available.
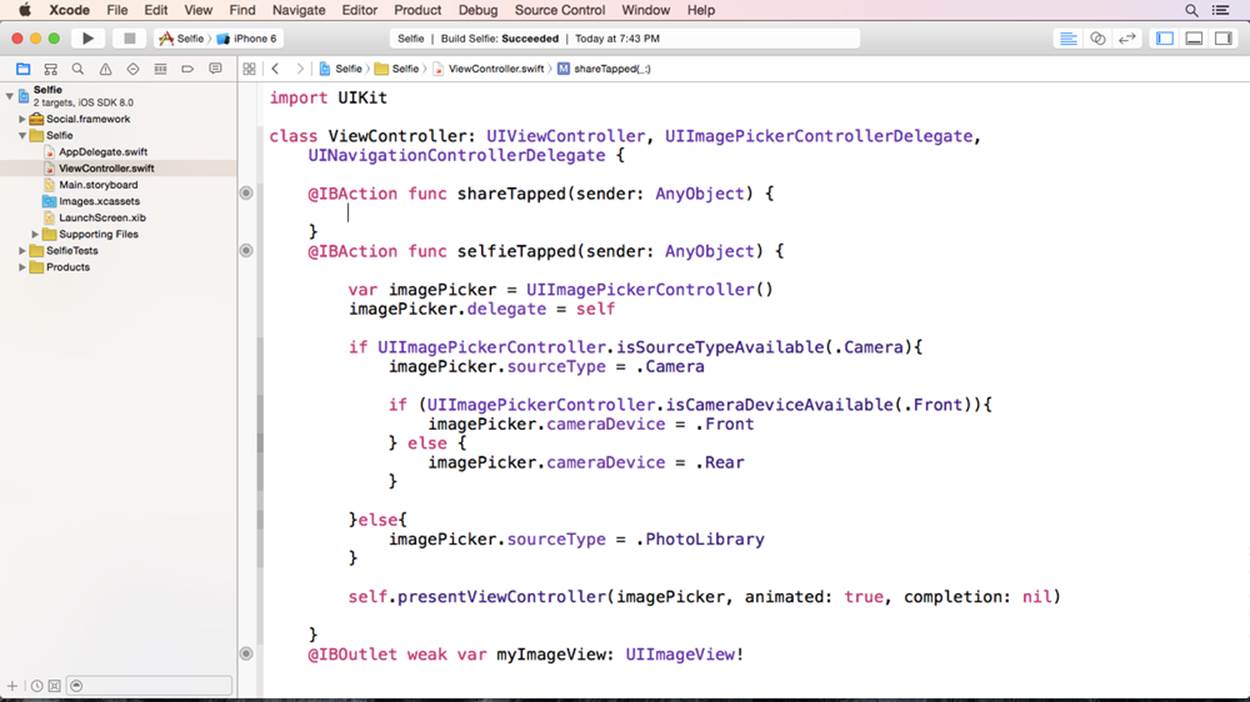
Figure 9-16. Updated code
Next, add the didFinishPickingImage delegate method. Add the following method below selfieTapped:
func imagePickerController(picker: UIImagePickerController!,
didFinishPickingImage image: UIImage!, editingInfo: [NSObject : AnyObject]!){
}
This method will be called when the user has taken a photo or has selected a photo from the Photo Library. The method has two parameters: the first is the UIImagePickerController, provided for convenience, and the second parameter is a UIImage named image. The imageparameter contains the image selected or created by the user. Add the following code to ViewController.swift:
func imagePickerController(picker: UIImagePickerController!,
didFinishPickingImage image: UIImage!, editingInfo: [NSObject : AnyObject]!){
myImageView.image = image
self.dismissViewControllerAnimated(true, completion: nil)
}
The first line takes the image parameter and displays it inside myImageView. The next line hides the imagePicker and animates the transition.
Next, place your cursor below the import UIKit line and add the following:
import Social
This will import Social.framework into ViewController.swift . Place your cursor inside the new shareTapped method. This method will be called each time the Share button is tapped. Two things must happen inside this method: the image must be added, and the Facebook post dialog must be displayed.
Add the following code to shareTapped():
var social = SLComposeViewController(forServiceType: SLServiceTypeFacebook)
social.addImage(myImageView.image)
self.presentViewController(social, animated: true, completion: nil)
The first line creates an SLComposeViewController and sets the serviceType property to Facebook. Then the myImageView image is added to the Facebook post. Finally, the SLComposeViewController is displayed, and the transition is animated.
Build and run the project. Select a photo and tap Share. An alert will be displayed stating that the iOS Simulator does not have a Facebook account associated with it. Click the Settings option and then add a Facebook account. Once this is done, stop the iOS Simulator and relaunch the app (Figure 9-17).
Figure 9-17. iOS Simulator
Don’t worry if you received an error, a warning, or your app did not run as expected. The best way to learn is to make mistakes. Practice makes perfect. A sample version of the project is available on AppSchool.com/book. Download it, compare it, and try, try again. Don’t be afraid to start the exercise over and walk through it until you get it right.
All materials on the site are licensed Creative Commons Attribution-Sharealike 3.0 Unported CC BY-SA 3.0 & GNU Free Documentation License (GFDL)
If you are the copyright holder of any material contained on our site and intend to remove it, please contact our site administrator for approval.
© 2016-2026 All site design rights belong to S.Y.A.