iPad All-in-One For Dummies, 7th Edition (2015)
Book III. iPad on the Go
 Visit www.dummies.com/extras/ipadaio for more ideas about apps that are useful to business power users.
In this book…
· Stay in touch with others and your home office while traveling
· Connect with clients by using video and FaceTime
· Find your way with the Maps app
Chapter 1. Configuring Your iPad to Connect Everywhere
In This Chapter
![]() Making Wi-Fi and 3G/4G settings
Making Wi-Fi and 3G/4G settings
![]() Tethering your iPad to your smartphone
Tethering your iPad to your smartphone
![]() Setting up a Microsoft Exchange account
Setting up a Microsoft Exchange account
This chapter is all about connecting, whether you’re connecting to the Internet via Wi-Fi, 3G, or 4G (not available on the original iPad or iPad 2) or connecting to your company network. Apple has made an effort over the years with iPhone to support enterprises, meaning that you can use the phone to connect with your company network and vital work data. The iPad continues that tradition with support for Microsoft Exchange Server, virtual private networks (VPNs), and Lightweight Directory Access Protocol (LDAP) accounts.
Your best ally in setting up the more technical of these is your network administrator. In this chapter, I give you an overview of the capabilities of iPad to connect and some guidance in making the settings you need to make.
Making Wi-Fi and 3G/4G Settings
The way people with iPads can connect to the Internet, the grandmother of all networks, is via its Wi-Fi or 3G/4G capabilities (assuming that you have a 3G or 4G model).
The third-generation (and later) iPad and the iPad mini offer Wi-Fi only or Wi-Fi and 3G/4G, which gives you the ability to connect to a super-fast 4G LTE network; if a 4G network isn’t available (and they aren’t yet in many areas), your 4G iPad can still access several types of 3G networks including GSM/UMTS networks around the world.
In this section, I go into the settings you can make to manage your Wi-Fi or 3G/4G connection.
Making Wi-Fi settings
Book I, Chapter 5 gives you the information you need to connect to a Wi-Fi network, a matter of simply signing in to the network, with a password, if necessary. Now it’s time to go over some of the finer points of your Wi-Fi connection.
A basic Wi-Fi setting tells iPad to automatically search for and join networks that are in range. If several networks are in range, using this setting, iPad joins the one that it used most recently.
After iPad has joined a network, a little Wi-Fi icon appears in the status bar. The number of dots indicates the strength of the signal, just as you’re used to seeing on your cellphone.
To get to Wi-Fi settings, tap Settings on your Home screen and then tap Wi-Fi (see Figure 1-1).
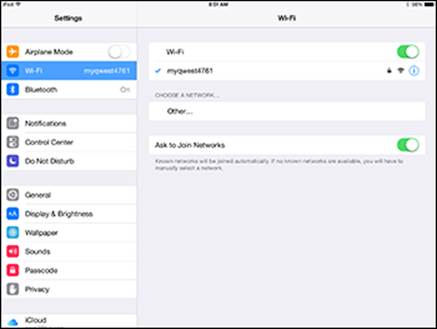
Figure 1-1: Wi-Fi settings.
Here’s a rundown of the items you can work with in Settings for your Wi-Fi configuration:
· Wi-Fi On/Off: Simply tap this switch to On to turn on Wi-Fi. If you want it off, perhaps to avoid battery drain or because you’re on an airplane and the pilot tells you to, set this to Off. (Note that iPads also have an Airplane Mode setting, which I discuss in the next section.)
· The network you’re currently connected to: The current connection is listed. Tap it to change any settings for it or to disconnect.
· Other: If you want to join a network that doesn’t appear on the list, tap Other under the Choose a Network section of these settings. In the dialog that appears, enter the network name and choose a type of security, such as WEP or WPA. When you choose a form of security and return to the dialog shown in Figure 1-2, the Password field appears. Some networks might need other information, such as a username or static IP address, to complete this dialog. Check with your administrator for any information you can’t provide.
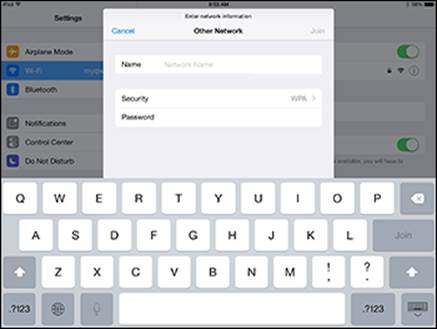
Figure 1-2: Accessing a closed network.
· Ask to Join Networks: iPad automatically connects to the previously joined network. With this setting on, an alert will appear asking if you want to join other networks that you come in range of. Tap this switch to the On position, and iPad displays all possible network connections. If a network requires a password, it sports a padlock symbol. If no known networks are available, you’re asked whether you want to join unknown networks. To forget a network so that iPad doesn’t join it automatically, tap the Information icon on the right of the network name and then tap Forget This Network.
 To adjust settings for individual Wi-Fi networks, tap the Information icon to the right of a listed network.
You can set up Home Sharing to share music and video content from your Mac or PC with your iPad if they are on the same network and have the same Home Sharing ID as your iPad. See Book V, Chapter 1 for more about Home Sharing.
Making 3G/4G settings
When you own a Wi-Fi+Cellular model of iPad, in addition to modifying Wi-Fi settings as covered in the preceding section, you can make changes to your cellular data in Settings. Cellular Data settings enable you to manage data roaming and your account information (see Figure 1-3). You can use these settings to sign up for a data plan by entering your name, phone number, and credit card information; when you submit this information, your account is set up with your provider with a unique phone number associated with the account. You need this phone number to speak to customer representatives about your account.
You can find the following items under the Cellular Data category in Settings:
· Cellular Data: Turn 3G/4G on or off here.
· Enable LTE: To enable your iPad to search for and connect to LTE networks, turn on this setting. Data may load faster using LTE, but remember that downloading still takes a toll on your battery life.
· Data Roaming: Data Roaming is a feature of cellular networks that takes advantage of other carriers’ networks, if you’re out of range of your primary carrier’s network. Using data roaming can result in additional charges, so you may want to turn it off when you don’t need it.
· View Account: Tap this setting to view account information.
· Add a SIM PIN: You may want to protect the data on your SIM card from prying eyes. Beyond setting a password to unlock your iPad, you can assign a PIN to your SIM card here. When you’ve assigned a PIN, whenever you try to use a new SIM card or restart your Wi-Fi or 3G/4G iPad, you have to enter the password. Don’t forget your PIN, though, or you can’t unlock your SIM card.
With any Wi-Fi and 3G/4G model iPad, you also have access to the Airplane Mode setting in both the Settings and Control Center. This setting allows you to disable wireless features of your device as required by airline regulations when you’re on an airline flight. With Airplane Mode turned on, you won’t be able to browse, email, sync, buy stuff online, or stream videos (which you would only be able to do with a 3G/4G model a few miles up in the sky) unless the airline provides Wi-Fi. If it does, you can use the Wi-Fi only setting in the Control panel to enable this, but do turn it off before takeoff and landing. Also, the GPS locator of Maps won’t work, but you can play content that you’ve downloaded, play games, and create documents in apps like Pages and Numbers. Just don’t forget to turn off the Airplane Mode setting when you land!
Connecting with Personal Hotspot or iPhone Tethering
If you want to connect your Wi-Fi–only iPad to your smartphone to go online when out of range of a Wi-Fi network, you can tether the iPad to the phone using Verizon’s, T-Mobile’s, or Sprint’s Personal Hotspot or AT&T’s iPhone 3G/4G Tethering. Tethering with any of these services allows your iPad to tap into your phone’s data connection to go online. You can get a connection anywhere your phone gets a connection — even if you have a Wi-Fi–only iPad model.
Tethering involves a few challenges. You don’t go online instantly because you have to complete a few steps first, the connection speed might be a tad slow, and it can drain your phone battery quickly.
After you’re comfortable with the trade-offs of the tethering option, you need to do two things:
1. Add the tethering option for your carrier on the carrier’s website by logging in to your account and adding the feature.
This can come with a cost; for example, with AT&T you might pay for tethering support (based on GB of usage) anywhere from $50 to $100 at the time of this writing.
2. Make the setting on your iPad turn on the tethering service feature by doing the following:
1. Tap the Settings icon.
2. Tap Wi-Fi.
3. Tap the tethering service in the Choose a Network section and make settings specific to your carrier.
Sprint, AT&T, T-Mobile, and Verizon pricing and features for iPad Air 2/mini 3 vary. For example, Verizon offers an individual plan at $45 a month and a family plan called More Everything for up to 4 lines for $140. AT&T offers 3GB of data for $30 a month and 40GB of data for a family for $150. You need both a basic data plan and a tethering feature plan which could cost an additional $50, which can add up. Still, if you often wander into areas that have no Wi-Fi and you don’t have a 3G or 4G iPad, it may — or may not — be more cost effective to use this feature.
Connecting to an Enterprise
Microsoft Exchange support opens possibilities for connecting with an enterprise network and its data remotely. If you work at a company using Microsoft Exchange and use an iPad, this is very good news.
Thanks to these enterprise features, here are some of the things you can do to connect to your organization’s network and data.
Setting up a configuration profile
Microsoft Exchange is a messaging standard that allows the exchange of information between networks. With a configuration profile in place, you can set up a Microsoft Exchange account on your iPad. A configuration profile is a way for the network administrator at your enterprise to set up your iPad to use the systems in your company, via Microsoft Exchange or a VPN (virtual private network), which controls access to corporate email or contacts.
Your administrator should check out the Enterprise Deployment Guide and the iPad Configurator utility from Apple (www.apple.com/support/ipad/enterprise) to set up a configuration profile. After a configuration profile is in place, it can be emailed to you or placed on a secure web page. Alternatively, your company’s network administrator can install a configuration profile on your iPad for you.
When you receive a configuration profile, you can install it yourself by opening the message and tapping the file. Tap Install and enter any information that’s requested, such as your password.
Setting up a Microsoft Exchange account
Many companies use Microsoft Exchange to exchange their email, contacts, and calendar information with devices. iPhone has supported Microsoft Exchange for a while now, and iPad carries on the tradition. You can use Microsoft Exchange to wirelessly sync that information to your iPad from your corporate network.
One benefit of a connection with Microsoft Exchange is that your IT administrator can wipe the data and settings off a device remotely by using a command in Exchange if it’s lost or stolen, keeping those confidential business contacts private. Another option for erasing content on a lost device is to use iCloud’s Find My iPad feature, covered in more detail in Book I, Chapter 9.
To set up Microsoft Exchange, follow these steps:
1. Tap Settings.
2. Tap Mail, Contacts, Calendars.
3. Tap Add Account.
4. Tap Exchange.
5. Enter your account information in the dialog shown in Figure 1-3 (email address, password, and a description) and then tap Next.
The iPad then uses Microsoft’s Autodiscover feature to verify your Exchange server.

Figure 1-3: Exchange settings.
6. If your iPad can verify your information, tap Save and you’re all set.
If it can’t, you may have entered incorrect information. Check with your network administrator to get the info you need.
When you’re setting up a Microsoft Exchange account, you can choose which items you want to sync with, including your email, contacts, or calendar. You get choices for how existing data on your iPad is handled (merged, kept in a separate account, or overwritten).
Setting up an LDAP account
You can also set up a Lightweight Directory Access Protocol (LDAP) account. LDAP accounts allow you to search for contacts on an LDAP server, which many organizations use to store data, and access them through iPad Contacts.
Here’s how to set up an LDAP account on your iPad:
1. In Settings, tap Mail, Contacts, Calendars.
2. Tap Add Account.
3. Tap Other.
4. Tap Add LDAP Account.
5. Enter your LDAP account information (see Figure 1-4) and then tap Next to verify the account.
6. Tap Save.
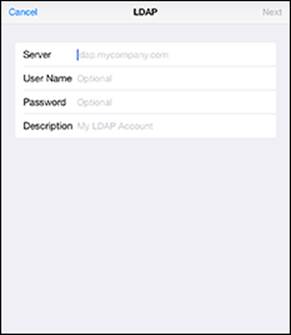
Figure 1-4: The LDAP settings.
When you’ve set up this type of account, contacts imported from the account appear as a group in the iPad Contacts app as with any group. To see these contacts, your iPad has to be connected to the Internet because they aren’t stored locally (meaning that they’re stored on your company’s servers). If necessary, check with your company’s network administrator for information about your network and LDAP requirements.
Setting up a virtual private network
If you want to be able to connect to your organization’s network, you may be able to use a virtual private network, or VPN. A VPN, which works over both Wi-Fi and 3G/4G cellular data connections, allows you to access data securely whether you’re using a network outside your company — such as at home or in a café — to access the servers inside your company’s network. After a VPN is set up at your company, you can use VPN settings on your iPad to connect to your company network.
You might need to ask your network administrator for information on how to make settings for accessing a VPN. If you’ve set up VPN on your computer, you should be able to use the same VPN settings on your iPad. You might want to let your admin know that iPad can connect to VPNs that use the L2TP, PPTP, or Cisco IPSec protocol.
To add a new VPN configuration, go to Settings and tap General⇒VPN⇒Add VPN Configuration. The settings shown in Figure 1-5 appear. Fill in the information requested and tap Save.
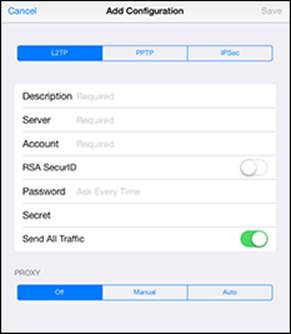
Figure 1-5: The Add Configuration settings.
You can have multiple VPNs set up, for example if you consult with several companies with their own VPNs. Tap the one you want to use, and then set the VPN switch to On. To switch VPNs, disconnect from one, select the new one, and then turn VPN back on. Only one VPN can be active at any time. To delete a VPN configuration, tap the blue arrow to the right of the configuration name in the General settings and then tap Delete VPN.
Have your administrator check out third-party tools that help to enable the use of the corporate network by remote iPad users. Good for Enterprise helps a user manage and update smartphone-like standards if that person’s company has no single standard. Array Networks provides the iPad app Desktop Direct – My Desktops that, along with Citrix Receiver software, helps users access their desktop from afar.
Status icons
In case you’re wondering what the icons in the status bar on top of the iPad screen mean relative to your connections, here’s a rundown:
|
Icon |
Meaning |
|
|
Airplane mode is on, and your Wi-Fi and 3G/4G connection capabilities are turned off. |
|
|
A 3G/4G network is available. |
|
|
A carrier’s EDGE (2G) network is available. |
|
|
A GPRS (2G) network is available. |
|
|
Your iPad has a Wi-Fi Internet connection. The more bars you see, the stronger your connection. |
|
|
Network or data-syncing involving a third-party app is detected. |
|
|
You’re connected to a VPN network. |
All materials on the site are licensed Creative Commons Attribution-Sharealike 3.0 Unported CC BY-SA 3.0 & GNU Free Documentation License (GFDL)
If you are the copyright holder of any material contained on our site and intend to remove it, please contact our site administrator for approval.
© 2016-2026 All site design rights belong to S.Y.A.