iPad All-in-One For Dummies, 7th Edition (2015)
Book III. iPad on the Go
Chapter 2. Finding Your Way with Maps
In This Chapter
![]() Going to your current location
Going to your current location
![]() Knowing where you’ve been
Knowing where you’ve been
![]() Finding directions, info, and more
Finding directions, info, and more
![]() Conveying location information beyond maps
Conveying location information beyond maps
![]() Getting turn-by-turn navigation help
Getting turn-by-turn navigation help
You may have used a maps app on a smartphone before. The big difference with the iPad is its large screen, on which you can view all the beautiful map visuals, traffic flow, and streets in standard views and even 3D as long as you have an Internet connection. You can also display a map and written directions simultaneously or have Maps speak your directions, guiding you as you drive with your 3G/4G iPad.
You will find lots of great functions in the Maps app, including getting directions with suggested alternative routes from one place to another by foot or car. You can bookmark locations to return to them again. And the Maps app makes it possible to get information about locations, such as the phone numbers and web links to businesses. You can even add a location to your Contacts list or share a location with your buddy using Mail, Message, Twitter, or Facebook.
Be prepared: This app is a fun way to find your way in the world.
Getting Where You’re Going
The first duty of a map is to get you where you want to go. The Maps app can go directly to wherever you are or to any other location you wish to visit. You can also use tools that help you find different views of locales by displaying streets, terrain, or aerial views or zooming in and out for various levels of detail. In this section, you find out how to use Maps to get around.
Going to your current location
The iPad is pretty smart; it can figure out where you are at any point in time and display your current location using GPS technology (with a 3G/4G model) or a triangulation method (Wi-Fi model). You must have an Internet connection and turn Location Services on in the Privacy pane in Settings; your location can be pinpointed more exactly if you have a 3G or 4G iPad, but even Wi-Fi models do a pretty good job, and they do even better when you’re surrounded by hotspots.
To display your current location in Maps, follow these steps:
1. From the Home screen, tap the Maps icon.
2. Tap the Current Location icon (the arrow shown in the lower-left corner of Figure 2-1).
Your current location is displayed with a pin in it and a pulsating blue circle around it (see Figure 2-1). The circle indicates how accurate the location is — it could actually be anywhere within the area of the circle.
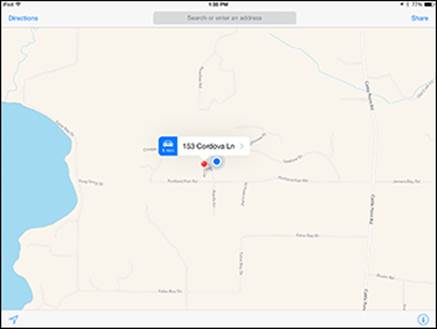
Figure 2-1: Go to your current location quickly to see where you are.
 Having trouble getting Maps to work? That could be because if you turn off Location Services in Settings, Maps can’t find you. Go to Settings and in the Privacy setting, make sure that Location Services is set to On for the Maps app.
3. Double-tap the screen to zoom in on your location.
Additional methods of zooming in and out are covered in the “Zooming in and out” section, later in this chapter.
 If you don’t have a 3G/4G version of iPad, your current location is a rough estimate based on a triangulation method. Only 3G- and 4G-enabled iPads with GPS can really pinpoint your location. Still, if you type a starting location and an ending location to get directions, you can get pretty accurate results even with a Wi-Fi–only iPad.
Changing views
The Maps app offers three views: Standard, Satellite, and Hybrid. You see the Standard view by default the first time you open Maps. Here’s what these views offer:
· Standard: Your basic street map that you might find in any road atlas
· Satellite: An aerial view
· Hybrid: A satellite view with street names included
 Another cool app for those who like their maps of the topographical variety is Topo Maps for iPad from Phil Endecott ($7.99). This app taps into the United States Geological Society (USGS) and Canadian topographical maps and is great for planning that next trek into the wilderness.
Follow these steps to switch among the views in Maps:
1. With Maps open, tap the Information button in the bottom-right corner of the screen and reveal the Maps popover, shown in Figure 2-2.
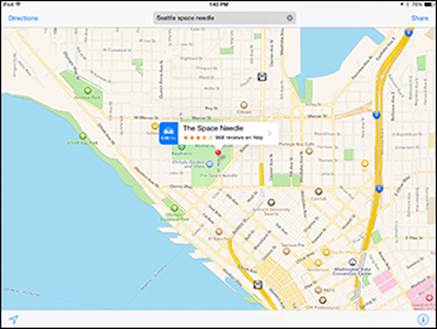
Figure 2-2: The controls for Maps are displayed when you tap the Information button.
2. Tap the Satellite option.
The Satellite view, shown in Figure 2-3, appears.
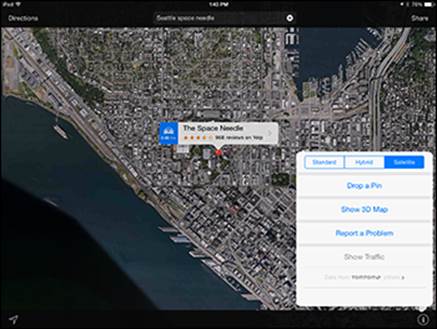
Figure 2-3: Using Satellite view, you look at a location from the sky.
3. Tap to reveal the menu again and tap Hybrid, as shown in Figure 2-4.
Doing this displays a Satellite view with street names superimposed.
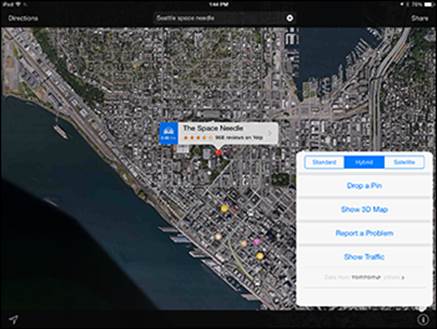
Figure 2-4: Street names and highway numbers appear in Hybrid view.
4. Tap the Show 3D Map button in the Maps popover.
A 3D effect is applied to whatever view is displayed (see Figure 2-5).
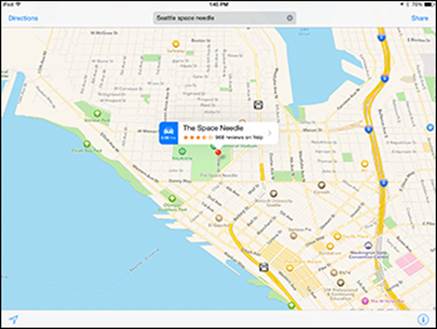
Figure 2-5: 3D seems to rotate and slant the map before your eyes.
You can drop a pin to mark a location on a map that you can return to. See the “Dropping a pin” section, later in this chapter, for more about this feature.
You can also turn on a feature that displays an overlay on the Standard map to show current traffic conditions. (The Show Traffic setting is shown earlier in Figure 2-2.) This feature works best in major metropolitan areas and displays red dashes on roads indicating accidents or road closures, and orange dashes to indicate traffic slowdowns to help you navigate your rush-hour commute or trip to the mall.
To print any displayed map to an AirPrint-compatible printer, just tap Share in the top-right corner and then tap the Print button.
Zooming in and out
If you’ve used an online mapping program, you know that you frequently have to move to more or less detailed views of the map to find what you’re looking for: The street detail doesn’t show the nearest highway, and the region level doesn’t let you see that all-important next turn. You’ll appreciate the feature in the Maps app that allows you to zoom in and out to see more or less detailed maps and to move around a map.
You can use the following methods on a displayed map to zoom in and out and move around a map:
· Double-tap with a single finger to zoom in and reveal more detail.
· Double-tap with two fingers to zoom out and reveal less detail.
· Place two fingers together on the screen and move them apart to zoom in.
· Place two fingers apart on the screen and pinch them together to zoom out.
· Press your finger to the screen and drag the map in any direction to move to an adjacent area.
It can take a few moments for the map to redraw itself when you enlarge, reduce, or move around it, so have a little patience. An area that’s being redrawn will look like a blank grid but will fill in, in time. Also, if you’re in Satellite or Hybrid view, zooming in may take some time; wait it out because the blurred image will resolve itself.
Going to another location
If you’re at Point A and want to get to Point B — Calcutta, Des Moines, or wherever — you need to know how to find any location other than your current location using Maps. Doing this involves entering as much information as you have about the location’s address in the Search field.
Try going to another location using these steps:
1. With Maps open, tap in the Search field.
If you don’t see the Search field in the upper-right corner, you may have to tap the Clear button.
The keyboard opens (as shown in Figure 2-6).
2. Type a location, using a street address with city and state, a stored contact name, or a destination, such as Empire State Building or Detroit airport.
Maps may make suggestions as you type if it finds any logical matches.
Tap the Dictation key (not available on iPad 2) on the onscreen keyboard (refer to Figure 2-6) and speak a location to iPad if you prefer. Tap in the Search field and then tap the Dictation key and say the location; tap the Dictation key or in the Search field again and what you’ve spoken appears there.
Double-tap the Home button and ask Siri (third-generation iPad or later) for a type of business or location by zip code. For example, if you crave something with pepperoni, say “Find pizza in 99208 zip code.” The results typically display a small map that you can tap to open the Maps app to find your way there. See Book V, Chapter 6 for more about using Siri.
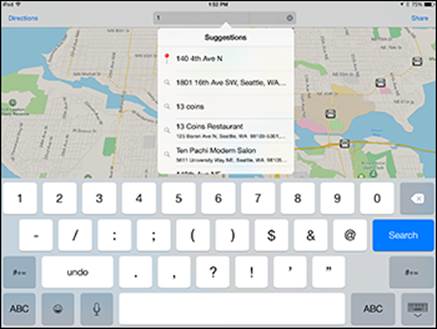
Figure 2-6: You can use the onscreen keyboard to enter location information.
3. Tap the Search button.
The location appears with a red pin inserted in it and a label with the location and an Information icon (shown in Figure 2-7).
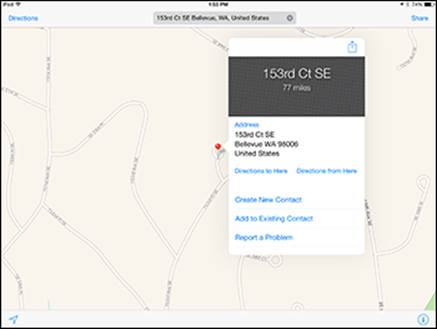
Figure 2-7: The more specific the address information you enter, the more likely you are to find just the right location.
4. Tap the Information icon to see more about the destination.
Note that if several locations match your search term, you may see several pins displayed in a Suggestions list.
5. You can also tap the screen and drag in any direction to move to a nearby location.
See the upcoming “Dropping a pin” section to find out how to zero in on the location and get the label with links to additional information, as you see in Figure 2-7.
Add the city and state, if you know them, whenever you enter a destination. A search for Bronx Zoo landed me in the Woodland Park Zoo in Tacoma, Washington, because the search uses the individual words and the closest geographical location for a Zoo match to find results!
Remembering Where You’ve Been
Why reinvent the (mapping) wheel? One of the great capabilities of a mapping program is the ability to store locations you like to go to for future reference. In Maps, you can do this in a few ways. You can drop a pin on a map, which marks a beginning point for getting directions from one site to another. Or you can place a bookmark for a site you want to revisit often. You then access your bookmarks by tapping Recents in the Search field; tap Favorites to see your bookmarks.
Dropping a pin
With the iPad, pins act like the pins you might place on a paper map to note routes or favorite locations. Also, pins are markers: A green pin marks a start location; a red pin marks search results; a pin you that drop yourself appears in a lovely purple; and a blue pin (referred to as the blue marker) marks your iPad’s current location.
Use these steps to try the pin feature of iPad:
1. Display a map that contains a spot where you want to drop a pin to help you get directions to or from that site.
If necessary, you can zoom in to a more detailed map to get a better view of the location you want to pin using the techniques I cover in the earlier “Zooming in and out” section.
2. Press and hold your finger on the screen at the location where you want to place the pin.
The pin appears, together with an information bar (shown in Figure 2-8).
Figure 2-8: The information bar provides access to yet more Maps tools.
3. Tap the Information bar that appears when you tap a pin to display details about the pin location (shown in Figure 2-9).
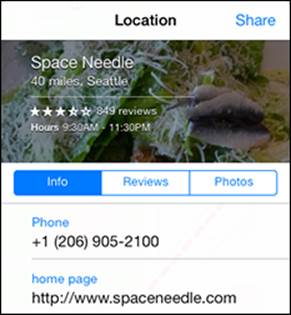
Figure 2-9: This very useful dialog gives you information and lets you share what you know.
If a site has associated reviews on Yelp, you see a More Info on Yelp button in its Information dialog. Tap this button to install the Yelp app and read the reviews. If you like the destination, add it to your contacts to find it easily in the future.
Adding and viewing a favorite
Favorites are a tried-and-true way to save a destination so that you can display a map or directions to that spot quickly. You’ve probably used a similar bookmark feature in a web browser. With Maps, you can save favorites and access those locations from the search field.
Here’s how to add a favorite in Maps:
1. Place a pin on a location, as described in the preceding section.
2. Tap the Information bar to display the Information dialog.
3. Tap the Share button. (See Figure 2-10.)
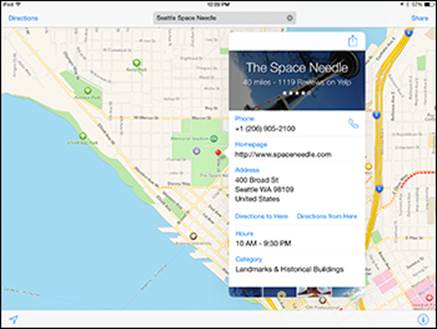
Figure 2-10: Click here to add a favorite.
4. Tap Add to Favorites.
The Add to Favorites dialog and the keyboard appear (as shown in Figure 2-11). If you like, you can modify the name of the bookmark.
5. Tap Save.
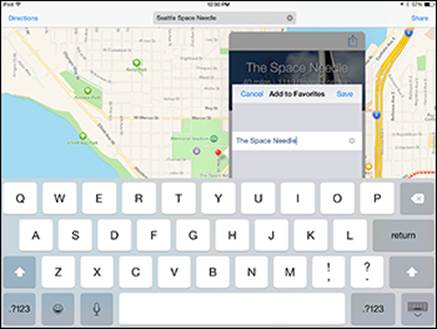
Figure 2-11: Name the bookmark.
6. To view your favorite bookmarks, tap the Search field at the top of the Maps screen
Tap Favorites, as shown in Figure 2-12.
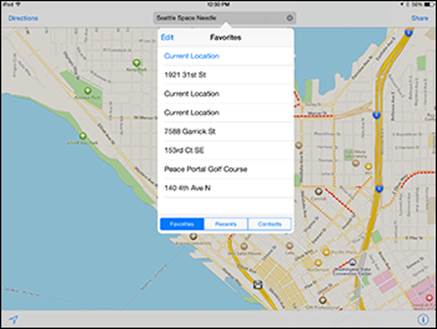
Figure 2-12: The list of saved bookmarks.
7. Tap a bookmark to go to the location in Maps.
You can also view recently viewed locations even if you haven’t bookmarked them. Tap Bookmark, and then, on the bottom of the Favorites dialog that appears, tap Recents. Locations you’ve visited recently are listed there. Tap a location to return to it.
Deleting a favorite
Eventually, a site you used to visit gets crossed off your A list. At that point, you might want to delete a bookmarked favorite, which you can easily do by following these steps:
1. Tap the Search field, enter a location, and then tap Favorites.
2. Tap the Edit button.
A red minus icon appears to the left of your bookmarks, as shown in Figure 2-13.
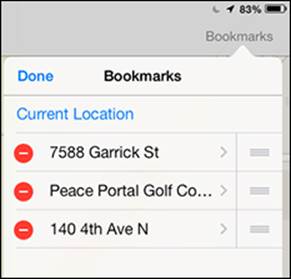
Figure 2-13: Tap a bookmark’s red icon to select it for deletion.
3. Tap a red minus icon.
4. Tap Delete.
The bookmark is removed.
To use a touchscreen shortcut after you’ve displayed the bookmarks in Step 1, simply swipe across a bookmark and then tap the Delete button that appears.
You can also clear all recent locations stored by Maps to give yourself a clean slate. Tap the Bookmark icon and then tap the Recents tab. Tap Clear and then confirm by tapping Clear All Recents.
Getting Directions, Information, and More
Maps can provide all kinds of information, from directions from one location to another to the street address and phone number for a particular business or landmark.
Getting directions
You can get directions by using pins that you drop on a map for the starting and ending locations, or by entering an address or name of a place, such as an airport or shopping mall. The directions are shown in a blue line leading from one place to another. You can even choose directions by car or foot. Directions also give you an idea of the miles and hours it will take you to get to your destination. (It will take you 15 hours and 43 minutes, for example, to walk from the Bronx Zoo to the Empire State Building — in case you wondered.) Here are the steps to get directions to two different locations in Maps using pins:
1. With at least one pin on your map (at your destination) in addition to your current location, tap Directions in the top-left corner of your screen and then tap another location on the list that appears.
A line appears, showing the route between your current location and the closest pin. (See Figure 2-14.)

Figure 2-14: Go from pin to pin on your map to get directions.
2. Tap the Drive or Walk tab to get the kind of directions you prefer; tap Clear to return to the Maps main screen.
3. You can also enter two locations in the boxes at the top of the page to get directions from one to the other.
Here are the steps to get directions in maps by typing the addresses in the Search fields:
1. Tap the Directions button in Maps and then tap in the field labeled Start.
The keyboard appears (see Figure 2-15).
2. Enter a different starting location.
3. Tap in the End field and enter a destination location. Tap Route.
The route between the two locations displays. If you like, you can tap the Drive or Walk button to select a category of information once the route is displayed.
You can also tap the Information bar that appears when you select a pin and use the Directions to Here or Directions from Here button to generate directions.
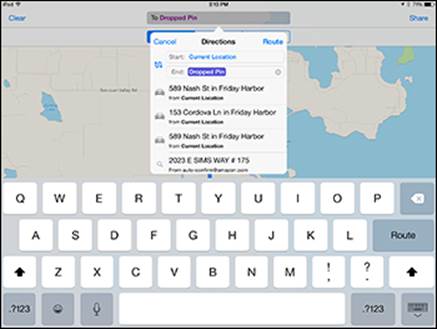
Figure 2-15: Enter addresses using the keyboard or Dictation key.
With a route displayed, an information bar appears telling you about the time it takes to travel between the two locations. If there are alternative routes, Maps notes the time it takes for any alternative routes alongside the routes on the map. Tap a route timing to make it the active route.
Getting information about a location
Previous sections of this chapter tell you how to display the Information dialog for locations in order to get directions. This section focuses on the other useful information displayed there. Using the Information button for any location, you can get the street address, phone number, and even the URL for some businesses or landmarks.
To get to the Information dialog, go to a location and tap the pin. In the information bar that appears above the pinned location, tap the arrow (shown in Figure 2-16).
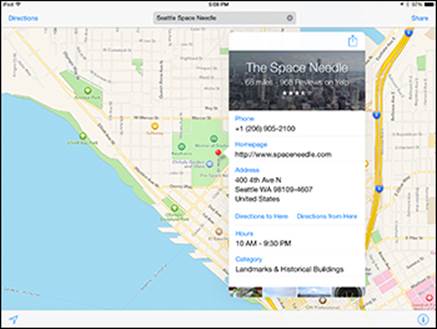
Figure 2-16: An information bar above a pinned location.
In the Information dialog, you can tap the web address listed in the Home Page field to be taken to the location’s web page, if it has one associated with it.
You can also press and hold the Phone or Address field (refer to Figure 2-16) and use the Copy button to copy the phone number, for example, so that you can place it in a Notes document for future reference. When you have all the information you need, tap anywhere outside the Information dialog to close it.
Rather than copy and paste information, you can easily save all the information about a location in your Contacts address book. See the “Adding a location to a contact” section, later in this chapter, to find out how that’s done.
Sending Location Info beyond Maps
When you find a location you want to come back to or tell others about, you can use features of Maps that help you out. You can save a location to the Contacts app, which also saves the address, phone number, and URL, if any. You can also share a link to locations with friends via email, Messages, AirDrop, Facebook, or Twitter. They can then access the location information by using Maps on any iOS device or Mac.
Adding a location to a contact
The beauty of this feature is that not only can you store valuable information such as phone numbers and street addresses in Contacts quickly and easily, you can also use stored contacts to quickly find locations in Maps.
Here’s how this works:
1. Tap a pin to display the information bar.
2. Tap the arrow on the bar.
3. In the Information dialog that appears, tap Create New Contact.
The New Contact dialog appears (as shown in Figure 2-17). Whatever information was available about the location has been entered.
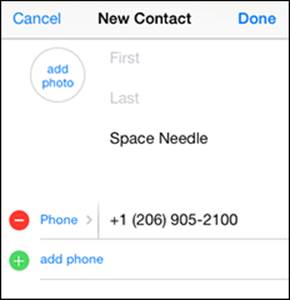
Figure 2-17: Any available information can be stored to Contacts.
4. Enter any additional information you need, such as name, phone number, or email address.
5. Tap Done.
The information is stored in your Contacts address book.
After you store information in Contacts, you can also share it with friends from there by tapping the Share button in the address record. See Book V, Chapter 5 for more about using Contacts.
Sharing location information
Have you found a fantastic restaurant or movie theater that you absolutely have to share with a friend? From within Maps, you can use a simple procedure to email a link to your friend. When your friend is connected to the Internet and taps the link, that link opens the map to the location in Maps (a free service).
After you save a location in Contacts, take these steps to share a location:
1. Tap a pin to display the information bar.
2. Tap the Share button at the top right of the Maps screen and then tap Selected Location.
In the dialog that appears (see Figure 2-18), you can choose to share via AirDrop, text message, Facebook posting, tweet, or email.
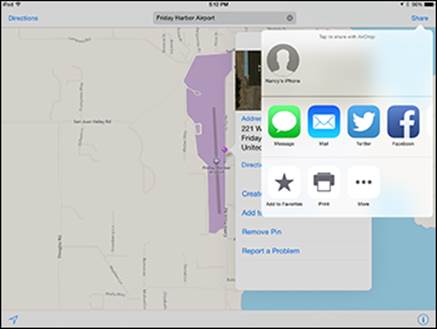
Figure 2-18: You have a variety of ways to share locations.
3. Tap Mail to see how this option works.
4. In the email form that appears, use the onscreen keyboard to enter a recipient’s information as appropriate to the service you chose to share.
5. Tap Send.
A link to the location information in Maps is sent to your designated recipient(s).
If you tap Twitter or Facebook in Step 4, you have to have activated Twitter or Facebook and have the appropriate account set up using Settings. Tapping Message in Step 4 displays a new message form; just enter an email address or phone number in the To field, enter your text message, and then tap Send.
Use this feature to share your current location so that a friend or emergency service can find you. However, beware of sharing your current information with strangers!
Getting Turn-by-Turn Navigation Help
When you’ve entered directions for a route and displayed that route, you can then, with a 3G/4G iPad model, get spoken instructions that can be helpful as you’re driving. Follow these steps to get spoken navigation:
1. Tap the Start button at the bottom of the screen.
2. The narration begins and large text instructions are displayed, as shown in Figure 2-19.
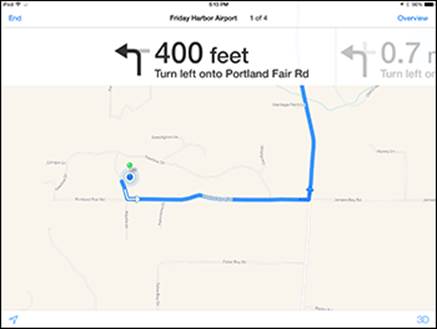
Figure 2-19: Turn-by-turn navigation may make your car’s navigation system obsolete.
Continue driving according to the route until the next instruction is spoken.
3. For an overview of your route at any time, you can tap the Overview button.
Tap Resume to go back to the step-by-step instructions.
To change route information from miles to kilometers, go to Settings, tap Maps, and then tap In Kilometers.
All materials on the site are licensed Creative Commons Attribution-Sharealike 3.0 Unported CC BY-SA 3.0 & GNU Free Documentation License (GFDL)
If you are the copyright holder of any material contained on our site and intend to remove it, please contact our site administrator for approval.
© 2016-2026 All site design rights belong to S.Y.A.