iPad All-in-One For Dummies, 7th Edition (2015)
Book I. Getting Started with iPad
Chapter 2. Getting Started with iPad
In This Chapter
![]() Discovering what’s in the box
Discovering what’s in the box
![]() Getting your first look at the gadget
Getting your first look at the gadget
![]() Charging the battery
Charging the battery
![]() Powering on your iPad and registering it
Powering on your iPad and registering it
![]() Using the touchscreen
Using the touchscreen
![]() Getting familiar with the split keyboard
Getting familiar with the split keyboard
![]() Making sure your operating system is up to date
Making sure your operating system is up to date
![]() Discovering Multitasking Gestures
Discovering Multitasking Gestures
![]() Taking a first look at iPad’s camera
Taking a first look at iPad’s camera
![]() Understanding how to customize the Side switch
Understanding how to customize the Side switch
![]() Becoming familiar with the status bar
Becoming familiar with the status bar
![]() Using Control Center
Using Control Center
![]() Locking your iPad, turning it off, and unlocking it
Locking your iPad, turning it off, and unlocking it
After you get your hands on an iPad, you should explore what’s in the box and get an overview of the buttons and slots you’ll encounter — luckily, there are very few of them.
You also need to get comfortable with the touchscreen. If you have a smartphone or computer with a touchscreen, you’re ahead of the game here, but even if you do, you should take a little time to get comfortable working with using the iPad screen.
iPads (with the exception of the original iPad) have two cameras and a customizable side switch. In addition, iPad has native printing ability, all of which I introduce you to here.
Finally, after a tough day of playing with your new gadget, you need to know how to put it to sleep. I cover all these iPad basics in this chapter.
Exploring What’s in the Box
When you fork over your hard-earned money for your iPad, you’re left holding one box about the size of a package of copy paper. Here’s what you’ll find when you take off the shrink wrap and open the box:
· iPad: Your iPad is covered in two plastic sheets that you can take off and toss (unless you think there’s a chance you’ll return it, in which case you might want to keep all packaging for 14 days — Apple’s return period).
· Documentation (and I use the term loosely): You find a small, white envelope under the iPad itself, about the size of a half-dozen index cards. Open it, and you’ll find
· A single sheet titled iPad Info: This pamphlet is essentially small print (that you mostly don’t need to read) from folks like the FCC.
· A mysterious label sheet: This contains two white Apple logo stickers. (Apple has provided these for years with its products as a form of cheap advertising when users place stickers on places like their computers or car windows.)
· A small card containing the actual documentation (sort of): This displays a picture of the iPad and callouts to its buttons on one side, and the other side contains about three sentences of instructions for setting it up and info about where to go online to find out more.
· Lightning to USB Cable: Use this cord (see Figure 2-1) to connect the iPad to your computer, or use it with the last item in the box, which is the power adapter.
· 10W USB Power Adapter: The power adapter (see Figure 2-1) attaches to the Lightning to USB Cable (or the Dock Connector to USB Cable) so that you can plug it into the wall and charge the battery.
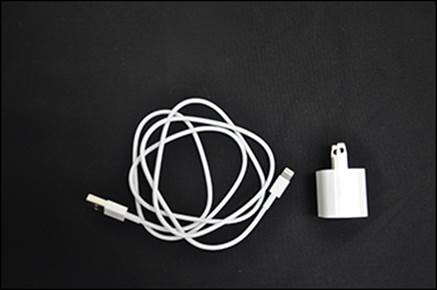
Figure 2-1: Some pretty simple gadgets for power and USB connections.
That’s it. That’s all there is in the box. It’s kind of the typical Apple study in Zen-like simplicity.
Taking a First Look at the Gadget
The little card contained in the documentation (see the preceding section) gives you a picture of the iPad with callouts to the buttons you’ll find on it. In this section, I give you a bit more information about those buttons and some other physical features of the iPad. Figure 2-2 shows you where each of these items is located.
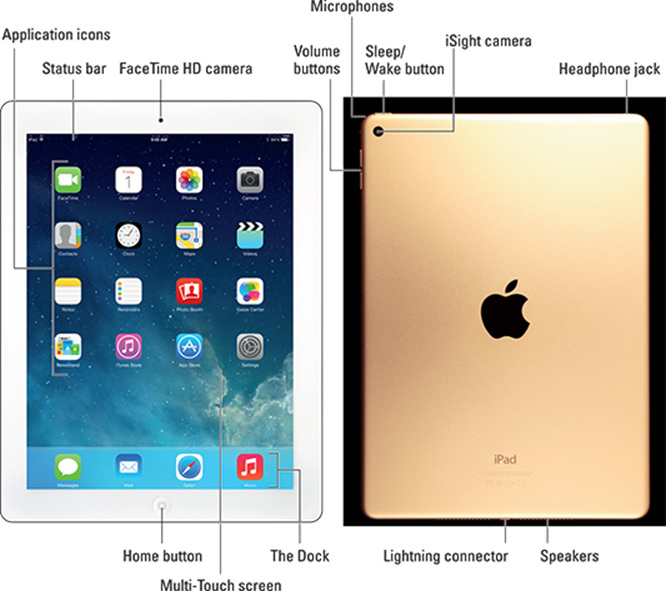
Figure 2-2: There are probably fewer gizmos to get used to on an iPad than on the average cellphone.
Here’s the rundown on what these things are and what they do:
· (The all-important) Home button: On the iPad, press this button to go back to the Home screen to find just about anything. The Home screen displays all your installed and preinstalled apps and gives you access to your iPad settings. No matter where you are or what you’re doing, press the Home button, and you’re back at home base. You can also double-press the Home button to pull up a scrollable display of apps called the App Switcher so that you can quickly move from one to another or quit apps that you don’t want or need to have running. (Apple refers to this as multitasking.) If you press and hold the Home button, you open Siri, the iPad voice assistant. Finally, on recent iPad models, the Home button contains a fingerprint reader used with the Touch ID feature.
· Sleep/Wake button: You can use this button to power up your iPad, put it in sleep mode, wake it up, or power it down (more about this in the final section of this chapter).
· Lightning connector: This is where you plug in the Lightning connector at the USB end to the power adapter to charge your battery or use it without the power adapter to sync with your computer (which you find out more about in Chapter 5 of this minibook). Also use this slot for the Camera Connection Kit or to connect various AV adapter cables.
· Cameras: iPads (except for the original iPad) offer front- and rear-facing cameras that you can use to shoot photos or video. The rear one is on the top-right corner, and you need to be careful not to put your thumb over it when taking shots. (I have several very nice photos of my thumb already.)
· Side switch: In case you hadn’t heard, the iPad screen rotates to match the angle you’re holding it at. If you want to stick with one orientation even if you spin the iPad in circles, you can use this little switch on the iPad mini 3 to lock the screen, which is especially handy when reading an e-book. (Note that some apps can override this functionality if they require one orientation or the other.) iPad Air 2 no longer has a side switch, but you can change Rotation and Volume settings in the Control Center (swipe up from the bottom of the screen to open Control Center).
· (Tiny, mighty) speakers: One nice surprise when I first got my iPad Air 2 was hearing what a great little stereo sound system it has and how much sound can come from these tiny speakers. The speakers are located along one side of the iPad Air 2 and iPad mini 3.
· Volume: This is a volume rocker that you use like any other volume rocker: Press up for more volume and down for less. You can also use this rocker as a camera shutter button when the camera is activated.
· Headphone jack and microphone: If you want to listen to your music in private, you can plug a 3.5mm minijack headphone and some 1⁄8" headphones in here (including a set of Beats headphones sold through the Apple Store, if you have one, which gives you sound to both ears). There’s also a tiny microphone that makes it possible to speak into your iPad to deliver commands or enter content using the Siri feature. Using Siri, you can do things like make phone calls using the Internet and dictate text, or work with other apps that accept audio input.
Charging the Battery
You’ve heard about the awesome ten-hour battery life on your iPad, and it’s all true. My iPad showed up almost fully charged from the Apple Store, but even if you got yours shipped, it should’ve been at least partially charged. But all batteries run down eventually (the little battery icon in the iPad Status bar tells you when you’re running low), so one of your first priorities is to know how to recharge your battery. This is a pretty obvious procedure, given the few items that come with your iPad, but just in case you need help, you can follow these steps to get that battery meter up to 100 percent:
1. Gather your iPad, Lightning to USB cable (fourth generation and later) or Dock Connector to USB Connector (earlier models), and Apple USB power adapter.
2. Gently plug the USB end of the Lightning to USB Cable (or the Dock Connector to USB Cable) into the USB Power Adapter.
3. Plug the other end of the cord (see Figure 2-3) into the Lightning Connector (or Dock Connector slot) on the iPad.
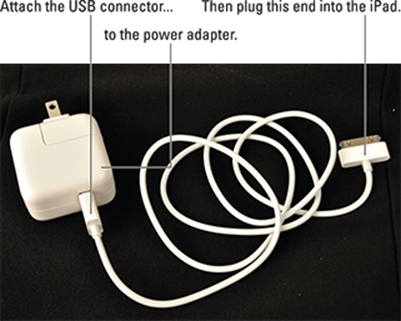
Figure 2-3: Assembling the connector cord and power adapter to charge the iPad battery.
4. Unfold the two metal prongs on the power adapter (refer to Figure 2-3) so that they extend from it at a 90-degree angle, and plug the adapter into an electrical outlet.
 Power adapters from earlier versions of iPad or other Apple devices such as iPhone or iPod will not work with your fourth-generation iPad or later. Replacement adapters are available, however, from Apple and various third-party vendors.
Turning the iPad On and Registering It
The first time you turn on your iPad, you need to go through a sequence of setup steps. The best way to do this is to be in range of a Wi-Fi network.
When you’re ready to get going with your new toy, be sure you’re within range of a Wi-Fi network that you can connect with, and then hold the iPad with one hand on either side, oriented like a pad of paper. Plug the Lightning to USB Cable that came with your device into your iPad and plug the other end into a USB port on your computer, just in case you lose your battery charge during the setup process.
Now follow these steps to set up and register your iPad:
1. Press and hold the Sleep/Wake button on the top of your iPad until the Apple logo appears.
In another moment, a screen appears with a cheery Hello on it.
2. Slide your finger to the right on the screen where it says Slide to Set Up.
3. Enter a password if you have an Apple ID, choose how other people can reach you with text messages through the Messaging app or video calls through FaceTime (choose your phone number, iCloud account, or email account), and whether to update to iCloud Drive (an online storage service).
Be sure to update to iCloud Drive on all your devices, such as iPhone, Mac, or Windows PC to make sure that your iCloud-stored documents continue to sync to them all.
4. You next see a series of screens that involve settings such as language, country, Wi-Fi network, and use of iCloud.
Follow the series of screens to respond to questions and make initial settings, all of which can be changed later in iPad Settings.
5. After you deal with all the setup screens, a Welcome to iPad screen appears; tap Get Started to display the Home screen.
You can choose to have certain items transferred to your iPad from your computer when you sync, including music, videos, downloaded apps, contacts, calendars, e-books, podcasts, and browser bookmarks. You can also transfer to your computer content that you download directly to your iPad using the iTunes and App Store apps as well as content that you gather through the Newsstand, iBooks, Podcasts, and iTunes U apps. See Book II, Chapter 1 for more about these features.
Meeting the Multi-Touch Screen
When your Home screen appears (see Figure 2-4), you’ll see a pretty picture in the background and two sets of icons. One set appears in the Dock along the bottom of the screen. The Dock contains Messages, Mail, the Safari browser, and Music app icons by default, though you can add up to two other apps to it. The Dock appears on every Home screen. (You start with one Home screen, but adding new apps creates additional Home screens — up to 15 in all.) You can also nest apps in folders, which theoretically gives you the capability to store limitless apps on your iPad — limited, that is, only by your tablet’s memory.
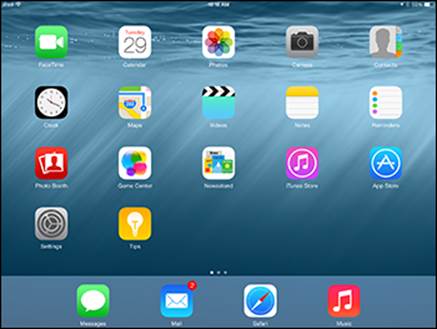
Figure 2-4: Icons for various apps live in the Dock or on a Home screen.
Other icons representing your installed apps appear above the Dock. (I give you an overview of the functionality of all these apps in Chapter 4 of this minibook.) Different icons appear in this area on each Home screen, but this Home screen contains most of the preinstalled apps.
This may or may not need saying, but the screen is made of glass and will smudge when you touch it and break if you throw it at the wall, and contrary to Apple’s boasts, can also be scratched. So, be careful and treat it nicely.
Connecting with the touchscreen
The iPad touchscreen technology allows you to swipe your finger across the screen or tap it to provide input to the device just as you use a mouse or keyboard with your computer. You read more about using the touchscreen in the next section, but for now, go ahead and play with it for a few minutes. Just as you may have become used to with your mobile phone, you use the pads of your fingertips (not your fingernails) and do the following:
1. Tap the Settings icon.
The various settings (which you read more about throughout this book) appear. (See Figure 2-5.)
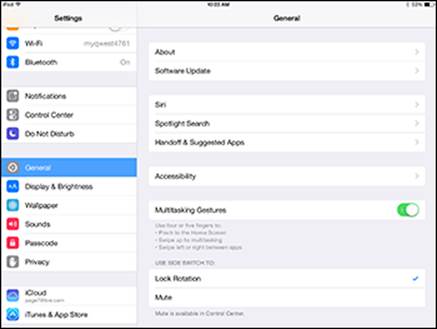
Figure 2-5: Settings is your central command for all things iPad.
2. To return to the Home screen, press the Home button.
3. Swipe a finger or two from right to left on the screen.
Because the iPad has a few additional Home screens available (15, to be exact) that you can fill up with all the apps you’ll be downloading, the screen shifts slightly to the left. (If you have more apps downloaded, filling additional Home screens, this action moves you to the next Home screen.)
With multiple Home screens in use, you get little dots at the bottom of the screen above the Dock icons, indicating which of the Home screens you’re on. You can tap to the right or left of the dots to move one screen in either direction.
4. To experience the rotating screen feature, hold the iPad firmly and turn it sideways.
The screen flips to a horizontal orientation. If it doesn’t, check the Side switch (above the volume rocker on the side of your iPad) to make sure that it’s not active. Though this Side switch can be set to mute the iPad rather than control orientation, by default it works with the orientation feature.
5. To flip the screen back, just turn the device so that it’s oriented like a pad of paper again.
6. Tap Music in the Dock.
7. Drag your finger down from the top of the screen to reveal the Notification Center (covered in Book V, Chapter 4).
8. Drag up from the bottom of the Home screen.
Notification Center disappears and the Control Center (discussed later in this chapter) is displayed.
9. Practice multitasking by double-pressing the Home button.
All running apps appear in a display across the middle of the screen.
10. Swipe to scroll through the apps, and tap one to jump to it without going back to the Home screen.
You can customize the Home screen by changing the wallpaper and brightness. Read about making these changes in Chapter 8 of this minibook.
Goodbye, click-and-drag; hello, tap-and-swipe
If you’re like me, you’ll fall in love with the touchscreen interface that iPad sports. It’s just so intuitive to use your finger as a pointing device — something you’re probably already doing on your iPhone, laptop, or other mobile device.
You can use several methods for getting around and getting things done in iPad using its Multi-Touch screen, including
· Tap once. To open an application on the Home screen, choose a field such as a search field, select an item in a list, select an arrow to move back or forward one screen, or follow an online link, tap the item once with your finger.
· Tap twice. Use this method to enlarge or reduce the display of a web page (see Chapter 6 in this minibook for more about using the Safari web browser) or zoom in or out in the Maps app.
· Pinch and expand. As an alternative to the tap-twice method, you can pinch or expand (unpinch) two fingers (most people use their index finger and thumb) on the screen (see Figure 2-6) when you’re looking at photos, maps, web pages, or email messages to quickly reduce or enlarge them, respectively.
You can use a three-finger tap to zoom your screen to be even larger, or use Multitasking Gestures to swipe with four or five fingers. (See “Exploring Multitasking Gestures,” later in this chapter.) These techniques are handy if you have vision challenges.
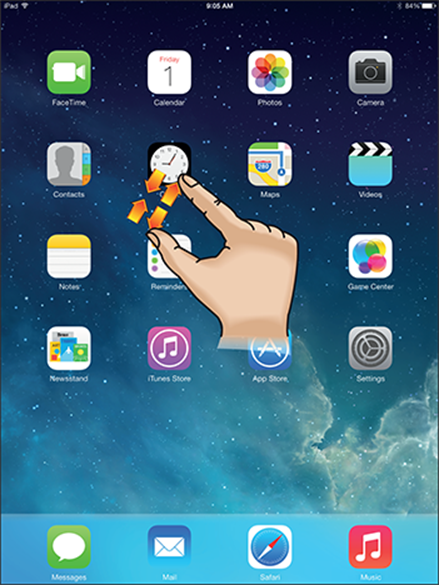
Figure 2-6: Pinch to zoom in or out on a page.
· Drag to scroll (known as swiping). When you press your finger to the screen and drag to the right or left, you move from one Home screen to another. (See Figure 2-7.) Swiping to the left on the Home screen, for example, moves you to the next Home screen. Swiping up while reading an online newspaper moves you down the page, while swiping down moves you back up the page.
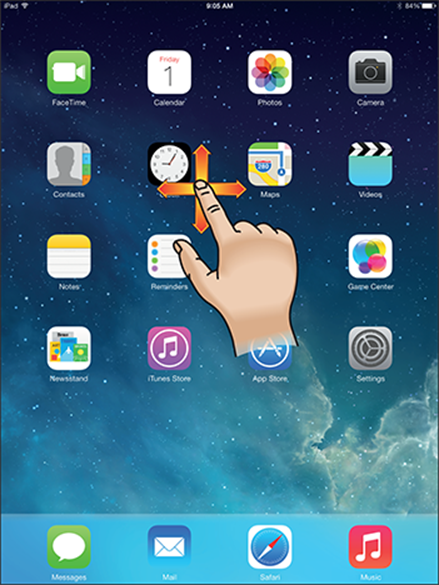
Figure 2-7: Swiping gets you around a screen quickly.
· Flick. To scroll more quickly on a page, quickly flick your finger on the screen in the direction you want to move.
· Tap the status bar. To move quickly to the top of a list, web page, or email message, tap the Status bar at the top of the iPad screen.
· Tap and hold. If you’re in any application where selecting text is an option, such as Notes or Mail, or if you’re on a web page, tapping and holding on text will select a word and bring up a contextual menu with editing tools that allow you to select, cut, copy, or paste text, and more. You can also use this tap-and-hold method to reposition the insertion point under the magnifying glass icon that appears.
Notice that when you rock your iPad backward or forward, the background moves as well. (This parallax feature was introduced in iOS 7.) You can disable this feature if it makes you seasick. Open the Settings app, tap General, tap Accessibility, and then set the Reduce Motion switch to Off.
To display the Notification Center, swipe down from the top of the screen with one finger. It lists all messages, mail, calendar events, and more in one handy spot.
If you feel like having a practice session, try the following steps from the Home screen:
1. Tap the Safari button to display the web browser.
You may be asked to enter your Wi-Fi network password to access the network to go online.
2. Tap a link to move to another page.
3. Double-tap the page to enlarge it; then pinch two fingers together on the screen to reduce its size.
4. Drag one finger around the page to scroll up or down or side to side.
5. Flick your finger quickly on the page to scroll more quickly.
6. Tap and hold your finger on text that isn’t a link.
The word is selected, and a contextual menu appears, as shown in Figure 2-8. Its options include Define and Copy.)
7. Release your finger.
8. Tap and hold your finger on a link or an image.
A contextual menu appears with commands that allow you to open the link or picture, open it in a new page, add it to your Reading List (see Chapter 6 in this minibook), or copy it. The menu also offers the Save Image command.
9. Put two fingers slightly apart on the screen and then pinch them together to reduce the page.
10. Press the Home button to go back to the Home screen.
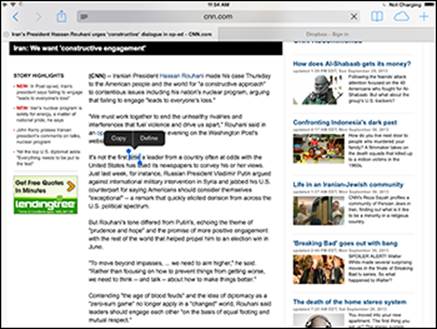
Figure 2-8: Copy text and paste it into an email or document using the Copy tool.
Displaying and using the onscreen keyboard
Part of the beauty of iPad is that it’s highly portable, but that portability comes at a price: the absence of a physical keyboard. You can use a wireless or Bluetooth keyboard, but for short text entry, you don’t really need either. That’s where the onscreen keyboard comes into play, allowing you to enter text as you may have done on a touchscreen mobile phone.
 iPad’s built-in keyboard appears whenever you’re in a text-entry location, such as in a Search field or when writing an email. With the debut of iOS 8, iPad makes suggestions based on the words you enter in the keyboard in the new QuickType bar above the keyboard, and can even recognize the person you’re typing a message to when you’re in Mail or Messages so that those suggestions are appropriate to the tone you might use with that recipient.
Follow these steps to practice using the onscreen keyboard:
1. Tap Notes on the Home screen to open this easy-to-use notepad.
2. Tap the blank note or, if you’ve already entered notes, tap one to open it.
The note appears.
3. Tap in the text of the note.
The onscreen keyboard appears.
4. Type a few words using the keyboard.
You can tap the Dictation key on the keyboard (see Figure 2-9) to activate the Dictation feature, and then speak your input. This requires that the Siri feature be turned on and an active Internet connection because the translation is done on Apple’s servers.
To get the widest keyboard display possible, rotate your iPad to be in landscape (horizontal) orientation, as shown in Figure 2-9.
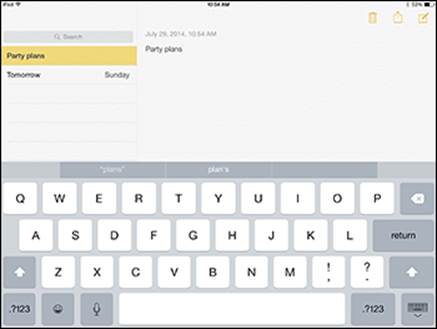
Figure 2-9: The onscreen keyboard is handiest to use in landscape orientation.
5. If you make a mistake (and you may when you first use it), use the Delete key (the key in the top-right corner of the keyboard with a little x on it) to delete text to the left of the insertion point.
6. To create a new paragraph, press the Return key, just as you would on a computer keyboard.
7. To type numbers and some symbols, press one of the number keys (labeled .?123) located on either side of the spacebar (refer to Figure 2-9).
Characters on the keyboard change. To return to the letter keyboard at any time, simply tap one of the letter keys (labeled ABC) on either side of the spacebar.
If you type a number in the number/symbol keyboard and then tap the spacebar, the keyboard automatically returns to the letter keyboard.
8. Use the Shift keys just as you would on a regular keyboard to type uppercase letters.
Tapping the Shift key once causes just the next letter you type to be capitalized.
9. Double-tap the Shift key to turn on the Caps Lock feature so that all letters you type are capitalized until you turn the feature off.
Tap the Shift key once to turn it off.
You can control whether this feature is available in Settings, in the General pane’s Keyboard section.
10. To type a variation on a symbol (for example, to get alternative currency symbols when you hold down the dollar sign on the numeric keyboard), tap and hold the key until a set of alternative symbols appears (see Figure 2-10).
 Note that displaying variations on symbols works only on some symbols.
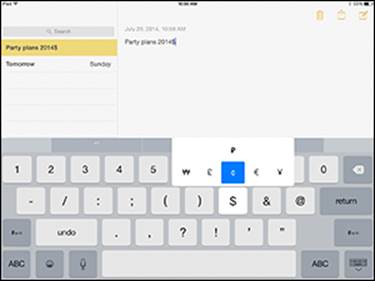
Figure 2-10: Only some symbols offer alternatives when you press and drag them.
11. Tap the Dictation key (refer to Figure 2-9) to activate the Dictation feature, and then speak your input.
This works in several apps, such as Mail, Notes, and Maps. Tap the Dictation key again (or tap in the note) to turn off the Dictation feature.
12.  Tap the Emoji key (a smiley face symbol to the left of the Dictation button) to display and select from a set of smiley symbols to insert in your document. Tap tabs along the bottom to display other graphic icon sets such as pictures from nature or city skylines.
13. To hide the keyboard, press the Keyboard key in the bottom-right corner.
14. Tap the Home button to return to the Home screen.
You can unlock the keyboard to move it around the screen. To do this, press and hold the Keyboard button on the keyboard and, from the pop-up menu that appears, choose Unlock. Now by pressing the Keyboard button and swiping up or down, you can move the keyboard up and down on the screen. To dock the keyboard again at the bottom of the screen, press and hold the Keyboard button and choose Dock from the pop-up menu. (For this to work, go to Settings and be sure to enable Split Keyboard in the Keyboard section of the General pane.)
To type a period and space, double-tap the spacebar. (For this to work, go to Settings and enable "." Shortcut in the Keyboard section of the General pane.)
Using the split keyboard
The Split Keyboard feature allows you to split the keyboard so that each side appears nearer the edge of the iPad screen. For those who are into texting with their thumbs, this feature makes it easier to reach all the keys from the sides of the device. The feature is on by default, but if it doesn’t work for you, it may have been turned off. (You can enable it by going to Settings and turning on Split Keyboard in the Keyboard section of the General pane.) Follow these steps to use it:
1. Open an application, such as Notes, where you can use the onscreen keyboard.
2. Tap in an entry field or page, which displays the onscreen keyboard.
3. Place two fingers in the middle of the onscreen keyboard and spread them toward the left and right.
The keyboard splits, as shown in Figure 2-11.
4. Hold the iPad with a hand on either side and practice using your thumbs to enter text.
5. To reconnect the split keyboard, place two fingers on each side of the keyboard and move them together to join them again.
When the keyboard is docked and unified at the bottom of your screen, you can also simply drag the Keyboard key upward. This both undocks and splits the keyboard. To reverse this, drag the Keyboard key downward. The split keyboard is both docked and joined into one keyboard.
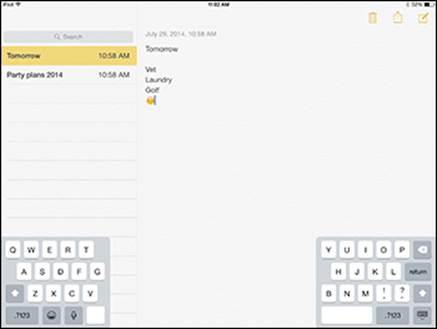
Figure 2-11: A split keyboard makes thumb entry quicker.
Flicking to search
Can’t find that song you downloaded or an email from your boss? You’ll be relieved to know that a search feature in iPad called Spotlight helps you find suggestions from the Internet, Music, iTunes, and the App Store, as well as suggestions for nearby locations, photos, music, emails, contacts, movies, and more. This search feature can be found on the screen to the left of the default Home screen.
Follow these steps to access and use Spotlight:
1. Swipe downward near the top of any Home screen (but not from the very top or bottom of the screen).
The Search field appears.
2. Tap in the Spotlight Search field.
The keyboard appears. (See Figure 2-12.)
3. Begin entering a search term.
For example, in Figure 2-13 I typed the letter C. iPad might display any app, contact, music, video, or note that begins with C. As you continue to type a search term, the results are narrowed down to match.
4. Tap an item in the search results to open it in the associated app or player.
To close the app and go back to the Search screen, tap the Home button, and then tap the left side of the Home button to display the Search screen again.
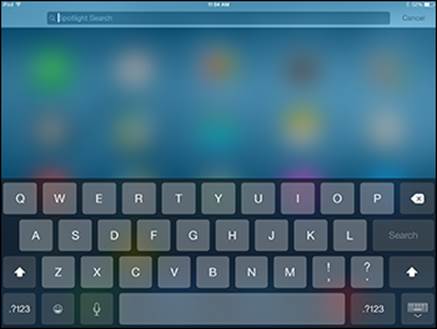
Figure 2-12: Use the familiar Search field to enter search terms.
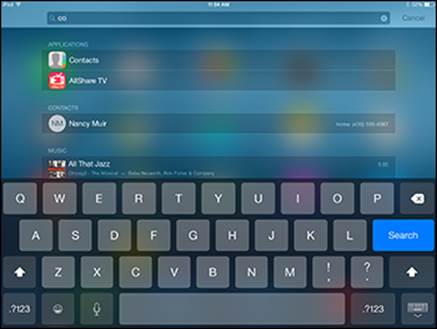
Figure 2-13: Narrow your search by typing more letters.
5. To enter a different search term, tap in the Search field and tap the circled X at the right end of the box or the Delete key on the keyboard to delete the current term, and then enter another.
6. Scroll down to the bottom of the search results and tap Search Web or Search Wikipedia to check results from those sources.
You can use some standard search techniques to narrow your search. For example, if you want only the emails that include both Bob Smith and Jane Jones, enter Smith, Jones and Bob, Jane as your search terms. To change the search language, tap the key on the onscreen keyboard that looks like a little globe to cycle through available languages.
Updating the Operating System
This book is based on the latest version of the iPad operating system at the time, iOS 8.0. If you have an iPad (generation 4 and later can update to iOS 8.0), to make sure that you get the latest and greatest features in iPad, it’s a good idea to update right now to the latest iOS (and periodically, no matter which recent model of iPad you have, to receive minor upgrades). If you’ve set up an iCloud account on your iPad, updates will happen automatically, or you can update over a Wi-Fi or 3G/4G connection by going to Settings and, on the General pane, tapping Software Update. Note that the original iPad model cannot run iOS 7 or later, so this book’s coverage will not match its functionality in large part.
It’s a good idea to have your iPad plugged into a power source before you start to download an iOS update so that the battery doesn’t drain before the update is complete.
Before you perform an update to the iOS, make sure that you have updated to the latest version of iTunes on your computer. (iOS 8.0 requires iTunes 11.4 or later.) After you do, here’s how to update the iOS via a connection with your computer:
1. Plug the Lightning to USB Cable (or the Dock Connector to USB Cable) into your iPad and plug the USB end into your computer.
When iTunes opens on your computer, look for your iPad name in the Devices section in the Source List on the left side of the screen (see Figure 2-14).
2. Click your iPad’s name in the Devices pop-up menu and then click the Summary tab if it’s not already displayed.
3. Read the note next to the Check for Update button to see whether your iOS is up to date; if it isn’t, click the Check for Update button.
iTunes checks to find the latest iOS version and walks you through the updating procedure.
Your iPad has to have enough memory to download the latest iOS. If you have an iPad with smaller memory, you may actually have to remove some apps or content such as music to make room for it before the update can take place.
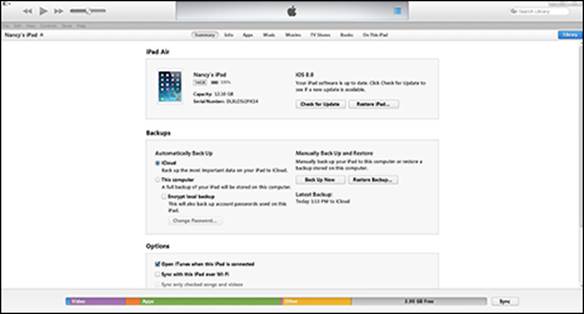
Figure 2-14: Go to the Summary tab to find out whether you need to update iOS.
A new iOS introduces new features for your iPad. If a new iOS version appears after you’ve bought this book, go to the companion website, www.ipadmadeclear.com, for updates on new features.
Understanding Multitasking Basics
Multitasking means that you can easily switch from one app to another without closing the first one and returning to the Home screen. This is accomplished by viewing all open apps and jumping from one to another, and quitting an app by simply swiping it upward. Follow these steps to multitask:
1. Open an app.
2. Press the Home button twice.
3. On the App Switcher view that appears (see Figure 2-15), scroll to the left or right until you find the other open app that you want to switch to.
4. Tap an app to switch to it.
Press the Home button to close the App Switcher and return to the app you were working in.
Figure 2-15: The App Switcher
Exploring Multitasking Gestures
Multitasking involves jumping from one app to another. Rather than using the Home button to open the App Switcher and then moving from one open app to another, you can use iOS’s multitasking gestures. You turn on these gestures by tapping Settings on the Home screen, and then in the General pane, set the Multitasking Gestures switch to On.
Here are the three multitasking gestures:
· Swipe up with four or five fingers on any Home screen to reveal the App Switcher.
· Swipe down with four or five fingers to close the App Switcher.
· With an app open, swipe left or right using four or five fingers to move to the next app. (The apps are in order by what was most recently used, so swiping right opens apps from most to least recently used, whereas swiping left opens apps from least to most recently used.)
Examining Your iPad Cameras
iPad has both front- and rear-facing cameras. You can use the cameras to take still photos or shoot videos (both covered in Book II, Chapter 4). The fourth-generation iPad introduced a higher quality FaceTime front-facing camera useful for making video calls. For now, take a quick look at your cameras by tapping the Camera app icon on the Home screen. An image appears, as shown in Figure 2-16.
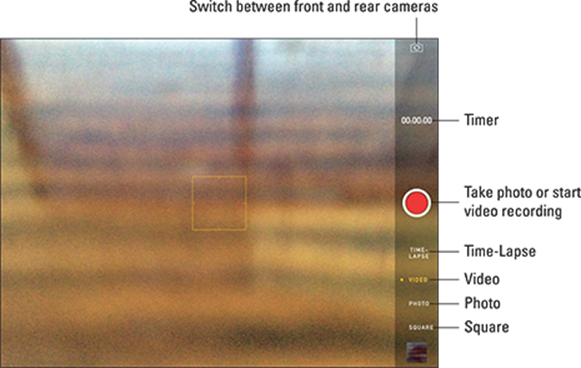
Figure 2-16: Simple tools let you start and stop a recording or switch between cameras.
The third-generation iPad introduced a super-clear Retina display and 5-megapixel rear-facing iSight camera for viewing and taking the best iPad-generated photos and video yet.
Controls located around the screen allow you to
· Switch between the front and rear cameras.
· Take a picture or start recording a video.
·  Turn the new Time-Lapse feature on or off.
· Open the previously captured image or video.
When you view a photo or video, you can use several features to do things like send the image via AirDrop, post it to Facebook or Flickr, send it by email or as a tweet, print an image, use a still photo as wallpaper or assign it to a contact, or run a slideshow. See Book II, Chapters 3 and 4for more details about using iPad cameras.
AirDrop works only with the fourth-generation (or later) iPad and original iPad mini (and later). If your iPad uses the Lightning connector (the small oval port on the bottom), it supports AirDrop.
Customizing the Side Switch
You can customize the Side switch on your iPad mini 3 (it’s at the top-right side if you’re holding the iPad in vertical orientation). Use these steps to set it up to either control the screen orientation or mute sound:
1. From the Home screen, tap the Settings icon.
2. In the General pane, tap either the Lock Rotation or Mute option in the Use Side Switch To section to choose which feature you want the switch to control.
3. Tap the Home button to return to the Home screen.
4. Move the Side switch up or down to toggle between the settings you chose: screen rotation locked or unlocked, or sound muted or unmuted.
If you choose to use the Side switch to mute or unmute system sound, you can use the Control Center to lock and unlock the screen rotation. This works the same way if you have set up the switch to handle screen rotation and want to mute or unmute the sound using the Control Center.
Exploring the Status Bar
Across the top of your iPad screen is the Status bar. (See Figure 2-17.) Little icons in this area can provide some useful information, such as the time, your battery charge, or the status of your wireless connection. Table 2-1 lists some of the most common items you’ll find on the status bar.
Though it doesn’t sport an icon, you can swipe down on the status bar to display the Notification Center. This handy feature shows you all your alerts, updates, appointments, and more in one place.
![]()
Figure 2-17: The status bar provides some handy info about your iPad.
Table 2-1 Common Status Bar Icons
|
Icon |
Name |
What It Indicates |
|
|
Wi-Fi |
You’re connected to a Wi-Fi network. |
|
|
Activity |
Something’s in progress, such as a web page loading. |
|
|
Time |
You guessed it: the time. |
|
|
Screen Rotation Lock |
The screen is locked and will not rotate when you turn the iPad. |
|
|
Play |
A media element (such as a song or video) is playing. |
|
|
Battery Life |
The percentage of charge your battery has left. (It changes to a lightning bolt when the battery is charging.) |
If you have GPS, 3G or 4G, and/or a connection to a virtual private network (VPN), symbols appear on the status bar when these features are activated. The GPS and 3G icons appear only with 3G/4G–enabled iPad models. If you have a 3G/4G model but no 3G/4G available, you may see an icon for EDGE. If you’re out of range of 3G/4G and EDGE, you see GPRS. Essentially, iPad tries for the best connection and then jumps to a lesser connection if the best isn’t available.
Using Control Center
 Control Center is a one-stop screen for common features and settings such as connecting to a network, increasing screen brightness or volume, and using the Calculator or Camera. Control Center settings include
· Music playback controls
· Audio volume
· Airplane mode
· Wi-Fi connection
· Bluetooth
· Do Not Disturb
· Orientation Lock or Mute, depending on what the Side switch is set to control (the side switch is not available on the iPad Air 2, though these Control Center settings allow you to change orientation and volume settings)
· Opening the Clock app
· Using the camera
· AirDrop
· Screen brightness
To display Control Center:
1. Swipe up from the bottom of the screen.
2. In the panel that appears, tap a button or slider to access or adjust a setting or app (see Figure 2-18).
3. Swipe down from the top of Control Center to hide it.
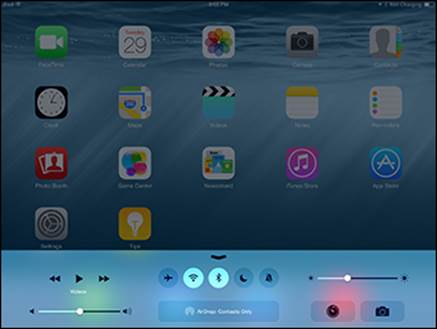
Figure 2-18: Get to frequently used settings in Control Center.
Locking the iPad, Turning It Off, or Unlocking It
You’ve seen how simple it is to turn the power on for your iPad earlier in this chapter. Now it’s time to put it to sleep (the iPad screen goes black, but iPad can quickly awaken again) or turn off the power to give your new toy a rest. Here are the procedures you can use:
· Press the Sleep/Wake button. iPad goes to sleep and the screen goes black. If iPad is asleep, pressing the Sleep/Wake button does its wake-up thing. If you set up a Passcode Lock in the General pane of Settings, you need to provide a passcode to wake up your iPad.
· Press the Home button and then use the Slide to Unlock bar. This wakes up iPad. Swipe the onscreen arrow on the Slide to Unlock bar to unlock the iPad.
· Press and hold the Sleep/Wake button until the Slide to Power Off bar appears at the top of the screen, and then swipe the bar. You’ve just turned off your iPad.
· Use the Smart Cover or Smart Case accessory. When you attach the Smart Cover and close it over your screen, iPad goes to sleep automatically; it wakes up when you pull back the cover.
 iPad automatically goes into sleep mode after a few minutes of inactivity. You can change the time interval at which it sleeps by adjusting the Auto-Lock feature in Settings. (I tell you how to do that in Chapter 8 of this minibook.)
All materials on the site are licensed Creative Commons Attribution-Sharealike 3.0 Unported CC BY-SA 3.0 & GNU Free Documentation License (GFDL)
If you are the copyright holder of any material contained on our site and intend to remove it, please contact our site administrator for approval.
© 2016-2025 All site design rights belong to S.Y.A.