iPad: The Missing Manual (2014)
Part 2. Pix, Flix, & Apps
Chapter 7, Music
Chapter 8, Taking Photos, Shooting Videos
Chapter 9, All About Apps
Chapter 10, The Built-In Apps
Chapter 7. Music
Of all the iPad’s talents, its iPoddishness may be the most successful. This function, after all, gets the most impressive battery life. There’s enough room on your iPad to store thousands of songs. And iTunes Radio means that you’ll never run out of music to listen to—and you’ll never have to pay a penny for it.
To enter iPod Land, open the Music app. On a new iPad, it’s at the lower-right corner of the screen.
TIP
There’s another way to get to iPod mode. Just swipe upward from the bottom of the screen. That opens the Control Center, whose central feature is the music playback controls and a volume control.
The Music program begins with lists—lots of lists. The icons at the bottom of the screen represent your starter lists: Radio, Playlists, Artists, Songs, Albums, Genres, Compilations, and Composers. Here’s what they all do.
iTunes Radio
Your iPad includes an amazing gift: your own radio station. Your own empire of radio stations, in fact.
The iTunes Radio service lets you listen to exactly the kind of music you want to hear. It doesn’t just distinguish among genres like jazz or rock—your choices are more like “upbeat male vocals with driving brass section” versus “slow lovesick ballads with lots of strings.”
You don’t get to choose the exact songs or singers you hear; you have to trust iTunes Radio to choose songs based on a song, singer, or music genre that you specify as a “seed.” For example, if you choose Billy Joel as your “seed,” you’ll hear a lot of Billy Joel, but also a lot of other music that sounds more or less like his.
Here’s something you can’t do when you listen to real radio: skip past a song you don’t like. When you tap the ![]() button, iTunes Radio instantly skips to the next song it would have played. In fact, you can even tell it Play More Like This or Never Play This Song to shape your radio station’s future.
button, iTunes Radio instantly skips to the next song it would have played. In fact, you can even tell it Play More Like This or Never Play This Song to shape your radio station’s future.
In exchange for all this magic, you have to listen to the occasional ad between songs. Unless you subscribe to iTunes Match (iTunes Match), that is, in which case you never hear any ads.
The idea of a “seed song”–based radio service isn’t new, of course. It’s the same idea as Pandora, a Web site and app that has offered precisely the same features for years. But iTunes Radio is built in, it’s incorporated with Siri and the Control Center, and it’s so nice to use. It’s also part of Apple’s larger ecosystem; that is, you can see your same set of “radio stations” on your Mac or PC (in the iTunes app), iPhone, and Apple TV.
Playing iTunes Radio
The first time you open the Music app, you see a Welcome screen. Tap Start Listening to arrive at the main iTunes Radio app. (You may be asked to enter your Apple ID and password. And if you’re not in a WiFi hotspot, the app either lets you know—or offers to use a cellular connection, if you have that kind of iPad.)
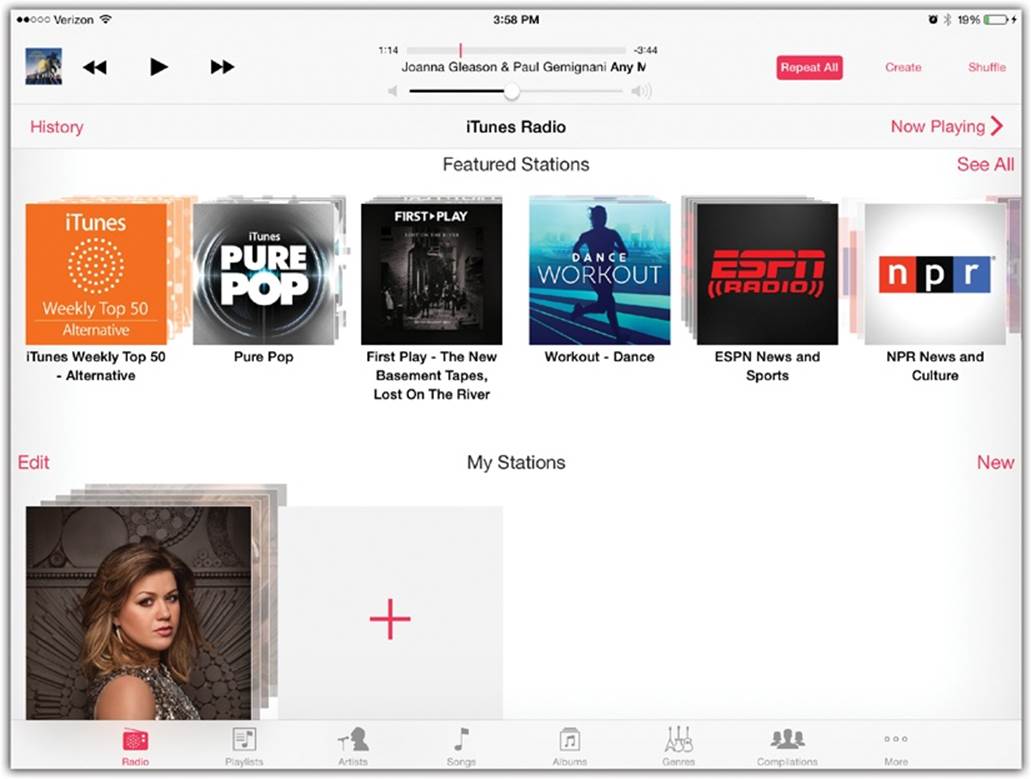
Across the top, you get a horizontally scrolling set of “album covers.” They represent ready-made “radio stations” that Apple has supplied for you. Tap the one called iTunes Top 50: Pop, for example, and your iPad instantly begins playing the biggest current pop hits.
Below these, you see similar “album covers” for stations you’ve created yourself, as described below. Don’t forget to scroll down to see them all.
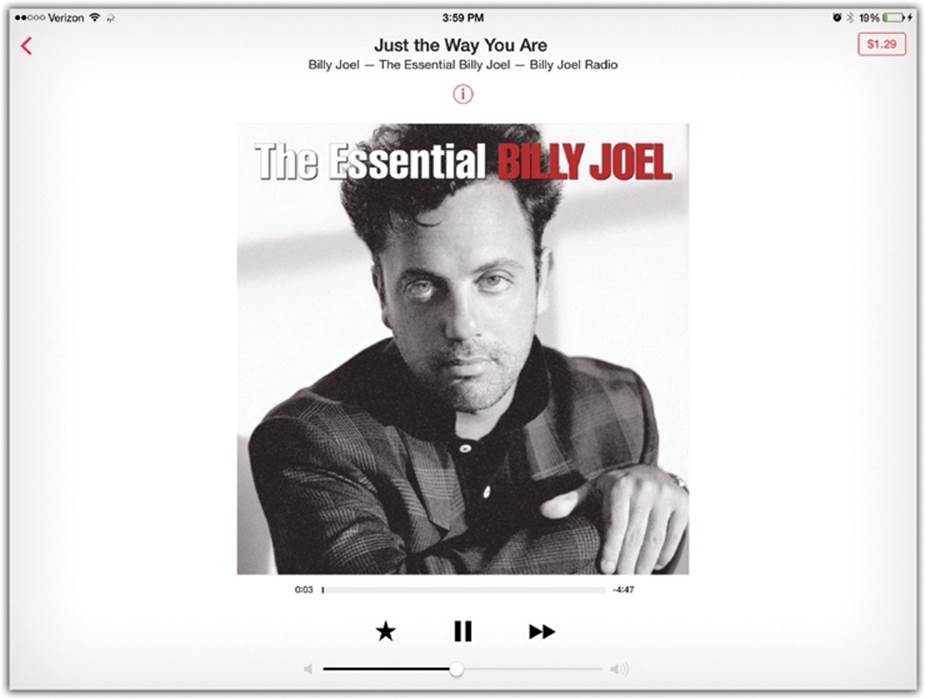
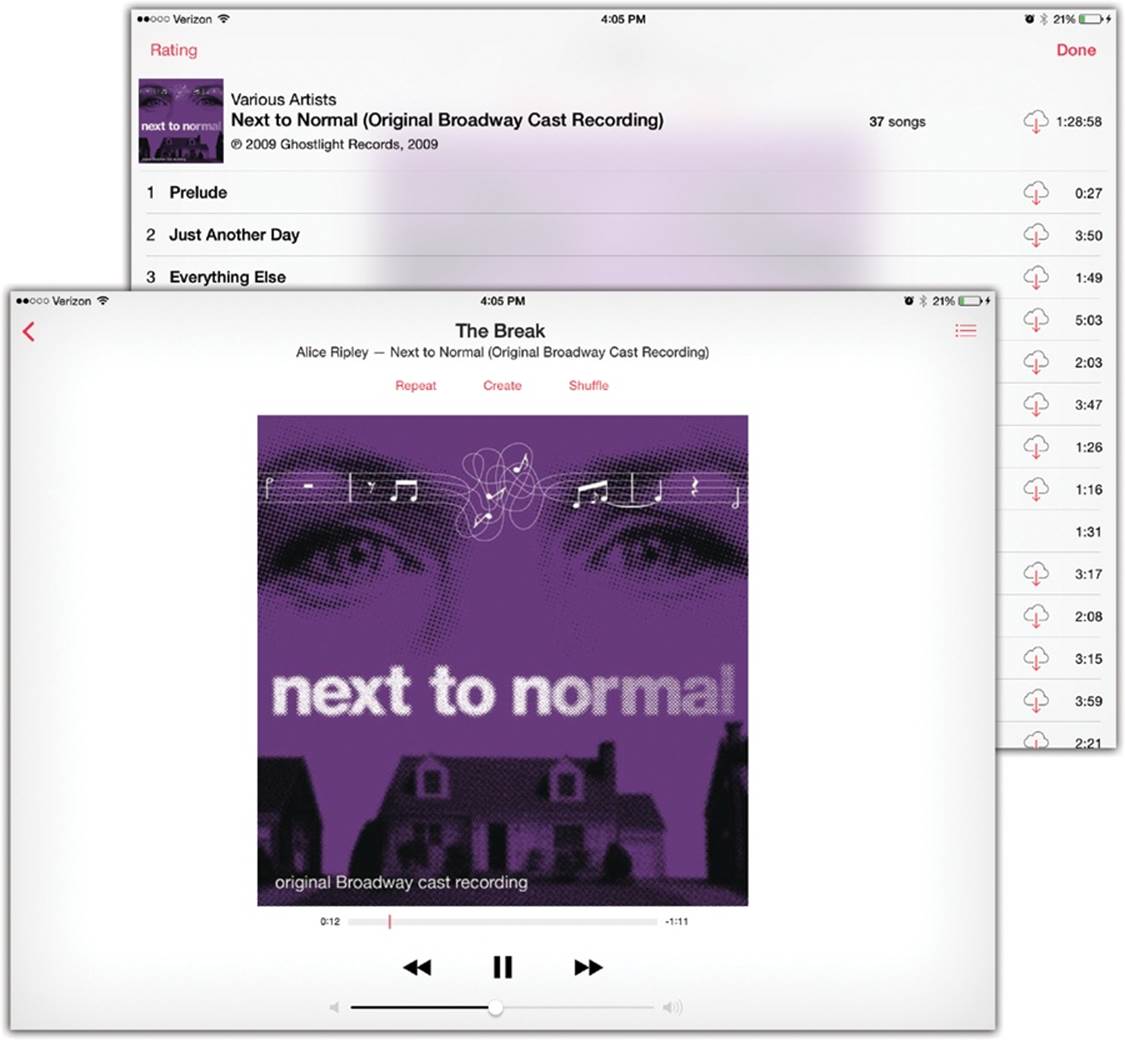
The Now Playing Screen
As a station plays, you see a screen like the one shown on The Info Screen. It displays the cover picture for the song’s album, the name of the song, the band, and the album name.
Here’s what the controls do:
§ ![]() . Returns to the Start screen, where you can choose a different radio station.
. Returns to the Start screen, where you can choose a different radio station.
§ ![]() . Opens the Info panel, described below.
. Opens the Info panel, described below.
§ Price. Of course, Apple would be thrilled if you came across a song you liked so much you wanted to buy it. That’s why the price button ($1.29, for example) is so prominent. When you tap it, the price changes to say Buy Song; tap again to download the song directly to your iPad. Now you can listen to it again, on command, without being subject to the randomness of iTunes Radio.
§ Progress bar. You can’t fast-forward or rewind within a Radio song. This strip is just a graph that shows you where you are in the song. The numbers on either side show you how far you are into the song and how much is left to play.
§ ![]() . Tap to find the Play More Like This and Never Play This Song buttons, which let you fine-tune your “radio station,” tailoring it precisely to your tastes.
. Tap to find the Play More Like This and Never Play This Song buttons, which let you fine-tune your “radio station,” tailoring it precisely to your tastes.
The third button, Add to iTunes Wish List, means, “I like this song; maybe I’ll buy it later.” When you get home to your Mac or PC, open the iTunes program, click Store at the top right, and then click My Wish List (in the list at right). Here’s the list you’ve been quietly building with your taps on the Add to iTunes Wish List button. You can listen to 1-minute previews, buy the complete songs, or delete them from the list if you’ve changed your mind.
TIP
You can also take a look at your Wish List right on the iPad. On the main Radio screen, tap History, then Wish List.
§ ![]() . Yeah, here’s another thing you can’t do with regular radio: pause.
. Yeah, here’s another thing you can’t do with regular radio: pause.
§ ![]() . This button doesn’t actually mean “fast-forward.” It means “skip.” You immediately hear the next song.
. This button doesn’t actually mean “fast-forward.” It means “skip.” You immediately hear the next song.
NOTE
You’re allowed to skip up to six songs per hour per station. When you reach that limit, the ![]() is dimmed.
is dimmed.
§ Volume slider. Of course, you can also press the buttons on the right side of the iPad.
TIP
While the music is playing, you can switch off the iPad. The music keeps playing, with the screen off to save battery power. What’s cool is that if you tap the Sleep switch again, the Lock screen looks like the Now Playing screen. That is, it has ![]() ,
, ![]() , and
, and ![]() buttons, so you can manage the playback without even having to fully wake the iPad.
buttons, so you can manage the playback without even having to fully wake the iPad.
Make Your Own Station
You can set up a new “radio station” of your own in either of two ways: by choosing one of Apple’s canned, ready-to-use stations or by typing in a song or performer you like.
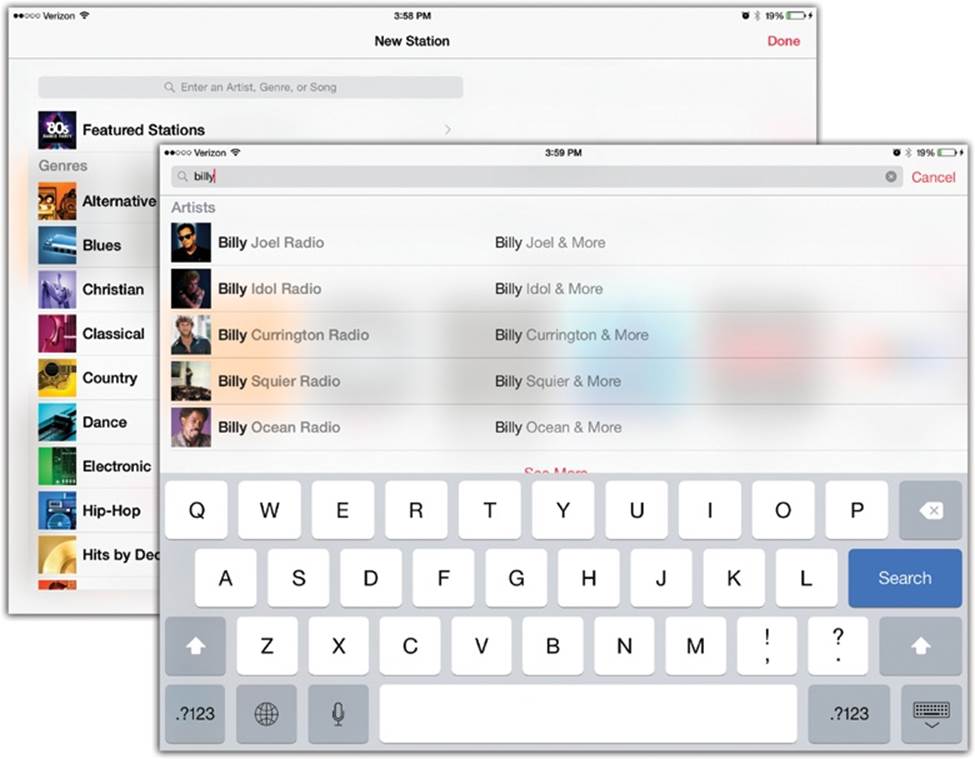
§ Prefab stations. On the Radio screen, tap New. Boom: There’s a huge list of music genres—Blues, Christian, Classical, Indie Rock, and so on. Tap one to see a list of prefab radio stations, ready to hear.
If you tap Jazz, for example, the options include Bop, Early Jazz, Jazz Rock, Latin Jazz, and The Big Band Era. Tap a name to listen a little bit. If you like what you hear, tap the tiny ![]() button to its right. You’ve just added a new “radio station” to the iTunes Radio main screen.
button to its right. You’ve just added a new “radio station” to the iTunes Radio main screen.
§ Type in a “seed.” Tap in the search box at the top; the keyboard appears. Type in—or tap the ![]() and speak—the name of a singer, band, song, or kind of music (show tunes or a cappella, for example).
and speak—the name of a singer, band, song, or kind of music (show tunes or a cappella, for example).
On the results screen, tap the entry that looks most promising (“A Cappella Radio,” for example). You’ve just created a new station, and it begins instantly.
As your stations build up, they require more scrolling down the main iTunes Radio screen to find. But the New Station button (to create a new station) is always there, always at the very bottom.
The Info Screen
If you tap the ![]() button above the Now Playing screen, you’re offered some options that give you more control over whatever’s assaulting your ears:
button above the Now Playing screen, you’re offered some options that give you more control over whatever’s assaulting your ears:
§ ![]() . This button opens the full list of songs from the album you’re hearing right now. Each, of course, has a price button so that you can buy it. You can also read the album’s reviews (Reviews) and see what other albums its fans have bought (Related).
. This button opens the full list of songs from the album you’re hearing right now. Each, of course, has a price button so that you can buy it. You can also read the album’s reviews (Reviews) and see what other albums its fans have bought (Related).
§ Price. Tap to buy the song and download it to your iPad.
§ New Station from Artist, New Station from Song. If a song comes on that you especially like, these buttons instantly create a new station that will play more music that sounds like this performer or this song. In effect, you get to branch your original station into one that’s more finely tuned to a particular taste.
§ Tune This Station (available for stations you’ve created). Do you want iTunes Radio to feed you the most popular songs within the category you’ve chosen? Or is it OK for it to play weirder, more obscure songs that you might not have heard before? Make your choice by adjusting this slider, from Hits (more mainstream) to Discovery (more out-there).
§ Add to My Stations (available for Apple’s suggested stations). Turns the current, Apple-selected station into one of your own.
§ Allow Explicit Tracks. Turn this switch on if you’re not easily offended by raunchy lyrics.
§ Share Station. If you’ve created and fine-tuned a station so that it’s truly amazing, you can bestow your superior taste on your friends by sending them a link to your station. Tap this button to produce the standard Share sheet; you can send a station by AirDrop, text message, email, Twitter or Facebook.
Tap outside the info panel to close it.
Deleting or Editing a Station
On the main Radio screen, in the My Stations row, tap Edit. Tap the name of the station you want to mangle or obliterate.
Now you can rename your station or share it. Using the Play More Like This and Never Play This sections, you can add performers, songs, or genres that you do or don’t want to be part of this station anymore.
Finally, if you scroll to the bottom, you can tap Delete Station to vaporize this ill-begotten station for good.
History
At the top of the main Radio screen, the History button opens a list of every song you’ve heard on each of your stations. It’s an amazing way to find out the name of some great song whose name you didn’t catch.
This list also, of course, includes a Buy button for each of those songs.
Siri and iTunes Radio
One of the best ways to control iTunes Radio is by barking orders at it. Luckily, Siri comes equipped to recognize a whole slew of commands pertaining to iTunes Radio.
Here’s a sampler; you don’t have to use these precise wordings.
§ Play the radio.
§ What song is this?
§ Play more like this.
§ Don’t play this song again.
§ Pause the music; resume the music; skip this song.
§ Play Billy Joel Radio or Play some Kelly Clarkson. (These must refer to stations you’ve already created.)
§ Add this song to my Wish List.
§ Stop the radio.
Playlists
A playlist is a group of songs you’ve placed together, in a sequence that makes sense to you. One might consist of party tunes; another might hold romantic dinnertime music; a third might be drum-heavy workout cuts.
In the olden days, you could create playlists only in the iTunes software. (And you still can. After you sync the iPad with your computer, your playlists appear here.) These days, however, you can also create playlists right on the iPad; read on.
Creating Playlists on the iPad
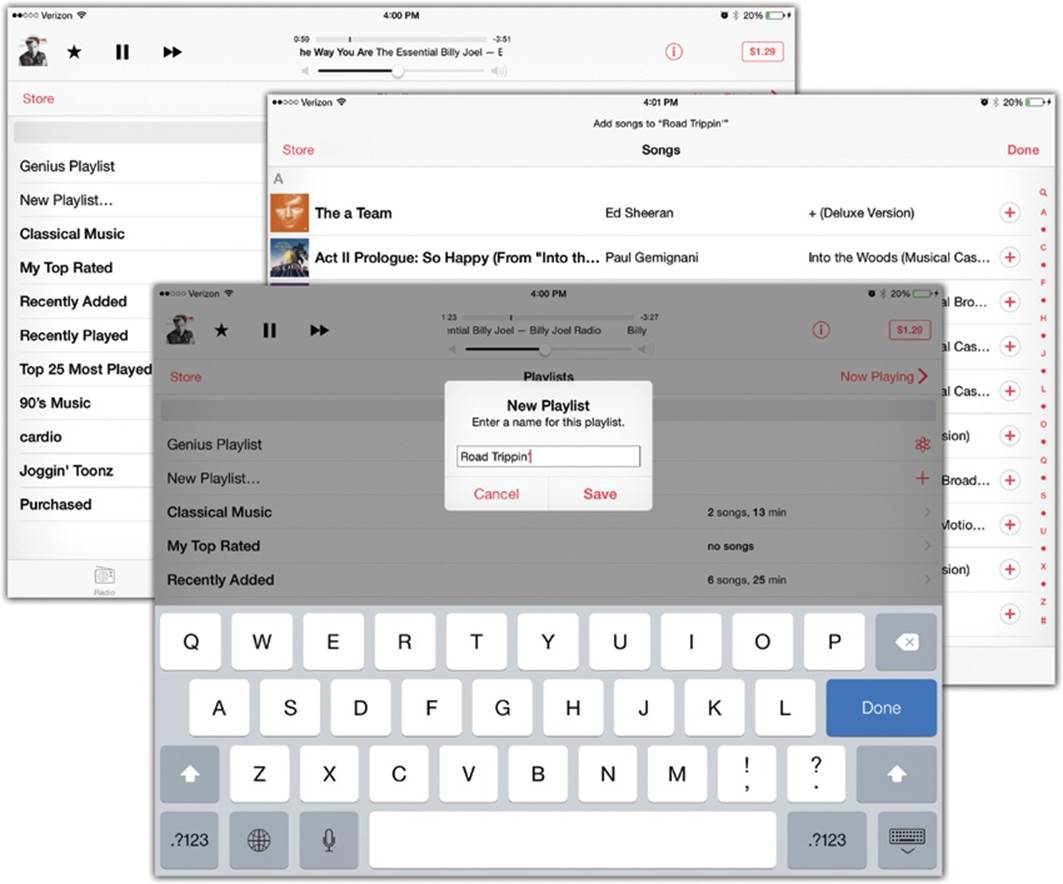
In the Music app, tap Playlists; tap New Playlist (below, left). Type a name for your new playlist (below, bottom), and then tap Save.
Now tap one of the icons at the bottom—Songs, Artists, Albums, and so on—and you’ll find that every song has a ![]() button (below, right). Tap that button, or tap directly on a song’s name, to add to the new playlist. Tap Done when you’ve added all the songs you want.
button (below, right). Tap that button, or tap directly on a song’s name, to add to the new playlist. Tap Done when you’ve added all the songs you want.
You arrive at the details screen for this playlist (facing page), where you can inspect or edit your handiwork. Tap Edit to rearrange the playlist songs or to delete some. Or tap Playlists to back out to the list of playlists, where your newly minted playlist is nestled.
TIP
The ![]() icon means that you own this song, but it’s not currently on your iPad. You can still play it, but only when you’re connected to the Internet. Tap the
icon means that you own this song, but it’s not currently on your iPad. You can still play it, but only when you’re connected to the Internet. Tap the ![]() to download it to the iPad for offline playback, or tap Download All to download all the online songs.
to download it to the iPad for offline playback, or tap Download All to download all the online songs.
Whatever playlists you create (or edit) on the iPad will wind up back on your computer, in iTunes, the next time you sync.
Using Playlists
To see what songs or videos are in a playlist, tap its name. (The ![]() symbol in a Music menu always means “Tap to see what’s in this list.”) Or swipe rightward across its name.
symbol in a Music menu always means “Tap to see what’s in this list.”) Or swipe rightward across its name.
Here you can use a standard iOS convention: Anywhere you’re asked to drill down from one list to another—from a playlist to the songs inside, for example—you can backtrack by swiping from the left edge of the iPad into the screen.
Or do it the long way: Tap ![]() at the upper-left corner of the screen (or swipe that word to the left). That button’s name always tells you what screen you just came from (Playlists, for example).
at the upper-left corner of the screen (or swipe that word to the left). That button’s name always tells you what screen you just came from (Playlists, for example).
You now arrive at a Playlist details screen, where your tracks are listed for your inspection. To start playing a song in the Playlist list, tap it.
Tap Edit, if you like, to drag the songs into a new sequence or to delete some of them. Tap Clear if you want to choose a different set of songs within this playlist name, or tap Delete to get rid of the playlist altogether. (Tapping Shuffle starts them playing right now, in a random order.)
Genius Playlists
Apple’s Genius playlist feature is supposed to analyze all your music and then, at the click of a button, create a playlist containing other songs from your library that “sound great” with one particular “seed” song. (Basically, it clumps songs by their degree of rockiness: soft-rock songs, harder rock, and so on.)
If you’ve used this feature in iTunes on your Mac or PC, and you’ve built up a Genius playlist or two, you’ll also find those playlists on your iPad. But you can make a Genius playlist right on the tablet.
Creating one of these playlists, however, involves submitting to Apple the contents of your music library, which creeps some people out. To confirm that you’re fine with that, you must begin in Settings→Music, turn on Genius, and accept the legalese.
Then, back in the Music app, on any of its screens, tap the song you want to be the “seed”—the one you want the playlist to sound the most like. It starts to play.
Now tap Create at the top of the screen, and then tap Genius Playlist. Suddenly there’s a new playlist on your Playlists screen called Genius Playlist. It contains a bunch more songs that “go well” with your seed songs. You’re listening to your new Genius playlist.
NOTE
That is, if you have enough music on the iPad. If you don’t have a lot of music, you may get the “This song does not have enough related songs” error message. Tap OK and then try a different song. Or just spend $500 on music.
If you consider this batch worth saving, tap Save (top of the Genius Playlist screen). The new playlist now appears among your others on the Playlists screen, named after your seed song, bearing the ![]() logo to remind you that the iPad created that wicked mix.
logo to remind you that the iPad created that wicked mix.
You can also tap Refresh to make the iPad take another stab at building a similar group of songs, or Delete to get rid of the playlist.
Next time you sync, this playlist will return to the mother ship: iTunes.
If you spot a song you can’t stand, swipe left across it and then tap Remove to delete it from the Genius playlist.
TIP
There’s another entity called a Genius mix. Unlike a Genius playlist, a mix is a never-ending “radio station.” You have to create it in iTunes on your computer and then sync it to your iPad. Once you do that, a new Genius button (![]() ) appears in the Music app on your iPad, providing access to your mixes.
) appears in the Music app on your iPad, providing access to your mixes.
Artists, Songs…
The other icons across the bottom of the Music screen include these:
§ Artists. This list identifies all the bands, orchestras, or singers in your collection. Even if you have only one song from a certain performer, it shows up here. Once again, you drill down to the list of individual songs by tapping an artist’s name. At that point, tap any song to begin playing it.
§ Songs. Here’s an alphabetical list of every song on your iPad. Scroll or flick through it; use the index at the right side of the screen to jump to a letter of the alphabet; or scroll all the way to the top and type a song name, album name, podcast name, or band name into the search box. Tap anything to begin playing it.
TIP
At the bottom of any of these lists, you’ll see the total number of items in that list: “76 Songs,” for example. At the top of the screen, you may see the Now Playing button, which opens up the playback screen of whatever is playing.
Best of all, if you drag all the way downward on any list—Music, Podcasts, whatever—you’ll see that a search box has been hiding from you, up off the top of the screen. It lets you search your audio stash by name (title, band, or album).
§ Albums. That’s right, it’s a list of all the CDs or downloaded albums from which your music collection is derived, complete with miniature pictures of the album art. Tap an album’s name to see a list of songs that came from it; tap a song to start playing it.
§ Genres. Tap this item to sort your collection by musical genre: Pop, Rock, World, Gospel, or whatever.
§ Compilations. A compilation is one of those albums that’s been put together from many different performers. You know: “Zither Hits of the 1600s,” “Kazoo Classics,” and so on. You’re supposed to turn on the Compilation checkbox manually, in iTunes, to identify songs that belong together in this way. Once you’ve done that, all songs that belong to compilations you’ve created show up in this list.
§ Composers. Here’s your whole music collection sorted by composer—a crumb the iPad creators have thrown to classical-music fans.
NOTE
There used to be entries here for podcasts and iTunes U (lectures, lab reports, movies, and other educational materials supplied to the world by universities). They’re gone now, because Apple would prefer that you use its dedicated Podcasts and iTunes U apps.
Other Lists
If you’ve turned on Home Sharing (Genius), the icons at the bottom of the Music app—usually Radio, Playlists, Artists, Songs and so on—shift around.
A More button appears here, replacing the Composers button. If you tap More, the More screen appears, listing two ways to view your collection: by Composers and by Shared. (Shared lists music that’s sitting on a computer elsewhere in your house, as described later in this chapter.)
Customizing List Land
But what if you’ve turned on Home Sharing, so your Composers button has moved into the More screen—but you like seeing your list of composers? Are you really expected to open up the More screen every time you want to see your list sorted that way?
Nope. You can add Composers to the bottom of the main Music screen, replacing any of the starter categories (Radio, Playlists, Artists, Songs, and so on).
To renovate the starter icons, tap More and then Edit. You arrive at the “Drag the icons to organize tabs” screen.
Drag an icon from the top half of the screen downward, directly onto the existing icon you want to replace. It lights up to show the success of your drag. When you release your finger, the new icon has replaced the old one. Tap Done.
Oh, and while you’re on the Edit screen: You can take this opportunity to rearrange the seven icons at the bottom. Drag them around with your finger. Fun for the whole family!
Playback Control: Now Playing
Whenever a song is playing, the top left of the screen offers all the controls you need to control music playback—some obvious and some not so obvious.
TIP
Here’s a non-obvious one: If the iPad is asleep, press the Home button (or tap the Sleep switch). Why, look—playback controls, right on the Lock screen! You don’t even have to wake or unlock the iPad.
§ Now Playing. Tap to see a huge version of the cover art, nearly filling the screen. Playback controls and song information are still available.
At the top-left corner of that screen, the ![]() means “Return to the list whence this song came.” It takes you back to the list of songs in this album, playlist, or whatever.
means “Return to the list whence this song came.” It takes you back to the list of songs in this album, playlist, or whatever.
§ Album list. At the top-right corner, the ![]() icon seems to say “list.” Tap it to view a list of the other songs on this song’s album (next page), where you can jump directly to another cut by tapping its name.
icon seems to say “list.” Tap it to view a list of the other songs on this song’s album (next page), where you can jump directly to another cut by tapping its name.
TIP
You can double-tap the big album art picture to open the track list, too. It’s a bigger target.
§ Album art. Most of the screen is filled with a bright, colorful shot of the original CD’s album art. (If none is available—if you’re listening to a song you wrote, for example—you see a big gray generic musical-note picture. You can drag or paste in an album-art graphic—one you found on the Web, for example—in iTunes.)
§ Song info. Center top: the artist name, track name, and album name.
§ Rating. If you tap the song’s name, it disappears. It’s replaced by a row of five light-gray dots.
This is your opportunity to rate the song, by tapping one of the five dots at the top edge of the screen. If you tap dot number three, for example, the first three dots all turn into stars. You’ve just given that song three stars. When you next sync your iPad with your computer, the ratings you’ve applied magically show up on the same songs in iTunes. (Tap the album cover to restore the song info and hide the rating.)
§ Scrubber. This slider reveals two useful statistics: how much of the song you’ve heard, in minutes and seconds (at the left end) and how much time remains (at the right end).
To operate the slider, drag the tiny, vertical-line handle with your finger. You can jump to any spot in the song this way. (Tapping directly on the spot you want to hear doesn’t work.)
TIP
This is very cool: You can control the speed of the scrubbing, using this highly secret trick:
Drag the little handle upward or downward; the song title changes to show you the new scrubbing speed. As your finger slides farther from the handle, it says “Hi-Speed Scrubbing,” then “Half-Speed Scrubbing,” then “Quarter-Speed Scrubbing,” then “Fine Scrubbing.” The point is to get finer control over your scrubbing, making it easier to locate a specific spot in the tune.
§ Play/Pause button. The Pause button beneath the album photo looks like this ![]() when the music is playing. If you do pause, then the button turns into the Play button (
when the music is playing. If you do pause, then the button turns into the Play button (![]() ).
).
TIP
If you’re wearing Apple earbuds, then pinching the microphone clicker serves the same purpose: It’s a Play/Pause control.
Incidentally, when you plug in headphones, the iPad’s built-in speaker turns off, but when you unplug the headphones, your music pauses instead of switching abruptly back to the speaker.
§ Previous, Next (![]() ,
, ![]() ). These buttons work exactly as they do on an iPod: Tap
). These buttons work exactly as they do on an iPod: Tap ![]() to skip to the beginning of this song (or, if you’re already at the beginning, to the previous song). Tap
to skip to the beginning of this song (or, if you’re already at the beginning, to the previous song). Tap ![]() for the next song.
for the next song.
TIP
If you’re wearing the earbuds, then you can pinch the clicker twice to skip to the next song.
If you hold down one of these buttons, you rewind or fast-forward. You hear the music speeding by, without turning the singer into a chipmunk. The rewinding or fast-forwarding accelerates if you keep holding the button down.
TIP
See the little scroll bar beneath the album art? You can also drag your finger across it to jump to any spot in the song.
§ Volume. You can drag the round handle of this slider (bottom of the screen) to adjust the volume—or you can use the volume buttons on the right side of the iPad.
TIP
If you use your iPad for music a lot, don’t miss the Control Center, the panel that appears when you swipe up from the bottom of the screen. It includes playback controls, so you don’t have to go to the Music app just to change tracks.
§ Repeat. If you really love a certain album or playlist, you can command the iPad to play it over and over again, beginning to end. Just tap the Repeat button.
Now you’re offered three looping options: Repeat Off (stop repeating), Repeat Song (loop this song endlessly), and Repeat All (repeat these songs over and over; it might instead say Repeat Album, Repeat Artist, or Repeat Playlist).
§ Create. And voilà: Another pop-up list of options. There’s Genius Playlist (create a Genius playlist based on the song you’re listening to, as described on Using Playlists;) New Station from Artist; and New Station from Song. These create new iTunes Radio “stations,” as described earlier in this chapter.
§ Shuffle. Ordinarily, the iPad plays the songs in an album sequentially, from beginning to end. But if you love surprises, tap here so it changes to say Shuffle All. Now the album plays in random order.
By the way, there’s nothing to stop you from turning on Repeat and Shuffle, meaning that you’ll hear the songs on the album played endlessly, but never in the same order twice.
Multi(music)tasking
Once you’re playing music, it keeps right on playing, even if you press the Home button and move on to do some other work on the iPad. After all, the only thing more pleasurable than surfing the Web is surfing it with a Beach Boys soundtrack.
If you’ve got something else to do—like jogging, driving, or performing surgery—tap the Sleep/Wake switch to turn off the screen. The music keeps playing, but you’ll save battery power.
TIP
Even with the screen off, you can still adjust the music volume (use the volume buttons on the earbud clicker or the buttons on the side of the iPad), pause the music (pinch the earbud clicker once), or advance to the next song (pinch it twice).
Speakers and Headphones
The iPad’s speaker is pretty darned good for such a tiny machine. But the world is full of better speakers—black-and-white Bluetooth wireless speakers, car stereo systems, hi-fi TVs, and fancy headphones. The iPad is especially easy to use with them.
Bluetooth Wireless
You can buy amazingly small, powerful Bluetooth stereo speakers that receive your iPad’s music from as far as 20 or 30 feet away—made by Jawbone, Bose, and others.
There are also Bluetooth headphones. But when you shop, make sure the headphones say “A2DP stereo”; the headsets for making office iPad calls and so on don’t play music over Bluetooth.
Once you’ve bought your headphones or speakers, you have to introduce them to the iPad—a process called pairing.
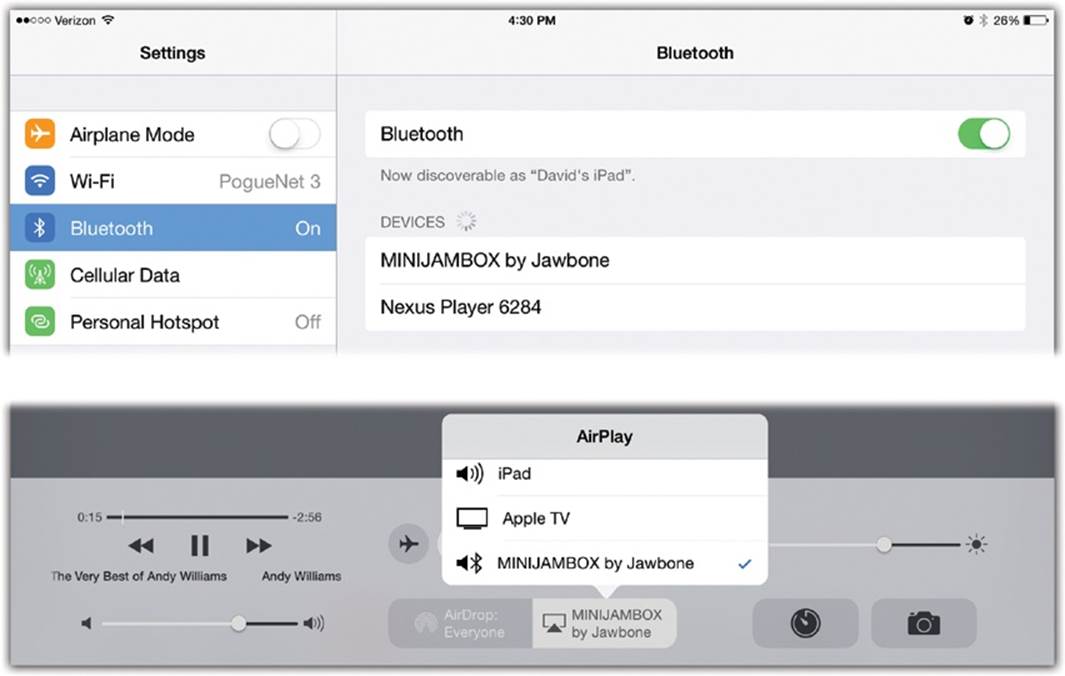
From the Home screen, tap Settings→Bluetooth. Turn Bluetooth on (below, top); you see the Searching ![]() animation as the iPad wirelessly hunts for your headphones or speakers.
animation as the iPad wirelessly hunts for your headphones or speakers.
Grab them, turn them on, and start the pairing procedure, as described in the manual. Usually that means holding down a certain button until a tiny light starts flashing. At that point, the headphones’ or speaker’s name appears on the iPad’s screen (below, bottom).
TIP
If the headphones or speakers require a one-time passcode—it’s usually 0000, but check the manual—then the iPad’s keyboard appears, so you can type it in.
A couple of seconds later, it says Connected; at this point, any sound that the iPad would ordinarily play through its speakers or earbuds now plays through the wireless ’phones or speakers. Not just music—which, in general, sounds amazing—but chirps, game sounds, and so on. Oh, and FaceTime calls.
If your headset has a microphone, too, you can even answer and make calls wirelessly. (There’s an Answer button right on the headphones.)
Using Bluetooth wireless stereo does eat up your battery charge faster. But come on: listening to your music without wires, with the iPad still in your bag? How cool is that?
AirPlay
There’s another way to transmit audio wirelessly from the iPad (and video, too). Apple came up with a technology called AirPlay; you can buy AirPlay speakers, amplifiers, and TV sets. The Apple TV is the best-known AirPlay machine.
AirPlay is described on AirPlay, because most people use it to transmit video, not just audio. But the steps for transmitting to an AirPlay audio gadget are the same.
Switching Among Speakers
When your iPad has a connection to a wireless sound source—a Bluetooth speaker or AirPlay receiver, for example—you need some way to direct the music playback to it.
The answer is the ![]() button. It’s on the Control Center (previous page). When you tap it, the iPad offers a button for each speaker (lower right); to switch, tap the one you want.
button. It’s on the Control Center (previous page). When you tap it, the iPad offers a button for each speaker (lower right); to switch, tap the one you want.
Instantly, the sound begins flowing from your other sound source. Use the same method to switch back to the iPad’s speakers when the time comes.
Familiar iPod Features
The iPad has a long list of traditional iPod features for music playback. Most of these options await in Settings→Music. (Shortcut: Tell Siri, “Open Music settings.”)
Sound Check
This feature smooths out the master volume levels of tracks from different albums, helping to compensate for differences in their recording levels. It doesn’t deprive you of peaks and valleys in the music volume, of course—it affects only the baseline level.
EQ (Equalization)
Like any good music player, the iPad offers an EQ function: a long list of presets, each of which affects your music differently by boosting or throttling various frequencies. One might bring out the bass to goose up your hip-hop tunes; another might emphasize the midrange for clearer vocals; and so on. “Late Night” is especially handy; it lowers the bass so it thuds less. Your downstairs neighbors will love it.)
Volume Limit
It’s now established fact: Listening to a lot of loud music through earphones can damage your hearing. Pump it up today, pay for it tomorrow.
Portable music players can be sinister that way, because in noisy places like planes and city streets, people turn up the volume much louder than they would in a quiet place, and they don’t even realize how high they’ve cranked it.
That’s why Apple created this volume slider. It lets you limit the maximum volume level of the music.
In fact, if you’re a parent, you can even lock down this control on your child’s iPad; it can be bypassed only with a password. Set the volume slider here, and then, in Settings→General→Restrictions, turn on Volume Limit, as described on Volume Limit.
Group By Album Artist
Suppose you’ve bought a movie soundtrack album or compilation album with a different band on each track.
In iTunes, you can see all these songs listed in a group, thanks to a text field called Album Artist. (There you see the unifying title—the movie name, for example.)
When you turn on this option, the Music app consolidates all those artist names into a single new album-name entry in your Artists list. For example, you’ll see an entry for “Apocalypse Now Soundtrack,” which you can tap to see the individual ’60s songs within it; the individual bands are no longer scattered alphabetically through the Artists list.
TIP
Many soundtrack albums come with their Album Artist identified only as “Various Artists,” and that’s how your iPad will group them. In iTunes, however, you can select all the songs on the album, choose File→Get Info, and change the Album Artist to something more descriptive, like the movie title. When you sync the results back to your iPad, the album will show up in the proper spot in the Artists list.
Show All Music
Ordinarily, the Music app lists all your songs, whether they’re on your iPad or stored online, in your iTunes Store “locker.” (Any song you’ve ever bought on any Apple gadget is available to play or download at any time.) Because, ordinarily, that’s what you’d want: the option to see all your music, no matter where it’s stored.
If you turn off Show All Music, the iPad lists only songs that are actually on it—not the online stuff.
Genius
Here’s the master switch for permitting Genius playlists, as described above.
Playing Music from Your Computer
Here’s a trick you weren’t expecting: You can store many terabytes of music on your Mac or PC upstairs—and play it on your iPad in the kitchen downstairs.
This nifty bit of wireless magic is brought to you by Home Sharing, a feature of the iTunes program. To set it up, make sure your iPad and computer are on the same WiFi network.
Then, in iTunes on the Mac or PC, open Preferences. Click Sharing, and turn on “Share my library on my local network.” (You can share only certain playlists, if you like.) Turn on Require password and enter your Apple account (iCloud) password. Click OK.
Now pick up your iPad. In Settings→Music, log into Home Sharing using the same Apple ID and password. Finally, open the Music app on the iPad. Tap More, tap Shared, and tap the name of your computer’s iTunes library. (Later, when you want to return to listening to the stuff on the iPad itself, tap that same Shared button, but this time tap the name of your iPad.)
The iTunes Store
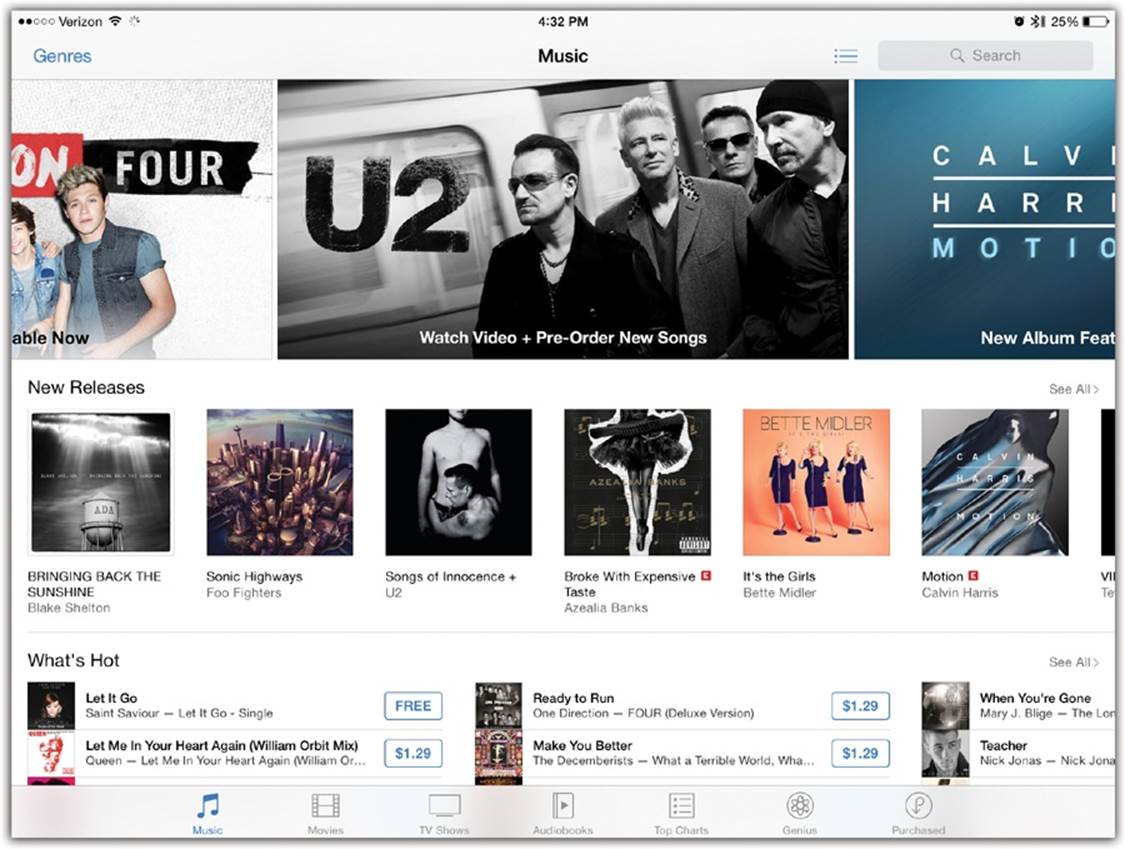
Just as you can buy apps using the App Store app, you can also browse, buy, and download songs, TV shows, and movies using the iTunes Store app. Anything you buy gets autosynced back to your computer’s copy of iTunes when you get home. Whenever you hear somebody mention a buy-worthy song, for example, you can have it within a minute.
To begin, open the iTunes Store app. The store you see here is modeled on the App Store described in Chapter 9. This time, the buttons at the bottom of the screen include Music, Movies, TV Shows, Audiobooks, and so on.
When you tap one of those buttons, the screen offers further drilling-down buttons. For Music, for example, the scrolling horizontal rows of options might include New Releases, Recent Releases, Singles, and Pre-Orders.
(Beneath each list is a Redeem button, which you can tap if you’ve been given an iTunes gift certificate or a promo code; a Send Gift button, which lets you buy a song or video for someone else; and an Apple ID button, which can show you your current credit balance.)
TIP
You can’t buy TV shows or movies on the cellular network—just in WiFi hotspots. That’s your cell company’s way of saying, “We don’t want you jamming up our precious cellular network with your hefty video downloads, bucko.”
Note, by the way, that you can rent movies from the store instead of buying them outright. You pay only $3, $4, or $5 to rent (instead of $10 to $16 to buy). But once you start watching, you have only 24 hours to finish; after that, the movie deletes itself from your iPad. (If you like, you can sync it to your Mac or PC to continue watching in iTunes—still within 24 hours.)
To search for something in particular, tap Search (top right). The keyboard appears. Type what you’re looking for: the name of a song, movie, show, performer, or album, for example. At any time, you can stop typing and tap the name of a match to see its details. You can use the buttons across the top to restrict the search to one category (just songs or albums, for example).
All these tools eventually take you to the details page of an album, song, or movie. It closely resembles the details page of an app in the App Store—you get an Info page, a page of customer ratings and reviews, and a Related tab that suggests similar masterpieces.
For a song, tap its name to hear a 90-second preview (tap again to stop). For a TV show or movie, tap ![]() to watch the ad or the sneak preview.
to watch the ad or the sneak preview.
If you’re sold, tap the price button to buy the song, show, or album (and tap BUY to confirm). Enter your Apple ID password when you’re asked. (For movies, you can choose either Buy or Rent, priced accordingly.) At this point, your iPad downloads the music or video you bought.
Purchased Items
Anything you buy from the iTunes Store winds up in the appropriate app on your iPad. Open the Videos app to see your TV shows and movies or the Music app to see your songs.
You can also inspect them from within the Music app; at the bottom, tap Purchased.
If you do that (and then tap the relevant category, like Music or Movies), you get a pair of tabs:
§ All. Here’s a list of everything you’ve bought from iTunes, on your iPad or any other Apple machine.
§ Not on This iPad. This is the cool part. Here you see not just the files on the iPad in your hand, but things you’ve bought on other Apple gadgets—an album you bought on your iPhone, for example, or a song you downloaded to your iPod Touch. (This assumes that you’re using the same Apple ID on all your gizmos.)
The beauty of this arrangement, of course, is that you can tap the name of something that’s Not on This iPad—and then download it. No extra charge.
TIP
If you prefer, you can direct your iPad to download those purchases that you make on other gadgets automatically, without your having to tap Not on This iPad. Visit Settings→iTunes & App Store, and turn on the switches for Music, Apps, and/or Books under Automatic Downloads. If you also turn on Use Cellular Data, then your cellular iPad will do this auto-downloading when you’re in any 3G or LTE cellular Internet area, not just in a WiFi hotspot.
So you’ve downloaded one of the store’s millions of songs, podcasts, TV shows, music videos, ringtones, or movies directly to your iPad. Next time you sync, that song will swim upstream to your Mac or PC, where it will be safely backed up in iTunes. (And if you lost your connection before the iPad was finished downloading, your Mac or PC will finish the job automatically. Cool.)
The Videos App
The iPad has a separate app for playing TV shows, movies, and other videos. It’s called, of all things, Videos.
If you can’t figure out how to operate this app, then you shouldn’t be allowed to have an iPad. Its tabs are Movies, TV Shows, and Music Videos (or whatever video types you actually have).
NOTE
If you’ve turned on Home Sharing (Genius), a tab appears here called Shared. It’s where you see your computers listed so that you can view the videos contained on them instead of on your iPad.
Tap to see the thumbnails of your videos; tap a video to see its plot summary, year of release, and so on. If it’s a TV series, tap an episode in that series, if necessary. Either way, tap ![]() to begin watching.
to begin watching.
NOTE
If you see a ![]() icon on this screen, it means that this bought or rented movie is not actually on your iPad. If you have a good WiFi signal, you can watch it right now by streaming it (instead of downloading it to your iPad); tap the movie poster to open it, and then tap
icon on this screen, it means that this bought or rented movie is not actually on your iPad. If you have a good WiFi signal, you can watch it right now by streaming it (instead of downloading it to your iPad); tap the movie poster to open it, and then tap ![]() . Or download it to your iPad by tapping
. Or download it to your iPad by tapping ![]() .
.
If you don’t see that icon, then an Edit button appears instead. Tap it, and then tap the ![]() to delete it.
to delete it.
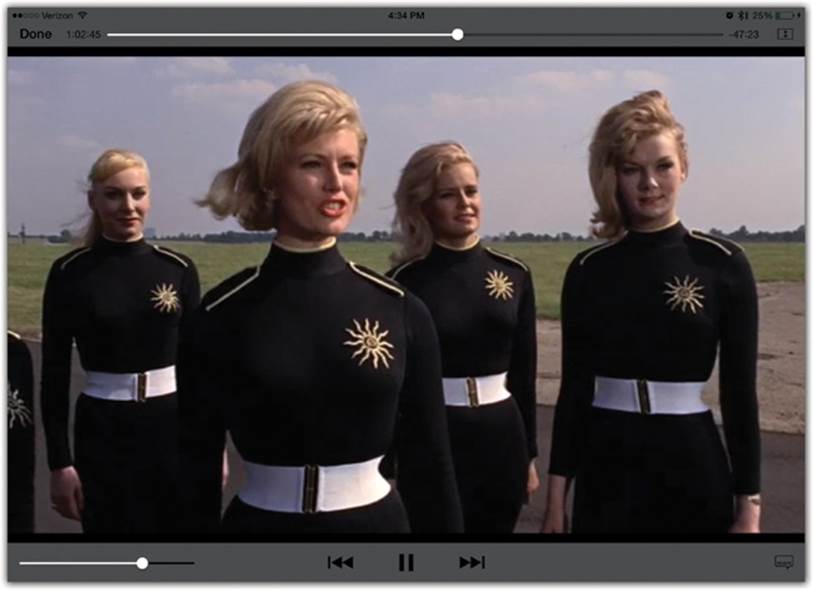
When you’re playing video, anything else on the screen is distracting, so Apple hides the video playback controls. Tap the screen once to make them appear and again to make them disappear.
Here’s what they do:
§ Done. Tap this button, in the top-left corner, to stop playback and return to the master list of videos.
§ Scroll slider. This progress indicator (top of the screen) is exactly like the one you see when you’re playing music. You see the elapsed time, the remaining time, and a white, round handle that you can drag to jump forward or back in the video.
TIP
Drag your finger farther (up or down) from the handle to choose a faster or slower scrubbing speed.
§ Zoom/Unzoom. In the top-right corner, a little ![]() or
or ![]() button appears if the video’s shape doesn’t exactly match your screen. Tap it to adjust the zoom level of the video, as described on Zoom/Unzoom.
button appears if the video’s shape doesn’t exactly match your screen. Tap it to adjust the zoom level of the video, as described on Zoom/Unzoom.
§ Play/Pause (![]() ). These buttons (and the earbud clicker) do the same thing to video as they do to music: alternate playing and pausing.
). These buttons (and the earbud clicker) do the same thing to video as they do to music: alternate playing and pausing.
§ Previous, Next (![]() ,
, ![]() ). Hold down your finger to rewind or fast-forward the video. The longer you hold, the faster the zipping. (When you fast-forward, you even get to hear the sped-up audio.)
). Hold down your finger to rewind or fast-forward the video. The longer you hold, the faster the zipping. (When you fast-forward, you even get to hear the sped-up audio.)
If you’re watching a movie from the iTunes Store, you may be surprised to discover that it comes with predefined chapter markers, just like a DVD. Internally, it’s divided up into scenes. To see them, stop playback (tap Done); on the movie page, tap Chapters. Tap a chapter name to skip to that chapter marker—or tap ![]() to return to your original spot.
to return to your original spot.
TIP
If you’re wearing the earbuds, you can pinch the clicker twice to skip to the next chapter, or three times to go back a chapter.

§ Volume. You can drag the round handle of this slider (bottom of the screen) to adjust the volume—or you can use the volume buttons on the right side of the iPad.
§ Language (![]() ). You don’t see this button often. But when you do, it summons subtitle and alternate-language soundtrack options, just like a DVD player.
). You don’t see this button often. But when you do, it summons subtitle and alternate-language soundtrack options, just like a DVD player.
§ AirPlay (![]() ). This symbol appears if you have an Apple TV (or another AirPlay-compatible electronic). Tap it to send your video playback to the TV, as described on TV Output.
). This symbol appears if you have an Apple TV (or another AirPlay-compatible electronic). Tap it to send your video playback to the TV, as described on TV Output.
§ Movie, Special Features, Related. These days, some movies come with what would once have been called DVD Extras: featurettes, alternate endings, “making of” documentaries, and the like. If your iTunes Store movie came with these extras, the Special Features button offers them to you. (Movie takes you back to the movie.) And Related shows you other movies that Apple thinks you might like because they’re similar to this movie.
TIP
To delete a video, swipe leftward across its name in the Videos list; tap Delete to confirm. (You can always re-download it, of course.)
Zoom/Unzoom
The iPad’s screen is bright, vibrant, and stunningly sharp. Sometimes, however, it’s not the right shape for videos.
Pre-HDTV shows are squarish, not rectangular. So when you watch older TV shows on a rectangular screen, you get black letterbox columns on either side of the picture.
Movies have the opposite problem. They’re usually too wide for the iPad screen. So when you watch movies, you may wind up with horizontal letterbox bars above and below the picture.
Some people are fine with that. After all, HDTVs have the same problem. At least when letterbox bars are onscreen, you know you’re seeing the complete composition of the scene the director intended.
Other people can’t stand letterboxing. You’re already watching on a pretty small screen; why sacrifice some of that precious area to black bars?
Fortunately, the iPad gives you a choice. If you double-tap the video as it plays, you zoom in, magnifying the image so it fills the entire screen. Or, if the playback controls are visible, you can also tap ![]() or
or ![]() .
.
Of course, now you’re not seeing the entire original composition. You lose the top and bottom of old TV scenes, or the left and right edges of movie scenes.

Fortunately, if this effect chops off something important—some text, for example—the original letterbox view is just another double-tap away.
(Of course, no zooming happens if the source material is already a perfect fit for the iPad’s screen shape.)
TV Output
When you crave a bigger screen, you can play your iPad’s videos on a regular TV. All you need is the right cable: the Apple Digital AV Adapter. It carries both audio and video over a single cable (an HDMI cable).
It mirrors what’s on the iPad: your Home screen, email, Safari, and everything else. (Photos and presentations appear on your TV in pure, “video outputted” form, without any controls or other window clutter.)
AirPlay
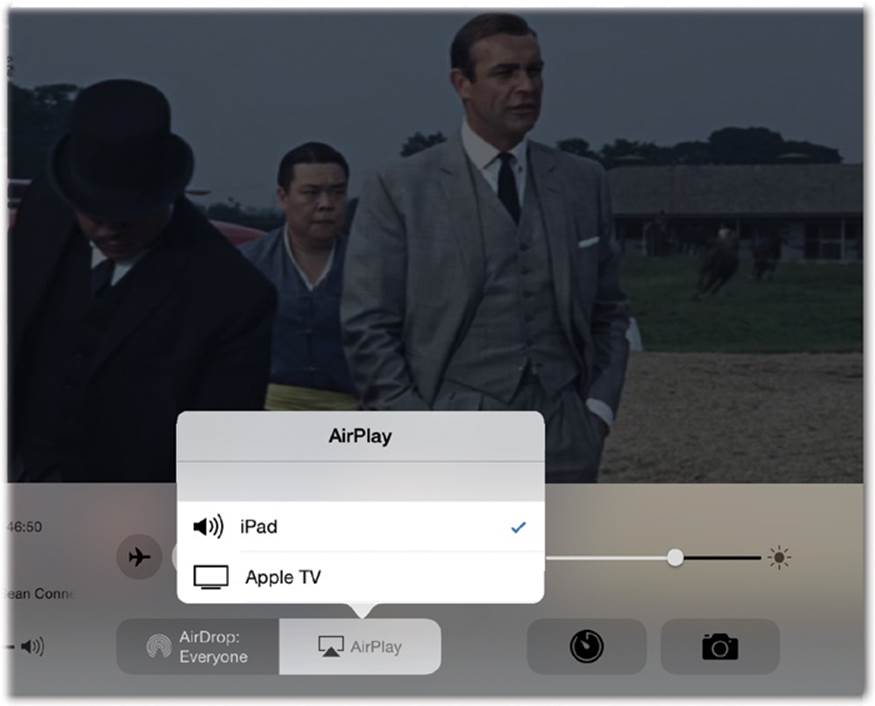
Your iPad also offers wireless projection, thanks to a feature called AirPlay. It transmits music or hi-def video (with audio) from your iPad to an Apple TV (or another AirPlay-equipped receiver) across the room. It’s a fantastic way to send slideshows, movies, presentations, games, FaceTime calls, and Web sites to your TV for a larger audience to enjoy. Whatever’s on the screen gets transmitted.
AirPlay receivers include the Apple TV (version 2 or later), plus speakers, stereos, and audio receivers from Denon, Marantz, JBL, iHome, and other companies.
The iPad and the AirPlay receiver must be on the same WiFi network. Then, when you’re playing a video or music, open the Control Center (Control Center), and tap ![]() to see a list of available AirPlay receivers, as illustrated on the next page. If you have an Apple TV, tap its name, then turn its Mirroring switch On.
to see a list of available AirPlay receivers, as illustrated on the next page. If you have an Apple TV, tap its name, then turn its Mirroring switch On.
That’s it! Everything on the iPad screen now appears on the TV or sound system. (The iPad’s status bar displays the ![]() icon, so you don’t wander off and forget that every move you make is visible to the entire crowd in the living room.)
icon, so you don’t wander off and forget that every move you make is visible to the entire crowd in the living room.)
TIP
You can even turn a Mac into an AirPlay receiver. A $13 program called Reflector (reflectorapp.com) lets you view the iPad’s live image on the Mac’s screen—and hear its sound. There’s also a Record command, so you can create a movie of whatever you’re doing on the iPad.
Reflector is great for trainers, teachers, or product demonstrators. And if you have a projector connected to the Mac, it’s a fantastic way to project your iPad onto a screen that’s even bigger yet.
Oh—and if you have a Mac running OS X Yosemite or later, a free trick awaits. Connect the iPad to the Mac with its white USB cable. Open QuickTime Player. Choose File→New Movie Recording. From the little ![]() menu next to the
menu next to the ![]() button, choose your iPad’s name.
button, choose your iPad’s name.
Now you’re seeing the iPad’s screen on your Mac—and you can record it, project it, or screen-capture it for future generations!
All materials on the site are licensed Creative Commons Attribution-Sharealike 3.0 Unported CC BY-SA 3.0 & GNU Free Documentation License (GFDL)
If you are the copyright holder of any material contained on our site and intend to remove it, please contact our site administrator for approval.
© 2016-2026 All site design rights belong to S.Y.A.