Teach Yourself VISUALLY iPhoto for iPad (2013)
Chapter 10: Using Filters and Effects
You can use iPhoto’s effects to transform your photos in dramatic ways. Instead of subtly enhancing a photo, you can totally transform its look and mood to create visually striking effects that were once only available to professionals. The effects are easy to use, but because they can be unpredictable the best way to master them is to experiment. This chapter introduces the simpler effects. Chapter 11 explores further creative experiments.
Understanding Effects
Add Ink Effects
Create Warm and Cool Colorings
Master Duotones
Convert Color to Black-and-White
Pick Out Strong Colors
Create Vintage Film Effects
Convert a Photo into Art
Understanding Effects
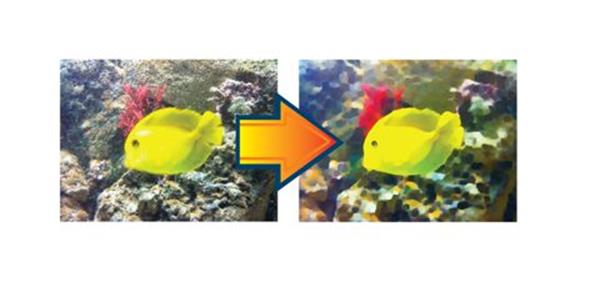
You can modify your photos in creative ways by applying various effects. Most create dramatic results — for example, you can change a color photo into a black-and-white one, or convert a photo into a painting. The Warm & Cool effect can create more subtle adjustments.
The effects appear on animated fold-out strips. You can select an effect by tapping a strip, and then modify the effect by dragging your finger left and right. You can also modify some effects by dragging your fingers on the photo.
Understanding Photo Effects
In the days of darkroom editing, photographers evolved a range of extreme special effects. iPhoto includes digital versions of many of these popular wet-paper, lens filter, and darkroom effects. The enhancements and corrections introduced in Chapter 8 add subtle improvements to a photo. The effects in this chapter are much more dramatic. You can use them to completely transform the look and the mood of a photo and to create images that look creative, unusual, and “photographic.” For best results, choose your source photo carefully, but do not be afraid to experiment. If you do not like an effect, you can always restore the original photo. Note that iPhoto can only apply one effect at a time, but you can save an edited photo to the camera roll, re-open it, and apply another effect.
Understanding Color Effects
Chapter 8 discussed how to enhance the color of a photo. The color filter effects can do much more. For example, the Black & White effect removes all the color from a photo, and it also allows you to choose how colors map to brightness. You can make a blue sky a dramatic shade of dark gray, or a much brighter white. The Aura effect is even more complex. It converts most of a photo into black-and-white, but leaves one or two selected colors.

Understanding Duotones
Duotones are one particular color effect. Visually, a duotone looks like a black-and-white photo overlaid with a subtle tint. A true chemical paper duotone uses a complex process that adds a hint of color and enhances the midtones — middle-brightness grays — to increase the impact of the photo. iPhoto uses a simpler process to create an approximation of the real effect. For even better results you can enhance the photo further by changing the exposure as described in Chapter 8. You can also restore some of the original colors to create an unusual blended result with austere but dramatic colors.
Understanding Vignettes and Highlights
An optional vignette effect is built into three filters — Black & White, Vintage, and Artistic. You can use this feature to darken the corners or edges of a photo, adding romantic distance to your photo and highlighting one area. This is not a complicated effect, but it can dramatically enhance the mood of a photo. You can set the width of the vignette by pinching with two fingers and move the center by dragging with one.
Understanding Artistic Effects
iPhoto includes a selection of popular art-look effects in the Artistic filter. Landscape photographers often create dramatic skies by using a plastic or glass filter over the lens with a gradient effect — a thick deep color, often orange or gray, that shades to transparency toward the middle of the frame. iPhoto includes three gradient effects with subtly different color tints. You can also blur the top and bottom of a photo to create an effect called tilt-shift, which creates photos that look like miniature scenes. You can add ink effects to create attractive painted photo edges. And you can experiment with two paint-like filters that mimic brush strokes on canvas or paper. This chapter introduces the paint-like effects. The other artistic effects are introduced in Chapter 11.
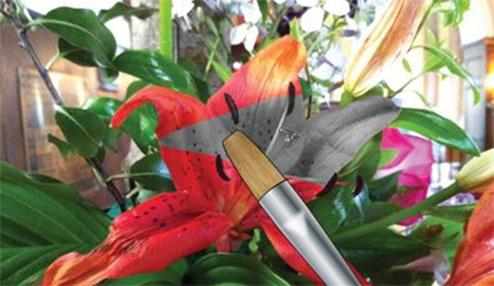
Add Ink Effects
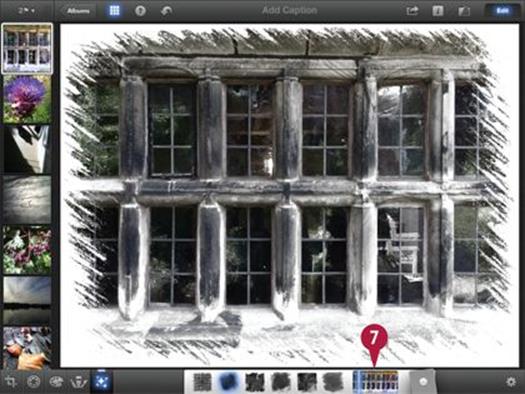
You can make your photos look more artistic by adding an ink effect to the edges of the photo. Unlike a photo, hand-drawn art is never a perfect rectangle because the edges are often smeared or textured.
You can create a similar result with the ink effects in iPhoto, applying one of six ready-made borders. The effect includes a color saturation slider so you can fade or pop the colors to heighten the mood. The ink effects are simple but they can look great on cards and small prints.
Add Ink Effects
![]() Open the thumbnail browser.
Open the thumbnail browser.
![]() Tap any thumbnail to select a photo for enhancement.
Tap any thumbnail to select a photo for enhancement.
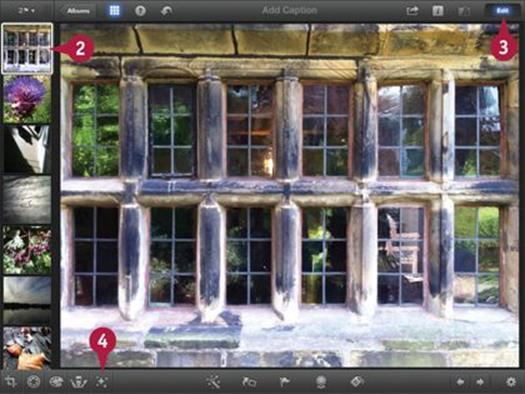
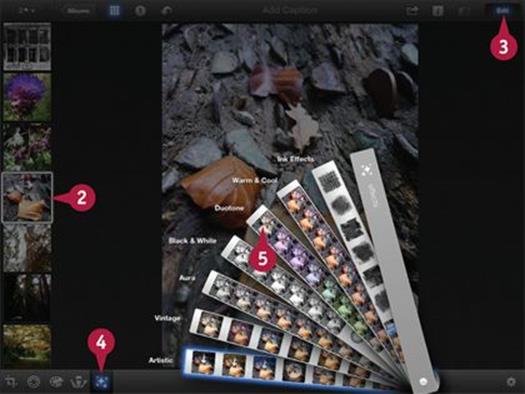
![]() If the bottom toolbar is not visible, tap the Edit button.
If the bottom toolbar is not visible, tap the Edit button.
![]() Tap the Effects icon (
Tap the Effects icon (![]() ).
).
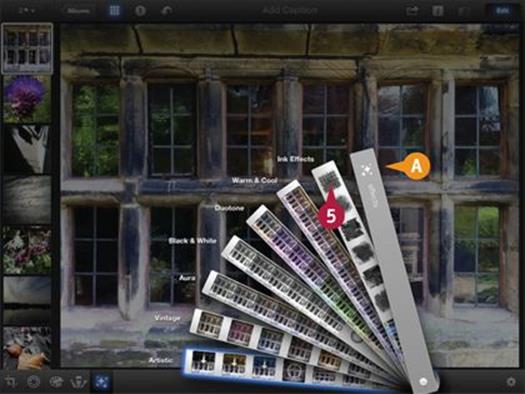
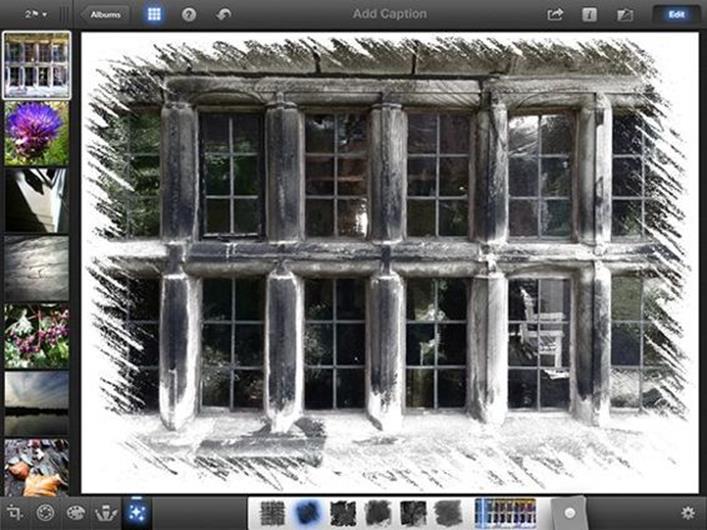
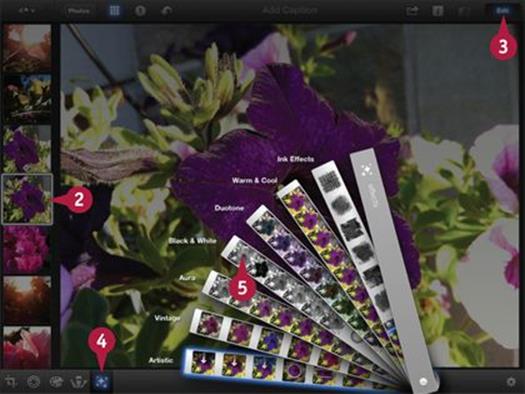
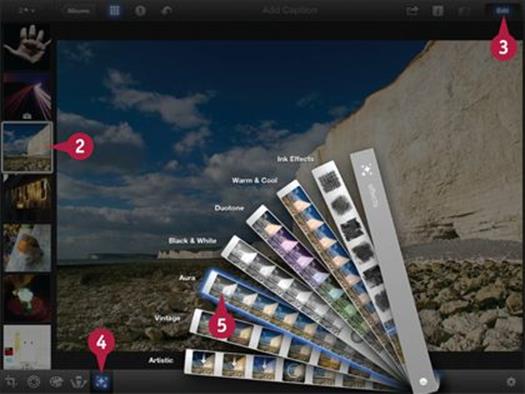
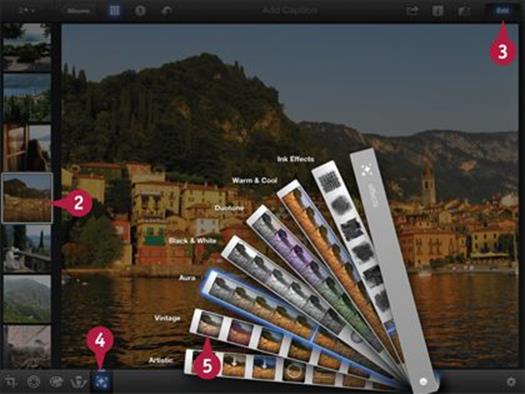
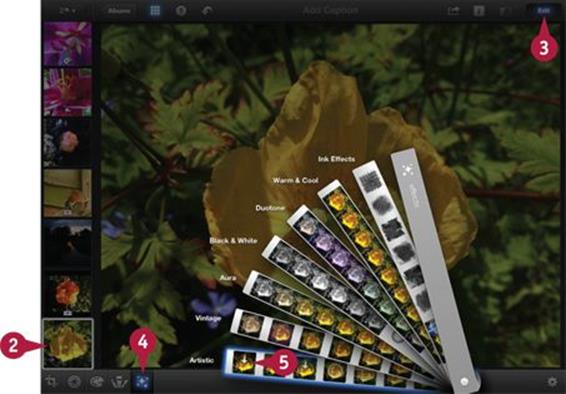
A iPhoto folds out a set of effects strips.
Note: The original photo is darkened when the strips appear.
Note: The strips include tiny preview thumbnails of each effect at different settings.
![]() Tap the Ink Effects strip to select the ink effects.
Tap the Ink Effects strip to select the ink effects.
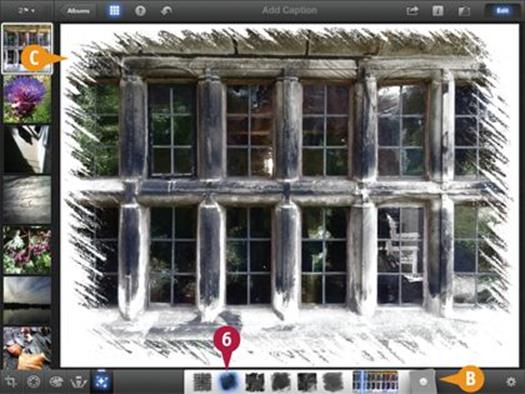
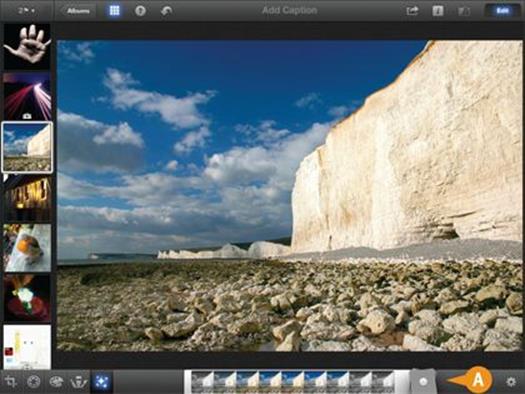
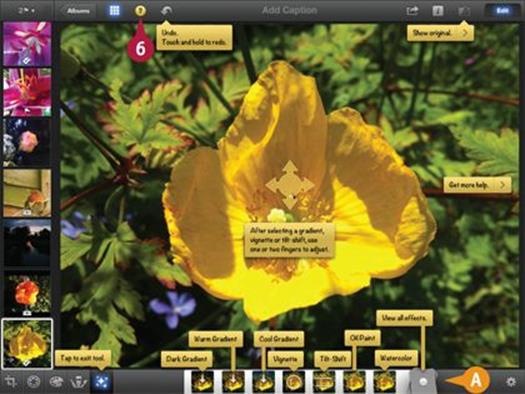
B iPhoto moves the Ink Effects strip to the bottom of the screen, ready for editing.
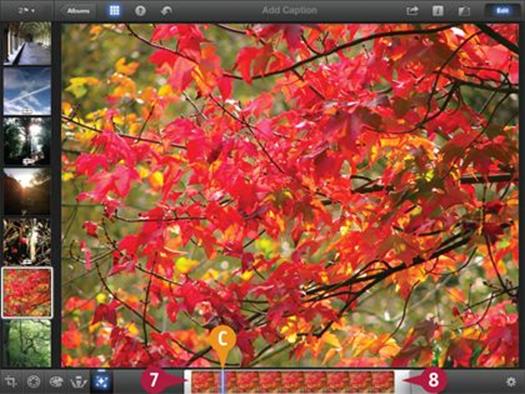
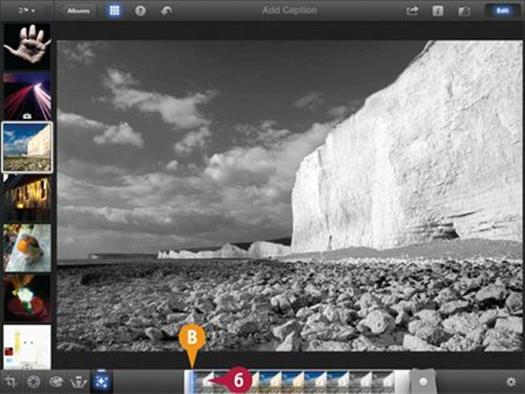
![]() Tap one of the preview thumbnails on the strip to select an effect.
Tap one of the preview thumbnails on the strip to select an effect.
C iPhoto adds a hand-drawn or hand-painted border to the photo.
Note: Tap the thumbnails to apply the different borders.
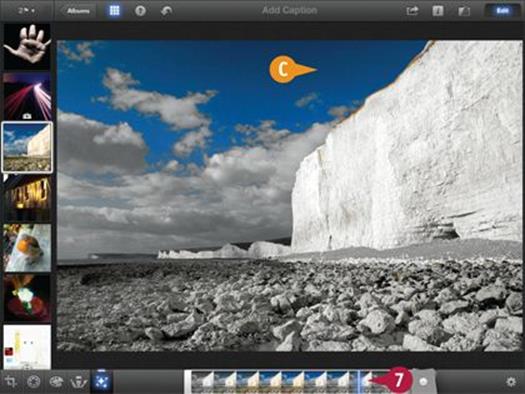
![]() Slide your finger on the saturation bar to tone down or boost the colors in the photo.
Slide your finger on the saturation bar to tone down or boost the colors in the photo.
TIPS
Can I customize the ink effects?
The border shapes and textures are fixed and you cannot import borders or create your own. But if you drag one finger up and down you can set the intensity or “bite” of the effect. You can also drag a finger left and right to change the color saturation.
Why do the colors change when I boost them?
The saturation slider applies a complex color shift that tries to mimic the look and feel of a pastel drawing. Blues are popped more than other colors. The effect is not the same as the color boost introduced in Chapter 8.
Create Warm and Cool Colorings
The Warm & Cool effect is designed to change the color balance of a photo. You can shift the balance slightly toward red for warmth, or toward blue for coolness. The effect is useful for adding life to portraits and for wintry or watery landscapes.
On other photos, you may find it difficult to see a difference. The results are very subtle and depend on the colors in the source photo and the quality of your iPad’s display. You can see the effect more easily on the improved retina display on the 3rd and 4th generation iPads and on high-quality paper prints.
Create Warm and Cool Colorings
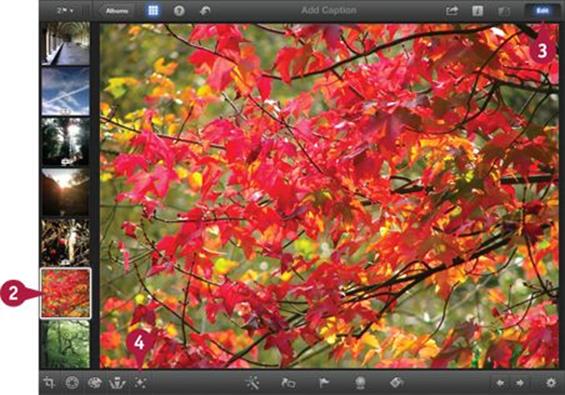
![]() Open the thumbnail browser.
Open the thumbnail browser.
![]() Tap any thumbnail to select a photo for enhancement.
Tap any thumbnail to select a photo for enhancement.
![]() If the bottom toolbar is not visible, tap the Edit button.
If the bottom toolbar is not visible, tap the Edit button.
![]() Tap the Effects icon (
Tap the Effects icon (![]() ).
).
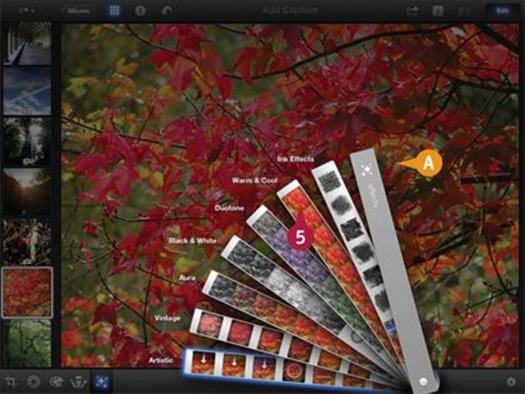
A iPhoto folds out a set of effects strips.
Note: The original photo is darkened when the strips appear.
![]() Tap the Warm & Cool strip to select the Warm & Cool effect.
Tap the Warm & Cool strip to select the Warm & Cool effect.
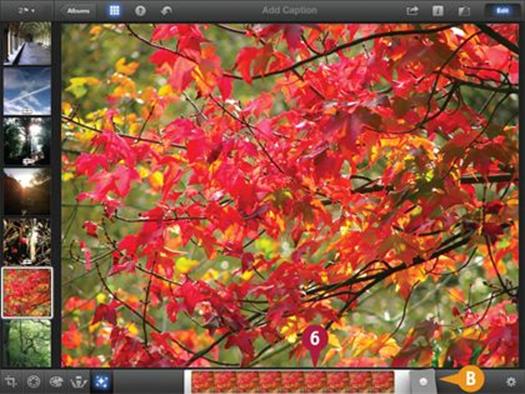
B iPhoto moves the Warm & Cool strip to the bottom of the screen, ready for editing.
![]() Tap the strip.
Tap the strip.
C iPhoto displays a light blue indicator line.
![]() Slide your finger on the indicator to the left to add more red and warm up the photo.
Slide your finger on the indicator to the left to add more red and warm up the photo.
![]() Slide your finger to the right to add more blue and cool down the photo.
Slide your finger to the right to add more blue and cool down the photo.
Note: The effect is subtle.
TIPS
Why does this filter do nothing?
The effect can be very subtle. Look closely at the colors and move the sliders between the extremes to see a difference. You should be able to see it working on any portrait photo taken in bright sunlight. The cooler extreme can enhance seascapes and snow scenes.
How do I remove an effect?
Tap the undo icon (![]() ) in the top toolbar. You can also tap the settings (gear) icon (
) in the top toolbar. You can also tap the settings (gear) icon (![]() ) in the lower toolbar and tap Remove Effect. You can find the settings (gear) icon on the bottom corner of the screen, on the opposite side from the thumbnail grid.
) in the lower toolbar and tap Remove Effect. You can find the settings (gear) icon on the bottom corner of the screen, on the opposite side from the thumbnail grid.
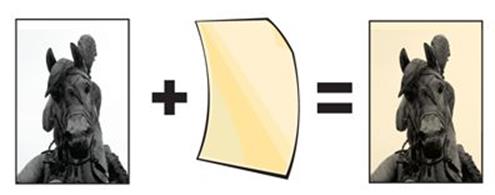
Master Duotones
You can use the Duotone effect to create black-and-white images with a hint of color. Simple black-and-white can look austere and lackluster. A subtle tint creates extra impact.
You can set the tint color, but not the tint intensity. Be careful to avoid a muddy result. Blue, orange, and purple tints often look good. Yellow is less useful. You can also add back muted versions of the original colors. The results are unpredictable — some photos look good, others become garish and weird.
Master Duotones
![]() Open the thumbnail browser.
Open the thumbnail browser.
![]() Tap any thumbnail to select a photo for enhancement.
Tap any thumbnail to select a photo for enhancement.
![]() If the bottom toolbar is not visible, tap the Edit button.
If the bottom toolbar is not visible, tap the Edit button.
![]() Tap the Effects icon (
Tap the Effects icon (![]() ).
).
![]() Tap the Duotone effect strip.
Tap the Duotone effect strip.

A iPhoto moves the Duotone strip to the bottom toolbar, ready for editing.
Note: You can preview the effect by viewing the thumbnails in the strip.
![]() Tap anywhere on the strip to create a duotone.
Tap anywhere on the strip to create a duotone.
B iPhoto displays a light blue indicator marker on the strip.
![]() Slide the marker left and right to select the tint color.
Slide the marker left and right to select the tint color.
![]() Tap the Color icon (
Tap the Color icon (![]() ) to add back some of the original color.
) to add back some of the original color.
Note: You can toggle the Color icon by tapping it again.
TIPS
What can I do with duotones?
Duotones are “black-and-white but better.” Viewers often do not notice the hint of color, but the duotone effect is more eye-catching than a plain black-and-white photo. The creative applications are almost endless. Simple images with a clean composition work best because duotones highlight shapes and textures.
Is this filter a good way to create a sepia look?
Moving the slider to the fifth or sixth thumbnail from the left creates a subtle sepia effect. The Black & White tool described in the next section includes a less subtle sepia option.
Convert Color to Black-and-White
You can use the Black & White effect to remove the colors from your photo. The color adjustment tool introduced in Chapter 8 also removes colors. The Black & White effect is more sophisticated, and includes many extra features.
You can control how colors map to different shades of gray, to lighten or darken skies and grass. You can also add film grain — subtle specks that add texture to a photo. The filter also includes a single-tap sepia option, which overlays a tan color for a vintage look. And finally, you can add a vignette effect.
Convert Color to Black-and-White
![]() Open the thumbnail browser.
Open the thumbnail browser.
![]() Tap any thumbnail to select a photo for enhancement.
Tap any thumbnail to select a photo for enhancement.
![]() If the bottom toolbar is not visible, tap the Edit button.
If the bottom toolbar is not visible, tap the Edit button.
![]() Tap the Effects icon (
Tap the Effects icon (![]() ).
).
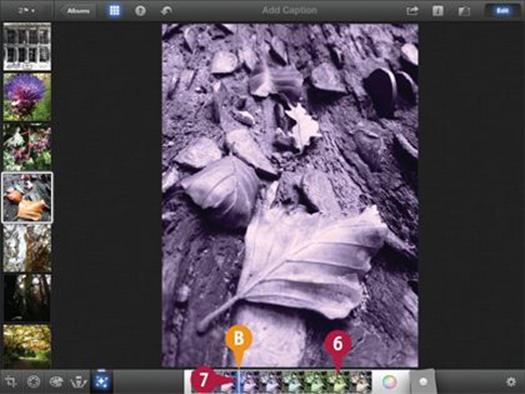
![]() Tap the Black & White effect strip.
Tap the Black & White effect strip.
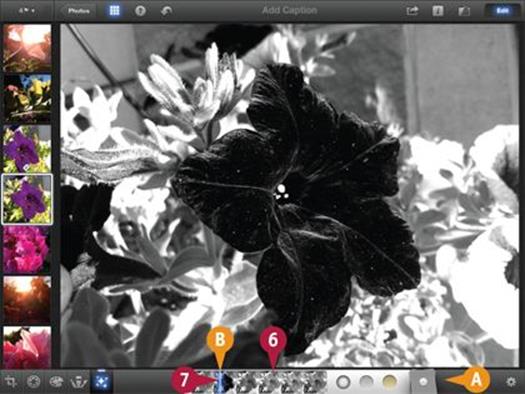
A iPhoto moves the Black & White strip to the bottom of the toolbar.
![]() Tap the toolbar to convert the photo to black-and-white.
Tap the toolbar to convert the photo to black-and-white.
B iPhoto displays a light blue indicator marker on the strip.
![]() Slide your finger left and right to change how colors are mapped to shades of gray.
Slide your finger left and right to change how colors are mapped to shades of gray.
Note: Small movements can make a big difference.
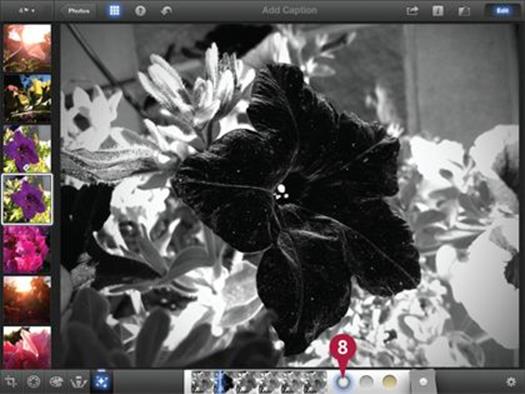
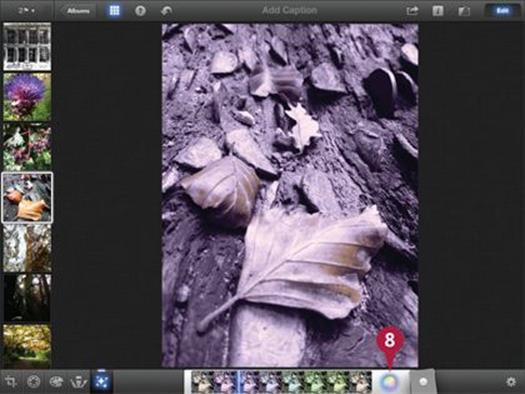
![]() Tap the Vignette icon (
Tap the Vignette icon (![]() ) to darken the corners of the photo.
) to darken the corners of the photo.
Note: You can find out more about the vignette effect in the next chapter.
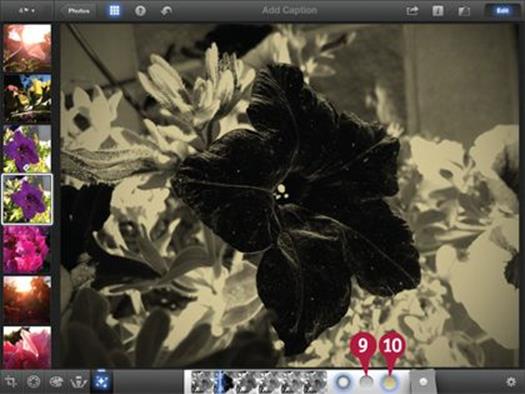
![]() Tap the Grain icon (
Tap the Grain icon (![]() ) to add film grain to the photo.
) to add film grain to the photo.
Note: Film grain is subtle and may only be obvious if you close the editor and zoom into the photo.
![]() Tap the Sepia icon (
Tap the Sepia icon (![]() ) to create a vintage look with a light tan overlay.
) to create a vintage look with a light tan overlay.
Note: You can tap the icons again to turn off the effects.
TIPS
How can I understand color mapping?
If you find — or take — a photo of a rainbow or a color spectrum, you can use it as a reference to see how the filter converts color to brightness. But you do not need to know the details to create a good result. The best approach is to experiment with the slider position until you find a setting that works for you.
When would I add film grain?
Without color, black-and-white images rely on texture. The small speckles added by the film grain effect add an all-over texture that makes a photo appear more eye-catching with extra depth and character. Without it, digital photos taken in bright light can look smooth and plastic. Photos taken in poor light usually have grain of their own and do not need more.
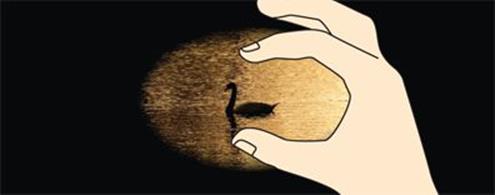
Pick Out Strong Colors
You can use the Aura effect to copy a striking photographic technique that is often used in creative photography and advertising.
The Aura effect creates a black-and-white photo with selected color highlights. The results are unpredictable and depend on the colors in the original scene. You cannot select the colors with any accuracy, but you can use the effect to create quirky and interesting hybrid photos, such as a black-and-white landscape under a blue sky.
Pick Out Strong Colors
![]() Open the thumbnail browser.
Open the thumbnail browser.
![]() Tap any thumbnail to select a photo for enhancement.
Tap any thumbnail to select a photo for enhancement.
![]() If the bottom toolbar is not visible, tap the Edit button.
If the bottom toolbar is not visible, tap the Edit button.
![]() Tap the Effects icon (
Tap the Effects icon (![]() ).
).
![]() Tap the Aura effect strip.
Tap the Aura effect strip.
A iPhoto moves the Aura strip to the bottom of the toolbar.
![]() Tap the strip at the far left to remove all the colors.
Tap the strip at the far left to remove all the colors.
B iPhoto displays a light blue indicator bar and removes the colors from the photo.
![]() Slide your finger to the right to restore a range of colors.
Slide your finger to the right to restore a range of colors.
C iPhoto converts part of the photo to black-and-white but keeps selected colors.
TIPS
How can I get more control over color selection?
The Aura filter cannot match the powerful color selection tools available in a professional photo editor. But you can use the Desaturate brush introduced in Chapter 9 to “paint” a similar effect with your fingers.
Which photos work best with the effect?
For portraits, make your subject wear a single strong color that clashes with the background. For other subjects, use photos with strong areas of red/orange, green, or blue. Although the effect is difficult to fine-tune, it can often pick out single colors for you.
Create Vintage Film Effects
You can use the Vintage effect to re-create popular vintage film looks. Vintage photos often have muted or incorrect colors because the colors have faded. Some films deliberately over-emphasized reds and oranges for better-looking skin tones.
You can select one of six standard effects — Early Chrome, Sixties, Saturated Film, Neutral Film, Vivacious, and Muted. The best way to understand them is to try them all with different source photos. The color and contrast of your starting image make a big difference to the result.
Create Vintage Film Effects
![]() Open the thumbnail browser.
Open the thumbnail browser.
![]() Tap any thumbnail to select a photo for enhancement.
Tap any thumbnail to select a photo for enhancement.
![]() If the bottom toolbar is not visible, tap the Edit button.
If the bottom toolbar is not visible, tap the Edit button.
![]() Tap the Effects icon (
Tap the Effects icon (![]() ).
).
![]() Tap the Vintage effect strip.
Tap the Vintage effect strip.
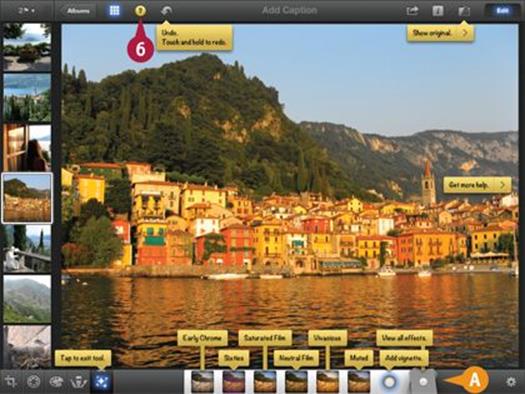
A iPhoto moves the Vintage strip to the bottom of the toolbar.
![]() Tap the help icon (
Tap the help icon (![]() ) to view the name of each effect.
) to view the name of each effect.
![]() Tap one of the thumbnails to preview an effect, such as the Early Chrome thumbnail.
Tap one of the thumbnails to preview an effect, such as the Early Chrome thumbnail.
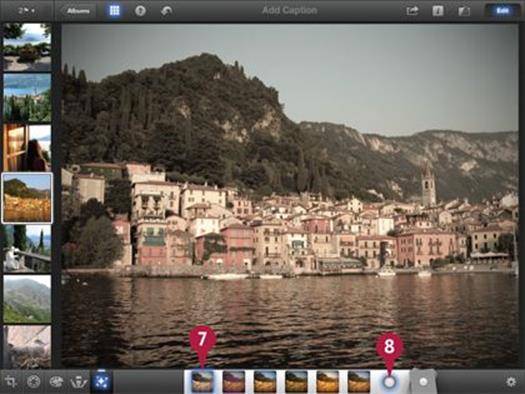
![]() Tap the Vignette icon (
Tap the Vignette icon (![]() ) to remove the vignette effect.
) to remove the vignette effect.
Note: The Vintage effect always adds a vignette effect. You must turn it off if you do not want it.
iPhoto applies the effect.
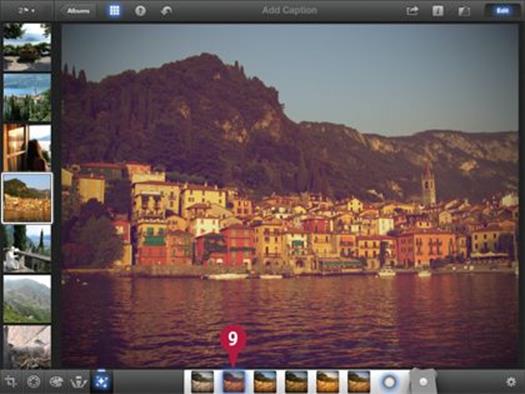
![]() Tap the other effect thumbnails to explore what they do, such as the Sixties thumbnail.
Tap the other effect thumbnails to explore what they do, such as the Sixties thumbnail.
Note: The thumbnails apply different effects. You cannot use a slider to move smoothly between them.
TIPS
Can I modify the vintage effects?
No, the effects are preset and you cannot change them. However, you can re-create most of the effects manually using exposure and color adjustments. For example, to copy the Early Chrome effect, push in the highlight and shadow sliders of the Exposure tool to decrease the contrast, and use the Color tool to turn down the saturation.
Can I modify the vignette effect?
You can adjust the vignette in the usual ways. Pinch with two fingers to shrink or expand the darkened area. Drag the center of the vignette to change its position.
Convert a Photo into Art
You can use the Artistic filters to turn photos into paintings. People find art interesting because it hints at shapes, colors, and scenes, and distorts images in interesting ways. The paint-effect filters in iPhoto simulate two of the many possible ways a photo can be turned into art.
The filters have no settings, so you cannot change what they do. For good results, modify the color and exposure of a photo before applying a filter. Art often distorts color and contrast. You can create a more realistic painted effect by starting with a photo you have modified in unrealistic ways.
Convert a Photo into Art
![]() Open the thumbnail browser.
Open the thumbnail browser.
![]() Tap any thumbnail to select a photo for enhancement.
Tap any thumbnail to select a photo for enhancement.
![]() If the bottom toolbar is not visible, tap the Edit button.
If the bottom toolbar is not visible, tap the Edit button.
![]() Tap the Effects icon (
Tap the Effects icon (![]() ).
).
![]() Tap the Artistic effect strip.
Tap the Artistic effect strip.
A iPhoto moves the Artistic strip to the bottom of the toolbar.
![]() Tap the help icon (
Tap the help icon (![]() ) to view the name of each effect.
) to view the name of each effect.
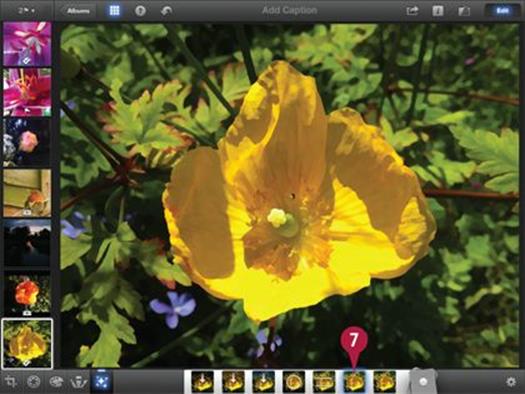
![]() Tap the Oil Paint thumbnail to view the oil paint effect.
Tap the Oil Paint thumbnail to view the oil paint effect.
iPhoto applies the oil paint effect.
Note: The effect softens hard edges and removes detail, but does not simulate brush strokes.
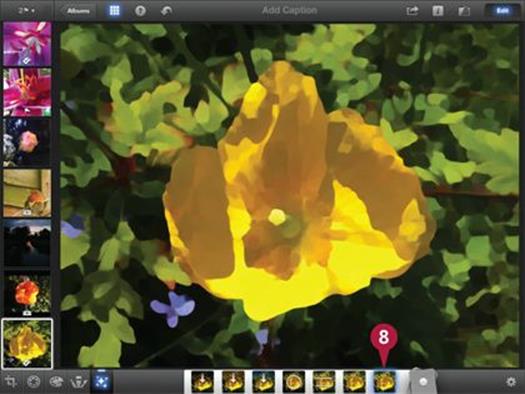
![]() Tap the Watercolor thumbnail.
Tap the Watercolor thumbnail.
iPhoto applies the watercolor effect.
Note: The effect breaks up the image into lightly textured areas of color.
TIPS
Can I make these effects look more like paintings?
iPhoto’s paint-like effects are very simple. You may not find them very convincing if you have worked with real watercolors, oils, and acrylics. Unfortunately these effects have no settings. You can use them as they are, or not at all. But do try modifying the color and exposure of a photo before you apply them.
What do the other Artistic filters do?
The other Artistic filters are photographic and do not attempt to simulate a painted look. You can use them to add colored gradients, blur the top and bottom of the image, or add a vignette. For details, see the next chapter.
All materials on the site are licensed Creative Commons Attribution-Sharealike 3.0 Unported CC BY-SA 3.0 & GNU Free Documentation License (GFDL)
If you are the copyright holder of any material contained on our site and intend to remove it, please contact our site administrator for approval.
© 2016-2025 All site design rights belong to S.Y.A.