Teach Yourself VISUALLY iPhoto for iPad (2013)
Chapter 12: Sharing Photos
You can use iPhoto’s sharing features to share your edited and original photos with friends and family. iPhoto includes direct support for Twitter, Facebook, and the popular Flickr online album. You can also print and e-mail photos, and save them to the device camera roll or a special iTunes-compatible folder. This chapter explores each option in detail. Chapter 13 explains how to save and share photos in journals.
Learn about Photo Sharing
Save Photos to the Camera Roll
Share Photos with iTunes
E-Mail Photos
Beam Photos to Another Device
Print Photos
Share Photos via Twitter
Upload Photos to Flickr
Post Photos to Facebook
Create and View a Slide Show
Using Other Sharing Options
Learn about Photo Sharing
Photos are more fun when shared. iPhoto includes a full selection of sharing features. You can use them to share photos to social networks, e-mail photos to friends or colleagues, add photos to an online album, print photos, and view them on the iPad or an external display.
You can also copy photos to your Mac or Windows computer and import them into other photo-editing applications. Because the iOS file system is locked down for security reasons, you may need to spend some extra time getting comfortable with these more serious sharing options.
Select and Share
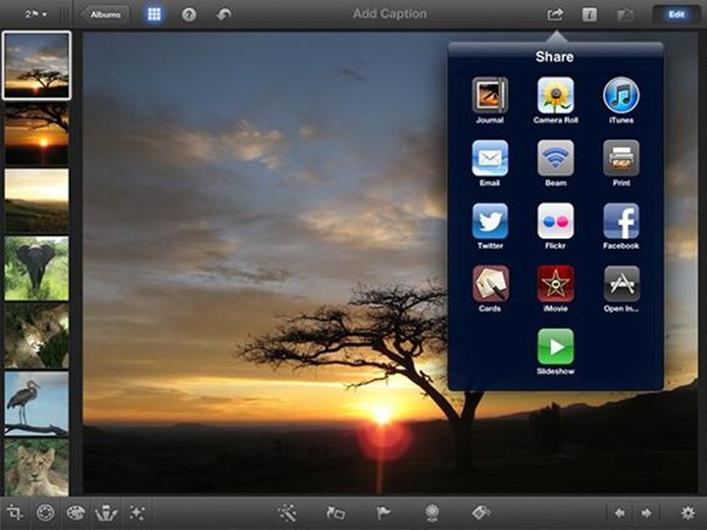
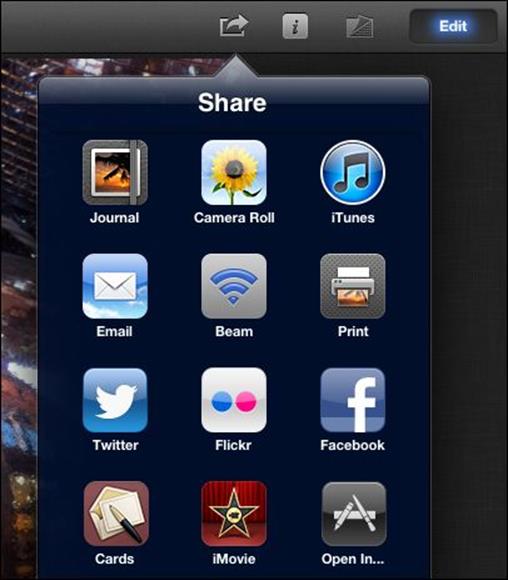
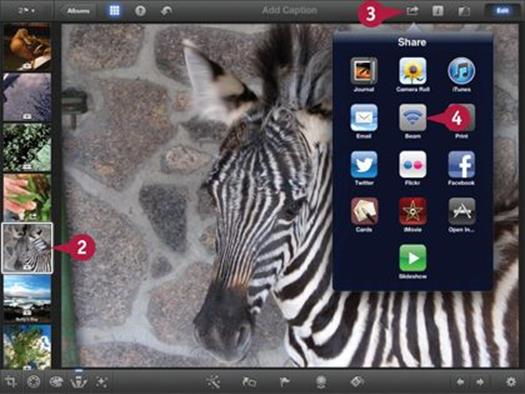
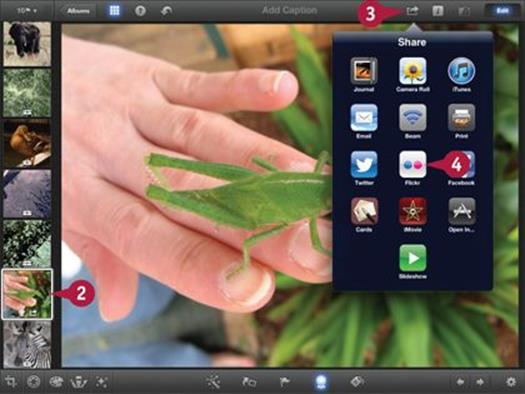
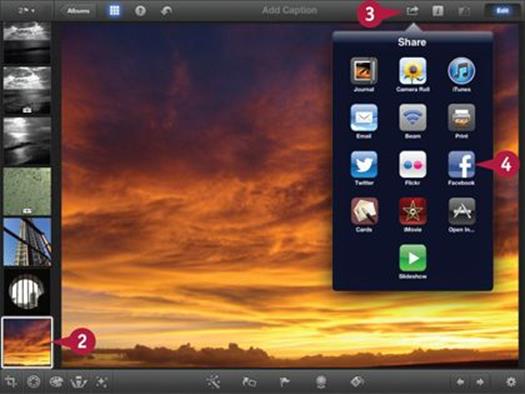
You can access the sharing options by tapping the Share icon (![]() ) which appears near the top right of the main toolbar in the thumbnail browser. The options appear in a popover. You can add photos to a journal; save photos to the camera roll; share photos with iTunes; e-mail, beam, or print photos; share photos to a social network; or create a slide show. You can share more than one photo at a time by selecting or flagging multiple photos. For details see Chapter 4 or Chapter 6. You can also share every photo in the current album or event.
) which appears near the top right of the main toolbar in the thumbnail browser. The options appear in a popover. You can add photos to a journal; save photos to the camera roll; share photos with iTunes; e-mail, beam, or print photos; share photos to a social network; or create a slide show. You can share more than one photo at a time by selecting or flagging multiple photos. For details see Chapter 4 or Chapter 6. You can also share every photo in the current album or event.
Using Social Networks
Social networks are immensely popular, and you can share photos to both Twitter and Facebook from iPhoto. After you log in — you only need to do this once — you can share photos quickly and easily, adding an optional comment or caption. You can also upload photos to the Flickr photo sharing service, an easy and free way to keep your photo collection safe online and share your favorites with friends and family.

Print and View
With Apple’s AirPrint technology, you can send your photos to a Wi-Fi-enabled printer for instant printing. Many budget printers can create small prints with a standard glossy finish, which can rival, or sometimes beat, the colors produced by a commercial photo print service. AirPrint is useful and convenient but not essential. You can also save your photos to a folder that appears in iTunes and print them from a Mac or PC. More expensive printers can create small posters or art prints on larger paper for framing and selling. For less permanent sharing you can also connect your device to a projector or a home TV, with optional horizontal mirroring so they display correctly.

Create Slide Shows
You can create a complex slide show with a few finger taps. Slide shows combine your selection of photos with preset animations and an optional musical backing. You cannot save or share slide shows, but you can view them on a device or on an external display, such as a TV or projector. Although slide shows are limited — you cannot change the animations or use your own music — they are a simple, fun, and effective way to view photos with friends and family members.

Beam and Save to iTunes
You can beam photos between devices as long as the devices are on the same Wi-Fi network and both are running iPhoto. Beaming a photo literally copies it from one device to another. It is a good option for sharing a small number of photos but is not a speedy choice, and is not ideal for sharing large collections. You can also share photos to a Mac or PC through iTunes. When you next sync your device in iTunes, the photos appear in special folders on the File Sharing page. You can copy the folders to your Mac or Windows hard drives with simple drag and drop.
Save Photos to the Camera Roll
Getting photos into iPhoto is relatively easy. Copying photos out of iPhoto is less obvious, especially when they appear in one of iPhoto’s smart albums.
In fact, you can export any photo from any album, event, or photo collection. The trick is to save your photo to the device camera roll. You can then import the contents of the camera roll into iPhoto on a Mac, or copy the photos directly from your device in Windows. To save a photo, access the Share dialog and select the Camera Roll option.
Save Photos to the Camera Roll
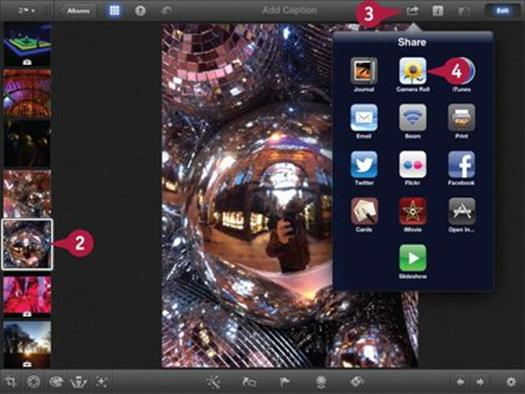
![]() Open the thumbnail browser for any album or event or for the Photos collection.
Open the thumbnail browser for any album or event or for the Photos collection.
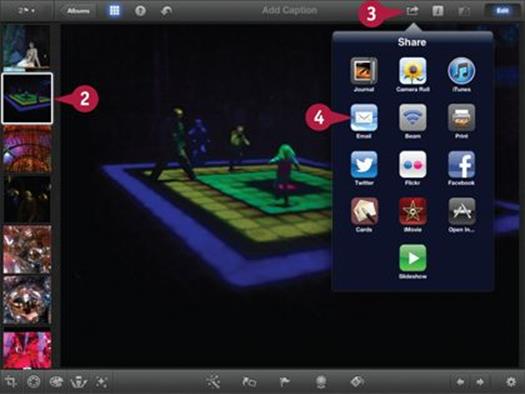
![]() Tap any thumbnail to select it for saving.
Tap any thumbnail to select it for saving.
![]() Tap the Share icon (
Tap the Share icon (![]() ).
).
Note: You do not need to be in Edit mode to save a photo.
![]() Tap the Camera Roll icon.
Tap the Camera Roll icon.
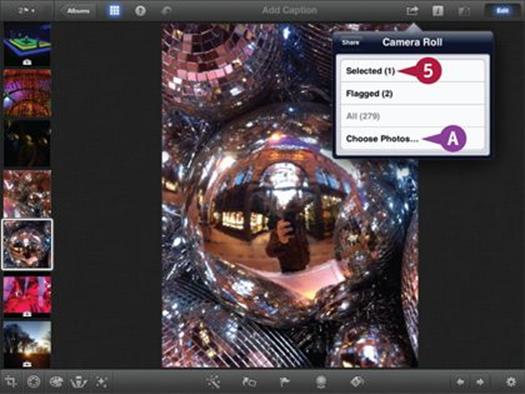
iPhoto displays the Selection popover.
![]() Tap the Selected option to save the current photo.
Tap the Selected option to save the current photo.
A You can tap the Choose Photos option to select and save a different photo.
Note: You can only select and save a single photo at a time.
Note: If exactly one photo is flagged, the Flagged option is not grayed out, and you can share that one photo.
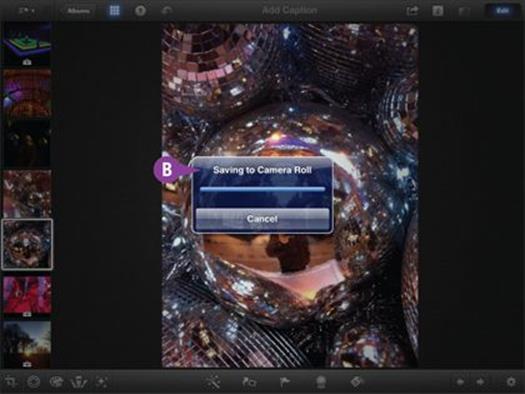
B iPhoto displays a progress bar as it saves the selected photo to the camera roll.
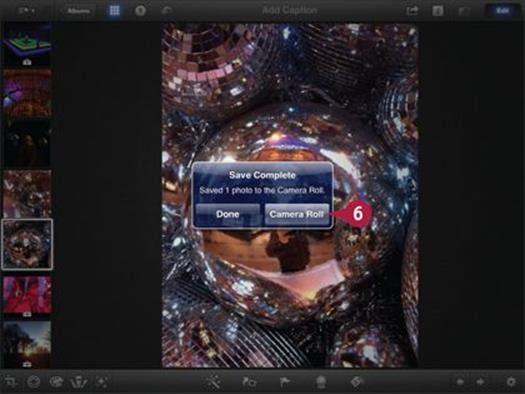
![]() Tap Done when finished or Camera Roll to open the Camera Roll album and view the photo.
Tap Done when finished or Camera Roll to open the Camera Roll album and view the photo.
TIPS
How can I share an entire album?
You can only share a single photo at a time to the camera roll. To share an entire album, share to iTunes and copy the photos from iTunes to a folder on your Mac or PC as described in the next section.
Why does saving to the camera roll create duplicates?
Imported, beamed, or uploaded photos already exist on your device. Saving them to the camera roll creates another copy. This is not usually a problem. You can clear the camera roll by importing the photos to your Mac or copying them to a Windows PC and deleting the files from your device. When you clear the camera roll, the duplicates disappear.
Share Photos with iTunes
You can copy photos from your device to your Mac or PC via iTunes. To use this feature, tap the iTunes option in the sharing popover.
iPhoto saves your selected photos to a named folder. To access the folder, connect your device to your Mac or PC, launch iTunes, select your device in the device list, and click the Apps option. Scroll down and click iPhoto in the File Sharing list to see the folders created by the Share to iTunes option. You can drag the folders from iTunes and drop them on any location in Finder or Windows Explorer.
Share Photos with iTunes
![]() Open the thumbnail browser for any album or event or for the Photos collection.
Open the thumbnail browser for any album or event or for the Photos collection.
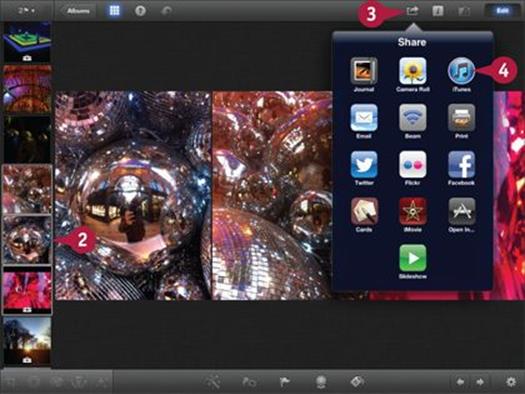
![]() Select one or more photos for sharing.
Select one or more photos for sharing.
![]() Tap the Share icon (
Tap the Share icon (![]() ).
).
Note: You do not need to be in Edit mode to share a photo.
![]() Tap the iTunes icon.
Tap the iTunes icon.
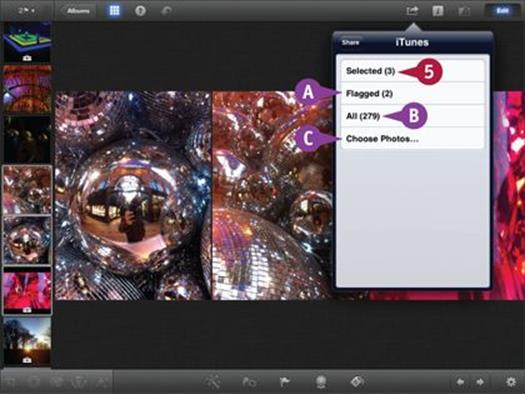
![]() Tap the Selected option to save the currently selected photos.
Tap the Selected option to save the currently selected photos.
A You can tap the Flagged option to save all flagged photos in the current album or event or in the complete photo collection.
B You can tap the All option to save all photos in the current album or event or in the complete photo collection.
C You can tap the Choose Photos option to select one or more other photos.
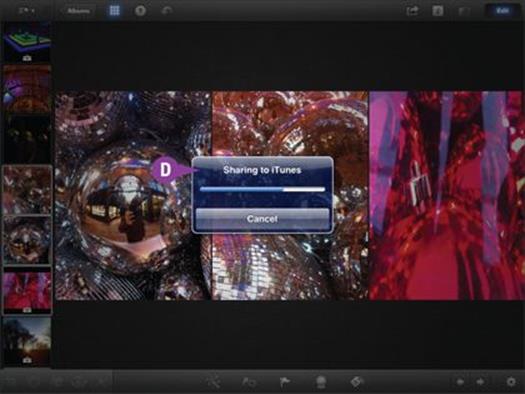
D iPhoto displays a progress bar as it saves the selected photos to iPhoto’s documents folder.
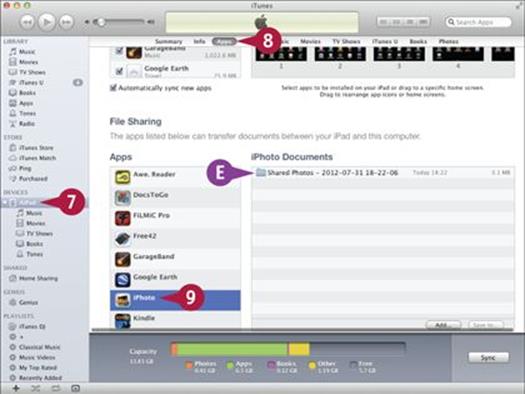
![]() Connect your device to your Mac and launch iTunes if it does not launch automatically.
Connect your device to your Mac and launch iTunes if it does not launch automatically.
![]() Select your device in the Devices list.
Select your device in the Devices list.
![]() Click Apps.
Click Apps.
![]() Scroll down to the File Sharing section and click iPhoto.
Scroll down to the File Sharing section and click iPhoto.
E iTunes displays a list of folders saved from iPhoto.
Note: You can drag folders from the iPhoto Documents list to any folder on your hard drive, and then open them to view or copy the photos inside them.
TIPS
Why are the import and export options on different pages?
The iTunes design separates these features. You can upload photos to your device using the Photos option introduced in Chapter 5. It would be simpler if you could import photos on the same page, but iOS has a secure file system and you can only access some of the files in your device on the Apps File Sharing page.
Why can I not open the folders on this page?
Currently there is no way to open a folder on the File Sharing page in iTunes. To open a folder, first copy it to your Mac or PC. Note that you can delete files and folders on this page by clicking to highlight them, and then pressing ![]() . (You can also import files by dragging them from Finder or Windows Explorer, but iPhoto ignores them.)
. (You can also import files by dragging them from Finder or Windows Explorer, but iPhoto ignores them.)
E-Mail Photos
You can share photos by e-mailing them. The e-mail option is a good choice for private sharing. However, you can share only a maximum of five photos in a single e-mail.
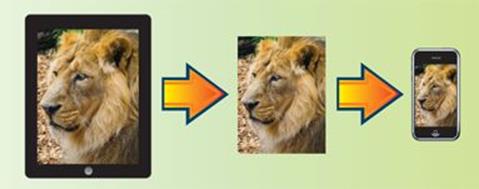
The e-mail feature has some hidden options. If you have more than one e-mail account set up on your device, you can tap the sender field to select a different sender. You can also set the image size to send a thumbnail instead of a full-sized image.
E-Mail Photos
![]() Open the thumbnail browser for any album or event or for the Photos collection.
Open the thumbnail browser for any album or event or for the Photos collection.
![]() Select one or more photos for sharing.
Select one or more photos for sharing.
![]() Tap the Share icon (
Tap the Share icon (![]() ).
).
Note: You do not need to be in Edit mode to e-mail a photo.
![]() Tap the Email icon.
Tap the Email icon.
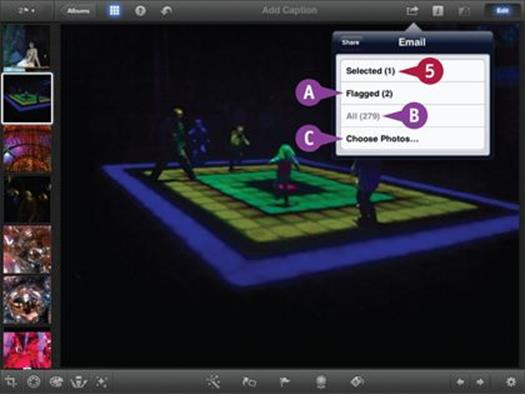
![]() Tap the Selected option to e-mail the currently selected photos.
Tap the Selected option to e-mail the currently selected photos.
A You can tap the Flagged option to e-mail all flagged photos in the current album or event or in the complete photo collection.
B You can tap the All option to e-mail all photos in the current album or event or in the complete photo collection.
C You can tap the Choose Photos option to e-mail one or more other photos.
Note: Some options are grayed out automatically so you cannot e-mail more than five photos.
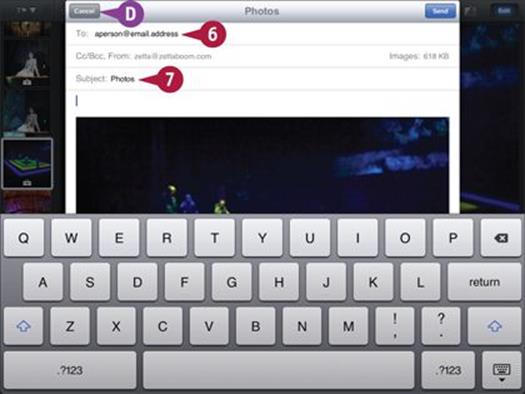
iPhoto displays an e-mail composer.
![]() Tap the To: field to set the recipient.
Tap the To: field to set the recipient.
![]() Tap the Subject: field to change the subject.
Tap the Subject: field to change the subject.
D You can tap Cancel followed by Delete Draft to cancel.
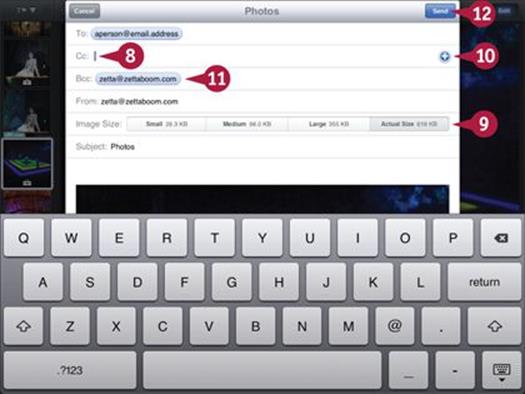
![]() Tap the Cc: field to show further options.
Tap the Cc: field to show further options.
![]() Tap a button to select an image size for the photos.
Tap a button to select an image size for the photos.
Note: Select Small or Medium if sending to someone’s phone or tablet.
![]() Tap
Tap ![]() to add further recipients.
to add further recipients.
![]() Tap the Bcc: field to add further hidden recipients.
Tap the Bcc: field to add further hidden recipients.
Note: Addresses in the Bcc: field are hidden from all recipients.
![]() Tap Send to send the e-mail.
Tap Send to send the e-mail.
TIPS
Why is e-mail sharing limited?
Many e-mail systems reject large messages. There is no standard maximum size, but 5MB is a practical limit. Messages larger than 10MB are very likely to be rejected. iPhoto deliberately limits the size to avoid this, but keep in mind that if you import photos from a good SLR, a single image can easily be 5MB or more, and you should e-mail a smaller version.
How can I e-mail more images?
The e-mail sharing option is designed for casual sharing among friends and for low-volume business use. iPhoto cannot e-mail tens or hundreds of photos. For professional photo sharing, import the photos to a Mac or PC and use a high-volume service such as FTP (File Transfer Protocol) to upload them to a company web server.
Beam Photos to Another Device
You can beam photos to another device. Beaming copies photos over Wi-Fi. The other device must be connected to the same Wi-Fi network, and it must be running iPhoto. You can beam a maximum of 100 photos.
To beam photos, select them and tap the Beam sharing option. iPhoto looks for devices on the network that are also running iPhoto for iOS. (As of version 1.1, you cannot beam photos to iPhoto on a Mac.) When you select a device, iPhoto sends a request. If the user accepts the request, iPhoto copies the photos and puts them in a special Beamed album.
Beam Photos to Another Device
![]() Open the thumbnail browser for any album or event or for the Photos collection.
Open the thumbnail browser for any album or event or for the Photos collection.
![]() Select one or more photos for sharing.
Select one or more photos for sharing.
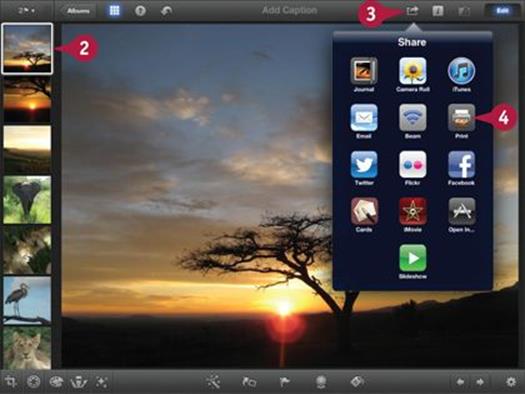
![]() Tap the Share icon (
Tap the Share icon (![]() ).
).
Note: You do not need to be in Edit mode to beam a photo.
![]() Tap the Beam icon.
Tap the Beam icon.
Note: You must enable beaming in the iPhoto preferences. See Chapter 1 for details.
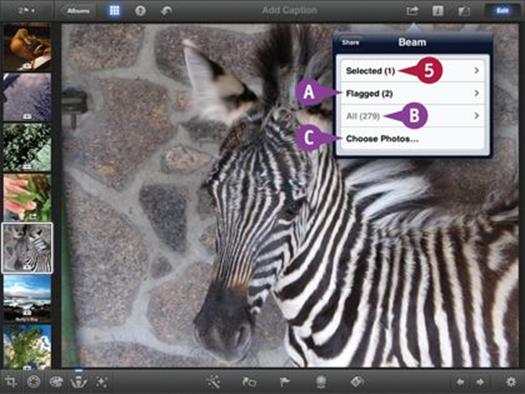
![]() Tap the Selected option to beam the currently selected photos.
Tap the Selected option to beam the currently selected photos.
A You can tap the Flagged option to beam all flagged photos in the current album or event or in the complete photo collection.
B You can tap the All option to beam all photos in the current album or event or in the complete photo collection.
C You can tap the Choose Photos option to beam one or more other photos.
Note: Options are grayed out if they offer more than a hundred photos.
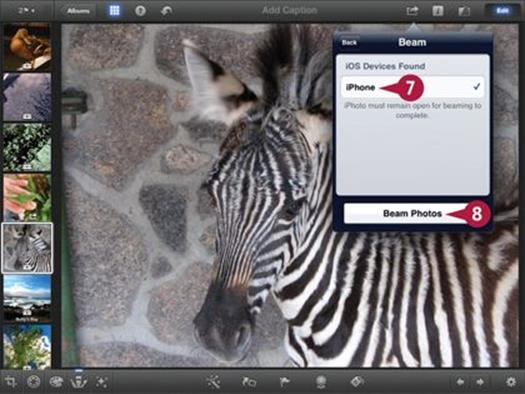
![]() Launch iPhoto on the other device, if it is not running already.
Launch iPhoto on the other device, if it is not running already.
![]() Tap the name of the other device in the popover to select it.
Tap the name of the other device in the popover to select it.
![]() Tap Beam Photos to begin beaming.
Tap Beam Photos to begin beaming.
iPhoto displays an alert showing that beaming has started.
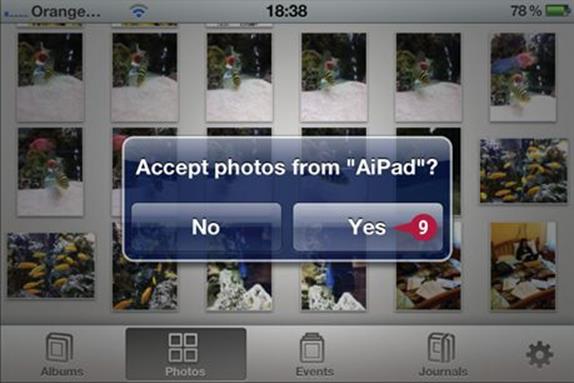
![]() On the other device, tap Yes when the Accept Photos dialog appears.
On the other device, tap Yes when the Accept Photos dialog appears.
![]() Wait until beaming completes.
Wait until beaming completes.
Note: In the current version of iPhoto, the progress bar does not indicate progress while beaming, but beaming is still happening while you wait.
TIPS
How can I save the photos in the Beamed album?
The Beamed album is invisible to iTunes, so you cannot sync the photos in it to your Mac or PC. But you can save photos from the album to the device camera roll, and then import or copy the camera roll from your device to a Mac or PC.
Why is beaming so slow?
Beaming was speeded up in version 1.1 of iPhoto. But the speed still depends on the speed and quality of your Wi-Fi connection. Public Wi-Fi is often slow. Beaming works best with a handful of photos; it can take hours to beam a hundred photos.
Print Photos
You can send photos from iPhoto to any compatible AirPrint printer. The printing option has no settings and works over Wi-Fi. After you select a printer, it “just works.” You can select an unlimited number of photos for printing, but you should print only in small batches of ten or so.
Note that you cannot send photos to a commercial print lab from iPhoto. If you have too many photos to print at home, you can upload the photos to Flickr, iPhoto on a Mac, Photoshop Elements on a PC, and similar packages and use the commercial printing features built into those products. Many photo print services also support direct uploading from your photo library via a web page.
Print Photos
![]() Open the thumbnail browser for any album or event or for the Photos collection.
Open the thumbnail browser for any album or event or for the Photos collection.
![]() Select one or more photos for printing.
Select one or more photos for printing.
![]() Tap the Share icon (
Tap the Share icon (![]() ).
).
Note: You do not need to be in Edit mode to print photos.
![]() Tap the Print icon.
Tap the Print icon.
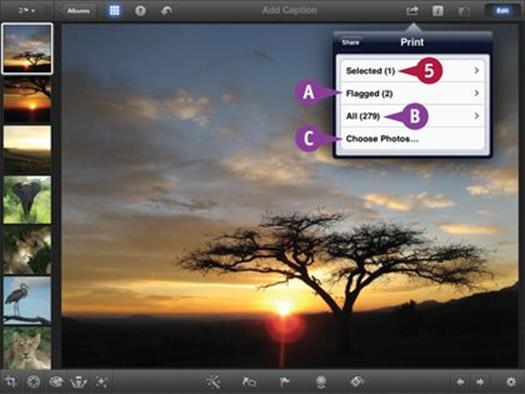
![]() Tap the Selected option to print the currently selected photos.
Tap the Selected option to print the currently selected photos.
A You can tap the Flagged option to print all flagged photos in the current album or event or in the complete photo collection.
B You can tap the All option to print all photos in the current album or event or in the complete photo collection.
C You can tap the Choose Photos option to print one or more other photos.
Note: You can select unlimited photos for printing.
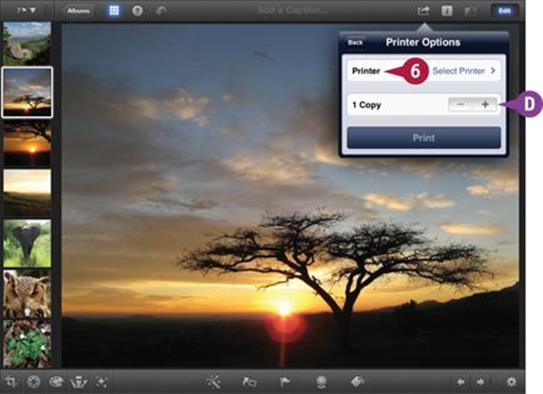
![]() Tap the Printer option to select a printer.
Tap the Printer option to select a printer.
D You can tap ![]() or
or ![]() for more or fewer copies.
for more or fewer copies.
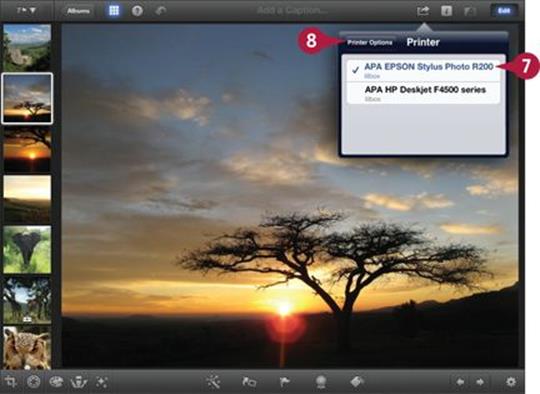
![]() Tap a printer to select it.
Tap a printer to select it.
Note: By default, only AirPrint printers appear in this list. To print to a standard printer, see the tip.
![]() Tap the Printer Options button to return to the previous dialog.
Tap the Printer Options button to return to the previous dialog.
![]() Tap the Print button to begin printing.
Tap the Print button to begin printing.
TIP
Do I have to use a special printer?
In theory you must buy a compatible printer to use AirPrint. For a list of models, see the Apple support document at http://support.apple.com/kb/ht4356. In practice you can print to any printer attached to a Mac or PC as long as it is on the same Wi-Fi network. The details depend on your computer and other hardware. Some printer manufacturers have created their own special drivers — search the web for the manufacturer’s name and “AirPrint.” For a general solution for a Mac, search the web for “AirPrint Hacktivator.” For Windows, search for “sc.exe Bonjour AirPrint.”
Share Photos via Twitter
You can use the Twitter share option to send a photo with optional text to the popular Twitter service. iPhoto uses your usual Twitter identity and sign-in details. You can share only one photo in each tweet.
Photos appear as Photobucket links in your Twitter feed. iPhoto automatically shrinks the photo to a reasonable size, uploads it to Photobucket, and creates a clickable link. If you add text, it appears above the photo link in your feed.
Share Photos via Twitter
![]() Open the thumbnail browser for any album or event or for the Photos collection.
Open the thumbnail browser for any album or event or for the Photos collection.
![]() Select a photo for tweeting.
Select a photo for tweeting.
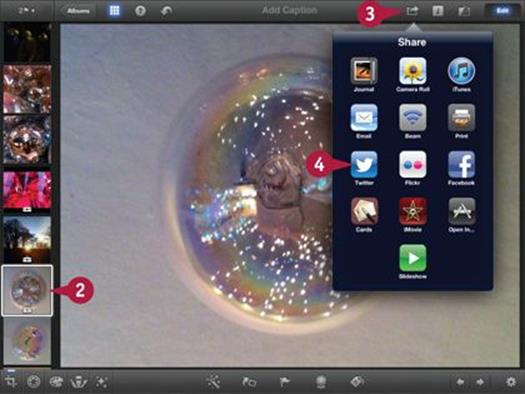
![]() Tap the Share icon (
Tap the Share icon (![]() ).
).
Note: You do not need to be in Edit mode to tweet a photo.
![]() Tap the Twitter icon.
Tap the Twitter icon.
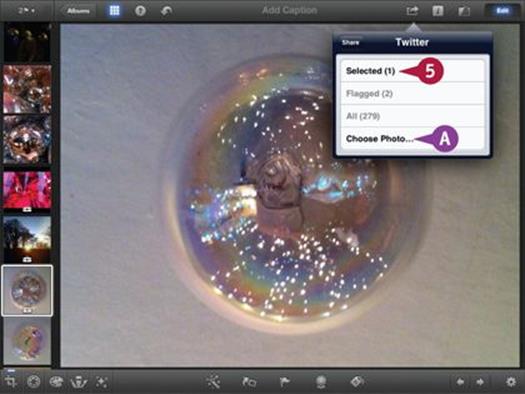
![]() Tap the Selected option to tweet the current photo.
Tap the Selected option to tweet the current photo.
A You can tap the Choose Photo option to select and tweet a different photo.
Note: You can only tweet a single photo at a time.
Note: If exactly one photo is flagged, the Flagged option is not grayed out, and you can tweet that one photo.
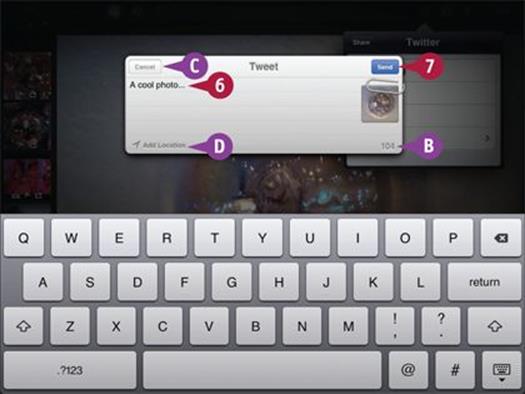
![]() Type some text to describe your tweet.
Type some text to describe your tweet.
B iPhoto displays the remaining character count as you type.
Note: Tweets are limited to 140 characters.
![]() Tap Send to send the tweet.
Tap Send to send the tweet.
Note: You must have Wi-Fi or mobile data access to send a tweet.
C You can tap Cancel to cancel it.
D You can tap the Add Location option at the bottom left to include your location with the tweet.
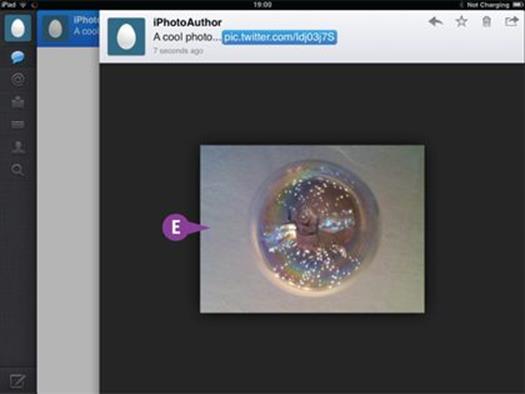
E iPhoto posts the tweet. You and your followers can view it with any Twitter client.
TIPS
Why does iPhoto ask me to sign in?
The Twitter feature uses your device’s standard Twitter account. If you have not already signed in, iPhoto opens the Settings app on the correct page so you can enter your details. You only need to do this once. After you sign in, iPhoto always skips straight to the Twitter send popover.
Can I share photos to more than one account?
In iOS, your device can log in to only one account at a time. Currently iPhoto uses the first account you set up in Settings, even if you change the selected account in the Twitter app. So you can send photos only from that one account. There is no way to switch accounts or to send photos from multiple accounts.
Upload Photos to Flickr
You can use the Flickr photo sharing service to share your photos. You can create public and private photo collections and upload tens or even hundreds of photos at a time. However, sharing is slow, so expect to wait a few hours if you attempt to upload an entire album.
Flickr is easy to use. It is managed by Yahoo! and you will need a Yahoo!, Facebook, or Twitter account to use it. iPhoto asks you to sign up or log in before you can share photos, but you only need to do this once on each device.
Upload Photos to Flickr
![]() Open the thumbnail browser for any album or event or for the Photos collection.
Open the thumbnail browser for any album or event or for the Photos collection.
![]() Select one or more photos for uploading.
Select one or more photos for uploading.
![]() Tap the Share icon (
Tap the Share icon (![]() ).
).
Note: You do not need to be in Edit mode to upload photos.
![]() Tap the Flickr icon.
Tap the Flickr icon.
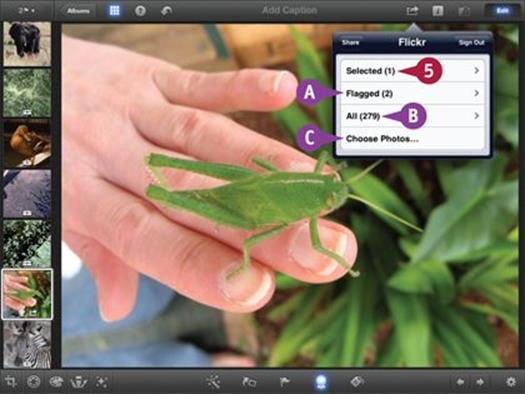
![]() Tap the Selected option to upload the currently selected photos.
Tap the Selected option to upload the currently selected photos.
A You can tap the Flagged option to upload flagged photos in the current album or event or in the complete photo collection.
B You can tap the All option to upload all photos in the current album or event or in the complete photo collection.
C You can tap the Choose Photos option to select one or more other photos.
Note: You can select unlimited photos for upload.
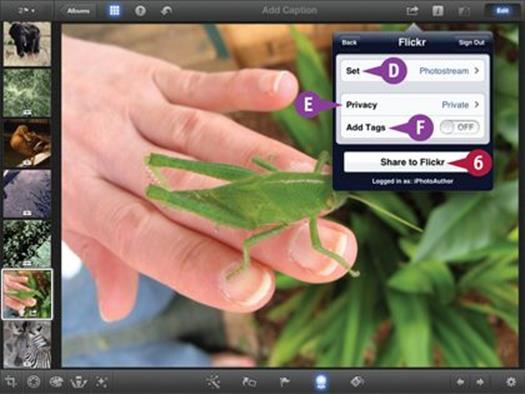
D You can tap to select a set.
E You can tap to select Privacy.
Note: You can select Private, Family, Friends, and Public privacy settings to limit access to your photos.
F You can tap Add Tags to show a Tag text box.
Note: Tags are optional single-word descriptions that can help you sort and find photos.
![]() Tap Share to Flickr to upload the photos.
Tap Share to Flickr to upload the photos.
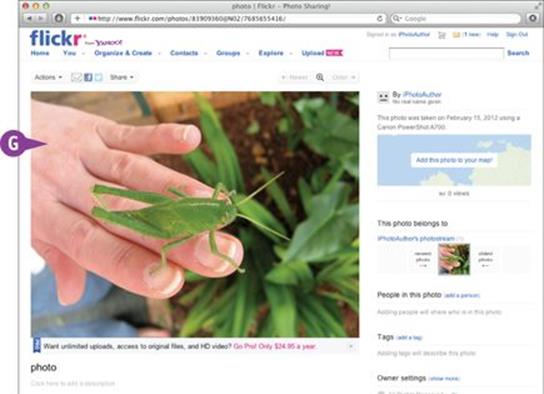
iPhoto displays a progress bar as it uploads the photos, followed by a Done dialog when uploading is complete.
G The photo or photos appear on the Flickr website.
Note: The privacy settings control access to the photos. You can nominate friends and family groups to keep some photos private. For details, see the online help on Flickr.
TIPS
Why would I use Flickr?
Flickr is a popular and widely known photo sharing service. Visitors can view and comment on your public photos. You can also create private collections for friends and family. You can use Flickr as an online album. Some users find it easier to use than iCloud journals. You can also order paper prints and photo books using the Snapfish service.
Do I have to use Yahoo! to use Flickr?
You can log in to Flickr with a Facebook or Twitter account. You do not have to create a separate Yahoo! ID if you do not want one.
Post Photos to Facebook
You can upload one or more photos to Facebook with the Facebook sharing option. By default, the photos are posted to your Facebook Wall Photos album. You can also choose to upload them to one of your other albums.
You must sign in to Facebook before you can post photos, and also give iPhoto permission to send and receive data from your Facebook account. You only need to do this once. After you sign in and set up the account, you can post photos with a few taps. Uploaded photos do not include a description, but you can add one on Facebook.
Post Photos to Facebook
![]() Open the thumbnail browser for any album or event or for the Photos collection.
Open the thumbnail browser for any album or event or for the Photos collection.
![]() Select one or more photos for posting.
Select one or more photos for posting.
![]() Tap the Share icon (
Tap the Share icon (![]() ).
).
Note: You do not need to be in Edit mode to post photos.
![]() Tap the Facebook icon.
Tap the Facebook icon.
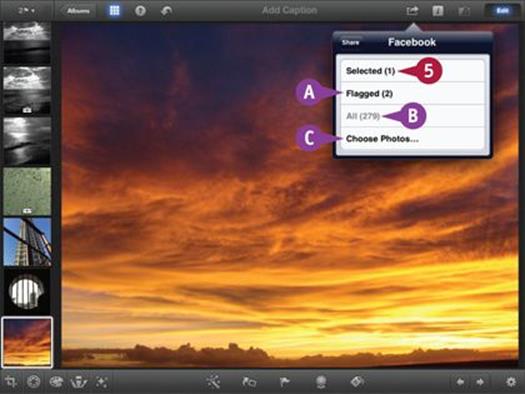
![]() Tap the Selected option to post the currently selected photos.
Tap the Selected option to post the currently selected photos.
A You can tap the Flagged option to post all flagged photos in the current album or event or in the complete photo collection.
B You can tap the All option to post all photos in the current album or event or in the complete photo collection.
C You can tap the Choose Photos option to post one or more other photos.
Note: You can post an unlimited number of photos.
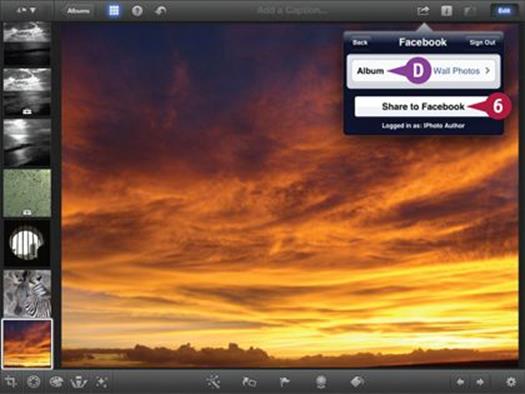
D By default photos are posted to your Wall Photos album, but you can tap the Album option to select a different album.
![]() Tap Share to Facebook to upload the photos.
Tap Share to Facebook to upload the photos.
Note: Sharing can take a long time, especially if you post tens or hundreds of photos.

iPhoto displays a progress bar as it uploads the photos, followed by a Done dialog when uploading is complete.
E The photo or photos appear on Facebook.
F You can click this option to add a description.
TIPS
Are uploaded photos full-sized?
Between them, iPhoto and Facebook shrink photos to a manageable size, usually a few hundred pixels on a side. iPhoto does not upload the original full-sized versions of your photos. Although web users can still download and link to your photos, they cannot make high-resolution prints or copies.
Do the photos include location information?
iPhoto uploads location information to Facebook, and you can add a location to the photo on Facebook if you choose to. However, location information is stripped out of the photo. If someone downloads a photo, he cannot see your location.
Create and View a Slide Show
You can create a live slide show to display your photos with interesting animations and music. Slide shows are a good way to make your photo collections more entertaining. You can select the photos you want to share, or share every photo in an album.
iPhoto creates slide shows “live” as you view them. You cannot save a slide show as a file, copy it to another device, or upload it to iCloud or to a web server. However, you can view a slide show on an external display.
Create and View a Slide Show
![]() Open the thumbnail browser for any album or event or for the Photos collection.
Open the thumbnail browser for any album or event or for the Photos collection.
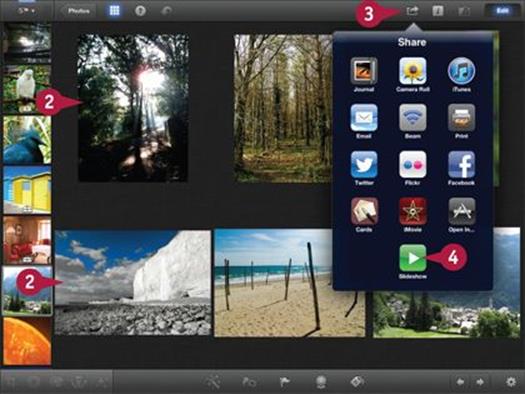
![]() Select one or more photos for the slide show.
Select one or more photos for the slide show.
![]() Tap the Share icon (
Tap the Share icon (![]() ).
).
Note: You do not need to be in Edit mode to create a slide show.
![]() Tap the Slideshow icon.
Tap the Slideshow icon.
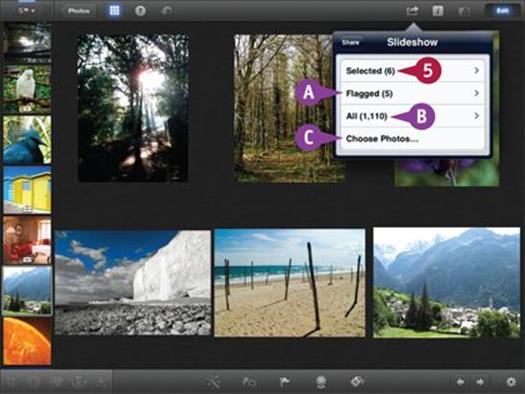
![]() Tap the Selected option to include all selected photos.
Tap the Selected option to include all selected photos.
A You can tap the Flagged option to include all flagged photos in the current album or event or in the complete photo collection.
B You can tap the All option to include all photos in the current album or event or in the complete photo collection.
C You can tap the Choose Photos option to select other photos.
Note: You can include an unlimited number of photos, but you must include more than one.
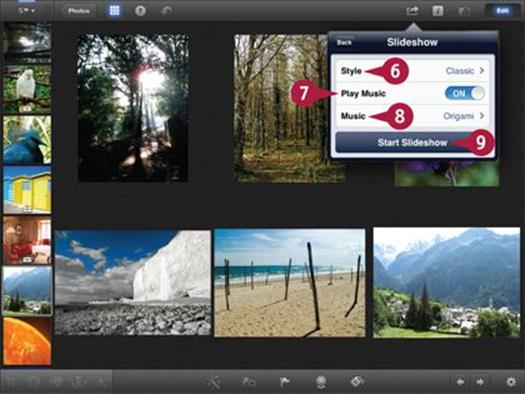
![]() Tap to select an animation style.
Tap to select an animation style.
Note: To see what the animation styles do, experiment with them.
![]() Tap this switch to add music.
Tap this switch to add music.
![]() Select the backing track.
Select the backing track.
![]() Tap Start Slideshow to play the slide show.
Tap Start Slideshow to play the slide show.

iPhoto plays an animated slide show with optional backing music.
Note: You can tap the screen to show a transport bar with stop, pause, previous, and next buttons.
Note: This example is playing a slide show with all photos selected, not just the photos selected in the previous steps.
TIPS
How can I improve the sound quality?
If you use the built-in speaker on your device, the music may sound thin and tinny. You can connect your device to an external music system with better speakers through a standard 3.5mm adapter lead. Most mall electronic supplies stores stock suitable adapters, but they may be expensive. eBay is a good source for cheap adapters.
Why does iPhoto crash if I select a lot of photos?
iPhoto creates the slide show and saves it before it plays. If your device has too little free memory, iPhoto can crash if it tries to work with too many photos, usually when you try to change the slide show type or select different music. To fix this, create a slide show with a single item, change the animation and music, go back, and reselect all the photos you want to see.
Using Other Sharing Options
You can use other sharing options to do more with your photos. You can view photos on an external display by plugging your iDevice into a projector with a special adapter. If you have an Apple TV, you can use AirPlay to view photos on your television.
You can also share your photos with other apps. In version 1.1 of iPhoto you can copy photos to Apple’s Cards and iMovie apps and to selected third-party apps. Unfortunately the app sharing feature is not compatible with popular photo-editing apps. iMovie can accept multiple photos and videos. The other options can share a single photo at a time.
Using Other Sharing Options
Copy a Photo to Cards
![]() Select a photo and tap the Share icon (
Select a photo and tap the Share icon (![]() ).
).
![]() Tap the Cards icon and tap the Selected option.
Tap the Cards icon and tap the Selected option.
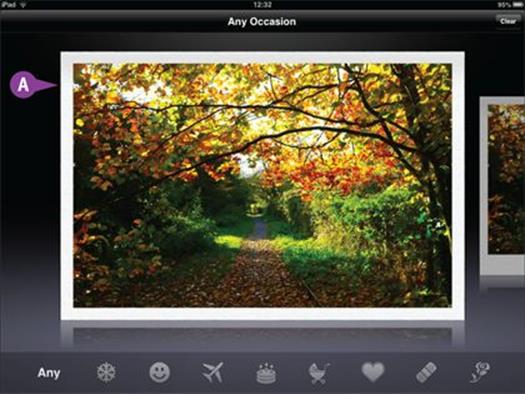
A iPhoto opens the Cards app, copies the photo to it and pastes it into the standard card templates.
Note: You can only share one photo at a time.
Note: The Cards app is free. Cards cost $2.99 each if mailed within the US and $4.99 if mailed elsewhere.
Copy a Photo to iMovie
![]() Select a photo or video and tap the Share icon (
Select a photo or video and tap the Share icon (![]() ).
).
![]() Tap the iMovie icon and tap the Selected option.
Tap the iMovie icon and tap the Selected option.
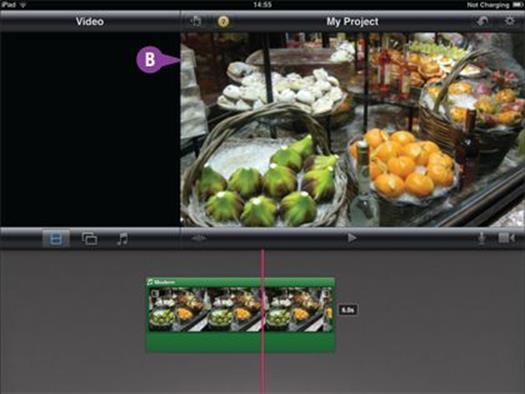
B iPhoto opens iMovie app and copies the photo or movie to it so that you can add it to a video or slide show.
Note: You must install iMovie ($4.99) to use this option.
Copy a Photo to Other Apps
![]() Select a photo or video.
Select a photo or video.
![]() Tap the Share icon (
Tap the Share icon (![]() ).
).
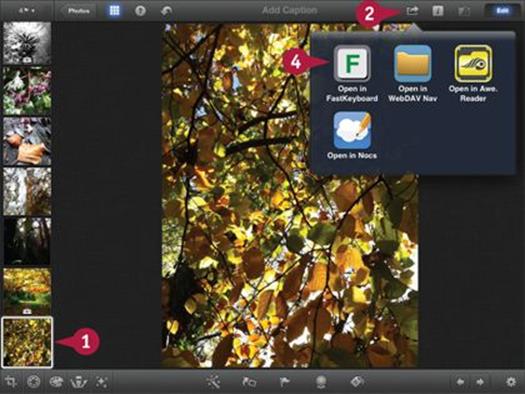
![]() Tap the Open in icon and tap the Selected option.
Tap the Open in icon and tap the Selected option.
![]() Tap one of the apps in the popover.
Tap one of the apps in the popover.
Note: Only a few apps are compatible with photo sharing. Most photo-editing apps are not. There is no guarantee that apps listed in the popover can receive or display photos correctly.
Show Photos on an External Display
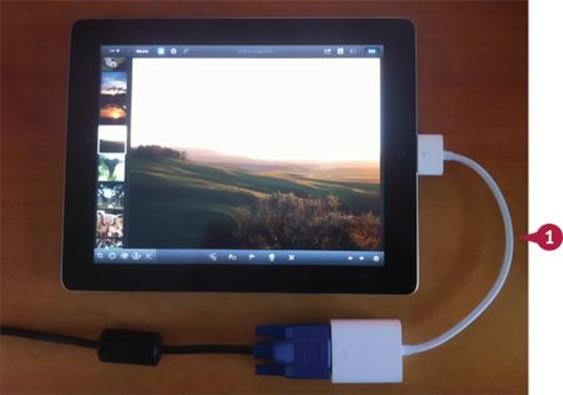
![]() Connect your iPad via a special adapter to a projector or external monitor.
Connect your iPad via a special adapter to a projector or external monitor.
iPhoto displays photos on the external display.
Note: You can enable mirroring to display iPhoto as you edit. For details see the section “Investigate iPhoto Settings” in Chapter 1.
TIPS
Which adapter do I need?
Projectors and monitors support four standards — composite video, HDMI, VGA, and DVI. Your display’s manual lists the connectors your display works with. The Apple Store sells Apple-brand adapters for the first three types. You can find HDMI to DVI adapter cables on Amazon and eBay.
Can I buy a cheaper adapter?
eBay is a popular source of cheap cables and adapters. However, performance is not guaranteed. The products are usually much cheaper than their official Apple equivalents, but they may not work correctly, so you buy from eBay at your own risk.
All materials on the site are licensed Creative Commons Attribution-Sharealike 3.0 Unported CC BY-SA 3.0 & GNU Free Documentation License (GFDL)
If you are the copyright holder of any material contained on our site and intend to remove it, please contact our site administrator for approval.
© 2016-2025 All site design rights belong to S.Y.A.