Teach Yourself VISUALLY iPhoto for iPad (2013)
Chapter 13: Creating Journals
You can use journals to collect and display your photos in attractive documents. Albums and events are simple photo collections. Journals can be decorated with text, notes, quotes, maps, calendars, and even weather reports and recipes. Journals also support full-screen photo viewing, and you can easily share them with friends and family.
Learn about Journals
Create a New Journal
Change a Journal’s Background
Add Photos to a Journal
Add Other Items to a Journal
Lay Out a Journal Automatically
Move and Resize Items
Swap Items
Edit Special Content
Share a Journal to iCloud
Share a Journal to iTunes
Learn about Journals
Journals are a unique feature in iPhoto for iOS. You can use them to present your photos in attractive and creative ways. You can choose the photos you want to include. You can also add further content including quotes, text, maps, weather reports, and recipes.
Journals are more open-ended than iPhoto’s albums and events. They make an ideal replacement for paper photo albums. You can arrange photos as you want, highlight some photos by size, and add captions. You can also share your journals to iCloud, and then send friends and family a link to a single journal or your journal collection.
Create a Journal
To create a journal, use the Share popover introduced in Chapter 12 and share one or more photos to a new journal. There is no separate “create a journal” option. You can name a journal when you create it. Note that the name on the Journals page is fixed — you cannot change it later. You can also set the background image and layout style of the journal. iPhoto gives you the option to open the journal immediately after you create it so you can customize the layout and add further content.

Add Photos and Other Items
You can add as many photos as you want at any time to a journal by selecting an existing journal in the Share popover. You can edit a journal to show text in various styles. You can also decorate a journal with page dividers, smileys, and other graphics by importing them into iPhoto from your Mac or PC and adding them to a journal by hand. Some of the built-in extra content — calendar, weather, maps, and so on — reads and uses information from the last photo you add.

Design a Journal
Journals include a full set of page layout options. You can change the size of a photo or any other element, change the position, create multiple pages, and move content between pages. You can also select one of a small number of fixed background colors and textures. The design options are simple but powerful. You can easily create a layout that displays your photos in an attractive way.

View a Journal
Journals are the only way to view photos full screen in iPhoto. When you tap a photo in a journal, iPhoto hides the toolbars and other content and scales the photo so it fills as much of the screen as possible. You can then drag left or right to view the other photos in the journal. Unfortunately, you cannot zoom photos.

Create a Slide Show
You can convert a journal into a slide show with a couple of taps. The slide show option is exactly the same as the slide show feature introduced in the previous chapter. Only photos are displayed. Extra items — text, maps, and so on — are ignored.

Share a Journal to iCloud
You can share a journal to iCloud and to a “Home Page.” In fact, both options create a new web page on iCloud, but the first option displays a single journal, whereas the Home Page displays a collection arranged on a glass shelf. Viewers can click on any journal on the “shelf” to view it. You can view the journals in any web browser. You can also share the link by copying and pasting it into an e-mail or some other document. Sharing is a simple process, but it is not quick. iCloud can take a good few moments to set up and display your journals.

Share a Journal to iTunes
You can share a journal to iTunes, creating a folder with web pages that you can copy using the File Sharing option in iTunes and view in Safari. The pages look and work like a journal. You can upload them to a private web server to share your journal online without uploading it to iCloud.

Create a New Journal
To create a new journal, select one or more photos, tap the Share icon, and select the Journal icon. iPhoto asks you which photos you want to include.
Select Journal and then New, select a journal background, type a name, and tap the Create Journal button. iPhoto adds the photos to a new journal. You can then edit the layout and add further content, or create another journal.
Create a New Journal
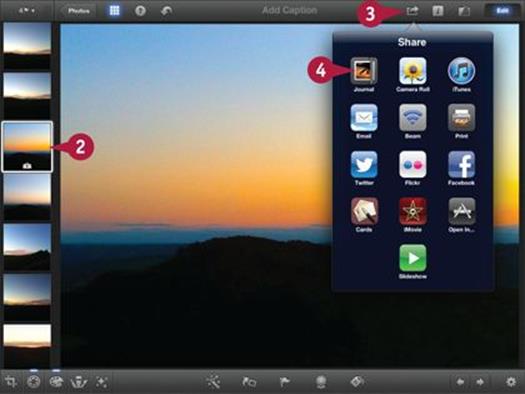
![]() Select an album, event, or the photos list to open the thumbnail browser.
Select an album, event, or the photos list to open the thumbnail browser.
![]() Select one or more photos to add to the journal.
Select one or more photos to add to the journal.
Note: For more information about selecting photos, see Chapter 4.
Note: If you select an edited photo, iPhoto automatically adds the edited version to the journal.
![]() Tap the Share icon (
Tap the Share icon (![]() ).
).
![]() Tap the Journal icon.
Tap the Journal icon.
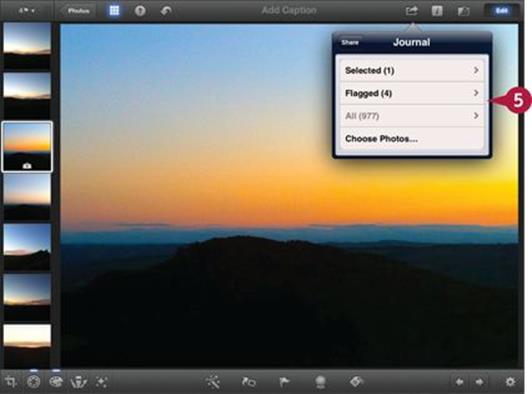
iPhoto displays a popover with photo selection options.
![]() Tap one of the selection options.
Tap one of the selection options.
Note: Selected chooses the photos you selected in step 2, and Flagged chooses all flagged photos.
Note: iPhoto limits the number of photos you can add. Grayed out features like the All option here are over the limit.
Note: You can use the Choose option to view the thumbnails again and select further photos.
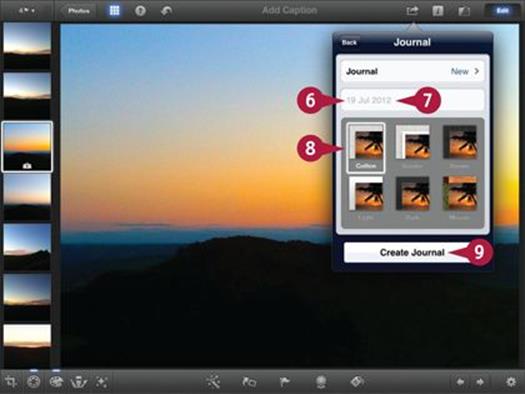
![]() Tap the name field.
Tap the name field.
iPhoto displays the keyboard, or enables input from an external Bluetooth keyboard if you are using one.
![]() Type a name for the new journal.
Type a name for the new journal.
Note: You cannot change the name that appears on the Journals page after you create it.
![]() Tap one of the preset styles for the journal to select it.
Tap one of the preset styles for the journal to select it.
![]() Tap the Create Journal button.
Tap the Create Journal button.
Note: You can tap the Back button at the top of the popover to go back to a previous step.
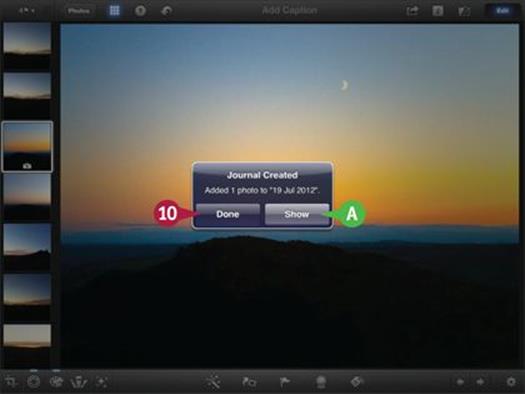
![]() Tap the Done button to continue viewing and editing photos or if you want to add further photos to the journal.
Tap the Done button to continue viewing and editing photos or if you want to add further photos to the journal.
A You can tap the Show button to close the editor and thumbnail view and open the journal.
TIPS
Do I have to give the journal a name?
If you leave the name field blank, iPhoto creates a new journal with the name of the first photo you add. You can edit this to enter a more descriptive name.
What happens if I delete a photo in a journal?
iPhoto creates a copy of every photo in a journal. If you take a new photo, add it to a journal from the camera roll, and then delete the photo, the photo does not disappear, although you may see a temporary placeholder image while iPhoto reorganizes its photo collection immediately after the deletion.
Change a Journal’s Background
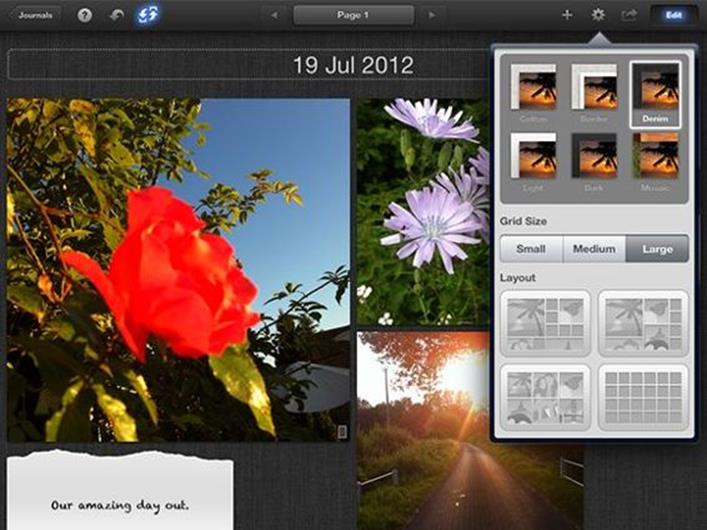
Journals offer six preset backgrounds and layouts. The default is Cotton, which displays photos on a light fabric. Border is identical, but adds a thin white border around each photo. Denim is a dark gray fabric. Light and Dark are plain near-white and near-black colored backgrounds. Mosaic is similar to Dark but leaves no spaces between photos.
You can change the background at any time by tapping the settings (gear) icon and selecting one of the backgrounds in the popover. To preview a different background, tap the thumbnail in the popover.
Change a Journal’s Background
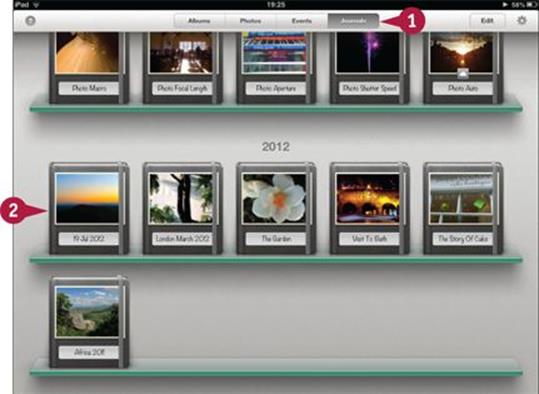
![]() If your journal is not already open, tap the Journals button.
If your journal is not already open, tap the Journals button.
![]() Tap the journal to open it.
Tap the journal to open it.
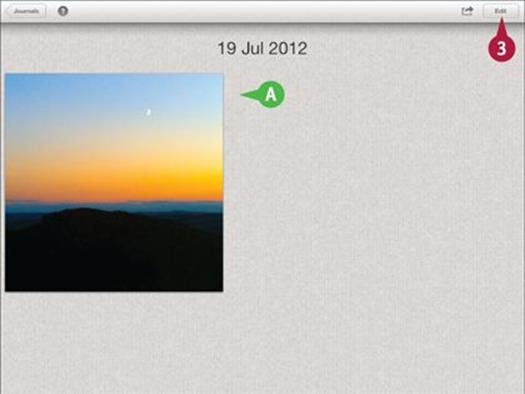
A iPhoto displays the contents of the journal.
![]() Tap the Edit button to enable editing.
Tap the Edit button to enable editing.
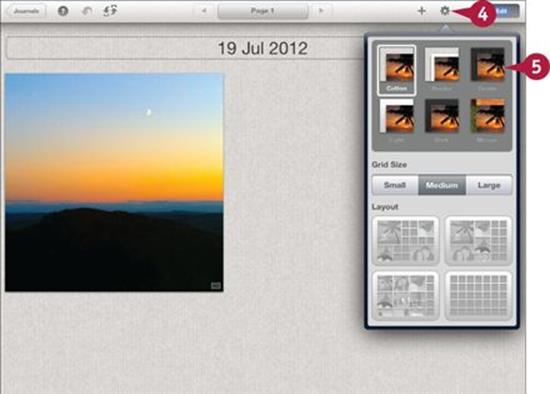
![]() Tap the settings (gear) icon (
Tap the settings (gear) icon (![]() ).
).
iPhoto displays a popover with a preview of the different backgrounds.
![]() Tap one of the thumbnails to select a different background.
Tap one of the thumbnails to select a different background.
Note: iPhoto updates the background at each selection.
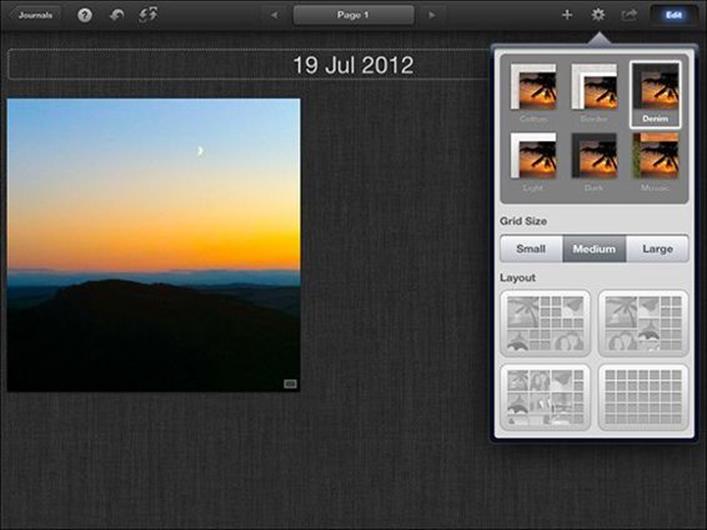
Note: You can tap anywhere outside the popover to hide it.
Note: iPhoto also displays the background selection popover when you create a new journal or add photos to an existing journal.
TIPS
Can I create my own backgrounds?
It would certainly be useful to add custom colors and textures, but this option is not available in the current version of iPhoto. It may perhaps be added later. For now the backgrounds are fixed, and you cannot customize them.
Why does the Mosaic background leave no space between photos?
This is a deliberate design choice. As the name suggests, the Mosaic background creates a mosaic of images. You can use it to create a custom thumbnail grid. The other backgrounds are designed to look more like printed photos on fabric or plain paper.
Add Photos to a Journal
To add one or more photos to an existing journal, repeat the steps used to create a new journal, but select an existing journal as the destination from the list that appears in the popover. Not all journals will appear in the list, so you may need to scroll down.
By default, iPhoto automatically creates a new page whenever you add photos. This is rarely what you want, especially when you add photos singly. For better results, select a page before you add the photos.
Add Photos to a Journal
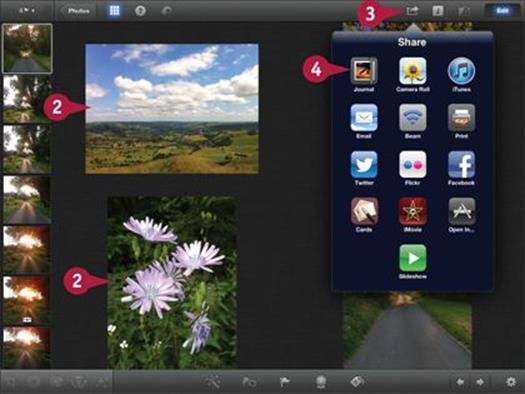
![]() Select an album, event, or the photos list to open the thumbnail browser.
Select an album, event, or the photos list to open the thumbnail browser.
![]() Select one or more photos to add to the journal.
Select one or more photos to add to the journal.
Note: For more information about selecting photos, see Chapter 4.
![]() Tap the Share icon (
Tap the Share icon (![]() ).
).
iPhoto displays a popover with share options.
![]() Tap the Journal icon (see the section “Create a New Journal” for an example).
Tap the Journal icon (see the section “Create a New Journal” for an example).
![]() Tap Selected, Flagged, All, or Choose Photos to select the photos to add.
Tap Selected, Flagged, All, or Choose Photos to select the photos to add.
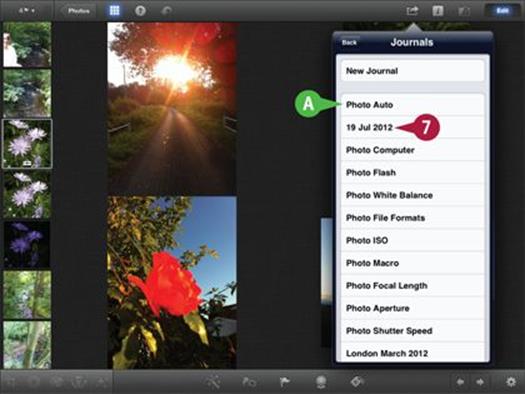
![]() Tap the Journal button when it appears.
Tap the Journal button when it appears.
A iPhoto displays a list of journals.
![]() Tap the name of the journal to which you want to add photos.
Tap the name of the journal to which you want to add photos.
Note: You can drag the list up and down to scroll through it.
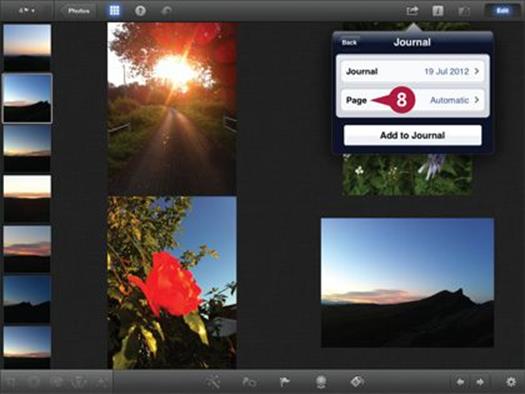
iPhoto displays a page selection popover.
![]() Tap the Page button.
Tap the Page button.
Note: If you leave Automatic selected iPhoto creates a new page in the journal for the photo or photos. Select a page manually to add the photos to it.
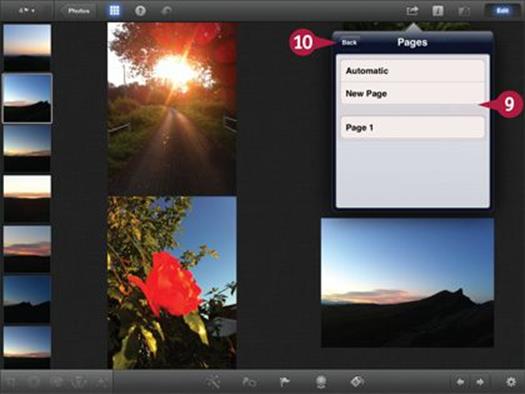
![]() Tap one of the Pages options.
Tap one of the Pages options.
Note: Typically you add photos to Page 1 or another page that already exists, but you can select New Page here to create a new page for the photo.
![]() Tap the Back button.
Tap the Back button.
![]() Tap the Add to Journal button in the previous popover to add the photos.
Tap the Add to Journal button in the previous popover to add the photos.
iPhoto adds the photos to the journal and displays a dialog asking if you want to show it, or if you are done and want to continue editing and viewing photos.
TIPS
Why do the photos have different sizes?
If you add multiple photos, iPhoto attempts to create an attractive layout. It does not “look” at the photos or try to select which photos are more important. The default layout can usually be improved with manual editing.
Does iPhoto copy captions?
If you caption a photo in the thumbnail browser and add it to a journal, iPhoto copies the caption and includes it automatically. See Chapter 6 for details.
Add Other Items to a Journal
Albums and events can only include photos. Journals can also include text in various formats, and other content including maps, weather icons, and a calendar date display.
To add other items, tap the Edit button, tap ![]() , and select the content from a popover. The text options add text on various backgrounds. You can add a header, a plain description, a yellow stick-on note, a divider, and a “memory,” a note with torn paper edges. Some content includes extra settings. For example, you can tap a Date to turn off auto-lookup and set the date manually.
, and select the content from a popover. The text options add text on various backgrounds. You can add a header, a plain description, a yellow stick-on note, a divider, and a “memory,” a note with torn paper edges. Some content includes extra settings. For example, you can tap a Date to turn off auto-lookup and set the date manually.
Add Other Items to a Journal
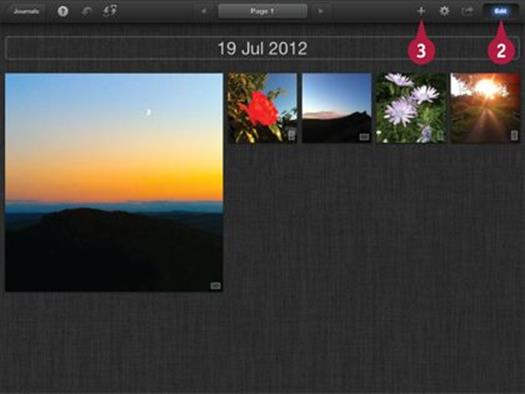
![]() Open a journal.
Open a journal.
![]() If Edit mode is not already selected, tap the Edit button.
If Edit mode is not already selected, tap the Edit button.
![]() Tap
Tap ![]() to add other content.
to add other content.
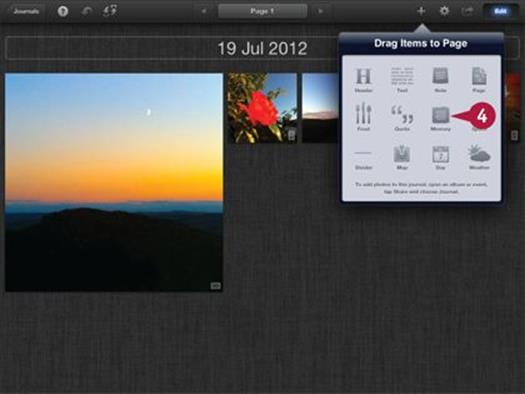
iPhoto displays a content popover with various items.
![]() Tap any item to add it to the journal.
Tap any item to add it to the journal.
Note: This example adds a Memory item.
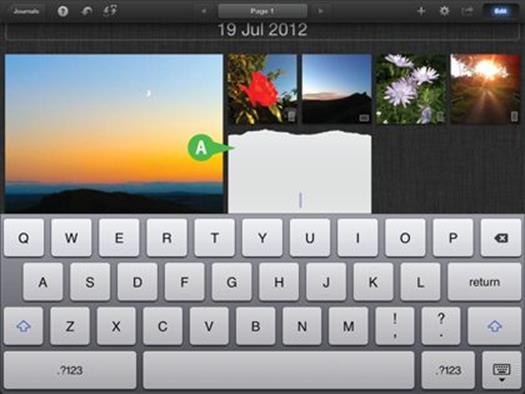
A iPhoto adds the item to the journal. Items with editable text display the keyboard automatically.
Note: Some items do not have a visible boundary around them.
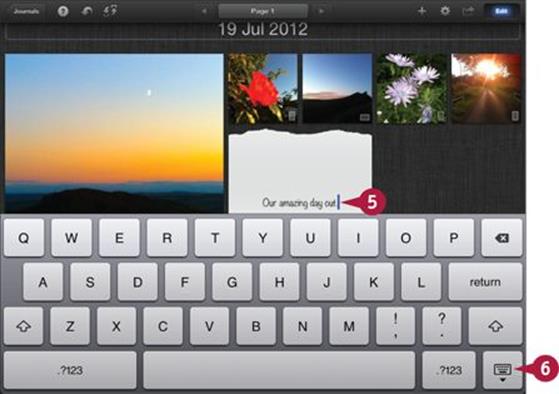
![]() For items that show text, type on the keyboard to edit the text.
For items that show text, type on the keyboard to edit the text.
![]() Tap the Hide button when done to hide the keyboard.
Tap the Hide button when done to hide the keyboard.
iPhoto edits the item and displays your new text.
Note: You can add as many extra items to a journal as you want.
Note: You can customize items that show text (including the main heading) by tapping them and selecting border, text style, and layout options from a popover.
TIPS
Can I add video clips to a journal?
If you create a live recording with the Camera app, it appears on your device camera roll in the usual way, and you can add it to a journal. Video clips appear as stills in the journal. You can play them by tapping the play icon in the full-screen view.
How does iPhoto know the weather for a photo?
iPhoto uses the history feature at Weather Underground (www.wunderground.com) to find the weather for the date and location of the last photo you add. The photo must include location information. You can also set the weather manually by double-tapping a weather icon and turning off the Auto switch. If you delete a photo, you must turn Edit mode off and on again before adding a weather item. Otherwise, iPhoto does not know which photo to find details for.
Lay Out a Journal Automatically
If you have a lot of photos, notes, and other content, you can save time by using the single-tap automatic layout feature to lay out pages for you. This feature is a good way to minimize wasted space.
To use this feature, tap the Edit button, tap the settings (gear) icon, and tap one of the preset layout buttons. You can also set a small, medium, or large grid size. Use the layout as a starting point — you can resize and move content by hand to make the layout look even better, as described in the next section.
Lay Out a Journal Automatically
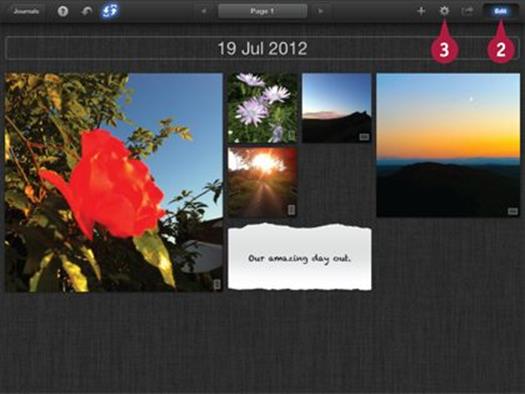
![]() Open a journal.
Open a journal.
![]() If Edit mode is not already selected, tap the Edit button.
If Edit mode is not already selected, tap the Edit button.
![]() Tap the settings (gear) icon (
Tap the settings (gear) icon (![]() ).
).
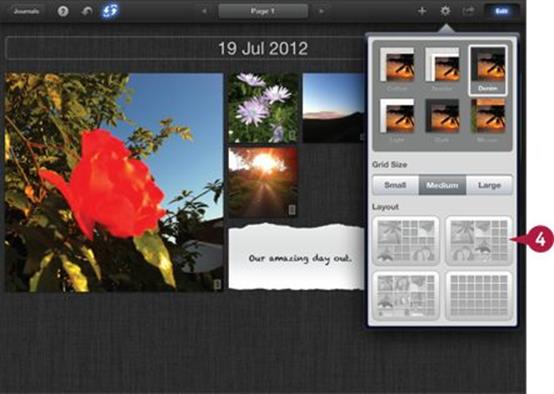
![]() Tap one of the preset layout buttons.
Tap one of the preset layout buttons.
Note: Use the layout thumbnails in the popover as a guide. The final layout may not match the thumbnails exactly, but it will be close.
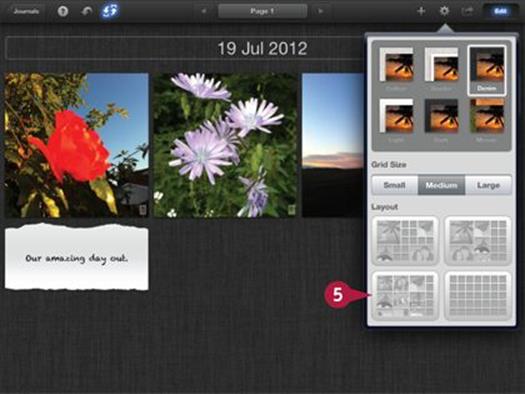
iPhoto adjusts the layout to match the preset.
![]() Tap a different thumbnail to change the layout.
Tap a different thumbnail to change the layout.
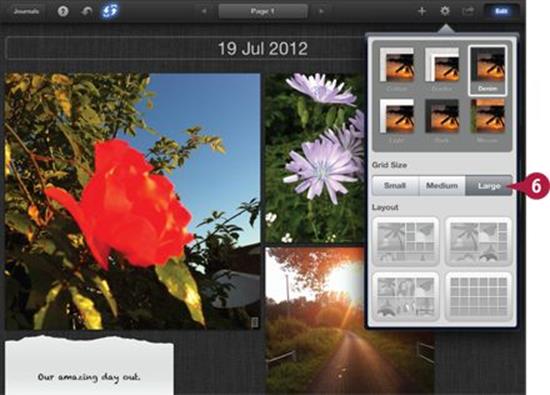
iPhoto rearranges the layout again.
![]() Tap one of the Grid Size buttons to change the size of the items on the layout.
Tap one of the Grid Size buttons to change the size of the items on the layout.
iPhoto resizes the content and rearranges the layout to fit it onto the screen.
Note: The effect of the Grid Size options is most obvious if you select the grid layout thumbnail at the bottom right.
Note: You can usually improve on an automatic layout by moving and resizing items manually.
TIPS
How does the automatic layout feature work?
This feature cannot “see” photos and does not know which photos matter to you, so it attempts to make the content as large as possible on the page using the current layout as a starting point.
How can I add space to a page?
Automatic layouts often look busy. You can thin them out by adding one or more Space items from the content popover. (Tap ![]() to access the content popover.) As the name suggests, these items add empty space to a page. You can use them for finer control of a manual layout, and to add some gaps to an automatic layout. You can also add a divider element, but dividers disappear if you use the automatic layout option.
to access the content popover.) As the name suggests, these items add empty space to a page. You can use them for finer control of a manual layout, and to add some gaps to an automatic layout. You can also add a divider element, but dividers disappear if you use the automatic layout option.
Move and Resize Items
You can customize a page layout by resizing and moving the items on the page. To move an item, tap it and hold it. You can then drag it to a new position. Other items on the page move around to make space for it. The results are always entertaining, but often unpredictable.
To resize an item, tap it and release it. iPhoto adds a blue border with corner and edge markers. Drag the markers to change the size. You can also pinch zoom/expand inside any item to change its size. iPhoto moves the other items around as you make changes.
Move and Resize Items
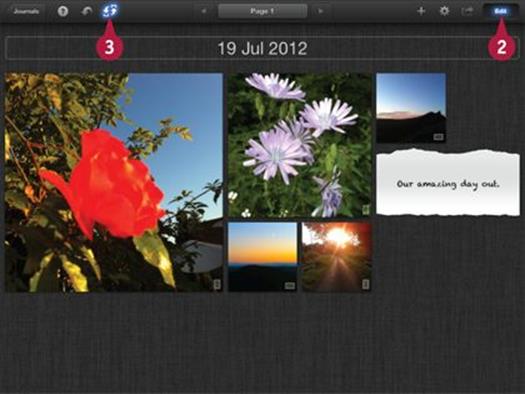
![]() Open a journal.
Open a journal.
![]() If Edit mode is not already selected, tap the Edit button.
If Edit mode is not already selected, tap the Edit button.
![]() If the Enable Item Swapping icon (
If the Enable Item Swapping icon (![]() ) is highlighted, tap it to deselect it.
) is highlighted, tap it to deselect it.
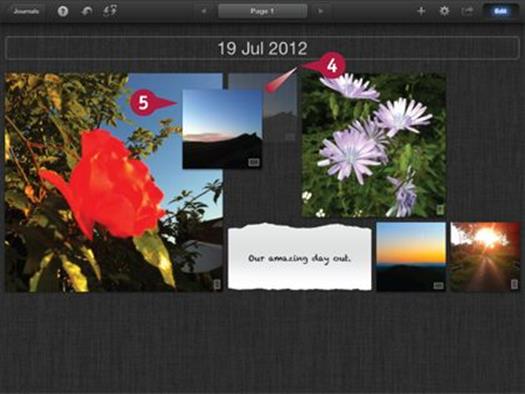
![]() Tap and hold an item until its size increases slightly.
Tap and hold an item until its size increases slightly.
![]() Drag it to a new position and release it.
Drag it to a new position and release it.
Note: iPhoto rearranges the other items as you drag and displays a translucent preview of the item’s new position.
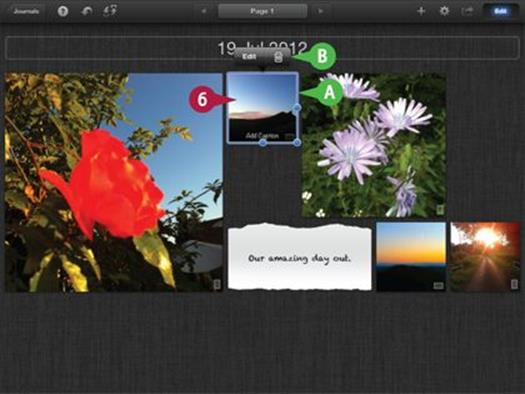
![]() To resize an item tap it once.
To resize an item tap it once.
A iPhoto draws a blue border around the item.
Note: Not all items can be resized.
B iPhoto also displays optional editing popovers.
Note: Different item types display different popover options.
Note: You can tap the trash can icon (![]() ) to delete an item from the journal.
) to delete an item from the journal.
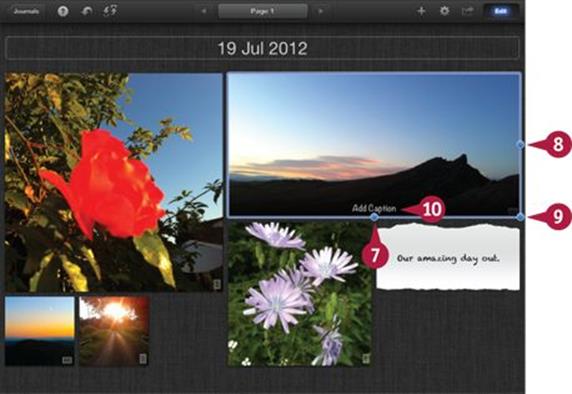
![]() Drag the bottom dot to change the height of an item.
Drag the bottom dot to change the height of an item.
![]() Drag the side dot to change the width of an item.
Drag the side dot to change the width of an item.
![]() Drag the corner dot to change the height and width.
Drag the corner dot to change the height and width.
![]() Double-tap the caption item to caption a photo.
Double-tap the caption item to caption a photo.
Note: When you resize a photo, iPhoto may crop it to the area inside the frame.
Note: You cannot scroll photos inside a frame to set the visible area.
Note: You can tap the undo icon (![]() ) to undo your changes.
) to undo your changes.
TIPS
Can I make the layout more predictable?
There is no way to fix the position of some items while you move or resize others around them. You must resize and move items repeatedly until you create a layout you like.
Why does nothing happen when I tap?
The difference between a tap and hold and release and a plain tap and release is subtle. When iPhoto is ready to move a photo, it floats the photo and makes it slightly larger. When it is ready to resize the photo, it displays the blue border. If you tap and nothing happens, try again.
Swap Items
You can use iPhoto’s Swap Items feature to swap photos and other content on the grid without modifying the layout. This is a good option to use when you create a layout you like but want to reposition some of the photos and other content in it. Swapping items helps you define the look and impact of the journal. Bigger photos make more of an impression than smaller ones.
You can swap any photo with any other, whatever the size. You can also swap text content with other text content. But you cannot swap text content with a smaller photo, and you can only swap weather and calendar icons with items that have a frame with exactly the same dimensions.
Swap Items
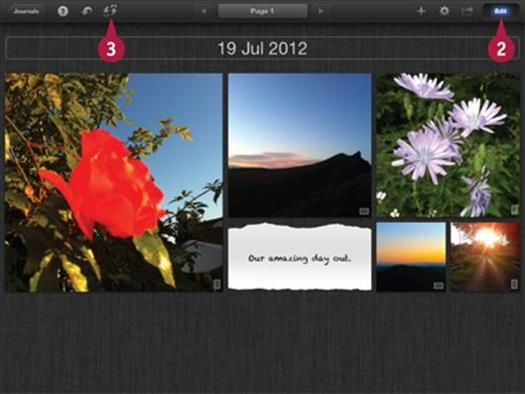
![]() Open a journal.
Open a journal.
![]() If Edit mode is not already selected, tap the Edit button.
If Edit mode is not already selected, tap the Edit button.
![]() Tap the Enable Item Swapping icon (
Tap the Enable Item Swapping icon (![]() ) if it is not already highlighted.
) if it is not already highlighted.
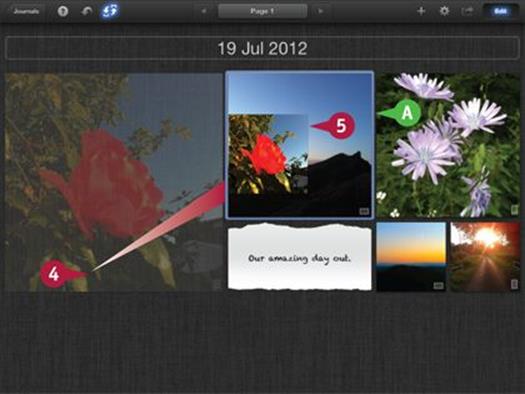
![]() Tap a photo to select it, hold it, and drag it on top of another photo.
Tap a photo to select it, hold it, and drag it on top of another photo.
A With Swap Items on, iPhoto locks the layout and previews the old and new position of your swapped photos on the grid.
![]() Release the floating photo.
Release the floating photo.
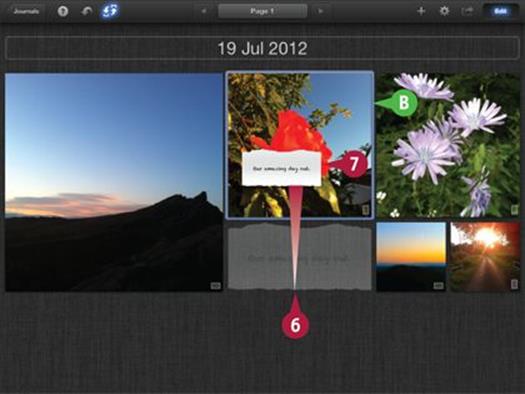
iPhoto swaps the two photos and resizes them if necessary.
![]() Drag and hold any box with text content and hold it over a larger photo.
Drag and hold any box with text content and hold it over a larger photo.
B iPhoto draws a blue line around the larger photo to show you can swap the items.
![]() Release the text box to swap it with the photo.
Release the text box to swap it with the photo.
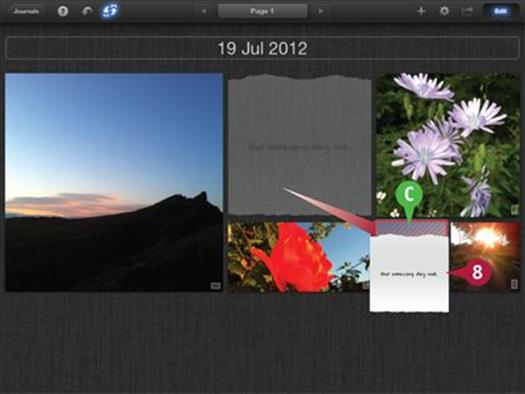
![]() Drag the same text box over a photo with a smaller frame.
Drag the same text box over a photo with a smaller frame.
C iPhoto draws a red frame around two items when their sizes do not allow swapping.
Release the text box to allow it to return to its original location.
TIPS
Why does swapping depend on size??
Text boxes can include a large block of text. If you swap the text into a smaller frame some of it will disappear off the bottom of the frame, creating a bad visual effect. Apple decided not to allow this. And because some items have a fixed size, you cannot swap them with larger or smaller content.
Are there any hidden editing options?
Tapping in the gaps between content displays the new content popover. You can select an item and add it to the layout as described earlier in this chapter. Depending on the layout, the item may not appear in the gap.
Edit Special Content
You can add special content — text, dates, maps, and so on — to your journal. For text, iPhoto displays a message telling you that you can double-tap the text to edit it. But some editing options remain hidden, and iPhoto does not give you clear instructions for editing other types of content.
You must be in Edit mode to edit special content. Tap an item once to display a small popover menu with a delete option. Some content offers further options in the popover. Double-tap an item to edit its contents.
Edit Special Content
![]() Open a journal.
Open a journal.
![]() If Edit mode is not already selected, tap the Edit button.
If Edit mode is not already selected, tap the Edit button.
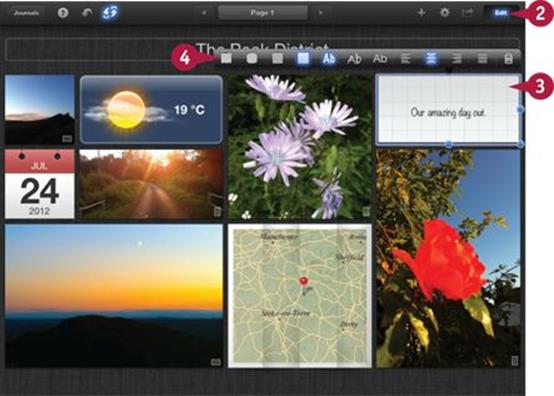
![]() Tap any text box to show a popover.
Tap any text box to show a popover.
![]() Tap the options to set the frame and background, the lettering style, and the justification, the text layout in the box.
Tap the options to set the frame and background, the lettering style, and the justification, the text layout in the box.
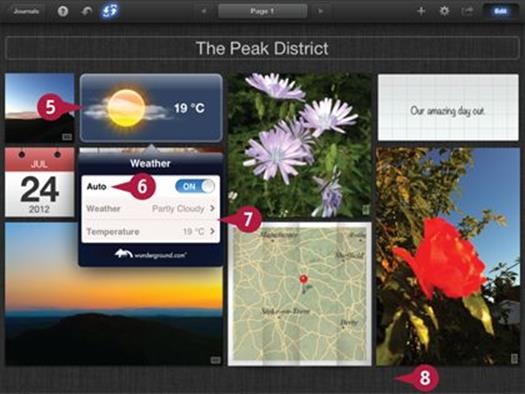
![]() To edit a weather item, double-tap it to display a popover.
To edit a weather item, double-tap it to display a popover.
![]() Tap the Auto switch so you can select the weather by hand.
Tap the Auto switch so you can select the weather by hand.
![]() Tap the Weather and Temperature settings to change them.
Tap the Weather and Temperature settings to change them.
![]() Tap anywhere outside the popover to hide it and display the new weather.
Tap anywhere outside the popover to hide it and display the new weather.
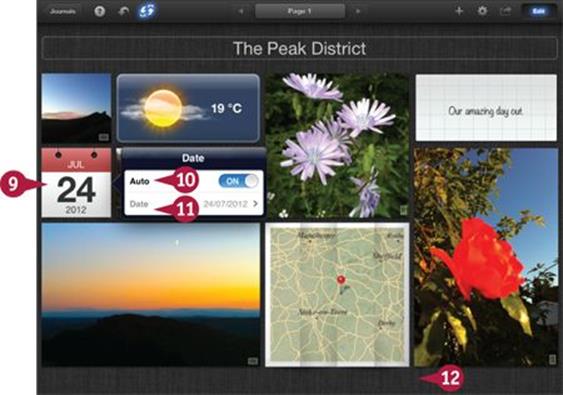
![]() To edit a date item, double-tap it to display a popover.
To edit a date item, double-tap it to display a popover.
![]() Tap the Auto switch so you can set the date manually.
Tap the Auto switch so you can set the date manually.
![]() Tap the Date setting to display a date scroller and set the date.
Tap the Date setting to display a date scroller and set the date.
![]() Tap anywhere outside the popover to hide it and display the new date.
Tap anywhere outside the popover to hide it and display the new date.
Note: You can also double-tap a map to display scroll arrows, and then drag the map to reposition it.
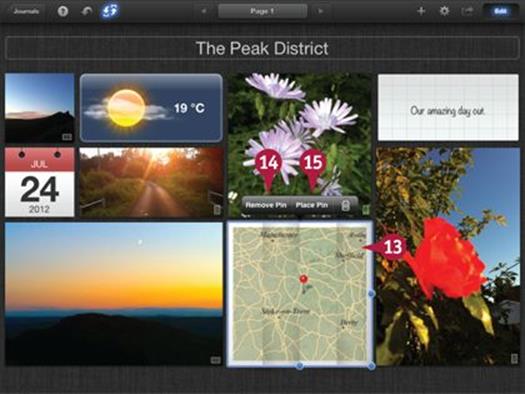
![]() Single-tap a map to view more options on a popover.
Single-tap a map to view more options on a popover.
![]() Tap Remove Pin to remove the default pin.
Tap Remove Pin to remove the default pin.
![]() Tap Place Pin to show a further location look-up popover.
Tap Place Pin to show a further location look-up popover.
Note: You can use this extra popover to place a pin on a location after a search, or at the current location of the device.
Note: All items include a trash can icon (![]() ) to remove an item from a journal.
) to remove an item from a journal.
TIPS
Why do some items show an Auto option?
When Auto is on, the weather and date items use information embedded in the last photo you add to your journal. The date item reads the date from the photo. The weather item reads the date and location and looks up the weather from a record on an online database. These features do not work without an Internet connection. If you turn off Auto, you can set the date and weather manually.
Can I modify photos in a journal?
If you single-tap a photo and select Edit, iPhoto displays the standard photo editor page. If you double-tap a photo iPhoto displays drag arrows. Depending on the photo layout, you can drag the content left and right or up and down inside its frame.
Share a Journal to iCloud
You can share your journals to iCloud and send friends and family web links for easy viewing. If you select Publish to iCloud, iPhoto creates a single web page with a single journal. If you select Add to Home Page, iPhoto adds the journal to a “Home Page” on iCloud which displays all your public journals.
After publishing the journal you can share it as a weblink. You can create an e-mail with an embedded link, post a link to Facebook or Twitter, send the link in a text message, or copy it for use in some other application.
Share a Journal to iCloud
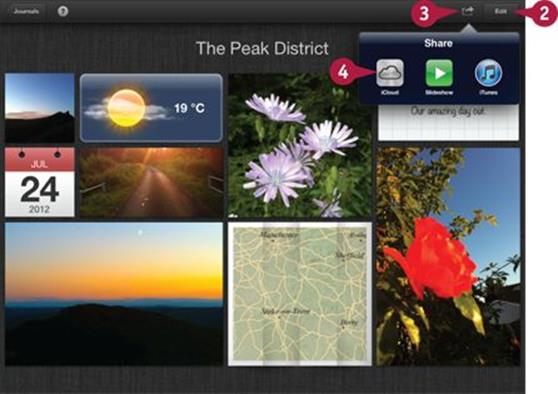
![]() Open a journal.
Open a journal.
![]() If Edit mode is selected, tap the Edit button to deselect it.
If Edit mode is selected, tap the Edit button to deselect it.
![]() Tap the Share icon (
Tap the Share icon (![]() ).
).
![]() Tap the iCloud icon.
Tap the iCloud icon.
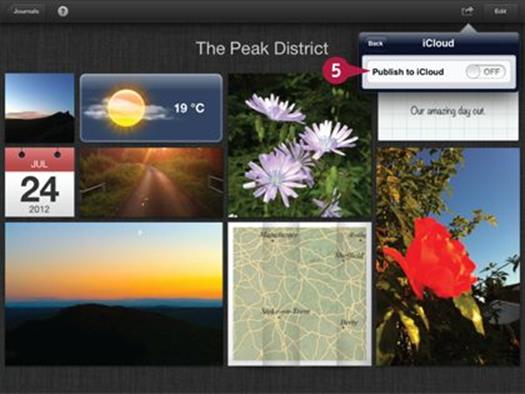
![]() Tap the Publish to iCloud switch to turn it on.
Tap the Publish to iCloud switch to turn it on.
iPhoto displays a larger popover and begins uploading the journal.
Note: This can take a long time, even with a small journal.
Note: The share buttons remain grayed out while the journal uploads, and an “Uploading” message appears at the bottom of the popover.
Note: iPhoto adds a small iCloud logo to published journals on the main Journals page.
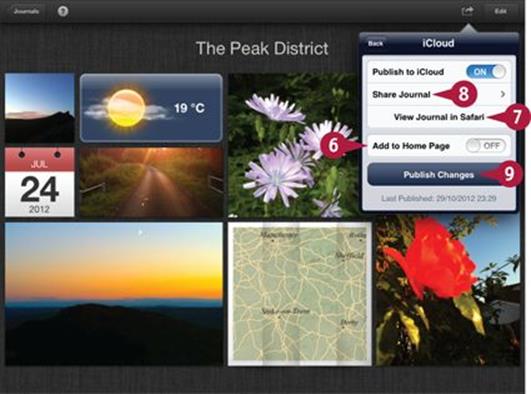
![]() When the upload completes, tap the Add to Home Page switch to add the journal to your iCloud journal home page.
When the upload completes, tap the Add to Home Page switch to add the journal to your iCloud journal home page.
Note: The home page upload also takes a long time.
![]() Tap the View Journal in Safari button to open Safari and view the journal online.
Tap the View Journal in Safari button to open Safari and view the journal online.
![]() Tap the Share Journal button to open a sharing popover.
Tap the Share Journal button to open a sharing popover.
![]() Tap the Publish Changes button to update your journal when you change it.
Tap the Publish Changes button to update your journal when you change it.
Note: iPhoto displays an alert exclamation mark on the Share icon when you edit a journal to remind you to publish the changes.
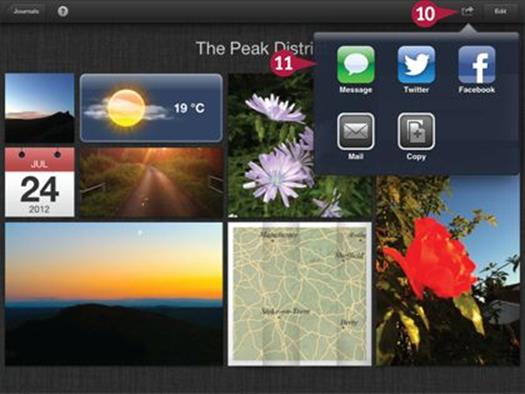
![]() Tap the Share icon (
Tap the Share icon (![]() ).
).
![]() Tap one of the sharing buttons to send friends and family a link to your journal.
Tap one of the sharing buttons to send friends and family a link to your journal.
Note: The Copy icon copies the journal link to the Clipboard. If you open a document or text editor you can paste the link into a document.
TIPS
Why does iPhoto call the journal collection a Home Page?
This is a remnant of the older MobileMe service which offered extra features. MobileMe is no longer available, so think of the “Home Page” as your public journal collection.
Why is the upload process so slow?
iPhoto and iCloud do a lot of work when they create a web page. All photos have to be resized and uploaded, and iPhoto also has to create the web page itself. This can take a long time. Expect to wait at least a few minutes — much longer if your journal has many photos.
Share a Journal to iTunes
You can share a journal to a folder which you can copy via iTunes. This sharing option works almost exactly like the iTunes sharing option introduced in the previous chapter, with the difference that the folder it creates includes extra information needed to show a journal as a web page.
After you copy the folder from iTunes, you can view the journal from your Mac or PC’s hard drive in Safari. You can also upload the journal to a web server. The page iPhoto creates is mostly compatible with other browsers, so almost all web users can view it.
Share a Journal to iTunes
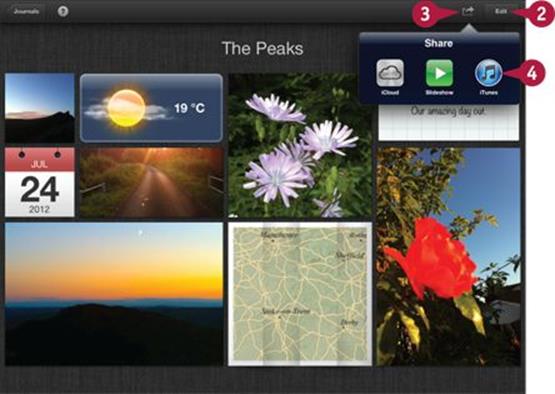
![]() Open a journal.
Open a journal.
![]() If Edit mode is selected, tap the Edit button to deselect it.
If Edit mode is selected, tap the Edit button to deselect it.
![]() Tap the Share icon (
Tap the Share icon (![]() ).
).
![]() Tap the iTunes icon.
Tap the iTunes icon.

A iPhoto creates and saves a folder of photos embedded in a web page.
Note: It can take a few minutes for iPhoto to finish exporting the photos and web details.
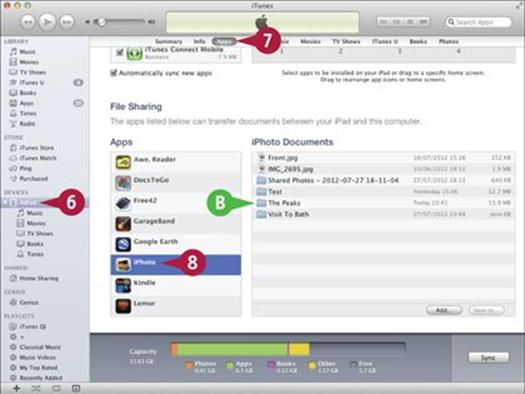
![]() Connect your device to your Mac and launch iTunes if it does not launch automatically.
Connect your device to your Mac and launch iTunes if it does not launch automatically.
![]() Click your device in the Devices list.
Click your device in the Devices list.
![]() Click Apps.
Click Apps.
![]() Scroll down to the File Sharing section and click iPhoto.
Scroll down to the File Sharing section and click iPhoto.
B iPhoto displays a list of the documents iPhoto has saved, including the folder you created in steps 1 to 4.
Note: When you save a journal, it automatically appears in this list as a named folder.
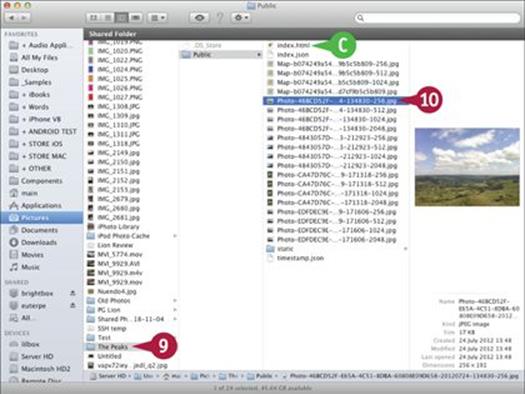
![]() Drag the folder from iTunes and drop it on another folder in Finder.
Drag the folder from iTunes and drop it on another folder in Finder.
![]() Click individual photos to view them.
Click individual photos to view them.
Note: iPhoto saves the original and the resized versions of all photos in the journal folder.
C You can click the index.html file in the Public subfolder to open the journal in your web browser.
TIPS
Can I upload the content to a web server?
If you have your own web server, you can copy all the files inside the Public folder using FTP (File Transfer Protocol) to a folder on the server. This can be a better option than using iCloud because your photos remain private, and iCloud does not need to load or process the content before it appears.
Is there any way to create a Home Page on my server?
The Save to iTunes option saves single journals. You cannot re-create the Home Page feature available on iCloud. However, you can create a separate index page using conventional web links to each journal.
All materials on the site are licensed Creative Commons Attribution-Sharealike 3.0 Unported CC BY-SA 3.0 & GNU Free Documentation License (GFDL)
If you are the copyright holder of any material contained on our site and intend to remove it, please contact our site administrator for approval.
© 2016-2025 All site design rights belong to S.Y.A.