iPhoto: The Missing Manual, 1st Edition (2014)
Part 3. Advanced iPhoto
Chapter 11. Screensavers, AppleScript, and Automator
You’ve assembled a library of digital images, sent heart-touching moments to friends and family via email, published your recent vacation pics on the Web, edited a movie or three, and even boosted the stock prices of Canon and Epson single-handedly through your consumption of inkjet printer cartridges. What more could there be?
Plenty. This chapter covers iPhoto’s final repertoire of photo stunts, like turning your photos into one of the best screensavers that’s ever floated across a computer monitor, plastering one particularly delicious shot across your desktop, calling upon AppleScript to automate photo-related chores for you, and harnessing iPhoto’s partnership with Automator. (This chapter’s alternate title: “Miscellaneous iPhoto Stunts that Didn’t Really Fit in the Outline.”)
Building a Custom Screensaver
The Mac’s screensaver feature is so good, it’s pushed more than one Windows person to switch to a Mac. When the screensaver kicks in (after a few minutes of inactivity on your part), your Mac’s screen becomes a personal movie theater. The effect is something like a slideshow, except that the pictures don’t simply appear one after another and sit there on the screen. Instead, they’re much more animated. They slide gently across the screen (or multiple screens), zooming in or out, smoothly dissolving from one to the next.
OS X comes equipped with a few photo collections that look great with this treatment: forests, space shots, and so on. But let the rabble use those canned screensavers. You, a digital master, can use your own photos as screensaver material.
Your entire iPhoto world—everything in your Source list, plus Faces and Places info (Chapter 4) and saved slideshows (Show Title Slide)—is accessible from within your Mac’s System Preferences and, therefore, available as an instant screensaver. Just imagine the possibilities! If you’ve taken the time to tag your photos with Faces info, you can create a screensaver of Mom and Dad’s entire life to play at their 50th wedding anniversary shindig in seconds, without opening iPhoto. Having a dinner party and want to show off recent photos from Italy? If they’re geotagged (Editing Names), your screensaver is ready and waiting for you.
NOTE
If you’ve got dual monitors—or a monitor plugged into a laptop—you see different photos on each monitor as the screensaver plays. Sweet!
Choose ![]() →System Preferences→Desktop & Screen Saver. Near the top of the window shown in Figure 11-1 (top), click the Screen Saver tab, and then click one of the 14 photo-based screensaver themes in the list on the left. When you do, a Source pop-up menu appears beneath the theme’s preview on the right; choose Photo Library (it may take a moment for your Mac to populate this menu, so be patient). A new pane appears with a list of your iPhoto goodies on the left (see Figure 11-1, bottom); just scroll to your album of choice. Click it to see what photos are inside, and then click Choose. Back in the Desktop & Screen Saver window, pick a theme from the panel on the left; you see a mini version of your new screensaver playing on the right.
→System Preferences→Desktop & Screen Saver. Near the top of the window shown in Figure 11-1 (top), click the Screen Saver tab, and then click one of the 14 photo-based screensaver themes in the list on the left. When you do, a Source pop-up menu appears beneath the theme’s preview on the right; choose Photo Library (it may take a moment for your Mac to populate this menu, so be patient). A new pane appears with a list of your iPhoto goodies on the left (see Figure 11-1, bottom); just scroll to your album of choice. Click it to see what photos are inside, and then click Choose. Back in the Desktop & Screen Saver window, pick a theme from the panel on the left; you see a mini version of your new screensaver playing on the right.
TIP
In the Desktop & Screen Saver preferences pane, if you pick one of the seven non-photo-based themes (like Flurry or Arabesque), the Source menu doesn’t show itself. Simply click one of the photo-based themes instead to make it appear.
NOTE
Unless you’re using a plasma screen as your monitor, you don’t technically need a screensaver to protect it from burn-in. Today’s flat-panel screens never burn in, and even a fairly modern CRT monitor wouldn’t burn an image into the screen unless you left it on continuously for two years. No, screensavers today are solely about entertainment (and/or privacy).
There are two ways to control when your screensaver takes over your monitor: by using the “Start after” setting to specify a duration of keyboard or mouse inactivity and/or by clicking Hot Corners. The latter method presents you with a pane that lets you turn each corner of your monitor into a hot spot. Whenever you position your cursor into the specified corner(s), the screensaver either turns on instantly (great when you’re shopping on eBay and your boss walks by) or stays off permanently (for when you’re reading onscreen or watching a movie). For example, you can use two corners for controlling the screensaver and the other two for, say, summoning Dashboard and the Notification Center (OS X’s widget and alert features, respectively).
Either way, pressing any key or clicking the mouse always exits the screensaver and takes you back to whatever you were doing.
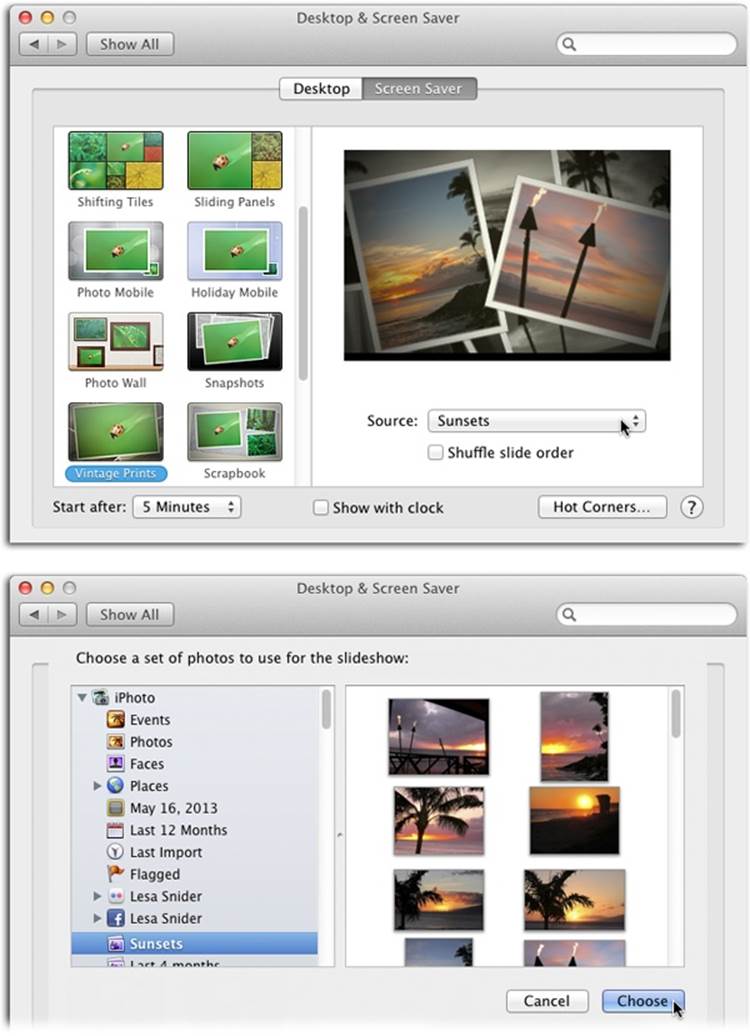
Figure 11-1. Top: OS X gives you 14 photo-based screensaver themes; just click the one you want to use. Your Mac turns your photos into a smooth, full-screen slideshow and previews it on the right. Here, the theme is set to Vintage Prints, in which your photos don white borders and appear on your desktop, one by one or two by two (depending on their orientation), in a big stack. To show your photos in random order, instead of how they’re organized in the album, turn on “Shuffle slide order.” Turn on “Show with clock” to have your Mac display the current time whenever the screensaver is playing (you don’t see the clock in the screensaver preview). Bottom: To access your iPhoto world, choose Photo Library from the Source pop-up menu. When you do that, a new pane appears containing all your albums on the left. To peek inside, click an album to see its contents on the right.
One-Click Desktop Backdrop
iPhoto’s desktop-image feature is the best way to drive home the point that photos of your children (or dog, or mother, or self) are the most beautiful in the world. You pick one spectacular shot to replace the standard OS X Mavericks wave photo desktop background. It’s like refrigerator art on steroids.
Creating wallpaper in iPhoto is so easy that you could change the picture every day—and you may well want to. In iPhoto, click a thumbnail, and then choose Share→Set Desktop (that’s the Share menu at the top of your screen, not the Share icon in iPhoto’s toolbar). Your desktop is now filled with the picture you picked, though you may need to minimize the iPhoto window to see it.
NOTE
If you select several thumbnails or an album in iPhoto (not in the Desktop & Screen Saver preferences) before choosing Share→Set Desktop, your Mac assumes that you want it to rotate among your selected photos, displaying a new one every few minutes.
Just three bits of advice. First, choose a picture that’s as big as your screen (at least 1280 x 800 pixels, for example). Otherwise, OS X will stretch it to fit, distorting the photo in the process. If you’re really fussy, you can even crop the photo to the exact measurements of the screen; in fact, the first command in iPhoto’s Constrain pop-up menu (How to Crop a Photo) lists the exact dimensions of your monitor, so you can crop the designated photo (or a copy of it) to fit precisely with just one click.
Second, horizontal shots work much better than vertical ones; iPhoto enlarges vertical shots to fit the width of the screen, potentially chopping off the heads and feet of your loved ones.
Finally, if a photo doesn’t precisely match the screen’s proportions, the pop-up menu at the top of Figure 11-2 lets you specify how you want OS X to handle this discrepancy:
§ Fill Screen. This option enlarges or reduces the image so that it fills every inch of your desktop, and in most cases, OS X does a good job. But if the image is small, the low-resolution stretching can look awful. Conversely, if the image is large but its proportions don’t match your screen’s, parts get chopped off. Either way, this option never distorts the picture, as the Stretch option (below) does.
§ Fit to Screen. This setting centers the photo neatly on the screen, at whatever size fits. The photo doesn’t fill the entire background; instead, it sits right smack in the center of the monitor. Of course, this arrangement may leave a swath of empty border all the way around the picture. As a remedy, Apple provides a color swatch next to the pop-up menu. Click it to open the Colors panel and specify a hue for the “frame” around the photo.
§ Stretch to Fill Screen. Use this option at your peril, since it makes your picture fit the screen exactly, come hell or high water. Unfortunately, larger pictures may be squished vertically or horizontally, and small pictures are drastically enlarged and reshaped, usually with grisly results.
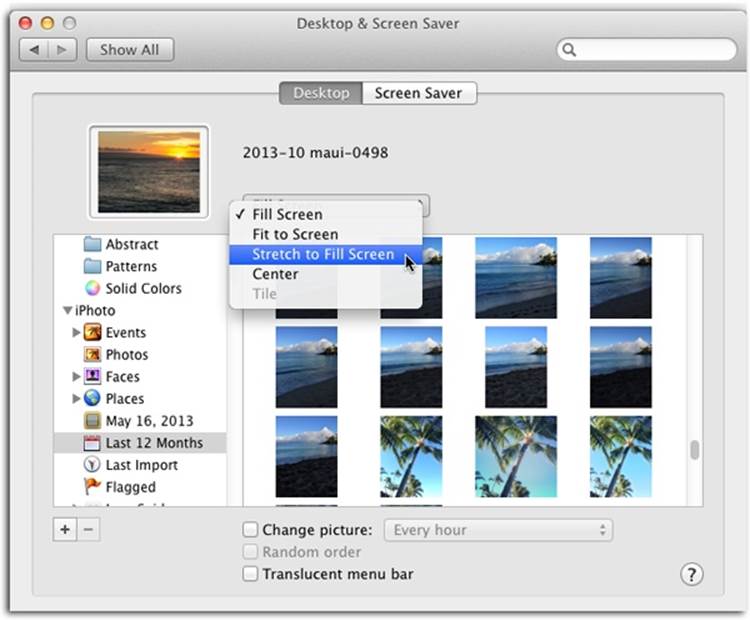
Figure 11-2. If your photo doesn’t fit the screen perfectly, choose a different option from this pop-up menu. In most cases, though, the factory setting of Fill Screen works just fine. While you’re in the Desktop & Screen Saver window’s Desktop pane, you might notice that all of your iPhoto albums are listed below the collection of images that came with your Mac. You can navigate through those albums to find a new desktop image.
§ Center. This one is basically the same as “Fit to Screen,” except that it displays your picture at full size. If the picture is larger than the screen, you see only the middle; the edges get chopped off where they extend beyond your screen. Conversely, if the picture is too small, you may never see it.
§ Tile. This option makes your picture repeat over and over until the multiple images fill your monitor. (If your picture is larger than the screen, this option is grayed out as in Figure 11-2.)
And one last thing: If public outcry demands that you return your desktop to one of the standard system backdrops, go to ![]() →System Preferences→Desktop & Screen Saver, and click the Desktop tab; then choose Apple in the list on the left, and then take your pick.
→System Preferences→Desktop & Screen Saver, and click the Desktop tab; then choose Apple in the list on the left, and then take your pick.
Exporting and Converting Pictures
The whole point of iPhoto is to provide a central location for all your photos, but that doesn’t mean they’re locked in there forever. You’ll be pleased to know that it’s as easy to take pictures out of iPhoto as it is to put them in. Liberating a picture from iPhoto can be useful in situations like these:
§ You’re creating a web page or photo book outside of iPhoto and you need a photo in a certain size and format.
§ You shot a bunch of 10-megapixel photos but you’re running out of disk space, and you wish they were all 6-megapixel shots instead. (They’ll still have plenty of detail without taking up so much hard-drive space.)
§ You’re submitting some prize-winning photos to a newspaper or magazine, and the publication requires them in TIFF format, not iPhoto’s standard JPEG format.
§ Somebody else on your network loves one of your pictures and would like to use it as a desktop background on that machine.
§ You want to send a batch of pictures to someone on a CD or DVD.
Exporting by Dragging
It’s amazingly easy to export photos from iPhoto: Just drag their thumbnails out of the photo-viewing area and onto the desktop, as shown in Figure 11-3. But that’s not all: You can also drag thumbnails onto a folder’s icon, into an open Finder window, or even into a Mail message (handy!). After a moment, their file icons appear in the destination.
The drag-and-drop method has enormous virtue in its simplicity and speed, but it doesn’t grant you much flexibility. It produces JPEG files only, at the original camera pixel dimensions, with the camera’s own cryptic naming scheme (unless you renamed them in iPhoto).
Exporting by Dialog Box
To gain control over the dimensions, names, and file formats of the exported graphics, use the Export command. After selecting a picture, a group of pictures, or an album, invoke this command by choosing File→Export (or pressing Shift-⌘-E). The highly useful Export dialog box shown inFigure 11-4 appears.
Click the File Export tab (if it’s not already active), and then make the following decisions:
TIP
If you want to email a few photos, don’t bother with the Export dialog box; use iPhoto’s Mail command instead. Using iPhoto’s Mail Command has the scoop.
§ Kind. You can use this pop-up menu to specify the file format of the photo(s) you’re about to export. Here are your options:
§ Original. iPhoto exports the photo in whatever format it was in when you imported it. If the picture came from a digital camera, for example, it’s probably a JPEG.
If your camera captured the photo in raw format (Raw Files), the Original option is even more valuable. It lets you export the raw file so that you can, for example, work with it in a more sophisticated editor like Adobe Photoshop Lightroom or Adobe Camera Raw (the latter comes with Photoshop and Photoshop Elements). That said, the exported file doesn’t contain any edits you’ve made in iPhoto.
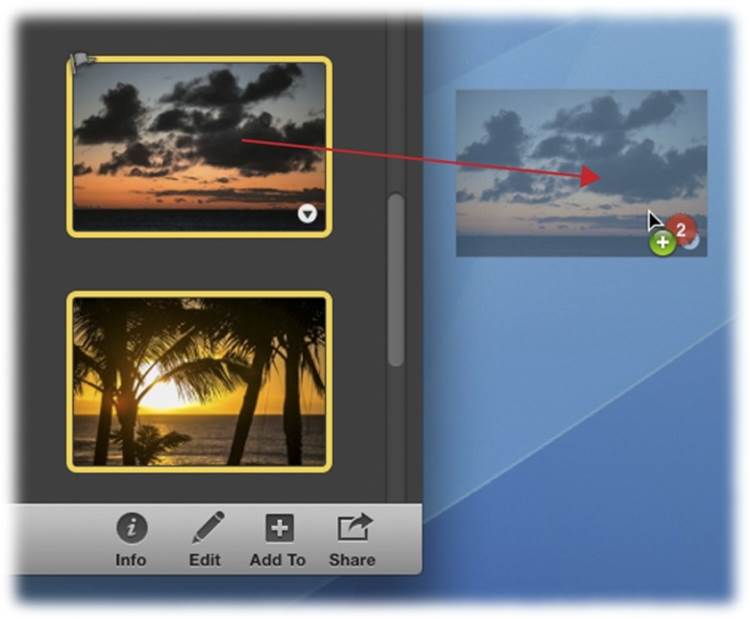
Figure 11-3. The drag-and-drop technique produces full-size JPEG files, exactly as they appear in iPhoto. Their names, however, might not be particularly user friendly. If you haven’t renamed your photos yet (page 64), then a picture named IMG_5197.jpg will wind up on your desktop.
§ Current. This option exports the file in whatever format it’s currently in. For example, if you imported a raw image and then edited it, it will be exported as a JPEG.
§ JPEG. This abbreviation stands for Joint Photographic Experts Group (that’s the group of geeks who came up with this format). JPEG format is the most popular format for photos on the Internet (and in iPhoto) thanks to its wide range of colors and relatively small file size.
NOTE
If you choose JPEG, you can use the JPEG Quality pop-up menu to specify a quality level (High, Medium, and so on). Just remember that the file size gets bigger as the quality increases.
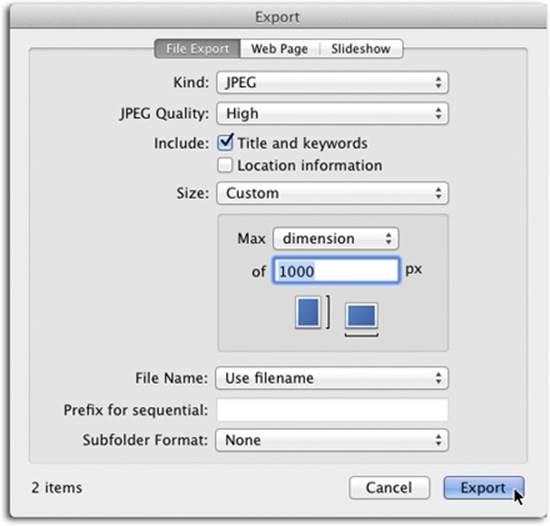
Figure 11-4. The Export dialog box gives you control over the file format, names, and dimensions of the pictures you’re about to extract from iPhoto. You can also include the photo’s map coordinates by turning on Location Information. You can even tell iPhoto to use whatever names you gave your pictures, instead of the original filenames bestowed by your camera. To do so, choose “Use title” from the File Name pop-up menu. And don’t miss the Size pop-up menu’s Custom option, which lets you export scaled-down versions of your photos for use in web pages, as desktop pictures, and so on. The number of photos you’re about to export appears in the dialog box’s lower left.
§ TIFF. These files (whose abbreviation is short for Tagged Image File Format) are something like JPEG without the “lossy” compression. That is, they maintain every bit of quality available in the original photograph, but because of that they take up much more disk space (or memory-card space) than JPEGs. TIFF can be a good choice if quality is more important than portability—if, say, the photo is destined for printing by a service that requires this format (though these days, more online printers prefer a JPEG at the highest quality).
§ PNG. This format (short for “Portable Network Graphics”) was designed to replace the GIF format on the Web. (The company that came up with the algorithms behind the GIF format exercised its legal muscle…long story.) Whereas GIF graphics generally don’t make good photos because they’re limited to 256 colors, PNG is a good choice for photos (except the variation called PNG-8, which is just as limited as GIF). The resulting files are smaller than TIFF images but larger than JPEGs, yet don’t exhibit any of the compression-related quality issues of the latter.
§ Titles and keywords. iPhoto maintains two names for each photo: its original filename as it appears in the Finder, and the title you may have assigned while working in iPhoto (The Info Panel).
If you turn on the Export dialog box’s “Title and keywords” setting (available for JPEG or TIFF formats only), then each exported file has the name you gave it in iPhoto. The file also contains any keywords you assigned to it (Keywords). That’s a big deal, because it means that (a) you’ll be able to find it on your Mac with a Spotlight search, and (b) if you import it into another iPhoto library (or other program that understands keywords, such as Aperture, Adobe Photoshop Lightroom, or Photoshop Elements), it remembers the keywords you gave it.
§ Location information. Turn on this setting to include Places info in your exported file(s).
§ Size. As you learned on How to Crop a Photo, although digital-camera files may not always have enough resolution for large prints (depending on your camera’s quality setting when you took the shot), they generally have far too much resolution for displaying onscreen. Fortunately, you can use this setting to reduce the number of pixels in your photos, shrinking them down to something more manageable.
Your choices here are Small (320 x 240 pixels, suitable for emailing or web pages visited by dial-up victims); Medium (640 x 480, also good for email and websites); Large (1280 x 960, nice for slideshows); Full Size (whatever size the photo is now, best for printing); and Custom.
If you choose Custom, you get the curious controls shown in Figure 11-4, where a Max pop-up menu lets you specify the maximum pixel dimension for each photo’s height, width, or both. Why didn’t Apple just offer you Height and Width boxes? Because the exported photos might have different proportions, so saying, “Export these at 800 x 600” wouldn’t always make sense. This way, you’re specifying the maximum dimensions on one side or both (or rather, the longest edge).
§ File Name. From this pop-up menu, you can specify how you want iPhoto to name the exported files:
§ Use title. The files are named whatever you named them in iPhoto (The Info Panel).
§ Use filename. The files bear the original names given to them by your camera, like DSC_0192.jpg or IMG_4821.JPG.
§ Sequential. The files will be named Bad Hair Day 1, Bad Hair Day 2, and so on. (In the “Prefix for sequential” box, type Bad Hair Day or whatever you like.)
§ Album name with number. This option tells iPhoto to name your exported photos according to the name of the album they’re in and their sequence within that album. So if an exported photo is the fourth picture in an album titled Sunsets, iPhoto will call the exported file “Sunsets–04.jpg.” Because you determine the order within an album (by dragging, so long as it’s not a smart album [Deleting an Album]), this is the only option that lets you control the numbering of the exported files.
Plug-Ins and Add-Ons
Friends and foes of Apple can all agree on one thing: iPhoto is no Photoshop. iPhoto was deliberately designed to be simple and streamlined, although it’s picking up more power with each new version.
Yet Apple thoughtfully left the back door open. Other programmers are free to write add-ons and plug-ins—software that contributes additional features, lends new flexibility, and gooses up the power of iPhoto.
And yet, with great power comes great complexity—in this case, power and complexity that Apple chose to omit. But at least this plug-in arrangement means that nobody can blame Apple for junking up iPhoto with extra features. After all, you’re the one who installed them.
A few of the most important plug-ins and add-on programs are described in the relevant chapters of this book:
§ Duplicate Annihilator (www.brattoo.com/propaganda) determines whether you have any duplicate photos, missing photos, or corrupt JPEGs in your iPhoto library, and gives you several options for dealing with them.
§ iPhoto Library Manager (Swapping Libraries (Apple’s Method)) lets you create and manage multiple iPhoto libraries more easily than Apple does.
§ Portraits & Prints (see the box on Portraits & Prints) expands iPhoto’s printing features and lets you create a multiphoto layout on a single sheet of paper that you can print.
§ SmugMugExport (www.aarone.org/smugmugexport) lets you export photos from iPhoto to SmugMug, a popular resource for storing photos and creating web galleries, as well as whipping up photo-based mementos like prints, mugs, and shirts.
As iPhoto’s popularity grows, new add-ons and plug-ins will surely sprout up like roses in your macro lens. It’s worthwhile to peruse sites such as MacUpdate.com and Download.com from time to time to see what’s available. Search for iPhoto, and you’ll be surprised at the number of goodies waiting for you to try.
AppleScript Tricks
AppleScript is the famous Macintosh scripting language—a software robot that you can program to perform certain repetitive or tedious tasks for you.
iPhoto is fully scriptable, meaning that AppleScript gurus can manipulate it by remote control with AppleScripts that they create. (It even works with Automator, the program in OS X that makes programming even easier than using AppleScript; see the following section.)
But even if you’re not an AppleScript programmer, this is still good news, because you’re perfectly welcome to exploit the ready-made, prewritten AppleScripts that other people come up with. You can find them by Googling iPhoto AppleScripts.
Automator Tricks
If you use your Mac long enough, you’re bound to start repeating certain tasks over and over again. Automator is a program that lets you teach your Mac what to do, step by step, by assembling a series of instructions called actions (each is a single, specific task). You can make your Mac perform super-complex tasks by assembling a variety of prerecorded actions into a specific order in Automator. To trigger the task, you can click Automator’s Run button or save the task as a genuine, double-clickable, standalone application. Either way, your Mac faithfully runs each action one at a time, one right after the other.
As it turns out, Automator works great with iPhoto. By following “recipes” that you find online—or the sample described here—you can add all kinds of new, timesaving features to iPhoto and your Mac.
The Lay of the Land
To open Automator, visit your Applications folder and give the program’s icon a swift double-click. Click New Document, and you should see something like Figure 11-5, starring these key elements:
§ Type pane. The Type pane (Figure 11-5, top) lists the different things you can create in Automator. (If you single-click an icon, its description appears at the bottom of the pane.) For example, to combine several actions into a single complex task, choose Workflow; to create an action that automatically runs when you drop files onto it, choose Application; or to create an action that’s available within the Service menu of many OS X programs, choose Service.
§ Library list. Automator’s Library list shows you all the items on your Mac that can be controlled by Automator actions: Calendar, Contacts, Files & Folders, and so on. When you click an item in this list, the Action list to its right shows you every action (command) that the chosen item understands.
TIP
To see all of Automator’s ready-made actions for iPhoto, type iPhoto into the Search box near the program’s top left.
§ Action list. This list (which doesn’t have a heading—it’s to the right of the Library list) shows you the contents of whatever category you’ve selected in the Library list. If, for example, you select Photos in the Library list, the Action list shows you all the photo-related actions available on your Mac. To build a workflow (or customize an existing one), drag actions from the Action list into the Workflow pane, as shown in Figure 11-5 (middle). (Double-clicking an action does the same thing.)
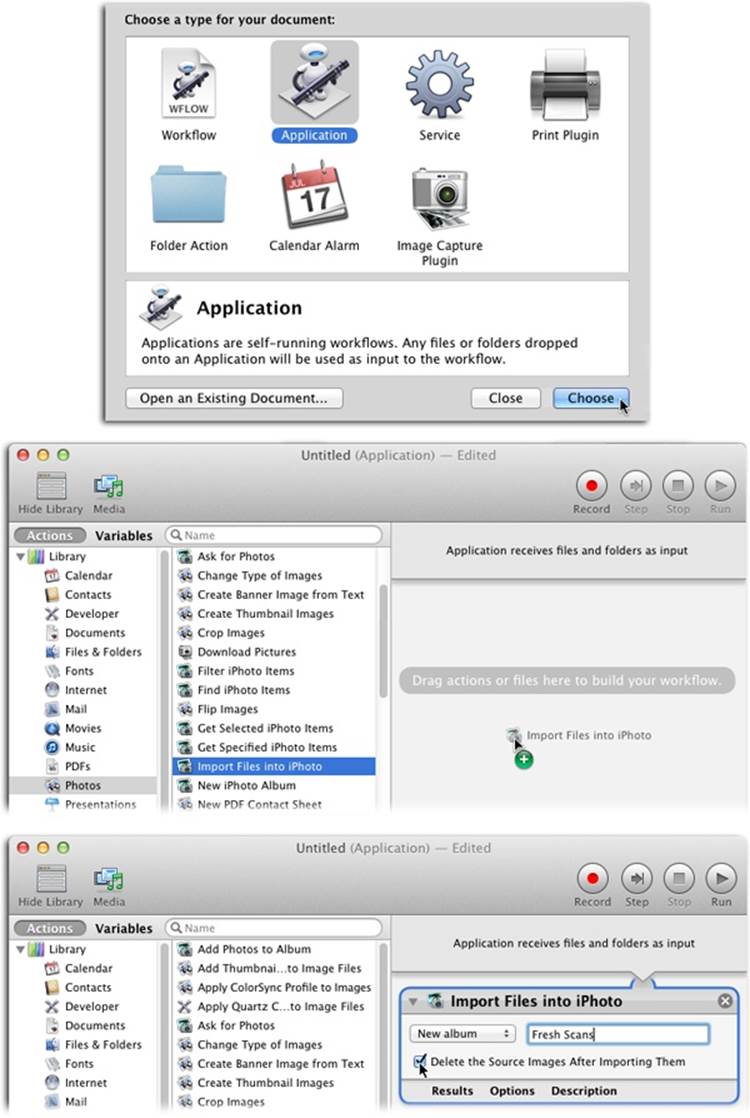
Figure 11-5. Top: You can choose what you want to create—and how you’ll trigger it—in this pane. (You can reopen it later by choosing File→New.) To create a task that you can trigger by dropping files or folders onto an icon, for example, choose Application. Middle: Narrow down your options by choosing what kind of task you want Automator to perform. In this case, choose Photos in the far left column (the Library list). Then either double-click an action in the second column (the Action list) or drag the action into the Workflow pane on the right to tweak its settings. Bottom: By choosing “Import Files into iPhoto” and adjusting the settings as shown here, you can have Automator fetch files you’ve scanned and plop them into iPhoto, saving you the drudgery of creating a new album, importing the files into it, and then deleting the originals from your hard drive. To trigger the task, scan all your files, stick them in a folder, and then drop that folder onto the application’s icon. If you do a lot of scanning, this can be a huge timesaver.
§ Workflow pane. Think of this pane as Automator’s kitchen. It’s where you put your actions in whatever order you want, set any action-specific preferences, and fry them all up in a pan.
The Workflow pane is also where you see how the info from one action gets piped into another, creating a stream of information. This aspect of Automator differentiates it from the dozens of nonvisual, programming-based automation tools out there.
When you drag an action from the Action list into the Workflow pane, any surrounding actions scoot aside to make room for it. When you let go of the mouse, the action you dragged materializes in the Workflow pane.
TIP
If you select an action in the Action list and then press Return, Automator automatically inserts that action at the bottom of the Workflow pane.
Saving Your Task
Once you’re finished creating your little Automator robot, you need to save it by choosing File→Save As. Give your new task a name, and then click the File Format pop-up menu. Choose Workflow if you’ll trigger the task from within Automator by clicking the program’s Run button (shown in Figure 11-5), or choose Application to create an icon that triggers the task when you drop files onto it.
TIP
If you picked Application in the Type pane, you can choose File→Save instead. In that case, Automator already knows what you want to save; you just need to give it a name and tell it where to put the new application on your hard drive.
The Auto Import Folder
If you know where to look, you’ll find that Apple secretly included an Automator folder action into your copy of iPhoto. That’s right—it’s just sitting on your hard drive waiting to be discovered. It’s a folder called Auto Import.
The beauty of this magic folder is that you can park it on your desktop and then drag photo files onto it as you go about your day. Then, the next time you open iPhoto, they’ll be imported automatically. How is this useful? In so many ways:
§ As you add more photos, iPhoto takes longer and longer to open. When you know iPhoto is going to take 30 seconds to open and you just have a couple of photos to import, for example, it scarcely seems worth sitting through the startup process. But thanks to the Auto Import folder, you can add photos anytime, a couple at a time or whatever, without waiting for iPhoto to open. When you finally have some time to really work, then you can open iPhoto and it will grab the photos you’ve scheduled for importing.
§ You can park different “Add to iPhoto” folders on your desktop, one for each iPhoto library (Managing Photo Libraries). When iPhoto opens, it’s smart enough to import only the photos in the Auto Import folder that corresponds to the library you’re using.
§ When you’re in a hurry, you can insert your camera’s memory card into your Mac, look over the photos in the Finder, and then copy only the worthwhile ones to your Mac by dropping them into the Auto Import folder. That way they’re safe and ready to be imported into iPhoto, but you haven’t wasted any time waiting for iPhoto to open and close.
Here’s how to set up the Auto Import folder:
1. In your Mac’s Finder, locate your iPhoto library in your Home→Pictures folder.
As you learned back in Chapter 1, this is where your iPhoto library lives unless you moved it somewhere else. (See A Trip to the Library for details.)
2. Control-click the iPhoto Library icon and choose Show Package Contents (Figure 11-6, top).
A new Finder window opens showing everything that’s inside the iPhoto Library package.
3. Locate the folder named Auto Import, and then ⌘-Option drag it onto your desktop (Figure 11-6, bottom).
You’ve hit pay dirt! This is the folder action Apple snuck into your copy of iPhoto without telling you. Holding down the ⌘ and Option keys forces your Mac to create an alias of the folder (a shortcut to the real one). The alias has a little curved arrow on its bottom-left corner.
From now on, whenever you want to schedule some pictures for iPhoto importing, drag them onto the Auto Import icon on your desktop. The next time iPhoto opens, you’ll see it flip automatically into Importing mode and slurp those photos in. After the import is complete, you’ll notice that the Auto Import folder is empty once again.
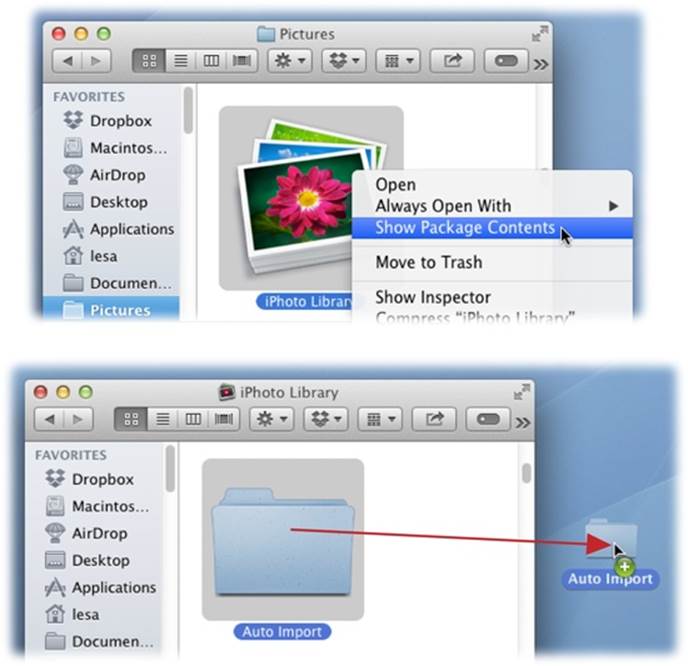
Figure 11-6. If iPhoto isn’t running, the files are added the next time you launch the program. If iPhoto is running, the files you drop onto the Auto Import folder are added to your library immediately. Once you’ve created the Auto Import alias, you can rename it anything you want. A good choice might be “Add to iPhoto.”
All materials on the site are licensed Creative Commons Attribution-Sharealike 3.0 Unported CC BY-SA 3.0 & GNU Free Documentation License (GFDL)
If you are the copyright holder of any material contained on our site and intend to remove it, please contact our site administrator for approval.
© 2016-2026 All site design rights belong to S.Y.A.