iPhoto: The Missing Manual, 1st Edition (2014)
Part 2. Editing and Sharing
Chapter 10. iPhoto Goes to the Movies
As Chapter 6 makes clear, once you select your images and pair music with them, iPhoto orchestrates the production and presents it live on your Mac’s screen as a slideshow. Which is great—as long as everyone in your social circle lives within six feet of your screen.
The day will come when you want friends and family who live a little farther away to be able to see your slideshows. That’s the beauty of QuickTime, a multimedia program built into every Mac. Even if the recipient uses a Windows PC—hey, every family has its black sheep—she can still see your photos: QuickTime movies play just as well on HPs and Dells as they do on iMacs and MacBooks.
Fortunately, iPhoto makes it easier than ever to convert those photos into mini-movies. The program’s Slideshow Export option lets you save your slideshows as QuickTime movie files that play flawlessly on iPads, iPods, iPhones, Apple TVs, and other video-watching gadgets. Within seconds, you’ll have a file on your hard drive that you can send to other people (including Windows folks) via services like Dropbox; post on your web page; upload to YouTube, Facebook or Flickr; or burn onto a CD or DVD.
This chapter teaches you how to do all those things and more.
NOTE
If you’re using iPhoto on an iPad and you have an iCloud account (Using iCloud’s Photo Stream), you can create a slideshow and then publish it on your iCloud web page. This method lets you skip the whole “exporting it as a movie” process. Flip ahead to Sharing a Slideshow for details.
Making Movies
Older versions of iPhoto offered two ways to export your photos as a slideshow. Now there’s just one.
In the old days, you could export an album of photos as a basic movie; the process required some effort but resulted in an emailable file. The current method, called Slideshow Export, is foolproof yet produces a gigantic file that’s too big to email. Why? Because the resolution of your photos is likely quite high. Plus, the movie retains all the fancy animations, transitions, music, and other custom goodies described back in Chapter 6. (Movie length is a big factor, too.)
For the curious, exporting your slideshow at 640 x 480 resolution results in a final file size that’s nearly one megabyte per photo—more if you keep each photo onscreen for several seconds. So if your slideshow consists of more than, say, 10 pictures, emailing it isn’t an option.
Happily, there are many other ways to share your movie, as you’ll learn later in this chapter, so the inability to email it isn’t a deal-breaker. The Slideshow Export feature converts your slideshow into a QuickTime movie that’s designed to look fantastic on specific screens, like an iPhone, iPad, iPod Touch, or Apple TV. There’s even an option to send the exported movie over to iTunes so you can sync it onto your iOS devices.
To export your first movie, all you need is a slideshow—whether it’s an instant slideshow or one that you’ve saved. Flip back to Chapter 6 for instructions on creating both kinds.
UP TO SPEED: SLIDESHOW STORYTELLING 101
Before sending your slideshow movie to hapless relatives who’ll have to endure downloading it over a dial-up connection, it’s a good idea to make sure it’s worth watching in the first place. And if you’re planning on uploading the movie to YouTube, you don’t want to give Internet hecklers ammunition for leaving disparaging comments (though you could turn off YouTube’s Discussion tab). Here are some tips for creating the best possible movie:
As you review your slideshow, place the pictures into the proper sequence, remembering that you won’t be there to explain them as it plays. Ask yourself, “If I knew nothing about this subject, would this show make sense to me?”
With that in mind, you might decide that your slideshow could use a few more descriptive images to better tell the story. In that case, go back through your photo library and look for pictures of recognizable landmarks and signs. Put one or two at the beginning of the show to set the stage. For example, if your slideshow is about a vacation in Washington, D.C., then you might want to open with a picture of the Capitol, the White House, or the Lincoln Memorial.
Another option is to turn on captions (Show Caption) to aid in your storytelling. When you do that, iPhoto displays the photo’s name and/or description as a text overlay atop the picture whenever it’s visible onscreen. You might also want to begin your show with some opening credits. You can let iPhoto do the job with a title slide (Show Title Slide). Or, for something more elaborate, you can create the text in a program like Pages or Photoshop Elements and save the document as a JPEG (make sure it matches the pixel dimensions of your slideshow). Then drag the JPEG into your slideshow album, placing it first in the sequence. Now you’ve got yourself an opening title screen! You could do the same for closing credits, too.
Exporting an Instant Slideshow
Say you’ve got an instant slideshow up on your Mac’s screen right now, full of freshly snapped pictures of the kids. And you really want to take a copy of it with you on your iPad when you leave for the airport in a few hours. Here’s what to do:
1. Choose File→Export (or press Shift-⌘-E).
The Export dialog box appears.
2. Click the dialog box’s Slideshow tab (Figure 10-1), and adjust the settings.
This is where you choose what size you want the movie to be. (The size determines things like the file’s audio and video compression.) Here are your options:
o Standard Definition (480p). With a resolution of 640 x 480 pixels, this size is good for an iPod Touch (third generation), iPhone 3GS, iPad 1, and Apple TV (first generation). This setting creates the smallest file, though it’s perfectly watchable on a computer, and it’s great for transferring to another Mac via AirDrop (Enhancing iPhoto’s HTML), sharing with loved ones using Dropbox (Sharing Movies Online), and so on.
o High Definition (720p). At 1280 x 720 pixels, this size looks even better on your computer—but makes for a bigger file. It works with the iPod Touch (fourth generation), iPhone 4, iPad, and Apple TV (second generation). If you’re planning to upload the movie to YouTube, pick this option.
o High Definition (1080p). If you want a slideshow that looks awesome on the latest iOS devices and TV screens, go for this 1920 x 1080 pixel option. It’s compatible with the iPod Touch (fifth generation), iPhone 5, iPad 2, and Apple TV (third generation). Just be prepared for a hefty file.
NOTE
You can upload a 1920 x 1080 movie to YouTube, though it’ll take a while. But if you’re posting a video of your photos in the hopes of winning a National Geographic competition, then the extra quality could be worth it.
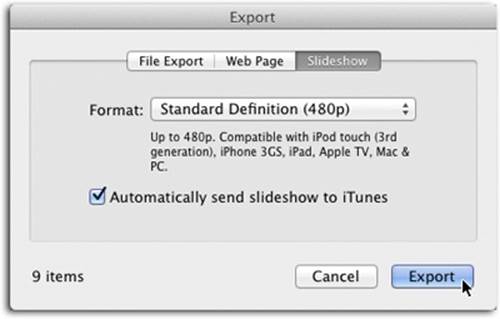
Figure 10-1. iPhoto’s Slideshow Export feature takes the guesswork out of picking the right settings. Choose an option from the Format pop-up menu based on what device you (or your recipient) will use to watch the movie. When you pick a setting, the text beneath it changes to tell you what gadgets the video will work best with.
If you want to send the exported file right into iTunes for easy syncing to an iPhone, iPad, or iPod Touch, leave “Automatically send slideshow to iTunes” turned on. (To learn more about syncing iPhoto content with those devices, see Syncing with iTunes.) If you don’t want the file in iTunes, turn off this setting.
TIP
Want to put your new movie into a Pages document? How about a Keynote presentation? Easy. Turning on “Automatically send slideshow to iTunes” makes the resulting movie available in the Mac’s Media Browser, which is accessible from those programs.
3. Click Export and specify a destination.
When you click Export, iPhoto lets you change the exported movie’s destination. If you don’t specify one, the file lands in Home→Pictures→iPhoto Slideshows. When you click OK, iPhoto exports the slideshow as a QuickTime-friendly .m4v file. The process may take several minutes. (Motion-heavy themes like Shatter take longer to export than a straightforward Classic slideshow.) If you opted to send the file to iTunes, then iPhoto kicks the exported slideshow into the Videos area of your iTunes library. From there, it’s one quick sync to iPadville (seeSyncing with iTunes for more on syncing).
Exporting a Saved Slideshow
That masterpiece of a slideshow you spent all weekend slaving over—one of the saved slideshows described on Show Title Slide—is very easy to export. In fact, it’s basically the same process as exporting an instant slideshow:
1. In the Slideshows section of your Source list, select your magnum opus.
2. Click Export in the toolbar (see Figure 10-2).
iPhoto displays the same settings shown in Figure 10-1, though this time they appear in a pane. Perform steps 2 and 3 in the previous section to export your saved slideshow.

Figure 10-2. Exporting a saved slideshow doesn’t get any easier than this. Just select the show in the Source list and then click Export on the toolbar. You don’t even have to root around in menus to find an export option (although File→Export works, too).
That’s it. The next section gives you a few ideas on how to share your movie with others online.
TIP
Even Windows PC owners can enjoy your QuickTime movies—if they visit www.apple.com/quicktime/download and download the free QuickTime Player program for Windows.
Sharing Movies Online
With all the high-quality photos, music, animations, and other bells and whistles (not to mention movie length), exported slideshows are typically far too large to email, but there are other ways of getting them to your friends over the Internet. For one, you can use AirDrop (Enhancing iPhoto’s HTML) to transfer it between Macs in your home or office, or you can use the file-transfer feature of an instant-messaging program like Messages (Instant Messaging Photos) to send the file from your Mac to another computer (even a PC).
NOTE
You can use iCloud (The Drag-and-Drop Method) to transfer documents and data from Mac programs such as Automator, Preview, TextEdit, Keynote, and Pages, but iCloud doesn’t (yet) work with iPhoto. Bummer!
Here are two ways of getting your movie off your Mac and in front of other peoples’ eyeballs:
§ Dropbox. This free file-sharing service lets you upload large files to its servers and then send a download link to others. You can also use it to store files that you might need to access elsewhere (say, big work files that you need to access from home). Dropbox even lets you create shared folders that you can invite other people to. It’s a fabulous resource to have in your file-sharing bag of tricks.
Once you sign up for a free account at Dropbox.com and log in, you see a folder named Public (you can create your own folders, but Public works just fine). Double-click this folder to open it, and then drag your exported movie into it; you see a status bar letting you know how long it’ll take to upload. When it’s finished, Control-click the file and choose “Copy public link.” A window opens that contains the web address of your movie; click “Copy to clipboard” and fire up your email program. Paste the link into the email and let her rip. When your pal opens the message and clicks the link, the file downloads from Dropbox onto his hard drive—no muss, no fuss.
TIP
A free Dropbox account gives you 2 GB of storage; you can pay to get more. Either way, you’ll definitely want to free up space by deleting files from your Public folder once they’ve been downloaded.
§ YouTube. This is Google’s free video-sharing site. TV networks use it to broadcast some of their content (BBC, CBS, and so on), and individuals use it to post anything and everything under the sun: from controversial TV clips, to amateur “funniest home videos” style stuff, to short original movies, to pseudo-educational content (“Hosting Your First Tupperware Party” anyone?), and then some.
NOTE
To upload a movie to YouTube, it must be less than 15 minutes long and smaller than 32 gigabytes.
Visit YouTube.com, create a free account, and then sign in. Click Upload near the top of the page and then drag your exported movie file onto the web page (or click “Select files to upload” and then find the file on your hard drive). Set the privacy menu to Public, Unlisted (meaning YouTube won’t list it in any of its categories, making it harder to find), or Private (only those you share the link with can see it).
Once the file finishes uploading, click the Share link. The “Share this video” section opens, and you see a slew of icons that you can use to share the link with Facebook, Twitter, Google+, Pinterest, and so on. You also see a web address that you can copy and send via email. Click Embed to get a block of HTML code that you can use instead, or click Email and fill out YouTube’s email form.
NOTE
If you’ve added your favorite Taylor Swift tune as background music to your slideshow, YouTube may reject posting it for copyright reasons. In that case, tuck your tail between your legs and edit the slideshow to use one of iPhoto’s built-in music tracks instead. Alternatively, use GarageBand to create your own copyright-free soundtrack.
POWER USERS’ CLINIC: VIEWING PHOTOS AND SLIDESHOWS ON AN APPLE TV
If you own an Apple TV (www.apple.com/appletv), you can use it to display photos and slideshows on your home theater system. Few Mac tricks are as impressive to friends and family as this one.
Depending on exactly which model Apple TV you have, the photos are either streamed to your TV straight from iTunes (if you own a second generation or later) or copied onto the Apple TV itself during an iTunes sync (if you own a first generation). If you haven’t gone to the trouble of creating a slideshow from your pictures in iPhoto, the Apple TV includes a dozen or so slideshow styles that you can use on your photos, too.
For this technique to work, your Mac and Apple TV need to be on the same wireless network. If you’ve got an iCloud account, simply sign into it on your Apple TV, and then choose iCloud Photos or Photo Stream from the main menu; then you can see those pictures on your Apple TV. If you’re rolling sans iCloud, sharing needs to be turned on in iTunes on your Mac and on the Apple TV. Here’s how to set that up:
With your Apple ID in hand, fire up iTunes on your Mac and choose File→Home Sharing→Turn On Home Sharing (for iTunes 10.7 and earlier, choose Advanced→“Turn on Home Sharing”). When prompted, enter your Apple ID and password. Then choose File→Home Sharing→“Choose Photos to Share.” The iTunes window changes to display a list of your albums, Events, and Faces albums. Make sure the “Share Photos from” option is turned on, and then use the controls to share all of your photos or a portion of them. Be sure to turn on “Include videos” so any slideshows you’ve exported as QuickTime movies are in on the fun, too. When you’re done, click Apply.
On the Apple TV, choose Settings→Computers→Turn On Home Sharing. Enter your Apple ID; you’ll see the iTunes libraries you shared from your Mac. Simply choose what you want to see (Photos or Videos, say). As long as the Mac containing the shared library is turned on and iTunes is running, you see your photos parade across your TV. All you have to do now is sit back and enjoy the show!
Fun with QuickTime Player
QuickTime Player—which you’ll find in your Mac’s Applications folder—is, well, just a media player. But it does have some features worth noting:
§ Play movies in Full Screen mode. QuickTime Player can play full-screen videos—no menu bar, Dock, window edges, or other distracting elements. In effect, it turns your laptop screen into a portable theater. Choose View→Enter Full Screen (or press Option-⌘-F).
NOTE
Apple discontinued QuickTime Pro—the $30 upgrade that offered more powerful editing features—after version 7. (If you owned it before upgrading to Snow Leopard, you may still find it in your Macintosh HD→Applications→Utilities folder.) Then again, you may as well use iMovie, which you should already own.
§ Record video and audio. You can record your own videos in QuickTime Player, using the built-in camera on your Mac, a USB webcam, and so on. And you can record audio with your Mac’s built-in microphone, or an external mic or musical instrument connected via USB.
To do either, choose File→New Movie Recording or New Audio Recording. In the resulting window, pick one of the input sources described above, choose a quality, and then click the red Record button. When you’re finished, click the same button again. You’ll find the new movie waiting in your Movies folder (inside your Home folder).
§ Rotate or flip a clip. QuickTime Player’s Edit menu contains Rotate Left, Rotate Right, Flip Horizontal, and Flip Vertical commands, which can be handy when a movie turns out to be flipped or rotated the wrong way—or when you want to flip or rotate it for creative purposes.
§ Split, combine, and shorten your flicks. QuickTime Player is great for splitting and combining your movie clips—two tricks that iPhoto can’t perform—as well as trimming off excess footage, just like iPhoto can (Editing Movies in iPhoto).
To split a single clip in two, choose View→Show Clips (or press ⌘-E), and then drag QuickTime Player’s playhead (the red bar circled in Figure 10-3, top) to the spot where you want the movie to split. Choose Edit→Split Clip (or press ⌘-Y), and you see both clips highlighted in yellow. At this point, you can insert another clip (as described next) or rearrange the clips by dragging them left or right. If you split the clip into three chunks, you can select the middle one (a yellow outline appears around it) and zap it by pressing the Delete key on your keyboard.
To combine clips, open one clip and then choose Edit→“Add Clip to End.” In the Open dialog box, double-click the clip you want to tack on. You can also drag movie clips’ icons from the desktop right into a movie window. QuickTime Player adds them to the end of the existing movie. (You can then repeat the process to combine several clips.)
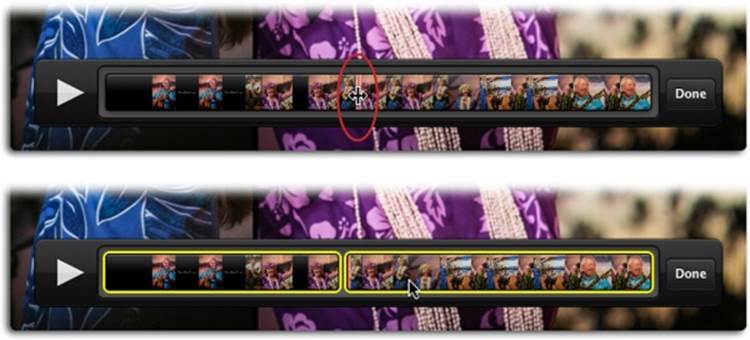
Figure 10-3. Top: QuickTime Player lets you split clips, which is helpful when you want to chop something out of the middle. The key is to position the program’s playhead (circled) in the right spot before triggering the Split command. When you point your mouse at the playhead, your cursor turns into a double-sided arrow (circled). Bottom: After splitting a clip, both pieces sport a yellow border that indicates they’re selected. Click a single clip to select it and deselect the other.
If you want the second movie to appear somewhere in the middle of the first movie, split the clip as described earlier, and then click the clip that appears right before the spot where the new movie will go. Choose Edit→Insert Clip After Selection; in the resulting dialog box, double-click the movie file you want to bring in. (You can also drag a movie file from the Finder directly into the gap between two clips.)
Exporting Edited Movies
After you’ve finished working on a movie in QuickTime Player, you can send it out into the world in a variety of ways:
§ Choose File→Export and pick 480p, 720p, 1080p, and so on (see Exporting an Instant Slideshow). Pick iTunes if you want to sync it onto your iOS devices and Apple TV.
§ Choose File→Share and pick from Facebook, Flickr, YouTube, Messages, and more. Pick your poison; Quick Time optimizes your masterpiece for that particular program or service.
TIP
There’s no way to upload an exported slideshow movie to Facebook or Flickr from inside iPhoto, but you could do so via QuickTime Player. Simply open the movie file in QuickTime Player and then choose File→Share. You could also use Facebook or Flickr’s website to get it done.
When you’re finished, choose File→Close. In the resulting dialog box, name your edited masterpiece and click Save. Once you’ve stored the new version on your hard drive, you can drag it back into iPhoto.
Movies from Your Camera
Digital-camera movies were once a novelty that few people cared about. Today, though, they’ve become a convenient way to record video without lugging around a camcorder. Current digicams can capture movies with standard (640 x 480) or even high-definition resolution, TV smoothness (24 frames per second), and sound. Most smartphones (including iPhones) can capture high-quality video, too.
When you import your movies into iPhoto, the program cheerfully adds those video files to your library, denoted by a little camcorder icon and a duration indicator. iPhoto doesn’t let you do much with such videos, but you can watch them and trim footage off either end.
TIP
Want to make your camera’s movies easy to find? Create a smart album as described in Chapter 2 (Deleting an Album), and set the New Smart Album dialog box “Photo,” “is,” and “Movie.” After that, you’ll always find your movies collected in this self-updating album.
Playing Digital Movies in iPhoto
To play a movie that’s found its way into iPhoto, double-click its thumbnail. (Or, if the thumbnail is selected already, press the space bar.) The movie expands to fill the photo-viewing area and begins to play.
If you keep your mouse still while the video is playing, then after a moment, the control bar vanishes. (The bar also vanishes if you move your cursor outside the video area). This minimalist design works great when all you want to see is your movie. To bring back the control bar, simply wiggle your mouse. Figure 10-4 explains these controls, but the main thing is this: Hit the space bar to pause or resume playback.
When you’ve had enough, tap the space bar again; the movie collapses back into thumbnail form.
TIP
The control bar’s ![]() button harbors a pop-up menu that lets you view the movie at its original size or blown up to fill the iPhoto window. It holds the Trim and Reset Trim commands, described next.
button harbors a pop-up menu that lets you view the movie at its original size or blown up to fill the iPhoto window. It holds the Trim and Reset Trim commands, described next.

Figure 10-4. The volume slider controls the sound of your movie independently of the volume setting on your computer (click the ![]() icon to mute the video). The control bar also includes the typical Play/Pause, Fast-Forward, and Rewind buttons.
icon to mute the video). The control bar also includes the typical Play/Pause, Fast-Forward, and Rewind buttons.
Editing Movies in iPhoto
To trim off the boring parts of a movie, right here in iPhoto, follow these simple steps:
1. Double-click the movie’s thumbnail.
You can also select the video’s thumbnail and then press the space bar. Either way, the movie starts playing.
2. In the video’s control bar, click ![]() and choose Trim.
and choose Trim.
The control bar transforms to display stills from your video, with yellow handles at either end. Your job now is to isolate the part of the movie you want to keep.
3. Drag the yellow handles left or right to designate the new start and end points of your movie, and then click Trim (see Figure 10-5).
iPhoto trims your movie. Now you can show it to people without subjecting them to the 30 seconds of fumbling at the beginning and end of the shot.
TIP
Google the phrase “Wadsworth Constant” and you’ll be surprised to learn that the first 30 percent of any video may be irrelevant. In fact, if you add @wadsworth=1 to the end of any YouTube URL, the first 30 percent of that video is automatically skipped. Who knew?
The changes aren’t permanent, though. You can always restore the original version (the full-length director’s cut, if you will) by clicking ![]() again and choosing Reset Trim.
again and choosing Reset Trim.
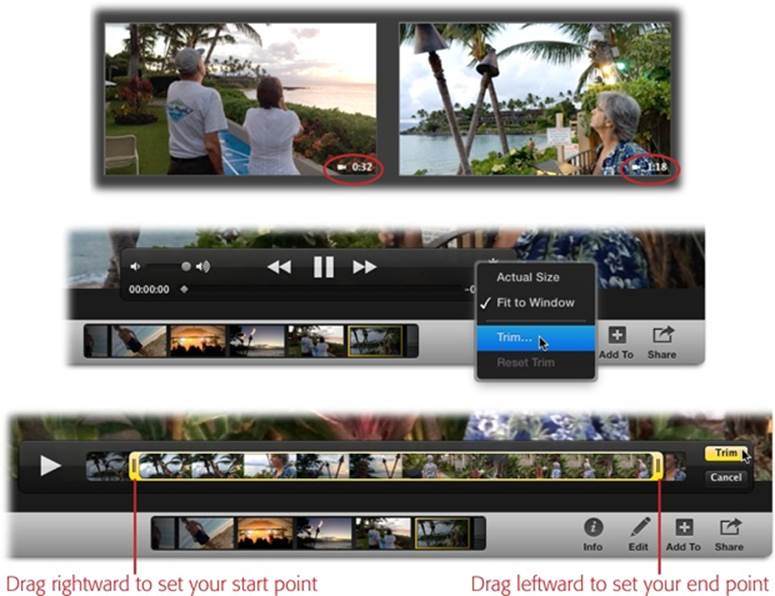
Figure 10-5. Top: iPhoto indicates videos by putting a tiny camcorder icon at the bottom left of their thumbnails. The number on the right side represents the movie’s duration. Middle: When playing a video, click the ![]() to reveal this menu. Bottom: When you’ve positioned the yellow handles just right, click the Trim button. (You can also move around within your movie by swiping a finger across the top of your Magic Mouse or Magic Trackpad.)
to reveal this menu. Bottom: When you’ve positioned the yellow handles just right, click the Trim button. (You can also move around within your movie by swiping a finger across the top of your Magic Mouse or Magic Trackpad.)
Editing Movies in iMovie
For more editing power, you can use iMovie, Apple’s video-editing program. In the Event Library at the left side of the iMovie window (choose Window→Event Library if you don’t see it), click iPhoto Videos. Then drag the clip you want to edit into iMovie’s Project area.
The end.
All right, there’s a little more to it—like learning how to use iMovie—but that’s a different book (iMovie: The Missing Manual, to be exact). The point here is that you can incorporate movies from iPhoto’s library in whatever iMovie project you have open, ready to edit as you would any other clips.
Burning a Slideshow Movie CD or DVD
If your slideshow has more than 10 pictures, it’s probably too big to send to people by email. Luckily, you’ve got an alternative: Burn a CD or DVD of the slideshow. The process is described in detail on Burning Files to CD or DVD.
Slideshow Movies on the Web
Chapter 8 details how to post individual photos on the Web. But with a few adjustments to the instructions, you can just as easily post your slideshow movies on the Web, too, complete with music.
If you maintain your own website, you can upload the movie as you would any graphic file. Create a link to it in the same way, and your movie will start to play in your visitors’ web browsers when they click that link.
But if you have an iCloud account and an iPad, posting the movie is even easier—and you can do it from iPhoto on your iPad, without resorting to iMovie. The whole glorious and frustratingly iOS-only process works as described on Sharing a Slideshow.
You can also share movies on Flickr and Facebook. Just select the movie in iPhoto, click the Share button, and choose the one you prefer. Unfortunately you can’t upload a slideshow that you’ve exported as a QuickTime movie to either one; you’ll have to visit their respective websites and upload them that way instead. (Though you can use QuickTime Player to upload straight to Flickr or Facebook, as described on Exporting Edited Movies.)
All materials on the site are licensed Creative Commons Attribution-Sharealike 3.0 Unported CC BY-SA 3.0 & GNU Free Documentation License (GFDL)
If you are the copyright holder of any material contained on our site and intend to remove it, please contact our site administrator for approval.
© 2016-2026 All site design rights belong to S.Y.A.