iPhoto: The Missing Manual, 1st Edition (2014)
Part 1. iPhoto Basics
Chapter 3. Five Ways to Flag and Find Photos
The more you get into digital photography, the more pictures you’ll store in iPhoto. And the more pictures you store in iPhoto, the more urgently you’ll need ways to find them again—to pluck certain pictures out of this gigantic, seething haystack of digital files.
Fortunately, iPhoto is equally seething with search mechanisms. You can find pictures by the text associated with them (name, location, description, Event, and so on); by the date you took them; by the keywords you’ve tagged them with; or by the ratings you’ve given them. You can also use iPhoto’s flagging feature to find, and later round up, any photos you like.
This chapter covers all five methods and gives you strategic suggestions on how you might use them together.
NOTE
You can easily track down photos by tagging them with Faces and Places info, too. Those features are covered in Chapter 4.
Flagging Photos
Here’s a simple, sweet iPhoto feature: You can flag, or mark, a photo.
So what does the flag mean? Anything you want it to mean; it’s open to a multitude of personal interpretations. The bottom line, though, is that you’ll find this marker extremely useful for temporary organizational tasks.
For example, you might want to cull only the most appropriate images from a photo album for use in a printed book or slideshow. As you browse through the images, flag each shot you want. Later, you can round up all the images you flagged so you can drag them all into a new album. Another idea is to flag photos for deletion and then obliterate them en masse. Yet another use is to flag images that you want to apply a certain creative effect to, like an edge vignette. The possibilities are endless, though this much is certain: The more you use flags, the more uses you’ll discover for them.
How to Flag a Photo
You can flag a selected photo, or a bunch of selected photos, by choosing Photos→Flag Photo (or pressing ⌘-period). You can also flag a photo by pointing to its thumbnail and clicking the ghostly pennant that appears on its top-left corner.
Either way, a little orange flag appears at the upper-left corner of the photo’s thumbnail, as shown in Figure 3-1.
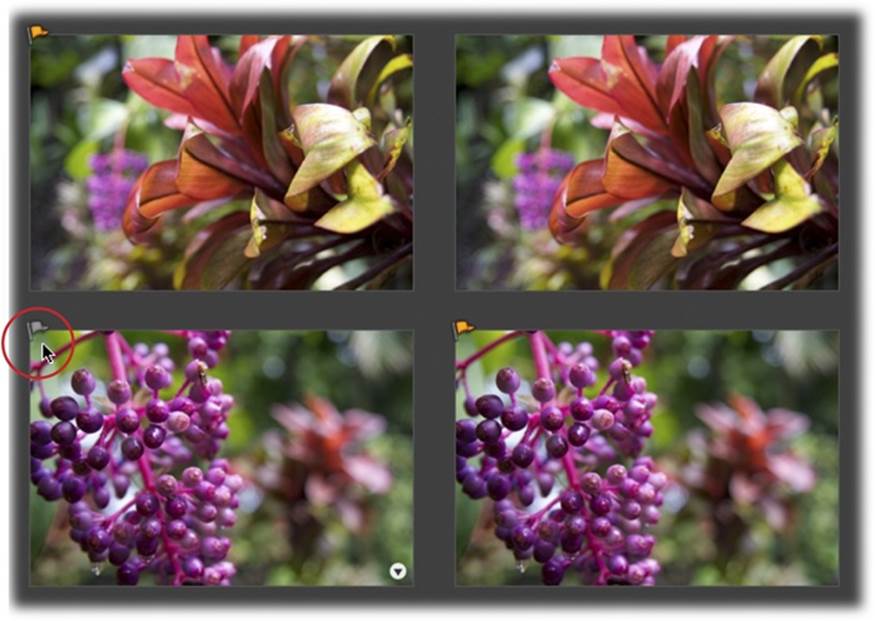
Figure 3-1. When you point your cursor at a thumbnail, you see a ghostly gray flag appear at its top left (circled); just click it to flag the photo. When you do, the flag turns orange. You can think of this as temporarily marking the photo so you can add it to a grouping of like-minded pictures later. One of the most common uses for flags is for marking photos for deletion, as explained on page 76.
How to Unflag Photos
You can remove photos’ flags by selecting thumbnails and then choosing Photos→Unflag Photos (or pressing ⌘-period again). You can also click the orange pennant at the top left of the photo’s thumbnail (at which point it turns ghostly again).
TIP
You can also remove the flags from all your photos at once, everywhere in your library, by using a secret command. Open the Photos menu, hold down the Option key, and marvel as the Clear All Flags command appears. You can also point your cursor at the number to the right of the Flagged item in your Source list; when you do, the number turns into a clickable, albeit microscopic, X.
How to Use Flagged Photos
Suppose you’ve worked through all your photos for some purpose, carefully flagging them as you go. Here’s the payoff: rounding them up so that you can delete them all, hide them all, incorporate them into a slideshow, finally sit down and geotag them (Manually Geotagging Photos), use them in a book, export them as a batch, and so on.
See them all at Once
If you click Flagged in the Source list, then iPhoto shows you all flagged photos in your entire library. You can select them all and drag them into a regular album (not a smart album), if you like, in readiness for making a slideshow, a book, or anything else where you’d like the freedom to rearrange their sequence.
Put them into an Event
iPhoto can generate a new Event that contains only the photos you’ve flagged in all your other Events. This method isolates the flagged photos instantly into a single, handy subset, and removes them from their original Events (photos can live inside only one Event at a time).
All you have to do is choose Events→Create Event From Flagged Photos. A box appears to warn you that you’re about to remove the photos from their original Events; nod understandingly and click Create. In a flash, your new Event appears, filled with flagged photos and ready to rename.
TIP
You don’t have to create a new Event to hold your flagged photos, either. If you click Events in the Source list and then click an Event in the photo-viewing area, you can then choose Events→Add Flagged Photos To Selected Event. That way, you add the flagged photos to the existing Event—a handy option when you’ve put all the flagged photos into an Event and later added flags to more photos that really belong with their brethren.
Create a Smart Album
You can easily set up a smart album (Deleting an Album) to round up all the flagged photos in your entire collection, but iPhoto already has one: the Flagged item in the Source list (it’s actually a built-in smart album).
Nevertheless, there are some creative opportunities here. You could create a new smart album to collect flagged photos and incorporate some additional criteria, such as “Rating is greater than 4 stars,” or “Date is in the last 30 days.” If you shoot a lot, the latter criteria would let you corral all the flagged photos you’ve taken within the last 30 days in order to spend more time on them, say, to produce a black-and-white or sepia effect (a fancy way of saying “brown overlay”), prepare them for your blog, and so on. Once 30 days pass, the shot would automatically disappear from the smart album, letting you skip any irrational guilt for not getting around to processing it further.
To make a new smart album for flagged photos, choose File→New Smart Album, and in the dialog box that appears, set up the pop-up menus to say “Photo” “is” and “Flagged.” Click the + at the far right if you want to add another line of criteria.
Hide them all at Once
Here’s another sneaky hidden iPhoto command: Open the Photos menu, and then hold down the Control key; the Hide Flagged Photos command appears. When you choose it (or just press Control-⌘-L), iPhoto designates all of your flagged photos as hidden (Hiding Photos), so you don’t see them in your iPhoto library (though they’re still there).
Move them all to iPhoto’s Trash
The parade of sneaky hidden iPhoto commands never stops. If you open the Photos menu and hold down the Control key, you also get the “Move Flagged to Trash” command, which does just what it says.
For a large number of iPhoto fans, this is the most logical use for flags. When used in conjunction with the assessment process you’ll learn about in the Ratings section of this chapter (Ratings), flagging photos for deletion will save you tons of time and help keep your iPhoto library lean and mean (provided, of course, that at some point you remember to empty iPhoto’s Trash!).
Searching for Photos by Text
Flags are a great way to temporarily tag photos, but there are other ways, too. For example, the name you give a picture might be significant; its original filename on the hard drive might be important; or maybe you’ve typed some helpful clues into its Description field or given its Event a meaningful name.
Finding that kind of information is the purpose of the search icon (![]() ) at the bottom left of the iPhoto window. Start by selecting the container you want to search—the Event, album, folder, or whatever—and then proceed as shown in Figure 3-2.
) at the bottom left of the iPhoto window. Start by selecting the container you want to search—the Event, album, folder, or whatever—and then proceed as shown in Figure 3-2.
TIP
iPhoto can search your photos’ metadata, too—the photographic details like camera manufacturer, f-stop, flash status, exposure settings, and so on. But you don’t use the Search box for that; you have to create a smart album instead, as described on Deleting an Album.
NOTE
Keep in mind that iPhoto restricts each search to the currently selected container in the Source list. For example, to search your entire photo library, be sure to select Events or Photos before you trigger the search.

Figure 3-2. Click Search at the left end of iPhoto’s toolbar to open the Search box. As you type, iPhoto hides all the pictures except ones that have your typed phrase somewhere in their titles, keywords, descriptions, Faces, Places, filenames, or Event names. In this case, the word “maui” appears somewhere in every photo. To cancel your search and see all the pictures again, click the X on the right side of the Search box.
The Calendar
iPhoto offers a plethora of ways to find certain photos: visually, by Event, by album, by searching for text in their names or comments, and so on. But it also offers what seems like an obvious and very natural method of finding specific pictures: by consulting a calendar.
After all, you might not know the filenames of the pictures you took during your February 2013 trip to Poughkeepsie, and you might not have filed them away in an album. But one thing’s for sure: You know darn well you were there in February because it was so cold! The iPhoto calendar can help you find those pictures fast.
To use the calendar, start by heading to the Source list and selecting the container you want the calendar to search: an album or a folder, for example, or one of the items under the Library or Recent headings.
Next, click Search in the iPhoto toolbar, and then make the calendar appear by clicking the tiny ![]() at the left edge of the Search box. From the pop-up menu, choose Date (Figure 3-3).
at the left edge of the Search box. From the pop-up menu, choose Date (Figure 3-3).

Figure 3-3. Top: If you click the search icon in iPhoto’s toolbar, you’ll see the search field shown here. To summon this pop-up menu, click the tiny magnifying glass icon; choose Date to display the calendar. Bottom: Click a day, week, month, or year in the calendar to round up only the photos taken in those time intervals. Text or numbers shown in bold mean you took photos in that month, in that year, and on those days.
The little calendar may look small and simple, but it holds a lot of power—and, if you look closely, a lot of different places to click.
For example, the calendar offers both a Year view (showing 12 month buttons) and a Month view (showing 28 to 31 date squares). Click the tiny triangle in the calendar’s top-left corner to switch between these two views. You can also use the arrows in the top-right corner to move through months or years (depending upon which view you’ve chosen). And you can double-click a month’s name (in Year view) to open the month, or double-click the month title in Month view (“March 2013”) to return to Year view.
Here’s how you can use the calendar to pinpoint photos taken in a certain time period:
§ Photos in a certain month. See the names of the months in Year view? The names in bold type are the months when you took some photos. Click a boldfaced month to see thumbnails of those photos; they appear in the main viewing area. (To scroll to a different year, click the arrows at the top right of the calendar, as shown in Figure 3-3.)
§ Photos on a certain date. In Year view, the calendar changes to show you the individual dates within each month. As you scroll through the months, bold type lets you know that photos are waiting. Click a date to see the photos you took that day. (Here again, the arrows above the calendar let you scroll to different months.)
§ Photos in a certain week. Once you’ve drilled down into Month view, as described above, you can round up the photos taken during an entire week: Just double-click anywhere within the week in question. iPhoto highlights the horizontal week bar of the calendar in light gray, and the photos taken during any of those seven days appear in the photo-viewing area.
It’s possible to develop some fancy footwork when you work with this calendar since, as it turns out, you can select more than one week, month, or day at a time. In fact, you do that using the exact same keyboard shortcuts that you would use to select individual photo thumbnails. For example:
§ You can select multiple adjacent time units by clicking the first and then Shift-clicking the last. For example, in Year view, you can see all the photos from June through August by first clicking June, and then Shift-clicking August. (You can use the same trick to select a series of days or weeks in Month view.)
TIP
Alternatively, you can just drag your cursor across the dates in Month view or the months in Year view to select consecutive time periods.
§ You can select multiple time units that aren’t adjacent by ⌘-clicking them. For example, in Month view, you can select November 1, 5, 12, 20, and 30 by ⌘-clicking those dates. In the photo-viewing area, you see all the photos taken on all of those days.
§ Here’s an offbeat shortcut that might actually be useful someday: You can round up all the photos taken during a specific month, week, or day from every year in your collection by holding down the Option key as you select. For example, you can round up six years’ worth of Christmas shots by Option-clicking the December button in Year view. Or you can find the pictures taken every year on your birthday (from all years combined) by Option-clicking that date in Month view.
Apple really went the extra mile on behalf of shortcut freaks when it designed the calendar. Here are a few more techniques that you probably wouldn’t stumble upon by accident:
§ In Year view, select all the days in a month by double-clicking the month’s name. In Month view, you can do the same by triple-clicking any date.
§ Return to Year view by quadruple-clicking any date, or by clicking the month’s name.
§ Skip ahead to the next month or year (or the previous month or year) by turning the scroll wheel on your mouse, if it has one.
§ Deselect anything that’s selected in the calendar by clicking any empty spot in the calendar.
Once you’ve made a date selection, faint gray type in the Search box reminds you of the date range you’ve selected.
TIP
Once you’ve made an initial date selection, you can reopen the calendar by clicking inside the Search box; you don’t have to fuss with the little pop-up menu beside it.
In any case, you can close the calendar and return to seeing all your pictures by clicking the X on the right side of the Search box.
Keywords
Keywords are descriptive words—like Food, Vacation, Sunsets, or Fido—that you can use to label and categorize your photos, regardless of which album or Event they’re in.
The beauty of iPhoto keywords is that they’re searchable. Want to comb through all the photos in your library to find every closeup picture of seashells you’ve ever taken during summer vacation? Instead of browsing through multiple photo albums, just perform a search for photos containing the keywords Closeup, Seashell, Summer, and Vacation. You’ll have the results in seconds.
NOTE
The next chapter explains how to tag your photos with the names of the people in them (Faces) or the locations where the photos were taken (Places). Needless to say, you can search using that info, too.
Editing Keywords
To get started with keywords, first view some photos—click Photos in your Source list or double-click an Event to see inside it. Then choose Window→Manage My Keywords or press ⌘-K. The weird and wonderful Keywords window shown in Figure 3-4 appears.
Apple offers you a few sample entries in the Keywords list to get you rolling: Birthday, Family, Favorite, Kids, and Vacation. But these are intended only as a starting point. You can add as many keywords as you want—or delete any of Apple’s—to create a meaningful, customized list.
To add, delete, or rename keywords, click Edit Keywords. Then proceed as shown in Figure 3-4.
NOTE
As usual in iPhoto, you can select multiple keywords for deletion by Shift-clicking or (for nonconsecutive ones) ⌘-clicking them in the list; then click the minus sign at the bottom of the dialog box to remove them. When you remove a keyword from the list, iPhoto also removes it from any pictures you’ve applied it to.
Be careful about renaming keywords after you’ve started using them; the results can be messy. If you’ve already applied the keyword Fishing to a batch of photos but later decide to replace it with Romantic in your keyword list, all the Fishing photos automatically inherit the keywordRomantic. Depending on you and your interests, this may not be what you intended.
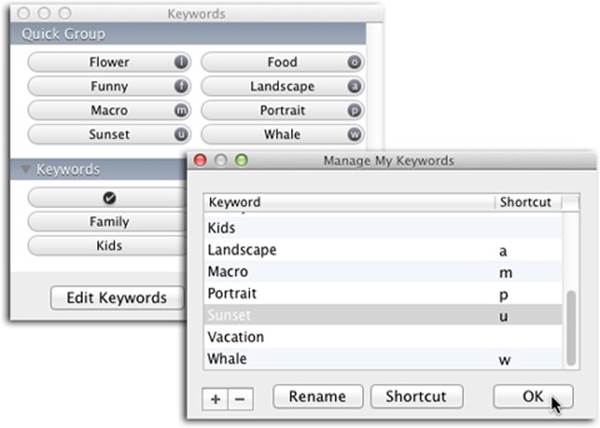
Figure 3-4. Left: The first time you open the Keywords window, you won’t see anything in the Quick Group section at the top, but as soon as you add keywords of your own (described next), they appear there. Right: Click Edit Keywords to summon this window, where you can add keywords of your own. Click + to create a new one, give it a name, and then press Return. iPhoto automatically chooses a one-letter keyboard shortcut for new keywords (usually the first letter of the word), allowing you to apply it to photos quickly, without fussing with this window. You can change a keyword or its keyboard shortcut by double-clicking the entry in its respective column.
It may take some time to develop a really good master set of keywords. The idea is to assign labels that are general enough to apply across your entire photo collection but specific enough to be meaningful when you conduct searches. You might find it helpful to think of adding keywords as attaching “what” info to your photos. Of the four W’s in journalism—who, what, when, and where—iPhoto knows the “when” because that info is captured by your camera and, if you’re using Faces and Places tags (Chapter 4), it knows the “who” and the “where,” too. That leaves the “what” up for grabs, which is a perfect use for keywords.
That said, iPhoto’s facial-recognition feature doesn’t work well on animals, making pet names prime keyword candidates, too.
NOTE
iPhoto automatically creates the checkmark keyword. It’s just a little checkmark inside a circle that, when applied to your thumbnails, can mean anything you want. In fact, it works exactly like the flag feature described earlier in this chapter.
The only reason the checkmark keyword still exists, in fact, is to provide compatibility with older versions of iPhoto, to accommodate people who used to use the checkmark keyword for purposes now much better served by the flag.
Here are some rules of thumb: Use albums to group pictures for specific projects—a calendar, a slideshow, or a book, for example. Use Events to group pictures by time or Event. And use keywords to focus on general characteristics that are likely to appear throughout your entire photo collection—words like Concert, Food, Soccer, Beach, and Sci-Fi Convention.
Suppose your photo collection includes a bunch of shots taken during a once-in-a-lifetime trip to Rome last summer. You might be tempted to assign Rome as a keyword—but don’t. Why? Because you probably won’t use it on anything other than that one set of photos. It’d be easier to pop into Places (described in the next chapter) and create a smart album called “Trip to Rome” to collect those pictures. Then use keywords to tag the same pictures with descriptors like Travel or Ancient Ruins.
It’s also useful to apply keywords that describe attributes of the photos themselves, such as Closeup, Landscape, Portrait, Architecture, or Macro (extreme closeup).
Assigning and Unassigning Keywords
You can apply as many keywords as you like to an individual photo. So a picture of your cousin Rachel at a hot-dog-eating contest in London might bear all these keywords: Relatives, Travel, Food, Humor, and Medical Crisis. Later, you’ll be able to find that photo no matter which of these categories you search for.
iPhoto offers three ways to apply keywords: the mouse way, the keyboard way, and the other keyboard way.
§ Mouse method. Open the Keywords window by pressing ⌘-K. Select the photo(s) you want to bless with a keyword, and then click the appropriate keyword(s) in the Keywords window.
§ Keyboard method, with Keywords window. Open the Keywords window by pressing ⌘-K. Highlight the photo(s) you want to bless with a keyword, and then press the keyboard shortcut letter for the keyword you want to apply (M for Mexico, for example).
NOTE
When you use the two methods listed above, you get visual feedback that the keyword was actually applied—it appears briefly in the center of the photo-viewing area, like the informational overlays described on Showing/Hiding Titles, Ratings, and Keywords.
§ Keyboard method, with Info panel. Choose View→Keywords and then open the Info panel by clicking Info in iPhoto’s toolbar. Then proceed as shown in Figure 3-5.
NOTE
If you import photos into iPhoto from your hard drive, they may come with keywords you didn’t assign. The additional blurbs came from the program you used to import them from your camera to your computer, or someone else added them (a stock photographer, say). For example, you can have Adobe Photoshop Elements automatically assign keywords (Raw, Blurry, Closeup, Longshots, and so on) when i’s importing and analyzing images. Since that info is stored inside your photo as part of its metadata (see Renaming and Redating Photos), those keywords come along for the ride into iPhoto.

Figure 3-5. To add a keyword in the Info panel, first select the photo(s). Next, click the word Keywords to expand that section (if it’s not already expanded), and then click inside the field beneath it that reads “Add a keyword.” Begin typing the keyword you want to assign or press its keyboard shortcut; iPhoto completes the word for you. Press Return to accept the suggestion.
To unassign a keyword you’ve applied, just repeat the steps you used to assign it, or open the Info panel, click the keyword, and then press the Delete key. If you’ve got the Keyword window open, you see the keyword appear in red in your photo-viewing area. It even “explodes” with the same animation you see when you remove an icon from your Mac’s Dock.
Keyboard Shortcuts
The business of applying keywords using keyboard shortcuts makes the whole keywording business a lot easier to manage. You can let iPhoto choose one-letter keystrokes for your keywords automatically, or you can create them yourself:
§ To have iPhoto assign shortcuts. In the Keywords window, drag your most frequently used keywords up into the Quick Group area. As you can see at left in Figure 3-4, iPhoto automatically assigns a letter to each one. (It uses the first letter of the keyword. If that’s already assigned to another keyword, it uses the second letter. And so on.)
§ To assign shortcuts yourself. For more control, open the Keywords window, and then click Edit Keywords. Double-click in the Shortcut column and then press the key you want to assign. (iPhoto lets you know if you pick a key that’s already in use.) When you do, the newly shortcutted keyword appears in the Quick Group area of the Keywords window.
WARNING
There’s a keyboard shortcut for splitting Events while you’re in Events view, and it’s the letter S. That means if you (or iPhoto) assign S as a keyword keyboard shortcut (for the keyword Sunset, say), you need to make sure the Keywords window is open when you press the S key or you’ll wreak Event-splitting havoc on your photo collection.
Viewing Keyword Assignments
Once you’ve tagged a few pictures with keywords, you can see them in either of two ways:
§ Open the Keywords window. When you select a photo, its assigned keywords turn light blue in the Keywords list.
§ Choose View→Keywords (or press Shift-⌘-K), and then open the Info panel. Click the little triangle to the right of the word Keywords to expand that section (if it isn’t already expanded) and iPhoto lists the keywords you’ve assigned (as shown in Figure 3-5).
There’s no way to view keywords below the photo thumbnails in iPhoto (imagine how chaotic the photo-viewing area would get). Happily, there’s a better way of rounding up photos that don’t yet have keywords: Use a smart album. This incredibly useful technique is explained in the box below.
WORKAROUND WORKSHOP: FINDING PHOTOS THAT DON’T HAVE KEYWORDS
In older versions of iPhoto, you could choose View→Keywords to make keywords appear below their thumbnails. To the dismay of many, that feature isn’t in iPhoto anymore, which makes it tough to see photos that don’t yet have keywords applied.
Happily, there’s a smarter way to locate them.
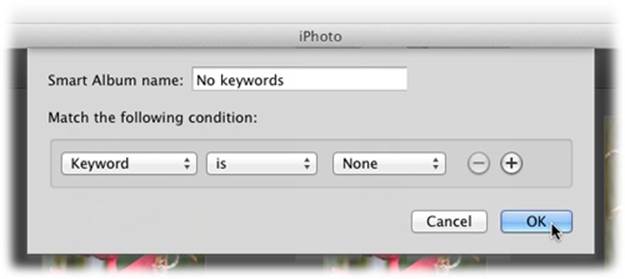
To find all the photos that don’t have keywords, choose File→New Smart Album and name it “No keywords.” Then set the pop-up menus to “Keyword,” “is,” and “None,” and then click OK. iPhoto scours your entire library for photos that don’t have any keywords applied and plops them into your new smart album. The next time you’ve got a hanker in’ to go keywordin’, those photos will be waiting for you. And as soon as you add a keyword, they’ll dutifully remove themselves from the smart album. Who knew?!
Using Keywords
If you have the diligence to tag your photos with keywords, a big payoff arrives the second you need to find a certain set of photos, because iPhoto lets you isolate them with one click.
Start by clicking Search in the iPhoto toolbar, and then click the tiny magnifying glass that appears at the left of the Search box. In the menu that appears, click Keyword.
A little palette of all your keywords appears (see Figure 3-6), and here’s where the fun begins. When you click one of the keyword buttons, iPhoto rounds up all the photos labeled with that keyword, displays them in the photo-viewing area, and hides all your other images (remember, the results are dictated by what container you’ve chosen in the Source list).
Here are the important points to remember when using iPhoto’s keyword searches:
§ To find photos that match multiple keywords, click additional keyword buttons. For example, if you click Travel and then click Holidays, iPhoto reveals all the pictures that have both of those keywords. To find photos that have either keyword (but not necessarily both), Shift-click the keyword buttons instead.
Every button stays “clicked” until you click it a second time; you can see two keyword buttons “clicked,” and thus highlighted in gray, in Figure 3-6.
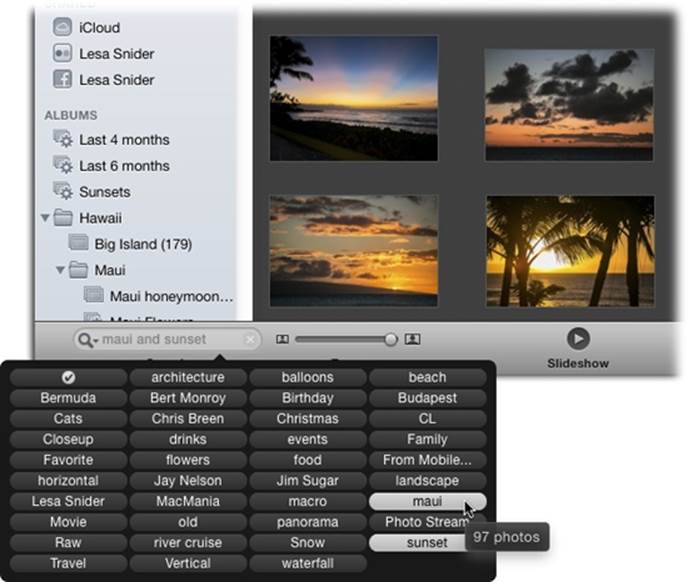
Figure 3-6. As you click keyword buttons, iPhoto hides photos that don’t match. The gray lettering in the Search box identifies, in words, what you’re seeing. In this example, the keywords “maui” and “sunset” were clicked, so the search field says “maui and sunset.” If you point to one of these buttons without clicking, a pop-up balloon tells you how many photos have been assigned that keyword. By pointing to the keyword “maui,” for example, you can see that 97 photos contain that keyword.
§ Suppose you’ve rounded up all your family pictures by clicking the Family keyword. The trouble is, your ex-spouse is in half of them, and you’d really rather keep your collection pure.
No problem: Option-click the keyword button for his name (Casey, say). iPhoto obliges by removing all photos with that keyword from whatever is currently displayed. In other words, Option-clicking a keyword button means “Find photos that don’t contain this keyword.” (In that case, the Search box says, in faint gray lettering, “Vacation and not Casey,” or whatever.)
§ You can confine your search to a single album (or other container) by selecting it in the Source list before searching. Similarly, clicking Events (or even Last Import) in the Source list before searching means you want to search only that photo collection. You can even select multiple albums and search only in those (⌘-click each album).
§ In the Search box, click the X to restore the view to whatever you had visible before you performed the search.
Ratings
iPhoto offers another way to categorize your pictures: by how great they are! You can assign each picture a rating of one to five stars and then use the ratings to sort your library, or gather only the cream of the crop into a slideshow, a smart album, or a photo book.
NOTE
Why, you might ask, would you bother to rate your photos if you just spent hours giving them all keywords? To give yourself another level of filtering. By using a smart album, you can filter your photos by keyword and rating to find the best photos of a subject even faster. You can even use ratings in conjunction with Faces or Places tags to find the best pictures of Aunt Edna or your Roman holiday!
Here’s how to rate your digital masterpieces:
§ Select a photo (or several) and then choose Photos→My Rating; from the submenu, choose from one through five stars. You can even do this while you’re editing a single photo. (To give your photography skills room to grow, you might start by assigning a three-star rating to the best ones.)
§ If you’re not a mousy sort of person, you can perform the same stunt entirely from the keyboard, which is handy in iPhoto’s Full Screen view (The Post-Import Inspection). Press ⌘-1 to assign a rating of one star, ⌘-2 for two stars, and so on.
§ Choose View→Ratings and then point your cursor at a photo’s thumbnail; you see little hollow stars appear beneath it. Just click the star for the rating you want to apply, as Figure 3-7 (top) explains.
§ Click the triangle in the lower-right corner of any photo to summon the shortcut menu shown in Figure 3-7, bottom. In the shortcut menu that appears, click the star for the rating you want to assign.
§ To remove a rating, select the photo and then choose Photos→My Rating→None. You’re saying, in effect, “This photo has not yet been rated.” Better yet, use the keyboard shortcut: ⌘-O.
Once you’ve rated your photos, you can make that effort pay off in any number of ways:
§ Sort by ratings. Select an Event and then choose View→Sort Events→By Rating, and iPhoto displays all the thumbnails in that Event in ratings order. If the View→Sort Events→Ascending option is checked, then the worst photos (no stars or one star) appear at the top, and the best ones (five stars) at the bottom. Choose View→Sort Events→Descending to put the five-star prize-winners at the top.
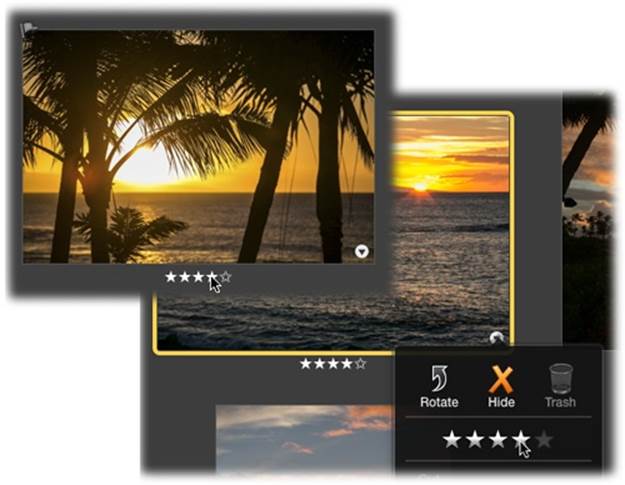
Figure 3-7. Top: By choosing View→Ratings, you can see the star ratings you’ve assigned to each photo. And, if you point to a thumbnail without clicking, iPhoto displays a row of hollow stars you can use to rate that photo. Click the star that represents the rating you’d like to bequeath. For example, to apply a three-star rating, click the third star (you don’t have to click each individual star). To remove the rating, click just left of the first star. Bottom: The stars in this shortcut menu work the same way—just click the one that represents the rating you want to apply, or click to the left of the stars to remove the rating.
§ Find by ratings. You can round up all the five-star photos in the current container (Event, album, or whatever is selected in the Source list) by clicking Search in the toolbar, clicking the ![]() in the search field, choosing Rating from the pop-up menu, and then clicking the fifth star. iPhoto hides all your photos except the ones with five stars. (Of course, you can use the same technique to find the one-, two-, three-, or four-star photos.) Click the X in the search field to see all your photos again.
in the search field, choosing Rating from the pop-up menu, and then clicking the fifth star. iPhoto hides all your photos except the ones with five stars. (Of course, you can use the same technique to find the one-, two-, three-, or four-star photos.) Click the X in the search field to see all your photos again.
§ Create a smart album of the best. You can easily create a self-updating smart album that contains your best work at all times. After all, you never know when the Popular Photography contest-committee judges might come knocking. Deleting an Album has the details.
UP TO SPEED: ASSESSING PHOTOS
With myriad ways to mark your images, developing an easy-to-use strategy for assessing your photos when you import them can be tough.
The star rating system works great, though problems can occur. Typically, it goes something like this: You look through your photos and find a great shot so you give it three stars. You keep perusing photos and find an even better shot, so you give it three stars and then you backtrack to find the previous 3-starred shot and give it a 2-star rating instead. This time-consuming process can repeat itself for hours until you vow never to use star ratings again.
Consider this as one possible solution: Give all the keepers a 1-star rating, filter the photos so you see only those with a 1-star rating and reassess from there, adding a 2-star rating to the best ones, and then delete all the photos with no stars or a 1-star rating. Here’s how that might go:
1. As soon as you import photos, click Last Import in the Source list.
2. Press Shift-⌘-R or choose View→Ratings to display ratings.
3. Click the double-arrow icon at the top right of the iPhoto window to enter Full Screen view.
4. Adjust the Zoom slider in the iPhoto toolbar so you can see at least five thumbnails to a row. This is big enough to determine whether each photo is a keeper, but not so big that you get distracted and enter Edit mode, where you’ll spend 30 minutes messing with a shot that isn’t even the best of the bunch.
5. Make a first pass through the photos, ⌘-clicking the thumbnails of keepers and then pressing ⌘-1 to give them a 1-star rating.
6. Use the search field in the iPhoto toolbar to search by Rating and then click one star. Now you’re seeing only the photos from the last import with a 1-star rating or higher.
7. Make a second pass through the photos and assign a 2-star rating to those deserving. As you go, click the flag icons—or press ⌘-period (.)—to flag the 2-star photos that you want to do something special with (say, add to your blog, make a print, email, turn into a black-and-white, or whatever).
8. Use the search field to see photos with a rating of two stars or higher.
9. Press ⌘-A to select all and then press ⌘-N to plop the 2-star shots into a new album (you can always continue your assessment within the album).
10. In your Source list, click Last Import again, and then choose View→Sort Photos→By Rating. Pick Ascending so the unrated thumbnails appear at the top and the highest-rated photos appear at the bottom.
11. Click to select the first thumbnail at the top of the photo-viewing area, and then scroll down until you see the last 1-star photo. With informational overlays turned on (see Showing/Hiding Titles, Ratings, and Keywords), you’ll know the second you scroll into multi-starred photo territory. Shift-click to select the last 1-star photo, as well as all thumbnails in between.
12. At this point, only photos with no stars or a 1-star rating should be selected. Press the Delete key on your keyboard. The rejected photos are now in iPhoto’s Trash, awaiting deletion.
Having a strategy such as this goes a long way toward keeping your iPhoto library manageable. And if nothing else, it’s a great starting point for creating an assessment strategy of your own. After all, the more you use it, the more you’ll be able to tweak it to your liking.